1
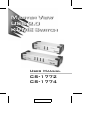
User Manual
CS-1772
CS-1774
2005-03-16
NOTE: This equipment has been tested and found to comply with the
limits for a Class B digital device pursuant to Subpart J of Part 15 of
the FCC Rules. These limits are designed to provide reasonable
protection against harmful interference in a residential installation.
This equipment generates, uses and can radiate radio frequency
energy and, if not installed and used in accordance with the
instructions, may cause harmful interference to radio communications.
However, there is no guarantee that interference will not occur in a
particular installation. If this equipment does cause harmful
interference to radio or television reception, which can be determined
by turning the equipment off and on, the user is encouraged to try to
correct the interference by one or more of the following measures:
M Reorient or relocate the receiving antenna.
M Increase the separation between the equipment and receiver.
M Connect the equipment into an outlet on a circuit different from
that which the receiver is connected.
M Consult the dealer or an experienced radio/television technician for
help.
2005-03-16
CS-1772 / CS-1774 User Manual
Packing List
The complete Master View USB 2.0 KVME CS-1772 / CS-1774 package consists of:
M 1
CS-1772 or CS-1774 KVM Switch
M 2
CS Custom KVM Cables (CS-1772)
M 4
CS Custom KVM Cables (CS-1774)
M 1
Firmware Upgrade Cable
M 1
Power Adapter
M 1
User Manual
M 1
Quick Start Guide
Check to make sure that all the components are present and that nothing was damaged
in shipping. If you encounter a problem, contact your dealer.
Read this manual thoroughly and follow the installation and operation procedures
carefully to prevent any damage to the unit, and/or any of the devices that connect to
it.
©Copyright 2005 ATEN® International Co., Ltd.
Manual Part No. PAPE-0244-100
Printed in Taiwan 03/2005
All brand names and trademarks are the registered property of their respective owners.
iii
2005-03-16
CS-1772 / CS-1774 User Manual
Notes:
iv
2005-03-16
CS-1772 / CS-1774 User Manual
Contents
1. Introduction
Features . . . . . . . .
Hardware Requirements
Console . . . . . . .
Computer . . . . . .
Cables . . . . . . . .
.
.
.
.
.
.
.
.
.
.
.
.
.
.
.
.
.
.
.
.
.
.
.
.
.
.
.
.
.
.
.
.
.
.
.
.
.
.
.
.
.
.
.
.
.
.
.
.
.
.
.
.
.
.
.
.
.
.
.
.
.
.
.
.
.
.
.
.
.
.
.
.
.
.
.
.
.
.
.
.
.
.
.
.
.
.
.
.
.
.
.
.
.
.
.
.
.
.
.
.
.
.
.
.
.
.
.
.
.
.
.
.
.
.
.
.
.
.
.
.
2
3
3
3
3
2. Hardware Setup
CS-1772 / CS-1774 Front View
CS-1772 / CS-1774 Rear View .
Cable Connection . . . . . . .
Port Numbering . . . . . . . . .
Powering Off and Restarting . .
Hot Plugging . . . . . . . . . .
.
.
.
.
.
.
.
.
.
.
.
.
.
.
.
.
.
.
.
.
.
.
.
.
.
.
.
.
.
.
.
.
.
.
.
.
.
.
.
.
.
.
.
.
.
.
.
.
.
.
.
.
.
.
.
.
.
.
.
.
.
.
.
.
.
.
.
.
.
.
.
.
.
.
.
.
.
.
.
.
.
.
.
.
.
.
.
.
.
.
.
.
.
.
.
.
.
.
.
.
.
.
.
.
.
.
.
.
.
.
.
.
.
.
. 5
. 7
. 9
. 11
. 11
. 11
3. Port Switching
Manual Port Switching . . . .
Hotkey Port Switching . . . .
Cycling Through the Ports .
Going Directly to a Port . .
Auto Scanning . . . . . . .
.
.
.
.
.
.
.
.
.
.
.
.
.
.
.
.
.
.
.
.
.
.
.
.
.
.
.
.
.
.
.
.
.
.
.
.
.
.
.
.
.
.
.
.
.
.
.
.
.
.
.
.
.
.
.
.
.
.
.
.
.
.
.
.
.
.
.
.
.
.
.
.
.
.
.
.
.
.
.
.
.
.
.
.
.
.
.
.
.
.
.
.
.
.
.
.
.
.
.
.
.
.
.
.
.
13
13
14
15
16
4. Hotkey Setting Mode
Invoking Hotkey Setting Mode .
Alternate HSM Invocation Keys
Alternate Port Switching Keys .
Keyboard Operating Platform .
List Hotkey Settings . . . . . .
USB Reset . . . . . . . . . . .
Hotkey Beeper Control . . . . .
Disable Port Switching Keys . .
Restore Default Settings . . . .
Invoke Firmware Upgrade Mode
HSM Summary Table . . . . .
.
.
.
.
.
.
.
.
.
.
.
.
.
.
.
.
.
.
.
.
.
.
.
.
.
.
.
.
.
.
.
.
.
.
.
.
.
.
.
.
.
.
.
.
.
.
.
.
.
.
.
.
.
.
.
.
.
.
.
.
.
.
.
.
.
.
.
.
.
.
.
.
.
.
.
.
.
.
.
.
.
.
.
.
.
.
.
.
.
.
.
.
.
.
.
.
.
.
.
.
.
.
.
.
.
.
.
.
.
.
.
.
.
.
.
.
.
.
.
.
.
.
.
.
.
.
.
.
.
.
.
.
.
.
.
.
.
.
.
.
.
.
.
.
.
.
.
.
.
.
.
.
.
.
.
.
.
.
.
.
.
.
.
.
.
.
.
.
.
.
.
.
.
.
.
.
.
.
.
.
.
.
.
.
.
.
.
.
.
.
.
.
.
.
.
.
.
.
.
.
.
.
.
.
.
.
.
.
.
.
.
.
.
.
.
.
.
.
.
.
17
18
18
19
20
20
20
21
21
21
22
v
2005-03-16
CS-1772 / CS-1774 User Manual
5. Keyboard Emulation
Sun Keyboard . . . . . . . . . . . . . . . . . . . . . . . . . . . . . 23
Mac Keyboard . . . . . . . . . . . . . . . . . . . . . . . . . . . . . 24
6. The Firmware Upgrade Utility
Before You Begin . . . . . .
Starting the Upgrade . . . . .
Upgrade Succeeded . . . . .
Upgrade Failed . . . . . . . .
.
.
.
.
.
.
.
.
.
.
.
.
.
.
.
.
.
.
.
.
.
.
.
.
.
.
.
.
.
.
.
.
.
.
.
.
.
.
.
.
.
.
.
.
.
.
.
.
.
.
.
.
.
.
.
.
.
.
.
.
.
.
.
.
.
.
.
.
.
.
.
.
.
.
.
.
.
.
.
.
.
.
.
.
25
26
29
29
Appendix
Specifications . . . . .
Hotkey Default Settings
Troubleshooting . . . .
Limited Warranty . .
.
.
.
.
.
.
.
.
.
.
.
.
.
.
.
.
.
.
.
.
.
.
.
.
.
.
.
.
.
.
.
.
.
.
.
.
.
.
.
.
.
.
.
.
.
.
.
.
.
.
.
.
.
.
.
.
.
.
.
.
.
.
.
.
.
.
.
.
.
.
.
.
.
.
.
.
.
.
.
.
.
.
.
.
31
32
33
34
.
.
.
.
.
.
.
.
.
.
.
.
Conventions
This manual uses the following conventions:
Courier
Indicates text that you should key in.
[]
Indicates keys you should press. For example, [Enter] means to
press the Enter key. If keys need to be chorded, they appear
together in the same bracket with a plus sign between them:
[Ctrl+Alt].
1.
Numbered lists represent procedures with sequential steps.
M
Bullet lists provide information, but do not involve sequential
steps.
→
Indicates movement through a series. For example, Start → Run
means to open the Start menu, and then select Run.
Indicates critical information.
vi
2005-03-16
Chapter 1.
Introduction
Overview
The Master View CS-1772 and CS-1774 represent a revolutionary new direction in
KVM (Keyboard, Video, Mouse) Switches. These two (CS-1772) and four (CS-1774)
port USB KVM Switches incorporate a two port USB Hub and an ethernet hub all in
the same compact unit. This eliminates the need to purchase separate hubs or
standalone peripheral sharers such as print servers, modem splitters, etc.
As KVM switches, the CS-1772 and CS-1774 allow users to access two or four
computers from a single USB keyboard, USB mouse, and monitor console. They
improve on previous designs by using the fast, reliable, USB bus to transferring
keyboard and mouse data to the computers, while the integrated two-port USB hub
permits any of the computers to access any peripherals connected to it on a ‘one
computer at a time’ basis.
Recognizing the importance of sound in the computing environment, the CS-1772 /
CS-1774 is also audio enabled. A single microphone can provide audio input to any
of the computers, and you can listen to the audio output of any computer (on a
one-at-a-time basis) on a single set of speakers.
The CS-1772 / CS-1774’s asynchronous switching feature allows independent
switching of the KVM, USB hub, and audio focus. If you wish, you can give one
computer the KVM console focus, another the USB hub focus, while a third has the
audio focus. You can work on a spreadsheet on one computer, for example, while you
print from a second computer at the same time.
Setup is fast and easy; you simply plug cables into their appropriate ports. There is no
software to configure, no installation routines, and no incompatibility problems. Since
the CS-1772 / CS-1774 intercepts keyboard input directly, it works on multiple
operating platforms (PC compatible, Mac, Sun, etc.). There are two convenient
methods to access the computers: pressing push button port selection switches located
on the unit’s front panel; and entering hotkey combinations from the keyboard.
Since a single console manages all of the computers, the CS-1772 / CS-1774
installation: 1) eliminates the expense of having to purchase separate components for
each computer; 2) saves all the space those extra components would take up; 3) saves
on energy costs; and 4) eliminates the inconvenience and wasted effort involved in
constantly moving from one computer to another.
1
2005-03-16
CS-1772 / CS-1774 User Manual
Features
M Multifunction USB KVM switch integrates a USB hub, ethernet hub, and audio
M One console controls 2 (CS-1772) or 4 (CS-1774) computers and USB peripherals
connected to two USB 2.0 ports
M Independent (asynchronous) switching of KVM, USB, and audio focus USB ports
M Easy installation - no software required - connecting cables to the PCs is all it takes
M Easy to operate - port selection via push button switches or hotkeys - auto scanning
to monitor computer operation
M Power on detection - automatically switches to the first powered on port
M Keyboard and mouse emulation - computers boot even when the console focus is
elsewhere
M Supports Microsoft IntelliMouse and the scrolling wheel on most mice
M Supports Logitech and Microsoft wireless keyboards and mice
M Supports multimedia USB keyboards
M Caps Lock, Num Lock, and Scroll Lock states are saved and restored when
switching
M LED Display For Easy Status Monitoring
M Auto Scan Mode for monitoring all computers
M Complete keyboard emulation for error free booting
M Hotkey operating platform selection
M Superior video quality - up to 2048x1536; DDC2B
M Upgradeable firmware
M Auto-sensing, Plug-and-Play Ethernet/Fast Ethernet/Dual Speed hub built in - per
port MDI/MDIX - full/half duplex - IEEE802.3 and IEEE802.3µ compatible
M Hot pluggable - add or remove computers for maintenance without powering down
the switch
M Compatible with multiple operating platforms (PC, Mac, and Sun)
M Supports Windows 98SE / ME / 2000 / XP / Server 2003; Mac OS8.6 or higher;
Solaris; Linux
2
2005-03-16
Introduction
Hardware Requirements
Console
M A VGA, SVGA, or Multisync monitor capable of the highest resolution that you
will be using on any computer in the installation.
M A USB style mouse
M A USB style keyboard
Computer
The following equipment must be installed on each computer:
M A VGA, SVGA or Multisync card
M 1 Type A USB port for keyboard/mouse cable
M 1 Type A USB port for USB hub cable
Cables
Only CS Custom cable sets specifically designed to work with this switch may be
used to link to the computers. Two (CS-1772) or four (CS-1774) 1.8m cable sets are
provided with this package.
Note: The quality of the display is affected by the quality and length of the cable. If
you need additional cable sets, contact your dealer to purchase the correct ones
for your switch.
3
2005-03-16
CS-1772 / CS-1774 User Manual
Notes:
4
2005-03-16
Chapter 2.
Hardware Setup
CS-1772 / CS-1774 Front View
1&2
3
4
1&2
4
3
5
2005-03-16
CS-1772 / CS-1774 User Manual
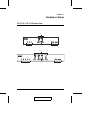
1. Port Selection Switches
Pressing a switch brings the focus to the computer attached to its corresponding
port. See p. 13 for operation details.
2. Port LEDs
The Port LEDs are built into the Port Selection Switches. The upper ones are the
KVM Port LEDs; the lower ones are the USB LEDs:
LED
KVM:
Indication
M Lights DIM ORANGE to indicate that the computer attached to its
corresponding port is up and running (On Line).
M Changes to BRIGHT ORANGE to indicate that the computer
attached to its corresponding port is the one that has the KVM focus
(Selected).
M Flashes to indicate that the computer attached to its corresponding
port is being accessed under Auto Scan mode.
USB:
M Lights DIM GREEN to indicate that there is a USB cable connection
to the computer attached to its corresponding port. Does not light if
there is no USB connection to the computer.
M Changes to BRIGHT GREEN to indicate that the computer attached
to its corresponding port is the one that has access to the USB
peripherals.
3. Ethernet LEDs
The ethernet LEDs light to indicate the data transmission status of their
corresponding ports on the ethernet hub:
LED
LAN Link
10/100Mbps
Status
Indication
Off
No data connection to the computer attached to its
corresponding port.
On
Data connection to the computer attached to its
corresponding port is in effect.
Flashing
Data is being transmitted through the port.
Off
Data transmission speed is 10Mbps.
On
Data transmission speed is 100Mbps.
4. USB Hub Section
USB peripherals (printers, scanners, etc.) can plug into either port.
6
2005-03-16
Hardware Setup
CS-1772 / CS-1774 Rear View
1
2
4
5
1
4
3
2
6
3
5
6
7
2005-03-16
CS-1772 / CS-1774 User Manual
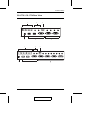
1. Ethernet Port Section
The Cat5 LAN cable that connects to the computer’s ethernet port can plug into
any available port.
2. Console Audio Jacks
The cables from your microphone and speakers plug in here. Each jack is color
coded and marked with an appropriate icon to indicate itself.
3. Firmware Upgrade Port
The Firmware Upgrade Cable that transfers the firmware upgrade data to the
CS-1772 / CS-1774 plugs in here. See p. 25 for firmware upgrade details.
4. Power Jack
The power adapter cable plugs into this jack.
5. Console Port Section
Your USB keyboard, USB mouse, and monitor plug in here.
6. CPU Port Section
The cables that link the switch to your computers plug in here. Each CPU port is
comprised of a microphone jack, speaker jack, and KVM data connector.
Note: The shape of these 15-pin connectors has been specifically modified so that
only KVM cables designed to work with this switch can plug in (see the
Cables section on p. 3, for details). Do NOT attempt to use ordinary 15 pin
VGA connector cables to link these ports to the computers.
8
2005-03-16
Hardware Setup
Cable Connection
1. Make sure that power to all the devices you will be connecting up have
been turned off. You must unplug the power cords of any computers
that have the Keyboard Power On function.
2. Make sure that all devices on the installation are properly grounded.
To set up your Master View CS-1772 / CS-1774 installation, refer to the installation
diagram on the following page, and do the following:
1. Plug your keyboard, mouse and monitor into the Console Ports located on the
unit’s rear panel.
2. Plug your microphone and speakers into the Console microphone and speaker
jacks located on the unit’s rear panel.
3. Using a KVM cable set (provided with this package), plug the custom SPHD
connector into any available CPU Port on the switch and plug the accompanying
microphone and speaker connectors into the CPU Port’s microphone and speaker
jacks.
Note: 1. The connectors and jacks are color coded and marked with an appropriate
icon for easy installation.
2. Be sure that all the plugs are in the same CPU Port sockets (all in Port 1,
all in Port 2, etc.).
4. At the other end of the cable, plug the USB keyboard/mouse, USB hub, video,
microphone and speaker cables into their respective ports on the computer.
5. Use Cat5 cable to connect any available ethernet port on the switch to the
computer’s ethernet port.
Repeat steps 3 - 5 for any other computers you are connecting up.
6. Plug the cable from your external LAN source into any available ethernet port on
the switch.
7. Plug the power adapter that came with your switch into an AC power source, then
plug the power adapter cable into the switch’s Power Jack.
8. Plug your USB peripherals into the USB hub section on the front panel.
9
2005-03-16
CS-1772 / CS-1774 User Manual
5
2
6
3
7
1
4
5
8
10
2005-03-16
Hardware Setup
Port Numbering
Each CPU port on the CS-1772 / CS-1774 switch is assigned a port number (1 or 2
for the CS-1772; 1 to 4 for the CS-1774). The port numbers are marked on the rear
panel of the switch (see p. 7).
The Port ID of a computer is derived from the CPU port number it is connected to.
For example, a computer connected to CPU port 2 has a Port ID of 2.
The Port ID is used to specify which computer gets the KVM, USB hub, and audio
focus with the Hotkey port selection method (see p. 13, for details).
Powering Off and Restarting
If it becomes necessary to Power Off the Master View unit do the following:
1. Power off the switch.
M Unplug the KVM cables from the switch’s rear panel.
M Unplug the switch’s power adapter cable.
2. Wait 10 seconds, then reconnect the KVM cables.
3. Plug the switch’s power adapter cable back in.
Hot Plugging
The Master View CS-1772 / CS-1774 supports USB hot plugging - components can
be removed and added back into the installation by unplugging their cables from the
CPU ports without the need to shut the unit down.
11
2005-03-16
CS-1772 / CS-1774 User Manual
Notes:
12
2005-03-16
Chapter 3.
Port Switching
There are two convenient methods to switch the KVM, USB hub, and audio focus
among the ports: Manual - which involves pressing the pushbutton port selection
switches located on the unit’s front panel; and Hotkey - which involves entering
combinations from the keyboard.
Manual Port Switching
M Press and release a switch (for less than three seconds) to bring only the KVM
focus to the computer attached to its corresponding port.
M Press a switch for longer than three seconds to bring the KVM, USB hub, and
audio focus to the computer attached to its corresponding port.
M Press switches 1 and 2 simultaneously for 2 seconds to start Auto Scan Mode. See
p. 16 for details.
Hotkey Port Switching
All port switches begin with tapping the Scroll Lock key twice. The tables on the
following pages describe the actions that each combination performs.
Note: If using the Scroll Lock key conflicts with other programs running on the
computer, the Ctrl key can be used, instead. See Alternate Port Switching
Keys, p. 18, for details.
13
2005-03-16
CS-1772 / CS-1774 User Manual
Cycling Through the Ports
Hotkey
[Scroll Lock] [Scroll Lock] [Enter]
Action
Brings the KVM, USB hub, and audio focus from the port
that currently has the KVM focus to the next port on the
installation (1 to 2; 2 to 1 for the CS-1772; 1 to 2; 2 to 3; 3
to 4; 4 to 1 for the CS-1774).
Note that the KVM, USB hub, and audio focus all go to this
port even if they were on different ports to begin with.
[Scroll Lock] [Scroll Lock] [K]
[Enter]
Brings only the KVM focus from the port that currently has it
to the next port on the installation. The USB hub and audio
focus remain where they are.
[Scroll Lock] [Scroll Lock] [U]
[Enter]
Brings only the USB hub focus from the port that currently
has it to the next port on the installation. The KVM and
audio focus remain where they are.
[Scroll Lock] [Scroll Lock] [S]
[Enter]
Brings only the audio focus from the port that currently has
it to the next port on the installation. The KVM and USB hub
focus remain where they are.
14
2005-03-16
Port Switching
Going Directly to a Port
Hotkey
[Scroll Lock] [Scroll Lock] [n] [Enter]
Action
Brings the KVM, USB hub, and audio focus to the
computer attached to the port corresponding to the
specified Port ID.
Note that the KVM, USB hub, and audio focus all go to
this port even if they were on different ports to begin with.
[Scroll Lock] [Scroll Lock] [n] [K]
[Enter]
Brings only the KVM focus to the computer attached to
the specified port. The USB hub and audio focus remain
where they are.
[Scroll Lock] [Scroll Lock] [n] [U]
[Enter]
Brings only the USB hub focus to the computer attached
to the specified port. The KVM and audio focus remain
where they are.
[Scroll Lock] [Scroll Lock] [n] [S]
[Enter]
Brings only the audio focus to the computer attached to
the specified port. The KVM and USB hub focus remain
where they are.
[Scroll Lock] [Scroll Lock] [n] [K] [U]
[Enter]
Brings the KVM and USB hub focus to the computer
attached to the specified port. The audio focus remains
where it is.
[Scroll Lock] [Scroll Lock] [n] [K] [S]
[Enter]
Brings the KVM and audio focus to the computer
attached to the specified port. The USB hub focus
remains where it is.
[Scroll Lock] [Scroll Lock] [n] [U] [S]
[Enter]
Brings the USB hub and audio focus to the computer
attached to the specified port. The KVM focus remains
where it is.
Note: The n stands for the computer’s Port ID number (1, 2, 3, or 4 - see Port
Numbering, p. 11). Replace the n with the appropriate Port ID when entering
hotkey combinations.
15
2005-03-16
CS-1772 / CS-1774 User Manual
Auto Scanning
The CS-1772 / CS-1774’s Auto Scan feature automatically cycles the KVM focus
through the computer ports at regular intervals. This allows you to monitor the
computer activity without having to take the trouble of switching from port to port
manually. See the table below for details.
Hotkey
Action
[Scroll Lock] [Scroll Lock] [A] [Enter]
Starts Auto Scan. The KVM focus cycles from port
to port at 5 second intervals.
[Scroll Lock] [Scroll Lock] [A] [n] [Enter]
Starts Auto Scan. The KVM focus cycles from port
to port at n second intervals.
Note: 1. The n stands for the number of seconds that the CS-1772 / CS-1774 should
dwell on a port before moving on to the next. Replace the n with a number
between 1 and 99 when entering this hotkey combination.
2. Although the video focus switches from port to port, the keyboard, mouse,
audio and USB focus doesn’t switch. They stay at the port they were on
when Auto Scanning started.
3. While Auto Scan Mode is in effect, ordinary keyboard functions are
suspended - only Auto Scan Mode compliant keystrokes can be input. You
must exit Auto Scan Mode in order to regain normal control of the keyboard.
To exit Auto Scan Mode, press the Esc key, the Spacebar, or any Port Selection
switch.
16
2005-03-16
Chapter 4.
Hotkey Setting Mode
Invoking Hotkey Setting Mode
Hotkey Setting Mode is used to set up your CS-1772 / CS-1774 switch configuration.
All operations begin with invoking Hotkey Setting Mode (HSM). To invoke HSM do
the following:
1. Press and hold down the Num Lock key
2. Press and release the minus key
3. Release the Num Lock key
Note: There is an alternate key combination to invoke HSM. See below for details.
M When HSM is active, the Caps Lock, and Scroll Lock LEDs flash in succession to
indicate that HSM is in effect. They stop flashing and revert to normal status when
you exit HSM.
M Ordinary keyboard and mouse functions are suspended - only Hotkey compliant
keystrokes and mouse clicks (described in the sections that follow), can be input.
M At the conclusion of some hotkey operations, you automatically exit hotkey mode.
With some operations, you must exit manually. To exit HSM manually, press the
Esc key, or the Spacebar.
17
2005-03-16
CS-1772 / CS-1774 User Manual
Alternate HSM Invocation Keys
An alternate set of HSM invocation keys is provided in case the default set conflicts
with programs running on the computers.
To switch to the alternate HSM invocation set, do the following:
1. Invoke HSM (see above)
2. Press and release the H key
The HSM invocation keys become the Ctrl key and F12 (instead of Num Lock and minus).
Note: This procedure is a toggle between the two methods. To revert back to the original
HSM invocation keys, invoke HSM, then press and release the H key again.
Alternate Port Switching Keys
The port switching activation keys can be changed from tapping the Scroll Lock key
twice ([Scroll Lock] [Scroll Lock]) to tapping the Ctrl key twice. To change the port
switching activation keys, do the following:
1. Invoke HSM (see p. 17)
2. Press and release the T key
Note: This procedure is a toggle between the two methods. To revert back to the
original [Scroll Lock] [Scroll Lock] method, invoke HSM, then press and
release the T key again.
18
2005-03-16
Hotkey Setting Mode
Keyboard Operating Platform
The CS-1772 / CS-1774’s default port configuration is for a PC Compatible keyboard
operating platform. If your requirements call for different port settings (you have a
Mac or Sun attached to a port, e.g.), you can change a port’s keyboard operating
platform configuration as follows:
1. Bring the KVM focus to the port you want to set.
2. Invoke HSM (see p. 17)
3. Press and release the appropriate Function key (see table). After completing a
setting, you automatically exit HSM.
Function Key
Operation
[F2]
Sets the Mac keyboard operating platform.
[F3]
Sets the Sun keyboard operating platform.
[F10]
Auto detects the keyboard operating platform (for PC compatible systems).
Activates Pass Through keyboard mode (keystrokes are sent directly to the
computer instead of through the Mac or Sun emulator).
* The first time that the Sun system runs from a port, you must configure its port for
the Sun keyboard operating platform before you turn the system on, or else the Sun
system will not start.
19
2005-03-16
CS-1772 / CS-1774 User Manual
List Hotkey Settings
To see a listing of the current hotkey settings, do the following:
1. Invoke HSM (see p. 17).
2. Press and release the F4 function key.
3. Open a text editor or word processor and use its Paste function to display the
settings.
USB Reset
If the Console USB keyboard and/or mouse loses focus and needs to be reset, do the
following:
1. Invoke HSM (see p. 17).
2. Press and release the F5 function key.
Hotkey Beeper Control
The Beeper can be hotkey toggled On and Off. To toggle the Beeper, do the following:
1. Invoke HSM (see p. 17).
2. Press and release the B key.
The Beeper toggles On or Off. The Command Line displays Beeper On or Beeper Off
for one second; then the message disappears and you automatically exit Hotkey Mode.
20
2005-03-16
Hotkey Setting Mode
Disable Port Switching Keys
To disable the Port Switching Keys ([Scroll Lock] [Scroll Lock] / [Ctrl] [Ctrl]), do the
following:
1. Invoke HSM (see p. 17).
2. Press [X] [Enter].
Note: This procedure is a toggle. To enable the Port Switching keys repeat steps 1
and 2.
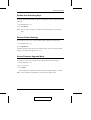
Restore Default Settings
To reset the CS-1772 / CS-1774 to its default hotkey settings, do the following:
1. Invoke HSM (see p. 17).
2. Press [R] [Enter].
All hotkey settings return to the factory default settings. A table showing the default
settings is provided in the Appendix, on p. 32.
Invoke Firmware Upgrade Mode
To set the CS-1772 / CS-1774 to Firmware Upgrade Mode, do the following:
1. Invoke HSM (see p. 17).
2. Key in: upgrade
3. Press [Enter].
The front panel port LEDs flash to indicate Firmware Upgrade Mode is in effect.
Note: To exit Firmware Upgrade Mode, you must power off the switch.
21
2005-03-16
CS-1772 / CS-1774 User Manual
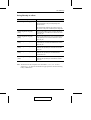
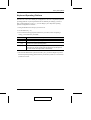
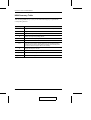
HSM Summary Table
After invoking HSM (see p. 17), key in one of the following keys to perform the
corresponding function:
Key
Function
H
Toggles between the default and alternate HSM invocation keys.
T
Toggles between the default and alternate Port Switching keys.
F2
Sets the Mac keyboard operating platform.
F3
Sets the Sun keyboard operating platform.
F4
Lists the current hotkey settings via the Paste function of a text editor or WP.
F5
Performs a USB reset.
F10
Auto detects the keyboard operating platform (for PC compatible systems).
Activates Pass Through keyboard mode (keystrokes are sent directly to the
computer instead of through the Mac or Sun emulator).
B
Toggles the beeper On and Off.
X [Enter]
Enables/Disables the Port Switching keys.
R [Enter]
Resets the hotkey settings to their default status.
upgrade [Enter]
Invokes Firmware Upgrade Mode.
22
2005-03-16
Chapter 5.
Keyboard Emulation
Sun Keyboard
The PC compatible (101/104 key) keyboard can emulate the functions of the Sun
keyboard when the Control key [Ctrl] is used in conjunction with other keys. The
corresponding functions are shown in the table below.
Note: When using [Ctrl] combinations, press and release the Ctrl key, then press and
release the activation key.
PC Keyboard
Sun Keyboard
[Ctrl] [T]
Stop
[Ctrl] [F2]
Again
[Ctrl] [F3]
Props
[Ctrl] [F4]
Undo
[Ctrl] [F5]
Front
[Ctrl] [F6]
Copy
[Ctrl] [F7]
Open
[Ctrl] [F8]
Paste
[Ctrl] [F9]
Find
[Ctrl] [F10]
Cut
[Ctrl] [4]
[Ctrl] [H]
Help
[Ctrl] [1]
Mult
[Ctrl] [2]
V_DN
[Ctrl] [3]
V_UP
[Win]
Compose
23
2005-03-16
CS-1772 / CS-1774 User Manual
Mac Keyboard
The PC compatible (101/104 key) keyboard can emulate the functions of the Mac
keyboard. The emulation mappings are listed in the table below.
Note: When using key combinations, press and release the first key, then press and
release the second one.
PC Keyboard
Mac Keyboard
[Shift]
Shift
[Ctrl]
Ctrl
[Win]
[Ctrl] [4]
[Alt]
Alt/Option
[Prt_Sc]
F13
[Scroll Lock]
F14
[Desktop Menu]
=
[Enter]
Return
[Back Space]
Delete
[Ins]
Help
[Ctrl] [Win]
F15
[Ctrl] [1]
Mult
[Ctrl] [2]
V_DN
[Ctrl] [3]
V_UP
24
2005-03-16
Chapter 6.
The Firmware Upgrade Utility
The Windows-based Firmware Upgrade Utility (FWUpgrade.exe) provides a smooth,
automated process for upgrading the KVM switch’s firmware. The Utility comes as
part of a Firmware Upgrade Package that is specific for each device. New upgrade
packages are posted on our web site as new firmware revisions become available.
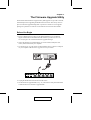
Before You Begin
1. From a computer that is not part of your KVM installation go to our Internet
support site and choose the model name that relates to your device (CS-1772 /
CS-1774) to get a list of available Firmware Upgrade Packages.
2. Choose the Firmware Upgrade Package you want to install (usually the most
recent), and download it to your computer.
3. Use the Firmware Upgrade Cable provided with this unit, to connect a COM port
on your computer to the Firmware Upgrade Port of your switch.
4. Unplug the KVM cables from the back of the switch.
5. Invoke Firmware Upgrade Mode (see p. 21). The switch’s front panel LEDs flash
to indicate that it is in Firmware Upgrade Mode.
25
2005-03-16
CS-1772 / CS-1774 User Manual
Starting the Upgrade
To upgrade your firmware:
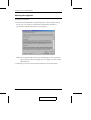
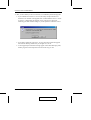
1. Run the downloaded Firmware Upgrade Package file - either by double clicking
the file icon, or by opening a command line and entering the full path to it.
The Firmware Upgrade Utility Welcome screen appears:
Note: The screenshots in this section are for example purposes. The screens that
appear during your firmware upgrade may vary slightly as to their wording
and descriptions.
2. Read and Agree to the License Agreement (enable the I Agree radio button).
26
2005-03-16
The Firmware Upgrade Utility
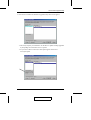
3. Click Next to continue. The Firmware Upgrade Utility main screen appears:
M The Utility inspects your installation. All the devices capable of being upgraded
by the package are listed in the Device List panel.
M As you select a device in the list, its description appears in the Device
Description panel.
27
2005-03-16
CS-1772 / CS-1774 User Manual
4. After you have made your device selection(s), Click Next to perform the upgrade.
M If you enabled Check Firmware Version, the Utility compares the device’s
firmware level with that of the upgrade files. If it finds that the device’s version
is equal to, or higher than, the upgrade version, it brings up a dialog box
informing you of the situation and gives you the option to Continue or Cancel.
M If you didn’t enable Check Firmware Version, the Utility installs the upgrade
files without checking whether they are a higher level, or not.
M As the Upgrade proceeds status messages appear in the Status Messages panel,
and the progress toward completion is shown on the Progress bar.
28
2005-03-16
The Firmware Upgrade Utility
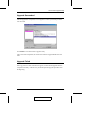
Upgrade Succeeded
After the upgrade has completed, a screen appears to inform you that the procedure
was successful.
Click Finish to close the Firmware Upgrade Utility.
After a successful completion, the switch exits Firmware Upgrade Mode and resets
itself.
Upgrade Failed
If the Upgrade Succeeded screen doesn’t appear, it means that the upgrade failed to
complete successfully, in which case you should repeat the upgrade procedure from
the beginning.
29
2005-03-16
CS-1772 / CS-1774 User Manual
Notes:
30
2005-03-16
Appendix
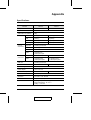
Specifications
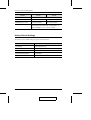
Function
CS-1772
CS-1774
Computer Connections
2
CPU Port Selection
Front Panel Switches; Hotkey
USB/Audio Port Selection
Hotkey
LEDs
KVM
2 (Orange)
4 (Orange)
USB
2 (Green)
4 (Green)
Link
3 (Green)
5 (Green)
10/100Mbps
3 (Green)
5 (Green)
Keyboard
1 x USB Type A female
Mouse
1 x USB Type A female
Video
1 x HDB -15 female
Audio
1 x Speaker jack
1 x Microphone jack
KVM data
2 x SPHD - 15 female
4 x SPHD - 15 female
Audio
2 x Speaker jacks
2 x Microphone jacks
4 x Speaker jacks
4 x Microphone jacks
Console
Connectors
CPU
Connectors
4
USB Hub
2 x USB Type A female
Ethernet Hub
3 x RJ-45 sockets
Firmware Upgrade Port
1 x RJ- 11socket
Power Adapter
1 x DC 5.3V; 2.4A
Power Consumption
DC5.3V; 4.5W; 900mA
Scan Interval
1 - 99 secs. (5 secs. default)
Resolution
Up to 2048 x 1536; DDC2B
KB/Mouse Emulation
USB (PC, Mac, Sun)
Environment
Operating Temperature: 0 - 50o C
Storage Temperature: -20 - 60o C
Humidity: 0 - 80% RH
5 x RJ-45 sockets
DC5.3V; 5W; 1000mA
31
2005-03-16
CS-1772 / CS-1774 User Manual
Function
CS-1772
CS-1774
Housing
Metal
Weight
0.71 kg
0.92 kg
Dimensions (L x W x H)
21.0 x 8.8 x 5.55cm
27.0 x 8.8 x 5.55cm
OS Support
Windows 98 or higher, Mac OS 8.6 or higher, SUN
Blade 2000/100 (Sun Solaris 8), Linux RedHat 7.1 or
higher, FreeBSD 3.51, 4.2, 4.3, 4.5 or newer
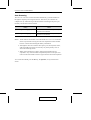
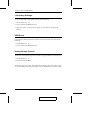
Hotkey Default Settings
The hotkey factory default settings are given in the table below:
Setting
Default
Port Switching
[Scroll Lock] [Scroll Lock]
Invoking HSM
[Num Lock] [ - ]
Beeper
On
Keyboard Operating Platform
PC Compatible
Port Switching Keys
Enabled
32
2005-03-16
The Firmware Upgrade Utility
Troubleshooting
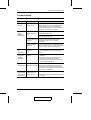
Symptom
Possible Cause
Action
Erratic
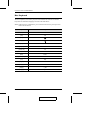
behavior.
Unit not receiving
enough power.
Use a DC 5.3V power adapter if you are not
already using one. If you are already using a
power adapter, check that it matches the
system specifications (DC 5.3V), and that it is
plugged in and functioning properly.
Keyboard
and/or
Mouse not
responding.
Keyboard and/or
mouse need to be
reset.
Use the USB Console Reset hotkey
combination (see p. 20).
No connection to the
computer.
Check the cable from the switch to the
computer to make sure it is properly
connected.
KVM switch needs
to be reset.
Power off all devices on the installation (see
the note at the top of p. 9); power off the KVM
switch; wait five seconds; then power up.
USB devices
not
responding.
USB ports need to
be reset.
Unplug the device’s USB cable from the USB
port on the switch’s rear panel, then plug it
back in.
Device not
recognized
message
(Windows)
Windows timing
problem.
1. Unplug the KVM cable from the computer’s
USB port.
2. Go into Windows’ System Settings and
remove the Unknown Device entry.
3. Plug the KVM cable back in. Windows will
now recognize the device.
Unplug the cable(s) from the console port(s),
then plug it/them back in.
Sun system
CPU port not
does not start. configured correctly.
The first time that a Sun system runs from a
port, you must configure its port for the Sun
keyboard operating platform before you turn
the system on, or else the Sun system will not
start. See p. 19 for details.
Mac keyboard Some Mac
doesn’t have a keyboards do not
Scroll Lock or
have these keys.
Num Lock key.
M Use F14 to substitute for the Scroll Lock key.
M Use the Clear key to substitute for the Num
Lock key.
33
2005-03-16
CS-1772 / CS-1774 User Manual
Limited Warranty
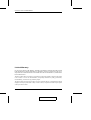
IN NO EVENT SHALL THE DIRECT VENDOR’S LIABILITY EXCEED THE PRICE PAID
FOR THE PRODUCT FROM THE DIRECT, INDIRECT, SPECIAL, INCIDENTAL OR CONSEQUENTIAL DAMAGES RESULTING FROM THE USE OF THE PRODUCT, DISK OR ITS
DOCUMENTATION.
The direct vendor makes no warranty or representation, expressed, implied, or statutory with respect
to the contents or use of this documentation, and specially disclaims its quality, performance,
merchantability, or fitness for any particular purpose.
The direct vendor also reserves the right to revise or update the device or documentation without
obligation to notify any individual or entity of such revisions, or update. For further inquires please
contact your direct vendor.
34
2005-03-16