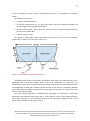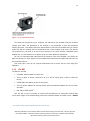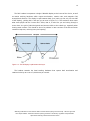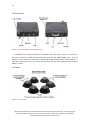
1
MEAP Edition
Manning Early Access Program
Oculus Rift in Action
Version 12
Copyright 2015 Manning Publications
©Manning Publications Co. We welcome reader comments about anything in the
manuscript - other than typos and other simple mistakes. These will be cleaned up during
production of the book by copyeditors and proofreaders.
https://forums.manning.com/forums/oculus-rift-in-action
For more information on this and other Manning titles go to
www.manning.com
©Manning Publications Co. We welcome reader comments about anything in the manuscript - other than typos and
other simple mistakes. These will be cleaned up during production of the book by copyeditors and proofreaders.
https://forums.manning.com/forums/oculus-rift-in-action
welcome
Hello, and welcome to our MEAP! Thanks for joining us in this project to document and make
easy-to-use that brand new, not-even-released yet piece of the future of Virtual Reality, the
Oculus Rift. We’re ridiculously excited about the prospects of the hardware, and if our book
improves the quality of the software that folks write for it, then our work here is done. We
know that the Rift—in fact, all of VR—is terra incognita for many of our readers, so we’re
aiming this book at experienced object-oriented developers who may not know OpenGL or
advanced 3D graphics, but have at least seen them across the room at parties.
Oculus Rift in Action has a few simple goals:
1. Defuse all fear of coding for the Rift. Make it clear that it’s easy; make it clear that it’s
fun.
2. Walk the reader through the key methods of the Oculus SDK.
3. Offer advanced readers deeper insights into other languages, other platforms, and how
they can work more directly with the headset.
4. Show readers how not to make their users violently ill with motion sickness (and how to
avoid that fate while developing, too!)
What you’re looking at now is a small, very early section of our book, covering just the first
few chapters. Chapter One introduces you (our reader) to the Rift, covering the device and the
development process. Chapter Two walks the reader through the basics of interacting with the
Rift with examples of using the SDK to get input from the head tracker and send simple output
to the display, intended to get the ball rolling for early development without touching on any of
the thornier issues of VR.
What we’re hoping you’ll contribute, in exchange for this early preview, is solid technical
feedback on how we’ve structured our book, whether we’re teaching what we’re trying to
teach, and whether you feel like you’re actually learning how to code for the Rift.
And, of
course, whether we’re right! If you spot bugs in the code, please let us know.
Sincerely yours,
Brad, Karen and Alex
©Manning Publications Co. We welcome reader comments about anything in the manuscript - other than typos and
other simple mistakes. These will be cleaned up during production of the book by copyeditors and proofreaders.
https://forums.manning.com/forums/oculus-rift-in-action
brief contents
PART 1: GETTING STARTED
1 Meet the Oculus Rift
PART 2: USING THE OCULUS C API
2 Creating Your First Rift Interactions
3 Pulling Data Out of the Rift: Working with the Head Tracker
4 Sending Output to the Rift: Working with the display
5 Putting it all Together: Integrating Head Tracking and 3D Rendering
6 Performance and quality
PART 3: USING UNITY
7 Unity: Creating Applications That Run on the Rift
8 Unity: Tailoring Your Application for the Rift
PART 4: THE VR USER EXPERIENCE
9 User Interface Design for Virtual Reality
10 Reducing Motion Sickness and Discomfort
PART 5: ADVANCED RIFT INTEGRATIONS
11 Using the Rift with Java and Python
12 Case Study: A VR Shader Editor
13 Augmenting Virtual Reality
APPENDICES
A Setting Up the Rift in a Development Environment
B Mathematics and software patterns for 3D graphics
C Suggested Books and Resources
D Glossary
©Manning Publications Co. We welcome reader comments about anything in the manuscript - other than typos and
other simple mistakes. These will be cleaned up during production of the book by copyeditors and proofreaders.
https://forums.manning.com/forums/oculus-rift-in-action
1
Part 1
Getting Started
Part 1 of the book introduces you to the Oculus Rift hardware and to virtual reality. We begin
with an exploration of what virtual reality is and why you would want to develop for the Rift.
From there, we move on to an overview of the Rift hardware and how it works. After getting to
know the Rift hardware, we’ll take a look at the different development paths you can take for
creating your Rift application.
One unusual aspect to working with the Rift is that using it can be physically uncomfortable,
as it can sometimes trigger symptoms of motion sickness. To help you have a more pleasant
working experience, Chapter 1 also includes tips on what you can do to deal with motion
sickness. When you are done with Part 1 you will be ready to start building Rift applications
using your chosen development path, either working directly with the C API (Part 2 of this
book) or working with Unity (Part 3 of this book).
©Manning Publications Co. We welcome reader comments about anything in the manuscript - other than typos and
other simple mistakes. These will be cleaned up during production of the book by copyeditors and proofreaders.
https://forums.manning.com/forums/oculus-rift-in-action
2
1
Meet the Oculus Rift
This chapter covers
•
Why you should support the Rift
•
How the Rift is being used today
•
The Rift hardware and how it works
•
Setting up your hardware
•
Dealing with motion sickness
•
Development paths: C, Java, Python, or Unity
If you've picked up this book, you probably already know that the Rift is a virtual reality
head-mounted display (VR HMD). You may have one of your own already or maybe you’ve
tried one out and were, like us, blown away by the intense immersion. Even if you've only read
about the Rift in passing, if you watch demo videos and reaction shots, you can often see the
look of incredulous delight on peoples' faces the first time they use the Rift.
With the increased field of view (more than double what you get with a typical monitor!)
and head tracking to change the viewpoint (the wearer just turns their head to see what they
want, no need to use a mouse or joystick to orient), the Rift represents an opportunity for
people to view your work in a way they never could before.
In this book, we will show you how to build immersive environments that run on the Rift.
While the first steps are rendering to the device and tracking the user's head movements, VR
also presents some unique usability challenges, not the least of which is that it can cause
motion sickness for some users.
Before we get started, let's talk a bit about why you should support the Rift.
©Manning Publications Co. We welcome reader comments about anything in the manuscript - other than typos and
other simple mistakes. These will be cleaned up during production of the book by copyeditors and proofreaders.
https://forums.manning.com/forums/oculus-rift-in-action
3
1.1
Why support the Rift?
There are really two questions here. The first is whether you should support VR in general, and
the second is whether you should support the Rift specifically.
1.1.1
The call of virtual reality
If you’ve ever seen an episode of Star Trek and imagined what you could do with your own
personal holodeck, or wished you were the greatest swordfighter in the Metaverse, then this
book is for you. Or perhaps you’ve flown a flight simulator and wished you could just look out
at the mountains to your left by turning your head, or maybe you have wished you could build
cities with a wave of your hand. If so, you’ve felt the call of VR and this book is for you.
Maybe you have more practical interests; saving money or increasing safety. For years, VR
has been used in specialized niches where immersion in an environment, without actually being
in the environment, was critical. The canonical example is the flight simulator. When you’re
training a pilot to operate a piece of machinery that costs tens or hundreds of millions of
dollars, spending a few hundred thousand, or even a few million on creating an artificial
environment in which to train without the risks associated with a real aircraft can be a pretty
wise investment and this book is for you.
1.1.2
But what about the Rift?
What’s special about the Rift is that it can deliver nearly the same level of immersion as
existing commercial setups costing orders of magnitude more, but at a price that makes it
available, if not to the average consumer, at least to the average consumer who would already
have the kind of computing or gaming system that can support the Rift. 1
Immersion and Presence
Two key terms we use to describe VR are immersion and presence.
Immersion is the art and technology of surrounding the user with a virtual context, such that there
is world about, below, and all around you.
Presence is the visceral reaction to a convincing immersion experience: when immersion is so good
that the body reacts instinctively to the virtual world as though it is the real one.
When you turn your head to look up at the attacking enemy bombers, that’s immersion; when you
can’t stop yourself from ducking as they roar by overhead, that’s presence.
The appeal of applying VR to the field of gaming should be obvious, and indeed gaming is
the area which will almost certainly drive mass market adoption. But the really exciting thing
to us is the potential the Rift brings. By democratizing the use and development of VR, it has
the potential to radically alter the world in ways we can’t yet imagine. .
1
The first development kit was sold for $300, a price comparable to high-end video cards. Oculus has repeatedly said they’re
trying to hit the same price point for the consumer version, albeit with vastly improved specifications.
©Manning Publications Co. We welcome reader comments about anything in the manuscript - other than typos and
other simple mistakes. These will be cleaned up during production of the book by copyeditors and proofreaders.
https://forums.manning.com/forums/oculus-rift-in-action
4
But all this cheerleading might not be assuaging your doubts. Maybe you feel the call of
VR, but you (or your manager) don’t know if your project has the budget to include such
frivolous features as virtual reality. Well here’s the great part. Supporting the Rift is cheap
and easy, and we’re going to show you how to do it.
Need a little more inspiration? Let’s take a look at what people are already doing with the
Rift.
1.2
How is the Rift being used today?
Developers around the world are taking the Rift and doing amazing things with it, either
displacing previous VR solutions at a fraction of the price, or creating innovative applications
that simply weren’t possible or practical before. The examples below are just a small sample of
what is going on in VR right now, but we hope that it provides some inspiration as you start
your own projects.
One obvious application of VR is virtual tourism. In our opinion, no other media comes as
close to making you feel like you are somewhere else quite like VR. We’d even say that if a
picture is worth 1000 words, a VR experience is worth 1,000,000 words. One virtual tourism
demo that can give you a taste for just what VR can do is Tower Eiffel 2 by Didier Thery (Figure
1.1). You can look at a picture of the Eiffel Tower or watch a movie, you can read about how
tall it is and about how it was constructed, but none of that will convey to you what it feels like
to look up and see the metal arches of the tower above you.
3
Figure 1.1: Tower Eiffel by Didier Thery
2
3
https://share.oculus.com/app/tower-eiffel
https://share.oculus.com/app/tower-eiffel
©Manning Publications Co. We welcome reader comments about anything in the manuscript - other than typos and
other simple mistakes. These will be cleaned up during production of the book by copyeditors and proofreaders.
https://forums.manning.com/forums/oculus-rift-in-action
5
While visiting the Eiffel Tower is possible in real life, visiting outer space is a bit out of reach
for most people. That brings us to another one of our favorite demos, “Titans of Space” by
Drash LLC (Figure 1.2).
4
Figure 1.2: Titans of Space by Drash LLC
In Titans of Space, you can get a real feel for the beauty and vastness of space.
VR can do more than just make you feel what it is like to be someplace else. It can provide
an experience so visceral that it will make you break out in goose bumps, jump with fright, or
duck to avoid an oncoming object. Don’t Let Go by Skydome Studios (Figure 1.3) is a fun
example of the chills and thrills of VR.
5
Figure 1.3: Don’t Let Go by Skydome Studios
4
https://share.oculus.com/app/titans-of-space
©Manning Publications Co. We welcome reader comments about anything in the manuscript - other than typos and
other simple mistakes. These will be cleaned up during production of the book by copyeditors and proofreaders.
https://forums.manning.com/forums/oculus-rift-in-action
6
When you combine a virtual world, with thrills and goals, you’ve got what some consider
the ultimate experience: immersive gaming. Team Fortress 2 6 was one of the first existing
games to be updated with Oculus Rift support and is well worth a look.
Figure 1.4: Team Fortress 2: One of the first games to be updated with Oculus Rift support
Of course, not all of Rift experiments we’ve seen are fun and games. The Rift has also
facilitated some serious work. For example, one of the more interesting experiments we’ve
seen using the Rift is by the research group, Be Another Lab 7. Their experiment uses the Rift,
multiple cameras, and human actors to allow users to view what it would be like to be someone
else (Figure 1.5).
5
6
7
https://share.oculus.com/app/dont-let-go
http://store.steampowered.com/app/440/
http://www.themachinetobeanother.org
©Manning Publications Co. We welcome reader comments about anything in the manuscript - other than typos and
other simple mistakes. These will be cleaned up during production of the book by copyeditors and proofreaders.
https://forums.manning.com/forums/oculus-rift-in-action
7
Figure 1.5: Two subjects in an experiment by Be Another Lab look down and see themselves as the other
person thanks to a set of cameras and the Rift
The Be Another Lab experiment allows researcher to get a view into human empathy that
previously was simply not affordable to a lab on a modest budget.
In even more practical
terms, we think the Norwegian army 8 is taking an intriguing approach to using the Rift (Figure
1.6) to increase the safety of soldiers during combat.
8
http://www.tu.no/tutv/forsvar/2014/05/05/norwegian-army-driving-armoured-vehicle-using-oculus-rift
©Manning Publications Co. We welcome reader comments about anything in the manuscript - other than typos and
other simple mistakes. These will be cleaned up during production of the book by copyeditors and proofreaders.
https://forums.manning.com/forums/oculus-rift-in-action
8
Figure 1.6: An experiment using the Rift to allow tank drivers to drive with the hatch closed as seen in a
report on Norwegian TV station TuTV
In this experimental use of the Rift, there are cameras mounted on all sides of the tank.
The images are then fed to a driver wearing the Rift inside the tank. The intent is to allow the
driver to drive the tank with the hatch closed during combat situations.
Ready to meet the Rift? Let’s go!
1.3
Get to know the Rift Hardware
So far two models of the Rift that have been made commercially available, the first and second
developer kits, known as DK1 and DK2 for short.
The DK1 has been discontinued, but has
been replaced with the DK2, which is currently available. We'll cover the hardware for both
versions.
1.3.1
The DK2
The DK2 kit includes
•
A headset
•
An infrared USB camera for positional tracking
•
Two (2) pairs of lenses, referred to as A and B lenses (plus a cloth to clean the lenses).
The A lenses come preinstalled in the headset.
•
A paired HDMI / USB cable
•
Positional tracker sync cable
•
A DVI to HDMI adapter
©Manning Publications Co. We welcome reader comments about anything in the manuscript - other than typos and
other simple mistakes. These will be cleaned up during production of the book by copyeditors and proofreaders.
https://forums.manning.com/forums/oculus-rift-in-action
9
•
A 5v DC power adapter for US style power with international adapters for various other
countries.
In addition to the hardware, the kits also include the Oculus Rift Development Kit
Instruction Manual. This manual covers basic usage of the headset along with some important
health and safety notes. Please read and observe all precautions before using the Rift.
For the most up-to-date health and safety information, please check the Oculus VR
website 9.
The following sections provide more information on the bits and pieces that make up the DK
2.
THE HEADSET
The headset, Figure 1.7, is formed of black molded plastic.
9
https://developer.oculusvr.com/?action=doc
©Manning Publications Co. We welcome reader comments about anything in the manuscript - other than typos and
other simple mistakes. These will be cleaned up during production of the book by copyeditors and proofreaders.
https://forums.manning.com/forums/oculus-rift-in-action
10
Figure 1.7 The DK 2 headset: front, side and back views
It has small adjustment wheels on the left and right side that allow you to move the display
closer to or further from your face. There is foam padding on the surfaces intended to rest
against the skin and straps that secure the Rift to your head. In addition to the normal ‘around
the sides’ strap that you might find on any pair of ski goggles, an additional strap goes directly
over the top of your head. This third strap provides additional support for the headset, which
while light, can still be front-heavy enough to cause fatigue during extended use. Perhaps more
importantly, the third strap reduces the need to secure the side straps as tightly, alleviating
another potential source of discomfort and fatigue.
The headset’s display power button is located on the top edge of the headset next to the
power indicator light. The indicator light glows blue when the headset is powered on and
receiving a video signal and orange when the headset is on but not receiving a video signal. (If
©Manning Publications Co. We welcome reader comments about anything in the manuscript - other than typos and
other simple mistakes. These will be cleaned up during production of the book by copyeditors and proofreaders.
https://forums.manning.com/forums/oculus-rift-in-action
11
you are not getting a signal, see the troubleshooting section in the appendix on hardware
setup.)
The headset incorporates
•
a single 1920x1080 display
•
An inertial measurement unit (or IMU) that reports linear and angular acceleration as
well as magnetic field strength and direction
•
several infrared lights. These lights are tracked by the included tracking-camera to
provide user position data.
•
a built-in latency tester.
The display is split between both eyes (each eye can only see one half of the display),
yielding 960 × 1080 per eye as seen in Figure 1.8.
Figure 1.8: The Rift display is split between both eyes.
The display panel itself isn’t particularly remarkable, other than in the sense that any such a
lightweight and high-density display would have been remarkable 10 years ago, and
astonishing 20 years ago. The mobile computing industry has driven at an astonishing pace the
commodification of small high resolution panels, and the recent rounds of competition between
the primary tablet and display manufacturers on the basis of pixels-per-inch will only drive this
trend in a favorable direction.
The head tracking hardware is somewhat more specialized. It’s designed to report both
acceleration and rotational velocity at a rate of 1,000 times per second. Still, while impressive,
this doesn’t represent any sort of quantum leap over the commodity hardware found in most
modern game controllers and mobile devices.
©Manning Publications Co. We welcome reader comments about anything in the manuscript - other than typos and
other simple mistakes. These will be cleaned up during production of the book by copyeditors and proofreaders.
https://forums.manning.com/forums/oculus-rift-in-action
12
THE LENSES
The DK2 model includes two pairs of lenses, termed the “A” and “B” lenses. The “A” lenses are
for those with 20/20 vision and are installed in the headset by default. The “B” lenses (shown
in Figure 1.9) are for those who are very nearsighted.
Figure 1.9: The “B” Lenses
The pairs are identical in terms of how they transmit light. How they differ is that they
place the lens at slightly different distances from the actual display.
Combined with the
headset distance adjustment knobs, this allows the user to vary the distance between the
screen and the lenses, as well as the lenses and the eyes (commonly referred to as ‘eye
relief’), in order to accommodate a wide variety of facial characteristics as well as users who
require prescription glasses.
Note that the DK2 does not allow you to change the distance between the lenses. It is fixed
at 63.5 mm apart. However, this isn’t as much of an issue as one might suspect. The lenses
are designed to present the same image to the user regardless of where exactly the eyes are
located. If you move an image-capturing device (your eye, for instance) off the center axis of
the lens, the image captured does not itself move laterally. As long as they’re within a volume
about 1.5x1.5cm across and 0.5cm deep, barring a small amount of distortion at the edges,
your eyes will perceive the same image from the screen, with the same pixel appearing
‘directly ahead’.
This allows the Rift to support a broad swath of users with varying inter-
pupillary distances. This remarkable property is called collimated light and will be discussed in
detail in Chapter 4.
THE POSITIONAL CAMERA
To track the user’s head position, the DK2 uses a camera (Figure 1.10) to detect infrared lights
located in the headset (hidden behind the front of the headset). You’ll notice that the lens of
the camera is mirrored as it only tracks infrared light.
©Manning Publications Co. We welcome reader comments about anything in the manuscript - other than typos and
other simple mistakes. These will be cleaned up during production of the book by copyeditors and proofreaders.
https://forums.manning.com/forums/oculus-rift-in-action
13
Figure 1.10: DK 2 positional camera
The camera is connected to your computer via USB and to the headset using the included
camera sync cable. The placement of the camera is very important to how well positional
tracking will work. The camera should be placed about 5 feet from the headset and you should
make sure that the camera has an unobstructed view of the headset at all times. The camera
can be placed on your desk or on top of your monitor or as it also includes a standard tripod
attachment, you can attach it to a tripod to give you more options for placement.
As it is very important that nothing block the camera’s view of the headset, you should not
place any stickers or other objects on the headset that could block the lights from detection by
the positional camera.
Let’s now take a look at the original development kit for those who are still using DK1
hardware.
1.3.2
The DK1
The DK1 kit included
•
A headset with an attached control box
•
Three (3) pairs of lenses, referred to as A, B, and C lenses (plus a cloth to clean the
lenses)
•
A USB cable with Male A to Mini B connectors
•
A 5v DC power adapter for US style power with international adapters for various other
countries.
•
DVI and/or HDMI cables 10
Like the DK 2, the kit includes an Oculus Rift Development Kit Instruction Manual that
covers basic usage of the headset along with some important health and safety notes. Please
10
The number and type of cables shipped with the DK1 varied over time
©Manning Publications Co. We welcome reader comments about anything in the manuscript - other than typos and
other simple mistakes. These will be cleaned up during production of the book by copyeditors and proofreaders.
https://forums.manning.com/forums/oculus-rift-in-action
14
read and observe all precautions before using the Rift. For the most up-to-date health
and safety information, please check the Oculus VR website 11.
Let's now take a look at the parts of the DK 1.
THE HEADSET
The DK 1 headset, Figure 1.11, is formed of black molded plastic, has small adjustment wheels
on the left and right side that allow you to move the display closer to or further from your face
and uses foam padding on the surfaces intended to rest against the skin and straps that secure
the Rift to your head. You’ll also note that the DK 1 adjustment buckles on the straps also
include a handy gripper for the wire running between the Rift and the control box.
Figure 1.11 The DK 1 headset: front, side and back views
11
https://developer.oculusvr.com/?action=doc
©Manning Publications Co. We welcome reader comments about anything in the manuscript - other than typos and
other simple mistakes. These will be cleaned up during production of the book by copyeditors and proofreaders.
https://forums.manning.com/forums/oculus-rift-in-action
15
The DK1 headset incorporates a single 1280x800 display at the heart of the device, as well
as motion tracking hardware which reports acceleration, rotation rate, and magnetic field
strength and direction. The display is split between both eyes (each eye can only see one half
of the display), yielding 640 × 800 per eye as seen in Figure 1.12. This resolution does cause
what some people call the “screen door” effect, that is, it looks like you are looking through a
screen door: the grid of individual pixels can become visible to the naked eye, especially when
viewing static content. This should be less of a problem in later versions of the Rift as screen
resolution improves, reducing inter-pixel spacing.
Figure 1.12: The Rift display is split between both eyes.
The headset contains the head tracking hardware that reports both acceleration and
rotational velocity at a rate of 1,000 times per second.
©Manning Publications Co. We welcome reader comments about anything in the manuscript - other than typos and
other simple mistakes. These will be cleaned up during production of the book by copyeditors and proofreaders.
https://forums.manning.com/forums/oculus-rift-in-action
16
THE CONTROL BOX
Figure 1.13 The Control Box: front and back views
In addition to the cable extending to the headset, the control box, Figure 1.13, also has a
DC power connector, a USB mini-B female port, and DVI and HDMI female ports. It has 5
buttons, one for power, and two each for controlling brightness and contrast on the display. It
also has a small blue LED in the center of the Oculus VR logo that glows blue when the Rift
display is active.
THE LENSES
Figure 1.14 The Lenses
©Manning Publications Co. We welcome reader comments about anything in the manuscript - other than typos and
other simple mistakes. These will be cleaned up during production of the book by copyeditors and proofreaders.
https://forums.manning.com/forums/oculus-rift-in-action
17
The DK1 model includes three pairs of lenses, pictured in Figure 1.14.
The pairs are all
identical in terms of how they transmit light. How they differ is that they place the lens at
slightly different distances from the actual LCD display. (You can see this in Figure 1.14 by
comparing their heights; the “C” lenses are visibly shallower than the “A” lenses.) Combined
with the headset distance adjustment knobs, this allows the user to vary the distance between
the screen and the lenses, as well as the lenses and the eyes, in order to accommodate a wide
variety of facial characteristics as well as users who require prescription glasses.
Note that the current model does not allow you to change the distance between the lenses.
It is fixed at 64mm apart. However, this isn’t as much of an issue as one might suspect. The
lenses are designed to present the same image to the user regardless of where exactly the
eyes are located.
If you move an image-capturing device (your eye, for instance) off the
center axis of the lens, the image captured does not itself move laterally. As long as they’re
within a volume about 1.5x1.5cm across and 0.5cm deep, barring a small amount of distortion
at the edges, your eyes will perceive the same image from the screen, with the same pixel
appearing ‘directly ahead’. This allows the Rift to support a broad swath of users with varying
inter-pupillary distances. This remarkable property is called collimated light and will be
discussed in detail in Chapter 4.
1.3.3
The GPU
It’s worth touching on one additional component essential to the operation of the Rift which
isn’t included in either kit: the GPU.
Every modern personal computer today includes a
Graphics Processing Unit with a programmable pipeline. This remarkable piece of technology is
an integral part of what makes the Oculus Rift possible.
1.4
How the Rift Works
Virtual reality is about constructing an experience that simulates a user’s physical presence in
another environment. The Rift accomplishes this by acting both as a specialized input device
and a specialized output device.
As an input device, it uses a combination of several sensors to allow an application to query
for the current orientation and position of the user’s head. This is commonly referred to as the
head pose. This allows an application to change its output in response to the changes in where
the user is looking or where their head is.
Head pose
In VR applications, a head pose is a combination of the orientation and position of the head relative to
some fixed coordinate system.
As an output device, the Rift is a display that creates a deep sense of immersion and
presence by attempting to more closely reproduce the sensation of looking at an environment
as if you were actually there, compared to viewing it on a monitor. It does this by
©Manning Publications Co. We welcome reader comments about anything in the manuscript - other than typos and
other simple mistakes. These will be cleaned up during production of the book by copyeditors and proofreaders.
https://forums.manning.com/forums/oculus-rift-in-action
18
•
Providing a much wider field of view than conventional displays
•
Providing a different image to each eye
•
Blocking out the real environment around you, which would otherwise serve as a
contradiction to the rendered environment.
On the Rift display, we can display frames that have been generated to conform to this wide
field of view and offer a distinct image to each eye.
Frame
Because developing for the Rift involves rendering multiple images, it’s important to have terminology
that makes it clear what image we might be talking about at a given moment. When we use the term
frame, we’re referring to the final image that ends up on a screen. In the case of a Rift application,
these frame images will be composed of two eye images, one each for the left and right eyes. Each
eye image will have been distorted specifically to account for the lens under which it will appear, and
then composited together during the final rendering step before they are displayed on the screen.
These specializations do not happen automatically. You can’t simply replace your monitor
with a Rift and expect to continue to use your computer in the same way. Only applications
that have been specifically written to read the Rift input and customize the output to conform
to the Rift’s display will provide a good experience.
To understand how an application running on the Rift is different, it is important to look at
how it is distinct from non-Rift applications.
CONVENTIONAL APPLICATIONS
All applications have input and output and most graphical applications invoke a loop that
conceptually looks something like Figure 1.15.
©Manning Publications Co. We welcome reader comments about anything in the manuscript - other than typos and
other simple mistakes. These will be cleaned up during production of the book by copyeditors and proofreaders.
https://forums.manning.com/forums/oculus-rift-in-action
19
Figure 1.15: The typical loop for conventional applications
The details can be abstracted in many ways, but for just about any program you can
eventually look at it as an implementation of this loop.
For as long as the application is
running, it responds to any user input, renders a frame and outputs that frame to the display.
RIFT APPLICATIONS
Rift-specific applications embellish this loop, as seen in Figure 1.16.
Figure 1.16: A typical loop for a Rift application
In addition to conventional user input, we have another step which fetches the current head
pose from the Rift.
frame.
This is typically used by the application to change how it renders the
Specifically, if you’re rendering a 3D virtual environment, you want the view of the
scene to change in response to the user’s head movements.
©Manning Publications Co. We welcome reader comments about anything in the manuscript - other than typos and
other simple mistakes. These will be cleaned up during production of the book by copyeditors and proofreaders.
https://forums.manning.com/forums/oculus-rift-in-action
20
In addition to the rendering step, we also need to distort it to account for the effects of the
lenses on the Rift.
Practically speaking, the head pose is really a specialized kind of user input, and the Riftrequired distortion is part of the overall process of rendering a frame, but we’ve called them
out here as separate boxes to emphasize the distinction between Rift and non-Rift applications.
However, as we said, the design of the Rift is such that it shows a different image to each
eye by showing each eye only one half of the display panel on the device. As part of generating
a single frame of output, we render an individual image for each eye and distort that image,
before moving on to the next eye. Then, after both per-eye images have been rendered and
distorted, we send the resulting output frame to the device. 12
Let’s take a closer look at the individual steps.
1.4.1
Using head tracking to change the point of view
The first way the Rift increases immersion is via head tracking, eliminating part of the
necessary mental translation when interacting with a computer generated environment. If you
want to see what’s to your left, you no longer have to go through the process of calculating
how far to move your mouse, or how long to hold the joystick. You simply look to your left.
This is as much an instance of Natural User Interface (NUI) as Virtual Reality. NUI is all about
making the interface for interacting with a computer application or environment so seamless as
to essentially be no interface at all. Interacting with a touch-screen surface and dragging a UI
element around by literally dragging it is a form of NUI. Changing your perspective within an
artificial environment by moving your head is another.
The Rift enables this kind of interaction by integrating sensor hardware that detects spatial
acceleration on 3 axes and rotation rate on 3 axes. The 3 rotation axes and 3 acceleration
axes add up to six degrees of freedom, commonly abbreviated as 6DOF 13.
This kind of
hardware is probably already familiar to users of mobile computing devices such as
smartphones and tablets, which now almost universally include such sensors.
It’s also
commonly found in some game console hardware, such as controllers for Nintendo’s and Sony’s
lines of consoles. Most commodity hardware of this kind is intended to be wielded by hand and
doesn’t have stringent latency requirements, unlike what’s desirable for VR. As such, the Rift
tracking hardware is a step above what’s typically found elsewhere, both in terms of reporting
resolution and accuracy.
However, even with their high quality, these sensors alone are
insufficiently accurate to track relative changes in position over time periods of more than a
second, so the DK1 kit is limited to tracking only the orientation of a user’s head.
In the second version of the Rift development kit (DK2), this limitation has been overcome
by adding an infrared camera (separate from the Rift itself) as part of the kit. In combination
12
In the early versions of the SDK, distortion and rendering of the final output to the Rift display device had to be done by
applications. Since 0.3.x, the distortion and rendering to the device are typically handled inside the SDK, though you can
override this behavior.
13
Note that this is a slightly different usage of the term 6DOF than when it is used to describe a system that tracks both
position and orientation, since here we’re tracking acceleration and angular acceleration, each on 3 axes.
©Manning Publications Co. We welcome reader comments about anything in the manuscript - other than typos and
other simple mistakes. These will be cleaned up during production of the book by copyeditors and proofreaders.
https://forums.manning.com/forums/oculus-rift-in-action
21
with an array of infrared lights built into the headset itself, this allows the position of the Rift to
be tracked, as long as it is within view of the camera.
Beyond the hardware, the Oculus SDK includes support for taking the raw messages from
the hardware and coalescing them into a single head pose.
The end result is that as you render each frame in your application, you’re able fetch the
pose of user and then use that input during the rendering process to ensure the viewpoint that
appears inside the Rift corresponds with the direction the user position in 3D space and the
direction in which they are looking (boxes 1, 2, and 3 in Figure 1.17).
Figure 1.17: Render process for each frame: from head movement to new image on the headset
Let’s now look at rendering for the Rift.
1.4.2
Rendering an immersive view
The second way the Rift increases immersion is rendering a more immersive view by accurately
mimicking the way actual vision works with a wide field of view and different images presented
to each eye.
HOW THE RIFT ACHIEVES ITS FIELD OF VIEW
The Rift hardware offers a much wider field of view than a typical monitor (see Figure 1.18).
Even a 30-inch monitor will typically only occupy about 50 degrees of your field of view,
depending on how close you sit to it. Ideally the Rift provides a field of view of over 90 degrees
or more vertically and a remarkable 100 degrees or more horizontally. The exact field of view
experienced is dependent on a variety of factors, including how the Rift hardware is configured
and the physical characteristics of the wearer.
©Manning Publications Co. We welcome reader comments about anything in the manuscript - other than typos and
other simple mistakes. These will be cleaned up during production of the book by copyeditors and proofreaders.
https://forums.manning.com/forums/oculus-rift-in-action
22
Figure 1.18: Comparison of the field of view of a typical monitor with that of the Rift
The Rift achieves this high field of view through the placement of the display and the use of
special lenses. Inside the Rift is a small high-resolution LCD display, and wearing the device
places the display directly in front of you at a distance of about 4 centimeters, as seen in Figure
1.19. This alone makes the panel occupy a substantial field of view, but is far too close to allow
a user to easily bring it into focus.
©Manning Publications Co. We welcome reader comments about anything in the manuscript - other than typos and
other simple mistakes. These will be cleaned up during production of the book by copyeditors and proofreaders.
https://forums.manning.com/forums/oculus-rift-in-action
23
Figure 1.19 Panel and lens position. The resolution listed is for the DK2.
Between your eyes and the display panel are lenses designed to distort light in such a way
as to both make the apparent focal depth infinitely far away (resolving the focus issue) and to
make the panel appear much wider than it is, further increasing the field of view (Figure 1.20).
Figure 1.20: The lenses distort light in such a way as to make the panel appear much wider than it is
The lenses are also designed to present roughly the same image to the user even if your
point of view is off the axis of the lens. The effect is similar to a magnifying glass, but with a
few important differences.
©Manning Publications Co. We welcome reader comments about anything in the manuscript - other than typos and
other simple mistakes. These will be cleaned up during production of the book by copyeditors and proofreaders.
https://forums.manning.com/forums/oculus-rift-in-action
24
MAXIMIZING THE RIFT’S FIELD OF VIEW
To understand how to maximize the Rift’s field of view, you need to look at how the brain
interprets the images perceived by the eyes. Each eye covers its own field of view, with the
left eye showing more of the world to your left, and the right showing more to your right, with
a large amount of crossover at the center, as shown in Figure 1.21.
Figure 1.21: Left and right field of view
Your brain takes the two images and fuses them into a single panoramic view. This invokes
a sense of depth. Even though actual depth information (parallax) is only really available for
items in the crossover area (see Figure 1.22), the overall sense of depth ends up being greater
than the sum of the parts. Your brain will also take into account other cues such as lighting,
the size of familiar objects and small object movements relative to one another when the point
of view changes, such as when you move your head.
©Manning Publications Co. We welcome reader comments about anything in the manuscript - other than typos and
other simple mistakes. These will be cleaned up during production of the book by copyeditors and proofreaders.
https://forums.manning.com/forums/oculus-rift-in-action
25
Figure 1.22: Left and right images are fused by your brain to create a single image
To maximize the field of view in the Rift, the images presented to each eye need to mimic
real vision in that more data is presented on the left of the image for the left eye and more
data is presented on the right for the right eye.
RENDERING FOR THE RIFT
To render images properly for the Rift means you need to take into account the LCD display,
how vision works with separate images for each eye, and the lenses used.
The lenses in the Rift distort the image on the screen (as all lenses do), introducing a
fisheye lens effect.
That means that images shown on the screen inside the Rift must be
adjusted before they appear, inverting that distortion.
That way, when viewed through the
lens, the image distortion and the lens distortion will cancel out and the resulting picture will
look crisp and clear.
As you can see in Figure 1.23, a grid of lines, if simply viewed through the Rift as is, would
appear distorted inwards by the lenses; as though drawn towards the center. This type of
distortion is a called a "pincushion" distortion.
©Manning Publications Co. We welcome reader comments about anything in the manuscript - other than typos and
other simple mistakes. These will be cleaned up during production of the book by copyeditors and proofreaders.
https://forums.manning.com/forums/oculus-rift-in-action
26
Figure 1.23: A grid of lines as they would appear on the screen and through the Rift lenses
To counter the pincushion effect, software needs to apply the inverse (“barrel”) distortion to
the source image before sending it to the Rift, as seen in Figure 1.24. Now the image appears
as intended in the Rift.
Figure 1.24: The source image, the same image after an inverse distortion has been applied, and then the
distorted image as seen through the Rift.
We will cover distortion in more detail in Chapter 4.
Now that we know there are two images presenting different data to each eye, and that the
images are distorted, let’s take a look at a screenshot from a Rift demo to see what that looks
like when viewed on a traditional monitor (Figure 1.25). This two-oval view is what often what
you will see when shown a VR application screenshot and one we will be using in many of the
example pictures in this book.
©Manning Publications Co. We welcome reader comments about anything in the manuscript - other than typos and
other simple mistakes. These will be cleaned up during production of the book by copyeditors and proofreaders.
https://forums.manning.com/forums/oculus-rift-in-action
27
Figure 1.25: A screenshot of the Oculus Tuscany demo as seen on a conventional monitor
Now that you understand how the Rift works, time to get started developing for it.
1.5
Setting up the Rift for development
Getting the Rift setup for use is pretty well documented in the Oculus Rift Development Kit
Instruction Manual that comes with the kit and if you follow those instructions, you should be
able to get the Rift up and running. However, if you run into issues, or would like to spend
some time optimizing your setup for development, please see the appendix on hardware setup.
One of the hazards of developing for the Rift is that using it can sometimes trigger
symptoms of motion sickness. If you are going to be working with the Rift, it is a good idea to
know how to deal with motion sickness to keep it from becoming a serious issue for you.
1.6
Dealing with motion sickness
Motion sickness is generally caused by conflicting sensory signals going to the brain, such as a
mismatch between the visual appearance of velocity and the inner ear’s sensation of motion. It
has been well known for some time that first person games alone or 3D vision alone can trigger
motion sickness in some people.
The Rift provides an incredibly immersive experience.
Unfortunately, one of the downsides to such impressive immersion is that even if you are the
©Manning Publications Co. We welcome reader comments about anything in the manuscript - other than typos and
other simple mistakes. These will be cleaned up during production of the book by copyeditors and proofreaders.
https://forums.manning.com/forums/oculus-rift-in-action
28
type of person who never gets motion sickness in real life, you still might get motion sickness
from using a Rift.
Even when following all precautions, you may still feel motion sickness. Here are some
strategies to use when you first start working with the Rift that can help with motion sickness:
•
Do not try to power through it. If you experience nausea or other symptoms of
motion sickness, stop and take a break right away. We cannot stress enough how
important this is. Trying to force yourself to continue will typically just make things
worse and can even lead to an aversion to using the Rift at all.
•
Learn to recognize it quickly. The first symptom of motion sickness is not always
nausea. For some people, the first symptom can be headache, flashes of vertigo or
breaking into a cold sweat. The quicker you recognize the issue, the quicker you can
take corrective action. Often, waiting until you actually feel nausea will make it harder
to recover.
•
Make sure the Rift has been adjusted to fit correctly on your head. Be sure to:
o
Use the right lenses for your vision
o
Set the distance between the lenses and your face—close, but not too close
o
Adjust the straps to ensure a perfect headset fit
You can find more information in the appendix on hardware setup.
•
Create a user profile for yourself.
The Rift takes into account certain physical
characteristics of the user, such as height and the distance between the eyes, when
rendering content. You can use the OculusConfigTool to create a profile for yourself (see
the appendix on hardware setup).
•
Start slowly - get your “VR legs.” Give yourself time to get used to using the Rift.
Just like sailors need to get their sea legs, you'll want to get your VR legs. One way to
ease into the VR waters is to start by familiarizing yourself with games or demos you
want to play on your monitor, before using the Rift. Then play on the Rift only in short
increments. Give yourself a few days of playing this way before spending extended time
using the Rift.
•
Use the Rift sitting down. Don't try standing or walking while wearing the Rift. The
extra movement from standing or walking can trigger motion sickness and as the Rift
blocks out the real world, there is the added danger of tripping and falling.
•
Turn the brightness level down (DK1 only). For many people turning the brightness
levels down helps. The brightness and contrast of the headset can be adjusted using the
buttons on the top of the control box. Looking from the back of the control box, the two
buttons on the left control the contrast and the next two control the brightness.
•
Take regular breaks. Even after you feel like a pro in virtual environments, you should
still take breaks to let your mind and your eyes rest. Every so often be sure to stop,
stretch, take a walk and get some fresh air. (This is good advice for life in general,
actually.)
©Manning Publications Co. We welcome reader comments about anything in the manuscript - other than typos and
other simple mistakes. These will be cleaned up during production of the book by copyeditors and proofreaders.
https://forums.manning.com/forums/oculus-rift-in-action
29
•
Work in a quiet environment. Ambient noise can interfere with how your brain
perceives the images on screen and can trigger motion sickness in some people.
Spatialized sounds that disagree with your virtual environment send conflicting
messages that your mind will struggle to contextualize.
Try working in a quiet
environment or wearing noise-canceling headphones to remove ambient noise.
•
Watch what you eat before strapping on the Rift. This is common sense. Just as
you wouldn't binge on sushi, donuts, beef jerky, and cherry Gatorade right before riding
in the back of a speeding minivan going down the Pacific Coast Highway 14, you should
watch what you eat right before using the Rift.
•
Take time to recover! The disorientation effects of using the Rift can last for some
time after taking off the headset. For your safety and the safety of others, you should
not operate any machinery or drive a car, etc., if you have just used a VR headset.
There are strategies for mitigating motion sickness from within your application (see
Chapter 10) and well-designed applications may not cause motion sickness for you. However,
as you develop, you may find that one of the "bugs" in your software is that it causes motion
sickness. It may take many testing iterations before you can fix the problem. In addition, some
of the causes of motion sickness are inherent to the Rift itself and while Oculus has announced
improvements (lower latency devices, higher resolution screens) that should help in future
versions of the Rift, you still need to work with the version you have.
You don't need to suffer for your art. If you experience nausea or other motion sickness
symptoms and resting isn't enough, here are some additional remedies you can try:
•
Eat ginger. Ginger has long been used as a motion sickness remedy. You can eat it in
any form - candied ginger, ginger-snap cookies, ginger tea, ginger ale - just make sure
that it contains real ginger and not just ginger flavoring. If you don't like how ginger
tastes, powdered ginger is available in pill form and can be found on the vitamin aisle of
most major drug stores.
•
Eat saltines or other dry crackers. Nibbling on dry crackers may also help.
•
Acupressure. Acupressure uses pressure or other stimulation on specific points of the
body to treat ailments. Practitioners of acupressure believe stimulation of the p6
acupressure point, located about two finger-widths from the crease on the underside of
the wrist may help symptoms of motion sickness. You can try applying pressure to this
point yourself or you can use one of the several brands of acupressure bands available.
•
Medication. If you are having persistent issues with motion sickness, there are
prescription and nonprescription medicines that may prevent and treat symptoms. Talk
to your doctor to learn more.
Using and developing for the Rift should be fun and we hope these tips help keep any
motion sickness issues you might have to a minimum.
14
Or maybe this is just what you refer to as ‘Fridays’. We’re not here to judge.
©Manning Publications Co. We welcome reader comments about anything in the manuscript - other than typos and
other simple mistakes. These will be cleaned up during production of the book by copyeditors and proofreaders.
https://forums.manning.com/forums/oculus-rift-in-action
30
1.7
Development Paths
This book covers several different approaches to Rift development.
•
Using the C APIs: If you plan to work directly with the Rift C APIs, head to part 2 and
start with chapter 2. It will introduce you to the C API and get you started writing your
first Rift integrations.
•
Using Java or Python: If you plan to use a language other than C, such as Java or
Python, we recommend reading through part 2 starting with chapter 2 on the using the
C APIs first and then reading chapter 11 to understand how to do the Python and Java
bindings.
•
Using Unity: If you plan to use the popular game engine Unity for your development,
head to part 3 and read chapters 7 and 8. It is possible to interact with the C API from
within Unity, so when you want a better understanding of the C API, you’ll find part 1
interesting reading.
No matter which development path you choose, know that you can develop for the Rift even
if you don’t yet have one yet as the Oculus SDK and Unity can be used without a headset. For
more information see the appendix on hardware setup.
1.8
Summary
In this chapter we covered
•
The Oculus Rift is a virtual reality head-mounted display.
•
Two versions of the Rift have been made available, the DK 1 and the DK 2. Only the DK
2 is currently available for purchase.
•
The Rift is immersive, can be used to create presence, and is inexpensive, both in terms
of supporting it in your applications, and in terms of hardware cost.
•
The Rift is two devices in one: a specialized input device and a specialized output device.
•
As an input device, the Rift uses a combination of several sensors to allow an application
to query for the current orientation and position of the user’s head so thw an application
can change its output in response to the changes in where the user is looking or where
their head is.
•
As an output device, the Rift is a display that creates a deep sense of immersion and
presence by attempting to more closely reproduce the sensation of looking at an
environment as if you were actually there, compared to viewing it on a monitor.
•
Rendering images properly for the Rift means you need to take into account the display,
how vision works with separate images for each eye, and the lenses used.
•
The lenses in the Rift distort the image on the screen (as all lenses do), introducing a
fisheye lens effect. That means that images shown on the screen inside the Rift must be
adjusted before they appear.
•
Only applications that have been specifically written to read the Rift input and to
©Manning Publications Co. We welcome reader comments about anything in the manuscript - other than typos and
other simple mistakes. These will be cleaned up during production of the book by copyeditors and proofreaders.
https://forums.manning.com/forums/oculus-rift-in-action
31
customize the output to conform to the Rift’s display will provide a good experience.
•
Using the Rift may cause motion sickness. There are some simple tips that can be used
to manage any symptoms of motions sickness you might feel when using the Rift.
•
When using the Rift, be sure to use the right lenses for your vision, set the distance
between the lenses and your face, and adjust the straps to ensure a perfect headset fit.
To maximize comfort, be sure to create a user profile using the Oculus Configuration
Tool.
•
You can develop for the Rift even if you don’t yet have one as the SDK can be used
without a headset. Another option for development without a Rift is to use Unity 4.6 with
the Oculus Integration package.
©Manning Publications Co. We welcome reader comments about anything in the manuscript - other than typos and
other simple mistakes. These will be cleaned up during production of the book by copyeditors and proofreaders.
https://forums.manning.com/forums/oculus-rift-in-action