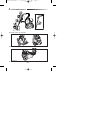
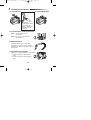
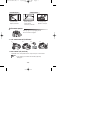
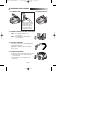
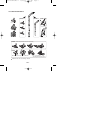
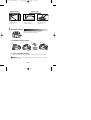
1
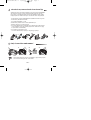
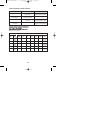
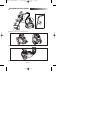
DJ68-00341Y(TR)-1
12/11/09 1:29 AM
Page 1
Kullaným
Kýlavuzu
Kullaným
Kýlavuzu
TR
SC 4130
SC 4137
SC 4170
SC 41A7
SC 41A9
ELEKTRÝKLÝ SÜPÜRGE
❈ Bu cihazý çalýþtýrmadan önce lütfen talimatlarý dikkatlice okuyun.
❈ Sadece iç kullaným içindir.
DJ68-00341Y REV(0.7)
Ürününüzü www.samsung.com/global/register adresini kullanarak kaydedin.
DJ68-00341Y(TR)-1
12/11/09 1:29 AM
Page 2
ÖNEMLÝ GÜVENLÝK UYARILARI
1. Tüm talimatlarý dikkatlice okuyun. Cihazý çalýþtýrmadan önce, elektrik
kaynaðýnýzdaki voltaj deðerinin, süpürgenin arkasýndaki plakada
belirtilen deðer ile ayný olduðundan emin olun.
2. DÝKKAT:
Halý ya da zemin ýslakken elektrikli süpürgeyi kullanmayýn.
Elektrikli süpürgeyi su çekmek için kullanmayýn.
3. Bu cihaz çocuklar ya da kullanýmýný bilmeyen kiþiler tarafýndan
kullanýlmamalýdýr. Bu kiþilerin, ancak sorumlu bir kiþi tarafýndan
bilgilendirildikten ve cihazýn güvenli þekilde kullanýlacaðýndan emin olunduktan
sonra cihazý kullanmasýna izin verilebilir. Küçük çocuklarýn cihazla oynamasý
tehlikeli olabileceðinden engellenmelidir.
4. Elektrikli süpürgeyi bir toz torbasý olmaksýzýn kullanmayýn. Etkili kullanýma
devam etmek için toz torbasý tamamen dolmadan önce onu deðiþtirin.
5. Elektrikli süpürgeyi kibrit, sönmemiþ kül veya sigara izmaritlerini çekmek için
kullanmayýn. Elektrikli süpürgeyi fýrýn ya da diðer ýsý kaynaklarýndan uzak tutun.
Isý ünitenin plastik aksamýný bozarak zarar verebilir.
6. Sert ve keskin objeleri elektrikli süpürge ile çekmekten sakýnýn. Bunlar süpürgenin
aksamýna zarar verebilir. Hortumu monte edilmiþ þekilde býrakmayýn.
Hortumun üzerine aðýrlýk koymayýn. Emme aksamýný bloke etmeyin.
7. Fiþi prizden çekmeden önce elektrikli süpürgeyi düðmesine basarak kapatýn.
Fiþi prizden çýkartmak için kablodan tutarak çekmeyin.
Filtre ile ilgilenmeden önce cihazýn fiþten çekilmiþ olduðuna emin olun.
8. Cihazý temizlemeden ya da bakýmýný yapmadan önce fiþi prizden çýkartarak
gücü kesmeniz gerekmektedir.
9. Uzatma kablosu kullanýmý tavsiye edilmemektedir.
10. Eðer, elektrikli süpürgeniz doðru þekilde çalýþmýyorsa, güç kaynaðýný kapatýn
ve yetkili bir servise danýþýn.
11. Eðer süpürgenin kablosu hasar gördü ise, zarar görmemek için üretici ya da
yetkili servisi veya eþ deðer nitelikte bir servis elemaný tarafýndan deðiþtirilmelidir.
12. Elektrikli süpürgede kendi kendine sýfýrlanan termik kesme sistemi vardýr.
Bu sayede cihaz aþýrý ýsýndýðýnda otomatik olarak kapanýr. Aþýrý ýsýnmaya filtrenin,
baþlýðýn, boru veya hortumun bir nesne ile engellenmesi yol açabilir. Buna yol açan
nesne çýkartýlýp, motor soðuduktan sonra süpürge otomatik olarak çalýþacaktýr.
TR-2
DJ68-00341Y(TR)-1
12/11/09 1:29 AM
Page 3
1 SÜPÜRGENÝN MONTAJI
OPSÝYON
OPSÝYON
OPSÝYON
▲
Özellikler modele göre deðiþebilir.
▲
Ürünü kullanmadýðýnýz zamanlarda yer baþlýðýný gövdeye takýn.
▲
Araç Bölmesi
TR-3
DJ68-00341Y(TR)-1
2
12/11/09 1:29 AM
Page 4
SÜPÜRGENÝZÝN ÇALIÞTIRILMASI
2-1 GÜÇ KABLOSU
2-2 AÇMA/KAPAMA
AÇMA/KAPAMADÜÐMESÝ
DÜÐMESÝ
NOT :
Fiþi prizden
çýkartacaðýnýz zaman,
fiþten kavrayarak
çekmeye dikkat edin.
Kablodan tutarak
çekmeyin.
2-3 GÜÇ KONTROLÜ (SADECE HACÝM TÝPÝ
MIN = Hassas dokumalar için,
örn. perdeler.
MAK = Sert zemin ve sýk dokumalý
aðýr halýlar için.
2-4 EMME KONTROLÜ
Kumaþlar, küçük hlilar ve diðer hafif
dokumalarý temizlerken emme gücünü
azaltmak için, hava çýkýþýný delik açýlana
dek kaydýrýn.
2-5 ÜFLEYÝCÝNÝN KULLANILMASI
Süpürgenin sol arka tarafýnda yer almaktadýr.
1) Hortumu süpürgenin gövdesinden
ayýrýn.
2) Hortum kelepçesini üfleme deliðine
takýn.
TR-4
MIN
MAX
DJ68-00341Y(TR)-1
12/11/09 1:29 AM
Page 5
2-6 ZEMÝN ARAÇLARININ KULLANIMI
OPSÝYON
OPSÝYON
OPSÝYON
Zemin Baþlýðý
Toz Alma
Köþe Aparatý
OPSÝYON Kolay temizlik için þeffaf kasnak kapaðýný çýkartýn.
OPSÝYON
Battaniye Fýrçasý Yatak Örtüsü veya Battaniye
▲
Özellikler modele göre deðiþebilir.
TR-5
Fýrçaya dolanan hayvan kýllarý, iplik,
lifleri makas ile keserek temizleyebilirsiniz
DJ68-00341Y(TR)-1
12/11/09 1:29 AM
KÖÞE APARATI
TOZ ALMA FIRÇASI
- Toz alma fýrçasý;
mobilyalar, raflar,
kitaplar için idealdir.
Page 6
- Köþe aparatý; kalorifer,
yarýklar, köþeler ve
minder aralarýný
temizlemek için idealdir.
- Etkin kullaným için
Yer Baþlýðýný Köþe
Aparatý ile temizleyin.
3GÖSTERGE IÞIKLARI
Gösterge ýþýðýnýn rengi deðiþtiði zaman
lütfen toz torbasýný deðiþtirin.
3-1 TOZ TORBASININ DEÐÝÞTÝRÝLMESÝ
1
2
3
4
3-2 BEZ TORBA ÝÇÝN (OPSÝYON)
Kullandýktan sonra, kumaþ torba doldu ise, orbayý temizleyin ve tekrar kullanýn.
DÝKKAT : Lütfen süpürgeyi toz torbasý takýlý olmadan çalýþtýrmaya
kalkýþmayýn.
TR-6
DJ68-00341Y(TR)-1
4
12/11/09 1:29 AM
Page 7
SÝKLONÝK FÝLTRE (SADECE SÝKLONÝK FÝLTRE TÝPLERÝ ÝÇÝN)
Siklonik Filtre sistemi sayesinde toz torbalarýný uzun süre boyunca kullanabildiðiniz
gibi cihazýnýzýn temizleme verimi de maksimumda kalmaya devam edecektir.
Emilen hava ve tozlar Siklonik Filtrede dönerken filtre tarafýndan süzülen tozlarýn
büyük parçalarý Toz Varilinde kalýr. Böylece toz torbasýna sadece küçük parçalar
Toz Varili gösterge çizgisine kadar dolduðunda, boþaltýlarak temizlenmesi gerekir.
Toz Varili su ile yýkanarak temizlenebilir.
1.Toz Varilini sola döndürün ve çekin.
2.Siklonik Filtreyi uzatma borusu ve tutma aparatýndan ayýrýn.
3.Dolanmýþ, iplik, lif, saç ve kýllarý temizleyin.
4.Toz Varili ve Siklonik Filtreyi temizledikten sonra, Siklonik Filtreyi uzatma borusu
ve tutma aparatýna monte edin (yýkanan parçalar monte edilmeden önce gölge
bir yerde tamamen kurutulmalýdýr).
5.Toz Varilini itin ve saða doðru çevirin.
Toz Varili ve Siklonik Filtreye ayrýlmýþ her bir göstergeyi ayarlayýn.
SÝKLONÝK FÝLTRE
KÖÞE
APARATI
TOZ
VARÝLÝ
5 GÝRÝÞ FÝLTRESÝNÝN TEMÝZLENMESÝ
1
NOT :
2
3
4
Filtrenin týkanmasýna izin vermeyin. Aksi takdirde bu, güçte azalmaya ya da
motor ünitesinin hasar görmesine neden olabilir.
TR-7
DJ68-00341Y(TR)-1
12/11/09 1:29 AM
Page 8
- EÐER BIR SORUNLA KARÞILAÞIRSANIZ
PROBLEM
SEBEP
Motor çalýþmýyor.
Emme gücü kademeli
olarak azalýyor.
ÇÖZÜM
Güç kaynaðý yok.
Termik kesinti.
Kabloyu, fiþi, prizi kontrol edin.
Cihazýn soðumasýný bekleyin.
Hortum baþý, emme hortumu
Týkayan nesneyi çýkartýn.
ya da boru týkanmýþ.
Kablonun kývrýlýp kývrýlmadýðýný,
Kablo tamamen sarýlamýyor. düzensiz dolanýp dolanmadýðýný
kontrol edin.
Elektrikli süpürge kiri
Hortumda çatlak veya delik.
çekemiyor.
Kabloyu 2-3m dýþarý çekin ve
kablo sarma düðmesine basýn.
Hortumu kontrol edin,
gerekirse yenisiyle deðiþtirin.
Kullanım ömrü 10 yıldır.
Teknik Özellikler
MODEL Boyutlari
NO
(E*B*Y)
SC4130
SC4137
SC4170
SC41A7
SC41A9
275x365
x230
275x365
x230
275x365
x230
275x365
x230
275x365
x230
Net Maximum Nominal
ag˘irlik
güç
güç
Emis¸
gücü
Toz
hacmi
Siklon
Filtre
3.8kg
1600W
1400W
320W
3It
Hayır
3.8kg
1600W
1400W
320W
3It
Hayır
3.8kg
1800W
1600W
350W
3It
Hayır
3.8kg
2000W
1700W
370W
3It
Hayır
3.8kg
2000W
1700W
370W
3It
Hayır
TR-8
Boru
Tipi
Celik
Teleskobik
Celik
Teleskobik
Celik
Teleskobik
Celik
Teleskobik
Celik
Teleskobik
DJ68-00341Y(EN)-2
12/11/09 1:35 AM
EN
Page 1
Operating Instructions
SC 4130
SC 4137
SC 4170
SC 41A7
SC 41A9
VACUUM CLEANER
❈ Before operating this unit, please read the instructions carefully.
❈ For indoor use only.
Register your product at www.samsung.com/register
DJ68-00341Y(EN)-2
12/11/09 1:35 AM
Page 2
IMPORTANT SAFEGUARDS
1. Read all instructions carefully. Before switching on, make sure that the voltage
of your electricity supply is the same as that indicated on the rating plate on
the bottom of the cleaner.
2. WARNING: Do not use the vacuum cleaner when rug or floor is wet.
Do not use to suck up water.
3. This appliance is not intended for use by persons (including children) with
reduced physical, sensory or mental capabilities, or lack of experience and
knowledge, unless they have been given supervision or instruction concerning
use of the appliance by a person responsible for their safety.
Children should be supervised to ensure that they do not play with the
appliance.
4. Do not use the vacuum cleaner without a dust bag. Replace the dust bag
before it is full in order to maintain the best efficiency.
5. Do not use the vacuum cleaner to pick up matches, live ashes or cigarette
butts. Keep the vacuum cleaner away from stoves and other heat sources.
Heat can deform and discolour the plastic parts of the unit.
6. Avoid picking up hard, sharp objects with the vacuum cleaner as they may
damage the cleaner parts. Do not stand on the hose assembly. Do not put a
weight on the hose. Do not block the suction or the exhaustion part.
7. Switch the vacuum cleaner off at the machine before unplugging from the
electrical outlet. Do not pull on the cord to disconnect the plug from the
electrical outlet. Ensure that it is disconnected before attending to the filter.
8. The plug must be removed from the socket out-let before cleaning or
maintaining the appliance.
9. The use of an extension cord is not recommended.
10. If your vacuum cleaner is not operating correctly, switch off the power supply
and consult an authorized service agent.
11. If the supply cord is damaged, it must be replaced by the manufacturer or its
service agent or a similarly qualified person in order to avoid a hazard.
12. The vacuum cleaner is provided with a self-resetting thermal cut-out which
automatically shuts off on over-heating. Overheating can be caused by
blockage in the filter, nozzle, tube or hose. After removing the cause and
allowing the motor to cool, the vacuum cleaner will automatically restart.
EN-1
DJ68-00341Y(EN)-2
12/11/09 1:35 AM
Page 3
1 ASSEMBLING THE CLEANER
OPTION
OPTION
OPTION
▲
Features may vary according to model.
▲
For storage, park the floor nozzle.
▲
Tool storage
EN-2
DJ68-00341Y(EN)-2
12/11/09 1:35 AM
Page 4
2 OPERATING YOUR CLEANER
2-1 POWER CORD
2-2 ON/OFF SWITCH
NOTE :
When removing the
plug from the socket,
please take care to
grasp the plug, not
the cord in order to
avoid undue stress.
2-3 POWER CONTROL(VOLUME TYPE ONLY)
MIN = For delicate fabrics, e.g.
net curtains.
MAX = For hard floors and heavily
soiled carpets.
2-4 SUCTION CONTROL
To reduce suction for cleaning draperies,
small rugs and other
light fabrics, slide the air vent until the
hole is open.
2-5 USING THE BLOWER
Located on the left rear side of the cleaner.
1) Disconnect the hose from the body
of the cleaner.
2) Connect the hose clamper to the
blow hole.
EN-3
MIN
MAX
DJ68-00341Y(EN)-2
12/11/09 1:35 AM
Page 5
2-6 USING FLOOR TOOLS
OPTION
OPTION
OPTION
Floor Nozzle
Dusting
Crevice
OPTION Detach transparent drum cover for easy cleaning.
OPTION
Blanket brush Bedclothes or Blanket
▲
Features may vary according to model.
EN-4
Cut off pet hairs or threads
surrounding brush by using scissors.
DJ68-00341Y(EN)-2
12/11/09 1:35 AM
DUSTING BRUSH
- Dusting brush for
furniture. shelves,
books, etc.
Page 6
CREVICE TOOL
- Crevice tool for radiators,
crevices, corners,
between cushions.
- For efficiency. clean
Floor Nozzle with
Crevice Tool.
3 INDICATOR LIGHTS
When the indicator color has changed
Please replace the dust bag.
3-1 CHANGING THE DUST BAG
1
2
3
4
3-2 FOR CLOTH BAG (OPTION)
After using, if the cloth bag is full of dust, clean the cloth bag and use it again.
WARNING : Please do not attempt to operate the cleaner without a dust bag
fitted.
EN-5
DJ68-00341Y(EN)-2
12/11/09 1:35 AM
Page 7
4 CYCLONIC FILTER(ONLY CYCLONIC FILTER TYPES)
You can use a dust bag in your cleaner for a long time thanks to the Cyclonic Filter
system and it maintain the maximum cleaning efficiency.
The larger particle of dust filtered from Cyclonic Filter remain in Dust Barrel when
suctioned air and dust revolves in the Cyclonic Filter. So the dust bag contains only
smaller ones.
When the Dust Barrel is filled with dust up to the indicating line, it needs disposing and
cleaning. Dust Barrel can be cleaned in water.
1.Turn the Dust Barrel to the left and pull it.
2.Disconnect the Cyclonic Filter from extension wand and handle.
3.Remove thread and hair tangled around the net.
4.After cleaning the Dust Barrel and Cyclonic Filter,connect the Cyclonic Filter with
extension wand and handle(washed part should be dried in the shade throughly
before assembling).
5.Push and turn the Dust Barrel to the right.
Adjust indicating marks each other carved on Dust Barrel and Cyclonic Filter.
CYCLONIC
FILTER
CREVICE
TOOL
DUST
BARREL
5 CLEANING THE INLET FILTER(OPTION)
1
2
3
4
NOTE : Do not allow the filter to become clogged as this may cause power reduction
or may damage the motor.
EN-6
DJ68-00341Y(EN)-2
12/11/09 1:35 AM
Page 8
- IF YOU HAVE A PROBLEM
PROBLEM
CAUSE
REMEDY
Motor does not start.
No power supply.
Thermal cut-out.
Check cable, plug and
socket.Leave to cool.
Suction force is gradually
decreasing.
Nozzle, suction hose or
tube is blocked.
Remove the object.
Cord does not rewind fully.
Check that the cord is not
twisted or wound unevenly.
Pull the cord out 2-3m and push
down the cord rewind button.
Vacuum cleaner does not
pick up dirt.
Crack or hole in hose.
Check hose and replace if
required.
This Vacuum cleaner is approved the following.
EMC Directive : 2004/108/EEC
Low Voltage Safety Directive : 2006/95/EC