1
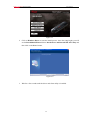
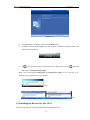
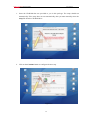
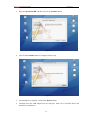
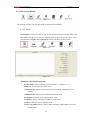
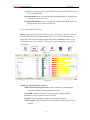
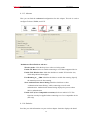
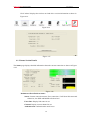
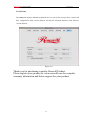
Wireless N Adapter RNX-N250UB User Manual Wireless N Adapter RNX-N250UB User Manual FCC STATEMENT This equipment has been tested and found to comply with the limits for a Class B digital device, pursuant to part 15 of the FCC Rules. These limits are designed to pro-vide reasonable protection against harmful interference in a residential installation. This equipment generates, uses and can radiate radio frequency energy and, if not in-stalled and used in accordance with the instructions, may cause harmful interference to radio communications. However, there is no guarantee that interference will not occur in a particular installation. If this equipment does cause harmful interference to radio or television reception, which can be determined by turning the equipment off and on, the user is encouraged to try to correct the interference by one or more of the following measures: • Reorient or relocate the receiving antenna. • Increase the separation between the equipment and receiver. • Connect the equipment into an outlet on a circuit different from that to which the receiver is connected. • Consult the dealer or an experienced radio/ TV technician for help. This device complies with part 15 of the FCC Rules. Operation is subject to the following two conditions: 1) This device may not cause harmful interference. 2) This device must accept any interference received, including interference that may cause undesired operation. Any changes or modifications not expressly approved by the party responsible for compliance could void the user’s authority to operate the equipment. FCC RF Radiation Exposure Statement This equipment complies with FCC RF radiation exposure limits set forth for an uncontrolled environment. This device and its antenna must not be co-located or operating in conjunction with any other antenna or transmitter. “To comply with FCC RF exposure compliance requirements, this grant is applicable to only Mobile Configurations. The antennas used for this transmitter must be installed to provide a separation distance of at least 20 cm from all persons and must not be co-located or operating in conjunction with any other antenna or transmitter.” CE Mark Warning This is a class B product. In a domestic environment, this product may cause radio interference, in which case the user may be required to take adequate measures. National Restrictions 2400.0-2483.5 MHz Country Restriction Bulgaria France Reason/remark General authorization required for outdoor use and public service Outdoor use limited to 10 mW e.i.r.p. Military Radiolocation use. Refarming of the 2.4 GHz band has been within the band 2454-2483.5 MHz ongoing in recent years to allow current relaxed regulation. Full implementation planned 2012 Italy If used outside of own premises, general authorization is required 2 Wireless N Adapter RNX-N250UB Luxembourg User Manual General authorization required for network and service supply(not for spectrum) Norway Implemented This subsection does not apply for the geographical area within a radius of 20 km from the centre of Ny-Ålesund Russian Only for indoor applications Federation Note: Please don’t use the product outdoors in France. 3 Wireless N Adapter RNX-N250UB User Manual Before We Begin Thank you for purchasing this product, we would like to use this manual to help you know more about your RNX-N250UB. COPYRIGHT & TRADEMARKS Specifications are subject to change without notice. is a registered trademark of ROSEWILL INC. Other brands and product names are trademarks or registered trademarks of their respective holders. No part of the specifications may be reproduced in any form or by any means or used to make any derivative such as translation, transformation, or adaptation without permission from ROSEWILL INC. Copyright © 2009 ROSEWILL INC. All rights reserved. http://www.rosewill.com Special Icons that needs your attention: NOTE: This mark indicates that there is a note of interest or something you need to pay special attention to. WARNING: This mark indicates warning or caution that there might be something can damage your device or property. 4 Wireless N Adapter RNX-N250UB User Manual Table of Content Chapter 1 Introduction..................................................................................................... 6 1.1 Features & Benefits............................................................................................... 7 1.2 Package Contents .................................................................................................. 7 1.3 USB Adapter Description ..................................................................................... 7 1.4 System Requirements............................................................................................ 8 1.5 Specification ......................................................................................................... 8 1.6 Suggested Applications....................................................................................... 10 1.7 Network Configuration ....................................................................................... 10 Chapter 2 Installation Guide.......................................................................................... 12 2.1 Before You Begin ............................................................................................... 12 2.2 Installing the Drivers for XP, Vista, and Win7................................................... 12 2.3 Installing the Drivers for Mac OS X................................................................... 14 2.4 Uninstall the Drivers & Client Utility................................................................. 18 Chapter 3 Connection Guide ......................................................................................... 20 3.1 Connecting with Microsoft Zero Configuration (XP only) ................................ 20 3.2 Connecting through Rosewill Utility .................................................................. 22 3.2.1 Steps to add wireless signal with Rosewill Utility for one time use........ 23 3.2.2 Steps to add wireless signal into Profile and keep for future record ....... 24 3.3 Connecting with Mac OS.................................................................................... 26 Chapter 4 Utility Detailed Definition Guide ................................................................. 31 4.1 Utility Guide for Windows OS ........................................................................... 31 4.1.1 Tab Section Details .................................................................................. 32 4.1.2 Status Section Details............................................................................... 38 4.2 Utility Guide for Mac OS ................................................................................... 46 4.2.1 Profiles ..................................................................................................... 46 4.2.2 Infrastructure Mode ................................................................................. 47 4.2.3 Ad-hoc Mode ........................................................................................... 49 4.2.4 Authentication and Security..................................................................... 50 4.2.5 Link Status ............................................................................................... 52 4.2.6 Site Survey ............................................................................................... 53 4.2.7 Statistics ................................................................................................... 54 4.2.8 Advanced Configuration .......................................................................... 55 4.2.9 WPS ......................................................................................................... 55 4.2.10 About...................................................................................................... 57 Appendix A – Glossary ..................................................................................................... 58 5 Wireless N Adapter RNX-N250UB User Manual Chapter 1 Introduction The high-speed wireless USB 2.0 client adapter is the most convenient way to let you put a desktop/notebook computer almost anywhere without the hassle of running network cables. Now you don’t need to suffer from drilling holes and exposed cables. Once you are connected, you can do anything, just like the wired network. This USB client adapter operates seamlessly in 2.4GHz frequency spectrum supporting the 802.11b, 802.11g, and 802.11n wireless standards. It’s the best way to add wireless capability to your existing wired network or simply surf the web. To protect your wireless connectivity, the high-speed wireless USB 2.0 client adapter can encrypt all wireless transmissions through 64/128-bit WEP, WPA, WPA-PSK and WPA2-AES encryption and authentication allowing you to experience the most secure wireless connectivity available. Rosewill 802.11n USB Adapter (RNX-N250UB) implements N standard which extremely improves wireless signal for your computer than existing wireless 802.11g technology. It supports the 2T2R MIMO architecture with fully forward compatibility with IEEE802.11n. The incredible speed of RNX-N250UB USB adapter makes heavy traffic networking activities more flexible and takes the wireless into practical road. You could enjoy the racing speed of wireless connection, surfing on Internet without string wires. Adding Rosewill RNX-N250UB to your Notebook or Computer, it provides an excellent performance and cost-effective solution for doing media-centric activities such as streaming video, gaming, and enhances the QoS (WMM) without any reduction of performance. It extends 3 times network coverage and boosts 6 times transmission throughput than existing 11g product. Advanced power management and low power consumption among 11n products. For more security-sensitive application, RNX-N250UB supports Hardware-based IEEE 802.11i encryption/decryption engine, including 64-bit/128-bit WEP, TKIP, and AES. Also, it supports Wi-Fi alliance WPA and WPA2 encryption and is Cisco CCX V1.0, V2.0 and V3.0 compliant. 6 Wireless N Adapter RNX-N250UB User Manual 1.1 Features & Benefits Features Benefits Racing Speed up to 300Mbps data rate Enjoy the Internet connection in crazy-fast speed, (2.4GHz 11N technology) without the bottleneck of stringing wires. Advanced power management WPA/WPA2 (IEEE 802.11i), WPA-PSK, Low power consumption Powerful data security. WPA2-AES, WEP 64/128 Support Support 2Tx * 2Rx Radio With Intelligent Antenna enables WMM (IEEE 802.11e) standard support Wireless Multimedia Enhancements Quality of Service support (QoS) / enhanced power saving for Dynamic Networking USB 2.0/1.1 USB 2.0 interface and compatible with USB 1.1 1.2 Package Contents Open the package carefully, and make sure that none of the items listed below are missing. Do not discard the packing materials, in case of return; the unit must be shipped in its original package. One Wireless LAN USB Adapter One CD-ROM with Drivers and User’s Manual Included One Quick Installation Guide 1.3 USB Adapter Description The USB adapter is a standard USB adapter that fits into any USB interface. PWR and LINK LED Indicator USB Connector 7 Wireless N Adapter RNX-N250UB User Manual WPS button 1.4 System Requirements The following are the minimum system requirements in order to use the USB adapter. PC/AT compatible computer with a USB interface. Windows 2000/XP/Vista/7 (32 and 64 bit) or Mac OS X 10.6 operating system. 30 MB of free disk space for installing the USB adapter driver and utility program. 1.5 Specification Technical Specification Hardware Specification CPU Ralink RT3072 Standard IEEE802.11b, IEEE802.11g, IEEE802.11n (2.0), IEEE802.11e (WMM), I, f and h standards, IEEE802.1x Physical USB 1.1 / 2.0 Interface Operating 5V Voltage LED Status Link Activity & PWR WPS WPS Button Dimension 77.5(L) mm x 21.5(W) mm x 10(H) mm Weight RF Specification Frequency 2.400~2.484 GHz Band Modulation OFDM: BPSK, QPSK, 16-QAM, 64-QAM, DBPSK, DQPSK, CCK Technology Operating 11 for North America, 14 for Japan, 13 for Europe Channels 8 Wireless N Adapter RNX-N250UB User Manual Wireless Operation Mode – Client Settings Wireless Mode – 11b / 11g / 11n Channel Selection (Setting varies by Country) Channel Bandwidth (Auto, 20Mhz, 40Mhz) Transmission Rate: 11g: Best. 54, 48, 36, 24, 18, 12, 11, 9, 6, 5.5, 2, 1 in Mbps Guard Interval 800ns Guard Interval 400ns MCS 20MHz 40MHz 20MHz 40MHz index (Mbps) (Mbps) (Mbps) (Mbps) 0 6.5 13.5 7.2 15 1 13 27 14.4 30 2 19.5 40.5 21.7 45 3 26 54 28.9 60 4 39 81 43.3 90 5 52 108 57.8 120 6 58.5 121.5 65 135 7 65 135 72.2 157.5 8 13 27 14.4 30 9 26 54 28.9 60 10 39 81 43.3 90 11 52 108 57.8 120 12 78 162 86.7 180 13 104 216 115.6 240 14 117 243 130 270 15 130 270 144.4 300 Receive 2.412~2.472G(IEEE802.11b): Optimal -90dBm @ 1Mbps Sensitivity 2.412~2.472G(IEEE802.11g): Optimal -89dBm 2.412~2.472G(IEEE802.11N): Optimal -89dBm Transmit Power 2.412~2.472G(IEEE802.11b): Up to 18dBm 2.412~2.472G(IEEE802.11g): Up to 15dBm 2.412~2.472G(IEEE802.11N): Up to 15dBm Regulation FCC Part 15, ETSI 300/328/CE Certifications Software Feature Wireless WEP, WPA / WPA2 (AES / TKIP), WPS, WMM Supported OS Windows 2000/XP/Vista/7, Linux 2.4 and 2.6, Mac OS X 10.6 Environment & Physical 9 Wireless N Adapter RNX-N250UB User Manual Temperature Range 0 to 45° C - Operating, -10 to 70 ° C - Storage Humidity (non-condensing) 15%~95% typical 1.6 Suggested Applications The wireless LAN products are easy to install and highly efficient. The following list describes some of the many applications made possible through the power and flexibility of wireless LANs: a) Difficult-to-wire environments There are many situations where wires cannot be laid easily. Historic buildings, older buildings, open areas and across busy streets make the installation of LANs either impossible or very expensive. b) Temporary workgroups Consider situations in parks, athletic arenas, exhibition centers, disaster-recovery, temporary offices and construction sites where one wants a temporary WLAN established and removed. c) The ability to access real-time information Doctors/nurses, point-of-sale employees, and warehouse workers can access real-time information while dealing with patients, serving customers and processing information. d) Frequently changed environments Show rooms, meeting rooms, retail stores, and manufacturing sites where frequently rearrange the workplace. e) Small Office and Home Office (SOHO) networks SOHO users need a cost-effective, easy and quick installation of a small network. f) Wireless extensions to Ethernet networks Network managers in dynamic environments can minimize the overhead caused by moves, extensions to networks, and other changes with wireless LANs. g) Wired LAN backup Network managers implement wireless LANs to provide backup for mission-critical applications running on wired networks. h) Training/Educational facilities Training sites at corporations and students at universities use wireless connectivity to ease access to information, information exchanges, and learning. 1.7 Network Configuration To better understand how the wireless LAN products work together to create a wireless network, it might be helpful to depict a few of the possible wireless LAN PC card network configurations. The wireless LAN products can be configured as: a) Ad-hoc (or peer-to-peer) for departmental or SOHO LANs. b) Infrastructure for enterprise LANs. a) Ad-hoc (peer-to-peer) Mode 10 Wireless N Adapter RNX-N250UB User Manual This is the simplest network configuration with several computers equipped with the PC Cards that form a wireless network whenever they are within range of one another. In ad-hoc mode, each client is peer-to-peer, would only have access to the resources of the other client and does not require an access point. This is the easiest and least expensive way for the SOHO to set up a wireless network. The image below depicts a network in ad-hoc mode. b) Infrastructure Mode The infrastructure mode requires the use of an Access Point (AP). In this mode, all wireless communication between two computers has to be via the AP. It doesn’t matter if the AP is stand-alone or wired to an Ethernet network. If used in stand-alone, the AP can extend the range of independent wireless LANs by acting as a repeater, which effectively doubles the distance between wireless stations. The image below depicts a network in infrastructure mode. 11 Wireless N Adapter RNX-N250UB User Manual Chapter 2 Installation Guide 2.1 Before You Begin Note: WiFi Alliance certification recommends WPA2 AES to be the security mechanism under 11N mode. System driver will automatically bring down wireless data rate to 54Mbps if other security method such as WEP or WPA is used under 11n mode. If your 11N router is using security mechanism other than WPA2 AES, you are recommended to disable security setting or change it to WPA2 AES to fully utilize 11N capability. This policy has no effect if connecting with b/g only wireless access point. During the installation, XP may need to copy systems files from its installation CD. Therefore, you may need a copy of the Windows installation CD at hand before installing the drivers. On many systems, instead of a CD, the necessary installation files are archived on the hard disk in C:\WINDOWS \OPTIONS\CABS directory. 2.2 Installing the Drivers for XP, Vista, and Win7 Follow the steps below in order to install the USB adapter drivers: 1. Insert the CD-ROM that was provided to you in this package. The setup should run automatically. If the setup does not run automatically, then must manually select the setup.exe file from the CD-ROM drive. 12 Wireless N Adapter RNX-N250UB User Manual Figure 2-1 2. Click on Windows Driver to start the install process. Once the setup begins you will see the InstallShield Wizard. Select Install driver and Rosewill WLAN Utility and then click on the Next> button. Figure 2-2 3. Wait for a few seconds until the driver and client utility is installed. 13 Wireless N Adapter RNX-N250UB User Manual Figure 2-3 4. The installation is complete. Click on the Finish button. 5. Carefully insert the USB adapter into the USB port. Windows will then detect and install the new hardware. Figure 2-4 6. A icon will then appear in the system tray. Right click on the icon and then click on Launch Config Utility. Note: Click on Use Zero Configuration as Configuration Utility if you would like to use Windows Zero Configuration (XP only feature). Vista XP 2.3 Installing the Drivers for Mac OS X Follow the steps below in order to install the USB adapter drivers: 14 Wireless N Adapter RNX-N250UB User Manual 1. Insert the CD-ROM that was provided to you in this package. The setup should run automatically. If the setup does not run automatically, then you must manually select the setup file from the CD-ROM drive. Figure 2-5 2. Click on the Continue button to configure the next step. Figure 2-6 15 Wireless N Adapter RNX-N250UB User Manual 3. Select the Macintosh HD and then click on the Continue button. Figure 2-7 4. Click on the Continue button to configure the next step. Figure 2-8 5. The installation is complete. Click on the Restart button. 6. Carefully insert the USB adapter into the USB port. MAC OS X will then detect and install the new hardware. 16 Wireless N Adapter RNX-N250UB User Manual 7. The Client Utility is installed in the Applications folder. 17 Wireless N Adapter RNX-N250UB User Manual 2.4 Uninstall the Drivers & Client Utility If the USB client adapter installation is unsuccessful for any reason, the best way to solve the problem may be to completely uninstall the USB adapter and its utility and repeat the installation procedure again. Follow the steps below in order to uninstall the client utility: 1. Click on Start > Rosewill Wireless > Uninstall Rosewill Wireless USB Adapter Figure 2-9 2. The un-installation process will then begin. Figure 2-10 3. Click on the Yes button to confirm the un-installation process and then click on the Next button. Figure 2-11 Figure 2-12 18 Wireless N Adapter RNX-N250UB User Manual 4. The un-installation process is complete. Select Yes, I want to restart my computer now radio button and then click on the Finish button. Then remove the USB adapter. Figure 2-13 19 Wireless N Adapter RNX-N250UB User Manual Chapter 3 Connection Guide 3.1 Connecting with Microsoft Zero Configuration (XP only) 1. After specifying the Microsoft Zero Configuration tool to configure your wireless on system tray as below. Select “View network, right click on the icon available wireless Networks” to specify your wireless network. Figure 3-1 2. The tool shows the available wireless networks. Select your network SSID to connect with like Figure 3-2. Figure3-2 3. If your wireless Network has encryption enable, you will be ask to enter the password like Figure 3-3. Please enter your wireless password at “Network key” section twice and click “Connect” to confirm. 20 Wireless N Adapter RNX-N250UB User Manual Figure 3-3 4. If your wireless Network does not contains encryption, select the intended access point and click "Connect". Then click "Connect Anyway" like Figure 3-4 Figure 3-4 5. Once completed, you should see like Figure 3-5 as your computer is now “Connected” with your wireless Network. 21 Wireless N Adapter RNX-N250UB User Manual Figure 3-5 6. You should see the pop-up window on your low right hand corner indicate the connected status. As shown in Figure 3-6 Figure 3-6 3.2 Connecting through Rosewill Utility We provide this utility for users to connect to a wireless network easily. It provides more information and configuration for this adapter. As default, the utility is started automatically upon starting your computer and connects to a connectable wireless network with best signal strength. Please refer to the following chapters to get information regarding to the functions of this utility. Clicking the Rosewill icon on your desktop will bring up the utility main window. Users can find the surrounding AP signal in the list. The currently connected AP will be shown with a blue icon beside it, as shown in Figure 3-7. You can use the advanced tab to configure other advanced features provided by Rosewill's wireless NIC. For details on configuring the advanced features, please check with Chapter 5. 22 Wireless N Adapter RNX-N250UB User Manual Figure 3-7 3.2.1 Steps to add wireless signal with Rosewill Utility for one time use This section will lead you to link your wireless signal with your RNX-N250UB. Please follow the Figure 3-8 in adding the signal. 1. Click“Rescan": Click on Rescan to search for all wireless signals near you. 2. Select your desire SSID: Click to select your wireless signal, in this example, you can see desired SSID. 3. next to AP1; meaning we have select AP1 as our Click“Add to Profile"or“Connect": I. Add to Profile: This part will help your wireless adapter memorize the signal and password for your future use. Please see Next Section for more detail. II. Connect: This is when you are in locations where you do not need your adapter to remember the signal. 23 Wireless N Adapter RNX-N250UB User Manual Figure 3-8 3.2.2 Steps to add wireless signal into Profile and keep for future record Add to profile will help to store your wireless signal’s information with your RNX-N250UB. Please follow the Figure 3-9 to add the signal into your profile so you don’t have to enter them in the future. There are two ways to “Add to Profile”. You can add through Network tab or add through tab. Adding to Profile through Network Tab. (Figure 4-10): 1. First select “Add to Profile” 2. Choose the SSID you want to connect to. eg: Rosewill-1. 3. Key in your desired Profile Name, eg, HOME. 4. Or you can choose SSID with the pull-down window. 5. When complete, please select “Auth.\ Encry” to enter your password. 24 Wireless N Adapter RNX-N250UB User Manual Figure 3-9 6. In Auth.\Encry., First select Authentication of your wireless signal, Like Figure 3-10 7. Enter your Wireless Network’s password. Click OK to complete the process. Figure 3-10 Note: you could also add a new profile quickly by selecting an available network in the “Network” function then press the “Add to Profile” button. Adding to Profile through Profile Tab. (Figure 3-11): 1. First select “Add” 2. Key in your desired Profile Name, eg, HOME. 3. Choose the SSID by selecting the pull-down window. 4. When complete, please select “Auth.\ Encry” to enter your password. 25 Wireless N Adapter RNX-N250UB User Manual Figure 3-11 5. In Auth.\Encry. Like Figure 3-12 6. First select Authentication of your wireless signal. This should automatically provided to you when select your desired SSID. 7. Enter your password. 8. Click OK to complete the process. Figure 3-12 3.3 Connecting with Mac OS The Connection Utility can also help you connect through Mac OS. 26 Wireless N Adapter RNX-N250UB User Manual Figure 3-13 1. Upon opening the Wireless Utility program, first click open “Site Survey” 2. Select your desired AP signal under the AP List. You can further search the signal by clicking “RESCAN” 3. After selecting the AP signal, you can select either “CONNECT” or “ADD PROFILE” CONNECT: This is for connecting only once which best use for places other than your regular use areas such as coffee shop, libraries, and etc. ADD PROFILE: This is for adding the signal into your most common use list. Once wireless adapter plug-in, the utility will automatically connect to the profile. 27 Wireless N Adapter RNX-N250UB User Manual Figure 3-14 4. Once click Profile, you will be prompt to ask for your personal settings such as “System Configuration” and “Authentication & Security”. You have the choice to select “Authentication & Security” and enter the password for connecting to the signal. Please make sure that your settings for Authentication & Security are the same as your Wireless Router’s setting 28 Wireless N Adapter RNX-N250UB User Manual Figure 3-15 5. For WEP, Select Open or Shared from the Authentication Type‘s drop-down list. Then select WEP from Encryption’s drop-down list. WEP Key: Type a character string into the field. For 64-bit enter 5 alphanumeric or 10 hexadecimal characters. For 128-bit enter 13 alphanumeric or 26 hexadecimal characters. Click on the OK button to save the changes. 29 Wireless N Adapter RNX-N250UB User Manual Figure 3-16 6. For WPA or WPA2, please select from Authentication’s drop-down list. Select TKIP or AES from Encryption’s drop-down list. WPA Preshared key: Enter a pass phrase which is between 8 and 32 characters long. Click on the OK button to save the changes. Show Password check box. If you want to make sure the accuracy of password you type, click the Show Password box to check it. 30 Wireless N Adapter RNX-N250UB User Manual Chapter 4 Utility Detailed Definition Guide 4.1 Utility Guide for Windows OS The Rosewill Utility consisted of three parts: 1 Figure 4-1 Tab Section: on top of the window. You can click each button to access each configuration windows includes Profile page, Network Page, Advanced Page, WPS Page, Radio On/Off function, and About 2 Network Section: Provides you with information on the wireless signals around you. You have options to setup wireless network here with “Rescan”, “Add to Profile”, and “Connect” 3 Status Section: bottom of the utility window. It shows the connection status and system information. 31 Wireless N Adapter RNX-N250UB User Manual 4.1.1 Tab Section Details Figure 4-2 Tab Section provides you with the option to utilize RNX-N250UB. 4.1.1.1 Profile The Profile List keeps a record of your favorite wireless settings at home, office, and other public hot-spots. You can save multiple profiles, and activate the correct one at your preference. Figure 4-3 and Figure 4-4 shows the basic profile section. Figure 4-3 Figure 4-4 Definition of Each Fields in Profile: Profile Name: Name of profile, preset to PROF* (* indicate 1, 2, 3...). SSID: The access point or Ad-hoc name. Network Type: Indicates the networks type, including infrastructure and Ad-Hoc. Authentication: Indicates the authentication mode used. Encryption: Indicates the encryption Type used. Use 802.1x: Shows if the 802.1x feature is used or not. Cannel: Channel in use for Ad-Hoc mode. Power Save Mode: Choose from CAM (Constantly Awake Mode) or Power Saving Mode. 32 Wireless N Adapter RNX-N250UB User Manual Tx Power: Transmitting power, the amount of power used by a radio transceiver to send the signal out. RTS Threshold: Users can adjust the RTS threshold number by sliding the bar or keying in the value directly. Fragment Threshold: The user can adjust the Fragment threshold number by sliding the bar or key in the value directly. 4.1.1.2 Network (Site Survey) Network Tab lists the available wireless networks. The utility connects to a wireless network with best signal strength automatically. You can change the connecting network by clicking on the network name and click the “Connect” button. To see detail information of each network, please double click on each item to pop up the Status below. Figure 4-5 Figure 4-6 Definition of Each Fields in Network: SSID, Channel and Signal buttons: Click each button to sort the listing networks by SSID, Channel and Signal strength. Show dBm: Mark the checkbox to show the signal strength in dBm. Rescan: To rescan available wireless networks. Connect: Click this button to connect to a designated network. Add to Profile: Click this button to add a network to profile after selecting a network. 33 Wireless N Adapter RNX-N250UB User Manual 4.1.1.3 Advance Here you can find the Advanced configurations for this adapter. This tab is used to configure Tx burst, WMM, and CCX. Figure 4-7 Figure 4-8 Definition of Each Fields in Advance: Wireless mode: Click the drop list to select a wireless mode. Enable TX Burst: Select to enable connecting to a TX Burst supported device. Enable TCP Window Size: Mark the checkbox to enable TCP window size, which help enhance throughput. Fast Roaming at __ dBm: Mark the checkbox to enable fast roaming. Specify the transmit power for fast roaming. Show Authentication Status Dialog: Mark the checkbox to show “Authentication Status Dialog” while connecting to an AP with authentication. Authentication Status Dialog displays the process about 802.1x authentication Enable CCX (Cisco Compatible extensions): Select to enable CCX. This function can only be applied when connecting to a Cisco compatible device. (XP only) 4.1.1.4 Statistics Provides you with information on your wireless adapter. Statistics displays the detail 34 Wireless N Adapter RNX-N250UB User Manual counter information based on 802.11 MIB counters. This page translates the MIB counters into a format easier for user to understand. Figure 4-9 Figure 4-10 Definition of Each Fields in Statistics - Transmit: Frames Transmitted Successfully: Frames successfully sent. Frames Retransmitted Successfully: Successfully retransmitted frames numbers Frames Fail To Receive ACK After All Retries: Frames failed transmit after hitting retry limit RTS Frames Successfully Receive CTS: Successfully receive CTS after sending RTS frame RTS Frames Fail To Receive CTS: Failed to receive CTS after sending RTS Restart Counter: Reset counters to zero 35 Wireless N Adapter RNX-N250UB User Manual Figure 4-11 Definition of Each Fields in Statistics - Receive: Frames Received Successfully: Frames received successfully Frames Received With CRC Error: Frames received with CRC error Frames Dropped Due To Out-of-Resource: Frames dropped due to resource issue Duplicate Frames Received: Duplicate received frames. 4.1.1.5 WMM This function allows users to activate the WMM function for this device. Please note that this function only works while connecting to a WMM compatible device. Figure 4-12 Figure 4-13 Definition of Each Fields in WMM: WMM Enable: Enable Wi-Fi Multi-Media. WMM - Power Save Enable: Enable WMM Power Save. Please enable WMM before configuring this function. Direct Link Setup Enable: Enable DLS (Direct Link Setup). Please enable WMM before configuring this function. 4.1.1.6 WPS The primary goal of Wi-Fi Protected Setup (Wi-Fi Simple Configuration) is to simplify the security setup and management of Wi-Fi networks. By pressing this button, the security settings of the device will automatically synchronize with other wireless devices on your network that support Wi-Fi Protected Setup. 36 Wireless N Adapter RNX-N250UB User Manual Figure 4-14 Figure 4-15 Definition of Each Fields in WPS: WPS AP List: Display the information of surrounding APs with WPS IE from last scan result. List information includes SSID, BSSID, Channel, ID (Device Password ID), Security-Enabled. Rescan: Click to rescan the wireless networks. Connect: Command to connect to the selected network inside credentials. Disconnect: Stop WPS action and disconnect this active link. And then select the last profile at the Profile Page of RaUI if exist. If there is an empty profile page, the driver will select any non-secure AP WPS associate IE: Send the association request with WPS IE during WPS setup. It is optional for STA. WPS probe IE: Send the probe request with WPS IE during WPS setup. It is optional for STA. Progress Bar: Display rate of progress from Start to Connected status Status Bar: Display currently WPS Status 4.1.1.7 About 37 Wireless N Adapter RNX-N250UB User Manual Click "About" displays the wireless card and driver version information as shown in Figure 4-16. Figure 4-16 Figure 4-17 4.1.2 Status Section Details The Status page displays detailed information about the current connection as shown in Figure 4-18. Figure 4-18 Definition of Each Fields in Status: Status: Current connection status. If no connection, if will show Disconnected. Otherwise, the SSID and BSSID will show here. Extra Info: Display link status in use. Channel: Display current channel in use. Authentication: Authentication mode in use. 38 Wireless N Adapter RNX-N250UB User Manual Encryption: Encryption type in use. Network Type: Network type in use. IP Address: IP address about current connection. Sub Mask: Sub mask about current connection. Default Gateway: Default gateway about current connection. Link Speed: Show current transmit rate and receive rate. Throughout: Display transmits and receive throughput in unit of Mbps. Link Quality: Display connection quality based on signal strength and TX/RX packet error rate. Signal Strength 1: Receive signal strength 1, user can choose to display as percentage or dBm format. Signal Strength 2: Receive signal strength 2, user can choose to display as percentage or dBm format. Signal Strength 3: Receive signal strength 3, user can choose to display as percentage or dBm format. Noise Strength: Display the surrounding environment noise signal strength. HT: Display current HT status in use, containing BW, GI, MCS, SNR0, and SNR1 value. 4.1.3 Authentication and Security for Windows The Security tab allows you to configure the authentication and encryption settings such as: WEP, WPA, WPA-PSK, WPA2, LEAP, 802.1x with PEAP, PEAP Authentication with EAP/TLS Smartcard, 802.1x with TTLS with EAP-MD5, MS-CHAP, MS-CHAPv2, and 802.1x CA Server. Each security option is described in detail below. Figure 4-19 4.1.3.1 WEP Encryption 39 Wireless N Adapter RNX-N250UB User Manual The WEP tab displays the WEP settings. Encryption is designed to make the data transmission more secure. You may select 64 or 128-bit WEP (Wired Equivalent Privacy) key to encrypt data (Default setting is Disable). WEP encrypts each frame transmitted from the radio using one of the Keys from a panel. When you use WEP to communicate with the other wireless clients, all the wireless devices in this network must have the same encryption key or pass phrase. The following information is included in this tab, as the image depicts below. Figure 4-20 Authentication Type: Select Open or Shared from the drop-down list. Encryption: Select WEP from the drop-down list. WEP Key (Hex or ASCII): Type a character string into the field. For 64-bit enter 5 alphanumeric or 10 hexadecimal characters. For 128-bit enter 13 alphanumeric or 26 hexadecimal characters. Click on the OK button to save the changes. Show Password check box. If you want to make sure the accuracy of password you type, click the Show Password box to check it. 4.1.3.2 WPA, WPA2 Authentication & TKIP, AES Encryption WPA (Wi-Fi Protected Access) was designed to improve upon the security features of WEP (Wired Equivalent Privacy). This is used along with 802.1x security setting. The technology is designed to work with existing Wi-Fi products that have been enabled with WEP. WPA provides improved data encryption through the Temporal Key Integrity Protocol (TKIP), which scrambles the keys using a hashing algorithm and by adding an integrity-checking feature which makes sure that keys haven’t been tampered with. EAP (Extensible Authentication Protocol) is an extension to the PPP 40 Wireless N Adapter RNX-N250UB User Manual protocol that enables a variety of authentication protocols to be used. It passes through the exchange of authentication messages, allowing the authentication software stored in a server to interact with its counterpart in the client. Figure 4-21 Authentication Type: Select WPA or WPA2 from the drop-down list. Encryption: Select TKIP or AES from the drop-down list. Click on the OK button to save the changes. Show Password check box. If you want to make sure the accuracy of password you type, click the Show Password box to check it. 4.1.3.3 WPA-PSK & WPS2-PSK Authentication & TKIP, AES Encryption WPA – PSK (Pre-shared Key) is used in a Pre Shared Key mode that does not require an authentication server. Access to the Internet and the rest of the wireless network services is allowed only if the pre-shared key of the computer matches that of the Access Point. This approach offers the simplicity of the WEP key, but uses stronger TKIP encryption. EAP (Extensible Authentication Protocol) is an extension to the PPP protocol that enables a variety of authentication protocols to be used. It passes through the exchange of authentication messages, allowing the authentication software stored in a server to interact with its counterpart in the client. 41 Wireless N Adapter RNX-N250UB User Manual Figure 4-22 Authentication Type: Select WPA-PSK or WPA2-PSK from the drop-down list. Encryption: Select TKIP or AES from the drop-down list. WPA Preshared key: Enter a pass phrase which is between 8 and 32 characters long. Click on the OK button to save the changes. Show Password check box. If you want to make sure the accuracy of password you type, click the Show Password box to check it. 4.1.3.4 LEAP Authentication LEAP (Lightweight Extensible Authentication Protocol) also known as Cisco-Wireless EAP provides username/password-based authentication between a wireless client and a RADIUS server. LEAP is one of several protocols used with the IEEE 802.1X standard for LAN port access control. LEAP also delivers a session key to the authenticated station, so that future frames can be encrypted with a key that is different than keys used by others sessions. Dynamic key delivery eliminates one big vulnerability; static encryption keys that are shared by all stations in the WLAN. EAP (Extensible Authentication Protocol) is an extension to the PPP protocol that enables a variety of authentication protocols to be used. It passes through the exchange of authentication messages, allowing the authentication software stored in a server to interact with its counterpart in the client 42 Wireless N Adapter RNX-N250UB User Manual Figure 4-22 Authentication Type: Select LEAP from the drop-down list. Identity: Enter the user name. Password: Enter the password. Domain: Enter a domain name. Encryption: Select WEP, WPA-TKIP or WPA2-AES encryption. Click on the OK button to save the changes. 4.1.3.5 802.1x with PEAP 802.1X provides an authentication framework for wireless LANs allowing a user to be authenticated by a central authority. 802.1X uses an existing protocol called EAP. EAP (Extensible Authentication Protocol) is an extension to the PPP protocol that enables a variety of authentication protocols to be used. It passes through the exchange of authentication messages, allowing the authentication software stored in a server to interact with its counterpart in the client. 4.1.3.6 PEAP Authentication with EAP/TLS Smartcard EAP/TLS Smartcard provides for certificate-based and mutual authentication of the client and the network. It relies on client-side and server-side certificates to perform authentication and can be used to dynamically generate user-based and session-based WEP keys to secure subsequent communications between the WLAN client and the access point. 43 Wireless N Adapter RNX-N250UB User Manual Figure 4-23 Authentication Type: Select PEAP from the drop-down list. Protocol: If your network uses TLS or Smart Card to authenticate its users, select TLS/Smartcard from the drop down list. TLS (Transport Layer Security) is an IETF standardized authentication protocol that uses PKI (Public Key Infrastructure) certificate-based authentication of both the client and authentication server. Identity: Enter the user name. Click on the OK button to save the changes. 4.1.3.7 802.1x with TTLS with EAP-MD5, MS-CHAP, MS-CHAPv2 802.1X provides an authentication framework for wireless LANs allowing a user to be authenticated by a central authority. 802.1X uses an existing protocol called EAP. EAP (Extensible Authentication Protocol) is an extension to the PPP protocol that enables a variety of authentication protocols to be used. It passes through the exchange of authentication messages, allowing the authentication software stored in a server to interact with its counterpart in the client. TLS (Transport Layer Security) is an IETF standardized authentication protocol that uses PKI (Public Key Infrastructure) certificate based authentication of both the client and authentication server. 44 Wireless N Adapter RNX-N250UB User Manual Figure 4-24 Authentication Type: Select TTLS from the drop-down list. Protocol: Select EAP-MSCHAP v2, MS-CHAP, or CHAP from the drop-down list. Identity: Enter the user name. Password: Enter the password. Click on the OK button to save the changes. 4.1.3.8 802.1x CA Server Depending on the EAP in use, only the server or both the server and client may be authenticated and require a certificate. Server certificates identify a server, usually an authentication or RADIUS server to clients. Most EAPs require a certificate issued by a root authority or a trusted commercial Certificate Authority. Figure 4-25 45 Wireless N Adapter RNX-N250UB User Manual Figure 4-26 Use certificate chain: Place a check in this to enable the certificate use. Certificate issuer: Select the Certification Authority from the drop-down list. Allow intermediate certificates: During tunnel creation the client must verify the server’s certificate. When checking this certificate the signature is verified against a list of trusted certificate authorities. If this parameter is true then the client will also accept a signature from a trusted intermediate certificate authority, otherwise it will not. Server name: Enter the server name if not selected from the existing drop-down list above. Click on the OK button to save the changes. 4.2 Utility Guide for Mac OS 4.2.1 Profiles The Profile tab is used to store the settings of multiple Access Points such as home, office, café, etc. When adding a profile you are required to enter a profile name and SSID as well as configure the power-saving mode, network type, RTS/fragmentation threshold and encryption/authentication settings. A profile can be configured as Infrastructure or Ad-hoc mode. The configuration settings for each mode are described below. 46 Wireless N Adapter RNX-N250UB User Manual Figure 4-27 4.2.2 Infrastructure Mode The infrastructure mode requires the use of an Access Point (AP). In this mode, all wireless communication between two computers has to be via the AP. It doesn’t matter if the AP is stand-alone or wired to an Ethernet network. If used in stand-alone, the AP can extend the range of independent wireless LANs by acting as a repeater, which effectively doubles the distance between wireless stations. 47 Wireless N Adapter RNX-N250UB User Manual Figure 4-28 Profile: Enter a name for the profile; this does not need to be the same as the SSID. SSID: Enter the SSID of the network or select one from the drop-down list. The SSID is a unique name shared among all points in your wireless network. The SSID must be identical for all points in the network, and is case-sensitive. PSM: Select a power saving mode (PSM) option. CAM (Continuously Active Mode): Select this option if your notebook is always connected to the power supply. PSM (Power Saving Mode): Select this option if your notebook uses its battery power. This option minimizes the battery usage while the network is idle. Network Type: Select Infrastructure from the drop-down list. TX Power: Select a transmit power from the drop-down list. If your notebook is connected to external power then select 100% or auto, if not, select one of the lower values for power saving. RTS Threshold: Place a check in this box if you would like to enable RTS Threshold. Any packet larger than the specified value (bytes) will send RTS/CTS handshake packet. Fragment Threshold: Place a check in this box if you would like to enable Fragment Threshold. Any packet larger than the specified value (bytes) will be fragmented. Click on the OK button to save the changes. 48 Wireless N Adapter RNX-N250UB User Manual 4.2.3 Ad-hoc Mode This is the simplest network configuration with several computers equipped with the PC Cards that form a wireless network whenever they are within range of one another. In ad-hoc mode, each client is peer-to-peer, would only have access to the resources of the other client and does not require an access point. This is the easiest and least expensive way for the SOHO to set up a wireless network. Figure 4-29 Profile: Enter a name for the profile; this does not need to be the same as the SSID. SSID: Enter the SSID of the network or select one from the drop-down list. The SSID is a unique name shared among all points in your wireless network. The SSID must be identical for all points in the network, and is case-sensitive. Network Type: Select Ad-hoc from the drop-down list. TX Power: Select a transmit power from the drop-down list. If your notebook is connected to external power then select 100% or auto, if not, select one of the lower values for power saving. Ad-hoc wireless mode: Select a wireless mode from the drop-down list depending on the type of stations used in the ad-hoc network. Select B/G Mix if the network consists of 11b and 11g stations. Select B-only or G-only if the network consists of only one type of wireless mode. RTS Threshold: Place a check in this box if you would like to enable RTS Threshold. Any packet larger than the specified value (bytes) will send RTS/CTS handshake 49 Wireless N Adapter RNX-N250UB User Manual packet. Fragment Threshold: Place a check in this box if you would like to enable Fragment Threshold. Any packet larger than the specified value (bytes) will be fragmented. Click on the OK button to save the changes. 4.2.4 Authentication and Security The Security tab allows you to configure the authentication and encryption settings such as: WEP, WPA-PSK, WPA2-PSK and 802.1x. Each security option is described in detail below. 4.2.4.1 WEP Encryption The WEP tab displays the WEP settings. Encryption is designed to make the data transmission more secure. You may select 64 or 128-bit WEP (Wired Equivalent Privacy) key to encrypt data (Default setting is Disable). WEP encrypts each frame transmitted from the radio using one of the Keys from a panel. When you use WEP to communicate with the other wireless clients, all the wireless devices in this network must have the same encryption key or pass phrase. The following information is included in this tab, as the image depicts below. Figure 4-30 Authentication Type: Select Open or Shared from the drop-down list. Encryption: Select WEP from the drop-down list. 50 Wireless N Adapter RNX-N250UB User Manual WEP Key: Type a character string into the field. For 64-bit enter 5 alphanumeric or 10 hexadecimal characters. For 128-bit enter 13 alphanumeric or 26 hexadecimal characters. Click on the OK button to save the changes. Show Password check box. If you want to make sure the accuracy of password you type, click the Show Password box to check it. 4.2.4.2 WPA-PSK & WPA2-PSK Authentication & TKIP, AES Encryption WPA – PSK (Pre-shared Key) is used in a Pre Shared Key mode that does not require an authentication server. Access to the Internet and the rest of the wireless network services is allowed only if the pre-shared key of the computer matches that of the Access Point. This approach offers the simplicity of the WEP key, but uses stronger TKIP encryption. EAP (Extensible Authentication Protocol) is an extension to the PPP protocol that enables a variety of authentication protocols to be used. It passes through the exchange of authentication messages, allowing the authentication software stored in a server to interact with its counterpart in the client. Figure 4-31 Authentication Type: Select WPA or WPA2 from the drop-down list. Encryption: Select TKIP or AES from the drop-down list. WPA Preshared key: Enter a pass phrase which is between 8 and 32 characters long. Click on the OK button to save the changes. 51 Wireless N Adapter RNX-N250UB User Manual Show Password check box. If you want to make sure the accuracy of password you type, click the Show Password box to check it. 4.2.5 Link Status The Link Status tab displays the current status of the wireless radio. The following information is included in this tab, as the image depicts below. Figure 4-32 Status: This indicates the state of the client. There are three options: Associated: Indicates that the wireless client is connected to an Access Point (AP). The BSSID is shown in the form of 12 HEX digits, which is the MAC address of the AP. Scanning: Indicates that the wireless client is searching for an AP in the area. Disconnected: Indicates that there are no APs or clients in the area. Current Channel: The operating frequency channel that the client is using (infrastructure mode). Link Speed: The current rate at which the client is transmitting and receiving. Throughput (bytes/sec): Displays the Tx (transmit) and Rx (receive) kilo-bytes per second. Link Quality: In infrastructure mode, this bar displays the transmission quality between an AP and a client. In Ad-hoc mode, this bar displays the transmission quality between one client, and another. 52 Wireless N Adapter RNX-N250UB User Manual Signal Strength: This bar displays the strength of the signal received from an AP or client. Noise Level: Displays the background noise level; a lower level indicates less interference. HT: High Through-Put / 802.11 n Section BW: Channel Bandwidth GI: Guard Interval MCS: Modulation Coding Scheme dBm Check Box. When you click on the check box as the drawing below. The signal strength and noise level will be shown as the dBm measurements. 4.2.6 Site Survey The Site Survey tab displays a list of Access Points and Stations in the area, and allows you to connect to a specific one. The following information is included in this tab, as the image depicts below. Figure 4-33 SSID: Displays the SSID of the Access Point. The SSID is a unique name shared among all points in your wireless network. The SSID must be identical for all points in the network, and is case-sensitive. BSSID: Displays the MAC address of the Access Point. 53 Wireless N Adapter RNX-N250UB User Manual Signal: Displays the receiving signal strength from the Access Point. Channel: Displays the channel number of the Access Point. Authentication: displays the authentication on the Access Point, this includes WPA, WPA-PSK, WPA2, or Unknown. Encryption: Displays the encryption on the Access Point, this includes WEP, TKIP, AES or None. Network Type: Indicates whether the SSID is a Station (Ad-hoc) or Access Point (Infrastructure). Rescan: Click on this button to view a list of Access Points in the area. Connect: to connect with a specific Access Point, select the SSID from the list, and then click on the Connect button. Add Profile: Click on this button to add the SSID and its associated settings into a profile. Click on the OK button if you have made any changes. 4.2.7 Statistics The Statistics tab displays transmit and receive packet statistics in real-time. Information included is frames transmitted/received successfully, transmitted successfully without and after retry, received with CRC error, duplicate frames received, etc. Figure 4-34 54 Wireless N Adapter RNX-N250UB User Manual 4.2.8 Advanced Configuration The Advanced tab is used to configure advanced wireless settings. Figure 4-35 Wireless mode: 2.4Ghz only. Tx Rate: The transmit rate is set to auto by default. Tx BURST: Click the check box will enhance the throughput Click on the Apply button to save the changes. 4.2.9 WPS WPS (Wireless Push Button) is used for WiFi Protected Setup. By pressing this button, the security settings of the device will automatically synchronize with other wireless devices on your network that support Wi-Fi Protected Setup. 55 Wireless N Adapter RNX-N250UB User Manual Figure 4-36 Rescan: Click on this button to view a list of Access Points in the area. Renew: Regenerate a new PIN code Config Mode: switch between Enrollee or Registrar Profile Detail: show profile of the selected party Connect: Click on the AP to start WPS connection with the AP Disconnect: Click to terminate WPS connection Import Profile: Load pre-stored profile database Delete: Remove the selected item 56 Wireless N Adapter RNX-N250UB User Manual 4.2.10 About The About tab displays information about the device, such as: the network driver version and date, configuration utility version and date, and the NIC (Network Interface Card) firmware version and date. Figure 4-37 Thank you for purchasing a quality Rosewill Product. Please register your product at: www.rosewill.com for complete warranty information and future support for your product. 57 Wireless N Adapter RNX-N250UB User Manual Appendix A – Glossary 8 802.11 A family of specifications for wireless local area networks (WLANs) developed by a working group of the Institute of Electrical and Electronics Engineers (IEEE). A Access Control List ACL. This is a database of network devices that are allowed to access resources on the network. Access Point AP. Device that allows wireless clients to connect to it and access the network ActiveX A Microsoft specification for the interaction of software components. Address Resolution Protocol ARP. Used to map MAC addresses to IP addresses so that conversions can be made in both directions. Ad-hoc network Peer-to-Peer network between wireless clients ADSL Asymmetric Digital Subscriber Line Advanced Encryption Standard AES. Government encryption standard Alphanumeric Characters A-Z and 0-9 Antenna Used to transmit and receive RF signals. AppleTalk A set of Local Area Network protocols developed by Apple for their computer systems AppleTalk Address Resolution Protocol AARP. Used to map the MAC addresses of Apple computers to their AppleTalk network addresses, 58 Wireless N Adapter RNX-N250UB User Manual so that conversions can be made in both directions. Application layer 7th Layer of the OSI model. Provides services to applications to ensure that they can communicate properly with other applications on a network. ASCII American Standard Code for Information Interchange. This system of characters is most commonly used for text files Attenuation The loss in strength of digital and analog signals. The loss is greater when the signal is being transmitted over long distances. Authentication To provide credentials, like a Password, in order to verify that the person or device is really who they are claiming to be Automatic Private IP Addressing APIPA. An IP address that that a Windows computer will assign itself when it is configured to obtain an IP address automatically but no DHCP server is available on the network B Backward Compatible The ability for new devices to communicate and interact with older legacy devices to guarantee interoperability Bandwidth The maximum amount of bytes or bits per second that can be transmitted to and from a network device Basic Input/Output System BIOS. A program that the processor of a computer uses to startup the system once it is turned on Baud Data transmission speed Beacon A data frame by which one of the stations in a Wi-Fi network periodically broadcasts network control data to other wireless stations. Bit rate The amount of bits that pass in given amount of time Bit/sec 59 Wireless N Adapter RNX-N250UB User Manual Bits per second BOOTP Bootstrap Protocol. Allows for computers to be booted up and given an IP address with no user intervention Bottleneck A time during processes when something causes the process to slowdown or stop all together Broadband A wide band of frequencies available for transmitting data Broadcast Transmitting data in all directions at once Browser A program that allows you to access resources on the web and provides them to you graphically C Cable modem A device that allows you to connect a computer up to a coaxial cable and receive Internet access from your Cable provider CardBus A newer version of the PC Card or PCMCIA interface. It supports a 32-bit data path, DMA, and consumes less voltage CAT 5 Category 5. Used for 10/100 Mbps or 1Gbps Ethernet connections Client A program or user that requests data from a server Collision When do two devices on the same Ethernet network try and transmit data at the exact same time. Cookie Information that is stored on the hard drive of your computer that holds your preferences to the site that gave your computer the cookie D Data Information that has been translated into binary so that it can be processed or moved to another device Data Encryption Standard 60 Wireless N Adapter RNX-N250UB User Manual Uses a randomly selected 56-bit key that must be known by both the sender and the receiver when information is exchanged Database Organizes information so that it can be managed updated, as well as easily accessed by users or applications. Data-Link layer The second layer of the OSI model. Controls the movement of data on the physical link of a network DB-25 A 25 ping male connector for attaching External modems or RS-232 serial devices DB-9 A 9 pin connector for RS-232 connections dBd Decibels related to dipole antenna dBi Decibels relative to isotropic radiator dBm Decibels relative to one milliwatt Decrypt To unscramble an encrypted message back into plain text Default A predetermined value or setting that is used by a program when no user input has been entered for this value or setting Demilitarized zone DMZ: A single computer or group of computers that can be accessed by both users on the Internet as well as users on the Local Network, but that is not protected by the same security as the Local Network. DHCP Dynamic Host Configuration Protocol: Used to automatically assign IP addresses from a predefined pool of addresses to computers or devices that request them Digital certificate: An electronic method of providing credentials to a server in order to have access to it or a network Direct Sequence Spread Spectrum 61 Wireless N Adapter RNX-N250UB User Manual DSSS: Modulation technique used by 802.11b wireless devices DMZ "Demilitarized Zone". A computer that logically sits in a "no-mans land" between the LAN and the WAN. The DMZ computer trades some of the protection of the router's security mechanisms for the convenience of being directly addressable from the Internet. DNS Domain Name System: Translates Domain Names to IP addresses Domain name A name that is associated with an IP address Download To send a request from one computer to another and have the file transmitted back to the requesting computer DSL Digital Subscriber Line. High bandwidth Internet connection over telephone lines Duplex Sending and Receiving data transmissions at the sane time Dynamic DNS service Dynamic DNS is provided by companies to allow users with Dynamic IP addresses to obtain a Domain Name that will always by linked to their changing IP address. The IP address is updated by either client software running on a computer or by a router that supports Dynamic DNS, whenever the IP address changes Dynamic IP address IP address that is assigned by a DHCP server and that may change. Cable Internet providers usually use this method to assign IP addresses to their customers. E EAP Extensible Authentication Protocol Email Electronic Mail is a computer-stored message that is transmitted over the Internet Encryption Converting data into cyphertext so that it cannot be easily read Ethernet The most widely used technology for Local Area Networks. 62 Wireless N Adapter RNX-N250UB User Manual F Fiber optic A way of sending data through light impulses over glass or plastic wire or fiber File server A computer on a network that stores data so that the other computers on the network can all access it File sharing Allowing data from computers on a network to be accessed by other computers on the network with different levels of access rights Firewall A device that protects resources of the Local Area Network from unauthorized users outside of the local network Firmware Programming that is inserted into a hardware device that tells it how to function Fragmentation Breaking up data into smaller pieces to make it easier to store FTP File Transfer Protocol. Easiest way to transfer files between computers on the Internet Full-duplex Sending and Receiving data at the same time G Gain The amount an amplifier boosts the wireless signal Gateway A device that connects your network to another, like the internet Gbps Gigabits per second Gigabit Ethernet Transmission technology that provides a data rate of 1 billion bits per second GUI Graphical user interface H 63 Wireless N Adapter RNX-N250UB User Manual H.323 A standard that provides consistency of voice and video transmissions and compatibility for videoconferencing devices Half-duplex Data cannot be transmitted and received at the same time Hashing Transforming a string of characters into a shorter string with a predefined length Hexadecimal Characters 0-9 and A-F Hop The action of data packets being transmitted from one router to another Host Computer on a network HTTP Hypertext Transfer Protocol is used to transfer files from HTTP servers (web servers) to HTTP clients (web browsers) HTTPS HTTP over SSL is used to encrypt and decrypt HTTP transmissions Hub A networking device that connects multiple devices together I ICMP Internet Control Message Protocol IEEE Institute of Electrical and Electronics Engineers IGMP Internet Group Management Protocol is used to make sure that computers can report their multicast group membership to adjacent routers IIS Internet Information Server is a WEB server and FTP server provided by Microsoft IKE Internet Key Exchange is used to ensure security for VPN connections 64 Wireless N Adapter RNX-N250UB User Manual Infrastructure In terms of a wireless network, this is when wireless clients use an Access Point to gain access to the network Internet A system of worldwide networks which use TCP/IP to allow for resources to be accessed from computers around the world Internet Explorer A World Wide Web browser created and provided by Microsoft Internet Protocol The method of transferring data from one computer to another on the Internet Internet Protocol Security IPsec provides security at the packet processing layer of network communication Internet Service Provider An ISP provides access to the Internet to individuals or companies Intranet A private network Intrusion Detection A type of security that scans a network to detect attacks coming from inside and outside of the network IP Internet Protocol IP address A 32-bit number, when talking about Internet Protocol Version 4, that identifies each computer that transmits data on the Internet or on an Intranet IPsec Internet Protocol Security IPX Internetwork Packet Exchange is a networking protocol developed by Novel to enable their Netware clients and servers to communicate ISP Internet Service Provider J Java 65 Wireless N Adapter RNX-N250UB User Manual A programming language used to create programs and applets for web pages K Kbps Kilobits per second Kbyte Kilobyte L L2TP Layer 2 Tunneling Protocol LAN Local Area Network Latency The amount of time that it takes a packet to get from the one point to another on a network. Also referred to as delay LED Light Emitting Diode Legacy Older devices or technology Local Area Network A group of computers in a building that usually access files from a server LPR/LPD "Line Printer Requestor"/"Line Printer Daemon". A TCP/IP protocol for transmitting streams of printer data. M MAC Address A unique hardware ID assigned to every Ethernet adapter by the manufacturer. Mbps Megabits per second MDI Medium Dependent Interface is an Ethernet port for a connection to a straight-through cable MDIX Medium Dependent Interface Crossover, is an Ethernet port for a connection to a crossover cable 66 Wireless N Adapter RNX-N250UB User Manual MIB Management Information Base is a set of objects that can be managed by using SNMP Modem A device that Modulates digital signals from a computer to an analog signal in order to transmit the signal over phone lines. It also Demodulates the analog signals coming from the phone lines to digital signals for your computer MPPE Microsoft Point-to-Point Encryption is used to secure data transmissions over PPTP connections MTU Maximum Transmission Unit is the largest packet that can be transmitted on a packet-based network like the Internet Multicast Sending data from one device to many devices on a network N NAT Network Address Translation allows many private IP addresses to connect to the Internet, or another network, through one IP address NetBEUI NetBIOS Extended User Interface is a Local Area Network communication protocol. This is an updated version of NetBIOS NetBIOS Network Basic Input/Output System Netmask Determines what portion of an IP address designates the Network and which part designates the Host Network Interface Card A card installed in a computer or built onto the motherboard that allows the computer to connect to a network Network Layer The third layer of the OSI model which handles the routing of traffic on a network Network Time Protocol Used to synchronize the time of all the computers in a network NIC 67 Wireless N Adapter RNX-N250UB User Manual Network Interface Card NTP Network Time Protocol O OFDM Orthogonal Frequency-Division Multiplexing is the modulation technique for both 802.11a and 802.11g OSI Open Systems Interconnection is the reference model for how data should travel between two devices on a network OSPF Open Shortest Path First is a routing protocol that is used more than RIP in larger scale networks because only changes to the routing table are sent to all the other routers in the network as opposed to sending the entire routing table at a regular interval, which is how RIP functions P Password A sequence of characters that is used to authenticate requests to resources on a network Personal Area Network The interconnection of networking devices within a range of 10 meters Physical layer The first layer of the OSI model. Provides the hardware means of transmitting electrical signals on a data carrier Ping A utility program that verifies that a given Internet address exists and can receive messages. The utility sends a control packet to the given address and waits for a response. PoE Power over Ethernet is the means of transmitting electricity over the unused pairs in a category 5 Ethernet cable POP3 Post Office Protocol 3 is used for receiving email Port A logical channel endpoint in a network. A computer might have only one physical channel (its Ethernet channel) but can have multiple ports (logical channels) each identified by a number. 68 Wireless N Adapter RNX-N250UB User Manual PPP Point-to-Point Protocol is used for two computers to communicate with each over a serial interface, like a phone line PPPoE Point-to-Point Protocol over Ethernet is used to connect multiple computers to a remote server over Ethernet PPTP Point-to-Point Tunneling Protocol is used for creating VPN tunnels over the Internet between two networks Preamble Used to synchronize communication timing between devices on a network Q QoS Quality of Service R RADIUS Remote Authentication Dial-In User Service allows for remote users to dial into a central server and be authenticated in order to access resources on a network Reboot To restart a computer and reload it's operating software or firmware from nonvolatile storage. Rendezvous Apple's version of UPnP, which allows for devices on a network to discover each other and be connected without the need to configure any settings Repeater Retransmits the signal of an Access Point in order to extend it's coverage RIP Routing Information Protocol is used to synchronize the routing table of all the routers on a network RJ-11 The most commonly used connection method for telephones RJ-45 The most commonly used connection method for Ethernet RS-232C 69 Wireless N Adapter RNX-N250UB User Manual The interface for serial communication between computers and other related devices RSA Algorithm used for encryption and authentication S Server A computer on a network that provides services and resources to other computers on the network Session key An encryption and decryption key that is generated for every communication session between two computers Session layer The fifth layer of the OSI model which coordinates the connection and communication between applications on both ends Simple Mail Transfer Protocol Used for sending and receiving email Simple Network Management Protocol Governs the management and monitoring of network devices SIP Session Initiation Protocol. A standard protocol for initiating a user session that involves multimedia content, such as voice or chat. SMTP Simple Mail Transfer Protocol SNMP Simple Network Management Protocol SOHO Small Office/Home Office SPI Stateful Packet Inspection SSH Secure Shell is a command line interface that allows for secure connections to remote computers SSID Service Set Identifier is a name for a wireless network Stateful inspection 70 Wireless N Adapter RNX-N250UB User Manual A feature of a firewall that monitors outgoing and incoming traffic to make sure that only valid responses to outgoing requests are allowed to pass though the firewall Subnet mask Determines what portion of an IP address designates the Network and which part designates the Host Syslog System Logger -- a distributed logging interface for collecting in one place the logs from different sources. Originally written for UNIX, it is now available for other operating systems, including Windows. T TCP Transmission Control Protocol TCP Raw A TCP/IP protocol for transmitting streams of printer data. TCP/IP Transmission Control Protocol/Internet Protocol TFTP Trivial File Transfer Protocol is a utility used for transferring files that is simpler to use than FTP but with less features Throughput The amount of data that can be transferred in a given time period Traceroute A utility displays the routes between you computer and specific destination U UDP User Datagram Protocol Unicast Communication between a single sender and receiver Universal Plug and Play A standard that allows network devices to discover each other and configure themselves to be a part of the network Upgrade To install a more recent version of a software or firmware product 71 Wireless N Adapter RNX-N250UB User Manual Upload To send a request from one computer to another and have a file transmitted from the requesting computer to the other UPnP Universal Plug and Play URL Uniform Resource Locator is a unique address for files accessible on the Internet USB Universal Serial Bus UTP Unshielded Twisted Pair V Virtual Private Network VPN: A secure tunnel over the Internet to connect remote offices or users to their company's network VLAN Virtual LAN Voice over IP Sending voice information over the Internet as opposed to the PSTN VoIP Voice over IP W Wake on LAN Allows you to power up a computer though it's Network Interface Card WAN Wide Area Network WCN Windows Connect Now. A Microsoft method for configuring and bootstrapping wireless networking hardware (access points) and wireless clients, including PCs and other devices. WDS Wireless Distribution System. A system that enables the interconnection of access points wirelessly. Web browser 72 Wireless N Adapter RNX-N250UB User Manual A utility that allows you to view content and interact with all of the information on the World Wide Web WEP Wired Equivalent Privacy is security for wireless networks that is supposed to be comparable to that of a wired network Wide Area Network The larger network that your LAN is connected to, which may be the Internet itself, or a regional or corporate network Wi-Fi Wireless Fidelity Wi-Fi Protected Access An updated version of security for wireless networks that provides authentication as well as encryption Wireless ISP A company that provides a broadband Internet connection over a wireless connection Wireless LAN Connecting to a Local Area Network over one of the 802.11 wireless standards WISP Wireless Internet Service Provider WLAN Wireless Local Area Network WPA Wi-Fi Protected Access. A Wi-Fi security enhancement that provides improved data encryption, relative to WEP. X xDSL A generic term for the family of digital subscriber line (DSL) technologies, such as ADSL, HDSL, RADSL, and SDSL. Y Yagi antenna A directional antenna used to concentrate wireless signals on a specific location 73