1
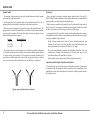
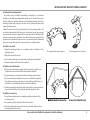
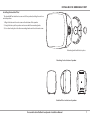
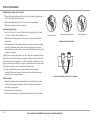
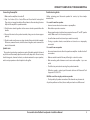
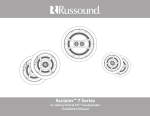
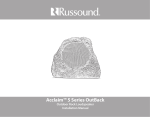
Acclaim™ 5 Series OutBack
Outdoor Loudspeaker
Installation Manual
Introduction
Introduction
Thank you for selecting the Russound Acclaim 5 Series Outdoor Speakers.
Like all Russound speakers, they combine acoustic technology with durability
and will provide years of musical enjoyment.
The Acclaim 5 Series line provides solutions for background music and
dedicated music listening. They combine premium acoustic materials with
advanced drivers to deliver exceptional performance in every application.
A key benefit to using these speakers is the high-efficiency design, which
means less amplification power is needed - less power does not mean quiet!
The speaker comes with two installation options: a free-standing base and
a bracket mount. The base attaches to one end of the speaker and provides
a stable vertical placement option for shelf or table. The bracket mount
accommodates flat surface and corner locations, plus the bracket accepts
U-bolts for attaching the speaker to a pole. Once the bracket is installed, the
speaker slips into slots on the bracket so you don’t have to hold the speaker
in place while securing it. The bracket and speaker have knurls for secure
alignment to the desired angle.
Designed and built to withstand the rigors of outdoor environments, the 5
Series outdoor speakers will provide years of trouble-free service. They work
in a wide range of temperatures and be unaffected by extremes of humidity.
A corrosion-resistant aluminum grille and bracket coupled with the speaker’s
rugged environmental design assures durability in any kind of weather. Sealed
enclosure offers greater durability against the environment's rigors.
2
Russound Acclaim OutBack Loudspeaker Installation Manual
speaker assembly
Mounting bracket
End cap Mounting knob
Speaker
Grille
Bookshelf foot option
Speaker assembly
Painting the speaker
The bracket has screw slots to accommodate both wall and pole installation
options. The speaker sits in the speaker bracket's "C" openings and is pivoted
into place and secured with the mounting knobs. End caps provide a cosmetic
covering over the bracket's attach points.
The speaker mounting bracket, enclosure, end caps, and grille can be
painted. If you paint the speaker, do not get paint on the speaker drivers. Also
be sure to minimize paint buildup so as not to clog the grille holes.
An included bookshelf foot option mounts in place of the bracket for an
attractive upright shelf installation for a speaker pair.
2. Mask the speaker terminals and baffle (the area on the front of the
enclosure that houses the drivers).
1. Gently pull off the speaker grille, making sure not to distort it.
3. Paint the bracket, enclosure, end caps, and grille separately. Spraying is
ideal, but if you can’t spray the paint, a roller with a short or medium nap
will work better than a brush. Apply one or two light coats.
4. While the paint is still wet, clear any clogged holes in the grille with bursts
of compressed air.
5. After the paint has thoroughly dried, remove the masking. Gently press
the grille into place on the speaker, using even pressure around the edge.
Russound Acclaim OutBack Loudspeaker Installation Manual
3
Wiring INfo
Speaker cable
Prewiring
The amount of wire needed varies with speaker placement. Label speaker
wires with left, right, and location.
Run a separate 2-conductor stranded copper speaker cable of at least 16
AWG (1.5 mm) from the amplifier to each speaker. Be sure to use cable with the
appropriate fire resistance rating for the application.
Use Russound AW series speaker cable or any reputable brand of 16 to 12
gauge multi-stranded wiring for amplifier- to-speaker connections.
Wire is measured in gauges: the greater the number, the smaller the wire. The
gauge of wire needed is determined by the distance between the amplifier/
receiver and the speakers. The longer the run, the heavier the gauge needed.
Use the following chart as a guide:
Length
0' to 100'
50' to 150'
100' to 200'
Minimum Gauge
16
14
12
+
Leave about 2 feet (0.6 m) of cable at each end for connecting to the speakers
and amplifier. Label the cables so you will know which cable connects to each
keypad or amplifier output channel.
• Avoid running speaker wires close to house electrical wiring for any
distance. If you have to run them parallel, leave two feet between the
wiring. Speaker wires should cross AC lines at a 90° angle.
The standard colors on the terminals are red Positive (+) and black Negative
(-). If the wire has transparent insulation, one conductor will be copper-colored
(+) and the other silver-colored (-). If the wire has an opaque insulation, the
conductors are differentiated by a series of ribs or grooves, a stripe, or dotted
line on one conductor. Use and mark these as the Positive (+) conductor.
-
When running a speaker cable parallel to an AC power cable, keep them at
least 12 inches (30 cm) apart to minimize electromagnetic interference. If the
speaker cables must cross AC wiring, cross them at right angles.
-
+
• The entire path between speakers and amplifier should be clear and
unobstructed. Confirm the placement for the wall port close to the
intended location of the amplifier or receiver.
• Label speaker wires at each end with left and right and location.
Impedance matching for amplifiers and speakers
If you intend to use more than one pair of speakers at a time it’s important
to consider both the impedance of the speakers and the capabilities of the
amplifier or receiver. Not all amplifiers or receivers can safely operate two sets
of speakers at once.
Typical usage of speaker wire conductors
4
Russound Acclaim OutBack Loudspeaker Installation Manual
installing the bracket on wall surface
Installing the mounting bracket
The speaker can be installed horizontally or vertically. For a horizontal
installation, install the mounting bracket with its end "C" slots at the top. Also,
when installing the speaker outdoors in the horizontal position, locate the
mounting bracket high enough so the front of the speaker will point down
toward the listening area.
Note: The bracket must be securely attached to the mounting surface. For
an exterior plywood wall with siding, use rust-resistant screws long enough
to penetrate the siding and plywood. For a standard interior hollow wall, we
recommend screwing the bracket to the wall studs whenever possible. If the
speaker must be mounted between studs, use a minimum of two hollow-wall
anchors to secure the bracket. For a masonry wall, use suitable anchors.
Installation on wood
1. Using the mounting bracket as a template, mark the locations of the
mounting screws.
Mounting bracket horizontal position
Mounting bracket vertical position
2. Drill pilot holes for the screws.
3. For an exterior wall, apply a ring of caulk or sealant around each hole.
4. Screw the bracket to the wall or other surface.
Installation on a hollow wall
1. Once you have determined roughly where to mount the speakers, use
a stud finder to locate the wall studs and mark their location.
2. Using the bracket as a template, mark the mounting screw locations.
3. If you are attaching the bracket to studs, use a small drill to make pilot
holes for the mounting screws. If you are using hollow-wall anchors, use
a drill of the size recommended by the anchor manufacturer.
4. Screw the mounting bracket to the wall studs with the screws provided, or
secure the wall anchors in the wall and attach the bracket to them.
Installation on masonry
1. Using the mounting bracket as a template, mark the locations of the
mounting screws.
2. Use a masonry drill to make pilot holes for the anchors.
3. Insert the suitable masonry anchors into the pilot holes and attach the
mounting bracket with screws.
Russound Acclaim OutBack Loudspeaker Installation Manual
5
installing the bracket on pole / shelf foot
Installing the mounting bracket on a pole
The speaker can be installed horizontally or vertically on a pole up to 1"
(2.54 cm) in diameter with two standard 5/16 x 1-3/8 x 1/2" U-bolts with 5/1618" threads. For a horizontal installation, install the mounting bracket with
its end "C" slots at the top. Also, when installing the speaker outdoors in the
horizontal position, locate the mounting bracket high enough so the front of
the speaker will point down toward the listening area.
Installation on pole
1. Pass two standard U-bolts behind the pole and slide bracket over ends.
2. Attach bracket with lock washers and bolts, and tighten.
Installation on in-ground pole
The speaker can be mounted on an in-ground pole with buried cable.
First, consult your local utility companies to learn of existing buried cables,
pipes or lines. Be aware of any local building code requirements that may be
applicable.
1. Drive a 1" (2.54 cm) pipe into the ground at the prequalified location.
Determine the length and location for the cable trench and dig below the
frost line. Use either direct buried speaker cable or cable run through
conduit.
Mounting bracket horizontal position
Mounting bracket vertical position
2. Pass two standard U-bolts behind the pole and slide bracket over ends.
3. Attach bracket with lock washers and bolts, and tighten.
4. Leave about 2 feet of cable at the speaker end for connections and
adjustments.
Speaker mounted on in-ground pole
6
Russound Acclaim OutBack Loudspeaker Installation Manual
installing the bookshelf foot
Installing the bookshelf foot
The bookshelf foot attaches to one end of the speaker, holding the unit in a
vertical position.
1. Align the foot over the end screw on the bottom of the speaker.
2. Snug the foot up to the speaker and secure with the mounting knob.
3. For a clean look, place the other mounting knob over the other end screw.
Mounting knob holds foot in place
Attaching foot to bottom of speaker
Bookshelf foot on bottom of speaker
Russound Acclaim OutBack Loudspeaker Installation Manual
7
attach the speaker
Attaching the speaker to the bracket
1. Thread the knobs halfway into the ends of the speaker, leaving about ¼
inch (6 mm) of their threads exposed.
2. Slip the knob threads into the "C" slots in the mounting bracket.
3. Rotate the speaker to show the terminals.
Connecting the speaker
1. Strip 1 to 2 inches (2.5 to 5 cm) off the end of the cable jacket. Then strip
½ inch (1.3 cm) of insulation off each wire.
2. Twist the wire strands together so there are no strands separated from
the bundle.
C-slot of bracket
Mounting knob attached
Speaker attached to bracket
3. Connect the wires to the speaker terminals, being sure to observe proper
polarity. For standard speaker cable with red and black wires, connect
the red wire to the red positive (+) terminal and the black wire to the black
negative (–) terminal.
Note: Some speaker cables may have other ways of designating polarity.
Cable with a clear jacket may has a copper-colored wire for positive and a
silver-colored wire for negative. In a cable with white and black wires, the
white is positive and the black is negative. Cable with both wires the same
color may have grooves, ribs, or stripes on the positive wire.
4. Check to make sure there are no stray strands of wire outside the
terminals. If there are, remove the wire, twist the strands together, and
reconnect the wire to the terminal.
Final Assembly
Insertion of speaker wire on back of speaker
1. Rotate the speaker to the desired angle. If you are installing the speaker
outdoors in the horizontal position, rotate it so the front points down
toward the listening area.
2. Tighten the knobs on both ends.
3. Slip the end caps onto the ends of the speaker, from the rear to the front.
8
Russound Acclaim OutBack Loudspeaker Installation Manual
End cap in place
connect to amplifier / troubleshooting
Connecting the amplifier
Troubleshooting Guide
1. Make sure the amplifier is turned off.
2. Strip 1 to 2 inches (2.5 to 5 cm) off the end of each cable’s outer jacket.
Then strip just enough insulation off each wire to allow inserting the wires
fully into the amplifier’s speaker terminals.
3. Twist the wire strands together so there are no strands separated from the
bundle.
4. Connect the wires to the speaker terminals, being sure to observe proper
polarity.
5. Check to make sure there are no stray strands of wire outside the terminals.
If there are, remove the wire, twist the strands together, and reconnect the
wire to the terminal.
Speaker care
These sealed construction speakers are made of durable materials that need
very little care. Occasionally wipe them with a soft, damp cloth. Do not use any
harsh detergents, chemical solvents, or abrasive materials on your speakers,
and do not spray water or other liquids into the grilles.
Before returning your Russound speakers for service, try these simple
remedies first.
No sound from either speaker:
• Incorrect source selected on receiver or preamplifier.
• Mute button pressed on receiver.
• Wrong speaker output selected; many receivers have an "A" and "B" speaker
switch. Make sure it is in the correct position.
• In-wall volume control not turned up or wired incorrectly.
• If using a speaker selector, room/station not turned on or improperly
connected.
No sound from one speaker:
• Unsecured connection at either the speaker or amplifier - double-check all
connections.
• Balance control turned all the way left or right - return it to center.
• Bad connecting cable between sound source and amplifier - try a new
cable.
• Check for stray wire strands crossing the speaker terminals.
• Defective speaker - contact your Russound dealer or call Russound Tech
Support at 603.659.5170.
Muffled sound from single point stereo speaker:
• Check polarity of speaker connections. One channel may be reversed.
Any other problems not listed, discuss with your dealer or call Russound.
Russound Acclaim OutBack Loudspeaker Installation Manual
9
Technical Specifications
Model: Description:
Woofer:
Tweeter:
Mounting Options: Dimensions:
Terminals:
Grille:
Bracket:
Bookshelf foot:
Recommended Power:
Sensitivity: Frequency Response:
Nominal Impedance: Unit Weight: 5B45
2-way Outdoor Loudspeaker Pair
4" (100 mm) IMPP cone
1" (25 mm) Teteron™
Bookshelf foot, pole, flat or corner surface
9.5" x 6.25" x 6.25" (24.13 x 15.87 x 15.87 cm)
12 gauge spring terminal
Aluminum
Aluminum
Yes
10 - 100 watts RMS
88 dB SPL (2.83V @ 1m)
80 Hz - 20 kHz ± 3 dB
8 ohm
3.9 lbs. (1.8 kg)
Model: Description:
Woofer:
Tweeter:
Mounting Options: Dimensions:
Terminals:
Grille:
Bracket:
Bookshelf foot:
Recommended Power:
Sensitivity: Frequency Response:
Nominal Impedance: Unit Weight: 5B65
2-way Outdoor Loudspeaker Pair
6.5" (165 mm) IMPP cone
1" (25 mm) Teteron
Bookshelf foot, pole, flat or corner surface
13" x 8.75" x 8.25" (33.02 x 22.22 x 20.95 cm)
12 gauge spring terminal
Aluminum
Aluminum
Yes
10 - 150 watts RMS
91 dB SPL (2.83V @ 1m)
64 Hz - 20 kHz ± 3 dB
8 ohm
7.1 lbs. (3.2 kg)
Model: Description:
Woofer:
Tweeter:
Mounting Options: Dimensions:
Terminals:
Grille:
Bracket:
Bookshelf foot:
Recommended Power:
Sensitivity: Frequency Response:
Nominal Impedance: Unit Weight: 5B55
2-way Outdoor Loudspeaker Pair
5.25" (133 mm) IMPP cone
1" (25 mm) Teteron
Bookshelf foot, pole, flat or corner surface
11.25" x 7.5" x 7.5" (28.57 x 19.05 x 19.05 cm)
12 gauge spring terminal
Aluminum
Aluminum
Yes
10 - 125 watts RMS
90 dB SPL (2.83V @ 1m)
72 Hz - 20 kHz ± 3 dB
8 ohm
5.4 lbs. (2.4 kg)
Model: Description:
Woofer:
Tweeter:
Mounting Options: Dimensions:
Terminals:
Grille:
Bracket:
Bookshelf foot:
Recommended Power:
Sensitivity: Frequency Response:
Nominal Impedance: Unit Weight: 5B65S
Single Point Stereo Outdoor Loudspeaker
6.5" (165 mm) IMPP cone
(2) 1" (25 mm) Teteron
Pole, flat or corner surface
13" x 8.75" x 8.25" (33.02 x 22.22 x 20.95 cm)
12 gauge spring terminal
Aluminum
Aluminum No
10 - 150 watts RMS
91 dB SPL (2.83V @ 1m)
62 Hz - 20 kHz ± 3 dB
8 ohm/8 ohm
7.2 lbs. ( 3.3 kg)
10
Russound Acclaim OutBack Loudspeaker Installation Manual
WARRANTY
All Russound Acclaim 5 Series Speaker products have a Limited Lifetime
Warranty against defects in materials and workmanship. Proof of Purchase
must accompany all claims. During the warranty period Russound will replace
any defective part and correct any defect in workmanship without charge for
either parts or labor.
This Warranty Does Not Cover:
• Damage caused by abuse, accident, misuse, negligence, or improper
operation (installation).
• Products that have been altered or modified.
Russound may replace returned speakers with a product of equal value and
performance. In such cases, some modifications to the mounting may be
necessary and are not Russound’s responsibility.
• Any product whose identifying number or decal, serial #, etc. has been
altered, defaced or removed.
For this warranty to apply, the unit must be installed and used according to
its written instructions. If necessary, repairs must be performed by Russound.
The unit must be returned to Russound at the owner’s expense and with
prior written permission. Accidental damage and shipping damage are not
considered defects, nor is damage resulting from abuse or from servicing
performed by an agency or person not specifically authorized in writing by
Russound.
Due to our continual efforts to improve product quality as new technology
and techniques become available, Russound/FMP, Inc. reserves the right to
revise speaker systems specifications without notice.
• Normal wear and maintenance.
Russound products are sold only through authorized Dealers and
Distributors to ensure that customers obtain proper support and service.
Russound reserves the right to limit the warranty of products purchased from
an unauthorized dealer or other source, including retailers, mail order sellers,
and online sellers, to ninety (90) days from the date of purchase.
Damage to or destruction of components due to application of excessive
power voids the warranty on those parts. In these cases, repairs will be made
on the basis of the retail value of the parts and labor. To return for repairs, the
unit must be shipped to Russound at the owner’s expense, along with a note
explaining the nature of service required. Be sure to pack the speaker(s) in a
corrugated container with at least 3" (7.6 cm) of resilient material to protect
the unit from damage in transit.
Before returning the unit for repair, call Russound at 603.659.5170 for a Return
Authorization number. Write this number on the shipping label and ship to:
Russound
ATTN: Service
5 Forbes Road
Newmarket, NH 03857
Russound Acclaim OutBack Loudspeaker Installation Manual
11
Acclaim™ 5 Series OutBack
Outdoor Loudspeaker
Installation Manual
©2009 Russound. All rights reserved.
All trademarks are the property of their respective owners.
Specifications are subject to change without notice.
Russound is not responsible for typographical errors or omissions.
Models: 5B45, 5B55, 5B65, 5B65S
Russound, Inc.
5 Forbes Road, Newmarket, NH 03857
tel 603.659.5170 • fax 603.659.5388
email: [email protected] www.russound.com
28-1349
10/14/09