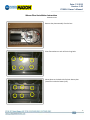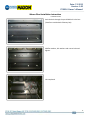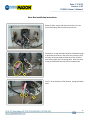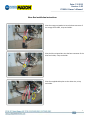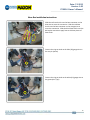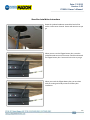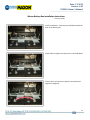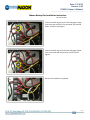
1
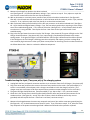
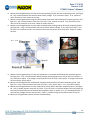
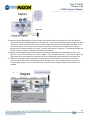
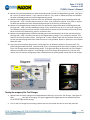
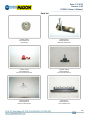
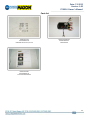
Date: 7.5.2012
Version: 1.0
Owners Manual INST007
Maxon Part # 906681-01
P7000-K MAXON #286121-01
OWNERS MANUAL
P7000-K MAXON PART #286121-01 KIT
General Information............................................................................................................................................................. 2
Plant Installation Instructions .............................................................................................................................................. 3
Nose Box Installation Instructions........................................................................................................................................ 6
Battery Box Installation Instructions .................................................................................................................................. 11
Wiring Diagram .................................................................................................................................................................. 19
Trouble Shooting ................................................................................................................................................................ 20
Trail Charger with Lockouts Theory of Operation .............................................................................................................. 26
Parts List ............................................................................................................................................................................. 29
Date: 7.5.2012
Version: 1.00
P7000-K Owner’s Manual
GENERAL INFORMATION
PROBLEM
On applications where liftgate batteries are mounted a long distance from the primary vehicle’s electrical system,
voltage drop will occur. The longer the distance and the smaller the cables that connect the two battery systems, the
greater the voltage drop. To charge these liftgate batteries, the correct voltage must be applied to these batteries.
Without the necessary voltage (electrical pressure) to push current through the liftgate batteries for recharging, no
recharging can occur. To charge a group 31 flooded cell battery at 0 degrees F, voltages of 15 volts are necessary. The
same battery pack at 80 degrees F might only require 14.0 volts. The heavy-duty commercial vehicle alternator is
normally set at 14.0 volts and flat compensated. The typical vehicle’s battery pack is maintained at approximately 13.5
volts. The difference occurs because of the voltage drop between the battery and the alternator. With this fact in
mind, the starting voltage for the liftgate batteries is 13.5 volts.
The circuit to charge the liftgate batteries includes the cables from the vehicle's battery box to the dual pole
receptacle at the back of the tractor, the dual pole cable from the tractor to the trailer, the receptacle at the front of
the trailer, and the cable that connects to the liftgate batteries. The total length of this can be well over 60 feet. All of
this length and connections (including fuses) create voltage drop in the system. While the total circuit resistance of
this circuit is constant, as the current load increases, the voltage drop also increases. It is impossible to have the
correct level of voltage at the liftgate batteries. This reduced voltage results in a battery pack that is not maintained at
a proper state of charge, which results in shortened battery life, less operating time and possible damage to the
liftgate motor.
SOLUTION
TRAIL CHARGER – Eliminates the above problem by amplifying (boosting) any input voltage (9 to 14) to the correct
voltage necessary to charge and maintain the liftgate batteries. This input voltage can be obtained through the 7-way
auxiliary pin, which now allows the liftgate batteries to be charged when connected to any tractor with no dual pole
connection necessary. This increased voltage will allow the batteries to be charged and maintained at a higher state of
charge so that they provide the energy necessary to do whatever job they are designed for, even in the toughest
environments. The Trail Charger also will not let the liftgate batteries back feed to the tractor’s battery pack.
The Trail Charger with Lockouts has a shutdown mode of operation:
Shutdown Mode: This mode is enabled when the lock out pin is active. In this mode the charger output is shutdown
and will not charge an external battery. This mode has the highest priority and overrides all other modes. This feature
is used when the Trail Charger is powered off of the aux circuit. A lead is connected to the stop light circuit to the six
pin connector of the Trail Charger with Lockouts. When the brakes are applied the Trail Charger with Lockouts turns
off so that the trailer’s ABS system gets full available power. When the brakes are released the Trail Charger turns back
on.
This system provides three ways to power the Trail Charger. Dual pole, single pole or from the aux circuit of the
seven way. Any tractor can provide power the Trail Charger with this system. It automatically selects the correct
source.
2
Date: 7.5.2012
Version: 1.00
P7000-K Owner’s Manual
Maxon Plant Installation Instructions
Installed at Plant
1.
2.
3.
Remove the plate assembly from the box.
Place flat washers on each of the six long bolts.
Mount plate to the back-side of plastic battery box.
(View from inside the battery box)
3
Date: 7.5.2012
Version: 1.00
P7000-K Owner’s Manual
7.
Maxon Plant Installation Instructions
Installed at Plant
4.
Push the bolts through the pre-drilled hole in the box.
(View from outside back of battery box)
5.
Add flat washers, lock washers and nuts to bolts and
tighten.
6.
Job completed.
4
Date: 7.5.2012
Version: 1.00
P7000-K Owner’s Manual
Nose Box Installation Instructions
Done by Trailer Manufacturer or Installer
1.
Mount the combo nose box to the front of the trailer.
Mount it close enough so the short conductor can easily
reach the seven way nose box. Place the supplied 2ft
piece of convoluted tubing over the blue, orange and
white wires.
2.
Secure the short white (10) gauge cable that is in the
convoluted tubing to the trailer for a redundant ground.
3.
Open the seven way nose box so that you can access the
terminals where the wires for the trailer are connected.
5
Date: 7.5.2012
Version: 1.00
P7000-K Owner’s Manual
Nose Box Installation Instructions
4.
5.
6.
Route the blue, orange and white wires that are in the
convoluted tubing into the seven way nose box.
Cut the blue, orange and white wires to the desired length
to eliminate excess wire in the seven way nose box. Place
one piece of the provided red heat shrink over the blue
wire and one piece over the orange wire. Place one piece
of the provided black heat shrink over the white wire.
Strip ¼” of the insulation off of the blue, orange and white
wires.
6
Date: 7.5.2012
Version: 1.00
P7000-K Owner’s Manual
Nose Box Installation Instructions
7.
Place the orange stripped wire into the butt-connector of
the orange fuse holder, crimp and solder.
8.
Place the blue stripped wire into the butt-connector of the
blue fuse holder, crimp and solder.
9.
Place the supplied #10 eyelet on the white wire, crimp
and solder.
7
Date: 7.5.2012
Version: 1.00
P7000-K Owner’s Manual
Nose Box Installation Instructions
10.
11.
12.
Slide the red heat shrink over the butt-connector on the
blue wire to cover the connection. Slide the red heat
shrink over the butt-connector on the orange wire to
cover the connection. Slide the black heat shrink over the
#10 eyelet connection. Apply heat to all three pieces of
heat shrink.
Connect the ring terminal on the blue (10) gauge wire to
the aux pin (center)
Connect the ring terminal on the white (10) gauge wire to
the ground pin. (Top)
8
Date: 7.5.2012
Version: 1.00
P7000-K Owner’s Manual
Nose Box Installation Instructions
13.
14.
15.
Connect the ring terminal on the orange (16) gauge wire to
the stop pin. (bottom)
Mount the seven-way nose box back on the trailer. Secure
the three wires in convoluted tubing with wire ties.
Route the jacketed conductor behind the front cover and
then under the head plate through the air/electrical tube
to the center channel.
9
Date: 7.5.2012
Version: 1.00
P7000-K Owner’s Manual
Nose Box Installation Instructions
16.
Route the jacketed conductor toward the back of the
trailer via the center channel. Secure with wire ties as you
go.
17.
When you are near the liftgate battery box, route the
jacketed conductor out of the center channel and toward
the liftgate battery box. Secure with wire ties as you go.
18
When you reach the liftgate battery box, you are done
with the routing and ready to start the battery box
installation.
10
Date: 7.5.2012
Version: 1.00
P7000-K Owner’s Manual
Maxon Battery Box Installation Instructions
Done by Installer
1.
2.
3.
Install the batteries. Positive posts should be toward the
door of the battery box. .
Install and then tighten the three nuts on the hold downs.
Connect inter-cell connectors (positive to positive and
negative to negative).
11
Date: 7.5.2012
Version: 1.00
P7000-K Owner’s Manual
Maxon Battery Box Installation Instructions
Done by Installer
4.
Connect the fuse cube bracket to the positive battery post
on the left side. Install nut and tighten.
5.
Connect the 16 gauge black wire marked liftgate battery
positive) to the right positive battery post.
6.
Connect the white (10) gauge cable from the black
installed stud to the battery ground post on the right side.
12
Date: 7.5.2012
Version: 1.00
P7000-K Owner’s Manual
Maxon Battery Box Installation Instructions
Done by Installer
7.
Install the nuts on the rest of the battery posts and
tighten.
8.
Route the jacketed wire into the rear opening of the
battery box.
9.
Position the conductor so that it can reach the five stud
strip and mark the connector.
13
Date: 7.5.2012
Version: 1.00
P7000-K Owner’s Manual
Maxon Battery Box Installation Instructions
Done by Installer
10.
Pull the conductor out of the box (easier to work on) and
cut of the excess at your mark.
11.
Cut the jacketed portion off of the conductor at
approximately 8 inches.
12.
Add heat shrink to the area where you cut the jacket off
and apply heat.
12.
14
Date: 7.5.2012
Version: 1.00
P7000-K Owner’s Manual
Maxon Battery Box Installation Instructions
Done by Installer
13.
Strip back the insulation of each of the four (4) wires 3/8
of an inch.
14.
Add red ¼ heat shrink on the black and orange and yellow
wires and black ¼ heat shrink on the white wire.
15.
Crimp the 3/8 ring terminals on the white and black wires.
Then crimp the #10 ring terminal on the yellow and
orange wires.
15
Date: 7.5.2012
Version: 1.00
P7000-K Owner’s Manual
Maxon Battery Box Installation Instructions
Done by Installer
16.
17.
18.
Position the heat shrink on each crimp and apply heat.
Connect the 3/8 ring terminal of the (10) gauge black wire
to the black insulated stud marked positive and install
and tighten the nut.
Connect the 3/8 ring terminal of the (10) gauge white wire
to the white insulated stud and install and tighten the nut.
16
Date: 7.5.2012
Version: 1.00
P7000-K Owner’s Manual
Maxon Battery Box Installation Instructions
Done by Installer
Connect the #10 ring terminal of the (16) gauge orange
wire to the top stud of the five connector strip marked
brake. Install nut and tighten.
19.
20.
21.
Connect the #10 ring terminal of the (16) gauge yellow
wire to the third stud marked relay. Install nut and
tighten.
Battery box installation completed.
17
Date: 7.5.2012
Version: 1.00
P7000-K Owner’s Manual
Maxon Battery Box Installation Instructions
Done by Installer
22.
22.
Job complete.
18
Date: 7.5.2012
Version: 1.00
P7000-K Owner’s Manual
LED’s are located on
the outside of the
nose box. The diagram
simply indicates
internal composition.
Note: The first step to troubleshooting the Trail Charger system should be to ensure the liftgate batteries
are in a good state of charge (at least 12.3 volts).
1.
Disconnect batteries
2.
Test each battery with an approved battery tester. If good, continue with the troubleshooting guide.
19
Date: 7.5.2012
Version: 1.00
P7000-K Owner’s Manual
Troubleshooting the input (dual or single pole) portion of the charging system (No load)
1. Plug the dual or single pole stinger cord into the combo nose box on the front of the trailer. (See picture #1)
The tractor must be running or you can use a combination of a battery and a battery charger. Note: if you
utilize the latter, it must be able to provide 13.5 to 14.5 volts and up to 25 amps when loaded and still
maintain the correct voltage levels.
2. Unplug both the four-pin Deutsch connector and the six-pin connector from the Trail Charger. (See picture #2)
Steps 3 to 12 are with no load (zero current flow)
3. With an ohmmeter or continuity tester, measure from the white ground insulated stud and the liftgate battery
negative stud. (See figure #1 – Ohm #1) It should read zero on ohms and buzz on continuity. If yes, continue
to step 4. If no, check both connections to see if they are tight. If that does not fix the issue, repair or replace
the wire as necessary.
4. With a voltmeter (Do NOT use a test light) measure the voltage from the black insulated stud to the white
insulated stud. (See figure #1 – V1) Should read more than 13.3 volts. If yes, continue to step 5. If no, repair
the circuit from the combo nose box on the front of the trailer to the black and white insulated studs in the
battery box. The yellow LED light illuminated indicates there is power and the fuse is not blown.
5. Measure the voltage from the fourth stud of the five stud strip and to the white insulated ground stud. (See
figure #1 –V2) It should read more than 13.3 volts. If yes, continue to step 6. If no, check the in-line fuse from
the black insulated power stud to the fourth stud of the five stud strip. (See figure #1 – Arrow) If the fuse is
blown make sure the leads are not grounded and then replace the fuse.
6. The green LED lights on the control module should be illuminated. (See figure #1 – Circle) If yes, continue to
step 7. If no, ensure the nut on the third stud of the five stud strip and the white insulated ground studs are
tight. If they are both tight, the control module is defective and needs replaced.
7. Measure the voltage from the second stud (Ignition) on the five-stud strip to the white insulated ground
stud. (See figure #1 – V3) It should read more battery voltage. If yes continue to step #8. If no, ensure the nut
securing the wire on the second stud of the five stud strip is tight. If it is, the issue is the control module and it
needs to be replaced.
V3
V1
Picture #1
V2
Ω1
Figure #1
Picture #2
8. Measure the voltage from pin #1 on the four-pin connector to the white insulated stud. (See figure #2 – V4) It
should read the same voltage as at the front of the trailer... If yes, continue to step 8. If no, repair or replace
the wire from the black insulated stud to pin #1.
20
Date: 7.5.2012
Version: 1.00
P7000-K Owner’s Manual
9. Measure the voltage from pin #4 to the white insulated
stud. (See figure #2 – V5) Should read battery voltage. If yes, continue to step 9. If no, replace or repair the
wire from the second stud on the five wire strip to the #4 pin.
10. With an ohmmeter or continuity tester, measure from pin #3 to the white insulated stud. (See figure #2 –
Ohm #2) It should read zero with the ohmmeter or hear the buzzer with the continuity tester. If yes, continue
to step 11. If no, replace or repair wire from the #3 pin to the white insulated stud.
11. With a voltmeter measure from the #2 pin of the four-pin connector to the white insulated stud. (See figure
#2 – V6) It should read liftgate battery voltage. If yes, the fuse cube is good and you need to go to the output
test of the troubleshooting guide. If no, check the fuse cube. (See figure #2 – arrow) If blown check the wire
to make sure it is not grounded. Then replace the fuse. Now move to the input session with a load
troubleshooting.
12. Plug in the four-pin Deutsch connector into the Trail Charger. (See picture #3) The green LED light on the Trail
Charger should illuminate. (See picture #4) If yes, input testing is completed and proceeds to the output
testing session. If the green LED light is not illuminated the Trail Charger is defective and should be replaced.
If the LED light on the Trail Charger is blinking green then red quickly and repeats, you have a voltage drop
issue caused by high resistance in either your power source/tractor or the wiring from the combo nose box to
the liftgate battery box. Repair or replace the defective component.
V6
Ω2
Picture #3
V5
V4
Figure #2
Picture #4
Troubleshooting the input (7-way aux pin) of the charging system
1. Unplug both the four-pin Deutsch connector and the six pin connector from the Trail Charger. (See picture #5)
2. Plug in the seven way cord from the tractor to the seven way nose box on the trailer. (See picture #6-A) If a
tractor is not available, utilize a battery with a charger connected to it with the charger turned on. (The
charger must have a minimum of 20 amps output and can provide an output voltage of 13.5 to 14.5 volts.)
3. The green LED light should illuminate. (See picture #6-B) If yes, skip to step 5. If no, continue to step 4.
4. Check the in-line 30 amp fuse in the blue power lead (inside the seven-way nose box) that connects to the
combo nose box. (See figure #3 – arrow) If the fuse is blown, check the leads to ensure they are not
grounded, and then replace the fuse. If the fuse is not blown, continue to step 5.
5. Measure the voltage between the seven-way receptacle aux (center) pin and the seven-way ground (top) pin.
(See figure #3 – V7) It should measure more than 13.3 volts. If yes, continue to step 6. If no, either the sevenway receptacle or the power source being utilized is defective and needs to be repaired or replaced.
21
Date: 7.5.2012
Version: 1.00
P7000-K Owner’s Manual
6. Measure the voltage between the relay coil (by back probing) and the dual pole receptacle ground. (See figure
#3 – V8) It should measure the same as tractor battery voltage. If yes, continue to step 7. If no, replace or
repair the wire from the aux pin to the relay.
7. Measure the voltage between the green LED connector (relay side) and the dual pole receptacle ground. (See
figure #3 – V9) It should measure more than 13.3 volts. If yes, continue to step 8. If no, the wire from the
relay coil to the connector is the issue. Repair or replace the wire.
8. Measure the voltage between the relay input contact (by back probing) and the dual pole receptacle ground.
(See figure #3 – V10) It should measure same as the tractor battery voltage. If yes, continue to step 9. If no,
the issue is in the blue wire and in-line fuse from the seven-way aux pin to the relay input. Repair or replace
this wire.
V7
V8
Picture #5
V10
A
V9
Figure #3
B
Picture #6
9. Measure the voltage between the relay coil (yellow wire is connected) and the dual pole receptacle ground.
(See figure #4 – V11) It should measure battery voltage, then dropping to zero volts in less than a minute. If
yes, continue to step 10. If no voltage is measured, the coil of the relay is bad, replace. If voltage is measured
but never drops, skip to step 12.
10. Measure the voltage between the dual pole receptacle positive and the dual pole receptacle ground. (See
figure #4 – V12) It should measure more than 13.3 volts. If yes, skip to step 12. If no, continue to step 11.
11. Measure the voltage between the relay output (30 terminal) and the dual pole receptacle ground. (See figure
#4 – V13) It should measure more than 13.3 volts. If yes, the issue is in the wire between the relay output (30
terminal) and the positive post of the dual pole receptacle, repair or replace. If no, try a known good relay. If
you now have voltage, the issue was the relay. If still no, install the original relay and continue to step 12.
12. Move to the liftgate battery box to continue troubleshooting.
22
Date: 7.5.2012
Version: 1.00
P7000-K Owner’s Manual
V12 V11
Figure #4
V13
13. Measure the voltage between the relay junction stud (the third stud from the top on the five stud junction
strip) and the white insulated ground stud. (See figure #5 – V14) It should measure battery voltage, then drop
to zero volts. When it drops to zero volts, the control module should have both LED lights illuminated. If yes,
continue to step 14. If no, check to see if the wire between the control module and the white insulated
ground stud is connected and the nut is tight. Connect and/or tighten if necessary. If connected and tight and
still no, the control module is defective and needs to be replaced.
14. Measure the voltage between the black positive insulated stud and the white insulated ground stud. (See
figure #5 – V15) It should measure 13.3 volts or higher. If yes, continue to step 15. If no, repair or replace the
white and or black wire between the nose box and the insulated studs (white and black) in the battery box.
15. Measure the voltage between the ignition junction stud (the second stud from the top on the five stud
junction strip) and the white insulated ground stud. (See figure #5 – V16) It should measure the same as
tractor battery voltage. If yes, continue to step 16. If no, the control module is defective and needs to be
replaced.
V16
V14
V15
Figure #5
23
Date: 7.5.2012
Version: 1.00
P7000-K Owner’s Manual
16. Measure the resistance between the white insulated ground stud and the liftgate battery ground. (See figure
#6 – Ohm 3) It should read zero. If yes, continue to step 17. If no, repair or replace the white wire between
the white insulated ground stud and the liftgate battery ground.
17. Measure the voltage between the #1 pin of the four pin Deutsch plug and the white insulated ground stud.
(See figure #6 – V17) It should read more than 13.3 volts. If yes, continue to step 18. If no, repair or replace
the black wire between the black insulated stud and the #1 pin of the four pin Deutsch plug.
18. Measure the voltage between the #4 pin of the four pin Deutsch plug and the white insulated ground stud.
(See figure #6 – V18) It should read battery voltage. If yes, continue to step 19. If no, the issue is the green
wire between the ignition junction stud (the second stud from the top on the five stud junction strip) and the
#4 pin of the four pin Deutsch plug, repair or replace this wire.
19. Measure the voltage between the white insulated ground stud and the #2 pin of the four pin Deutsch plug.
(See figure #6 – V19) It should be the same as the liftgate battery voltage. If yes, continue to step 20. If no,
check to see if the fuse cube is blown. (See figure #6 – arrow) If blown, check the wire between the #2 pin of
the four pin Deutsch plug and the fuse cube to ensure it is not grounded. Repair or replace wire, then replace
blown fuse cube.
20. Plug in the four pin Deutsch plug into the Trail Charger four pin Deutsch receptacle. (See picture #7) The
green LED light should illuminate. (See picture #8) If yes, input testing of the seven-way is complete, proceed
to the Trail Charger output troubleshooting section. If the green LED does not illuminate, the Trail Charger is
defective and needs to be replaced. If the LED light on the Trail Charger blinks green once, red twice, and
repeats, there is excessive voltage drop under a load between the tractor/power source and the trail charger.
Ω3
V19
Picture #7
V18
V17
Figure #6
Picture #8
Testing the output of the Trail Charger
1. Measure and record the voltage of the liftgate batteries before you turn on the Trail Charger. (See figure #7 –
V20) __________volts with no charging. It is highly suggested the liftgate batteries be tested and at least
12.35 volts or higher before testing.
2. Turn on the Trail Charger by connecting a power source to the combo nose box or seven-way nose box.
24
Date: 7.5.2012
Version: 1.00
P7000-K Owner’s Manual
3. Place a clip on ammeter around the red lead between pin
#2 of the four pin Deutsch plug and the fuse cube connected to the liftgate battery positive. (See picture #9)
Should read current. If yes, the Trail Charger is operating. If zero the Trail Charger is defective and needs to
be replaced.
Note: If you do not have a clip-on ammeter, use a voltmeter to read voltage when the Trail Charger is
operating. You should see considerably higher voltage.
Picture #9
V20
Figure #7
Testing the brake lock out
1. Plug the six-pin connector into the Trail Charger. (See picture #10) Apply the brakes on the tractor. Green
LED light should blink slowly and the Trail Charger should turn off when the brakes are applied. Release the
brakes and the green LED should turn solid green and the Trail Charger should turn on. If it does the above the
brake lock out is functioning correctly. If no, continue to the next step.
2. Unplug the six-pin connector. (See picture #11) With a voltmeter measure the voltage from pin #2 of the sixpin connector to the white insulated ground stud. (See figure #8 – V21) It should read voltage only when the
brakes are applied. If you have voltage when the brakes are applied and do not when they are released, you
are getting the proper signal and the Trail Charger is defective and needs replaced. If no voltage when the
brakes are applied, check the seven way nose box. The orange wire that connects to the brake circuit is fused
with a 2 amp in-line fuse in the seven-way nose box. (See figure #8 – arrow) Repair or replace the defective
portion of this circuit.
FRONT OF TRAILER
Picture #10
V21
Picture #11
Figure #8
25
Date: 7.5.2012
Version: 1.00
P7000-K Owner’s Manual
TRAIL CHARGER WITH LOCKOUTS THEORY OF OPERATION
The 11020CL0 is a specially designed DC/DC converter that is used to charge a battery from a 12V source. An example
is a battery that is mounted on the trailer of a vehicle. The distance between the alternator of the vehicle and the
trailer-mounted battery makes it difficult to get adequate charging voltage to the battery. The 11020CL0 has a
microprocessor on-board to measure the input voltage, output voltage and current, boost voltage, temperature
sensors, as well as monitoring the shutdown and reduce commands input to the unit. The lockout feature is provided
via an Intelligent Power Switch on the output, to provide consistent, robust protection and control of the output
current.
The 11020CL0 has four modes of operation:
• Boost Mode: This mode is enabled when input voltage is nominal (e.g.. Vin ≤ (Vout + 0.6 Vdc)). When the converter
is operating in this mode, the output voltage is temperature compensated, see graph 1.
• Bypass Mode: This mode is enabled when the input voltage is greater than the output voltage. In this mode, the
converter will enter a “burst” operation whereby the output will burst on and off when the pass through current
exceeds 20ADC. If the Reduce command is active, then the unit will burst if the pass through current exceeds 10ADC.
• Reduced Power Mode: This mode is enabled when the REDUCE or R¯E¯¯D¯U¯C¯¯E pin, is active (e.g. REDUCE ≥ 3Vdc
or R¯E¯¯D¯U¯C¯¯E ≤ 3Vdc). In this mode the output is current limited to approximately 12A. Reduced power mode is
effective during nominal Boost Mode operation and while in Bypass mode. In bypass, bursting will allow up to ~11A
RMS in reduce mode and up to ~22A RMS without the reduce command.
• Shutdown Mode: This mode is enabled when the SD pin is active (e.g. SD ≥ 3V). In this mode the charger output is
shutdown and will not charge an external battery. This mode has the highest priority and over-rides all other modes.
The microprocessor measures the temperature of the converter and provides a temperature compensated output,
optimized for recharging AGM batteries. This is most effective when the charger and battery are at the same
temperature (mounted in near proximity).
Monitoring the internal temperature provides thermal protection. When the microprocessor detects extreme
temperatures, action is taken to protect the unit, including shutdown of output.
The converter is designed to withstand the severe electrical environment of heavy-duty trucks and off highway
equipment. The converter can withstand load dump, reverse battery, short circuit, and over-temperature conditions
without sustaining damage.
The unit is adequately sealed to meet the performance standards called out in SAE J1455 Section 4 specification
relative to Humidity, Salt Spray, Splash and Dust bombardment.
26
Date: 7.5.2012
Version: 1.00
P7000-K Owner’s Manual
FUNCTIONAL DESCRIPTION
STB: Switch to battery. An STB input gets connected to a positive voltage source to activate its function.
STG: Switch To Ground. An STG input gets connected to ground in order to activate its function. Connections to the unit
are made via a 4-pin Deutsch connector and a 6 pin Deutsch connector.
The terminals are as follows:
Conn - Pin
J1-1
J1-2
J1-3
J1-4
J2-1
J2-2
J2-3
J2-4
J2-5
J2-6
Name
Vin
Vout
Ground
Ignition
Reduce
Shutdown
N/A
GLED
RLED
Reduce
Notes:
Provides the input voltage to the converter.
Output to the battery to be charged. Keep wiring as short as possible.
System ground. Must be common to both input and output.
STB Input. Enables the converter when Ignition is on.
STB input. When J2-1 is ³3Vdc, the current available to Vout (J1-2) is limited to
approximately 12A.
STB input. When J2-2 is ³ 3, J1-2, Vout is disabled and will not charge a battery.
Programming pin, factory use only. Do Not Connect.
Connects to the green LED positive terminal. (external LED1)
Connects to the red LED positive terminal. (External LED1)
STG input. When J2-6 is ²3Vdc, the current available to Vout (J1-2) is limited to
approximately 12A.
27
Date: 7.5.2012
Version: 1.00
P7000-K Owner’s Manual
LED indications:
The STATUS LED will indicate several different conditions of the Trail Charger. This is accomplished by the use of a BiColor LED that will indicate with either a solid color or a blinking color at three different blink rates, see table below:
RATE
TIMING
Slow
1 second on, 1 second off
Medium
500ms on, 500 ms off
High
250ms on, 250ms off
Definition of indications is found in the following table:
INDICATION
STATUS
Shutdown
RED, blink, high-rate
Reduce
Module off, ignition or input voltage not
present.
FAULT, any on the fault list, which follows
this table.
Green, blink, medium
SHUTDOWN mode
Green, blink, slow
Green, solid
LED off
Fault Condition
Input Command
Reduce
-
-
-
Any Fault condition
-
-
No Faults
ON
-
Reduce power mode, charging.
No Faults
OFF
ON
Charging or Charged.
No Faults
OFF
OFF
A RED LED blinking at a high rate indicates one of the following fault conditions exist:
• Input over-voltage limit.
• Input under-voltage limit.
• Output over-voltage limit.
• Output over-current limit.
• Output FET’s over thermal limits.
A fast blinking RED from any fault indication has a higher priority than all other indications if the ignition is on.
Temperature Compensation (The output is temperature compensated to provide a higher voltage level at lower
temperatures as recommended by AGM battery manufacturers.)
28
Date: 7.5.2012
Version: 1.00
P7000-K Owner’s Manual
Parts List
PURKEY# 11020CLO
MAXON# 906849-01
20 AMP DC/DC CONVERTER
PURKEY# H-00078
MAXON# 906678-01
T/C 4 PIN DEUTSCH HARNESS
PURKEY# H-00079
MAXON# 906679-01
BRAKE HARNESS
PURKEY# H-00080
MAXON# 906680-01
2 AMP FUSE HOLDER ASSEMBLY
PURKEY# H-00072
MAXON# 906673-01
10GA WHITE GROUND WIRE
PURKEY# F00037
MAXON# 906880-01
30 AMP FUSE CUBE
29
Date: 7.5.2012
Version: 1.00
P7000-K Owner’s Manual
Parts List
PURKEY# FH00018
MAXON# 906879-01
FUSE CUBE NUT
PURKEY# FH00014
MAXON# 906878-01
SINGLE FUSE CUBE BRACKET
PURKEY# FH00016
MAXON# 906648-01
RED CAP FOR SINGLE FUSE CUBE
PURKEYS# TM00020
MAXON# 906881-02
BLACK 3/8 JUNCTION STUD
PURKEYS# TM00037
MAXON# 906881-03
WHITE 3/8 JUNCTION STUD
PURKEYS# TB-5
MAXON# 906640-01
5 POST TERMINAL STRIP
30
Date: 7.5.2012
Version: 1.00
P7000-K Owner’s Manual
Parts List
PURKEY# BK-1008
MAXON# 906656-01
HARDWARE BAG KIT FOR T/C PLATE
PURKEYS# MOD00036-K
MAXON# 906693-01
6 WIRE MODULE
PURKEYS# INST007
MAXON# 906681-01
P7000-K OWNERS MANUAL
31
16.