1
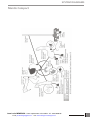
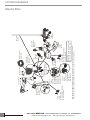
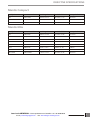
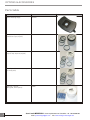
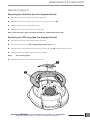
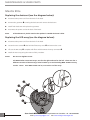
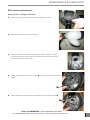
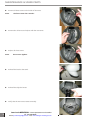
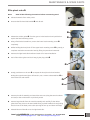
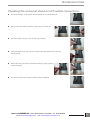
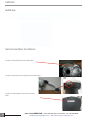
Jean Louis MENEGON
Représentant et Conseiller
Région Sud Ouest
Tel : 06 76 08 96 83
Email: [email protected]
www.menegon-metrologie.com
Service Manual
Mantis Compact & Elite
INTRODUCTION
Health & Safety
INTRODUCTION
Vision Engineering and its products conforms to the requirements of the EC Directives on Waste Electrical and
Electronic Equipment (WEEE) and Restriction of Hazardous Substances (RoHS).
Jean Louis MENEGON - Votre représentant et Conseiller - tél : 06 76 08 96 83
Email: [email protected] - web: www.menegon-metrologie.com
CONTENTS
SYSTEM DIAGRAMS
CONTENTS
Mantis Compact
1
Mantis Elite
2
OBJECTIVE SPECIFICATIONS
Mantis Compact
3
Mantis Elite
3
OPTIONS & ACCESSORIES
Parts table
4
MAINTENANCE & SPARE PARTS
Mantis Compact
Replacing the desiccant
Replacing the LED array
5
5
5
Mantis Elite
Replacing the desiccant
Replacing the LED array
Elite turret replacement
Elite pivot retrofit
6
6
6
7
9
Mantis universal arm baseplate mounting dimensions
10
Spare parts
11
TROUBLESHOOTING
COMPACT & ELITE
12
Checking the universal stand on/off switch connections
13
SERVICE
Address
14
Serial number locations
14
WARRANTY
Jean Louis MENEGON - Votre représentant et Conseiller - tél : 06 76 08 96 83
Email: [email protected] - web: www.menegon-metrologie.com
SYSTEM DIAGRAMS
SYSTEM DIAGRAMS
Mantis
Compact
Jean Louis MENEGON - Votre représentant et Conseiller - tél : 06 76 08 96 83
Email: [email protected] - web: www.menegon-metrologie.com
www.visioneng.com/support
Mantis Service Manual
1
2
Mantis Service Manual
EPI
Illuminator
MEI 001
Mantis Elite
Head Assembly
MEH-001
Anti Glare Hood
202-D0479
Mantis Elite
Bench Stand
MES-006
converging lens)
MEO-002 x2
MEO-006SL x6
Dust Cover
MS-003 - Mantis with Universal Stand
MS-004 - Mantis with Bench Stand
Objective
x15 x10
Lenses
Substage
MEO-004 x4
LED Array
MEO-006 x6
MELED-003
MEO-008 x8 x20
MEO-010 x10
x6
x8
Floating
MEO-015 x15
Power
x4
Stage
MEO-020 x20
X6 SLWD
Supply
MS-001
MPS-001 (UK)
Objective
x2
MPS-002 (USA/Japan/Asia)
Lenses
MPS-003 (Europe)
(complete with
Head
LED Arrays
MELED-001 (left side)
MELED-002 (right side)
Secondary Link
MF-005
MEO-025 Mantis Elite disposable Objective lens Protection Caps (pack of 4) for x4, x8 & x10 objectives
MEO-026 Mantis Elite disposable Objective lens Protection Caps (pack of 4) for x6 objective
Power
Supply
MPS-001 (UK)
MPS-002 (USA/Japan/Asia)
MPS-003 (Europe)
Mantis Elite
Universal Stand
MES-005
Articulated Arm
MEF-001
Power
Supply
(included)
Floor Stand
MF-006
SYSTEM DIAGRAMS
Mantis Elite
Jean Louis MENEGON - Votre représentant et Conseiller - tél : 06 76 08 96 83
Email: [email protected] - web: www.menegon-metrologie.com
www.visioneng.com/support
OBJECTIVE SPECIFICATIONS
OBJECTIVECompact
Mantis
SPECIFICATIONS
Objective Lenses
Part Number
Working Distance
Field of View
Depth of Field
X2
MCO-002
167mm / 6.57"
45.0mm / 1.77"
45.0mm
X4
MCO-004
96mm / 3.78"
27.5mm / 1.08"
27.5mm
X6
MCO-006
73mm / 2.87"
19.2mm / 0.76"
19.2mm
Mantis Elite
Objective Lenses
Part Number
Working Distance
Field of View
Depth of Field
X2
MEO-002
160mm / 6.29"
57.0mm / 2.24"
57.0mm
X4
MEO-004
96mm / 3.78"
34.0mm / 1.34"
34.0mm
X6
MEO-006
68mm / 2.68"
23.0mm / 0.91"
23.0mm
X8
MEO-008
59mm / 2.32"
17.0mm / 0.67"
17.0mm
X10
MEO-010
54mm / 2.13"
13.5mm / 0.53"
13.5mm
X15
MEO-015
40mm / 1.57"
8.8mm / 0.35"
8.8mm
X20
MEO-020
29mm / 1.14"
6.5mm / 0.25"
6.5mm
X6 SLWD
MEO-006SL
112mm / 4.41"
20.0mm / 0.79"
20.0mm
Jean Louis MENEGON - Votre représentant et Conseiller - tél : 06 76 08 96 83
Email: [email protected] - web: www.menegon-metrologie.com
www.visioneng.com/support
Mantis Service Manual
3
OPTIONS & ACCESSORIES
OPTIONStable
Parts
& ACCESSORIES
Part Name
4
Part Number
Mantis Floating Stage
MS-001
Compact X4, X6 Disposable Lens
Protections Caps (4-pack)
MCO-010
Elite Disposable Lens Protection
Caps for X4, X8, X10 (4-pack)
MEO-025
Elite Disposable Lens Protect Caps
for X6 (4-pack)
MEO-026
Dessicant, 10-pack
(Blue good; Pink replace)
M006
Picture
Jean Louis MENEGON - Votre représentant et Conseiller - tél : 06 76 08 96 83
Mantis Service Manual
Email: [email protected] - web: www.menegon-metrologie.com
www.visioneng.com/support
MAINTENANCE & SPARE PARTS
MAINTENANCE
Mantis
Compact
& SPARE PARTS
Replacing the desiccant (see the diagram below):
u
Disconnect the power cord from the back of the head.
u
Remove the screw securing the desiccant cover and remove the cover u.
u
Replace the desiccant and reinstall the cover.
u
Reconnect the power cord at the back of the head.
Note: If the desiccant is pink it needs to be replaced. Useable desiccant is blue.
Replacing the LED array (see the diagram below):
u
Disconnect the power cord from the back of the head.
u
Remove the desiccant cover u (see Replacing the desiccant above).
u
Remove the two screws that secure the array to remove the array v complete with the filters.
u
Install the new array using the reverse of this procedure.
Note:
u
Do not over tighten.
Reconnect the power cord at the back of the head.
u
v
Jean Louis MENEGON - Votre représentant et Conseiller - tél : 06 76 08 96 83
www.visioneng.com/support
Email: [email protected] - web: www.menegon-metrologie.com
Mantis Service Manual
5
MAINTENANCE & SPARE PARTS
Mantis Elite
Replacing the desiccant (see the diagram below):
u
Disconnect the power cord from the back of the head.
u
Remove the grommet u covering the desiccant and remove the desiccant.
u
Install fresh desiccant and replace the grommet.
u
Reconnect the power cord at the back of the head.
Note:
If the desiccant is pink it needs to be replaced. Useable desiccant is blue.
Replacing the LED array (see the diagram below):
u
Disconnect the power cord from the back of the head.
u
Loosen the two screws v that hold the filter/array cover w and remove the cover.
u
Lift out the LED array x complete with filter and disconnect the array connector y.
u
Install the new array using the reverse of this procedure.
Notes:
Do not over tighten screws.
The Mantis Elite uses 2 LED arrays; one for the right and one for the left. There are also 2
different versions of these arrays; serial number up to and including MEH-10756 use array
version "none". From MEH-10757 and on, use version 2 of the array.
w
v
x
v
y
u
6
Jean Louis MENEGON - Votre représentant et Conseiller - tél : 06 76 08 96 83
Mantis Service Manual
www.visioneng.com/support
Email: [email protected] - web: www.menegon-metrologie.com
MAINTENANCE & SPARE PARTS
Elite turret replacement
Required Tools: #1 Phillips screwdriver
u
Remove any objective lenses that may be installed in the turret.
u
Uninstall the Mantis Head from the stand.
u
Rest the viewing head upside down (objective turret facing up). Be sure
to secure the head so that it does not roll off of the work bench (a small,
empty cardboard box works well).
u
Ensure the objective lens securing screws u are fully screwed in (but not too
tightly).
u
u
Rotate the turret so that you can see all three of the mounting screws v.
v
Jean Louis MENEGON - Votre représentant et Conseiller
tél : 06 76 08 96 83 Email: [email protected] - web: www.menegon-metrologie.com
www.visioneng.com/support
Mantis Service Manual
7
MAINTENANCE & SPARE PARTS
u
Remove all three screws on the inside of the turret.
Note:
u
Remove the old turret and replace with the new turret.
u
Replace all three screws.
Note:
8
the front screw has a washer.
do not over tighten.
u
Reinstall the head to the stand.
u
Reinstall the objective lenses.
u
Verify that the new turret rotates smoothly.
Jean Louis MENEGON - Votre représentant et Conseiller
tél : 06 76 08 96 83
MantisEmail:
Service
Manual
[email protected]
- web: www.menegon-metrologie.com
www.visioneng.com/support
MAINTENANCE & SPARE PARTS
Elite pivot retrofit
Note:
Read all the following instructions before commencing work.
u
Isolate the Mantis from mains power.
u
Unscrew the left-hand side handle u and discard.
u
v
u
Release the rubber gaiter v from the groove in the head unit and peel back to
expose the head mounting screws.
u
Using a flat-bladed screwdriver, remove the lower head mounting screw w
completely.
u
Whilst holding the head, back off the upper head mounting screw x by exactly 2
complete revolutions. Remove the head by lifting it upwards and outwards.
u
Remove the right-hand side handle and retain it for later reinstallation.
u
Peel of the rubber gaitor and let it hang by the plug cable y.
w
x
y
u
Gently push down on the arm z to expose the head pivot bolt and washer.
Noting the approximate right to left tension, use a 10mm socket/nutdriver { to
remove the bolt and washer.
z
{
u
Remove the old tilt assembly and attach the new one (using the same hardware
and tool) to the same tension as previously noted.
u
Remove large handle from the new tilt assembly and carefully fit the rubber
gaiter back into place on the stand whilst lining up both handle bolts and pulling
the slack out of the head power cable (moving the arm up and down will help).
u
Reinstall the small handle on to the right-hand side.
Jean Louis MENEGON - Votre représentant et Conseiller - tél : 06 76 08 96 83
www.visioneng.com/support
Email: [email protected] - web: www.menegon-metrologie.com
Mantis Service Manual
9
MAINTENANCE & SPARE PARTS
u
Remove the lower head mounting bolt and then, ensuring the upper bolt is tight,
back it off 2 complete revolutions.
u
Hang the head and tighten both head mounting bolts.
u
Seat the rubber gaiter bacl into the groove in the head.
u
Thread on the large handle | and screw it in.
u
Plug the mains adapter into the mains supply and connect the head power cable
into the head.
u
The Mantis is now ready for use.
|
Mantis universal arm baseplate mounting dimensions
75mm dia.
5.5mm dia.
3 places
45 deg
45 deg
Mantis Universal Stand Baseplate (part number: 202-C-0050) mounting dimensions
Drawing not to scale. Dimensions for reference only.
10
Jean Louis MENEGON - Votre représentant et Conseiller - tél : 06 76 08 96 83
Mantis Service Manual
Email: [email protected] - web: www.menegon-metrologie.com
www.visioneng.com/support
MAINTENANCE & SPARE PARTS
Spare parts
202-A0073
Mantis Arm Clamp Assembly (with G-clamp)
202-B0248
Mantis Bench Stand stage glass
202-B0316
Mantis Elite Anti-Glare Shield.
202-D0479
Elite viewing mask to shield ambient light from the viewing lens.
202-C0050
New Mantis - Bench Mount
202-C007
Compact Head Top Cover Assembly
202-B0298
Compact Rubber Gaiter
202-B0290
Compact Stand to Head Cable
202-B0299
Elite Rubber Gaiter
202-B0291
Elite Stand to Head Cable
202-A0132
2x bolts used to mount the microscope head to the stand.
MCLED-001
Replacement LED Array; Mantis Compact
MELED-001
Replacement LED Array; Mantis Elite, Left Side (version "none")
MELED-001V2
Replacement LED Array; Mantis Elite, Left Side (version 2)
MELED-002
Replacement LED Array; Mantis Elite, Right Side (version "none")
MELED-002V2
Replacement LED Array; Mantis Elite, Right Side (version 2)
MELED-003
Replacement LED Array; Bench Stand
202-B0445
Mantis Elite rotary turret
MPS-001
Power Supply Unit, 220V UK
MPS-002
Power Supply Unit, 115 V (USA/Japan)
MPS-003
Power Supply Unit, 220V Europe
MS-003
Replacement Dust Cover; Universal Stand system
MS-004
Replacement Dust Cover; Bench Stand system
202-A0642
Objective thumbscrews (turret)
202-A0459
Objective bolts (turret)
Note:
MELED-001V2 & MELED-002V2 started with serial number: MEH-10757.
Jean Louis MENEGON - Votre représentant et Conseiller - tél : 06 76 08 96 83
Email: [email protected] - web: www.menegon-metrologie.com
www.visioneng.com/support
Mantis Service Manual
11
TROUBLESHOOTING
COMPACT & ELITE
TROUBLESHOOTING
Problem
LEDs not lit.
Possible Solution
* Verify power supply is plugged into the stand and into the
power outlet (utility power).
* Verify On/Off switch on stand is turned On.
* Verify that the power cord in the back of the head is plugged in.
* Verify that the power supply is functioning correctly. (Use a
multimeter to measure the output voltage or try using a spare
power supply.)
* Verify that the power outlet that the power supply is plugged
into is functioning properly. (Try plugging in another device to the
same outlet and verify that the outlet is functioning correctly.)
* If the LED arrays were recently replaced, verify that the arrays are
properly installed. (Check all electrical connections to the array.)
* Verify that the On/Off switch is connected inside the Universal
Stand (see separate procedure to check electrical connections).
Poor image quality.
* Verify that the Interpupillary Distance adjustment is correct for
the particular user.
* Verify that the front viewing lens is clean. (Use a lens cleaning
cloth.)
* Verify that the objective lens is clean. (Use a lens cleaning cloth.)
* For the Mantis Elite, verify that the objective lenses are installed
flush in the rotary turret.
Head not secure on stand.
* Verify that the head mounting bolts are tight.
If using the Bench stand, verify that the rear brace is properly
installed and tight.
12
Jean Louis MENEGON - Votre représentant et Conseiller - tél : 06 76 08 96 83
Mantis Service Manual
Email: [email protected] - web: www.menegon-metrologie.com
www.visioneng.com/support
TROUBLESHOOTING
Checking the universal stand on/off switch connections
u
Shown to the right, is the On/Off switch installed in the Universal Stand.
u
Using a small flat blade screwdriver, gently pry the switch out.
u
Once the switch is loose, pull it out using your fingers.
u
Verify that both wires are properly connected (the switch shown has one wire
disconnected).
u
With both wires connected, reinstall the switch by gently pressing
it back into place.
u
The switch should look as shown when properly reinstalled.
Jean Louis MENEGON - Votre représentant et Conseiller - tél : 06 76 08 96 83
www.visioneng.com/support
Email: [email protected] - web: www.menegon-metrologie.com
Mantis Service Manual
13
SERVICE
Address
SERVICE
If after using the information provided in this manual, the Mantis product you are working with needs additional
repair, please contact:
Vision Engineering
Monument House
Monument Way West
Woking
Surrey
GU21 5EN
Tel:
Fax:
+44 (0) 1483 248300
+44 (0) 1483 248301
Email: [email protected]
Serial number locations
Location of Mantis Head serial number label.
Location of Mantis Universal Stand serial number label.
Location of Mantis Bench Stand serial number
label.
14
Jean Louis MENEGON - Votre représentant et Conseiller - tél : 06 76 08 96 83
Mantis Service Manual
Email: [email protected] - web: www.menegon-metrologie.com
www.visioneng.com/support
WARRANTY
WARRANTY
This product is warranted to be free from defects in material and workmanship for a period of one year from the date of
invoice to the original purchaser.
If during the warranty period the product is found to be defective, it will be repaired or replaced at facilities of Vision
Engineering or elsewhere, all at the option of Vision Engineering. However, Vision Engineering reserves the right to refund
the purchase price if it is unable to provide replacement, and repair is not commercially practicable or cannot be timely
made. Parts not of Vision Engineering manufacture carry only the warranty of their manufacturer. Expendable
components such as fuses carry no warranty.
This warranty does not cover damage in transit, damage caused by misuse, neglect, or carelessness, or damage resulting
from either improper servicing or modification by other than Vision Engineering approved service personnel. Further, this
warranty does not cover any routine maintenance work on the product described in the user guide or any minor
maintenance work which is reasonably expected to be performed by the purchaser.
No responsibility is assumed for unsatisfactory operating performance due to environmental conditions such as humidity,
dust, corrosive chemicals, deposition of oil or other foreign matter, spillage, or other conditions beyond the control of
Vision Engineering.
Except as stated herein, Vision Engineering makes no other warranties, express or implied by law, whether for resale,
fitness for a particular purpose or otherwise. Further, Vision Engineering shall not under any circumstances be liable for
incidental, consequential or other damages.
Jean Louis MENEGON - Votre représentant et Conseiller - tél : 06 76 08 96 83
Email: [email protected] - web: www.menegon-metrologie.com
For more information...
LIT 4176 R1.0/02/08
Vision Engineering has a network of offices and technical distributors around the world. For more information,
please contact your Vision Engineering branch, local authorised distributor, or visit our website.
Vision Engineering Ltd.
(Manufacturing)
Send Road, Send, Woking,
Surrey, GU23 7ER, England
Tel:
+44 (0) 1483 248300
Fax:
+44 (0) 1483 223297
Email: [email protected]
Vision Engineering Inc.
(Manufacturing & Commercial)
570 Danbury Road, New Milford,
CT 06776 USA
Tel:
+1 (860) 355 3776
Fax:
+1 (860) 355 0712
Email: [email protected]
Vision Engineering Ltd.
(Central Europe)
Anton-Pendele-Str. 3,
D-82275, Emmering, Germany
Tel:
+49 (0) 8141 40167-0
Fax:
+49 (0) 8141 40167-55
Email: [email protected]
Vision Engineering Ltd.
(France)
1 Rue de Terre Neuve, ZA Courtaboeuf,
91967 Les Ulis Cedex, France
Tel:
+33 (0) 164 46 90 82
Fax:
+33 (0) 164 46 31 54
Email: [email protected]
Vision Engineering Ltd.
(Commercial)
Monument House, Monument Way West,
Woking, Surrey, GU21 5EN, England
Tel:
+44 (0) 1483 248300
Fax:
+44 (0) 1483 248301
Email: [email protected]
Vision Engineering Inc.
(Commercial West Coast USA)
745 West Taft Avenue, Orange,
CA 92865 USA
Tel:
+1 (714) 974 6966
Fax:
+1 (714) 974 7266
Email: [email protected]
Nippon Vision Engineering
(Japan)
272-2 Saedo-cho, Tsuduki-ku,
Yokohama-shi, 224-0054, Japan
Tel:
+81 (0) 45 935 1117
Fax:
+81 (0) 45 935 1177
Email: [email protected]
Vision Engineering Ltd Italia
(Italy)
Via Cesare Cantù, 9
20092 Cinisello Balsamo MI, Italy
Tel:
+39 02 6129 3518
Fax:
+39 02 6129 3526
Email: [email protected]
Vision Engineering Ltd
(China)
11J, International Ocean Building,
720 Pudong Avenue, Shanghai,
200120, P.R. China
Tel:
+86 (0) 21 5036 7556
Fax:
+86 (0) 21 5036 7559
Email: [email protected]
Vision Engineering
(India)
Tel:
+91 (022) 2613 0699
Fax:
+91 (022) 2610 3845
Email: [email protected]
Distributor
Jean Louis MENEGON
Représentant et Conseiller
Région Sud Ouest
Tel : 06 76 08 96 83
Email: [email protected]
www.menegon-metrologie.com
Visit our multi-lingual website:
www.visioneng.com