1
BPS 905 FC
Color Laser MFP
Printer_Copier_Scanner
User’s Guide
Thank You
Thank you for choosing this machine.
This User’s Guide describes the functions, operating procedures, precautions, and
basic troubleshooting for this machine.
Notice
We reserve the right to make changes to this guide and to the equipment described
herein without notice. Considerable effort has been made to ensure that this manual
is free of inaccuracies and omissions. However, we make no warranty of any kind
including, but not limited to, any implied warranties of merchantability and fitness for
a particular purpose with regard to this manual.
We assumes no responsibility for, or liability for, errors contained in this manual or
for incidental, special, or consequential damages arising out of the furnishing of this
manual, or the use of this manual in operating the equipment, or in connection with
the performance of the equipment when so operated.
Legal Restrictions on Copying
Certain types of documents must never be copied with the purpose or intent to pass
copies of such documents off as the originals.
The following is not a complete list, but is meant to be used as a guide to responsible
copying.
Financial Instruments
z Personal checks
z Traveler’s checks
z Money orders
z Certificates of deposit
z Bonds or other certificates of indebtedness
z Stock certificates
Legal Documents
z Food stamps
z Postage stamps (canceled or uncanceled)
z Checks or drafts drawn by government agencies
z Internal revenue stamps (canceled or uncanceled)
z Passports
z Immigration papers
z Motor vehicle licenses and titles
z House and property titles and deeds
General
z Identification cards, badges, or insignias
z Copyrighted works without permission of the copyright owner
In addition, it is prohibited under any circumstances to copy domestic or foreign currencies, or works of art without permission of the copyright owner.
When in doubt about the nature of a document, consult with legal counsel.
Our Concern for Environmental Protection
As an ENERGY STAR® Partner, we have determined that this machine meets
the ENERGY STAR Guidelines for energy efficiency.
What is an ENERGY STAR product?
An ENERGY STAR product has a special feature that allows it to automatically switch to a “low-power mode” after a period of inactivity. An ENERGY
STAR product uses energy more efficiently, saves you money on utility bills
and helps protect the environment.
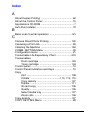
Contents
Thank You 2
Notice 2
Legal Restrictions on Copying 3
Our Concern for Environmental Protection 4
What is an ENERGY STAR product? 4
5
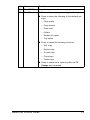
Contents 1
1
Introduction ....................................................................................................... 1
Getting Acquainted with Your Machine 2
Space Requirements 2
Installation Precautions 2
Part Names 3
Front View 3
Rear View 4
Inside 4
Front View with Options 5
Rear View with Options 5
Drivers and Documentation CD-ROM 6
Printer Drivers 6
Scanner Drivers 6
Applications CD-ROM 7
Applications 7
Utility 7
System Requirements 8
2
Control Panel and Configuration Menu .......................................................... 9
About the Control Panel 10
Control Panel Indicators and Keys 10
Display Indications 14
Main Screen 14
Print Screen 16
Checking the Machine Status and Settings 17
TONER REMAINING 17
TOTAL PAGE 17
TX/RX RESULT 18
PRINT REPORT 18
Functions Available With the Function Key 20
Configuration Menu Overview 21
Configuration Menu 21
MACHINE SETTING Menu 25
PAPER SOURCE SETUP Menu 27
COPY SETTING Menu 28
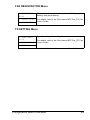
FAX REGISTRATION Menu 29
TX SETTING Menu 29
RX SETTING Menu 30
COMM. SETTING Menu 30
REPORTING Menu 30
USER SETTING Menu 31
DIRECT PRINT Menu 32
NETWORK SETTING Menu 33
E-MAIL SETTING Menu 34
SCANNER SETTING Menu 35
3
Media Handling ................................................................................................37
Print Media 38
Specifications 38
Types 39
Plain Paper (Recycled Paper) 39
Thick Stock 40
Envelope 41
Labels 42
Letterhead 43
Postcard 43
Transparency 44
Glossy Media 45
Guaranteed Imageable (Printable) Area 46
Imageable Area—Envelopes 46
Page Margins 46
Loading Media 47
Tray 1 (Multipurpose Tray) 47
Loading Plain Paper 47
Other Media 50
Loading Envelopes 50
Loading Labels/Postcard/Thick Stock/Transparency/Glossy media 57
Tray 2 59
Loading Plain Paper 59
About Duplex Printing 62
Double-Sided 62
Booklet 63
Output Bin 64
Media Storage 66
Original Media 67
Specifications 67
Documents that can be Placed on the Original Glass 67
Documents that can be Loaded into the ADF 67
Loading a Document to be Copied 69
Placing a Document on the Original Glass 69
Loading a Document into the ADF 70
4
Using the Printer Driver .................................................................................. 71
Auto Run Installer 72
Auto Run Installer (For Vista) 74
Using the Status Display Feature 77
Message List 78
Selecting Printer Driver Options 81
Uninstalling the Printer Driver 82
Uninstalling the Printer Driver (For Vista) 83
Displaying Printer Driver Settings 85
Windows XP/Server 2003 85
Windows 2000/Me/98SE 85
Printer Driver Settings 86
Common Buttons 86
OK 86
Cancel 86
Apply 86
Help 86
Easy Set 86
Paper Layout 86
Printer Figure 87
Setup Tab 88
Edit Watermark 89
Paper Tab 90
Scale to Fit 90
Center 90
Creating a New Page Overlay 92
Using a Page Overlay 93
Quality Tab 94
Device OptionsTab 95
Canceling a Print Job 96
5
Using Direct Print ............................................................................................ 99
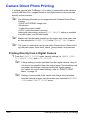
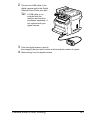
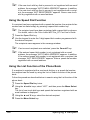
Camera Direct Photo Printing 100
Printing Directly from a Digital Camera 100
6
Using the Copier ........................................................................................... 103
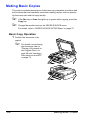
Making Basic Copies 104
Basic Copy Operation 104
Specifying the Copy Quality 105
Specifying the Zoom Ratio 106
Selecting a Preset Zoom Ratio 106
Specifying a Custom Zoom Ratio 106
Selecting the Copy Density 107
Selecting the Media Tray 107
Making Advanced Copies 108
Setting 2in1 Copying 108
ID Card Copying 109
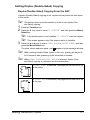
Setting Duplex (Double-Sided) Copying 111
Duplex (Double-Sided) Copying From the ADF 111
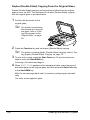
Duplex (Double-Sided) Copying From the Original Glass 112
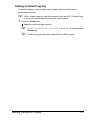
Setting Collated Copying 113
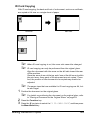
Setting Clone Copying 114
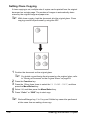
Setting Poster Copying 115
7
Using the Scanner .........................................................................................117
Making Basic Scans 118
Scanning via USB 118
Scanner Driver Settings 119
Original Size 119
Scan Type 119
Resolution 119
Scanning mode 119
Image size 119
Scan 119
About 119
Close 119
Preview Window 119
Clear 119
Width/Height 120
Prescan 120
Help 120
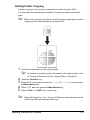
Basic Scan to Email Operation 121
Scan to Email Using the ADF 121
Scan to Email Using the Original Glass 124
Specifying a Recipient 127
Directly Entering an Email Address 127
Using a One-Touch Dial Key 127
Using the Speed Dial Function 128
Using the List Function of the Phone Book 128
Using the Search Function of the Phone Book 129
Entering Text 130
Key Operation 130
130
Inputting Example 131
Correcting Text And Input Precautions 132
8
Replacing Consumables ...............................................................................133
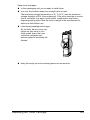
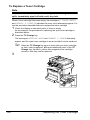
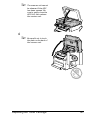
Replacing the Toner Cartridge 134
To Replace a Toner Cartridge 136
Replacing the Drum Cartridge 143
9
Maintenance ...................................................................................................149
Maintaining the Machine 150
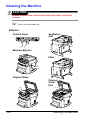
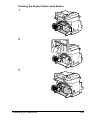
Cleaning the Machine 152
Exterior 152
Interior 153
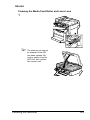
Cleaning the Media Feed Roller and Laser Lens 153
Cleaning the Duplex Option Feed Rollers 159
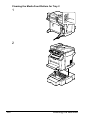
Cleaning the Media Feed Rollers for Tray 2 160
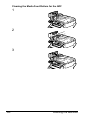
Cleaning the Media Feed Rollers for the ADF 162
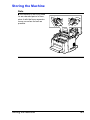
Storing the Machine 163
10 Troubleshooting ............................................................................................ 165
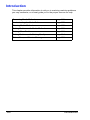
Introduction 166
Preventing Media Misfeeds 167
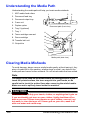
Understanding the Media Path 168
Clearing Media Misfeeds 168
Media Misfeed Messages and Clearing Procedures 169
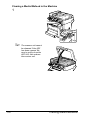
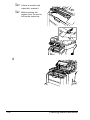
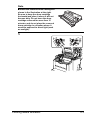
Clearing a Media Misfeed in the Machine 170
Clearing a Media Misfeed from the Duplex Option 180
Clearing a Media Misfeed from the ADF 181
Solving Problems with Media Misfeeds 183
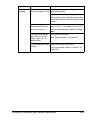
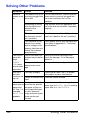
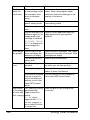
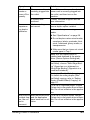
Solving Other Problems 186
Solving Problems with Printing Quality 192
Status, Error, and Service Messages 198
Status Messages 198
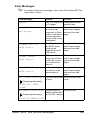
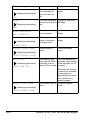
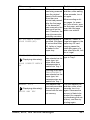
Error Messages 199
Service Messages 206
11 Installing Accessories .................................................................................. 207
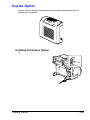
Introduction 208
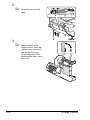
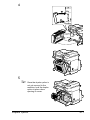
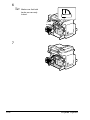
Duplex Option 209
Installing the Duplex Option 209
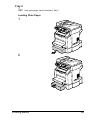
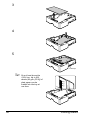
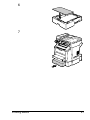
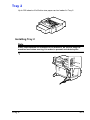
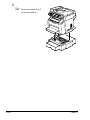
Tray 2 213
Installing Tray 2 213
A Appendix ........................................................................................................ 215
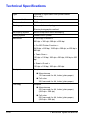
Technical Specifications 216
Consumable Life Expectancy Chart 219
User-Replaceable 219
Service-Replaceable 219
Index 1
1
Introduction
Getting Acquainted with Your Machine
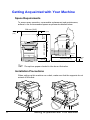
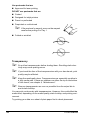
Space Requirements
To ensure easy operation, consumable replacement and maintenance,
adhere to the recommended space requirements detailed below.
528 mm (20.8")
100 mm (3.9")
138
mm
(5.4")
Front View
"
902 mm (35.5")
531 mm (20.9")
233 mm
(9.2")
100 mm
(3.9")
581 mm (22.9")
187 mm
(7.4")
768 mm (30.2")
100 mm
(3.9")
Side View
The options appear shaded in the above illustration.
Installation Precautions
When setting up this machine on a desk, make sure that the supports do not
extend off the desk.
2
Getting Acquainted with Your Machine
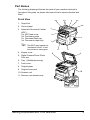
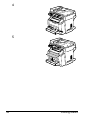
Part Names
The following drawings illustrate the parts of your machine referred to
throughout this guide, so please take some time to become familiar with
them.
Front View
3-a
3
3-b
3-c
1. Output bin
3-d
2. Control panel
3. Automatic Document Feeder
(ADF)
3-a. ADF feed cover
3-b. Document guide
3-c. Document feed tray
3-d. Document output tray
"
2
1
4
7
The ADF may appear as
“document cover” in status and error messages.
4. Engine cover
6
5
8
9
5. Digital Camera Direct Photo
Print port
6. Tray 1 (Multipurpose tray)
7. Front cover
8. Original glass
9. Original cover pad
10
10. Scanner unit
11. Scanner unit release lever
11
Getting Acquainted with Your Machine
3
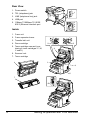
Rear View
1. Power switch
1
2. TEL (telephone) jack
3. LINE (telephone line) jack
4. USB port
5. 10Base-T/100Base-TX (IEEE
802.3) Ethernet Interface port
2
Inside
5
3
4
1. Fuser unit
2. Fuser separator levers
3. Transfer belt unit
4. Drum cartridge
2
5. Toner cartridge carousel (containing 4 toner cartridges: C, M,
Y and K)
2
3
6. Scanner lock
7. Toner cartridge
4
1
4
5
7
6
4
Getting Acquainted with Your Machine
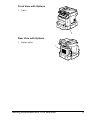
Front View with Options
1. Tray 2
1
Rear View with Options
1. Duplex option
1
Getting Acquainted with Your Machine
5
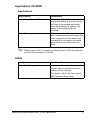
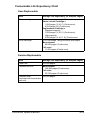
Drivers and Documentation CD-ROM
Printer Drivers
Drivers
Use/Benefit
Printer Driver for Windows Vista/XP/ These drivers give you access to all of
Server 2003/2000/Me/98SE
the printer features, including finishing
and advanced layout.
Scanner Drivers
Drivers
Use/Benefit
TWAIN Driver for
Windows Vista/XP/Server 2003/
2000
This drivers enables you to set scanning functions, such as the color setting and size adjustments.
TWAIN Driver for
Windows Me/98SE
For details, refer to “Scanner Driver
Settings” on page 119.
"
6
For details on the installation of the drivers, refer to the attached Installation Guide.
Getting Acquainted with Your Machine
Applications CD-ROM
Applications
Applications
Use/Benefit
Local Setup Device (LSD)
This software enables one-touch dialing, speed dialing, and group dialing
for faxes to be created and edited
from the computer. In addition, the
status of this machine can be
checked.
PaperPort
This software is a document management software package that helps you
scan, organize, access, share, and
manage both your paper and digital
documents on your personal computer.
"
Please select “LSD” to install Local Setup Device (LSD) from the Drivers and Documentation CD-ROM
Utility
Utility
Use/Benefit
Easy Web Management
With the web browser, the status of
printers can be checked, and each
setting can be changed.
For details, refer to the Color Laser
MFP Network Utility Guide.
Getting Acquainted with Your Machine
7
System Requirements
Personal computer
Pentium 2: 400 MHz or higher
Operating System
–
Microsoft Windows XP Home/Professional Edition, Windows Server
2003, Windows 2000, Windows Me, Windows 98SE
Free hard disk space
256 MB or more
RAM
128 MB or more
CD-ROM/DVD drive
I/O interface
–
10Base-T/100Base-TX (IEEE 802.3) Ethernet interface port
–
USB Revision 2.0 and USB Revision 1.1 compliant port
"
8
The Ethernet cable and USB cable are not included with the machine.
Getting Acquainted with Your Machine
2
Control Panel and
Configuration
Menu
About the Control Panel
1
2
3
45
6
7
8
9 10
@
11 12 14
15
15 18 19
13
16 17
20 21 22 23
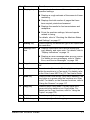
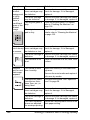
Control Panel Indicators and Keys
No. Name
Function
1
Provides fax operations.
Fax Operations
keys
For details, refer to the Color Laser MFP Fax_PC
Fax User's Guide.
2
Error indicator
Lights up when an error has occurred.
3
Function key
Press to specify tray settings, duplex (Double-Sided)
printing settings, ID card copy settings, Clone Copy,
and Poster Copy.
" The tray settings and duplex (Double-Sided)
printing settings cannot be specified if the
optional media feed unit and duplex are not
installed.
10
About the Control Panel
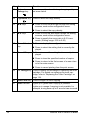
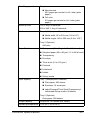
No. Name
Function
4
Press to check the status of this machine and the
specified settings.
Display key
Displays a rough estimate of the amount of toner
remaining.
Displays the total number of pages that have
been copied, printed and scanned.
Displays the results for fax transmissions and
receptions.
Prints the machine settings, lists and reports
related to faxing.
For details, refer to “Checking the Machine Status
and Settings” on page 17.
5
Quality key
Press to specify the document type to be copied and
the resolution.
6
Message Window
Displays information such as the media type,
copy density, and zoom ratio. For details, refer to
“Display Indications” on page 14.
Displays an error message when an error occurs.
For details on error messages, refer to “Status,
Error, and Service Messages” on page 198.
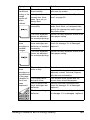
7
Keypad
Type in values such as the desired number of copies.
8
Fax key
Press to enter Fax mode. The key lights up in green
while the machine is in Fax mode. For details, refer
to the Color Laser MFP Fax_PC Fax User's Guide.
9
Scan key
Press to enter Scan mode. (only with a network) The
key lights up in green while the machine is in Scan
mode. For details, on the Scanner functions, refer to
“Using the Scanner” on page 117
10
Copy key
Press to enter Copy mode. The key lights up in
green while the machine is in Copy mode. For
details on the Copy functions, refer to “Using the
Copier” on page 103.
11
2in1 key
Press to specify 2in1 copying.
12
Collate key
Press to specify collated copying.
About the Control Panel
11
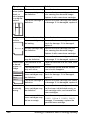
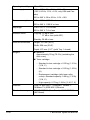
No. Name
Function
13
Reduce/
Enlarge key
Press to specify reduced/enlarged copying with preset zoom ratios.
14
Light/Dark key
Press to select the copy density.
15
*/) keys
Press to move left and right through the setting
screens, such as the configuration menu.
Press to select the copy density.
16
+/, keys
Press to move up and down through the setting
screens, such as the configuration menu.
Press to specify the zoom ratio in 0.01 increments. (Setting range: 0.50 to 2.00)
17
18
Menu Select
key
Press to display the configuration menu.
Cancel/C key
Press to cancel the setting that is currently displayed.
Press to select the setting that is currently displayed.
Press to clear the specified number of copies.
Press to return to the first screen of a menu item
or to the main screen.
Press to cancel printing from the print screen.
19
TC Change key Press to display the message for replacing the toner
cartridge. For details on replacing the toner cartridge, refer to “Replacing the Toner Cartridge” on
page 134.
20
Start-Color key Press to begin full-color copying.
21
Start indicator
Lights up in green when copying is possible.
Lights up in orange if copying is not possible, for
example, during warm-up or if an error has occurred.
12
About the Control Panel
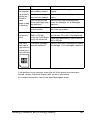
No. Name
Function
22
Start-B&W key
Press to begin monochrome copying.
23
Stop/Reset key Press to stop copying, scanning, and faxing.
Press to return the following to their default settings.
– Copy quality
– Copy density
– Zoom ratio
– Collate
– Number of copies
– Tray select
Press to cancel the following functions.
– 2in1 copy
– Duplex copy
– ID card copy
– Clone copy
– Poster copy
Press to cancel toner replacing after the TC
Change key is pressed.
About the Control Panel
13
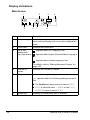
Display Indications
Main Screen
1
2
5
6
7
3
4
8
No. Indication
Description
1
Document type
Indicates the document type to be copied specified
either with the Quality key or from the configuration
menu.
2
Zoom ratio
Indicates the zoom ratio.
3
Icons that
appear with
copy operations
: Appears when 2in1 copying is set.
: Appears when duplex (Double-Sided) copying is
set.
: Appears when collated copying is set.
For details, refer to “Making Advanced Copies” on
page 108.
4
Number of
copies
Indicates the number of copies.
5
Copy density
Indicates the copy density.
[A] appears when the following settings are specified.
The Quality key was pressed to select TEXT.
AUTO is selected while 1 MODE on the COPY
SETTING menu is set to TEXT.
6
14
Media tray
Indicates the media tray that is selected.
About the Control Panel
No. Indication
Description
7
Indicates the media size that is selected.
Media size
Change the paper size from the PAPER SOURCE
menu.
For details, refer to “PAPER SOURCE SETUP
Menu” on page 27.
8
Status
Displays messages such as when media is empty.
About the Control Panel
15
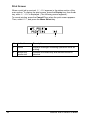
Print Screen
When a print job is received, PC:PRN appears in the status section of the
main screen. To display the print screen, press the Display key, then the )
key, while PC:PRN is displayed. (The following screen appears.)
To cancel printing, press the Cancel/C key when the print screen appears.
Then, select YES, and press the Menu Select key.
1
16
2
No. Indication
Description
1
Status
Displays messages indicating operations such as
printing.
2
Media tray/
media size
Indicates the media tray and media size that is
selected.
About the Control Panel
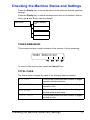
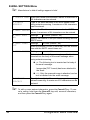
Checking the Machine Status and Settings
Press the Display key to check the status of this machine and the specified
settings.
Press the Display key to switch between each item to be checked. Alternatively, the + and , keys can be pressed.
TONER REMAINING
Main screen
TOTAL PAGE
TX/RX RESULT
PRINT REPORT
TONER REMAINING
This screen provides a rough estimate of the amount of toner remaining.
T ON E R R EMA I N I NG ?
To return to the main screen, press the Cancel/C key.
TOTAL PAGE
The total number of pages for each of the following can be checked.
B/W COPY
This counter shows the total number of pages
copied in black-and-white.
COLOR COPY
This counter shows the total number of pages
copied in color.
B/W PRINT
This counter shows the total number of pages
printed in black-and-white.
COLOR PRINT
This counter shows the total number of pages
printed in color.
Checking the Machine Status and Settings
17
FAX PRINT
This counter shows the total number of pages
that were faxed.
TOTAL SCAN
This counter shows the total number of document pages that were scanned.
TX/RX RESULT
The results of a maximum of 60 fax transmissions/receptions can be viewed.
In addition, the transmission/reception results that are displayed can be
printed by pressing the Start-B&W key. For details, refer to the Color Laser
MFP Fax_PC Fax User’s Guide.
PRINT REPORT
The machine settings, lists and reports related to faxing can be printed.
TX RESULT REPORT
Prints the results of fax transmissions. For
details, refer to the Color Laser MFP Fax_PC
Fax User’s Guide.
RX RESULT REPORT
Prints the results of fax receptions. For details,
refer to the Color Laser MFP Fax_PC Fax
User’s Guide.
ACTIVITY REPORT
Prints the results of fax transmissions and
receptions. For details, refer to the Color Laser
MFP Fax_PC Fax User’s Guide.
MEMORY DATA LIST
Prints the information for queued fax transmissions. For details, refer to the Color Laser MFP
Fax_PC Fax User’s Guide.
MEMORY IMAGE PRINT Prints the information and a reduced first page
of queued fax transmissions. For details, refer
to the Color Laser MFP Fax_PC Fax User’s
Guide.
18
ONE-TOUCH LIST
Prints a list of the destinations programmed for
one-touch dialing. For details, refer to the Color
Laser MFP Fax_PC Fax User’s Guide.
SPEED DIAL LIST
Prints a list of the destinations programmed for
speed dialing. For details, refer to the Color
Laser MFP Fax_PC Fax User’s Guide.
GROUP DIAL LIST
Prints a list of the one-touch dialing groups. For
details, refer to the Color Laser MFP Fax_PC
Fax User’s Guide.
MENU MAP
Prints the configuration menu and its settings.
Checking the Machine Status and Settings
CONFIGURATION PAGE Prints a rough estimate of the parcentage of
toner remaining and the settings, information
and status of this machine.
DEMO PAGE
Prints a demo page.
Checking the Machine Status and Settings
19
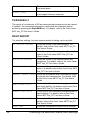
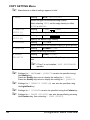
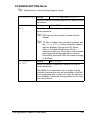
Functions Available With the Function Key
Press the Function key to specify tray settings, duplex (Double-Sided) copying, ID card copy settings, clone copy, and poster copy.
"
"
To specify tray settings, duplex (Double-Sided) copying, ID card copy
settings, clone copy, and poster copy, press the Copy key while the
Fax key or Scan key is lit up in green.
For details on the functions available with the Function key in Fax
mode, refer to the Color Laser MFP Fax_PC Fax User’s Guide.
Main screen
TRAY SELECT
*1
DUPLEX
*2
ID CARD COPY
CLONE COPY
POSTER COPY
*1 Cannot be set if the optional Tray 2 is not installed.
*2 Cannot be set if the duplex option is not installed.
1 TRAY SELECT Setting
TRAY1 / TRAY2
Select the tray. For details, refer to “Selecting the
Media Tray” on page 107.
2 DUPLEX
Setting
OFF / LONG EDGE / SHORT EDGE
Select the setting for duplex (Double-Sided) copying.
For details, refer to “Setting Duplex (Double-Sided)
Copying” on page 111.
3 ID CARD
COPY
Setting
4 CLONE COPY
Setting
OFF / ON
Select the setting for ID card copying. For details, refer
to “ID Card Copying” on page 109.
OFF / ON
Select the setting for clone copying. For details, refer
to “Setting Clone Copying” on page 114.
5 POSTER COPY Setting
OFF / ON
Select the setting for poster copying. For d etails, refer
to “Setting Poster Copying” on page 115.
20
Functions Available With the Function Key
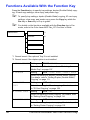
Configuration Menu Overview
The Color Laser MFP configuration menu accessible from the control panel is
structured as shown below.
Configuration Menu
"
Main
screen
Press Menu Select key to enter the configuration menu. Press the
Cancel/C key to return to the first screen of a menu item or to the
main screen.
MACHINE SETTING
1 AUTO PANEL
RESET
2 ENERGY SAVE
MODE
3 LCD CONTRAST
4 LANGUAGE
5 LAMP OFF TIME
6 BUZZER VOLUME
7 INITIAL MODE
8 TONER EMPTY
STOP
9 AUTO CONTINUE
10 CALIBRATION
Configuration Menu Overview
21
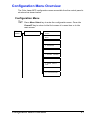
PAPER SOURCE
SETUP
1 TRAY1 PAPER
2 TRAY2 PAPER*
COPY SETTING
*Displays only if the optional
Tray 2 is installed.
1 MODE
2 DENSITY LEVEL
(A)
3 DENSITY LEVEL
(M)
4 COLLATE
5 QUALITY
6 PAPER PRIORITY
FAX REGISTRATION
1 ONE-TOUCH
DIAL
2 SPEED DIAL
3 GROUP DIAL
TX SETTING
1 SCAN DENSITY
2 RESOLUTION
3 HEADER
RX SETTING
1 MEMORY RX
MODE
2 No. of RINGS
3 REDUCTION RX
4 RX PRINT
5 RX MODE
6 FOOTER
7 SELECT TRAY
22
Configuration Menu Overview
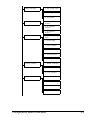
COMM.SETTING
1 TEL LINE TYPE
2 LINE MONITOR
3 PSTN/PBX
REPORTING
1 ACTIVITY
REPORT
2 TX RESULT
REPORT
3 RX RESULT
REPORT
USER SETTING
1 FAX PTT SETTING
2 DATE&TIME
3 DATE FORMAT
4 PRESET ZOOM
5 USER FAX NO.
6 USER NAME
DIRECT PRINT
1 IMAGE QUALITY
2 PAPER SIZE
3 N-UP LAYOUT
NETWORK SETTING
1 IP ADDRESS
2 SUBNET MASK
3 GATEWAY
4 DNS CONFIG.
Configuration Menu Overview
23
E-MAIL SETTING
1 SENDER NAME
2 E-MAIL
ADDRESS
3 SMTP SERVER
4 SMTP PORT NO.
5 SMTP TIMEOUT
6 TEXT INSERT
7 DEFAULT SUBJECT
SCANNER SETTING
1 RESOLUTION
2 IMAGE FORMAT
3 CODING METHOD
24
Configuration Menu Overview
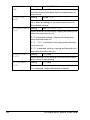
MACHINE SETTING Menu
"
Manufacturer’s default settings appear in bold.
1 AUTO PANEL
RESET
Setting
ON / OFF
Select whether or not all settings in the control panel
return to their default settings when no operation is
performed for a set length of time.
If ON is selected, select from 0.5, 1, 2, 3, 4, and 5
(units: minutes; default: 1) for the length of time until
the auto panel reset operation is performed.
If OFF is selected, the auto panel reset operation is not
performed.
2 ENERGY SAVE Setting
5 / 15 / 30 / 60
MODE
Enters Energy Save mode in order to conserve energy
when no operation is performed. Specify the length of
time in minutes until the machine enters Energy Save
mode.
3 LCD
CONTRAST
Setting
4 LANGUAGE
Setting
LIGHT
DARK
Specify the brightness of the message window.
ENGLISH / FRENCH / GERMAN /
ITALIAN / SPANISH / PORTUGUESE
/ RUSSIAN / CZECH / SLOVAKIAN /
HUNGARIAN / POLISH / JAPANESE
Select the language of the menus and messages that
appear in the message window.
5 LAMP OFF
TIME
Setting
MODE1 / MODE2
Select the length of time until the scanner unit lamp
goes off when no operation is performed.
If MODE1 is selected, the lamp goes off when four
hours have passed since the last operation was performed.
If MODE2 is selected, the lamp goes off when the
machine enters Energy Save mode.
Configuration Menu Overview
25
6 BUZZER VOL- Setting
HIGH / LOW / OFF
UME
Select the volume of the sound produced when a key
is pressed and of the alarm that is sounded when an
error occurs.
7 INITIAL
MODE
Setting
COPY / FAX
Specify the default mode when the machine is turned
on or when all settings in the control panel return to
their default settings.
8 TONER EMPTY Setting
ON / ON(FAX) / OFF
STOP
Select whether or not printing, copying and faxing stop
when the toner has run out.
If ON is selected, printing, copying and faxing stop
when the toner runs out.
If ON (FAX) is selected, only faxing stops when the
toner runs out.
If OFF is selected, printing, copying and faxing do not
stop when the toner runs out.
26
9 AUTO CONTINUE
Setting
10 CALIBRATION
Setting
ON / OFF
Select whether or not printing continues when a size
error occurs during printing.
ON / OFF
Select whether or not to perform image stabilization. If
ON is selected, image stabilization is started.
Configuration Menu Overview
PAPER SOURCE SETUP Menu
"
Manufacturer’s default settings appear in bold.
1 TRAY1 PAPER Media type
PLAIN PAPER / TRANSPARENCY /
LABELS / LETTERHEAD / ENVELOPE
/ POSTCARD / THICK STOCK /
GLOSSY
Media size
When a setting other than ENVELOPE
or POSTCARD is selected: A4 / B5 / A5
/ LEGAL / LETTER / G LETTER /
STATEMENT / EXECUTIVE / FOLIO
(If TRANSPARENCY, LABELS, THICK
STOCK or GLOSSY is selected, LEGAL
and FOLIO are not displayed.)
When ENVELOPE is selected: COM10 /
C5 / C6 / DL / MONARCH / CHOU #3 /
YOU #4 / CHOU #4
When POSTCARD is selected:
J-POSTCARD / DOUBLE POSTCARD
Select the type and size of the media loaded into Tray
1.
When a media type is selected, a screen appears,
showing the available media sizes. The available
media sizes differ depending on the selected media
type.
The default paper size for a setting other than ENVELOPE or POSTCARD is LETTER for 120 V models,
and A4 for 220 V models.
2 TRAY2 PAPER Media size
LETTER / A4
Select the size of the media loaded into Tray 2.
Only plain paper can be loaded into Tray 2.
The default paper size is LETTER for 120 V models,
and A4 for 220 V models.
Configuration Menu Overview
27
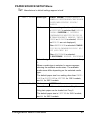
COPY SETTING Menu
"
Manufacturer’s default settings appear in bold.
1 MODE
Setting
MIX / TEXT / PHOTO
Select the type of document being copied.
After selecting TEXT, set the copy density to either
AUTO or MANUAL.
2 DENSITY
LEVEL(A)
Setting
3 DENSITY
LEVEL(M)
Setting
4 COLLATE
Setting
LIGHT
DARK
Adjust the density of the background color.
LIGHT
DARK
Specify the default copy density.
ON / OFF
Select whether or not collated copying is given priority.
5 QUALITY
Setting
NORMAL / FINE
Select the printing resolution.
6 PAPER
PRIORITY
Setting
TRAY1 / TRAY2
Select the whether Tray 1 or Tray 2 is given priority for
use.
" If Tray 2 is not installed, *NOT
appears.
"
"
"
"
28
AVAILABLE*
Settings for 1 MODE and 5 QUALITY can also be specified using
the Quality key.
Press the Quality key once to display the setting for 1 MODE.
Press the Quality key twice to display the setting for 5 QUALITY.
Settings for 3 DENSITY LEVEL(M) can also be specified using
the Light/Dark key.
Settings for 4 COLLATE can also be specified using the Collate key.
Settings for 6 PAPER PRIORITY can also be specified by pressing
the Function key, then selecting 1 TRAY SELECT.
Configuration Menu Overview
FAX REGISTRATION Menu
1 ONE-TOUCH
DIAL
Register fax destinations for one-touch dialing, speed
dialing, and group dialing.
2 SPEED DIAL
For details, refer to the Color Laser MFP Fax_PC Fax
User’s Guide.
3 GROUP DIAL
TX SETTING Menu
1 SCAN DENSITY
2 RESOLUTION
Specify settings for sending faxes.
For details, refer to the Color Laser MFP Fax_PC Fax
User’s Guide.
3 HEADER
Configuration Menu Overview
29
RX SETTING Menu
1 MEMORY RX
MODE
2 NO. of
RINGS
Specify settings for receiving faxes.
For details, refer to the Color Laser MFP Fax_PC Fax
User’s Guide.
3 REDUCTION
RX
4 RX PRINT
5 RX MODE
6 FOOTER
7 SELECT TRAY
COMM. SETTING Menu
1 TEL LINE
TYPE
2 LINE MONITOR
Specify the connection settings for faxing.
For details, refer to the Color Laser MFP Fax_PC Fax
User’s Guide.
3 PSTN/PBX
REPORTING Menu
1 ACTIVITY
REPORT
2 TX RESULT
REPORT
Specify the settings for printing the fax report.
For details, refer to the Color Laser MFP Fax_PC Fax
User’s Guide.
3 RX RESULT
REPORT
30
Configuration Menu Overview
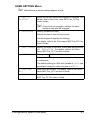
USER SETTING Menu
"
Manufacturer’s default settings appear in bold.
1 FAX PTT
SETTING
Select the country where this machine is installed. For
details, refer to the Color Laser MFP Fax_PC Fax
User’s Guide.
" If the country is changed, settings for other
functions may also be changed.
2 DATE&TIME
Specify the date and time.
Specify the time in the 24-hour format.
Use the keypad to specify the settings.
For details, refer to the Color Laser MFP Fax_PC Fax
User’s Guide.
3 DATE FORMAT Specify the order of the year, month and day specified
in 2 DATE&TIME. For details, refer to the Color
Laser MFP Fax_PC Fax User’s Guide.
4 PRESET ZOOM Setting
INCH / METRIC
Select whether the preset zoom ratios are set in inches
or millimeters.
The default setting for USA and Canada is INCH, and
the default setting for other countries is METRIC.
5 USER FAX
NO.
Enter your fax number. For details, refer to the Color
Laser MFP Fax_PC Fax User’s Guide.
6 USER NAME
Enter your name. For details, refer to the Color Laser
MFP Fax_PC Fax User’s Guide.
Configuration Menu Overview
31
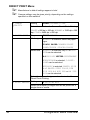
DIRECT PRINT Menu
"
"
Manufacturer’s default settings appear in bold.
Camera settings may be given priority, depending on the settings
specified on this machine.
1 IMAGE
QUALITY
Setting
DRAFT / NORMAL / FINE
Select the resolution for Camera Direct Photo Printing.
DRAFT = 600 dpi × 600 dpi; NORMAL = 1200 dpi × 600
dpi; FINE = 2400 dpi × 600 dpi
2 PAPER SIZE
Tray
TRAY1 / TRAY2
Media type
If TRAY1 is selected, select the paper
type.
PLAIN PAPER / LABELS / POST
CARD / THICK STOCK / GLOSSY
Media size
If TRAY2 is selected, only A4 or LETTER can be selected.
A4 / B5 / A5 / LETTER / STATEMENT
If POSTCARD is selected, J-POSTCARD can be selected.
If GLOSSY is selected, PHOTO SIZE
4×6, PHOTO SIZE 10×15, LTR
2UP SPL, A4 4UP SPL or A4 2UP
SPL can be selected.
Select the tray, media type, and media size for Camera
Direct Photo Printing.
3 N-UP LAYOUT Setting
1/2/3/4/6/8
Select the number of images that will be printed on a
single sheet of media.
32
Configuration Menu Overview
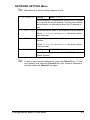
NETWORK SETTING Menu
"
Manufacturer’s default settings appear in bold.
1 IP ADDRESS
Setting
AUTO / SPECIFY
Select whether to automatically retrieve the IP address
or to specify a fixed IP address. Consult your network
administrator for information about the IP address to
use.
2 SUBNET MASK Enter the subnet mask of the network to be connected.
When IP ADDRESS is set to AUTO, this menu option
cannot be set.
3 GATEWAY
Enter the gateway address of the network to be connected.
When IP ADDRESS is set to AUTO, this menu option
cannot be set.
4 DNS CONFIG. Setting
DISABLE / ENABLE
Specify ENABLE or DISABLE for the DNS (Domain
Name System).
"
To edit or erase entered characters, press the Cancel/C key. To cancel a setting, hold down the Cancel/C key until, erase all characters,
and then press the Cancel/C key again.
Configuration Menu Overview
33
E-MAIL SETTING Menu
"
Manufacturer’s default settings appear in bold.
1 SENDER NAME Enter your name as the sender’s name. A maximum of
20 characters can be entered.
2 E-MAIL
ADDRESS
Type in the email address of the email sender when
using network scanning. A maximum of 64 characters
can be entered.
3 SMTP SERVER Type in the IP address or host name for the SMTP
server. A maximum of 64 characters can be entered.
4 SMTP PORT
NO.
Settings
5 SMTP TIMEOUT
Settings
1-65535 (Default : 25)
Specify the number of the port communicating with the
SMTP server.
30-300 (Default : 60)
Enter the amount of time (in seconds) until the connection with the SMTP server times out.
6 TEXT INSERT Settings
ON / OFF
Select whether or not the previously specified text is
inserted into the body of the email message when
using network scanning.
ON: The following text is inserted as the body of
the email message.
Image data(TIFF format) has been attached to
the email.
OFF: Only the scanned image is attached, and no
text is inserted into the email message.
7 DEFAULT
SUBJECT
"
34
Specify the subject of the email message when using
network scanning. A maximum of 20 characters can be
entered.
To edit or erase entered characters, press the Cancel/C key. To cancel a setting, hold down the Cancel/C key until, erase all characters,
and then press the Cancel/C key again.
Configuration Menu Overview
SCANNER SETTING Menu
"
Manufacturer’s default settings appear in bold.
1 RESOLUTION
Setting
150×150 / 300×300 / 600×600
Select the default scanning resolution for scan to email
operations.
2 IMAGE FORMAT
Setting
TIFF / PDF
Select the default format for saving files with scan to
email operations.
" PDF data can be opened in Adobe Acrobat
Reader.
" TIF files of images that have been scanned with
the Color or Gray setting cannot be opened
with the Windows Picture and FAX Viewer,
which is included with Windows XP as a
standard component. These files can be opened
with image-processing applications such as
PhotoShop, Microsoft Office Document Imaging
or ACDsee.
3 CODING
METHOD
Setting
MH / MR / MMR
Select the default compression method for scan to
email operations.
With MMR, the compression ratio is higher, but the
recipient’s fax machine may be incompatible. With MH,
the compression ratio is lower, but most fax machines
are compatible. Select the setting suitable for the recipient's fax machine.
Configuration Menu Overview
35
36
Configuration Menu Overview
3
Media Handling
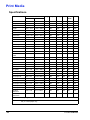
Print Media
Specifications
Media
Media Size
Tray*
Duplex
Copy
Print
Direct
Print
FAX
210.0 x 297.0 1/2
Yes
Yes
Yes
Yes
Yes
182.0 x 257.0 1
No
Yes
Yes
Yes
No
Yes
Yes
No
Yes
No
Yes
Inch
Millimeter
A4
8.2 x 11.7
B5 (JIS)
7.2 x 10.1
A5
5.9 x 8.3
148.0 x 210.0 1
No
Yes
Legal
8.5 x 14.0
215.9 x 355.6 1
No
Yes
Letter
8.5 x 11.0
215.9 x 279.4 1/2
Yes
Yes
Yes
Yes
Yes
Statement
5.5 x 8.5
140.0 x 216.0 1
No
Yes
Yes
No
No
Executive
7.25 x 10.5 184.0 x 267.0 1
No
Yes
Yes
No
No
Folio
8.3 x 13.0
No
Yes
Yes
No
No
210.0 x 330.0 1
Letter Plus
8.5 x 12.69 215.9 x 322.3 1
No
No
Yes
No
No
UK Quarto
8.0 x 10.0
No
No
Yes
No
No
Foolscap
203.2 x 254.0 1
8.0 x 13.0
203.2 x 330.2 1
No
No
Yes
No
No
Government Legal 8.5 x 13.0
216.0 x 330.0 1
No
No
Yes
No
No
Kai 16
7.3 x 10.2
185.0 x 260.0 1
No
No
Yes
No
No
Kai 32
5.1 x 7.3
130.0 x 185.0 1
No
No
Yes
No
No
Government
letter
8.0 x 10.5
203.2 x 266.7 1
No
Yes
Yes
No
No
16 K
7.7 x 10.6
195.0 x 270.0 1
No
No
Yes
No
No
Photo size 4x6"
4.0 x 6.0
101.6 x 152.4 1
No
No
Yes
Yes
No
Photo size 10x15
3.9 x 5.9
100.0 x 150.0 1
No
No
Yes
Yes
No
J-Postcard
3.9 x 5.8
100.0 x 148.0 1
No
Yes
Yes
Yes
No
Double Postcard
5.8 x 7.9
148.0 x 200.0 1
No
Yes
Yes
No
No
B5 (ISO)
6.9 x 9.8
176.0 x 250.0 1
No
Yes
Yes
No
No
Envelope #10
4.125 x 9.5 104.7 x 241.3 1
No
Yes
Yes
No
No
Envelope C5
6.4 x 9.0
162.0 x 229.0 1
No
Yes
Yes
No
No
Envelope DL
4.3 x 8.7
110.0 x 220.0 1
No
No
Yes
Yes
No
1
No
Yes
Yes
No
No
114.0 x 162.0 1
No
Yes
Yes
No
No
Envelope Chou #3 4.7 x 9.2
120.0 x 235.0 1
No
Yes
Yes
No
No
Envelope Chou #4 3.5 x 8.1
90.0 x 205.0
1
No
Yes
Yes
No
No
Envelope Monarch 3.875 x 7.5 98.4 x 190.5
Envelope C6
4.5 x 6.4
Envelope You #4
4.1 x 9.3
105.0 x 235.0 1
No
Yes
Yes
No
No
Custom,
Minimum
3.6 x 5.8
92.0 x 148.0
1
No
No
Yes
No
No
Custom,
Maximum
8.5 x 14.0
216.0 x 356.0 1
No
No
Yes
No
No
Thick Stock—Only supported for letter, A4, and smaller media.
Notes:
38
*Tray 1 = Multipurpose
Tray 2 = Plain paper only
Print Media
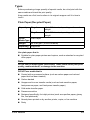
Types
Before purchasing a large quantity of special media, do a trial print with the
same media and check the print quality.
Keep media on a flat, level surface in its original wrapper until it is time to
load it.
Plain Paper (Recycled Paper)
Capacity
Tray 1
Up to 200 sheets, depending on the media
weight
Tray 2
Up to 500 sheets, depending on the media
weight
Driver
Plain Paper
Media Type
Weight
60 to 90 g/m² (16 to 24 lb bond)
Duplexing
Supported
Use plain paper that is
Suitable for plain paper printers and copiers, such as standard or recycled
office paper.
Note
Do not use the media types listed below. These could cause poor print
quality, media misfeeds, or damage to the machine.
DO NOT use media that is
Coated with a processed surface (such as carbon paper and colored
paper that has been treated)
Carbon backed
Unapproved iron-on transfer media (such as heat-sensitive paper,
heat-pressure paper, and heat-press transfer paper)
Cold-water-transfer paper
Pressure sensitive
Designed specifically for inkjet printers (such as superfine paper, glossy
film, and postcards)
Already been printed on by another printer, copier, or fax machine
Dusty
Print Media
39
Wet (or damp)
"
Keep media between 35% and 85% relative humidity. Toner does
not adhere well to moist or wet media.
Layered
Adhesive
Folded, creased, curled, embossed, warped, or wrinkled
Perforated, three-hole punched, or torn
Too slick, too coarse, or too textured
Different in texture (roughness) on the front and back
Too thin or too thick
Stuck together with static electricity
Composed of foil or gilt; too luminous
Heat sensitive or cannot withstand the fusing temperature (180°C
[356°F])
Irregularly shaped (not rectangular or not cut at right angles)
Attached with glue, tape, paper clips, staples, ribbons, hooks, or buttons
Acidic
Any other media that is not approved
Thick Stock
Paper thicker than 90 g/m2 (24 lb bond) is referred to as thick stock. Test all
thick stock to ensure acceptable performance and to ensure that the image
does not shift.
You can print continuously with thick stock. However, this could affect the
media feed, depending on the media quality and printing environment. If
problems occur, stop the continuous printing and print one sheet at a time.
Capacity
Tray 1
Up to 50 sheets, depending on their thickness
Tray 2
Not supported
Driver
Thick Stock
Media Type
Weight
91 to 163 g/m² (25 to 43 lb bond)
Duplexing
Not supported
"
40
43 lb bond is also referred to as 90 lb index stock.
Print Media
DO NOT use thick stock that is
Mixed with any other media in the trays (as this will cause media misfeeding)
Envelope
Print on the front (address) side only. Some parts of the envelope consist of
three layers of paper—the front, back, and flap. Anything printed in these layered regions may be lost or faded.
You can print continuously with envelope. However, this could affect the
media feed, depending on the media quality and printing environment. If
problems occur, stop the continuous printing and print one sheet at a time.
Capacity
Tray 1
Up to 10 sheets, depending on their thickness
Tray 2
Not supported
Driver
Envelope
Media Type
Duplexing
"
Not supported
43 lb bond is also referred to as 90 lb index stock.
Use envelopes that are
Common office envelopes approved for laser printing with diagonal joints,
sharp folds and edges, and ordinary gummed flaps
"
Because the envelopes pass through heated rollers, the gummed
area on the flaps may seal. Using envelopes with emulsion-based
glue avoids this problem.
Approved for laser printing
Dry
DO NOT use envelopes that have
Sticky flaps
Tape seals, metal clasps, paper clips, fasteners, or peel-off strips for sealing
Transparent windows
Too rough of a surface
Material that will melt, vaporize, offset, discolor, or emit dangerous fumes
Been presealed
Print Media
41
Labels
A sheet of labels consists of a face sheet (the printing surface), adhesive, and
a carrier sheet:
The face sheet must follow the plain paper specification.
The face sheet surface must cover the entire carrier sheet, and no adhesive should come through on the surface.
You can print continuously with label sheets. However, this could affect the
media feed, depending on the media quality and printing environment. If
problems occur, stop the continuous printing and print one sheet at a time.
Try printing your data on a sheet of plain paper first to check placement.
Check your application documentation for more information on printing labels.
Capacity
Tray 1
Up to 50 sheets, depending on their thickness
Tray 2
Not supported
Driver
Labels
Media Type
Duplexing
"
Not supported
43 lb bond is also referred to as 90 lb index stock.
Use label sheets that are
Recommended for laser printing
DO NOT use label sheets that
Have labels that easily peel off or have parts of the label already removed
Have backing sheets that have peeled away or have exposed adhesive
"
42
Labels may stick to the fuser, causing them to peel off and media
misfeeds to occur.
Print Media
Are precut or perforated
Do not use
OK to use
Shiny backed paper
Full-page labels
(uncut)
Letterhead
You can print continuously with letterhead. However, this could affect the
media feed, depending on the media quality and printing environment. If
problems occur, stop the continuous printing and print one sheet at a time.
Try printing your data on a sheet of plain paper first to check placement.
Capacity
Tray 1
Up to 50 sheets, depending on their size and
thickness
Tray 2
Not supported
Driver
Letterhead
Media Type
Duplexing
Not supported
Postcard
You can print continuously with postcard. However, this could affect the
media feed, depending on the media quality and printing environment. If
problems occur, stop the continuous printing and print one sheet at a time.
Try printing your data on a sheet of plain paper first to check placement.
Capacity
Tray 1
Up to 50 sheets, depending on their thickness
Tray 2
Not supported
Driver
Postcard
Media Type
Duplexing
Print Media
Not supported
43
Use postcards that are
Approved for laser printing
DO NOT use postcards that are
Coated
Designed for inkjet printers
Precut or perforated
Preprinted or multicolored
"
If the postcard is warped, press on the warped
area before putting it in Tray 1.
Folded or wrinkled
Transparency
"
"
"
"
Do not fan transparencies before loading them. Resulting static electricity may cause printing errors.
If you touch the face of the transparencies with your bare hands, print
quality may be affected.
Keep the media path clean. Transparencies are especially sensitive to
a dirty media path. If there are shadows on either the top or the bottom
of the sheets, see chapter 9, “Maintenance”.
Remove transparencies as soon as possible from the output bin to
avoid static buildup.
You can print continuously with transparencies. However, this could affect the
media feed, depending on the media quality, static buildup, and printing environment.
Try printing your data on a sheet of plain paper first to check placement.
44
Print Media
"
If you have problems feeding 50 sheets, try loading only 1–10 sheets
at a time. Loading a large number of transparencies at one time may
cause static buildup, causing feeding problems.
Capacity
Tray 1
Up to 50 sheets, depending on their thickness
Tray 2
Not supported
Driver
Transparency
Media Type
Duplexing
"
Not supported
Always first test a small quantity of a particular type of transparency.
Use transparencies that are
Approved for laser printing
DO NOT use transparencies that
Have static electricity that will cause them to stick together
Are specified for inkjet printers only
Glossy Media
Test all glossy media to ensure acceptable performance and to ensure that
the image does not shift.
You can print continuously with glossy media. However, this could affect the
media feed, depending on the media quality and printing environment. If
problems occur, stop the continuous printing and print one sheet at a time.
Capacity
Tray 1
Up to 50 sheets, depending on their thickness
Tray 2
Not supported
Driver
Glossy
Media Type
Duplexing
Not supported
DO NOT use glossy media that is
Mixed with any other media in the trays (as this will cause media misfeeding)
Specified for inkjet printers only
Print Media
45
Guaranteed Imageable (Printable) Area
The printable area on all media sizes is
up to 4 mm (0.157") from the edges of
the media.
Each media size has a specific imageable area, the maximum area on which
the machine can print clearly and without distortion.
a
a
a
Printable
Area
This area is subject to both hardware
a
limits (the physical media size and the
a = 4 mm (0.157")
margins required by the machine) and
software constraints (the amount of
memory available for the full-page frame buffer). The guaranteed imageable
(printable) area for all media sizes is the page size minus 4 mm (0.157") from
all edges of the media.
"
"
When printing in color on legal-size media, the bottom margin is
18 mm (0.709").
When printing on glossy media, the top margin is 10 mm (0.394").
Imageable Area—Envelopes
Envelopes have a nonguaranteed imageable area that varies with envelope
type.
"
The envelope
print orientation is determined
by your application.
Nonimageable area 4 mm (0.157")
Nonguaranteed area
Guaranteed
area
Page Margins
Margins are set through your application. Some applications allow you to set
custom page sizes and margins while others have only standard page sizes
and margins from which to choose. If you choose a standard format, you may
lose part of your image (due to imageable area constraints). If you can custom-size your page in your application, use those sizes given for the imageable area for optimum results.
46
Print Media
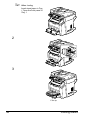
Loading Media
Take off the top and bottom sheets of a
ream of the media. Holding a stack of
approximately 200 sheets, fan the stack
to prevent static buildup before inserting
it in a tray.
"
Do not fan transparencies.
Note
Although this machine was designed for printing on a wide range of
media types, it is not intended to print exclusively on a single media
type except plain paper. Continuous printing on media other than plain
paper (such as envelopes, labels, thick stock, transparencies, or glossy
media) may adversely affect print quality or reduce engine life.
When refilling media, first remove any media remaining in the tray. Stack it
with the new media, even the edges, then reload it.
Do not mix media of different types and sizes, as this will cause media misfeeds.
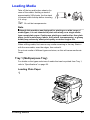
Tray 1 (Multipurpose Tray)
For details on the types and sizes of media that can be printed from Tray 1,
refer to “Specifications” on page 38.
Loading Plain Paper
1
Loading Media
47
"
When loading
Legal-sized paper in Tray
1, open the front panel of
Tray 1.
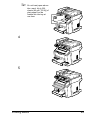
2
3
Face up
48
Loading Media
"
Do not load paper above
the t mark. Up to 200
sheets (80 g/m2 [22 lb]) of
plain paper can be
loaded into the tray at
one time.
4
5
Loading Media
49
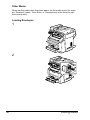
Other Media
When loading media other than plain paper, set the media mode (for example, Envelope, Labels, Thick Stock, or Transparency) in the driver for optimum print quality.
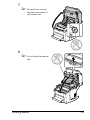
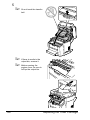
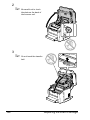
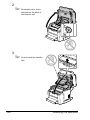
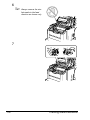
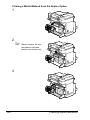
Loading Envelopes
1
2
50
Loading Media
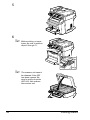
3
"
"
"
Before loading envelopes, press them down
to make sure that all air is
removed, and make sure
that the folds of the flaps
are firmly pressed; otherwise the envelopes may
become wrinkled or a
media misfeed may
occur.
Up to 10 envelopes can
be loaded into the tray at
one time.
Flap side down
For envelopes with the
flap along the long edge,
load the envelopes with
the flap toward the left of
the machine.
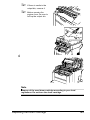
4
Loading Media
51
5
6
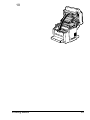
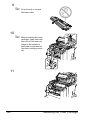
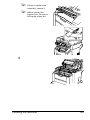
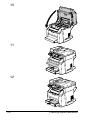
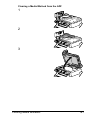
"
"
52
Before printing on envelopes, be sure to perform
steps 6 through 11.
The scanner unit cannot
be released if the ADF
has been opened. Be
sure to gently close the
ADF first, then release
the scanner unit.
Loading Media
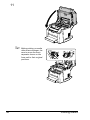
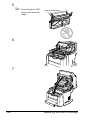
7
"
Be careful not to touch
the plate on the back of
the scanner unit.
8
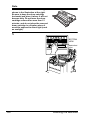
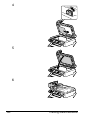
"
Do not touch the transfer
belt.
Loading Media
53
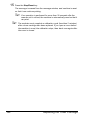
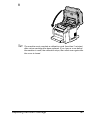
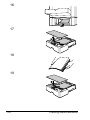
"
"
If there is media in the
output bin, remove it.
Before opening the
engine cover, be sure to
fold up the output bin.
9
54
Loading Media
10
Loading Media
55
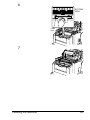
11
"
56
Before printing on media
other than envelopes, be
sure to move the fuser
separator levers on the
fuser unit to their original
positions.
Loading Media
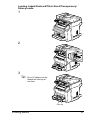
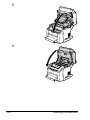
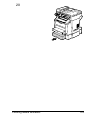
Loading Labels/Postcard/Thick Stock/Transparency/
Glossy media
1
2
3
"
Up to 50 sheets can be
loaded into the tray at
one time.
Face up
Loading Media
57
4
5
58
Loading Media
Tray 2
"
Only plain paper can be loaded in Tray 2.
Loading Plain Paper
1
2
Loading Media
59
3
4
5
Face up
"
60
Do not load above the
100% line. Up to 500
sheets (80 g/m2 [22 lb]) of
plain paper can be
loaded into the tray at
one time.
10
0%
75
50
Loading Media
6
7
Loading Media
61
About Duplex Printing
You should verify that the duplex option is physically installed on the machine
to successfully duplex the job.
Check your application to determine how to set your margins for duplex
printing.
Note
Only plain paper, 60–90 g/m2 (16–24 lb bond), can be autoduplexed. See
“Specifications” on page 38.
Duplexing envelopes, labels, transparencies postcards, or glossy
media is not supported.
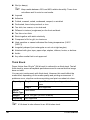
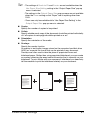
The following Double-Sided/Booklet settings are available.
"
With duplexing, the back side is printed first, and then the front
side is printed.
Double-Sided
If “Short Edge Binding” is selected, the pages will be laid out
to flip at the top.
11
2
2
11
13
If “Long Edge Binding” is selected, the pages will be laid out
to flip at the sides.
13
62
About Duplex Printing
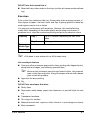
Booklet
"
If “Left Binding” is selected, the pages can be folded as a
left-bound booklet.
2
1
Only available for printer function.
1
If “Right Binding” is selected, the pages can be folded as a
right-bound booklet.
1
2
3
3
3
1
About Duplex Printing
63
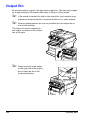
Output Bin
All printed media is output to the face-down output bin. This tray has a capacity of approximately 100 sheets (A4/Letter) of 80 g/m2 (22 lb) media.
"
"
If the media is stacked too high in the output bin, your machine may
experience media misfeeds, excessive media curl, or static buildup.
Remove transparencies as soon as possible from the output bin to
avoid static buildup.
The output bin can be adjusted to
two angles, as shown in the illustration at the right.
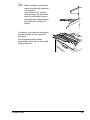
"
64
Press and hold in the button
on the right side of the output
bin to lower the bin to the
horizontal position.
Output Bin
"
When printing on postcards,
make sure that the output bin
is horizontal.
If the output bin is slanted
while printing, the postcards
may be curled and an error
message may appear before
the output bin contains 10
sheets.
In addition, the output bin extension
can be pulled out to two different
positions.
Use the appropriate position
depending on the size of the media
being printed on.
Output Bin
65
Media Storage
Keep media on a flat, level surface in its original wrapper until it is time to
load it.
Media that has been stored for a long time out of its packaging may dry up
too much and cause misfeeding.
If media has been removed from its wrapper, place it in its original packaging and store in a cool, dark place on a level surface.
Avoid moisture, excessive humidity, direct sunlight, excessive heat (above
35°C [95°F]), and dust
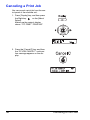
Avoid leaning against other objects or placing it in an upright position.
Before using stored media, do a trial print and check print quality.
66
Media Storage
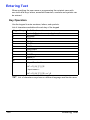
Original Media
Specifications
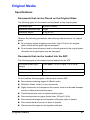
Documents that can be Placed on the Original Glass
The following types of documents can be placed on the original glass.
Document type
Sheets or books
Maximum document size
Legal
Maximum weight
3 kg (6.6 lb)
Observe the following precautions when placing a document on the original
glass.
Do not place objects weighing more than 3 kg (6.6 lb) on the original
glass; otherwise the glass may be damaged.
Do not press down extremely hard on a book spread on the original glass;
otherwise the original glass may be damaged.
Documents that can be Loaded into the ADF
The following types of documents can be loaded into the ADF.
Document media type /
Weight
Plain paper / 60 to 128 g/m² (16 to 34 lb)
Maximum document size
Legal
Media capacity
50 sheets
Do not load the following types of documents into the ADF.
Documents containing pages of different sizes
Wrinkled, folded, curled, or torn documents
Highly translucent or transparent documents, such as overhead transparencies or diazo photosensitive paper
Coated documents such as carbon-backed paper
Documents printed on paper thicker than 128 g/m² (34 lb)
Documents with pages bound together with paper clips or staples
Documents that are bound in a book or booklet
Documents with pages bound together with glue
Original Media
67
Documents with pages that have had cutouts removed or are cutouts
Label sheets
Offset printing masters
Documents with binder holes
68
Original Media
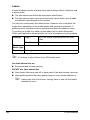
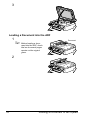
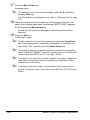
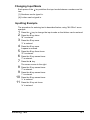
Loading a Document to be Copied
Placing a Document on the Original Glass
1
2
Document
"
Align the document with
the arrow on the left side
toward the rear of the
machine.
Loading a Document to be Copied
69
3
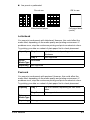
Loading a Document into the ADF
1
"
Document
Before loading a document into the ADF, check
that no document pages
remain on the original
glass.
2
70
Loading a Document to be Copied
4
Using the Printer
Driver
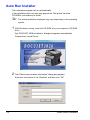
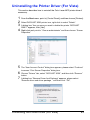
Auto Run Installer
The installation program will run automatically.
If the installation does not auto play, please run “Setup.exe” from the
CD-ROM’s root directory to install.
"
1
The actual installation displayed may vary depending on the operating
system.
With Windows running, insert the CD-ROM into your computer’s CD-ROM
drive.
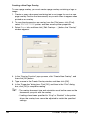
The “DOCUJET 2026 Installation” dialog box appears automatically.
Please select “Install Driver”
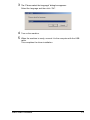
2
The “Please input reseller information” dialog box appears.
Enter the information of the “Reseller” and then click “OK”.
72
Auto Run Installer
3
4
5
The “Please select the language” dialog box appears.
Select the language and then click “OK”.
Turn on the machine.
When the machine is ready, connect it to the computer with the USB
cable.
This completes the driver installation.
Auto Run Installer
73
Auto Run Installer (For Vista)
The installation program will run automatically.
"
1
2
If the installation does not auto play, please run “Setup.exe”from the
CD-ROM’s root directory to install.
With Windows running, insert the CD-ROM into your computer’s CD-ROM
drive.
The “DOCUJET 2026 Installation” dialog box appears.
Select “Install Driver” .
3
The “Please input reseller information” dialog box appears.
Enter the information of the “Reseller” and then click “OK”.
4
74
The “Please select the language” dialog box appears.
Auto Run Installer (For Vista)
Select the language and then click “OK” .
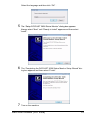
5
The “Setup-DOCUJET 2026 Status Monitor” dialog box appears.
Always select “Next” until “Ready to Install” appears and then select
“Install”.
6
7
The “Completing the DOCUJET 2026 Status Monitor Setup Wizard” dialog box appears and then select “Finish”.
Turn on the machine
Auto Run Installer (For Vista)
75
8
76
When the machine is ready, connect it to the computer with the USB
cable. The driver is installed successfully.
Auto Run Installer (For Vista)
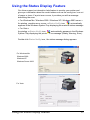
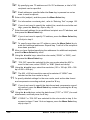
Using the Status Display Feature
Our driver support an interactive help feature to monitor your printer and
gives you information about its current status such as the runnig low / run out
of paper or toner. If a print error occurs, it provides you with a message
describing the error.
< For Windows Me / Windows 2000 / Windows XP / Windows 2003 server >
As printing ,machine error occurs, a Status Notify icon
automatically
appears in the Windows System Tray displaying the machine status message
< For Vista >
As printing, a Status Notify icon
automatically appears in the Windows
System Tray displaying the printer status message (Ready, Warning, Error).
Double-click Status Notify icon , the status message dialog appears.
For Windows Me
Windows 2000
Windows XP
Windows Server 2003
For Vista
Using the Status Display Feature
77
Printer status is ready.
Printer status is “Warning”.
Printer status is “Error”.
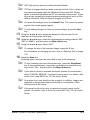
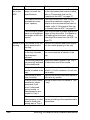
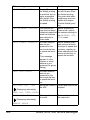
Message List
Warming up.
Communication Error
TRAY 1 Jam.
TRAY 2 (option) Jam.
78
Using the Status Display Feature
1.Duplex Jam.
2.Duplex Cover Open.
Fuser Jam.
Paper Size Error.
Front cover open.
Toner low
Black
Yellow
Magenta
Cyan
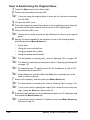
Using the Status Display Feature
79
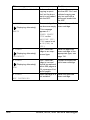
Toner empty.
“Cartridge used-up, please call agent.” message
appears.
Black
Yellow
Magenta
Cyan
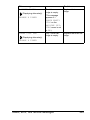
Drum life near end.
Drum life end.
Machine trouble.
80
Using the Status Display Feature
Selecting Printer Driver Options
Before you start working with your machine, you are advised to verify and, if
necessary, change the default printer driver settings. Also, in case you have
options installed, you should “declare” the options in the printer driver.
1
2
3
4
5
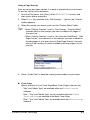
Choose the driver’s properties as follows:
–
(Windows XP/Server 2003)
From the start menu, choose Printers and Faxes to display the Printers and Faxes directory. Right-click the DOCUJET 2026 printer icon
and choose Printing Preferences.
–
(Windows 2000)
From the Start menu, choose Settings and then Printers to display
the Printers directory. Right-click the DOCUJET 2026 printer icon and
choose Printing Preferences.
–
(Windows Me/98SE)
From the Start menu, choose Settings and then Printers to display
the Printers directory. Right-click the DOCUJET 2026 printer icon and
choose Properties. Choose Printer Properties.
–
(VISTA).
From the Start menu, point to Control Panel and choose Printers to
display the Printers directory. Right-click the DOCUJET 2026 printer
icon and choose Printing Preferences.
If you have installed available options, proceed with the next step. Otherwise, proceed with step 8.
Select the [Device Options] tab.
Check that the options have been correctly identified.
Select an option (one at a time), and then select installed from Settings.
installed appears to the right of the option in the Device Options list.
"
6
To uninstall an option, select the option to be uninstalled in the Device
Options list, and then select Not installed from Settings.
Click Apply.
"
Depending on the version of the operating system, Apply may not
appear. Click OK to exit from the Properties dialog box.
Selecting Printer Driver Options
81
Uninstalling the Printer Driver
This section describes how to uninstall the Color Laser MFP printer driver if
necessary.
1
2
3
4
5
6
7
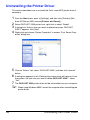
From the Start menu, point to [Settings], and then click [Printers] (Windows XP/Server 2003: choose [Printers and Faxes]).
Select DOCUJET 2026 printer icon, right-click to select “Delete”.
A dialog box “Are you sure you want to delete the printer ‘DOCUJET
2026’?” appears, click [Yes].
Right-click and choose “Server Properties” to access “Print Server Properties” dialog box.
Choose “Drivers” tab, select “DOCUJET 2026”, and then click “remove”
button.
A dialog box appears to ask “Deleting this printer driver will remove it from
the system. Are you sure you want to delete DOCUJET 2026?”, select
“Yes”.
The DOCUJET 2026 printer driver will be uninstalled from your computer.
"
82
When using Windows 98SE, restart the computer after uninstalling the
printer driver.
Uninstalling the Printer Driver
Uninstalling the Printer Driver (For Vista)
This section describes how to uninstall the Color Laser MFP printer driver if
necessary.
1
2
3
4
5
6
7
From the Start menu, point to [Control Panel], and then choose [Printers].
Select DOCUJET 2026 printer icon, right-click to select “Delete”.
A dialog box “Are you sure you want to delete the printer ‘DOCUJET
2026’?” appears, click [Yes].
Right-click and point to “ Run as administrator” and then choose “ Server
Properties”.
The “User Account Control” dialog box appears, please select “Continue”
to access “Print Server Properties” dialog box.
Choose “Drivers” tab, select “DOCUJET 2026”, and then clcik “Remove”
button.
A dialog box “Remove Driver And Package” appears, please select
“Remove driver and driver package.” and then click “OK”.
Uninstalling the Printer Driver (For Vista)
83
8
9
84
A dialog box appears to ask “Deleting this printer driver will remove it from
the system. Are you sure you want to delete DOCUJET 2026?”, select
“YES”.
The DOCUJET 2026 printer driver will be uninstalled from your computer.
Uninstalling the Printer Driver (For Vista)
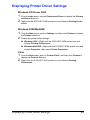
Displaying Printer Driver Settings
Windows XP/Server 2003
1
2
From the start menu, choose Printers and Faxes to display the Printers
and Faxes directory.
Right-click the DOCUJET 2026 printer icon and choose Printing Preferences.
Windows 2000/Me/98SE
1
2
From the Start menu, point to Settings, and then click Printers to display
the Printers directory.
Display the printer driver settings:
Windows 2000—Right-click the DOCUJET 2026 printer icon and
choose Printing Preferences.
Windows Me/98SE—Right-click the DOCUJET 2026 printer icon and
choose Properties, then select Printer Properties.
Vista
1
2
From the Start menu, point to Control Panel, and then click Printers to
display the Printers directory.
Right-click the DOCUJET 2026 printer icon and choose Printing
Preferences.
Displaying Printer Driver Settings
85
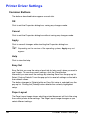
Printer Driver Settings
Common Buttons
The buttons described below appear on each tab.
OK
Click to exit the Properties dialog box, saving any changes made.
Cancel
Click to exit the Properties dialog box without saving any changes made.
Apply
Click to save all changes without exiting the Properties dialog box.
"
Depending on the version of the operating system, Apply may not
appear.
Help
Click to view the help.
Easy Set
Easy Set lets you save the setup of each tab for later recall, when you want to
use it again. To save the current settings, click the [Save] button.
Afterward, you can recall the settings by selecting them from the pop-up list.
Select “Factory Defaults” from the pop-up list to reset all settings on the tab to
their default values.
The button changes to [Delete] while an Easy Set setup is selected from the
pop-up list. Clicking the [Delete] button deletes the currently highlighted
setup.
Paper Layout
The Page Layout image shows what the printed document will look like using
the current printer driver settings. The Page Layout image changes as you
select different settings.
86
Printer Driver Settings
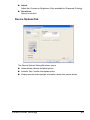
Printer Figure
The Printer Figure image shows a graphic image of what trays, and other
options are currently installed on the machine. All installed options are displayed, and the tray currently selected under Paper Source on the “Setup” tab
appears in light blue.
Printer Driver Settings
87
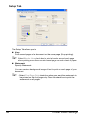
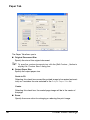
Setup Tab
The Setup Tab allows you to
N-up
Print several pages of a document on the same page (N-up printing).
"
Select Border Line check box to print a border around each page
when printing more than one document page on each sheet of paper.
Watermark
Specify Watermark.
You can create a background image of text to print on each page of your
document.
"
88
- Select First Page Only check box when you want the watermark to
be printed on the first page only. Clear the check box to print the
watermark on all pages.
Printer Driver Settings
Edit Watermark
Click "Edit Watermark" button displays the "Edit Watermark" dialog box.
1. Click the “New” button, and then type the desired text in the box.
2. Make any settings you want.
- Bold/Italic/Outline Only
- Font
- Angle
- Offset from Center
- Color
- Size
Duplex
Specify Double-Sided printing
When duplex printing is selected, select “Long Edge”, “Short Edge” or “No
(Simplex)” for the binding position.
"
- The optional Duplex Unit must be installed and power on.
- In addition, the "Duplex" option must be added to the list of installed
options in the "device Options" tab for the printer driver. When using
duplex printing, select "Plain Paper" as the media type.
Paper Source
Click the pop-up menu, and then select the tray from which paper should
be fed.
"
If the optional paper feed unit is installed, “Tray 2” appears.
Media Type
Select the type of media to be used for printing.
Printer Driver Settings
89
Paper Tab
The Paper Tab allows you to
Original Document Size
Specify the size of the original document.
"
To specify a custom document size, click the [Edit Custom...] button to
display the “Custom Sizes” dialog box.
Output Paper Size
Specify the output paper size.
Scale to Fit
Selecting this check box caused the printed image to be resized automatically so it matches the size selected in the Output Paper Size list.
Center
Selecting this check box, the scaled page image will be in the center of
the page.
Zoom
Specify the zoom ration for enlarging or reducing the print image.
90
Printer Driver Settings
"
- The settings of Scale to Fit and Center are not available when the
Use Paper Size Setting setting in the “Output Paper Size” pop-up
menu is selected.
- The settings in the Output Paper Size pop-up menu are not available
when the Zoom setting on the “Paper” tab is anything other than
100%
- Zoom can only be available while “Use Paper Size Setting” in the
Output Paper Size pop-up menu is selected.
Copies
Specify the number of copies to be printed.
Collate
Specify whether each copy of the document should be printed individually
or if all copies of each page should be printed as a set
Orientation
Specify the orientation of the media
Overlays
Specify the overlay function
An overlay is text and/or images stored on the computer hard disk drive
(HDD) as a special file format that can be printed on any document.
Overlays are often used to take the place of preprinted forms and
letterhead paper. Rather than using preprinted letterhead, you can create
an overlay containing the exact same information that is currently on your
letterhead. To print a letter with your company’s letterhead, you need only
tell the machine to print the letterhead overlay on your document.
Efbs!BCD
Efbs!BCD
Sfhbset
Sfhbset
XPSME!CFTU
Printer Driver Settings
XPSME!CFTU
91
Creating a New Page Overlay
To use a page overlay, you must create a page overlay containing a logo or
image.
1. Create or open a document containing text or an image for use in a new
page overlay. Position the items exactly as you wish them to appear when
printed as an overlay.
2. To save the document as an overlay, from the [File] menu, click [Print],
select DOCUJET 2026 printer, and then access printer properties.
3. Select Paper tab, and then click [ Edit Overlays.....] button, the “Overlay”
window appears.
4. In the “Overlay Function” pop-up menu, click “Create New Overlay”, and
then click [OK] button.
5. Type a name in the Create Overlay window, and then click [OK].
6. In the “Properties” dialog box, Click [OK], and then in the “Print” dialog
box, click [OK] to complete creating.
"
- The overlay document size and orientation must be the same as the
documents you print with the overlay.
- If settings have been specified for “N-up” or “Booklet” in the printer
driver, the overlay form cannot be adjusted to match the specified
settings.
92
Printer Driver Settings
Using a Page Overlay
After an overlay has been created, it is ready to printed with your document.
To print an overlay with a document.
1. From the [File] menu, click [Print], select DOCUJET 2026 printer, and
then access printer properties.
2. Select Paper tab, and then click [ Edit Overlays.....] button, the “Overlay”
window appears.
3. Select the overlay you want to print from the “Overlay Select” table.
"
- When “Overlay Function” is set to “One Overlay”, “Overlay Select”
chooses which of the overlays you want to added to all pages of
your print job.
- When “Overlay Function” is set to “Two Overlays (Odd/Even)”, “Odd
Page Overlay” choosed which of the overlays you want to added to
the odd pages of your print job and “Even Page Overlay” choosed
which of the overlays you want to added to the even pages of your
print job.
4. Check “Under Data” to have the overlay printed under your print data.
Cover Page
Specify to attach a Front Cover Page/Back Cover Page to the print job.
- “Tray” and “Media Type” are available while the Printed Cover is
selected.
- “Size”, “Tray” and “Media Type” are not available while the Printed
Cover and N-up are selected in the Back Cover Page.
- “Size”, “Tray” and “Media Type” are available while the Blank Cover is
selected.
Printer Driver Settings
93
Quality Tab
The Quality Tab allows you to
Color Printing
Specify whether to print in color or grayscale (black and white).
Color correction
Specify to adjust how colors are printed.
Color Correction
Description
Automatic (Default)
Select “Automatic” to have the driver automatically
adjust colors.
Manual Settings
Select “Manual Settings” choose specific color corrections for each element type (text, image, graphics).
Use Printer Setting
Select “Use Printer Setting” to turn off color correction in the driver. Depending on the printer settings,
color correction may still be performed by the printer.
94
Printer Driver Settings
Adjust
Adjust the Contrast or Brightness (Only available for Grayscale Printing).
Resolution
Specify resolution.
Device OptionsTab
The Device Options SettingTab allows you to
Automatically identify installed options
Activate Tray 2 and/or the duplex option
Display version and copyright information about this printer driver)
Printer Driver Settings
95
Canceling a Print Job
You can cancel a print job from the control panel of the machine unit.
1. Press [Display] key, and then press
the Right key
on the [Menu/
Select].
Make sure the copier’s display
shows “*PC PRINT* PRINTING”.
2. Press the [Cancel/C] key, and then,
the “PC JOB CANCEL?” confirmation message appears on the display.
96
Canceling a Print Job
3. Press the [Menu/Select] key to cancel the print job or the [Cancel/C]
key to resume printing.
Canceling a Print Job
97
98
Canceling a Print Job
5
Using Direct Print
Camera Direct Photo Printing
If a digital camera with PictBridge (1.0 or later) is connected to the machine
via the USB Host Port, images stored on the digital camera can be printed
directly on the machine.
"
"
"
The following features are not supported with Camera Direct Photo
Printing.
• DPOF AUTOPRINT image print
• Borderless
• Cable disconnect enable
• DPOF cable disconnect recovery
Index print and printing using an N-UP LAYOUT setting is possible
only with Letter- and A4-size media.
Make sure that the paper loaded into the paper tray is the same size
as that selected for PAPER SIZE in the DIRECT PRINT menu.
The types of media that can be used with Camera Direct Photo Printing are plain paper, thick stock, labels, glossy media, and postcard.
Printing Directly from a Digital Camera
1
From the DIRECT PRINT menu, specify settings for IMAGE QUALITY, PAPER SIZE, and N-UP LAYOUT.
"
"
100
If these settings can be specified from the digital camera, they do
not need to be specified from the control panel. These settings are
overridden by settings configured within the digital camera.
For details on control panel settings, refer to “DIRECT PRINT
Menu” on page 32.
Printing is not possible if the media size (image size) specified
from the camera is larger than the media size selected for PAPER
SIZE in the DIRECT PRINT menu.
Camera Direct Photo Printing
2
Connect the USB cable to the
digital camera and to the Digital
Camera Direct Photo print port.
"
3
4
A USB cable is not
included with the
machine and must be
purchased separately, if
not supplied with your
digital camera.
From the digital camera, specify
the image(s) that you wish to print and the desired number of copies.
Start printing from the digital camera.
Camera Direct Photo Printing
101
102
Camera Direct Photo Printing
6
Using the Copier
Making Basic Copies
This section contains descriptions of the basic copy operation procedure and
the functions that are frequently used when making copies, such as specifying the zoom ratio and the copy density.
"
"
If the Fax key or Scan key lights up in green while copying, press the
Copy key.
Change the media size from the PAPER SOURCE menu.
For details, refer to “PAPER SOURCE SETUP Menu” on page 27.
Basic Copy Operation
1
Position the document to be
copied.
"
104
For details on positioning
the document, refer to
“Placing a Document on
the Original Glass” on
page 69 and “Loading a
Document into the ADF”
on page 70.
Making Basic Copies
2
Specify the desired copy settings.
"
3
For details on setting clone copying, refer to “Setting Clone Copying” on page 114.
For details on setting poster copying, refer to “Setting Poster Copying” on page 115
Using the keypad, specify the desired number of copies.
"
4
For details on specifying the copy quality, refer to “Specifying the
Copy Quality” on page 105.
For details on specifying the zoom ratio, refer to “Specifying the
Zoom Ratio” on page 106.
For details on selecting the copy density, refer to “Selecting the
Copy Density” on page 107.
For details on selecting the media tray, refer to “Selecting the
Media Tray” on page 107.
For details on setting 2in1 copying, refer to “Setting 2in1 Copying”
on page 108.
For details on ID card copying, refer to “ID Card Copying” on page
109.
For details on setting duplex (Double-Sided) copying, refer to “Setting Duplex (Double-Sided) Copying” on page 111.
For details on setting collated copying, refer to “Setting Collated
Copying” on page 113.
If the number of copies was incorrectly entered, press the Cancel/
C key, and then specify the correct number of copies.
To print color copies, press the Start-Color key. To print monochrome
copies, press the Start-B&W key.
Copying begins.
"
If the Stop/Reset key is pressed while copying, PRESS THE
START KEY TO RESUME appears. To continue copying, press
the Start-B&W key or the Start-Color key. To stop copying, press
the Stop/Reset key.
Specifying the Copy Quality
The copy quality can be set according to the contents of the document.
1
2
Press the Quality key.
Press the * or ) key to select MIX, TEXT or PHOTO, and then press
the Menu/Select key.
The main screen appears again.
Making Basic Copies
105
Specifying the Zoom Ratio
The zoom ratio can be specified either by selecting a preset zoom ratio or by
specifying a custom zoom ratio.
Selecting a Preset Zoom Ratio
1
Press the Reduce/Enlarge key until the desired zoom ratio is selected.
"
The zoom ratio changes in the following order with each press of the
Reduce/Enlarge key.
When USER SETTING/PRESET ZOOM is set to METRIC:
1.15→1.41→2.00→0.50→0.70→0.81
When USER SETTING/PRESET ZOOM is set to INCH:
1.29→1.54→2.00→0.50→0.64→0.78
The zoom ratio cannot be changed using the keypad.
"
Depending on the selected preset zoom ratio, a sample of the change
to the media size may appear in the status area in the lower-right corner of the message window. The sample of the media size change will
disappear after 5 seconds.
Specifying a Custom Zoom Ratio
1
Press the + or , key until the desired zoom ratio is displayed.
"
Each press of the + or , key changes the zoom ratio by 0.01.
A setting between 0.50 and 2.00 can be specified.
The zoom ratio cannot be changed using the keypad.
106
Making Basic Copies
Selecting the Copy Density
"
1
If [A] is displayed, press the Light/Dark key twice to specify the copy
density.
Press the * or ) key to select the desired copy density.
As the indicator is moved to the right, the density becomes darker. As the
indicator is moved to the left, the density becomes lighter.
"
The copy density can also be selected by pressing the Light/Dark
key. Press the Light/Dark key to display the DENSITY screen. Press
the * or ) key to select the copy density, and then press the Menu/
Select key.
Selecting the Media Tray
"
1
2
Press the Function key.
Press the + or , key to select “1 TRAY SELECT”, and then press the
Menu/Select key.
"
3
If optional Tray 2 is not installed, the tray cannot be selected.
If Tray 2 is not installed, “1 TRAY SELECT” does not appear.
Press the * or ) key to select the TRAY1 or TRAY2, and then press
the Menu/Select key.
Making Basic Copies
107
Making Advanced Copies
This section contains descriptions of setting 2in1 copying, ID card copying,
duplex (Double-Sided) copying, collated copying, clone copying, and poster
copying.
"
2in1 copying, duplex (Double-Sided) copying, ID card copying, collated copying, clone copying and poster copying cannot be combined.
Setting 2in1 Copying
If 2in1 copying is set, two document pages can be copied together onto a single page.
"
1
With 2in1 copying, load the document into the ADF. 2in1 copying cannot be performed by using the original glass.
Press the 2in1 key.
The zoom ratio is set to 0.64 on USA and Canada and 0.70 on other
countries, and
appears in the message window.
"
108
2in1 copying cannot be specified if the ADF is open.
Making Advanced Copies
ID Card Copying
B
A
With ID card copying, the back and front of a document, such as a certificate,
are copied at full size on a single sheet of paper.
front side
back side
A
B
"
"
"
1
ID card copying can only be performed from the original glass.
Align the document with the arrow on the left side toward the rear
of the machine.
Since the areas 4 mm at the top and 4 mm at the left are not within
the print area, those parts of the document are not copied. Therefore, the position of the document to be copied may need to be
adjusted.
The paper sizes that are available for ID card copying are A4, Letter and Legal.
Position the document on the original glass.
"
2
3
When ID card copying is set, the zoom ratio cannot be changed.
For details on positioning the document on the original glass, refer
to “Placing a Document on the Original Glass” on page 69.
Press the Function key.
Press the , key twice to select the “3 ID CARD COPY”, and then press
the Menu/Select key.
Making Advanced Copies
109
4
5
6
Press the * or ) key to select ON, and then press the Menu/Select key.
To print color copies, press the Start-Color key. To print monochrome
copies, press the Start-B&W key.
Scanning of the document begins.
When NEXT PAGE appears, position the back side of the document at
the same location as the front side, and then press the Start-Color or
Start-B&W key.
After the back side has been scanned, printing automatically begins.
The main screen appears again.
110
Making Advanced Copies
Setting Duplex (Double-Sided) Copying
Duplex (Double-Sided) Copying From the ADF
If duplex (Double-Sided) copying is set, copies can be printed on both sides
of the media.
"
1
2
3
The duplex option must be installed in order to set duplex (Double-Sided) copying.
Press the Function key.
Press the , key once to select “2 DUPLEX”, and then press the Menu/
Select key.
"
"
If the duplex option is not installed, “2 DUPLEX” does not appear.
This screen appears only if the duplex option is installed.
Press the * or ) key to select LONG EDGE or SHORT EDGE, and then
press the Menu/Select key.
The main screen appears again, and
"
11
When making Double-Sided copies in full color, printing will begin 30
to 50 seconds after scanning of the document is finished.
When LONG EDGE or SHORT EDGE is selected, duplex (Double-Sided) copying is performed as described below.
2
"
appears in the message window.
If LONG EDGE is selected, the pages will be laid out to flip
at the sides.
13
If SHORT EDGE is selected, the pages will be laid out to flip
at the top.
11
2
13
Making Advanced Copies
111
Duplex (Double-Sided) Copying From the Original Glass
Duplex (Double-Sided) copying can be performed either from the original
glass or from the ADF. The description for duplex (Double-Sided) copying
with the original glass is provided below.
1
Position the document on the
original glass.
"
2
Press the Function key and set duplex (Double-Sided) copying.
"
3
4
For details on positioning
the document on the original glass, refer to “Placing a Document on the
Original Glass” on page
69.
For details on setting duplex (Double-Sided) copying, refer to “Setting Duplex (Double-Sided) Copying” on page 111.
To print color copies, press the Start-Color key. To print monochrome
copies, press the Start-B&W key.
Scanning of the document begins.
When NEXT PAGE appears in the message window, place the second
document page on the original glass, and then press the Start-Color key
or the Start-B&W key.
After the second page (back side) is scanned, printing begins automatically.
The main screen appears again.
112
Making Advanced Copies
Setting Collated Copying
If collated copying is set, multiple sets of copies can be printed from a
multi-page document.
"
1
With collated copying, load the document into the ADF. Collated copying cannot be performed by using the original glass.
Press the Collate key.
appears in the message window.
"
"
If COPY SETTING/”4 COLLATE” is set to ON, do not press the
Collate key.
Collated copying cannot be specified if the ADF is open.
Making Advanced Copies
113
Setting Clone Copying
If clone copying is set, multiple sets of copies can be printed from the original
document on a single page. The number of images is automatically determined by the original image and paper size.
"
1
With clone copying, load the document into the original glass. Clone
copying cannot be performed by using the ADF.
Position the document on the original glass.
"
2
3
4
5
Press the Function key.
Press the , key three times to select the “4 CLONE COPY”, and then
press the Menu/Select key.
Select ON, and then press the Menu/Select key.
Press “Color” or “B/W” key to start copy.
"
114
For details on positioning the document on the original glass, refer
to “Placing a Document on the Original Glass” on page 69.
Reduce/Enlarge key, 2 in 1 key and Collate key cannot be performed
at the same time as making clone copy.
Making Advanced Copies
Setting Poster Copying
If poster copying is set, prints an image onto 4 sheets of paper (2x2).
You can paste the printed pages together to make one poster-sized document.
"
1
With poster copying, load the document into the original glass. postercopying cannot be performed by using the ADF.
Position the document on the original glass.
"
2
3
4
5
For details on positioning the document on the original glass, refer
to “Placing a Document on the Original Glass” on page 69.
Press the Function key.
Press the , four times to select the “5 POSTER COPY”, and then press
the Menu/Select key.
Select “ON”, and then press the Menu/Select key.
Press “Color” or “B/W” key to start copy.
"
Reduce/Enlarge key, 2 in 1 key and Collate key cannot be performed
at the same time as making poster copy.
Making Advanced Copies
115
116
Making Advanced Copies
7
Using the Scanner
Making Basic Scans
Scanning via USB
Scanning can be performed from a TWAIN-compatible application.
"
1
To scan via the network, press the Scan key. For details, refer to
“Basic Scan to Email Operation” on page 121
Position the document to be
scanned.
"
2
3
4
5
118
For details on positioning
the document, refer to
“Placing a Document on
the Original Glass” on
page 69 and “Loading a
Document into the ADF”
on page 70.
Start the application to be used for scanning.
Start the scanner driver according to the application settings.
Specify the necessary scanner driver settings.
Click the Scan button in the scanner driver.
Making Basic Scans
Scanner Driver Settings
Original Size
Specify the original size.
Scan Type
Specify the scan type.
Resolution
Specify the resolution.
Scanning mode
Select Auto or Manual. When Manual is selected, settings can be specified
for Rotation type, Brightness/Contrast, Sharp, Curves, Level, Color Balance and Hue/Saturation.
Image size
Shows the data size of the scan image.
Scan
Click to begin scanning.
About
Shows the software version information.
Close
Click to close the scanner driver window.
Preview Window
Displays a preview of the scan.
Clear
Erases the preview.
Making Basic Scans
119
Width/Height
Shows the width and height of the area to be scanned.
Prescan
Displays a preview in the preview window.
Help
Displays the Help.
120
Making Basic Scans
Basic Scan to Email Operation
With a scan to email operation, documents are sent via a mail server.
"
In order to perform this operation, the network setting and the email
setting must have already been specified. For details, refer to “NETWORK SETTING Menu” on page 33 and “E-MAIL SETTING Menu” on
page 34.
Scan to Email Using the ADF
If the ADF is used, original documents containing multiple pages can be automatically scanned.
"
"
"
"
1
2
3
4
5
Do not load original documents that are bound together, for example,
with paper clips or staples.
Do not load more than 50 sheets; otherwise an original document misfeed or damage to the document or machine may occur.
If the original document is not loaded correctly, it may not be fed in
straight, or an original document misfeed or damage to the document
may occur.
Do not open the ADF cover while documents loaded into the ADF are
being scanned.
Press the Scan key to enter Scan mode.
Make sure that there is no document on the original glass.
Stack the document in the ADF document feed tray face up with the first
page to be sent on the top of the stack.
Adjust the document guides to the document size.
Specify the email address of the recipient in one of the following ways,
and then press the Menu Select key.
–
Direct input
–
Using the one-touch dial key (including group dialing)
–
Using the speed dial number
–
Using the phone book function
"
"
For information on entering text , refer to “Entering Text” on page 130.
For details on specifying the recipient, refer to “Specifying a Recipient”
on page 127.
Basic Scan to Email Operation
121
"
"
6
"
9
“COLOR” cannot be selected for the scan mode when the ADF is
used. In that case, select “GRAY” or “B/W” (black and white).
The 600 × 600 dpi resolution cannot be selected if “GRAY” was
selected as the scan mode in step 9.
To specify detailed settings for the scan mode, such as the data format
and compression encoding method, press the , key.
If you do not want to specify the data format and compression encoding method, press the Menu Select key instead of pressing the , key,
skip to step 15.
Using the * and ) keys, select the data format (“TIFF” or “PDF”) for email
attachments, and then press the , key.
"
122
To specify more then one CC address, press the Menu Select key to
enter the additional addresses. Repeat step 7 until all of the recipients
have been specified.
Using the * and ) keys, select the resolution (150 × 150 dpi, 300 × 300
dpi or 600 × 600 dpi).
"
12
If you do not want to specify CC address, press the Menu Select key
will skip to step 9.
Using the * and ) keys, select the color mode (“GRAY” or “B/W”), and
then press the Menu Select key.
"
11
If you do not want to specify the subject line, resolution and other settings, press the Start key, skip to step 15.
After you have finished specifying the addresses for additional recipients,
press the Menu Select key twice.
"
10
For information on entering text , refer to “Entering Text” on page 130.
Enter the email address for any additional recipient as a CC address, and
then press the Menu Select key.
"
8
Email addresses specified after the Scan key is pressed are set as
scan to email recipients.
Enter a title (subject), and then press the Menu Select key.
"
"
7
By specifying one TO address and 124 CC addresses, a total of 125
recipients can be specified.
If “GRAY” or “COLOR” was selected for the color mode in step 9, the
screens in steps 13 and 14 do not appear, press the Menu Select key,
skip tp step 15.
Basic Scan to Email Operation
"
"
"
"
13
14
15
TIF files of images that have been scanned with the Color or Gray setting cannot be opened with the Windows Picture and FAX Viewer,
which is included with Windows XP as a standard component. These
files can be opened with image-processing applications such as PhotoShop, Microsoft Office Document Imaging or ACDsee.
To cancel the settings, press the Cancel/C key. The screen for selecting the color mode appears again.
To quit making changes to the scan mode settings, press the Start
key.
Using the * and ) keys, adjust the density for the document to be
scanned, and then press the , key.
Using the * and ) keys, select the compression encoding method (“MH”,
“MR” or “MMR”), and then press the Menu Select key.
Using the * and ) keys, select “ADF”.
"
16
PDF data can be opened in Adobe Acrobat Reader.
To change the size of the scanned image, press the , key.
For information on changing the size, refer to “Entering Text” on page
130.
Press the Start key.
Scanning starts, and then the scan data is sent to the recipients.
"
"
"
"
To stop scanning and stop the transmission, press the Stop/Reset
key. A message appears, requesting confirmation to cancel the setting. Select “Yes”, and then press the Menu Select key.
If you want to cancel a scanned document queued for transmission,
select “CANCEL RESERV.” from the Function menu. For details, refer
to the Color Laser MFP Fax_PC Fax User's Guide.
Scan data is not sent directly to the recipient. In addition, images are
regarded as having been sent successfully on completion of their
transmission to the server.
If the email could not be sent, a transmission result report can be
printed. For details, refer to the Color Laser MFP Fax_PC Fax User's
Guide.
Basic Scan to Email Operation
123
Scan to Email Using the Original Glass
1
2
Press the Scan key to enter Scan mode.
Remove all documents from the ADF.
"
3
4
5
Lift open the ADF cover.
Place the original document face down on the original glass and align the
document on the scales above and to the left of the original glass.
Gently close the ADF cover.
"
6
–
Direct input
–
Using the one-touch dial key
–
Using the speed dial number
–
Using the phone book function
"
"
For details on specifying the recipient, refer to “Specifying a Recipient”
on page 127.
By specifying one TO address and 124 CC addresses, a total of 125
recipients can be specified.
Email addresses specified after the Scan key is pressed are set as
scan to email recipients.
For information on entering text, refer to “Entering Text” on page 130.
If you do not want to specify the subject line, resolution and other settings, press the Start key, skip to step 16.
Enter the email address for any additional recipient as a CC address, and
then press the Menu Select key.
"
124
For information on entering text , refer to “Entering Text” on page 130.
Enter a title (subject), and then press the Menu Select key.
"
"
8
Closing it too quickly may cause the document to move on the original
glass.
Specify the email address of the recipient in one of the following ways,
and then press the Menu Select key.
"
"
7
If you are using the original glass to scan, do not load any documents
into the ADF.
If you do not want to specify CC address, press the Menu Select key
will skip to step 10.
Basic Scan to Email Operation
"
9
10
11
After you have finished specifying the addresses for additional recipients,
press the Menu Select key twice.
Using the * and ) keys, select the color mode (“COLOR”, “GRAY”, or
“B/W”), and then press the Menu Select key.
Using the * and ) keys, select the resolution (150 × 150 dpi, 300 × 300
dpi or 600 × 600 dpi).
"
12
To specify more then one CC address, press the Menu Select key to
enter the additional addresses. Repeat step 8 until all of the recipients
have been specified.
The 600 × 600 dpi resolution cannot be selected if “COLOR” or
“GRAY” was selected as the scan mode in step 10.
To specify detailed settings for the scan mode, such as the data format
and compression encoding method, press the , key.
The screen for selecting the data format appears.
"
13
Using the * and ) keys, select the data format (“TIFF” or “PDF”) for email
attachments, and then press the , key.
"
"
"
"
"
14
15
16
If you do not want to specify the data format and compression encoding method, press the Menu Select key instead of pressing the , key,
skip to step 16.
If “GRAY” or “COLOR” was selected for the color mode in step 10, the
screens in steps 14 and 15 do not appear, press the Menu Select key,
skip tp step 16.
PDF data can be opened in Adobe Acrobat Reader.
TIF files of images that have been scanned with the Color or Gray setting cannot be opened with the Windows Picture and FAX Viewer,
which is included with Windows XP as a standard component. These
files can be opened with image-processing applications such as PhotoShop, Microsoft Office Document Imaging or ACDsee.
To cancel the settings, press the Cancel/C key. The screen for selecting the color mode appears again.
To quit making changes to the scan mode settings, press the Start
key.
Using the * and ) keys, adjust the density for the document to be
scanned, and then press the , key.
Using the * and ) keys, select the compression encoding method (“MH”,
“MR” or “MMR”), and then press the Menu Select key.
Using the * and ) keys, select “BOOK”.
Basic Scan to Email Operation
125
17
Press the Menu Select key.
Scanning starts.
"
18
For information on changing the size, refer to “Entering Text” on page
130.
When scanning a document containing several pages, place the next
page on the original glass when the message “NEXT PAGE?” appears,
and then press the Menu Select key.
–
19
Repeat step 18 until all of the pages in the document have been
scanned.
Press the Start key.
Transmission starts.
"
"
"
"
126
To change the size of the scanned image, press the , key before
pressing Start key.
To stop scanning and stop the transmission, press the Stop/Reset
key. A message appears, requesting confirmation to cancel the setting. Select “Yes”, and then press the Menu Select key.
If you want to cancel a scanned document queued for transmission,
select “CANCEL RESERV.” from the Function menu. For details, refer
to the Color Laser MFP Fax_PC Fax User's Guide.
Scan data is not sent directly to the recipient. In addition, images are
regarded as having been sent successfully on completion of their
transmission to the server.
If the email could not be sent, a transmission result report can be
printed. For details, refer to the Color Laser MFP Fax_PC Fax User's
Guide.
Basic Scan to Email Operation
Specifying a Recipient
The recipients can be specified in any of the following ways.
Direct input: Directly enter the email address.
Using a one-touch dial key: Specify a recipient registered with a
one-touch dial key.
Using speed dial numbers: Specify a recipient registered with a speed dial
number.
Using the phone book functions: List or search for recipients registered as
one-touch dial keys or speed dial numbers, and then select a recipient.
Directly Entering an Email Address
1
Use the numeric keypad to type in the email address for the recipient.
"
"
For details on entering/editing text and the characters that can be
entered, refer to the Color Laser MFP Fax_PC Fax User's Guide.
To erase the entered email address, hold down the Cancel/C key for
about one second, or press the Stop/Reset key.
Using a One-Touch Dial Key
If a recipient has been registered with a one-touch dial key, the recipient’s
email address can be entered simply by pressing the programmed one-touch
dial key.
"
1
The recipient must have been registered with a one-touch dial key in
advance. For details, refer to the Color Laser MFP Fax_PC Fax User's
Guide.
Press the desired one-touch dial key.
"
"
Press the one-touch dial key programmed with the group dial recipients to send an email to multiple recipients.
If a one-touch key programmed with group dial recipients is selected
in the screen for specifying the TO address, all email addresses
included in the group dial are added to the TO address. If it is selected
in the screen for specifying the CC address, all addresses are added
to the CC address.
If an incorrect recipient was selected, press the Cancel/C key.
Specifying a Recipient
127
"
If the one-touch dial key that is pressed is not registered with an email
address, the message “NOT E-MAIL ADDRESS” appears. In addition,
if the one-touch dial key that is pressed is not registered with a recipient, the message “NOT REGISTERED!” appears. Press a one-touch
dial key registered with an email address.
Using the Speed Dial Function
If a recipient has been registered with a speed dial number, the recipient’s fax
number can be dialed simply by pressing a speed dial number key.
"
1
2
The recipient must have been registered with a speed dial in advance.
For details, refer to the Color Laser MFP Fax_PC Fax User's Guide.
Press the Speed Dial key.
Use the keypad to enter the 3-digit speed dial number programmed with
the desired recipient.
The recipients name appears in the message window.
"
"
If an incorrect recipients was selected, press the Cancel/C key.
If the entered speed dial number is not registered with an email
address, the message “NOT E-MAIL ADDRESS” appears. In addition,
if the entered speed dial number is not registered with a recipient, the
message “NOT REGISTERED!” appears. Enter a speed dial number
registered with an email address.
Using the List Function of the Phone Book
If a recipient is registered with a one-touch dial key or a speed dial number,
the recipient can be found by using the List or Search function of the phone
book.
Follow the procedure described below to search using the List function of the
phone book.
1
2
3
4
128
Press the Speed Dial key twice.
Using the * and ) keys, select “LIST”, and then press the Menu Select
key.
The list of one-touch dial keys and speed dial numbers registered with an
email address is displayed.
Using the + and , keys, select the desired recipient.
Press the Menu Select key.
Specifying a Recipient
Using the Search Function of the Phone Book
If a recipient is registered with a one-touch dial key and a speed dial number,
the recipient can be found by using the List or Search function of the phone
book.
Follow the procedure described below to search using the Search function of
the phone book.
1
2
3
Press the Speed Dial key twice.
Using the * and ) keys, select “SEARCH”, and then press the Menu
Select key.
A screen appears, allowing you to enter the text to be searched for.
Using the keypad, enter the first few characters of the name programmed
for the desired recipient.
"
"
4
6
7
If there are no names programmed with one-touch dial keys or speed
dial numbers beginning with the entered text, “(0)” is displayed, and
then the screen allowing you to enter the search text appears.
To select a recipient from the displayed search results, skip to step 7.
OR
To narrow down the search results even further, press the Menu Select
key, and then enter more search text.
Press the Menu Select key.
Using the + and , keys, select the desired recipient.
"
8
Text up to 10 characters long can be entered.
Press the Menu Select key.
The number of names beginning with the text entered in step 3 is displayed.
"
5
Enter the name programmed in the one-touch dial key or the speed
dial number. For details on entering text, refer to “Entering Text” on
page 130.
If the desired recipient name does not appear in the search results,
press the Clear/C key twice to return to the screen allowing you to
enter the search text, and then try searching for different text.
Press the Menu Select key.
Specifying a Recipient
129
Entering Text
When specifying the user name or programming the recipient name with
one-touch dial keys, letters, accented characters, numbers and symbols can
be entered.
Key Operation
Use the keypad to enter numbers, letters, and symbols.
List of characters available with each key of the keypad
Keypad key
1
2
3
4
5
6
7
8
9
0
Available characters
. (period) @_ (underscore) - (hyphen) 1
ABC2abc
DEF3def
GHI4ghi
JKL5jkl
MNO6mno
PQRS7pqrs
TUV8tuv
WXYZ9wxyz
(space) 0
#
< Input E-mail address >
+&/* =!?( )%[ ]^‘’{ }|˜$
< Input name >
+&/* =!?( )%[ ]^‘’{ }|˜$,:;<>“¿£
"
130
List of characters varys base on different language and function area.
Entering Text
Changing Input Mode
Each press of the
ters.
key switches the input mode between numbers and let-
[1]: Numbers can be typed in.
[A]: Letters can be typed in.
Inputting Example
The procedure for entering text is described below, using “NJ Office” as an
example.
1
2
3
4
5
6
7
8
9
10
11
Press the
key to change the input mode so that letters can be entered.
Press the 6 key twice.
“N” is entered.
Press the 5 key once.
“J” is entered.
Press the 0 key once.
A space is entered.
Press the 6 key three times.
“O” is entered.
Press the 3 key seven times.
“f” is entered.
Press the ) key.
The cursor moves to the right.
Press the 3 key seven times.
“f” is entered.
Press the 4 key seven times.
“i” is entered.
Press the 2 key seven times.
“c” is entered.
Press the 3 key six times.
“e” is entered.
Entering Text
131
Correcting Text And Input Precautions
To erase all entered text, hold down the Cancel/C key.
To delete only part of the entered text, use the * and ) keys to move the
cursor (_) to the character that you want to delete, and then press the
Cancel/C key.
If multiple characters are assigned to a single key, “OK=)” appears at the
bottom of the screen.
If the same key is to be used to enter two characters in a row, press the )
key after selecting the first character. (Refer to the above inputting example.)
To enter a space, press the 0 key.
132
Entering Text
8
Replacing
Consumables
Replacing the Toner Cartridge
Note
Failure to follow instructions as outlined in this manual could result in
voiding your warranty.
Your machine uses four toner cartridges: black, yellow, magenta, and cyan.
Handle the toner cartridges carefully to avoid spilling toner inside the machine
or on yourself.
"
"
Install only new toner cartridges in your machine. If a used toner cartridge is installed, the indicator message will not clear.
The toner is nontoxic. If you get toner on your skin, wash it off with
cool water and a mild soap. If you get toner on your clothes, lightly
dust them off as best as you can. If some toner remains on your
clothes, use cool, not hot water, to rinse the toner off.
CAUTION
If you get toner in your eyes, wash it out immediately with cool water
and consult a doctor.
Note
Do not use refilled toner cartridges or unapproved toner cartridges. Any
damage to the machine or quality problems caused by a refilled toner
cartridge or unapproved toner cartridge will void your warranty. No
technical support is provided to recover from these problems.
When replacing a toner cartridge, refer to the following table. For optimum
print quality and performance, use only approved toner cartridges for your
specific machine type, as listed in the table below.
1.5K
4.5K
134
Y
93344Z014H012
M
93344Z015H018
C
93344Z016H013
Y
93344Z031H015
M
93344Z032H011
C
03344Z033H016
K
93344Z017H019
Replacing the Toner Cartridge
Keep toner cartridges:
In their packaging until you’re ready to install them.
In a cool, dry location away from sunlight (due to heat).
The maximum storage temperature is 35° C (95° F) and the maximum
storage humidity is 85% (noncondensing). If the toner cartridge is moved
from a cold place to a warm, humid place, condensation may occur,
degrading print quality. Allow the toner to adapt to the environment for
about one hour before use.
Level during handling and storage.
Do not hold, stand or store cartridges on their ends or turn
them upside down; the toner
inside the cartridges may
become caked or unequally distributed.
Away from salty air and corrosive gases such as aerosols.
Replacing the Toner Cartridge
135
To Replace a Toner Cartridge
Note
Be careful not to spill toner while replacing a toner cartridge. If toner
spills, immediately wipe it off with a soft, dry cloth.
When a toner cartridge becomes empty, the messages X TONER EMPTY
and CHANGE X TONER (X indicates the toner color) alternately appear. Follow the procedure described below to replace the toner cartridge.
1
2
Check the display to see which color of toner is empty.
As an example, the procedure for replacing the cyan toner cartridge is
described below.
Press the TC Change key.
The messages REPLACE MODE and CHANGE C TONER alternately
appear, and the cyan toner cartridge is moved so that it can be replaced.
"
3
136
Press the TC Change key once to move the cyan toner cartridge
so that it can be replaced. With each additional press of the TC
Change key, the black, yellow, then magenta toner cartridge
moves so that they can be replaced.
Replacing the Toner Cartridge
"
The scanner unit cannot
be released if the ADF
has been opened. Be
sure to gently close the
ADF first, then release
the scanner unit.
4
"
Be careful not to touch
the plate on the back of
the scanner unit.
Replacing the Toner Cartridge
137
5
"
"
"
138
Do not touch the transfer
belt.
If there is media in the
output bin, remove it.
Before opening the
engine cover, be sure to
fold up the output bin.
Replacing the Toner Cartridge
6
"
You can identify the toner
cartridge by the color of
the handle and by the letter molded into the handle: C (cyan), M
(magenta), Y (yellow)
and K (black).
7
"
Do not manually rotate
the toner cartridge carousel. In addition, do not
rotate the carousel with
force; otherwise it may be
damaged.
Note
Dispose of the empty toner cartridge according to your local
regulations. Do not burn the toner cartridge.
8
"
Make sure that the toner
roller cover is securely
attached before shaking
the toner cartridge.
Replacing the Toner Cartridge
New toner cartridge
139
9
"
Do not touch or scratch
the toner roller.
10
"
Before inserting the toner
cartridge, make sure that
the color of the toner cartridge to be installed is
the same as the label on
the toner cartridge carousel.
11
140
Replacing the Toner Cartridge
12
"
Before closing the engine
cover, be sure to close
the front cover. The front
cover cannot be closed
after the engine cover is
closed.
13
14
"
When the scanner unit is
closed, the black toner
cartridge automatically
moves so that it can be
replaced. With each
press of the TC Change
key, the yellow, then
magenta toner cartridge
moves so that it can be
replaced.
Replacing the Toner Cartridge
141
15
Press the Stop/Reset key.
The message is erased from the message window, and machine is reset
so that it can continue printing.
"
"
142
If no operation is performed for more than 30 seconds after the
scanner unit is closed, the machine is automatically reset so that it
can print.
The machine must complete a calibration cycle (less than 2 minutes)
after a toner cartridge has been replaced. If you open a cover before
the machine is reset, the calibration stops, then starts over again after
the cover is closed.
Replacing the Toner Cartridge
Replacing the Drum Cartridge
When the drum cartridge reaches the end of its service life, the messages
DRUM LIFE END and CHANGE DRUM alternately appear. Follow the procedure described below to replace the drum cartridge.
1
"
The scanner unit cannot
be released if the ADF
has been opened. Be
sure to gently close the
ADF first, then release
the scanner unit.
Replacing the Drum Cartridge
143
2
"
Be careful not to touch
the plate on the back of
the scanner unit.
3
"
144
Do not touch the transfer
belt.
Replacing the Drum Cartridge
"
"
If there is media in the
output bin, remove it.
Before opening the
engine cover, be sure to
fold up the output bin.
4
Note
Dispose of the used drum cartridge according to your local
regulations. Do not burn the drum cartridge.
Replacing the Drum Cartridge
145
5
"
Do not touch the OPC
drum on the drum cartridge.
New drum cartridge
6
7
146
Replacing the Drum Cartridge
8
"
The machine must complete a calibration cycle (less than 2 minutes)
after a drum cartridge has been replaced. If you open a cover before
the machine is reset, the calibration stops, then starts over again after
the cover is closed.
Replacing the Drum Cartridge
147
148
Replacing the Drum Cartridge
9
Maintenance
Maintaining the Machine
CAUTION
Read all caution and warning labels carefully, making sure to follow any
instructions contained in them. These labels are located on the inside of
the machine’s covers and the interior of the body.
Handle the machine with care to preserve its life. Abuse handling may cause
damage and void your warranty. If dust and paper scraps remain on the
inside or outside of the machine, machine performance and print quality will
suffer, so the machine should be cleaned periodically. Keep the following
guidelines in mind.
WARNING!
Turn off the machine, unplug the power cord, and disconnect interface
cable before cleaning. Do not spill water or detergent into the machine;
otherwise the machine will be damaged and an electric shock may
occur.
CAUTION
The fuser unit is hot. When the engine cover is opened, the
fuser unit temperature drops gradually (one hour wait time).
Be careful when cleaning the inside of the machine or removing media
misfeeds, as the fuser unit and other internal parts may be very hot.
Do not place anything on top of the machine.
Use a soft cloth to clean the machine.
Never spray cleaning solutions directly on the machine’s surface; the
spray could penetrate through the air vents of the machine and damage
the internal circuits.
Avoid using abrasive or corrosive solutions or solutions that contain solvents (such as alcohol and benzene) to clean the machine.
Always test any cleaning solution (such as mild detergent) on a small
inconspicuous area of your machine to check the solution’s performance.
Never use sharp or rough implements, such as wire or plastic cleaning
pads.
Always close the machine’s covers gently. Never subject the machine to
vibration.
150
Maintaining the Machine
Do not cover the machine immediately after using it. Turn it off and wait
until it cools down.
Do not leave the machine’s covers open for any length of time, especially
in well-lit places; light may damage the drum cartridge.
Do not open the machine’s covers during printing.
Do not tap media stacks on the machine.
Do not lubricate or disassemble the machine.
Do not tilt the machine.
Do not touch the electrical contacts, gears, or laser devices. Doing so may
damage the machine and cause the print quality to deteriorate.
Keep media in the output bin at a minimum level. If the media is stocked
too high, your machine may experience media misfeeds and excessive
media curl.
Make sure two people are available to lift the machine when
moving it.
Keep the machine level to avoid
toner spillage.
32 kg
70.5 lbs
When lifting the machine, grasp
the areas shown in the figure.
"
Do not lift the machine with
Tray 2 together.
If you get toner on your skin, wash it off with cool water and a mild soap.
CAUTION
If you get toner in your eyes, wash it out immediately with cool water
and consult a doctor.
Make sure any parts removed during cleaning are replaced before you
plug in the machine.
Maintaining the Machine
151
Cleaning the Machine
CAUTION
Be sure to turn off the machine and unplug the power cord before
cleaning.
"
Use a soft, dry cloth only.
Exterior
Control Panel
Ventilation
Grill
Machine Exterior
Filter
Original Glass
Original
Cover
Pad
152
Cleaning the Machine
Interior
Cleaning the Media Feed Roller and Laser Lens
1
"
The scanner unit cannot
be released if the ADF
has been opened. Be
sure to gently close the
ADF first, then release
the scanner unit.
Cleaning the Machine
153
2
"
Be careful not to touch
the plate on the back of
the scanner unit.
3
"
154
Do not touch the transfer
belt.
Cleaning the Machine
"
"
If there is media in the
output bin, remove it.
Before opening the
engine cover, be sure to
fold up the output bin.
4
Cleaning the Machine
155
Note
Position the removed drum cartridge as
shown in the illustration at the right.
Be sure to keep the drum cartridge
horizontal and place it where it will not
become dirty. Do not leave the drum
cartridge removed for more than 15
minutes, and do not place the removed
drum cartridge in a location where it
would be exposed to direct light (such
as sunlight).
5
BOTTOM
VIEW
Media feed
roller
156
Cleaning the Machine
6
BOTTOM
VIEW
Laser
lens
7
Cleaning the Machine
157
8
9
158
Cleaning the Machine
Cleaning the Duplex Option Feed Rollers
1
2
3
Cleaning the Machine
159
Cleaning the Media Feed Rollers for Tray 2
1
2
160
Cleaning the Machine
3
4
Cleaning the Machine
161
Cleaning the Media Feed Rollers for the ADF
1
2
3
162
Cleaning the Machine
Storing the Machine
Note
If this machine is not to be used
for an extended period of time,
store it with the fuser separator
levers moved as far back as
possible.
Storing the Machine
163
164
Storing the Machine
10 Troubleshooting
10
Introduction
This chapter provides information to aid you in resolving machine problems
you may encounter, or at least guide you to the proper sources for help.
166
Preventing Media Misfeeds
page 169
Understanding the Media Path
page 170
Clearing Media Misfeeds
page 170
Solving Problems with Media Misfeeds
page 185
Solving Other Problems
page 188
Solving Problems with Printing Quality
page 194
Status, Error, and Service Messages
page 200
Introduction
Preventing Media Misfeeds
Make sure that...
Media matches the machine specifications.
Media is flat, especially on the leading edge.
The machine is on a hard, flat, level surface.
You store media in a dry location away from moisture and humidity.
The output bin is positioned horizontally when postcards are being printed.
You remove transparencies from the output bin immediately after printing to
avoid static buildup.
You always adjust the media guides in Tray 1 after inserting the media (a
guide that is not properly adjusted can cause poor print quality, media misfeeds, and machine damage).
You load the media printing-side up in the tray (many manufacturers place
an arrow on the end of the wrapper to indicate the printing side).
Avoid...
Media that is folded, wrinkled, or excessively curled.
Double feeding (remove the media and fan the sheets—they may be sticking
together).
Fanning transparencies since this causes static.
Loading more than one type/size/weight of media in a tray at the same time.
Overfilling the trays.
Allowing the output bin to overfill (the output bin has a 100-sheet capacity—
misfeeding may occur if you allow more than 100 sheets of media to accumulate at one time).
Allowing the output bin to fill with more than a few transparencies.
Preventing Media Misfeeds
167
Understanding the Media Path
Understanding the media path will help you locate media misfeeds.
1. ADF media feed rollers
1
2
3
2. Document feed tray
3. Document output tray
4. Fuser unit
5. Duplex option
Document path (front view)
6. Tray 2 (optional)
7. Tray 1
8. Toner cartridge carousel
9. Drum cartridge
10. Transfer belt unit
11. Output bin
4
11
10
5
9
8
7
6
Media path (side view)
Clearing Media Misfeeds
To avoid damage, always remove misfed media gently, without tearing it. Any
piece of media left in the machine, whether large or small, can obstruct the
media path and cause further misfeeds. Do not reload media that has misfed.
Note
The image is not fixed on the media before the fusing process. If you
touch the printed surface, the toner may stick to your hands, so be
careful not to touch the printed face when removing the misfed media.
Make sure not to spill any toner inside the machine.
CAUTION
Unfused toner can dirty your hands, clothes, or anything else it gets on.
If you accidentally get toner on your clothes, lightly dust them off as
best as you can. If some toner remains on your clothes, use cool, not
hot water, to rinse the toner off. If toner gets on your skin, wash it off
with cool water and a mild soap.
168
Understanding the Media Path
CAUTION
If you get toner in your eyes, wash it out immediately with cool water
and consult a doctor.
If, after clearing the media misfeed, the misfeed message in the message
window persists, open and close the engine cover. This should clear the misfeed message.
Media Misfeed Messages and Clearing Procedures
Media Misfeed Message
Page Reference
PAPER MISFEED
page 170
(Displaying alternately)
OPEN FRONT COVER
PAPER JAM
page 170
(Displaying alternately)
OPEN FRONT COVER
PAPER JAM
page 180
(Displaying alternately)
OPEN DUPLEX COVER
ORIGINAL DOC. JAM
page 181
(Displaying alternately)
OPEN DOC. FEED COVER
Clearing Media Misfeeds
169
Clearing a Media Misfeed in the Machine
1
"
170
The scanner unit cannot
be released if the ADF
has been opened. Be
sure to gently close the
ADF first, then release
the scanner unit.
Clearing Media Misfeeds
2
"
Be careful not to touch
the plate on the back of
the scanner unit.
3
"
Do not touch the transfer
belt.
Clearing Media Misfeeds
171
"
"
If there is media in the
output bin, remove it.
Before opening the
engine cover, be sure to
fold up the output bin.
4
172
Clearing Media Misfeeds
Note
Position the removed drum cartridge as
shown in the illustration at the right.
Be sure to keep the drum cartridge
horizontal and place it where it will not
become dirty. Do not leave the drum
cartridge removed for more than 15
minutes, and do not place the removed
drum cartridge in a location where it
would be exposed to direct light (such
as sunlight).
5
Clearing Media Misfeeds
173
6
"
Always remove the misfed media in the feed
direction as shown only.
7
174
Clearing Media Misfeeds
8
9
Clearing Media Misfeeds
175
10
11
12
176
Clearing Media Misfeeds
13
"
If the paper in Tray 2 is
being used, perform the
procedure starting from
step 14 for clearing a
media misfeed.
14
15
Clearing Media Misfeeds
177
16
17
18
19
178
Clearing Media Misfeeds
20
Clearing Media Misfeeds
179
Clearing a Media Misfeed from the Duplex Option
1
2
"
Always remove the misfed media in the feed
direction as shown only.
3
180
Clearing Media Misfeeds
Clearing a Media Misfeed from the ADF
1
2
3
Clearing Media Misfeeds
181
4
5
6
182
Clearing Media Misfeeds
Solving Problems with Media Misfeeds
"
Frequent misfeeds in any area indicate that area should be checked,
repaired, or cleaned. Repeated misfeeds may also happen if you’re
using unsupported print media or original media.
Symptom
Cause
Solution
Several
sheets go
through the
machine
together.
The front edges of
the media are not
even.
Remove the media and even up the
front edges, then reload it.
The media is moist
from humidity.
Remove the moist media and replace it
with new, dry media.
Too much static elec- Do not fan transparencies.
tricity is present.
Media misfeed message stays
on.
Engine cover needs Open and close the engine cover
to be opened and
again.
closed again to reset
the machine.
Some media remains Recheck the media path and make
sure that you have removed all of the
misfed in the
machine.
misfed media.
Duplex
option misfeeds.
Unsupported media
(wrong size, thickness, type, etc.) is
being used.
Use approved media. See “Specifications” on page 38.
Plain paper, recycled paper can be
autoduplexed if the duplex option is
installed and the media type is set
properly in the driver. See “Specifications” on page 38.
Make sure that you have not mixed
media types in Tray 1.
Do not duplex, envelopes, labels, letter
head, postcards, thick stock, glossy
media, or transparencies.
Media is still being
misfed.
Recheck the media path inside the
duplex option and make sure that you
have removed all of the misfed media.
Solving Problems with Media Misfeeds
183
Symptom
Cause
Solution
Media is mis- The loaded document Load the correct document. For details
fed in the
does not meet the
on the documents that can be loaded,
ADF.
specifications.
refer to “Documents that can be
Loaded into the ADF” on page 67.
The loaded document Load the document so that it does not
exceeds the maxiexceed the maximum capacity. For
mum capacity.
details on the documents that can be
loaded, refer to “Documents that can
be Loaded into the ADF” on page 67.
The document guides
were not slid against
the edges of the document.
Slide the document guides against the
edges of the document. For details on
the loading the document, refer to
“Loading a Document into the ADF” on
page 70.
Media is mis- The media is not cor- Remove the misfed media and reposition the media properly in the tray.
feeding.
rectly positioned in
the tray.
The number of sheets Remove the excess media and reload
in the tray exceeds
the correct number of sheets in the
the maximum
tray.
allowed.
The media guides are Adjust the media guides in the Tray 1
not correctly adjusted to match the size of the media.
to the media size.
Warped or wrinkled
Remove the media, smooth it out, and
media is loaded in the reload it. If it still misfeeds, do not use
tray.
that media.
The media is moist
from humidity.
Remove the moist media and replace it
with new, dry media.
Custom-sized media, Special media must be loaded in Tray
envelopes, labels,
1 only.
postcards, thick
stock, letterhead,
glossy media, or
transparencies are
loaded in Tray 2.
The recommended
Load the transparencies or label
transparency or label sheets according to the manufacturer’s
sheet is facing the
instructions.
wrong way in Tray 1.
184
Solving Problems with Media Misfeeds
Symptom
Cause
Solution
Media is mis- Envelopes are facing Load the envelopes in Tray 1 with the
feeding.
the wrong way in Tray flaps facing down.
1.
If the flaps are on the long edge, load
the envelopes with the flap toward the
left of the machine with the flaps facing
down.
Transparencies have Remove the transparencies and load
collected static elec- them in Tray 1 one sheet at a time. Do
tricity in the tray.
not fan transparencies before loading
them.
Unsupported media
(wrong size, thickness, type, etc.) is
being used.
Use approved media.
See “Specifications” on page 38.
The media feed roller Clean the media feed roller.
is dirty.
For more details, refer to “Interior” on
page 153.
Solving Problems with Media Misfeeds
185
Solving Other Problems
Symptom
Cause
Solution
Machine
The power cord is not Turn off the machine, confirm that the
power is not correctly plugged into power cord is correctly plugged into
on.
the outlet.
the outlet, and then turn on the
machine.
Something is wrong
with the outlet connected to the
machine.
Plug another electrical appliance into
the outlet and see whether it operates
properly.
The power switch is
not correctly turned
on (I position).
Turn the power switch off (O position),
then turn it back to the on (I position).
The machine is con- Use a power source with the specifications listed in appendix A, “Technical
nected to an outlet
with a voltage or fre- Specifications.”
quency that does not
match the machine
specifications.
The control
panel displays
One of the toner car- Remove the toner cartridges and
tridges may be defec- check for damage. If it is damaged,
tive.
replace it.
TONER
LOW much
You printed with
heavy toner coverage.
sooner than
expected.
See specifications in Appendix A.
You can’t
The tray is empty.
Check that at least Tray 1 is loaded
print the
with media, in place, and secure.
machine sta- There is a media mis- Clear the media misfeed.
tus list.
feed.
If a fax is received, it To print a received fax, change the
could not be printed paper type to PLAIN PAPER and the
on paper of the cur- paper size to A4 or LETTER.
rently specified type
or size. However,
Warn Fax copy and print operations can be perappears.
formed.
When the
paper type or
paper size
for Tray 1 is
changed,
186
Solving Other Problems
Symptom
Cause
Images can- The digital camera
not be
transfer mode is not
printed from set to PictBridge.
the digital
camera.
Solution
Set the digital camera transfer mode to
PictBridge.
" The machine supports only
PictBridge-enabled digital
camera.
The paper size speci- Specify the same paper size with the
fied with the digital
digital camera and with this machine.
camera differs from
the paper size specified with this
machine.
The message
“Please confirm the
printer.” appears on
the digital camera,
and no error message appears on this
machine.
A paper size other
than A4 or LETTER
was selected on this
machine for layout
printing.
No error message
appears on this
machine.
Images can- The original glass is
not be
dirty.
printed from
the Clone
Copy
Solving Other Problems
Set the paper size on this machine to
A4 or LETTER.
Clean the original glass. For details,
refer to “Cleaning the Machine” on
page 152.
187
Symptom
Cause
Solution
Printing
takes too
much time.
The machine is set to
a slow printing mode
(for example, thick
stock or transparency).
It takes more time to print with special
media. When using regular paper,
make sure that the media type is set
properly in the driver.
The machine is set to It takes time for printing to start in
power saving mode. power saving mode.
The job is very complex.
Wait. No action needed.
A toner cartridge for a Install a correct approved toner cardifferent region or an tridge approved for your specific
machine.
unapproved toner
cartridge is installed
(X TONER INCORRECT is displayed in
the message window).
Blank pages One or more of the
are printed. toner cartridges are
defective or empty.
The wrong media is
being used.
Not all pages The Cancel key was
print.
pressed.
The tray is empty.
Check the toner cartridges. The image
will not print correctly or not at all, if the
cartridges are empty.
Check that the media type.
Make sure no one pressed the Cancel
key while your job was printing.
Check that the tray is loaded with
media, in place, and secure.
A document is printed Print the overlay file using attached
with an overlay file
Color Laser MFP printer driver.
which has been created by a non-Color
Laser MFP printer
driver.
Some parts
of the image
are lost with
2in1 copying.
188
2in1 copying is being Press the + or , key to adjust the
zoom ratio.
performed with
Legal-sized documents.
x0.64, which
appears with INCH
for 2in1 copying, is
set to adjust the size
to Letter size.
Solving Other Problems
Symptom
Cause
Machine
The power cord is not
resets or
correctly plugged into
turns off fre- the outlet.
quently.
A system error
occurred.
You are
experiencing duplex
problems.
Solution
Turn off the machine, confirm that the
power cord is correctly plugged into
the outlet, and then turn on the
machine.
Contact Technical Support with the
error information.
Media or settings are For autoduplexing, make sure that you
not correct.
have a duplex option installed.
Make sure that you are using correct
media.
See “Specifications” on page 38.
Do not duplex custom-sized media,
envelopes, labels, postcards, thick
stock, letterhead, glossy media, or
transparencies.
Make sure that you have not mixed
media types in Tray 1.
Make sure the duplex option is
installed and declared in the printer
driver (Device Options Setting tab).
In the printer driver (Layout/Double-Sided), choose “Short Edge Binding” (flipped as on a clipboard) or
“Long Edge Binding” (flipped as in a
loose-leaf notebook).
Set duplex (Double-Sided) copying.
For details on setting duplex (Double-Sided) copying, refer to “Setting
Duplex (Double-Sided) Copying” on
page 111.
For N-up on duplexed pages, choose
Collate only in the printer driver’s Basic
Tab. Do not set collation in the application.
With N-up on
multiple copies, the output is
incorrect.
Both the printer driver
and the application
have been set for collation.
Solving Other Problems
For N-up on multiple copies, choose
Collate only in the printer driver’s Basic
Tab. Do not set collation in the application.
189
190
Symptom
Cause
Solution
Booklet Left
and Right
Binding output is incorrect.
Both the printer driver
and the application
have been set for collation.
For Booklet Left Binding and Booklet
Right Binding, choose Collate only in
the printer driver’s Basic Tab. Do not
set collation in the application.
You hear
unusual
noises.
The machine is not
level.
Place the machine on a flat, hard, level
surface.
The tray is not
installed correctly.
Remove the tray that you are printing
from and reinsert it completely into the
machine.
There is a foreign
object stuck inside
the machine.
Turn off the machine and remove the
object. If you cannot remove it, contact
Technical Support.
When copying or scanning with the
ADF, a band
appears at
the end of
the image or
paper (5 to 6
mm).
A malfunction may
have occurred while
paper was being
transferred with the
ADF.
If a band appears in the copy after
copying, select a copy density setting
that is one level darker.
While scanning with the
ADF at 600
dpi, the
image has
become
lighter and
the background has
become
darker.
Immediately after the
machine is turned on,
the lamp intensity
increases. Therefore, the image may
become lighter and
the background may
become darker.
If the image becomes lighter or darker,
scan using the original glass. In addition, perform the scan operation after
turning the machine on and lighting the
lamp for an hour and a half or more.
The
web-based
utility cannot
be accessed.
The Easy Web Man- The Easy Web Management Adminisagement Administra- trator password has a 6-character mintor's password is
imum and a 16-character maximum.
incorrect.
If a band appears in the image after
scanning, scan using the original
glass.
Solving Other Problems
Symptom
Cause
Solution
Media is
wrinkled.
The media is moist
Remove the moist media and replace it
from humidity or hav- with new, dry media.
ing water spilled on it.
The media feed roller Check them for damage. If necessary,
or fuser unit is defec- contact Technical Support with the
tive.
error information.
Unsupported media
(wrong size, thickness, type, etc.) is
being used.
Use approved media. See “Specifications” on page 38.
Envelopes are being Before printing envelopes, place the
printed with the fuser fuser separator levers in the envelope
separator levers in
position.
the plain paper position.
Solving Other Problems
191
Solving Problems with Printing Quality
Symptom
Cause
Solution
Nothing is
printed, or
there are
blank spots
on the
printed page.
One or more of the
Remove the toner cartridges and
toner cartridges may check if any is damaged.
be defective.
The drum cartridge
may be defective.
Remove the drum cartridge and check
for damage. If it is damaged, replace it.
The media is moist
from humidity.
Adjust the humidity for media storage.
Remove the moist media and replace it
with new, dry media.
The media set in the
printer driver mismatches the media
loaded in the
machine.
Load the correct media in the machine.
The power source
does not match the
machine specifications.
Use a power source with the proper
specifications.
Several sheets are
Remove the media from the tray and
being fed at the same check for static electricity. Fan plain
time.
paper or other media (but not transparencies), and replace it in the tray.
Media is not set prop- Remove the media, tap it to straighten
erly in the tray(s).
it out, return it to the tray, and realign
the media guides.
Entire sheet
is printed in
black or
color.
192
One or more of the
Remove the toner cartridges and
toner cartridges may check for damage. If it is damaged,
be defective.
replace it.
The drum cartridge
may be defective.
Remove the drum cartridge and check
for damage. If it is damaged, replace it.
Solving Problems with Printing Quality
Symptom
Cause
Image is too Laser lens is dirty.
light; there is The copy density is
low image
set too light.
density.
The media is moist
from humidity.
There is not much
toner left in the cartridge.
Solution
Clean the laser lens.
Select a darker copy density.
Remove the moist media and replace
with new, dry media.
Replace the toner cartridge.
One or more of the
Remove the toner cartridges and
toner cartridges may check for damage. If it is damaged,
be defective.
replace it.
Media type is set
incorrectly.
Image is too The copy density is
dark.
set too dark.
The document was
not pressed close
enough against the
original glass.
When printing envelopes, labels, postcards, thick stock, glossy media, or
transparencies, specify the appropriate
media type in the printer driver.
Select a lighter copy density.
Position the document so that it is
pressed close enough against the original glass. For details on positioning
the document on the original glass,
refer to “Placing a Document on the
Original Glass” on page 69.
One or more of the
Remove the toner cartridges and
toner cartridges may check for damage. If it is damaged,
be defective.
replace it.
The drum cartridge
may be defective.
Remove the drum cartridge and check
for damage. If it is damaged, replace it.
Solving Problems with Printing Quality
193
Symptom
Cause
Solution
Image is
blurred;
background
is lightly
stained;
there is
insufficient
gloss of the
printed
image.
One or more of the
Remove the toner cartridges and
toner cartridges may check for damage. If it is damaged,
be defective.
replace it.
The drum cartridge
may be defective.
Remove the drum cartridge and check
for damage. If it is damaged, replace it.
The original glass is
dirty.
Clean the original glass. For details,
refer to “Cleaning the Machine” on
page 152.
The original cover
pad is dirty.
Clean the original cover pad. For
details, refer to “Cleaning the Machine”
on page 152.
The print or One or more of the
Remove the toner cartridges and
color density toner cartridges may check for damage. If it is damaged,
is uneven.
be defective or low.
replace it.
The drum cartridge is Remove the drum cartridge and check
defective.
for damage. If it is damaged, replace it.
The machine is not
level.
Irregular
The media is moist
print or mot- from humidity.
tled image
appears.
Unsupported media
(wrong size, thickness, type, etc.) is
being used.
Place the machine on a flat, hard, level
surface.
Adjust the humidity in the media storage area.
Remove the moist media and replace it
with new, dry media.
Use approved media. See “Specifications” on page 38.
One or more of the
Remove the toner cartridges and
toner cartridges may check for damage. If it is damaged,
be defective.
replace it.
The drum cartridge is Remove the drum cartridge and check
defective.
for damage. If it is damaged, replace it.
The fuser separator Return the fuser separator levers to the
levers are adjusted
plain paper setting.
for envelope printing.
194
Solving Problems with Printing Quality
Symptom
Cause
Solution
There is
insufficient
fusing or the
image
comes off
when
rubbed.
The media is moist
from humidity.
Remove the moist media and replace it
with new, dry media.
Unsupported media
(wrong size, thickness, type, etc.) is
being used.
Use approved media. See “Specifications” on page 38.
Media type is set
incorrectly.
When printing envelopes, labels, postcards, thick stock, or transparencies,
specify the appropriate media type in
the printer driver.
The fuser separator Return the fuser separator levers to the
levers are adjusted
plain paper setting.
for envelope printing.
There are
toner
smudges or
residual
images.
One or more of the
Remove the toner cartridges and
toner cartridges are check for damage. If it is damaged,
defective or installed replace it.
incorrectly.
There are
toner
smudges on
the back side
of the page
(whether or
not it has
been
duplexed).
The media transfer
roller is dirty.
Clean the media transfer roller.
The media path is
dirty with toner.
Print several blank sheets and the
excess toner should disappear.
One or more of the
toner cartridges are
defective.
Remove the toner cartridges and
check for damage. If it is damaged,
replace it.
The fuser separator Return the fuser separator levers to the
levers are adjusted
plain paper setting.
for envelope printing.
If you think the transfer roller should be
replaced, contact Technical Support
with the error information.
The drum cartridge is Remove the drum cartridge and check
defective.
for damage. If it is damaged, replace it.
Solving Problems with Printing Quality
195
Symptom
Cause
Solution
Abnormal
areas (white,
black, or
color) appear
in a regular
pattern.
The laser lens is dirty. Clean the laser lens.
Image
defects.
The laser lens is dirty. Clean the laser lens.
A toner cartridge may Remove the toner cartridges with the
be defective.
color causing the abnormal image.
Replace it with a new toner cartridge.
The drum cartridge is Remove the drum cartridge and check
defective.
for damage. If it is damaged, replace it.
A toner cartridge may Remove the toner cartridges and
be leaking.
check for damage. If it is damaged,
replace it.
A toner cartridge may Remove the toner cartridge with the
be defective.
color causing the abnormal image.
Replace it with a new toner cartridge.
Lateral lines
or bands
appear on
image.
The drum cartridge
may be defective.
Remove the drum cartridge and check
for damage. If it is damaged, replace it.
The machine is not
level.
Place the machine on a flat, hard, level
surface.
The media path is
dirty with toner.
Print several sheets and the excess
toner should disappear.
One or more of the
Remove the toner cartridges and
toner cartridges may check for damage. If it is damaged,
be defective.
replace it.
The drum cartridge is Remove the drum cartridge and check
defective.
for damage. If it is damaged, replace it.
Colors look
drastically
wrong.
One or more of the
Remove the toner cartridges and verify
toner cartridges may that the toner is distributed evenly on
be defective.
each cartridge roller, and reinstall the
toner cartridges.
One or more of the
Check the control panel for an X
toner cartridges may TONER LOW or X TONER EMPTY
be low or empty.
message. If necessary, replace the
specified toner cartridge.
196
Solving Problems with Printing Quality
Symptom
Cause
Solution
Colors are
not registering properly;
colors are
mixed or
have
page-to-pag
e variation.
The engine cover is
not properly closed.
Make sure that the engine cover is
closed.
The drum cartridge is Remove the drum cartridge and reinnot correctly seated. stall it.
Remove the toner cartridges and
One or more of the
toner cartridges may check for damage. If it is damaged,
be defective.
replace it.
The media is moist
from humidity.
Remove the moist media and replace it
with new, dry media.
Line art does The line art setting for
2400 x 600 dpi
not print in
requires Color Matchcolor.
ing to be turned off.
In the printer driver, go to Quality tab
and choose Off in the Color Matching.
The color
The drum cartridge
has a poor
may be defective.
reproduction
or has poor
color density.
Remove the drum cartridge and check
for damage. If it is damaged, replace it.
Lower the resolution to 1200 x 600 or
600 x 600 dpi.
If the problem is not resolved, even after all of the above have been performed, contact Technical Support with the error information.
For contact information, refer to the Need Assistance sheet.
Solving Problems with Printing Quality
197
Status, Error, and Service Messages
Status, error, and service messages are displayed in the message window.
They provide information about your machine and help you locate many problems. When the condition associated with a displayed message has changed,
the message is cleared from the window.
Status Messages
This message...
means...
Do this...
CANCELLING JOB
The job is being cancelled. No action needed.
*ENERGY SAVE*
The machine is in Energy
Saver mode to reduce
power consumption during
periods of inactivity.
IMAGING
The image from the digital
camera is being rendered.
*PLEASE WAIT!*
After replacing a toner cartridge, or after rebooting
your machine after environmental changes, your
machine automatically
pauses to do an
Auto-Image Density Control (AIDC) cycle. This process is provided to make
reliable machine operation
with optimum output quality
possible.
The machine is warming
up.
198
Status, Error, and Service Messages
Error Messages
"
For details on fax error messages, refer to the Color Laser MFP Facsimile User’s Guide.
This message...
means...
:EMPTY
Tray 1 or Tray 2 ran Load media into the
out of paper.
specified tray.
*CANNOT CONNECT*
While the scanned
document was
being sent in Scan
mode, a connection
with the specified
server could not be
established.
Check the Network
and E-mail settings
and send the data
again.
The IP address of
the SMTP server
could not be
obtained from the
DNS server.
Check the Network
and E-mail settings
and send the data
again.
While data was
being sent in Scan
mode, the connection to the server
was cut.
Check the Network
and E-mail settings
and send the data
again.
In Scan mode, the
connection to the
server was cut.
Check the Network
and E-mail settings
and send the data
again.
XXX Server
*CANNOT GET IP*
SMTP Server
*COMM. ERROR*
SMTP Server
*DISCONNECT*
SMTP Server
Do this...
DOC. FEED COVER OPEN The ADF feed cover Close the ADF feed
(Displaying alternately)
is open.
cover.
CLOSE DOC. FEED
COVER
DOCUMENT COVER OPEN
(Displaying alternately)
The document is
Close the ADF.
loaded into the ADF,
but the ADF is open.
CLOSE DOCUMENT COVER
Status, Error, and Service Messages
199
This message...
means...
Do this...
DRUM
The drum cartridge
has reached the
end of its service
life.
Replace the drum cartridge.
(Displaying alternately)
END
DRUM
(Displaying alternately)
The drum cartridge Prepare a new drum
is near the end of its cartridge.
life.
LOW
DRUM CARTRIDGE
NOT INSTALLED
DRUM LIFE END
(Displaying alternately)
The drum cartridge
is not installed.
Install the drum cartridge.
The waste toner
bottle in the drum
cartridge is full.
Replace the drum cartridge.
Duplex cover is
open.
Close the duplex
cover.
The memory has
becomes full while
scanning a document in Scan mode.
Turn the machine off,
and then, after waiting
a few seconds, turn it
on again.
CHANGE DRUM
DUPLEX COVER OPEN
(Displaying alternately)
CLOSE DUPLEX COVER
FILE FULL
(Displaying alternately)
PRESS ANY KEY
Decrease the amount
of data to be scanned
(for example, by
decreasing the resolution), and then try
scanning again.
FRONT COVER OPEN
(Displaying alternately)
The engine cover is Close the engine
open.
cover.
CLOSE FRONT COVER
200
Status, Error, and Service Messages
This message...
means...
Do this...
*JOB CANCELED*
While a document
was being scanned
from the original
glass in Scan mode,
more than one
minute had passed
after the first page
of the document
was scanned or the
data could not be
sent. Therefore, the
scan job was automatically canceled.
Turn the machine off,
and then, after waiting
a few seconds, turn it
on again.
NO SUITABLE PAPER
LOAD PAPER(XX)
ID card copying is
specified, but paper
of a size other than
A4, Letter or Legal
is loaded in the
paper tray.
Load A4-, Letter- or
Legal-size paper in the
paper tray. ID card
copying cannot be
used with paper of a
size other than A4, Letter or Legal.
MEDIA TYPE ERROR
TRANSPARENCY
(Displaying alternately)
LOAD CORRECT MEDIA
XX
When sending multiple pages, for example, from a book, scan
the first page, and then
scan the next page
within one minute.
Load the correct media
was selected as the type in Tray 1.
paper type, but
paper other than
transparencies is
loaded into Tray 1.
A setting other than
TRANSPARENCY
was selected as the
paper type, but
transparencies are
loaded into Tray 1.
MEMORY FULL
(Displaying alternately)
PRESS ANY KEY
The machine has
received more data
than can be processed with its internal memory.
Status, Error, and Service Messages
Turn the machine off,
and then, after a few
seconds, turn it on
again. Decrease the
amount of data to be
printed (for example,
by decreasing the resolution), and then try
printing again.
201
This message...
means...
Do this...
NO DUPLEX PAPER
Duplex (Double-Sided) printing
is specified, but no
paper compatible
with duplex (Double-Sided) printing
is loaded.
Load paper compatible with duplex (Double-Sided) printing.
Only plain and letterhead paper are compatible with duplex
(Double-Sided) printing.
*NO NETWORK SETTING* The network set-
Before scanning in
Scan mode, specify
the network settings in
the NETWORK SETTING menu.
*NOT E-MAIL ADDRESS* An email address
Before sending scan
data using one-touch
dial keys or speed dial
numbers, register an
email address with the
one-touch dial key or
speed dial number.
tings had not been
completely specified
when the machine
was switched to
Scan mode.
was not programmed in the
one-touch dial key
or speed dial number.
(This message
appears if a fax
number or email
address is programmed for group
dialing.)
*NOT REGISTERD*
An email address
was not programmed in the
one-touch dial key
or speed dial number.
ORIGINAL DOC. JAM
Media has misfed in Locate and remove the
the ADF.
misfeed.
(Displaying alternately)
OPEN DOC. FEED COVER
OUTPUT BIN FULL
(Displaying alternately)
The output bin is full Remove all media from
of media.
the output bin.
REMOVE PAPER
202
Status, Error, and Service Messages
This message...
means...
Do this...
PAPER EMPTY
Tray X (Tray 1 or
Tray 2) ran out of
paper.
Load paper into the
specified paper tray.
(Displaying alternately)
LOAD PAPER(XX)
PAPER JAM
(Displaying alternately)
Media has misfed in Locate and remove the
the duplex option.
misfeed.
OPEN DUPLEX COVER
PAPER JAM
(Displaying alternately)
Media has misfed in Locate and remove the
fuser area or trans- misfeed.
fer roller area.
OPEN FRONT COVER
PAPER MISFEED
(Displaying alternately)
Media has misfed
while being pulled
from the tray.
Locate and remove the
misfeed.
OPEN FRONT COVER
PAPER SIZE ERROR
(Displaying alternately)
RESET PAPER(XX)
The size of the
Load the correct media
media loaded in the size in the specified
media tray is incor- tray.
rect.
REMOVE ORIG. IN ADF
ID card copying is
specified, but the
document is loaded
into the ADF.
Remove the document
from the ADF. ID card
copying can only be
used with a document
placed on the original
glass.
SCANNER UNIT OPEN
Open the scanner
unit.
Close the scanner unit.
(Displaying alternately)
CLOSE SCANNER UNIT
*SERVER MEMORY FULL* The memory of the The server memory is
SMTP Server
SMTP server has
become full.
Status, Error, and Service Messages
full. Free up some
space on the disk such
as by contacting your
server administrator.
203
This message...
means...
Do this...
SET ORIGINAL TO ADF
2in1 or collated
copying is specified, but the document is not loaded
into the ADF.
Load the document
into the ADF. 2in1 and
collated copying can
only be used with a
document loaded into
the ADF.
X TONER
Replace the specified
Toner cartridge X
has become empty. toner cartridge.
(Displaying alternately)
EMPTY
(This message
appears if 8
TONER EMPTY
STOP on the
MACHINE SETTING menu is set
to ON(FAX) or
OFF.)
X TONER
(Displaying alternately)
INCORRECT
X TONER
(Displaying alternately)
LOW
X TONER
NOT INSTALLED
204
The X toner cartridge is an unapproved type.
Install an approved
toner cartridge of the
appropriate type, see
page 134.
Prepare the specified
The X toner carcolor toner cartridge.
tridge is low and
should be replaced
within 200 pages at
5% coverage of letter/A4 pages.
Toner cartridge X is Install the specified
not installed.
toner cartridge.
Status, Error, and Service Messages
This message...
means...
Do this...
X TONER EMPTY
The X toner cartridge is empty.
Replace the toner cartridge.
(Displaying alternately)
CHANGE X TONER
(This message
appears if 8
TONER EMPTY
STOP on the
MACHINE SETTING menu is set
to ON.)
TONER LIFE END
(Displaying alternately)
The X toner cartridge is empty.
Replace the toner cartridge.
CHANGE X TONER
Status, Error, and Service Messages
205
Service Messages
These messages indicate a more serious fault that can only be corrected by a
customer service engineer. If one of these messages appears, turn the
machine off, then turn it on again. If the problem persists, contact your local
vendor or authorized service provider.
This service message...
means...
Do this...
*CAUTION!*
MACHINE TROUBLE
An error has been
detected with the item
indicated “XX” in the
service message.
Reboot the machine.
This often clears the
service message,
and machine operation can resume.
(Displaying alternately)
SERVICE CALL(XX)
If the problem persists, contact Technical Support.
206
Status, Error, and Service Messages
11 Installing
Accessories
11
Introduction
Note
Any damage to the machine caused by the use of non-approved
accessories will void your warranty.
This chapter provides information about the following accessories.
Duplex Option
Auto duplexing
Tray 2
Lower feeder unit with 500-sheet tray included
Note
Installing accessories always requires that the machine and
accessories are turned off and unplugged during installation.
208
Introduction
Duplex Option
Duplex (Double-Sided) printing can be performed automatically with the
duplex option installed.
Installing the Duplex Option
1
Duplex Option
209
2
"
Be sure to remove the
tape.
3
"
210
Before installing the
duplex option, open the
duplex cover and check
that the knob is positioned vertically. After
checking the knob, close
the cover.
Duplex Option
4
5
"
Since the duplex option is
not yet secured to the
machine, hold the duplex
option in place when
opening its cover.
Duplex Option
211
6
"
Make sure that both
knobs are securely
locked.
7
212
Duplex Option
Tray 2
Up to 500 sheets of A4/Letter-size paper can be loaded in Tray 2.
Installing Tray 2
Note
Since consumables are installed in the machine, be sure to keep the
machine level when moving it in order to prevent accidental spills.
1
Tray 2
213
2
"
214
Be sure to place Tray 2
on a level surface.
Tray 2
A Appendix
Technical Specifications
Type
Desktop (4-cycle laser color printer-based
all-in-one)
Document holder
Stationary
Photoconductor
OPC
Printing system
2 laser diodes and polygon mirror
Electro photographic method
Developing system
Mono-component toner developing
Fusing system
Heated roller system
Resolution
< For Copy Function >
600 dpi × 300 dpi, 600 dpi x 600 dpi
< For GDI Printer Function >
2400 dpi × 600 dpi, 1200 dpi × 600 dpi, or 600 dpi ×
600 dpi
< Twain Scan >
150 dpi x 150 dpi, 300 dpi x 300 dpi, 600 dpi x 600
dpi
< Scan to E-mail >
150 dpi x 150 dpi, 300 dpi x 300 dpi
First print
Simplex
Monochrome
13.0 seconds for A4, Letter (plain paper)
Full color
22.0 seconds for A4, Letter (plain paper)
First copy
Simplex
Monochrome
23.0 seconds for A4, Letter (plain paper)
(600 dpi × 300 dpi)
Full color
52.0 seconds for A4, Letter (plain paper)
(600 dpi × 300 dpi)
216
Technical Specifications
Print/Copy speed
Simplex
Monochrome
20.0 pages per minute for A4, Letter (plain
paper)
Full color
5.0 pages per minute for A4, Letter (plain
paper)
Warm-up time
120 V: Avg. 45 seconds
Media sizes
Tray 1 (Multipurpose Cassette)
220 to 240 V: Avg. 49 seconds
Media width: 92 to 216 mm (3.6 to 8.5")
Media length: 148 to 356 mm (5.9 to 14.0")
Tray 2 (Optional)
A4/Letter
Paper/Media
Plain paper (60 to 90 g/m²; 16 to 24 lb bond)
Recycled paper (60 to 90 g/m²; 16 to 24 lb bond)
Transparency
Envelope
Thick stock (91 to 163 g/m²)
Postcard
Letterhead
Labels
Glossy media
Input capacity
Tray 1 (Multipurpose Cassette)
Plain paper: 200 sheets
Envelope: 10 envelopes
Label/Postcard/Thick Stock/Transparency/
Letterhead/Glossy media: 50 sheets
Tray 2 (Optional)
Plain paper: 500 sheets
Output capacity
Output bin: 100 sheets (A4, Letter)
Operating temperature 10 to 35°C (50 to 95°F)
Technical Specifications
217
Operating humidity
15 to 85%
Power supply
110 to 127 V, 50 to 60 Hz, -10% +6%
(120 V, 60 Hz, -10%, +10%, only USA and Canada)
Power consumption
110 to 127 V: 1100 W or less
220 to 240 V, 50 to 60 Hz, -10% +10%
220 to 240 V: 1100 W or less
Amperage
110 to 127 V: 11 A or less
Acoustic Noise
Copying: 53 dB or less
57 dB or less (with ADF)
220 to 240 V: 7 A or less
Standby: 39 dB or less
External dimensions
Height: 531 mm (20.9")
Width: 528 mm (20.8")
Depth: 475 mm (18.7") (with Tray 1 closed)
Weights
Machine:
Approximately 33 kg (70.5 lb) (excluding the
dust cover)
Toner cartridge:
– Standard in-box cartridge = 0.55 kg (1.21 lb)
(Y, M, C)
– Standard in-box cartridge = 0.65 kg (1.43 lb)
(K)
– Replacement cartridge (with toner roller
cover)= Standard-capacity: 0.60 kg (1.32 lb)
(Y, M, C)
– High-capacity: 0.70 kg (1.54 lb) (Y, M, C, K)
218
Interface
USB 2.0 and USB 1.1 compliant, 10Base-T/
100Base-TX (IEEE 802.3) Ethernet
Standard memory
128 MB SDRAM (Main Board), 16 MB SDRAM
(NIC Board)
Technical Specifications
Consumable Life Expectancy Chart
User-Replaceable
Item
Average Life Expectancy (in Simplex Pages)
Toner cartridge
At 5% coverage, using A4/Letter plain paper
Starter in-box Cartridge =
1,500 pages (Y, M, C) (Continuous)
4,500 pages (K) (Continuous)
Replacement Cartridge =
Standard-capacity:
1,500 pages (Y, M, C) (Continuous)
High-capacity:
4,500 pages (Y, M, C, K) (Continuous)
Drum cartridge
At 5% coverage, using A4/Letter plain paper
Monochrome:
45,000 pages (Continuous)
Full color:
11,250 pages (Continuous)
Service-Replaceable
Item
Average Life Expectancy (in Simplex Pages)
Fuser unit
120,000 pages
Transfer belt unit
Monochrome:
125,000 pages (Continuous)
Full color:
33,700 pages (Continuous)
Transfer roller
120,000 pages
(included with the transfer
belt unit)
Technical Specifications
219
220
Technical Specifications
Index
A
About Duplex Printing ............................................62
About the Control Panel .........................................10
Applications CD-ROM ..............................................7
Auto Run Installer ...................................................72
B
Basic scan to email operation ..............................121
C
Camera Direct Photo Printing ..............................100
Canceling a Print Job .............................................96
Cleaning the Machine ..........................................152
COMM. SETTING Menu ........................................30
Configuration menu ................................................21
Consumable Life Expectancy Chart .....................219
Consumables
Drum cartridge .............................................143
Toner cartridge ............................................134
Control panel ..........................................................10
Control Panel Indicators and Keys .........................10
Copy
2in1 ..............................................................108
Collate .........................................113, 114, 115
Copy density ................................................107
Duplex .........................................................111
ID card copy ................................................109
Quality .........................................................105
Select media tray .........................................107
Zoom ratio ...................................................106
Copy density ........................................................107
COPY SETTING Menu ..........................................28
D
Direct print ............................................................. 99
Displaying Printer Driver Settings .......................... 85
Duplex .................................................................. 111
Duplex option ....................................................... 209
E
Entering Text ....................................................... 130
Correcting text ............................................. 132
Input mode .................................................. 131
Input precautions ......................................... 132
F
FAX REGISTRATION Menu .................................. 29
Functions Available With the Function Key ........... 20
G
Getting Acquainted with Your Machine .................... 2
Glossy Media ......................................................... 45
ID card copy ......................................................... 109
Imageable area ...................................................... 46
Input mode ........................................................... 131
Installation precautions ............................................ 2
Installing the Duplex Option ................................. 209
K
Key operation ....................................................... 130
L
Labels .................................................................... 42
Layout tab .............................................................. 90
Letterhead .............................................................. 43
Loading a Document to be Copied ........................ 69
Loading document ................................................. 69
Loading Media ....................................................... 47
Loading print media ............................................... 47
M
Machine
Parts ................................................................3
MACHINE SETTING Menu ....................................25
Main screen ............................................................14
Maintaining the Machine ......................................150
Making Advanced Copies ....................................108
Making Basic Copies ............................................104
Making Basic Scans .............................................118
Media misfeed
ADF .............................................................181
Duplex option ...............................................180
Fuser ...........................................................170
Transfer roller ..............................................170
Tray1 ...........................................................170
Tray2 ...........................................................170
Media Storage ........................................................66
Message Window ...................................................10
Misfeed problems .................................................183
Clearing .......................................................168
Media path ...................................................168
Preventing ...................................................167
N
NETWORK SETTING Menu ..................................33
O
One-touch dial key
Specifying a recipient ..................................127
Original media
Loading ..........................................................69
Output bin ......................................................64
P
Page margins .........................................................46
PAPER SOURCE Menu .........................................27
Part Names ..............................................................3
Phone book
List ...................................................... 128
Search ................................................ 129
Plain paper ............................................................. 39
Postcard ................................................................. 43
Preventing Media Jams ....................................... 167
Preventing media misfeeds ................................. 167
Print media ............................................................. 38
Print media type
Envelope ............................................... 41
Glossy Media ........................................ 45
Labels ................................................... 42
Letterhead ............................................. 43
Plain paper ............................................ 39
Postcard ................................................ 43
Thick stock ............................................ 40
Transparency ........................................ 44
Print quality ......................................... 192
Print screen ............................................................ 16
Printer driver .......................................................... 86
Printer Driver Settings ............................................ 86
Printing Directly from a Digital Camera ................ 100
R
Replacing the Drum Cartridge ............................. 143
Replacing the Toner Cartridge ............................. 134
REPORTING Menu ............................................... 30
RX SETTING Menu ............................................... 30
S
Scanner driver ..................................................... 119
SCANNER SETTING Menu ................................... 35
Select media tray ................................................. 107
Selecting Printer Driver Options ............................ 81
Service messages ............................................... 206
Setting Clone Copying ......................................... 114
Setting Poster Copying ........................................ 115
Solving Problems with Media Misfeeds ................183
Solving Problems with Printing Quality ................192
Space Requirements ................................................2
Specifying a recipient ...........................................127
Direct entering ..............................................127
One-touch dial key .......................................127
Speed dial ....................................................128
Specifying recipient ......................................127
List ...............................................................128
Phone book ..........................................128, 129
Search ..........................................................129
Speed dial
Specifying recipient .....................................128
Storing the Machine .............................................163
System requirements ...............................................8
T
Technical Specifications .......................................216
Thick stock .............................................................40
Transparency .........................................................44
Tray 2 ...................................................................213
Troubleshooting ...................................................165
Media misfeed ..............................................183
Status, error, and service messages ...........198
TWAIN driver ........................................................119
TX SETTING Menu ................................................29
U
Uninstalling the Printer Driver ................................82
USER SETTING Menu ...........................................31
Using the Status Display Feature ...........................77
W
Watermark tab ........................................................94
Z
Zoom ratio ............................................................106