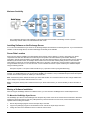
1
OneBridge Sync Server Version 4.1 Getting Started Guide 11/12/03 Copyright and Trademarks Copyright 2002-2003 Extended Systems Incorporated. All rights reserved. This document refers to numerous products by their trade names. OneBridge Sync Server is a product of Extended Systems Incorporated. All other designations are trademarks or registered trademarks of their respective companies. Extended Systems may make improvements and/or changes to the programs described in this publication at any time without notice. The information contained in this publication may therefore contain technical inaccuracies. Any such changes in the programs will be incorporated in a future edition of this publication. About This Guide This guide is designed to assist in the setup and configuration of the OneBridge Sync Server. The information provided is for the most typical implementation. For more information, see the OneBridge Sync Server help file available in the OneBridge Sync Server program folder. i Contacting Technical Support Online Support Knowledge Base Technical Support for OneBridge Sync Server is available through the Web with Extended Systems Knowledge Base. The Knowledge Base is an easy-to-use, searchable database that contains the same technical support notes used by our technical support team to help customers solve problems related to Extended Systems products. To search the Knowledge Base for information, visit our Web site at: http://www.extendedsystems.com Email OneBridge Sync Server Technical Services provides email support to all of our Mobile Software Alliance Partners and end user customers who have purchased an Annual Support and Maintenance Agreement. If you do not find the answers to your questions in the Knowledge Base and you are a paid subscriber, please contact us via email: [email protected] Phone Support OneBridge Sync Server Technical Services provides free phone support to all of our Mobile Software Alliance Partners and end user customers who have purchased an Annual Support and Maintenance Agreement. Call the support location in your country or nearest to your time zone. When contacting Technical Support, please have the following information available: • Support PIN • Software version (found in the Admin program Help About window) • Mobile device (for example, Palm 500 or Pocket PC) • Mail server (for example, Microsoft Exchange or Lotus Domino) • Specific error and a description of the problem Extended Systems Inc. Corporate Office: 5777 North Meeker Avenue Boise, Idaho 83713 United States 800-235-7576 ext. 6650 208-322-7575 ext. 6650 7:00 a.m. to 5:00 p.m. Mountain Time (GMT -7) Phone: 800-235-7576 (in U.S. & Canada) Phone: 208-322-7800 (outside U.S.) Fax: 208-327-5004 E-mail: [email protected] France +33 (0)130 092 323 8:00 a.m. to 5:00 p.m. (GMT+1) United Kingdom +44 117 901 5050 8:00 a.m. to 5:00 p.m. (GMT) Benelux +31 (0) 73 623 5359 8:00 a.m. to 5:00 p.m. (GMT+1) Germany +49 7032 798 555 9:00 a.m. to 5:00 p.m. (GMT+1) ii Table of Contents Copyright and Trademarks .......................................................................................................................................................... i About This Guide ......................................................................................................................................................................... i Contacting Technical Support......................................................................................................................................................ii Introduction................................................................................................................................................................................... 1 OneBridge Sync Server Overview .............................................................................................................................................. 1 Feature Enhancements .............................................................................................................................................................. 1 Component Overview ................................................................................................................................................................. 3 Before You Install ......................................................................................................................................................................... 6 Server and Device System Requirements .................................................................................................................................. 6 Pre-Installment Requirements .................................................................................................................................................... 7 Deployment Considerations........................................................................................................................................................ 8 OneBridge Sync Server Installation.......................................................................................................................................... 13 Upgrading to OneBridge Sync Server 4.1................................................................................................................................. 13 Installing OneBridge Sync Server Using Windows NT Authentication ...................................................................................... 13 Installing OneBridge Sync Server Using Lotus Notes Authentication ....................................................................................... 15 Installing OneBridge Sync Server Using Microsoft Exchange Authentication........................................................................... 16 Installing OneBridge Sync Server Using Database Authentication........................................................................................... 17 Installing OneBridge Sync Server Using Radius Authentication ............................................................................................... 18 The Wizards.............................................................................................................................................................................. 20 OneBridge Service Configuration ............................................................................................................................................. 23 Configuring the OneBridge Service .......................................................................................................................................... 23 Groupware Adapters .................................................................................................................................................................. 24 Notes Adapter Configuration..................................................................................................................................................... 24 Exchange Adapter Configuration .............................................................................................................................................. 25 Database Adapters ..................................................................................................................................................................... 28 Installing the Database Adapter................................................................................................................................................ 28 DMZ Proxy................................................................................................................................................................................... 29 DMZ Proxy Overview................................................................................................................................................................ 29 Installing the DMZ Proxy Software............................................................................................................................................ 29 OneBridge Sync Admin.............................................................................................................................................................. 30 Overview................................................................................................................................................................................... 30 Running the Admin Program..................................................................................................................................................... 30 OneBridge Client ........................................................................................................................................................................ 31 Overview................................................................................................................................................................................... 31 Client Deployment Considerations............................................................................................................................................ 32 Upgrading to the OneBridge Client 4.x for Palm OS................................................................................................................. 33 Client Database Data Drivers ................................................................................................................................................... 33 Client Deployment Wizard ......................................................................................................................................................... 34 Installing the Client Deployment Wizard Utility.......................................................................................................................... 34 Creating a Client Installation Application .................................................................................................................................. 34 Client Migration to OneBridge Sync Server 4.1 ........................................................................................................................ 35 Installing the Client Software .................................................................................................................................................... 36 Before You Install the Client Software ...................................................................................................................................... 36 General Client Installation Options ........................................................................................................................................... 36 Installing the Client Software Using a Custom Installation Application ..................................................................................... 37 Installing the Client Software Manually ..................................................................................................................................... 37 Synchronizing the Mobile Device.............................................................................................................................................. 38 Connecting the First Time......................................................................................................................................................... 38 Selecting a Connection Method ................................................................................................................................................ 39 Using a Network or Modem Connection - Windows CE/Palm OS/Smartphone........................................................................ 39 iii Using a Network (Wireless) Connection – Symbian (Nokia/P800/P900) .................................................................................. 40 Using the Desktop Connector Program to Connect .................................................................................................................. 40 Using a Dialup Connection – Windows CE............................................................................................................................... 41 Using ActiveSync Link to Connect – Windows CE/Smartphone ............................................................................................... 41 Synchronizing the SyncML Mobile Device ............................................................................................................................... 42 SyncML Client Configuration .................................................................................................................................................... 42 Live Connect ............................................................................................................................................................................... 44 Live Connect Overview............................................................................................................................................................. 44 Configuring Live Connect ......................................................................................................................................................... 44 Using Live Connect................................................................................................................................................................... 45 Desktop Connector..................................................................................................................................................................... 47 Overview................................................................................................................................................................................... 47 Starting Desktop Connector on the Desktop PC....................................................................................................................... 47 Setting Up Desktop Connector ................................................................................................................................................. 47 Configuring the OneBridge Client to Synchronize Using Desktop Connector........................................................................... 48 Using Desktop Connector with Palm OS Devices..................................................................................................................... 48 Using Desktop Connector with Windows CE or Smartphone Devices...................................................................................... 48 iv Introduction OneBridge Sync Server Overview OneBridge Sync Server is part of the OneBridge Mobile Groupware offering. Sync Server enables corporate IT managers to harness the power of handheld computing devices by remotely linking them directly to their corporate applications. This enables the mobile workforce to access and update information from any location, which can streamline business processes and accelerate corporate decision-making. OneBridge Sync Server supports the following features: • Synchronizes PIM (Personal Information Management) data on Palm, Pocket PC, Smartphone, Windows CE, RIM, SyncML, and Symbian OS (formerly known as EPOC) mobile devices with Microsoft Exchange and Lotus Notes groupware servers. • Synchronizes database data from any ODBC- or ADO/OLE DB-compliant DBMS to common databases on the Palm, Pocket PC, Windows CE mobile devices, and any 32-bit Windows desktop/laptop/server. Custom database solutions are also available. (optional) • Provides an always-on delivery with Live Connect technology to allow users to always have up-to-date information on the mobile device. • Manages data and applications on mobile devices with backup/restore, installation, configuration, and reporting capabilities. • Ensures secure data transfer with encryption. • Supports any wired or wireless connection, such as infrared, Ethernet, 802.11, and analog or wireless modems. Feature Enhancements OneBridge Mobile Groupware Live Connect Live Connect based push now supports the following new devices: • Treo 600 (Palm 5.x) • Sony Ericsson P800/P900 (Symbian 7 OS) • Orange SPV2 Smartphone (Microsoft Smartphone OS 2003) Device Platform Palm 5 OS - on devices like Tungsten T3 Server/Client Support Now supports Exchange 2003 server and Outlook 2003 client. Inbox Subfolder Inbox subfolder synchronization now supported for Palm and Pocket PC platforms from both Microsoft Exchange and Lotus Notes back-end groupware platforms. SecurID Authentication Native support for RSA SecurID agent on Palm, Pocket PC, and Smartphone devices platforms. 1 Citrix Support for Citrix Thin-client configurations. Clock Sync Action Ability to synchronize device times with new Clock Sync Action. OneBridge Mobile Data Suite Final Sync Before Database Sync Action Changes are Applied When database synchronization configurations are changed, the OneBridge sync engine now causes the device to synchronize the data one last time before applying the changes, thereby avoiding the loss of device-side data. This all happens automatically, without the need for any special settings. Smaller Internal Tables The tables that the OneBridge Database Sync adapters use have been reduced in size. In order to see the size savings, the configuration needs to be modified in some way in Admin and saved so that an initial sync is performed. Device-Requested Initial Syncs An initial sync of table data can be requested from the mobile device by going to the actions list and selecting the name of the table. An option is then available to request an initial sync of the table data. Custom Trigger Support Sync Actions can now be triggered programmatically by using the custom Push API. See the online documentation for more details. Business Logic Enhancements The Business Logic functionality that the Database Adapter provides has been enhanced to allow for the use of VBScript. A new option is now available to allow entry of the script directly into Admin, rather than requiring that a DLL be compiled. Also, a new OnConflict event is available that allows Business Logic to determine what data is used when a conflict does occur. Mobile Objects Technology OneBridge Mobile Objects offers the functionality to enhance custom applications by adding support for remote method invocation. The Client Interface Expert (CIE) is a new tool that can be run from the OneBridge Admin program to generate interfaces for COM objects to be remotely invoked. To make the deployment of custom applications easier, the Application Deployment Wizard is available for download, along with the Mobile Objects SDKs for AppForge, CodeWarrior, and embedded Visual Basic. Please see the Mobile Data Suite section of the help file for more information on how to write applications that utilize this feature. Integration Server Data Driver The OneBridge Integration Server data driver is now included in OneBridge Mobile Data Suite. This data driver allows for easier integration and configuration with the Integration Server back-end, allowing mobile devices to gain access to CRM database such as Siebel and SAP. 2 Component Overview OneBridge Service OneBridge Sync Server runs as a service on Windows NT or Windows 2000, allowing users to synchronize their mobile device. The OneBridge Service handles requests from the mobile device, manages security, and performs all the data transfers between the mobile device and the data sources. Site Wizard The Site Wizard is used during the server installation process and from within the Admin program to create the Configuration File and request a product license file. The Configuration File contains the following information: • The user authentication method (achieved using existing user details held by Microsoft Windows NT, Lotus Notes, Database, or Radius). • The details of which PIM applications on the mobile device are to be synchronized with Microsoft Exchange or Lotus Notes. • The details of any applications that are to be automatically installed on the mobile device. • Whether the mobile devices are to be automatically backed up to the server, and then restored as required. Groupware Sync Wizard The Groupware Sync Wizard is used during the server installation process and from within the Admin program to setup and modify the Configuration File to configure the synchronization of the built-in PIM applications on the mobile device with Microsoft Exchange or Lotus Notes. Device Management Wizard The Device Management Wizard is used to create a set of Actions to assist in managing your mobile devices. The following services can be setup using this wizard: Software Distribution, File Transfer, Backup & Restore, Device Information, Device Security, Profiles, and Device Messages. Database Sync Wizard The Database Sync Wizard is used to create a Database Sync Action and Trigger necessary to perform a database synchronization. Live Connect Wizard The Live Connect Wizard is used to create a default set of Live Connect Actions, Profile Actions, and Triggers necessary to automatically deliver email to mobile devices. Groupware Sync Adapters Groupware Sync Adapters are the link between the OneBridge Sync Server software and the corporate groupware, such as Microsoft Exchange or Lotus Domino. 3 Database Sync Adapters (optional) On the server, Database Sync Adapters provide a bridge between the database server (DBMS) and the sync engine. OneBridge Sync Server employs one or more installed Database Sync Adapters for each available database server (e.g., Oracle, MS SQL Server, or Advantage Database Server). Server Database Sync Adapters may be deployed in a variety of configurations to meet the company's scalability requirements. For example, you may install the Database Sync Adapters on a different server than OneBridge Sync Server to improve throughput. On the mobile device, Database Sync Adapters provide a bridge between the mobile database and the sync engine. OneBridge Sync Server has one Database Sync Adapter for all available mobile device databases (e.g., Palm PDB, Palm Satellite Forms, Windows CE DB, or Windows CE ADOCE). When a Database Sync Action is performed, the sync engine is used to coordinate information between the server database adapter and the mobile device database adapter. In addition, the sync engine provides conflict resolution between the two adapters. Data Drivers Data Drivers are the modules that directly read and write to the server or mobile device database. Among the Data Drivers included with OneBridge Sync Server are Win32 ADO that supports any OLEDB provider or ODBC data source, Lotus Notes, Palm PDB, Palm Satellite Forms, Palm AppForge, Windows CE DB (ObjectStore), Windows CE ADPCE, and Windows CE AppForge. OneBridge Sync Admin Program The Admin program is used to view and customize server settings. Features in the Admin program also include: • Adding users to groups (for example, sales groups or service groups). • Defining data transfers to be automatically performed whenever an end user connects to OneBridge Sync Server. • Configuring filter settings to allow users to customize which data is actually synchronized each time. For example, filters can be set to limit the size of emails, how many days of email to receive, and whether or not to download attachments. • Defining backup and restore actions to copy file and registry information between the client and the server. • Defining groupware sync actions that synchronize PIM applications between clients and servers. • Defining database sync actions that synchronize tables in a database between clients and servers. • Setting up security and encryption settings. After adjusting the settings in the Admin program, save the settings in an existing configuration file, or create a new configuration file using the Site Wizard. The configuration file instructs the OneBridge Service to perform all of the functions that have been defined in the Admin program. OneBridge Sync Log Viewer The Log Viewer is a Microsoft Management Console snap-in used to view the logs generated by OneBridge Sync Server software. The following features are included in Log Viewer: • Viewing logs grouped by category. • Filtering the logs to view based on various parameters, such as User Id, time, and so on. • Configuring the logger to enable or disable logging into Windows event viewer. • Archiving logs in a given date range to backup database. • Deleting logs in a given date range. • The Help Desk install option allows you to install only the Log Viewer to be used to view remote OneBridge Sync Server log files. 4 DMZ Proxy The DMZ Proxy is a component that can be installed within a corporate DMZ or Firewalling Gateway to bolster security for devices connecting to the OneBridge Sync Server from outside the corporate network. The DMZ Proxy software is a proxy server or an application-specific firewall for OneBridge Sync Server. The use of the DMZ Proxy makes utilizing filtering/firewalling significantly less complex to set up, while enhancing security and ease of use for functions such as auditing (for intrusion detection or usage monitoring). The DMZ Proxy understands the OneBridge protocol and makes it possible to disallow any connections from the Internet to the private network. The DMZ Proxy examines and authenticates each connection and checks OneBridge protocol packets for validity. Client Deployment Wizard The Client Deployment Wizard is a utility provided to assist administrators in creating pre-configured installation applications for distributing the OneBridge Client software to end users. OneBridge Client Software The OneBridge Client software is a program that runs on the mobile device, making synchronization possible between the OneBridge Sync Server and the client (the mobile device). Once the Client software has been installed and configured, the end user synchronizes their mobile device by tapping the client Connect icon. This action establishes a connection with the OneBridge Sync Server and initiates the synchronization. Desktop Connector Desktop Connector is a program that runs on a networked PC (running Windows NT/2000 or Windows 95/98/Me/XP), providing an efficient communication link between the mobile device and the OneBridge Sync Server. For some devices and hardware configurations, Desktop Connector is the only means of synchronizing the device with OneBridge Sync Server. For other configurations, it provides simpler setup than the alternatives (e.g., RAS) and/or eliminates the need for other desktop synchronization software (e.g., ActiveSync, HotSync, and Nokia PC suite). 5 Before You Install Server and Device System Requirements Supported OneBridge Sync Server Operating Systems • Windows NT Server 4.0 with Service Pack 6a or later • Windows 2000 Service Pack 2 Supported Desktop Operating Systems for Desktop Connector • Windows 95/98 • Windows Me • Windows NT • Windows 2000 • Windows XP OneBridge Sync Server Hardware Requirements • Pentium 233 minimum, faster processor required for larger installations • 128 MB RAM minimum, more RAM required for larger installations • 120 MB free disk space for server software plus approximately 4 MB for each defined user(s) • TCP/IP LAN connection OneBridge Sync Server Software Requirements • Outlook 2000 CDO version 1.2 or higher (custom install) – Exchange customers • Lotus Notes 5.0.11 – Domino customers • Internet Explorer 5.0 or higher Supported Mobile Device Operating Systems OneBridge Sync Server supports mobile devices that use the following operating systems: • Palm OS 3.5 or greater – Recommended device memory is 8 MB or more. Devices with less memory may not function properly for PIM synchronization or when using Bluetooth, IR, or GSM due to limited heap space. Device security functionality is only supported on Palm OS 4.0 or greater. • Windows CE Pocket PC, Pocket PC 2002, and HPC 2000 devices running CE OS 3.0 or greater. • Orange Smartphone (SPV) • SyncML v1.0.1 – OneBridge Sync Server has been successfully tested with Nokia's 9210 Communicator and Ericsson's R520e cell phone. • Symbian OS v6.0 (Formerly known as EPOC ER6) • RIM OS 2.1 Supported Windows Client Operating Systems • Windows 95/98/Me or Windows NT 4 with Y2K-compliant operating system updates. • Windows 2000, Windows XP 6 Supported Groupware • Lotus Notes 4.6, R5, R6 • Exchange 5.5, 2000, 2003 Pre-Installment Requirements Before installing OneBridge Sync Server, review this section for access setup requirements to be considered prior to install. Also see the Deployment Considerations. General • The OneBridge Service requires a user account that is a member of the local administrator group. • The port number the Sync Server is running on. Exchange • If using the DMZ Proxy, the port number being used. A DMZ Proxy must be used for a wireless connection. • A Resolver account must be setup prior to installing the Exchange Groupware Adapter. • The complete Outlook 2000/2003 Client (including CDO) must be installed on the computer that is running the Exchange Adapter. • The Exchange Adapter and Exchange Server must be located in the same domain. • If the Exchange Adapter is installed on Windows 2000, the Adapter service cannot be run as the local system account. It is necessary to select an account that has administrator privileges for the Adapter service. • For Live Connect, the account running the Adapter service must have the Exchange service account Admin role that is assigned through the Exchange Administration program and have the privileges of Administer Information Store and Receive As enabled. The account must also have administrator privileges in the local machine and have Act as part of operating system set in the local security policy. Notes • The user account running the OneBridge Service must have read/write access to the OneBridge install directory. • For Live Connect, the Notes Listener uses the Primary ID to detect user change. This is configured on the Notes Adapter Configuration - Login Information screen. This ID must have reader access in the ACL of all databases that will be Live Connect enabled. If the Notes Adapter is configured to use individual user IDs when accessing user data, the individual users' ID will be used when delivering the data. In this configuration, the Primary ID is only used to detect the changes. • If using the DMZ Proxy, the port number being used. A DMZ Proxy must be used for a wireless connection. • Lotus Notes 5.06 or higher must be installed on the same machine as the Notes groupware adapter. DMZ Requirements When deploying with a DMZ proxy, an additional server in the DMZ is required. This could be a shared server since the DMZ proxy does not consume a large amount of CPU. Stand-alone Adapters When deploying stand-alone adapters, a separate server needs to be allocated for the adapters. Typically, adapters consume a large amount of system resources, requiring a dedicated server. 7 Deployment Considerations Before installing OneBridge Sync Server, take a few minutes to review this section. This information is intended to assist you in making decisions regarding the best installation procedure for your network configuration. OneBridge Sync Server can be installed to support a variety of network topologies. As the OneBridge Sync Server software components are deployed within the corporate network, they can be installed on the same server or discretely on multiple individual computers. Before installing OneBridge Sync Server, two questions must be answered: 1. How are users going to access the network? 2. Where are the OneBridge Sync Server components going to be installed? Network Access A primary installation consideration is how users are going to access network data for synchronization. Will users be synchronizing only from within the corporate LAN, or also from remote locations via the Internet? If users will be accessing Sync Server via the Internet, it is recommended that the DMZ Proxy software be installed. The DMZ Proxy software is a component that can be installed within a corporate DMZ or Firewalling Gateway to bolster security for devices connecting to the Sync Server from outside the corporate network. The DMZ Proxy is a proxy server or an application-specific firewall for Sync Server. The use of the DMZ Proxy makes utilizing filtering/firewalling significantly less complex to set up while enhancing security and ease of use for such functions as auditing (for intrusion detection or usage monitoring). The DMZ Proxy understands the OneBridge protocol and makes it possible to disallow any connections from the Internet to the private network. The DMZ Proxy examines and authenticates each connection and checks OneBridge protocol packets for validity. The DMZ proxy is configured to forward packets to the Sync Server in the private network. The server's name and port, and the protocol to be used are configured. You may choose either HTTP or HTTPS for the protocol, however, HTTP is recommended since the information has already been encrypted. The firewalling/filtering rules between the DMZ and the private network should be set up to only allow connections to the Sync Server from the DMZ Proxy. The DMZ Proxy software is installed by choosing either the Multiple Node Installation or the Custom Installation options from the Main Installation screen. See Installing the DMZ Proxy Software. Note When using the DMZ Proxy, the public key displayed to users when they first connect to the server is the public key stored on the DMZ computer. In this case, use the Key Manager program on the DMZ computer to get the public key used in the Client Deployment Wizard or to provide to users to confirm the server's public key. Single Node vs. Multiple Node Installation Another key decision is determining where OneBridge Sync Server software components will reside when installed. Two installation configurations are provided: Single Node and Multiple Node. For Single Node installation, all of the OneBridge Sync Server installation components are installed on the same physical computer. It is not recommended to install single node on the same machine as the groupware or database server. For Multiple Node installation, the OneBridge Sync Server components are installed on multiple individual computers. This method should only be used when scalability of the stand-alone configuration is not adequate or the OneBridge Sync Server software needs to be installed on several nodes/computers to better integrate into existing security policies. Deployment Methods Depending on how users will connect, one of the following deployment methods is recommended for the Sync Server software: • Remote, Wireless, and LAN Connection – If users will be synchronizing over an Internet connection as well as using a physical connection to the network, it is recommended that the DMZ Proxy Stand-alone OneBridge Sync Server deployment method be used. • LAN Only Connection - If users will be synchronizing only when physically connected to the internal network, it is recommended that the Stand-alone OneBridge Sync Server deployment method be used. 8 Single Node Installation Decision: In a Single Node Installation, the OneBridge Sync Server software is installed either on the same computer on which the groupware/database is deployed or on a separate computer. You must decide whether the OneBridge Sync Server software should be installed on the groupware/database server computer. Shared Groupware/Database Server This configuration does not require any additional computing hardware. It offers some incremental performance benefit when OneBridge accesses groupware information. This configuration is recommended when the load on the groupware/database server is low to moderate. Stand-alone OneBridge Sync Server (recommended configuration) This configuration allows the administrator to offload the synchronization processing requirements from the groupware/database server to a machine dedicated to synchronization. This configuration offers better scalability and the benefits of dedicating a server to specific functionality. 9 DMZ Proxy Stand-alone OneBridge Sync Server (recommended configuration) This configuration provides additional security by requiring that all client requests first be processed in the DMZ network. Only those requests that are properly authenticated are forwarded to the Sync Server in the private network. Additionally, the communication between the DMZ Proxy and Sync Server can be monitored via a firewall or application proxy. This configuration is recommended when client requests could originate from the Internet. Multiple Node Installation Decision: For a Multiple Node installation, you must decide how the adapter software should be installed. Reduced Network Traffic This configuration reduces the network traffic between the groupware/database adapter and the groupware/database server while improving the adapter’s access performance to groupware/database information, but increases the CPU load on the groupware/database server. 10 Maximum Scalability This configuration offers the best scalability by taking advantage of the benefits of dedicating a server to specific functionality. Network traffic is introduced between each node. Installing Software on the Exchange Server It is not recommended that the Sync Server or the Exchange adapter be installed on the Exchange Server. If you must install the software on the Exchange Server, the client email Reply functionality is not available. Server Data Location During the Sync Server installation, the administrator will be asked to select a directory in which to store data. Sync Server components read and write data files into the directory that is specified. This data includes synchronization table map information, internal change log tables, synchronization logs, and other data necessary to the synchronization process. During a database synchronization action, for example, data is read from the source table and temporarily stored in a file in the data folder while its contents are converted to different data types, if necessary. This directory must be located on a drive that has enough available free space or a -9 error will result. You can calculate the amount of space needed by the database adapter using the following formula: free space required = 2.8 x (size of data included in sync) x (number of users syncing simultaneously) Note The size of data included in the initial sync will be large compared to the amount of data in a typical subsequent sync. For example, if a 100 MB table were to be synchronized, 280 MB (2.8 x 100 MB x 1 user) of available free space would be required for each user that was to perform an initial sync at the same time. Note If the directory that is selected to be the Sync Server data location is on a drive that does not have enough available free space, attempts to synchronize data will result in a -9 error. Note To change the directory that is selected to be the Sync Server data location, you must uninstall Sync Server and then reinstall. Moving a Software Installation When moving the OneBridge software to a different server, you must move the OneBridge server and the Adapter server. To Move the OneBridge Sync Server: The OneBridge Sync Server License Manager uses the public key stored on the server and the server's hostname to determine whether the license document is valid. The public/private keys must be moved to the new server, and the hostname must be updated before installing the software. 1. Run the Key Manager program and use the Export Keys command. 2. Copy the Key Manager program to the destination server and use the Import Keys command. 3. Change the name of the destination server to match the source server. 11 4. Install the software. The Site Wizard will automatically get a new copy of the license. To Move the Adapter Server: The passwords in the Notes and Exchange Settings configuration files are encrypted with the server's public key. If these configuration files (i.e., NotesSettings.xml and ExchSettings.xml) are copied to the destination server, you must export and import the public key using the Key Manager program. See Also Pre-Installment Requirements OneBridge Feature Enhancements Installing the DMZ Proxy Software Installing OneBridge Sync Server Using Windows NT Authentication Installing OneBridge Sync Server Using Lotus Notes Authentication Installing OneBridge Sync Server Using Database Authentication Installing OneBridge Sync Server Using Radius Authentication Installing the Notes Groupware Adapter Installing the Exchange Groupware Adapter Installing the Client Deployment Wizard Utility 12 OneBridge Sync Server Installation Upgrading to OneBridge Sync Server 4.1 Preparation • The OneBridge Service must be shutdown during the upgrade procedure. • While upgrading users will not be able to access the server, therefore, plan your upgrade during a period of low activity. • You can use your existing configuration file after the upgrade, however, if you would like to activate the Live Connect functionality, you will need to run the Live Connect Wizard after the installation has completed. • The server's public and private keys are not modified during an upgrade. • If you are using an Install action, you will need to update the files contained in the Installation folder with the new OneBridge Clients. To upgrade to OneBridge Sync Server 4.1 1. Run the setup.exe program. 2. Select Sync Server and click install now. 3. If you are prompted to stop the service before making changes to the installation, click Yes. 4. The installer will now upgrade the existing software on the server. 5. If you have an Exchange Adapter installed, the Exchange Settings program is displayed. Click Next while you review the existing configuration. 6. If you have a Notes Adapter installed, the Notes Settings program is displayed. Click Next while you review the existing configuration. 7. The OneBridge Service program is displayed. Click Next while you review the existing configuration. 8. The Site Wizard prompts if you would like to create a new configuration. Typically, you would select No and use the existing configuration. If you do decide to create a new configuration, be aware that creating new Groupware Sync actions or Database Sync actions will cause an initial sync on clients that have previously been using other sync actions. 9. Click Yes to start the OneBridge Service. Upgrade is complete. 10. If you are using an Install action to install the OneBridge Client software, remember to update the installation folder with the new clients. The clients are available in the Clients folder of the installation package. They are also installed with the OneBridge Sync Server in the Bin directory. 11. If you are using an existing configuration and would like to activate the Live Connect functionality for your users, you will need to run the Live Connect wizard in Admin against your existing configuration. Installing OneBridge Sync Server Using Windows NT Authentication This procedure performs a basic install of the OneBridge Sync Server. Review the Before You Install information to determine whether additional components should be installed at this time. Important If you are installing OneBridge Sync Server and the OneBridge Adapters on separate computers, it is recommended that the adapter be installed first. 1. From the Installer screen of the CD-ROM, select Sync Server and click install now. 2. Click Yes to accept the License Agreement. 3. Choose the type of installation and click Next. • Single Node Configuration – Select this option to install the server and adapter software on a single computer. Select which adapters you would like to install. 13 • 4. Multiple Node Configuration – Select this option to install the server and adapter software on separate computers and then select the components you would like to install. If you select one of the adapter components, you will need to select which adapters to install. Choose the component(s) you wish to install: • Database Adapter – Installs the adapter to allow synchronization with a variety of databases that provide an ADO, ODBC, or SQL interface. • Documentation – Installs the online help file onto the server. • Log Viewer – Installs the Log Viewer application onto the server. • Lotus Notes Adapter – Installs the adapter to allow device synchronization with Lotus Notes. • Lotus Notes Listener – Installs the listener to detect changes on the server that need to be sent to the mobile device. • Microsoft Exchange Adapter – Installs the adapter to allow device synchronization device with Microsoft Exchange. • Microsoft Exchange Listener – Installs the listener to detect changes on the server that need to be sent to the mobile device. 5. Choose the Destination Folder for the install components and click Next. 6. Choose the Data Directory for the Sync Server data and click Next. 7. If the Lotus Notes or Microsoft Exchange adapter was selected in step 4 above, configure the groupware adapters. The configuration screen(s) will be displayed. Refer to the Groupware Adapter Configuration section. 8. Configure the OneBridge Service. See Configuring the OneBridge Service. 9. The Site Wizard begins. After reviewing the Introduction screen, click Next. 10. Select Windows NT as the Authentication Server type and click Next. 11. Setup the Windows NT authentication. See Creating a Windows NT Authentication Item in the online help. a. Click the Add button to add users or groups of users that will be allowed to authenticate to Sync Server. Click OK. 12. The License Request screen is displayed if you do not already have a license. Enter your Serial Number to request a trial license. If you already have a valid license file, but have not yet installed it, click Skip Request. Click Next. 13. If a serial number was entered, the License Request Information screen will appear. Review the information and click OK to send the request to Extended Systems. 14. The Service Wizards screen is displayed. Select the wizard(s) that you would like to run: • Groupware Sync Wizard – Used to setup and modify the configuration file to configure the synchronization of the built-in PIM applications on the mobile device with Microsoft Exchange or Lotus Notes on the server. • Device Management Wizard – Used to setup and modify the configuration file to create a group of Actions that assist in managing your mobile devices. • Database Sync Wizard – Used to create a Database Sync Action to perform a database synchronization based on a defined a set of tables. • Live Connect Wizard - Used to setup the necessary actions to automatically deliver data to supported mobile devices. 15. Click Finish. 16. Select Yes when prompted to start the service. Adding Users or Groups of Users for Windows NT Authentication 1. On the Windows NT Authentication screen, click Add. 2. On the Select NT Groups for Authentication screen, select a domain from the List Names From drop-down menu. 3. Click the Show Users button to display a list of users and groups in the Names list. 4. Select from the Names list and click Add to include them in the Add Names list. 5. When all desired users and groups have been selected, click OK. The selected users and groups will be added on the Windows NT Authentication screen. 14 Installing OneBridge Sync Server Using Lotus Notes Authentication This procedure performs a basic install of the OneBridge Sync Server. Review the Before You Install information to determine whether additional components should be installed at this time. Important If you are installing OneBridge Sync Server and the OneBridge Adapters on separate computers, it is recommended that the adapter be installed first. 1. From the Installer screen of the CD-ROM, select Sync Server and click install now. 2. Click Yes to accept the License Agreement. 3. Choose the type of installation and click Next. 4. • Single Node Configuration – Select this option to install the server and adapter software on a single computer. Select which adapters you would like to install. • Multiple Node Configuration – Select this option to install the server and adapter software on separate computers and then select the components you would like to install. If you select one of the adapter components, you will need to select which adapters to install. Choose the component(s) you wish to install: • Database Adapter – Installs the adapter to allow synchronization with a variety of databases that provide an ADO, ODBC, or SQL interface. • Documentation – Installs the online help file onto the server. • Log Viewer – Installs the Log Viewer application onto the server. • Lotus Notes Adapter – Installs the adapter to allow device synchronization with Lotus Notes. • Lotus Notes Listener – Installs the listener to detect changes on the server that need to be sent to the mobile device. • Microsoft Exchange Adapter – Installs the adapter to allow device synchronization device with Microsoft Exchange. • Microsoft Exchange Listener – Installs the listener to detect changes on the server that need to be sent to the mobile device. 5. Choose the Destination Folder for the install components and click Next. 6. Choose the Data Directory for the Sync Server data and click Next. 7. If the Lotus Notes or Microsoft Exchange adapter was selected in step 4 above, configure the groupware adapters. The configuration screen(s) will be displayed. Refer to the Groupware Adapters section. 8. Configure the OneBridge Service. See Configuring the OneBridge Service. 9. The Site Wizard begins. After reviewing the Introduction screen, click Next. 10. Select Lotus Notes as the Authentication Server type. Click Next. Choose to authenticate all Notes users or specify specific Notes user groups. You must also enter the location of the Notes adapter. For a single node install, the default local host can be used; otherwise, enter the name of the server that is running the Notes adapter. 11. The License Request screen is displayed if you do not already have a license. Enter your Serial Number to request a trial license. If you already have a valid license file, but have not yet installed it, click Skip Request. Click Next. 12. If a serial number was entered, the License Request Information screen will appear. Review the information and click OK to send the request to Extended Systems. 13. The Service Wizards screen is displayed. Select the wizard(s) that you would like to run: • Groupware Sync Wizard – Used to setup and modify the configuration file to configure the synchronization of the built-in PIM applications on the mobile device with Microsoft Exchange or Lotus Notes on the server. • Device Management Wizard – Used to setup and modify the configuration file to create a group of Actions that assist in managing your mobile devices. • Database Sync Wizard – Used to create a Database Sync Action to perform a database synchronization based on a defined a set of tables. • Live Connect Wizard - Used to setup the necessary actions to automatically deliver data to supported mobile devices. 14. Click Finish. 15. Select Yes when prompted to start the service. 15 Installing OneBridge Sync Server Using Microsoft Exchange Authentication This procedure performs a basic install of the OneBridge Sync Server. Review the Before You Install information to determine whether additional components should be installed at this time. Important If you are installing OneBridge Sync Server and the OneBridge Sync Adapters on separate computers, it is recommended that the adapter be installed first. For more information on a particular screen or topic, click the links provided. 1. From the Installer screen of the CD-ROM, select Sync Server and click install now. 2. Click Yes to accept the License Agreement. 3. Choose the type of installation and click Next. 4. • Single Node Configuration – Select this option to install the server and adapter software on a single computer. Select which adapters you would like to install. • Multiple Node Configuration – Select this option to install the server and adapter software on separate computers and then select the components you would like to install. If you select one of the adapter components, you will need to select which adapters to install. Choose the component(s) you wish to install: • Database Adapter – Installs the adapter to allow synchronization with a variety of databases that provide an ADO, ODBC, or SQL interface. • Documentation – Installs the online help file onto the server. • Log Viewer – Installs the Log Viewer application onto the server. • Lotus Notes Adapter – Installs the adapter to allow device synchronization with Lotus Notes. • Lotus Notes Listener – Installs the listener to detect changes on the server that need to be sent to the mobile device. • Microsoft Exchange Adapter – Installs the adapter to allow device synchronization device with Microsoft Exchange. • Microsoft Exchange Listener – Installs the listener to detect changes on the server that need to be sent to the mobile device. 5. Choose the Destination Folder for the install components and click Next. 6. Choose the Data Directory for the Sync Server data and click Next. 7. If the Lotus Notes or Microsoft Exchange adapter was selected in step 4 above, configure the groupware adapters. If you selected the Exchange or Notes groupware sync adapter, their configuration is displayed. 8. Configure the OneBridge Sync Service. See Configuring the OneBridge Sync Service. 9. The Site Wizard begins. After reviewing the Introduction screen, click Next . 10. Select Microsoft Exchange as the User Authentication Server type. Click Next. 11. Select to authenticate all Exchange users or specify specific Exchange user groups. You must also enter the location of the Exchange adapter. For a single node install, the default local host can be used, otherwise, enter the name of the server that is running the Exchange adapter. See Creating an Exchange Authentication Item in the online help. 12. The License Request screen is displayed if you do not already have a license. Enter your Serial Number to request a trial license. If you already have a valid license file, but have not yet installed it, click Skip Request. Click Next. 13. If a serial number was entered, the License Request Information screen will appear. Review the information and click OK to send the request to Extended Systems. 14. The Service Wizard screen is displayed. Select the wizard(s) that you would like to run: • Groupware Sync Wizard – Used to setup and modify the configuration file to configure the synchronization of the built-in PIM applications on the mobile device with Microsoft Exchange or Lotus Notes on the server. • Device Management Wizard – Used to setup and modify the configuration file to create a group of Actions that assist in managing your mobile devices. • Database Sync Wizard – Used to create a Database Sync Action to perform a database synchronization based on a defined a set of tables. 16 • Live Connect Wizard - Used to setup the necessary actions to automatically deliver data to supported mobile devices. 15. Click Finish. 16. Select Yes when prompted to start the service. Installing OneBridge Sync Server Using Database Authentication This procedure performs a basic install of the OneBridge Sync Server. Review the Before You Install information to determine whether additional components should be installed at this time. Important If you are installing OneBridge Sync Server and the OneBridge Adapters on separate computers, it is recommended that the adapter be installed first. 1. From the Installer screen of the CD-ROM, select Sync Server and click install now. 2. Click Yes to accept the License Agreement. 3. Choose the type of installation and click Next. 4. • Single Node Configuration – Select this option to install the server and adapter software on a single computer. Select which adapters you would like to install. • Multiple Node Configuration – Select this option to install the server and adapter software on separate computers and then select the components you would like to install. If you select one of the adapter components, you will need to select which adapters to install. Choose the component(s) you wish to install: • Database Adapter – Installs the adapter to allow synchronization with a variety of databases that provide an ADO, ODBC, or SQL interface. • Documentation – Installs the online help file onto the server. • Log Viewer – Installs the Log Viewer application onto the server. • Lotus Notes Adapter – Installs the adapter to allow device synchronization with Lotus Notes. • Lotus Notes Listener – Installs the listener to detect changes on the server that need to be sent to the mobile device. • Microsoft Exchange Adapter – Installs the adapter to allow device synchronization device with Microsoft Exchange. • Microsoft Exchange Listener – Installs the listener to detect changes on the server that need to be sent to the mobile device. 5. Choose the Destination Folder for the install components and click Next. 6. Choose the Data Directory for the Sync Server data and click Next. 7. If the Lotus Notes or the Microsoft Exchange adapter was selected in step 4 above, configure the groupware adapters. The configuration screen(s) will be displayed. Refer to the Groupware Adapter Configuration section. 8. Configure the OneBridge Service. See Configuring the OneBridge Service. 9. The Site Wizard begins. After reviewing the Introduction screen, click Next. 10. Select Database as the User Authentication method and click Next. 11. Setup the Database Authentication: a. On the Database Authentication screen, enter a Display Name and Description for the new database authentication item. b. Enter the host server name or IP address where the Database Authentication Item has been installed as the Server Name. The Database Authentication Item component is installed automatically on any server where OneBridge Sync Server or a OneBridge Database Sync Adapter is installed. c. Enter the Port used by the Database Authentication Item to listen for authentication requests from the OneBridge Sync Server. The port defaults to 5001 for http and 6001 for https. d. From the Protocol drop-down menu, select the protocol to be used to communicate with the Database Authentication Item. Either http or https may be selected. e. Select the OneBridge Group that users are assigned to if they successfully authenticate to the database. 17 f. Enter a connection string either by using the data link dialog, using the existing connection dialog, or typing it in the Connection String box. g. To use a predefined user table for authentication (i.e., a lookup table where USERID and PASSWORD fields are matched), select Reference users from table and fill in the table name and credentials to access the database. Otherwise, authentication is based in access rights to the database itself. h. When finished, click OK. Note Database authentication allows all users with access to the database to use OneBridge. To restrict users, create an empty database and give rights only to the desired users, or create a table of usernames and passwords, and then configure the table to be the reference table. 12. The License Request screen is displayed if you do not already have a license. Enter your Serial Number to request a trial license. If you already have a valid license file, but have not yet installed it, click Skip Request. Click Next. 13. If a serial number was entered, the License Request Information screen will appear. Review the information and click OK to send the request to Extended Systems. 14. The Service Wizards screen is displayed. Select the wizard(s) that you would like to run: • Groupware Sync Wizard – Used to setup and modify the configuration file to configure the synchronization of the built-in PIM applications on the mobile device with Microsoft Exchange or Lotus Notes on the server. • Device Management Wizard – Used to setup and modify the configuration file to create a group of Actions that assist in managing your mobile devices. • Database Sync Wizard – Used to create a Database Sync Action to perform a database synchronization based on a defined a set of tables. • Live Connect Wizard - Used to setup the necessary actions to automatically deliver data to supported mobile devices. 15. Click Finish. 16. Select Yes when prompted to start the service. Installing OneBridge Sync Server Using Radius Authentication This procedure performs a basic install of the OneBridge Sync Server. Review the Before You Install information to determine whether additional components should be installed at this time. Important If you are installing OneBridge Sync Server and the OneBridge Adapters on separate computers, it is recommended that the adapter be installed first. 1. From the Installer screen of the CD-ROM, select Sync Server and click install now. 2. Click Yes to accept the License Agreement. 3. Choose the type of installation and click Next. 4. • Single Node Configuration – Select this option to install the server and adapter software on a single computer. Select which adapters you would like to install. • Multiple Node Configuration – Select this option to install the server and adapter software on separate computers and then select the components you would like to install. If you select one of the adapter components, you will need to select which adapters to install. Choose the component(s) you wish to install: • Database Adapter – Installs the adapter to allow synchronization with a variety of databases that provide an ADO, ODBC, or SQL interface. • Documentation – Installs the online help file onto the server. • Log Viewer – Installs the Log Viewer application onto the server. • Lotus Notes Adapter – Installs the adapter to allow device synchronization with Lotus Notes. • Lotus Notes Listener – Installs the listener to detect changes on the server that need to be sent to the mobile device. • Microsoft Exchange Adapter – Installs the adapter to allow device synchronization device with Microsoft Exchange. 18 • Microsoft Exchange Listener – Installs the listener to detect changes on the server that need to be sent to the mobile device. 5. Choose the Destination Folder for the install components and click Next. 6. Choose the Data Directory for the Sync Server data and click Next. 7. If the Lotus Notes or Microsoft Exchange adapter was selected in step 4 above, configure the groupware adapters. The configuration screen(s) will be displayed. Refer to the Groupware Adapters section. 8. Configure the OneBridge Service. See Configuring the OneBridge Service. 9. The Site Wizard begins. After reviewing the Introduction screen, click Next. 10. Select RADIUS as the User Authentication method and click Next. 11. Setup the Radius Authentication: a. On the Radius Authentication screen, enter the appropriate information for the Radius Server fields. Note To set up an ACE, Steel-Belted, or IAS Radius server, refer to the help provided in the Admin program or the documentation provided with each Radius server type. b. Select from the three methods available to map users to OneBridge Groups: • Use Radius server attribute - Select this option to store the OneBridge group list on the Radius server. This option requires that you use an IAS Radius server and that you install the IASOneBridgeGroups.DLL to provide the attribute support. Refer to the Admin online help for more details. Note The IASOneBridgeGroups.DLL is located in the product directory under Bin\Radius and is only compatible with IAS servers running under Windows 2000. NT4.0 is not supported. c. • Use native Windows NT groups – Select this option to directly map NT user groups to OneBridge user groups. Select Include domain name if the OneBridge group will include the NT domain name. This option is only necessary if you are using two NT groups with the same name, but are with different NT domains. This option requires that the OneBridge server be in the same domain or trusted domain for which the user is trying to authenticate. • Enter user names for each OneBridge group – Select this option to define the user-to-group mapping within the Radius authentication configuration item. Select a group from the drop-down menu. Click OK. 12. The License Request screen is displayed if you do not already have a license. Enter your Serial Number to request a trial license. If you already have a valid license file, but have not yet installed it, click Skip Request. Click Next. 13. If a serial number was entered, the License Request Information screen will appear. Review the information and click OK to send the request to Extended Systems. 14. The Service Wizards screen is displayed. Select the wizard(s) that you would like to run: • Groupware Sync Wizard – Used to setup and modify the configuration file to configure the synchronization of the built-in PIM applications on the mobile device with Microsoft Exchange or Lotus Notes on the server. • Device Management Wizard – Used to setup and modify the configuration file to create a group of Actions that assist in managing your mobile devices. • Database Sync Wizard – Used to create a Database Sync Action to perform a database synchronization based on a defined a set of tables. • Live Connect Wizard - Used to setup the necessary actions to automatically deliver data to supported mobile devices. 15. Click Finish. 16. Select Yes when prompted to start the service. 19 The Wizards Using the Site Wizard The Site Wizard is used during the server installation process and from within the Admin program to create the Configuration File and request a product license file. 1. From the Wizards menu, select Site Wizard. 2. On the Configuration dialog, select Site Wizard and click OK. 3. After reviewing the Introduction screen, click Next. 4. Select the Authentication Server type and click Next. Perform the necessary steps to set up the authentication method. For more information on the authentication screens, refer to the online help. 5. The License Request screen is displayed if you do not already have a license. Enter your Serial Number to request a trial license. If you already have a valid license file, but have not yet installed it, click Skip Request, and then click Next. 6. If a serial number was entered, the License Request Information screen will appear. Review the information and click OK to send the request to Extended Systems. 7. The Service Wizards screen is displayed. Select the wizard(s) that you would like to run. Click Finish. 8. The next selected wizard will begin. Using the Groupware Sync Wizard The Groupware Sync Wizard is used during the server installation process and from within the Admin program to setup and modify the configuration file to configure the synchronization of the built-in PIM applications on the mobile device with Microsoft Exchange or Lotus Notes on the server. The Groupware Sync Wizard automatically sets up which PIM applications on the mobile device are to be synchronized with Microsoft Exchange or Lotus Notes. 1. From the Wizards menu, select Groupware Sync Wizard. 2. Review the Groupware Sync Wizard overview information and click Next. 3. Select the mobile device(s) folders to be supported for Sync Actions. Click Next. 4. Select the groupware applications to synchronize with the selected mobile device(s). Click Next. 5. Select the groupware adapter to be used to synchronize with the mobile devices for this Sync Action. If necessary, add or edit an adapter to perform the required synchronization. Click Next. Note If the server and adapter have been installed on separate machines, select Add and supply the adapter type and location information. It is recommended that the adapter be installed first. 6. Set up the desired Sync Action(s) from the Sync Options screen. Click Next. 7. Select Yes when prompted to start the service. 20 Using the Device Management Wizard The Device Management Wizard is used during the server installation process and from within the Admin program to setup and modify the configuration file to create a group of Actions that assist in managing your mobile devices. 1. From the Wizards menu, select Device Management Wizard. 2. Review the Device Management Wizard overview information and click Next. 3. Select the mobile devices you would like to configure for mobile device management and click Next. 4. To create a Software Distribution Action, click Create an action to install applications to all mobile devices and select the location of the folder to be used. Click Next. 5. Select the appropriate file transfer options and select the location of the folder to be used. Click Next. 6. To create a Backup Action in the configuration file, select Create a backup action and then select the Backup Frequency from the list. 7. To create a Restore Action, select Create a restore action, and then select the folder to be used for backup and restore actions. Click Next. 8. To collect mobile device information, select Create a device information action, and then select the Action Frequency from the list. Click Next. 9. To verify security on the device prior to user synchronization, select the option to Require the user to have power-on password protection enabled. Click Next. 10. To create a Profile Action, click Create profile action. After the wizard completes, you must edit the profile action and add specific profiles for the mobile devices. Click Next. 11. To create a device message, click the Create device message action option. Type in a message, or choose Use a file, and then browse to the file location. Click Finish. Using the Database Sync Wizard The Database Sync Wizard is used to create a Database Sync Action to perform a database synchronization based on a defined a set of tables. 1. From the Wizards menu, select Database Sync Wizard. 2. Review the Database Sync Wizard overview information and click Next. 3. Select the mobile device or client folder to be supported for the Sync Action. Click Next. 4. Select the Server Database Adapter where the desired database to be synchronized can be accessed. If the required adapter is not displayed, select Add and supply the adapter type and location information. It is recommended that the adapter be installed first. Click Next. 5. Select the Server Database Connection that has been configured to connect to the desired database. If necessary, add or edit a connection to provide access to the desired database. Click Next. 6. Select the Mobile Database Connection that has been configured for the database on the mobile device. If necessary, add or edit a connection to provide access to the desired database. Click Next. 7. The wizard will attempt to retrieve a list of tables from the database through the server adapter. Select a table from the Available Tables list and click the top arrow to add it to the Selected Tables list. Click Field Map to create a mapping of fields between the server and mobile tables, and click OK. Repeat for additional tables as desired. Click Next. 8. On the Sync Options screen, enter or select an Action Name, Action Set Name, and Trigger Name. Click Finish to create the Action. 21 Using the Live Connect Wizard The Live Connect Wizard is used during the server installation process and from within the Admin program to setup the necessary actions to automatically deliver data to supported mobile devices. 1. From the Wizards menu, select Live Connect Wizard. 2. Review the Live Connect Introduction information and click Next. 3. Select the Mobile Devices to be supported for Live Connect. Click Next. 4. Select the Groupware Listener to be used to monitor the server for changes that need to be delivered to the device(s). If necessary, choose to add or edit a listener. Click Next. 5. On the Power Management screen, configure how information is to be delivered between the device and server and how battery life is to be preserved. Always-On provides faster delivery of information but requires more battery than Power-Save mode. Click Next. 6. Configure the Live Connect Profiles. The Desktop profile is used when the Desktop Connector can be detected, otherwise, the Wireless profile is used. If a new profile action is created, it may be necessary to edit the action after the wizard completes. Click Next. 7. On the Action Sets screen, customize the name of the registration action set. You must select which groupware action set to run when a groupware change is detected. Typically, is would be only one action set with a groupware sync action. Click Next. 8. On the User Groups & Passwords screen, select the user groups that will use Live Connect. Select from either Extended Sessions or Save Password to prevent users from being interrupted each time the device connects to the server to synchronize changes. Click Finish. 22 OneBridge Service Configuration Configuring the OneBridge Service 1. From the Start menu, select Programs, OneBridge Sync Server, and then click OneBridge Service. 2. On the Login Information screen, select the NT account to run the OneBridge Service. Click Next. Important If the Exchange Adapter has been installed on Windows 2000, a Windows NT account must be used (the local system account cannot be used). 3. On the HTTP Ports screen, select the ports for the service that will listen for client and adapter requests. The HTTPS port is only used by adapters. A default SSL Certificate is generated at install. 4. If DMZ Proxy has been installed, the DMZ Proxy screen will appear. Select Forward request to the following server to forward all requests to the selected server. Enter the name of the computer that is running the OneBridge Sync Server. 5. Click Finish. 23 Groupware Adapters Notes Adapter Configuration Installing the Notes Groupware Adapter This procedure performs a basic install of the OneBridge Lotus Notes Groupware Adapter. Review the Before You Install information to determine whether additional components should be installed at this time. Important Lotus Notes 5.06 or higher must be installed on the same machine as the Notes groupware adapter. If any of the Lotus Notes users using OneBridge Sync Server have been upgraded to the More Secure Internet Password Format, Lotus Notes 5.0.11 or higher must be installed on the same machine as the Notes Groupware Adapter. 1. Install the Lotus Notes client (version 5.06 or later) on the target computer. Refer to the Lotus Notes documentation for installation instructions. 2. From the OneBridge Installer screen, select Sync Server and click install now. 3. Click Yes to accept the License Agreement. 4. 5. Choose the type of installation. • Single Node Configuration – Select this option to install the server and adapter software on a single computer. • Multiple Node Configuration – Select this option to install the server and adapter software on separate computers and then click Adapter Software. Select the Lotus Notes Adapter from the list. Clear any other adapters that are not required. 6. Choose the install directory for the program and click Next. 7. Choose the data directory for the Program and click Next. The data directory stores configuration and user backup information. You may want to select a location that is available for backups, such as for a network drive. 8. On the Login Information screen, enter the name and password of the Primary ID File that can be used to look up information about each user in the Public Address Book. 9. Select the ID File to be used to access the user accounts. If the Individual User option was selected, enter the User ID File Formula. Click Next. 10. On the Server Information screen, enter the Domino Server name and the Notes INI File name. 11. If the Personal Address Book (PAB) is external to the mail file, select the check box, and then enter the PAB Server name and the PAB File Formula. 12. If the Journal is external to the mail file, select the check box, and then enter the Journal Server name and the Journal File Formula. 13. On the Custom Settings page, you can enter custom Notes formulas for obtaining user information rather than looking up the information from the Domain Address Book. 14. If you are using RIM Inbox Reconciliation, use the RIM Inbox Reconciliation screen to enter the information about your Blackberry Enterprise Server. 15. If a Notes Listener is to be setup to detect user changes, enter the server information on the Notes Listener Configuration screen. 16. Click Finish. 17. Configure the OneBridge Service. See Configuring the OneBridge Service. 18. Click Yes to start the OneBridge Service. 24 Configuring the Notes Adapter The Notes Settings wizard configures the Notes Adapter. The Notes Adapter can also be remotely configured using the Admin program. 1. On the Login Information screen, enter the name and password of the Primary ID File that will be used to look up information about each user in the Public Address Book. 2. Select the ID File to be used to access the user accounts. If the Individual User option was selected, enter the User ID File Formula. Click Next. 3. On the Server Information screen, enter the Domino Server name and the Notes INI File name. 4. If the Personal Address Book (PAB) is external to the mail file, select the check box, and then enter the PAB Server name and the PAB File Formula. 5. If the Journal is external to the mail file, select the check box, and then enter the Journal Server name and the Journal File Formula. Click Next. 6. On the Custom Settings page, you can enter custom Notes formulas for obtaining user information, rather than looking up the information from the Domain Address Book. 7. If a Notes Listener is to be setup to detect user changes, enter the server information on the Notes Listener Configuration screen. 8. Click Finish. Exchange Adapter Configuration Installing the Exchange Groupware Adapter This procedure performs a basic install of the OneBridge Groupware Adapters. Review the Before You Install information to determine whether additional components should be installed at this time. Before installing the Groupware Adapter, decide whether the adapter is to be run in User mode or administrator mode. Exchange User Mode Benefits • Exchange server is accessed using the User security privileges. The Adapter places the authorization control onto the server that results in easier maintenance for the system administrator. Requirements • CDO 1.21 (Collaboration Data Objects) must be installed in the adapter machine. The recommended versions of CDO.dll are 5.5.2657.55, 6.0.6487.2 or 6.5.6980.3. These are the versions referred to in KB818709, KB824282 and KB823383. Generally CDO is installed with Microsoft Outlook or Microsoft Exchange Server installations. For more information on preparing a CDO installation, refer to Exchange Adapter CDO Requirements in the online help. • The Exchange Adapter and Exchange Server must be located in the same domain. • The Log on as a batch job local security setting must be assigned to all users on the local computer that will be using the Exchange Adapter. The Adapter installer automatically assigns this privilege to everyone on the local computer. • The account running the Adapter service needs to have Act as part of the Operating System, Lock Pages in Memory, and Log on as Service rights assigned to it on the local computer. The OneBridge Service program automatically assigns this privilege to the account selected to run the Adapter service. • If Exchange Adapter is installed on Windows 2000, the Adapter service cannot be run as the local system account. It is necessary to select an account that has administrator privileges for the Adapter service. 25 Exchange Administrator Mode Benefits • The Exchange Adapter has higher performance. Requirements • The complete Outlook 2000/2003 Client (including CDO) must be installed on the computer that is running the Exchange Adapter. • The Exchange Adapter and Exchange Server must be located in the same domain. • The account running the Adapter service needs to have the Exchange service account Admin role that is assigned through the Exchange Administration program. • If Exchange Adapter is installed on Windows 2000, the Adapter service cannot be run as the local system account. It is necessary to select an account that has administrator privileges for the Adapter service. Important Due to issues with Outlook 2000, it is not recommended that the Exchange Adapter be installed on the same computer as the Exchange Server. Installation Procedure 1. Install complete Outlook 2000/2003 Client on the target computer. You may use your Microsoft Outlook CD to install CDO. During installation, select Custom Install, and then select the CDO component. 2. Using the Outlook 2000 Client, connect to the Exchange server to verify the installation. If you are prompted to set Outlook at the default mail client, select Yes. 3. From the OneBridge Installer screen, select Sync Server and click install now. 4. Click Yes to accept the License Agreement. 5. Choose the type of installation: • Single Node Configuration – Select this option to install the server and adapter software on a single computer. • Multiple Node Configuration – Select this option to install the server and adapter software on separate computers, and then click Adapter Software. 6. Select the Exchange Adapter from the list. Clear any other adapters that are not required. 7. Choose the install directory for the program and click Next. 8. Choose the data directory for the program and click Next. The data directory stores configuration and user backup information. You may want to select a location that is available for backups, such as a network drive. Note If the Notes adapter was also selected, the Notes Adapter Configuration is displayed. 9. On the Access Mode screen, enter the Name of the Exchange server. 10. Select the access mode from the options listed, and then click Next. The remainder of the installation procedure is dependent upon this selection: • Exchange User Mode • Exchange Administrator Mode 11. If Exchange User Mode was selected as the access mode, the Resolver Account screen will appear. Select the resolver account type: • Windows NT account • Exchange Guest account The options available on the Resolver Account screen depend on the account type that was selected. Enter the required information for the account type. 12. If an Exchange Listener is to be setup to detect user changes, enter the server information on the Exchange Listener Configuration screen. 13. Click Finish. 26 14. Configure OneBridge Service. See Configuring the OneBridge Service. 15. Click Yes to start the OneBridge Service. Configuring the Exchange Adapter The Exchange Settings wizard configures the Exchange Adapter. The Exchange Adapter can also be remotely configured using the Admin program. 1. On the Access Mode screen, enter the Name of the Exchange server. 2. Select the access mode from the options listed, and then click Next. The remainder of the installation procedure is dependent upon this selection: 3. • Exchange User Mode • Exchange Administrator Mode If Exchange User Mode was selected as the access mode, the Resolver Account screen will appear. Select the resolver account type: • Windows NT account • Exchange Guest account The options available on the Resolver Account screen depend on the account type that was selected. Enter the required information for the account type. 4. If an Exchange Listener is to be setup to detect user changes, enter the server information on the Exchange Listener Configuration screen. 5. Click Finish. 27 Database Adapters Installing the Database Adapter This procedure performs a basic install of the OneBridge Database Adapter. Review the Before You Install information to determine whether additional components should be installed at this time. 1. From the Installer screen of the CD-ROM, select Sync Server and click install now. 2. Click Yes to accept the License Agreement. 3. Choose the type of installation: • Single Node Configuration – Select this option to install the server and adapter software on a single computer. • Multiple Node Configuration – Select this option to install the server and adapter software on separate computers, and then click Adapter Software. 4. Select the Database Adapter from the list. Clear any other adapters that are not required. 5. Choose the install directory for the program and click Next. 6. Choose the data directory for the program and click Next. The data directory stores configuration and user backup information. You may want to select a location that is available for backups, such as a network drive. 7. Configure the OneBridge Service. See Configuring the OneBridge Service. 8. Click Yes to start the OneBridge Service. 28 DMZ Proxy DMZ Proxy Overview OneBridge Sync Server includes a component that can be installed within a corporate DMZ or Firewalling Gateway to bolster security for devices connecting to the Sync Server from outside the corporate network. The DMZ Proxy is a proxy server, or an application-specific firewall for Sync Server. The use of DMZ Proxy software makes utilizing filtering/firewalling significantly less complex to set up, while enhancing security and ease of use for such functions as auditing (for intrusion detection or usage monitoring). The DMZ Proxy understands the OneBridge protocol. It makes it possible to disallow any connections from the Internet to the private network. The DMZ Proxy examines and authenticates each connection and checks OneBridge protocol packets for validity. The DMZ Proxy can be configured to define which host to forward to, which port to use to connect to that host on, and what protocol to use (http/https). However, the use of https would be redundant and an unnecessary incremental degradation to performance, because the communications are already encrypted, even over http. The firewalling/filtering rules between the DMZ and the private network should be set up to only allow connections to the Sync Server from the DMZ Proxy. Installing the DMZ Proxy Software This procedure performs a basic installation of the DMZ Proxy software. The DMZ Proxy software is installed on a server in the DMZ network. It forwards client requests to the OneBridge Sync Server in the private network. 1. From the Installer screen of the CD-ROM, select Sync Server and click install now. 2. Click Yes to accept the License Agreement. 3. Click Multiple Node Configuration. 4. Click DMZ Proxy Software. 5. Choose the install directory for the program and click Next. 6. Choose the data directory for the program and click Next. The data directory stores configuration and user backup information. You may want to select a location that is available for backups, such as a network drive. 7. Configure the OneBridge Service. See Configuring the OneBridge Service. 29 OneBridge Sync Admin Overview The Admin Program is used to view and customize server settings. Features in the Admin program also include: • Adding users to groups (e.g., sales groups or service groups). • Defining data transfers to be automatically performed whenever an end user connects to OneBridge Sync Server. • Configuring filter settings to allow users to customize what data is actually synchronized each time. For example, filters can be set to limit the size of emails, determine how many days of email to receive, and determine whether or not to download attachments. • Defining backup and restore actions that copy file and registry information between the client and the server. • Defining groupware sync actions that synchronize PIM applications between clients and servers. • Defining database sync actions that synchronize tables in a database between clients and servers. • Setting up security and encryption settings. Note For more information and detailed instruction on using the Admin program, refer to the online help. Running the Admin Program 1. Select Start, Programs, Extended Systems OneBridge, Sync Server, and then OneBridge Sync Admin. The Start Options screen is displayed. 2. Select a configuration file from the list and click OK (the default name for the configuration file is Starter.xcf). If the configuration file is not listed, select More Files, and then click OK. Locate and select the configuration file, and then click Open. Note The Admin program can only be run on Microsoft Windows NT or Microsoft Windows 2000. 30 OneBridge Client Overview OneBridge Client Software The OneBridge Client Software is a program that runs on the mobile device, making synchronization possible between OneBridge Sync Server and the client (the mobile device). Once the client software has been installed and configured, the end user synchronizes their mobile device by tapping the client Connect icon. This action establishes a connection with OneBridge Sync Server and initiates the synchronization. Live Connect Live Connect provides an always-on experience by delivering information as it becomes available. The bidirectional model of Live Connect updates both the device and the server of any changes based on events (new, modified, deleted). Live Connect also includes a notification interface to update the user on the status of the delivery of information. Desktop Connector Desktop Connector is a program that runs on a networked PC (running Windows NT/2000 or Windows 95/98/Me/XP), providing an efficient communication link between the mobile device and the OneBridge Sync Server. For some devices and hardware configurations, Desktop Connector is the only means of synchronizing the device with OneBridge Sync Server. For other configurations, Desktop Connector provides simpler setup than the alternatives (e.g., RAS) and/or eliminates the need for other desktop synchronization software (ActiveSync, HotSync, Nokia PC suite). Client Deployment Wizard The Client Deployment Wizard is a utility that enables administrators to create and distribute preconfigured installation applications for the OneBridge Client software. The wizard presents a step-by-step procedure for creating custom installation applications ready for distribution to end users. Notes Client Setup Wizard The Notes Client Setup Wizard is a special tool to help Domino administrators automatically configure users' Notes Clients and databases for use with OneBridge Sync Server. This tool can be used to create customized setup programs that can be emailed to the end users. All that is required of the end user is to launch the installation, and all of the necessary configuration will then be done automatically at the user's workstation. The Notes Client Setup Wizard is installed with the Client Deployment Wizard. Notes user's will be prompted to run this wizard at the end of creating a client install. The Notes Client Setup Wizard may also be run independently by opening the xcssetup.nsf file from the OneBridge Sync Server CD-ROM or from the Client Deployment Wizard installation directory. Manual Client Software Installation A default client software file, setup.exe, is provided on the product CD to allow the administrator to install the client software manually. No custom installation application is required. CAUTION End users must not use the desktop synchronization software (ActiveSync, HotSync, Nokia PC suite) that came with their mobile device when using OneBridge Sync Server to synchronize. Only one synchronization application should be used to manage each PIM application. All PIM applications managed though OneBridge should be disabled on desktop PCs where synchronization software is used. If the mobile device is synchronized to OneBridge Sync Server and to the desktop PC, multiple entries may appear, or data may not be synchronized to both the server and desktop. 31 Supported Mobile Device Operating Systems Sync Server supports mobile devices that use the following operating systems: • Palm OS 3.5 or greater - Recommended device memory is 8 Meg or more. Devices with less memory may not function properly for PIM synchronization or when using Bluetooth, IR or GSM due to limited heap space. Device security functionality is only supported on Palm OS 4.0 or greater. • Windows CE Pocket PC, Pocket PC 2002, and HPC 2000 devices running CE OS 3.0 or greater. • Orange Smartphone (SPV) • SyncML v1.0.1. Sync Server has been successfully tested with Nokia's 9210 Communicator and Ericsson's R520e cell phone. • Symbian OS v6.0 (Formerly known as EPOC ER6) and Symbian OS v7.0 • RIM OS 2.1 Client Deployment Considerations Custom Installation Application The OneBridge Client Software Installation application can run in two modes: • Default mode performs a basic installation of the client software. The end user will be prompted for all configuration information during the installation process. • Preconfigured mode performs an installation of the client software based on the configuration provided by the administrator through the Client Deployment Wizard. The end user will only be shown screens and prompted for configuration information that the administrator has left to the discretion of the end user. Manual Client Installation In some instances, the OneBridge Client software may have been pre-installed on a user's mobile device by the supplier or manufacturer. In this case, the client software may still need to be configured for connection to OneBridge Sync Server. General Considerations End Users Must Not Use the Desktop Software Provided With Their Mobile Device For Groupware Synchronization When using OneBridge Sync Server to synchronize mobile devices with groupware accounts (such as Lotus Notes or Microsoft Exchange), end users must not use their mobile device’s desktop software (e.g., Palm Desktop or ActiveSync) to synchronize their mobile device with their desktop PC (or with their groupware server). OneBridge Sync Server does not support the use of the desktop software in this way. If the mobile device desktop software is used for synchronization, errors may occur, and groupware data may not correctly synchronize with the groupware account on the groupware server. These errors occur because, when the mobile device’s desktop software synchronizes, it may leave groupware databases on the mobile device in an unpredictable state. When the end user then performs a OneBridge Sync Server synchronization, OneBridge Sync Server is unaware of the true state of the groupware databases on the mobile device, and it cannot correctly synchronize the databases with the groupware account. To avoid this problem, each end user should complete the following procedure: 1. Ensure that all their groupware data on their mobile device is synchronized with their groupware account on the groupware server. 2. Reset their mobile device to clear any data from it. 3. Install the OneBridge Client software on their mobile device. 4. Use the client software to perform a OneBridge Sync Server synchronization. 32 5. If desktop software (e.g., Palm Desktop or ActiveSync) is used, verify that all groupware synchronization is disabled on the desktop software. Verification can be made through the OneBridge Client software installation or through the options setup on the desktop software. Upgrading to the OneBridge Client 4.x for Palm OS If the Palm Client is being upgraded from version 3.5 or 3.6 to the 4.x OneBridge Client through a File Install Action, an additional file, Convert_36_to_40.prc, must be included in the action. This file performs some necessary maintenance involved in this upgrade. It will not be required on future client upgrades; however, it also has no negative affects if it remains as part of the File Install Action. Client Database Data Drivers Users of OneBridge Sync Server - Database Edition will require mobile Data Drivers in addition to the OneBridge Client software. Data Drivers are the modules that directly read and write to a mobile database. On the mobile device, the OneBridge Sync Server Sync Engine communicates to the Database Adapter that uses a Data Driver to access the mobile database. OneBridge Sync Server currently ships with mobile Data Drivers for the following operating systems: Palm OS, Windows CE, Symbian OS, RIM, and Windows. A Data Driver may require the installation of additional files. By default, these files are installed into the c:\OneBridge Sync Server\Bin\DataDrivers folder on the OneBridge Sync Server. Driver files are most easily installed through a File Action on OneBridge Sync Server. Palm Data Drivers may also be included as part of a custom client installation application by adding the driver files through the Client Deployment Wizard. 33 Client Deployment Wizard Installing the Client Deployment Wizard Utility The Client Deployment Wizard utility is intended to assist the network administrator in creating custom, preconfigured installation applications of the OneBridge Client software. 1. From the Main screen of the CD, select Client Deployment Wizard and click install now. 2. Choose the File Destination Directory and Program Folder for the OneBridge Client Wizard. 3. The Run program after install check box can be selected to launch the program after the install is complete. Click Install. Creating a Client Installation Application The Client Deployment Wizard does not install the OneBridge Client directly. Rather, it creates customized Client Installation Applications that install the OneBridge Client. The setup applications (in self-extracting zip files) created by the Client Deployment Wizard are ready for distribution to end users. The newly generated Client Installation Application may optionally install a preconfigured OneBridge Client, install additional files to the client, and modify Groupware settings or install the Desktop Connector. 1. To start the Client Deployment Wizard utility, select Start, Programs, Extended Systems OneBridge, Client Wizard, and then Client Deployment Wizard. 2. Enter or select an appropriate name and location for the new customized client installation application, and then click Next. 3. Select the client platform(s) to be supported by the installation application and click Next. 4. If the Smartphone platform was selected and there are multiple Smartphone clients available, the Select Custom Smartphone Client screen will appear. Select the desired client to be used and click Next. 5. On the Server Settings screen, verify the Install client software to mobile device check box is selected. If this option is not selected, the client software will not be installed. 6. Enter the Server Host Name or IP address, Port Number, and Server Public Key for the OneBridge Sync Server. 7. Enter the User Name for accessing the OneBridge Sync Server. 8. Select the appropriate Time Zone from the drop-down menu and click Next. 9. Select the Install client Help file to desktop PC option to install the Mobile Client User’s Guide during the client software install. Click Next. 10. On the My Mobile Folder screen, select the Create My Mobile Folder desktop shortcut option to create a shortcut to a network directory. Enter the path to the network directory and a name to be displayed for the shortcut. Click Next. Note The directory must correspond to a File Action created in Admin. 11. On the Desktop/Client Setup screen, select the Initial client connection type from the drop-down menu that the mobile device will use to connect to OneBridge Sync Server. Note If more than one client platform was selected for this installation application, separate Desktop/Client Setup screens will appear for each selected platform. 12. If the software is to be installed with this application, select the Install Desktop Connector software check box. If the Desktop Connector software is not to be installed, clear this check box and skip to step 16. 13. Select the Run automatically at Startup check box to start the Desktop Connector software automatically. 14. To designate how the serial port connection will be made, select the Listen for serial connections on check box and select the port(s) from the drop-down menu. If All Available Ports is selected, select the Detect Connection (release other serial ports) check box to release any serial port that a connection is not detected on. Click Next. CAUTION The All Available Ports option will open all available serial ports and may disable other peripheral devices. 15. Repeat steps 11 through 15 if another Desktop Connector Setup screen is presented. 34 16. On the Select Files to Include in Client Install screen, select Add files to ___ installation to include additional files in the client installation package. Click Next. Note If more than one client platform was selected for this installation application, separate Select Files to Include in Client Install screens will appear for each platform. 17. Repeat step 16 if another Select Files to Include in Client Install screen is presented. 18. On the Groupware Applications screen, select the groupware application(s) to be managed through OneBridge Sync Server. 19. Select the Do not allow user to override these selection (recommended) check box to prevent users from changing the groupware applications that will be synchronized on their mobile device. If a user is permitted to change selected groupware applications, care should be taken to avoid synchronization conflicts (see Caution). Click Next. CAUTION Only one synchronization application should be used to manage each PIM application. All PIM applications managed though OneBridge should be disabled on desktop PCs where synchronization software is used. If the mobile device is synchronized to OneBridge Sync Server and to the desktop PC, multiple entries may appear or data may not be synchronized to both the server and desktop. 20. On the User Instruction screen, enter the desired custom instruction message for the end user to receive at the start of the client software installation. 21. Click Finish. 22. (Optional) If Lotus Notes is installed on the local machine, run the Notes Client Setup Wizard when prompted. Client Migration to OneBridge Sync Server 4.1 Note Refer to the online help for information on Client Migration from 2.x/PE to OneBridge 4.1. 35 Installing the Client Software Before You Install the Client Software OneBridge Sync Server Settings During the OneBridge Client software installation, specific server information will need to be entered. Before beginning the installation, have the following OneBridge Sync Server information available: • Server Name or IP Address – The resolvable host name or IP address of the OneBridge Sync Server. If you do not know this information, ask your administrator. • OneBridge Port Number – The port number is set by the administrator in the OneBridge Service application. The administrator will provide this port number. • User Name – The entire user name in the required format. If you do not know this information, ask your administrator. General Client Installation Options General installation options are available on all supported mobile devices when installing the OneBridge Client software. Entering a Username and Password Microsoft Exchange Authentication If the end user is being authenticated against Microsoft Exchange, their usual Windows NT username and password should be used. But they will also need to include their Windows NT domain. For example, if their Windows NT username is ‘jsmith’, and their domain is ‘sales’, they should enter their username as: sales\jsmith Alternatively, this same user could also add their SMTP address to their username. For instance, if their SMTP address is ‘[email protected]’ they should enter their username as: sales\jsmith\[email protected] Lotus Notes Authentication If the end user is being authenticated against Lotus Notes, their usual Lotus Notes username should be used. However, for their password, they should normally use their Lotus Notes Internet password. This assumes that the default settings were selected in the Site Wizard when OneBridge Sync Server was installed. If OneBridge Sync Server default settings are not being used for Lotus Notes authentication, end users will need to be informed of the correct password to use. Note End users should be reminded to set their Lotus Notes Internet password. Remember Password Option When the authentication is against Microsoft Exchange or Lotus Notes, there is an option in the OneBridge Client software to remember the user’s password so it is available to the end users. By default, this option is not enabled, and it will not be displayed on the OneBridge Client. To enable this option: 1. Select Start, Programs, Extended Systems OneBridge, Sync Server, and then OneBridge Sync Admin to start the Admin program. 2. The Start Options dialog will be displayed. If the configuration file is listed on the dialog, select it and click OK (the default name for the configuration file is: Starter.xcf). The configuration will be displayed in the Admin program. 3. If the configuration file is not listed, select More Files and click OK. The Open screen will be displayed. 36 4. Locate the configuration file and click Open. The configuration will be displayed in the Admin program. 5. In the left pane of the main Admin program screen, the configuration file is displayed using a tree structure. On this configuration tree, expand the General branch. 6. Expand the Groups sub-branch. 7. Double-click the Group Name you would like the remember password option enabled for. 8. Select Allow user to store password on the device. 9. Click OK, and then Save the configuration. The next time each end user connects, the remember password option will be enabled on their OneBridge Client software. Note Any changes that you make to your configuration file will only take effect when the OneBridge Service is saved and restarted. Installing the Client Software Using a Custom Installation Application 1. Run the custom Client Installation Application provided by the administrator. Your administrator will provide the location and access instructions for the application. If online instructions have been included in this application, they will be displayed when the application is run. 2. The setup wizard will guide you through the installation of the client software. You will be prompted for any settings not preconfigured by the administrator. For more information, click the Help button on the install screens. Installing the Client Software Manually 1. Insert the OneBridge Sync Server CD and choose Browse CD. Open the Clients folder and double-click setup.exe. 2. Select the platform of the mobile device and click Next. 3. On the Server Settings screen, verify the Install client software to mobile device check box is selected. If this option is not selected, the client software will not be installed. 4. Enter the Server Host Name or IP address and the Port Number for the OneBridge Sync Server. 5. Enter the User Name for accessing the OneBridge Sync Server. 6. Select the appropriate Time Zone from the drop-down menu and click Next. 7. On the Users Desktop/Client Setup screen, select from the drop-down menu the Initial device connection type that the mobile device will use to connect to OneBridge Sync Server. Note The Users Desktop/Client Setup screen will be specific to the mobile device previously selected. 8. If the software is to be installed with this application, select the Install OneBridge Desktop Connector software check box. If the Desktop Connector software is not to be installed, clear this check box and skip to step 11. 9. Select the Run automatically at Startup check box to start the Desktop Connector software automatically at startup. 10. To designate how the serial port connection will be made, select the Listen for serial connections on check box and select the serial port where the cradle/cable is attached from the drop-down menu. If All Available Ports is selected, select the Detect Connection (release other serial ports) check box to release any serial port that a connection is not detected on. Click Next. CAUTION The All Available Ports option will open all available serial ports and may disable other peripheral devices. 11. On the Groupware Options screen, select the groupware application(s) to be managed through OneBridge Sync Server and click Next. Note The Groupware Options screen will be specific to the mobile device platform previously selected. 12. Click Finish. 37 Synchronizing the Mobile Device Connecting the First Time Before connecting for the first time, be sure to have the following information available: the OneBridge Sync Server name, the connection Port Number, and your Username and Password for the OneBridge Sync Server. Ask your administrator for any information you do not know. Note This is a general procedure for connecting the first time. For platform-specific instructions, refer to the documentation provided in the OneBridge Sync Server online help. 1. Connect the mobile device to the PC using the cradle/serial connector provided with the device, or connect it using a modem. 2. Start the OneBridge Client application: • Windows CE/Palm OS/RIM - From the Home screen of the mobile device, select the OneBridge icon. • Symbian (Nokia/P800/P900) - Open the Extras screen on the Symbian device. Highlight the OneBridge icon and press the Open button. • Smartphone - From the home screen of the mobile device, select Programs, and then select Connect from the list of programs to start the OneBridge Client application. 3. If a Time Zone screen is presented, select the appropriate time zone from the list, and then select OK. 4. From the Current Profile menu, select a connection profile. If a profile is not selected, the default will be used. 5. Open the connection method screen: • Windows CE/Palm OS/RIM/Symbian - Open the Settings screen. Depending on the mobile device platform, the Settings option may be selected on the Main screen, or it may be necessary to first go to the Options menu and select Settings from the list provided. • Smartphone - Press the Menu button at the bottom right of the screen and select Connection to display the Connection screen. 6. From the Connection menu, select the appropriate connection method. Select OK/Done. 7. On the Main screen, select Connect. 8. If necessary, configure the Server Settings and User Credentials. You will be prompted for this information if it is required. Ask your administrator for any information you do not know. 9. If the administrator has configured OneBridge Sync Server to use encryption and did not already save the server’s public encryption key, a dialog will be displayed on the client displaying this key and asking for verification. Your administrator should have provided the key. Select Yes if the key is valid. If not, select No/Cancel and contact the administrator. 10. The mobile device will now try to connect to the OneBridge Sync Server. Throughout this process, status messages will be displayed on the mobile device indicating the connection stages. During the first connection, the server will send the Action List to the client. The Action List determines what the client can do while it is connected. Important Depending upon the initial configuration set up by your administrator, it may be necessary to customize your Action List settings. 11. When the connection has finished, the Log screen will be displayed. The top of the screen shows the result of the connection with the OneBridge Sync Server. It should say Session completed successfully. The bottom part of the screen will show the current Action List status and a summary of all actions completed. The log will show the result for each action that is run (e.g., the number of new or deleted emails, contacts, device message, etc.). If the summary information is underlined, more information is available. Select the underlined text to display more detailed results. The result of the first connection will depend on how the administrator has configured your user settings. 38 Selecting a Connection Method Note This is a general procedure for selecting a connection method. For platform-specific instruction, refer to the documentation provided in the OneBridge Sync Server help. 1. 2. 3. Start the OneBridge Client application: • Windows CE/Palm OS/RIM - From the Home screen of the mobile device, select the OneBridge icon. • Symbian (Nokia/P800/P900) - Open the Extras screen on the Symbian device. Highlight the OneBridge icon and press the Open button. • Smartphone - From the home screen of the mobile device, select Programs, and then select Connect from the list of programs. Open the connection method screen: • Windows CE/Palm OS/RIM/Symbian - Open the Settings screen. Depending on the mobile device platform, the Settings option may be selected on the Main screen, or it may be necessary to first go to the Options menu and select Settings from the list provided. • Smartphone - Press the Menu button at the bottom right of the screen and select Connection to display the Connection screen. Select the appropriate Connection type: • Network/Modem – To connect to OneBridge through a Network or Modem connection. See Using a Network or Modem Connection. • Desktop Connector – To connect to a PC through the serial port connector. See Using the Desktop Connector Program to Connect. • Dialup Connection (if available) – To connect to OneBridge through a preconfigured dialup connection. This option is only available when the dialup connection has been setup by the user. The name assigned to the dialup connection will be displayed in this menu. See Using a Dialup Connection. • Serial Link/Cable/Cradle/USB – To connect to a PC through the serial port/USB connector. See Using the Desktop Connector Program to Connect. • ActiveSync Link (Windows CE) – To connect to a PC through a serial port connector using ActiveSync Link. See Using ActiveSync Link to Connect. • Just HotSync – Serial (Palm OS) –To launch the Palm HotSync application instead of performing a OneBridge synchronization. Using a Network or Modem Connection - Windows CE/Palm OS/Smartphone This method of communication is used when you are away from your desktop PC. 1. Attach the mobile device to the modem, and then connect the modem to a phone socket. 2. Configure the Network or Modem Preferences on your mobile device. 3. Start the OneBridge Client application: 4. 5. • Windows CE/Palm OS - From the Home screen of the mobile device, select the OneBridge icon. • Smartphone - From the home screen of the mobile device, select Programs, and then select Connect from the list of programs to start the OneBridge Client application. Open the connection method screen: • Windows CE/Palm OS - Open the Settings screen. Depending on the mobile device platform, the Settings option may be selected on the Main screen, or it may be necessary to first go to the Options menu and select Settings from the list provided. • Smartphone - Press the Menu button at the bottom right of the screen and select Connection to display the Connection screen. From the Profile menu, select a connection profile. If a profile is not selected, the default will be used. 39 6. Select Network/Modem as the Connection type. Select OK/Done. 7. Select the Connect button on the OneBridge Main screen of your mobile device. 8. The client software will allow your mobile device to communicate with your organization’s OneBridge Sync Server using a network or modem connection and be synchronized with the databases on your organization’s network. Using a Network (Wireless) Connection – Symbian (Nokia/P800/P900) This method of communication is used when you are away from your desktop PC. 1. Open the Extras screen on the Symbian mobile device. Highlight the OneBridge icon and press the Open button to start the OneBridge Client application. 2. On the OneBridge Client Main screen, open the Options menu and select Settings. Note Open the Options menu by pressing the Menu key. Navigate the menus with the direction keys. Items are selected by pressing the Enter key or the Select command button. 3. On the Settings screen, select Network as the Connection Method from the drop-down menu. 4. From the Profile drop-down menu, select a connection profile. If a profile is not selected, the default will be used. Press Close. Note A clean installation of the OneBridge Sync Server provides a single profile named Default. If a profile is not selected, the default will be used. The profile can also be selected from the Profile menu on the OneBridge Client Main screen. 5. On the OneBridge Main screen, press the Connect button on the right side of the mobile device. 6. If necessary, configure the Server Settings and User Credentials. You will be prompted for this information if it is required. Ask your administrator for any information you may not know. 7. The Client software will now allow your mobile device to communicate with your organization’s OneBridge Sync Server using a network connection and be synchronized with the databases on your organization’s network. Using the Desktop Connector Program to Connect The Desktop Connector is used to connect to a desktop PC using the cradle/serial/USB connector of the mobile device. Data is then synchronized from the mobile through the PC to the corporate databases. Note This is a general procedure for using the Desktop Connector Program to connect. For platform-specific instructions, refer to the documentation provided in the OneBridge Sync Server help. Important The Desktop Connector program must be installed on the desktop PC to use this connection method. 1. Connect the mobile device to the PC using the cradle/serial/USB connector provided with the device. 2. Start the Desktop Connector program on the desktop PC. 3. 4. Start the OneBridge Client application: • Windows CE/Palm OS/RIM - From the Home screen of the mobile device, select the OneBridge icon. • Symbian (Nokia/P800/P900) - Open the Extras screen on the Symbian device. Highlight the OneBridge icon and press the Open button. • Smartphone - From the Home screen of the mobile device, select Programs and then select Connect from the list of programs. Open the connection method screen: • Windows CE/Palm OS/RIM/Symbian - Open the Settings screen. Depending on the mobile device platform, the Settings option may be selected on the Main screen, or it may be necessary to first go to the Options menu and select Settings from the list provided. 40 • Smartphone - Press the Menu button at the bottom right of the screen and select Connection to display the Connection screen. 5. Select the Profile from the drop-down menu. If a profile is not selected, the default will be used. 6. Select Serial Link/Cable/Cradle/USB as the Connection type. Select OK/Done. 7. Select the Connect button on the OneBridge Main screen of your mobile device. 8. If necessary, configure the Server Settings and User Credentials. You will be prompted for this information if it is required. Ask your administrator for any information you may not know. 9. The client will communicate with your organization’s OneBridge Sync Server using the Desktop Connector program. The mobile device will be synchronized with the databases on your organization’s network. Using a Dialup Connection – Windows CE 1. Attach the Windows CE mobile device to your modem, and then connect the modem to a phone socket. 2. On the mobile device, select Start, Programs, Connections, and tap the desired dialup connection. Enter your Username and Password, and then select the Save password check box. Tap OK. 3. From the Home screen of the mobile device, tap the OneBridge icon to start the OneBridge Client application. 4. On the OneBridge Main screen, select Settings. 5. On the Settings screen, select the Profile from the drop-down menu. If a profile is not selected, the default will be used. 6. Select the desired Dialup Connection as the Connection type. Tap OK. 7. Tap the Connect button on the OneBridge Main screen of your mobile device. 8. The client will communicate with your organization’s OneBridge Sync Server using a network or modem connection. The Windows CE mobile device will be synchronized with the databases on your organization’s network. Using ActiveSync Link to Connect – Windows CE/Smartphone Important The Desktop Connector program must be installed on the desktop PC to use this connection method. 1. Connect the mobile device to the PC using the cradle/serial/USB connector provided with the device. 2. Start the ActiveSync Link program on the desktop PC. 3. Start the Desktop Connector program on the desktop PC. 4. Start the OneBridge Client application: 5. • Windows CE - From the Home screen of the mobile device, select the OneBridge icon. • Smartphone - From the home screen of the mobile device, select Programs, and then select Connect from the list of programs. Open the connection method screen: • Windows CE - On the OneBridge Main screen, select Settings to display the Setting screen. • Smartphone - Press the Menu button at the bottom right of the screen and select Connection to display the Connection screen. 6. Select the Profile from the drop-down menu. If a profile is not selected, the default will be used. 7. Select ActiveSync Link as the Connection type. Select OK/Done. 8. Select the Connect button on the OneBridge Main screen of your mobile device. 9. If necessary, configure the Server Settings and User Credentials. You will be prompted for this information if it is required. Ask your administrator for any information you may not know. 10. The client will communicate with your organization’s OneBridge Sync Server using a network or modem connection. The Windows CE mobile device will be synchronized with the databases on your organization’s network. 41 Synchronizing the SyncML Mobile Device SyncML Client Configuration To configure a SyncML client to work with the SyncML server, the following information needs to be set up in the device SyncML client and the SyncML configuration (e.g., in Nokia Remote Sync profile configuration or Ericsson Synchronization configuration). • Server URL • Server User Id • Server Password • Database names • Database User Ids and Passwords. (optional) Server URL This is the URL on which the SyncML server will be running. In the OneBridge Sync Server default installation, the http server will be running in port number 5001. If OneBridge Sync Server is installed on a machine with an IP address of nnn.nnn.nnn.nnn, the server URL will be as follows: • http://nnn.nnn.nnn.nnn:5001/cgi-bin/syncmlcgi.exe (for Ericsson phones etc. where the URL includes the port number) Alternatively, the URL may be specified as, • http://nnn.nnn.nnn.nnn/cgi-bin/syncmlcgi.exe • Port: 5001 (for Nokia phones, etc., where the port number is specified separately from the URL) Server User ID and Server Password This is the user ID and password used for connection authentication and, optionally, database authentication when no database username and passwords are used. For example, if Windows NT authentication is used, this will be the NT user ID and password. Database names The data stores currently supported for SyncML are Contacts and Calendar. The server database name must be configured in the client for the SyncML client to communicate with the server. The names for the databases are as follows: • Contacts = Contacts • Calendar = Calendar These are case-sensitive names and must be specified without quotes. In the Ericsson R520 SyncML client, you will enter these names in Phonebook path or Calendar Path under Synchronization Configuration. In Nokia clients, you will specify these names in the data tab under RemoteSync profile settings. 42 Database User ID and Passwords If the user ID and password used to access Microsoft Exchange or Lotus Notes are different from the server authentication (NT Password), the Microsoft Exchange or Lotus Notes user ID and password can be specified as the user ID and password for the Contacts and Calendar databases, when applicable. This option is not currently supported by the Nokia client, but is supported by the Ericsson client. The database user ID and password can be specified in Options under Phonebook path or Calendar Path. WARNING Ericsson SyncML phone models R520, T68, or T39 may develop issues with appointment time. For these models, there is an issue with a set appointment time displaying one hour off on the device after synchronization, depending upon when the appointment was created/modified. To avoid this problem, upgrade to OneBridge Sync Server 3.1.20002.0606 or later; on the Ericsson phone, the Daylight-saving setting must always be set to Wintertime. 43 Live Connect Live Connect Overview Live Connect allows the OneBridge Client to be configured to automatically receive email and PIM data from the OneBridge Sync Server without requesting it. To use the Live Connect functionality, it must be enabled by the administrator. Installation The Live Connect Client is installed along with the OneBridge Client. Functionality is only available to the end user when enabled by the administrator. A Live Connect Action must be configured by the administrator on the Sync Server and synced to the client. After the sync, the Live Connect Client will display a status icon in the title bar of the mobile device. The status icon informs the user that new items have been delivered to the device, that items have been sent from the device, and displays the state of the connection. Additionally, it provides a means to configure the service on the device. Configuring Live Connect Live Connect is supported on the following mobile devices: • Windows CE • Palm OS • SmartphoneV2 • Treo 600 • Symbian P800/P900 Important The Power On Password feature can be used with Live Connect only with the "Prompt if device unused for" option set to 0 minutes. To configure Live Connect: Note Only options that have been enabled by the administrator will be available for configuration by the user. 1. From the OneBridge Client Options menu on the mobile device, select Live Connect. The Live Connect Settings screen will appear. 2. Select Enable Live Connect. 3. Choose the Desktop and Wireless profiles to use for the device. 4. Select the desired Notify Using method to be used to inform you when new data has been delivered to the device. 5. Enter the desired Power Management settings. 6. If Inbox Domain Filtering is to be used, select the Filters/Inbox Trigger button to display the Inbox Domain Filtering screen. See Using Live Connect Inbox Domain Filtering in the online help for details. 7. Select OK. 44 Using Live Connect Once a Live Connect Action has been synchronized with the client device, an icon will be displayed indicating the current state of the Live Connect Client. On Pocket PC 2002 devices, the icon is displayed in the title bar and is visible no matter what other application is running. Tapping on the icon displays a message balloon that provides more information about the current state of the client. The message balloon also contains buttons to display the Settings dialog, Details dialog if available, and Enable or Disable the Live Connect service, if allowed. Note The ability to Enable/Disable the service is dependent on how the Live Connect Action was configured at the server. If this property is user configurable, a Connect or Disable button will be displayed in the balloon (depending on the current state). Otherwise, these buttons will not be displayed. States and Icons Disabled • Notifications will not be received on the client. Enabled • Items will be delivered to the client when they become available. Items Available • New Items have arrived on the device. • Tapping on the icon to display the message balloon will clear this state. See Windows CE Considerations. Items Pending • There are changed or new items on the device that will be delivered the next time the device connects to the server. • This icon will be cleared as soon as the next sync is completed. Items Available and Pending • New Items have arrived on the device. • There are changed or new items on the device that will be synced the next time the device connects to the server. • This icon will be cleared as soon as the next sync is completed. • Tapping on the icon to display the message balloon will clear this state. See Windows CE Considerations. Interrupted • This indicates that Live Connect is enabled but the connection to the server has been broken. • The Enabled icon will be displayed as soon as the connection is restored Interrupted with Items Available • New items have arrived on the device but the connection to the server has been broken. • Tapping on the icon to display the message balloon will clear this state. See Windows CE Considerations. • The New Items icon will be displayed as soon as the connection is restored. Interrupted with Items Pending • There are changed or new items on the device that will be synced the next time the device connects to the server. • The Items Pending icon will be displayed as soon as the connection is restored. 45 Interrupted with Items Available and Pending • New Items have arrived on the device. • There are changed or new items on the device that will be synced the next time the device connects to the server. • The Items Available and Pending icon will be displayed as soon as the connection is restored • Tapping on the icon to display the message balloon will clear this state. See Windows CE Considerations. Windows CE Considerations Pocket PC - Live Connect Notifications The Live Connect notification icons are displayed in the taskbar on the Pocket PC and are only visible when the Today screen is displayed. It is recommended that you set up the device to return to the Today screen after a short period of inactivity in order to avoid missing notifications. You must return to the Today screen in order to access any Live Connect Client features or see the icon. Tapping on the icon displays a dialog somewhat equivalent to the message balloon. The same information will be displayed and the same buttons are available. Pressing any button will close the dialog. Pressing the Settings or Details buttons will display the corresponding dialog. Disable ActiveSync When Device is Cradled When the mobile device is in the cradle and wakes up to perform a Live Connect, it attempts to perform an ActiveSync. This will cause the Live Connect to fail. To avoid the connection failure, open ActiveSync and disable synchronizations when cradled. Palm OS Considerations The Live Connect notification states and icons are only displayed in the OneBridge Client and MailPlus applications. Tapping on the icon displays a dialog showing the current state of the Live Connect system. Tap the Info button to display the cumulative list of changes delivered to the device. When OK is selected, the list will be cleared as will the Items available icon. See Using Live Connect for a description of all States and Icons. Note For information on Live Connect Polling, refer to the online help. 46 Desktop Connector Overview Desktop Connector is a program that runs on a desktop PC and provides a mobile device with a TCP/IP network connection that will be used to communicate with OneBridge Sync Server. This program is used when there is a need to connect mobile devices directly to networked PCs using a serial or USB cable. Supported operating systems for Desktop Connector include the following: Windows 95, Windows 98, Windows Me, Windows XP, Windows NT, and Windows 2000. Automatic Device Detection As Desktop Connector runs, it queries Windows for a list of the available COM ports (both physical and virtual). When the Desktop Connector software is installed for the first time, by default it “listens” on all available COM ports. As soon as a connection is detected on one COM port, it will quit listening (disable) on all other COM ports, freeing them up to be used by other resources. Automatic detection occurs following the first connection of any supported type (TCP/IP, ActiveSync Link, USB, Serial, etc.). If, at a later time, a user wishes to move communication to another COM port or add another device on another COM port, the COM port must be enabled manually from within the Desktop Connector program. Automatic Device Detection runs only after the initial installation of the software or after an uninstall/re-install. If the user manually enables a COM port, the user must manually disable it before it will be available for use by another device or application. Starting Desktop Connector on the Desktop PC If the shortcut to the Desktop Connector program has been placed in the Windows Startup folder, Desktop Connector will start whenever the desktop PC is started. In this case, the end user does not need to start the program every time they want to synchronize their mobile device. If the shortcut to the Desktop Connector program has been placed in the Windows Start Menu, select Start, Programs, and then locate the folder where the shortcut has been placed. Click the shortcut. Whenever Desktop Connector is running on the desktop PC, the Desktop Connector tray icon will be displayed on the right side of the Task Bar. The icon will change appearance depending on the status of a connection. • Connection idle • Connection active Setting Up Desktop Connector If the OneBridge Client software cannot contact the Desktop Connector program on the desktop PC, the end user may need to perform the following setup procedure to change the settings: 1. Right-click the Desktop Connector tray icon on the right side of the Task Bar. A shortcut menu will be displayed. Note If the Desktop Connector tray icon is not found, start the Desktop Connector program. 2. Click Open Desktop Connector. 3. Desktop Connector should display all COM ports (COM1, COM2, etc.). For desktop PCs supporting USB connection, CE USB, Handspring UB, and Palm USB may also be displayed, depending on the drivers installed on the desktop PC. Make the desired setting changes. Refer to the Desktop Connector User Interface topic in the online help for more information. 4. Click Hide. 47 Enabling or Disabling a Serial/COM Port Each serial connection can be enabled or disabled by selecting the serial connection in the dialog and clicking Enable/Disable. If the desired port is disabled If the desired port for connecting to the Desktop Connector is disabled, try enabling the port by selecting the serial connection in the dialog, and then clicking Enable. If the status briefly changes to Can’t open and then back to Disabled, the port may be in use by another program. Close the active program and try enabling the port again. Configuring the OneBridge Client to Synchronize Using Desktop Connector In order for the OneBridge Client software to synchronize using Desktop Connector, rather than by using the usual TCP/IP network arrangement, the end users of the mobile devices must select the correct connection method (ActiveSync/Serial/USB) on the OneBridge Client before selecting the Connect button. Using Desktop Connector with Palm OS Devices With Serial Cradle Disable the local serial port on HotSync. Note If HotSync is running when Desktop Connector is launched and HotSync is using the serial port, the Desktop Connector serial port will not work. The user must disable the serial port on HotSync. With USB Cradle Disable the local USB port on HotSync. Using Desktop Connector with Windows CE or Smartphone Devices The Desktop Connector program can work in conjunction with ActiveSync or standalone. Using ActiveSync To use Desktop Connector in conjunction with ActiveSync, ActiveSync needs to be running on the desktop PC. Within the OneBridge Client, choose ActiveSync Link as the connection type on the initial screen. The connection will appear as a TCP/IP connection in the Desktop Connector dialog once the client software initiates the connection. Without Using ActiveSync With Serial Cradle 1. In the ActiveSync Connection Settings dialog on the desktop PC, clear the check boxes for all Allow serial cable or infrared connection to this COM port options. 2. On the device side, select Settings, Connections, and PC. Clear the Automatically synchronize when serial cable is connected using: check box. 3. Within the OneBridge Client, choose Serial Link as the connection type on the initial screen. 48 With USB Cradle 1. In the ActiveSync Connection Settings dialog on the desktop PC, clear the check boxes for all Allow USB connection to this desktop connector options. 2. On the device side, select Settings, Connections, and PC. Clear the Automatically synchronize when serial cable is connected using: check box. Note If the user does not see the Desktop Connector icon in the system tray as it should look when starting the OneBridge Client software, you must start the Desktop Connector. 3. Open the Desktop Connector dialog window either by double-clicking on the icon, or right-clicking on the icon and selecting Open Desktop Connector. 4. CE USB should say Docked if USB cradle is connected to desktop PC. If it does not, try taking USB cradle out and put it in again. When CE USB says Docked, Desktop Connector is ready for a Windows CE device over USB. 49