1
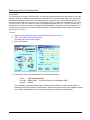
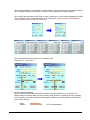
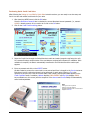
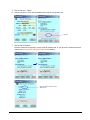
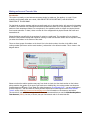
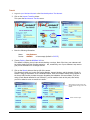
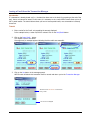
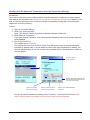
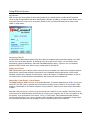
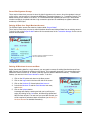
WEB Connect™
Professional Edition
Pocket PC Version
User Guide
Copyright © 2002, AMSI / Payment Resources International.
All rights reserved.
WEB Connect for Pocket PC
WEB Connect™ End-User License Agreement (EULA)
This Advanced Merchant Solutions, Inc. End-User License Agreement (EULA) is a legal agreement between you (either an individual or a
single entity) and Payment Resources International for the AMSI / Payment Resources International software product identified above, which
includes computer software and may include associated media, printed materials, and online or electronic documentation. The software also
includes any updates and supplements to the original software provided to you by Advanced Merchant Solutions, Inc. Any software provided along
with the software that is associated with a separate end-user license agreement is licensed to you under the terms of that license agreement. By
installing, copying, downloading, accessing, or otherwise using the software, you agree to be bound by the terms of this EULA.
USE
You (an entity or a person) may use the software product identified above (the "software") on ONE PDA within your organization.
TECHNICAL SUPPORT
The software is provided as is. Technical support is available only for registered users who have purchased the retail product or product downloads
from the Internet. Technical support can be obtained by contacting Payment Resources International.
RESTRICTIONS
Except as authorized by the user documentation, you may not merge, modify, or adapt the software in any way, including reverse engineering,
disassembling, de-compiling, or attempting to enable features that are disabled. You may not loan, rent, lease, license, or otherwise transfer the
software or any copy of it to any third party outside your organization.
COPYRIGHT
All intellectual property rights in the software and user documentation are owned by Advanced Merchant Solutions, Inc. or its suppliers and are
protected by United States, Canadian, and international copyright laws, other applicable copyright laws, and international treaty provisions.
Advanced Merchant Solutions, Inc. retains all rights not expressly granted.
NO WARRANTY
Given the nature of this right to use, AMSI and Payment Resources International make no warranty or representation, either expressed or implied,
with respect to the software or related user documentation or technical support, including their quality, performance, merchantability, or fitness for a
particular purpose. No Advanced Merchant Solutions, Inc. or Payment Resources International dealer, distributor, agent, or employee is authorized to
make any modifications or addition to this warranty.
NO SUPPORT
You will not receive any technical support (other than automated support) from Advanced Merchant Solutions, Inc. in connection with your use of
the software.
LIMITATION OF LIABILITY
Because software is inherently complex and may not be completely free of errors, you are required to verify your work and make back-up copies. In
no event will Advanced Merchant Solutions, Inc. be liable for direct, indirect, special, incidental, economic, cover, or consequential damages arising
out of the use of or inability to use the software, user documentation, or technical support, including, without limitation, damages or costs relating to
the loss of profits, business, goodwill, data, or computer programs, even if advised of the possibility of such damages. Some states or provinces do
not allow the exclusion or limitation of implied warranties or the limitation of liability for incidental or consequential damages, so the above exclusion
or limitation may not apply to you.
SOFTWARE SCOPE
The software and any updates or supplements to it provided to you by Advanced Merchant Solutions, Inc. are licensed for a period of one year.
PRERELEASE CODE
The software may contain pre-release code that is not at the level of performance and compatibility of the final, generally available, product offering.
These portions of the software product may not operate correctly and may be substantially modified prior to the first commercial shipment.
Advanced Merchant Solutions, Inc. is not obligated to make this or any later version of the software product commercially available.
TERMINATION
Without prejudice to any other rights, Advanced Merchant Solutions, Inc. may terminate this EULA if you fail to comply with the terms and conditions
of this EULA. In such event, you must destroy all copies of the software and all of its component parts.
U.S. GOVERNMENT RESTRICTED RIGHTS
The software and/or user documentation is provided with RESTRICTED AND LIMITED RIGHTS. Duplication or disclosure by the Government is
subject to restrictions as set forth in FAR 52.227-14 (June 1987) Alternate III (g)(3), FAR 52.227-19 (June 1987), or DFARS 52.227-7013 (c)(1)(June
1988), as applicable. Contractor/Manufacturer is Advanced Merchant Solutions, Inc., Inc., P.O. Box 3523 Fullerton, CA 92834
GENERAL
This software is NOT FOR EXPORT.
© 2002 - Advanced Merchant Solutions, Inc. and Payment Resources International - All rights reserved
WEB Connect for Pocket PC
Table of Contents
Welcome ............................................................................................................................................. 1
Installing WEB Connect...................................................................................................................... 1
Installation .............................................................................................................................................. 1
Registering Booster .................................................................................................................................. 1
Launching WEB Connect........................................................................................................................... 2
Activating a Merchant Account .......................................................................................................... 2
Activating a Second Merchant Account.............................................................................................. 4
Logging On to Your Merchant Account .............................................................................................. 4
Making your First Credit Card Sale..................................................................................................... 5
Introduction............................................................................................................................................. 6
Tutorial ................................................................................................................................................... 6
Working with an Approved Credit Card.............................................................................................. 9
Working with a Declined Credit Card ...............................................................................................10
Working with Transactions in a Weak/Non-Wireless Area..............................................................10
Credit Card Sales with Pocket Merchant and a Physical Credit Card ...............................................11
Introduction........................................................................................................................................... 11
Setting Up Your PDA for Quick Sales ....................................................................................................... 11
Performing Quick Credit Card Sales ......................................................................................................... 12
Making an Account Transfer Sale .....................................................................................................14
Introduction........................................................................................................................................... 14
Tutorial ................................................................................................................................................. 14
Using the Transaction Manager........................................................................................................18
Issuing a Void from the Transaction Manager .......................................................................................... 19
Issuing a Credit from the Transaction Manager ........................................................................................ 21
Working with Un-Approved Transactions from the Transaction Manager .................................................... 22
Using IR/Serial Options ...................................................................................................................23
Introduction........................................................................................................................................... 23
Assigning a Rep ID................................................................................................................................. 23
Setting up a Printer ................................................................................................................................ 23
Setting-Up a Card Reader / Check Reader ............................................................................................... 23
Server-Side Signature Storage ................................................................................................................ 24
Deleting All Data for a Single Merchant Account....................................................................................... 24
Deleting All Merchant Accounts and Data................................................................................................. 24
WEB Connect for Pocket PC
WEB Connect Edition Tutorial
(Pocket PC Edition)
Welcome
Welcome to WEB Connect. This document is a step-by-step tutorial outlining the major features of WEB
Connect. Each tutorial takes under 10 minutes to perform. As such, it is recommended that you use these
tutorials along with your PDA.
Installing WEB Connect
Please follow the instructions below to install WEB Connect onto your Pocket PC.
In order to install PocketVerifier Professional, you most have downloaded or obtained the software installation
file WC_PPCInstall.exe.
Note:
It is assumed that you have already installed the Pocket PC Active Sync software that came with your Pocket PC and that you have
successfully performed a User or Guess Connection between your Pocket PC and the computer you are using to install this software. If not,
please consult the documentation that came with your Pocket PC device and set up your system before continuing with this installation. For
on-line documentation on how to set up your Pocket PC, please visit: http://www.microsoft.com/mobile/pocketpc/tutorials/
Installation
In order to install WEB Connect onto your device…
1. Place your Pocket PC into its cradle and establish communications with your computer.
If you are using a computer other than your own, you do not need to create a partnership; logging in
as a guess is sufficient for installing the software.
2. Locate WC_PPCInstall.exe
3. Double-click on this file.
The installation will start. Simply follow the directions located on the screen.
When the installation is complete, WEB Connect will be successfully installed onto your Pocket PC and
registered with the system.
Registering Booster
WEB Connect requires the Booster runtime to be installed on your Pocket PC. The above installation
automatically installs this runtime and allows for a 30 day evaluation period. To use this runtime after the 30
period, you are required to register at: http://www.appforge.com/booster.html
WEB Connect for Pocket PC
page 1
Launching WEB Connect
After installation, WEB Connect will be installed in the Programs Directory. To launch WEB Connect for the first
time,
1. Click on the Start Menu.
2. Select Programs.
3. In the Programs Directory, select WEBConnect
Depending on how your Pocket PC is setup, you may not see the complete title (i.e., WEBConn…).
This will launch WEB Connect and start the activation process.
You may also want to all a shortcut to your Menu bar.
See your Pocket PC documentation on how to do this, or visit the Pocket PC web site at:
http://www.microsoft.com/MOBILE/developer/technicalarticles/shortcuts1.asp
WEBConn…
Activating a Merchant Account
Introduction
When you first launch WEB Connect, you will be required to activate at least one merchant account. To do this,
you must submit your Merchant Account paperwork in order to be issued a Merchant ID and password. In
addition, activation requires a serial number that is located on the inside flap of the Product Guide (Account
Activation).
If you already sent in your application and are waiting for your Merchant ID and password, you can still
activate a test account. This tutorial shows the test account 10600, but your can also use the test account
10011. This account will allow you to try most of the features that WEB Connect has to offer. It is
recommended however, that if you can, use your own account with the examples in this tutorial. The card
numbers and amounts used in this tutorial for credit card transactions are for testing purposes only. They are
special test cards that will provide valid responses, but will not be processed on your account.
When you first run WEB Connect, you will be asked to activate an account. Click the OK button to show the
Account Activation screen.
ACCOUNT ACTIVATION
Message Box Prompt.
Click OK to continue.
WEB Connect for Pocket PC
page 2
Tutorial
1. Enter your Merchant ID in to the Merchant ID text area.
The test account number is: 10600 or 10011
2. Enter your Serial Number into the Serial Number text area.
The serial number for either test account is: ser1234
Note:
When starting the communication process, your Pocket PC may display
additional messages. the exact message you will see at this point will vary
from PDA to PDA.
ACCOUNT ACTIVATION
It is also important that you have setup your Pocket PC correctly o that it
can automatically connect to the Internet. If you have not yet setup your
connection or need help in setting the correct parameters, please visit:
http://www.microsoft.com/mobile/pocketpc/software/connected.asp
3. Click on the Activate button.
This will result in a communication 'hop' to the Account Activation server. If your PDA device is not set
up properly, a message box will display the problem (i.e., connection not establish, serial port already
in use, batteries too weak for starting a wireless connection, IR port not open on your cell phone, etc.).
If communications are successful, a message box will request a name verification of your merchant
account.
4. If the Merchant Name is correct, click the Yes button.
This will send another request to the Account Activation server in order to valid the serial number.
The Merchant Name for test account 10600 is: Merchant Anywhere PRI Test Account
The Merchant Name for test account 10011 is: PRI Test Account
5. Click on the OK button.
Your account becomes activated and if you are using the
test account, a message box appears indicating that any
transactions processed will not actually occur. After
clicking on the OK button, you will then be brought to the
Log-On screen. Here you can add the appropriate
information to long into your account.
WEB Connect for Pocket PC
page 3
Activating a Second Merchant Account
If you activated the MerchantAnywhere Test Account, you can always activate another account at anytime from
the Log-On Information screen. Simply follow the steps below.
1. Click on the Merchant ID drop-down list box.
2. Select New account… in the list.
This displays the Account Activation screen.
3. Follow the steps outlined in the above section: Activating a Merchant Account.
Upon completion, your new Merchant ID will be available in the Merchant ID drop-down list.
You can use accounts 10011 or 10600 as alternate test accounts and even add your own!
Logging On to Your Merchant Account
Once you have activated at least one account, it is necessary to log on with your Merchant ID and Password
before you can make credit card sales or transfer money from an account. To log on to your account and
display the Menu screen…
1. Click on the Merchant ID drop-down list box …
If you have more than one Merchant Account activated on your PDA.
2. Select the account you want to use.
This tutorial will use Merchant ID: 10600
3. Enter your password.
The MerchantAnywhere PRI Test Account (10600) uses the password: 1234
After applying for your Merchant Account, you should have received a password with your Merchant ID.
You should enter if here, or use the test account with the password supplied above.
4. Click on the Remember Password check box (optional).
Each time you log on to this merchant account, your password will be shown. The password check box
is dependent on the Merchant ID (i.e., you can choose to remember a password for one Merchant ID
and not another).
WEB Connect for Pocket PC
page 4
5. Click on the OK button.
This brings you to the Menu screen where you can perform sales using credit cards, transfer funds
from checking or savings accounts, enter the Transaction Manager (see: Using the Transaction
Manager), and set up options. Information related to this screen is shown below.
Menu Screen Functions
Title displays the name of the Merchant Account. If the
name is longer that 25 characters, it is shortened with …
PRI Test Account
Click here to enter Credit Card Sale/Processing,
where you perform all your credit card sales.
Click here to enter Account Transfers.
Click here to go to the Transaction Manager screen
where you can review all stored and approved
transactions. See: Using the Transaction Manager
for more details.
Click here to change your IR/Serial options, or to remove
all data stored in the Transaction Manager for the current
Merchant Account.
Click here to go back to the Log-On Information
screen and change to another Merchant Account.
WEB Connect for Pocket PC
Click here to log-off from the current Merchant Account
and to exit the software.
page 5
Making your First Credit Card Sale
Introduction
In this tutorial you will take a Credit Card sale. You can follow step-by-step using the test account or your own
Merchant Account, by adding the exact data that is presented here. The card number used in this tutorial is for
demonstration purposes only and will not be processed by the system. If you are using the test account, you
can also use any credit card - even your own. The test account will not process any transactions. If you want to
use a 'live' card on your 'live' account, you will be charged the respective card's (i.e., Visa, MC, Discover, etc.)
transaction rate. If you do not wish to be charged this fixed transaction rate, please use the test account. The
test account will also allow you to perform Voids and Credits. The tutorial below will use a fictitious Visa card
belonging to Pete Peterson.
Tutorial
1. Log-On to your merchant account or the MerchantAnywhere Test Account.
2. Click on the Credit Card Processing picture.
This opens the Credit Card Sale screen.
3. Click on the Wizard
4. Following the steps in the Wizard and enter the following information.
Card #:
Zip Code:
Amount:
4005 5500 0000 0019
92807-1425
(the first 5 digits are also acceptable: 92807)
$49.95
The wizard takes you through various steps of entering data needed for a credit card transaction by
displaying a keypad. By clicking the Accept button, WEB Connect performs some quick validation routines
on your data. It also detects the type of credit card being used and formats it accordingly.
WEB Connect for Pocket PC
page 6
While the Wizard helps in entering data in a logical manner, you can also bring up the keypad by clicking
on the respective field entry. Below is the process for entering data when using the Wizard.
When using Pocket Merchant or PDA Swipe to swipe a credit card, only the Amount Keypad will be shown
(more information about swiped transaction can be found under: Credit Card Sales with PalmReader
Plus/Pocket Merchant and a Physical Credit Card.
Enter the Expiration Date by clicking on the respective field.
Exp Month: 5
Exp Year: 5
5. Enter the Name and Address
WEB Connect uses AVS (Address Verification System) when you manually enter credit cards. The
address must be the billing address for the card being used. However, to speed up writing information,
only the numeric portion of the address can be used for validation. A complete address is beneficial for
your records, however.
Name:
Address:
WEB Connect for Pocket PC
Pete Peterson
123 Main Street
(123 is also acceptable)
page 7
6. Enter the Invoice Number.
Entering the invoice is optional. If the invoice field is left blank, then PVP CE will be added as a default
value. In the example below AMS001 is entered.
7. Enter a Tip by clicking on the Tip Field (optional).
If you are in the service industry, you may request to have a tip added to the amount. This is optional.
Click on the Tip field and hand it to the client (The amount is shown in the caption). If a Tip is not
added, it will not be shown on the verification screen or on the printed receipt. In the example below,
an $8.00 tip is added for an amount of $49.95 (Total: $57.95).
Amount of bill is shown here.
Note:
When using Pocket Merchant or another Magnetic Card Reader attachment,
only the amount of the sale need be entered. AVS in not required, and swiped
rates are lower than keyed entry.
For information on how to use Pocket Merchant for entering credit card data,
see: Credit Card Sales with Pocket Merchant and a Physical Credit Card
Indicates a valid Visa card number.
8. Click on the Next… button.
The Credit Card Verification screen is displayed. Here you have the option to request a signature before
sending the information to the transaction server for authorizing payment. It is a good idea to give the
customer your device at this time so they can verify that the billing address, card number, amount, and
tip (if any) are correct.
WEB Connect for Pocket PC
page 8
9. Click on the Send button.
Once the information is verified and the customer signs, the next step in to transmit the data to the
transaction server for credit card approval.
After clicking on the Send button, communication will start.
Buttons that need to establish a
communications link with the Internet are
color-coded differently from all other buttons.
At this stage, one of three things can happen:
•
The credit card gets approved.
•
The credit card gets declined.
•
The transaction cannot be completed, because the server is undergoing maintenance or you
are in an a weak or non-wireless area.
Each of these situations are shown next.
Working with an Approved Credit Card
Once a transaction is complete, WEB Connect will return an Authorization Code and Transaction ID. Both of
these numbers are numerical. In the case of a test account, the Authorization Code will also contain letters (i.e.,
VITAL6 as in the current example).
The transaction is automatically stored as an approval and can be accessed from the Transaction Manager for
processing Voids or Credits. The Credit Card: Approval screen also provides you with the ability to print a
receipt if you are using Pocket Merchant or Pocket Printer4. Print Setup is available from the IR/Serial Options
screen. Otherwise, click on the New Sale button and return back to the Menu screen. In some cases, you will
also be permitted to delete the order from the internal database.
WEB Connect for Pocket PC
page 9
Working with a Declined Credit Card
There are many reasons why a card can get declined. Yet, for whatever reason, WEB Connect allows you to
return to the previous Credit Card Sale screen for entering a new card or different information. If for some
reason, you want to keep a declined transaction, you can always click on the Store button from the Credit Card
Verification screen.
Important Note:
Declined Cards are not automatically saved like Approved Transactions. You must click on the
Store button before exiting WEB Connect. Otherwise, you will loose this information.
For security reasons, WEB Connect does not save any information in memory once another
program takes control.
Working with Transactions in a Weak/Non-Wireless Area
There may be times when you are unable to perform a wireless approval for a credit card. Some possible
situations are:
•
•
•
•
•
•
The location you are in may have weak coverage causing a long time for processing to occur.
The location has no coverage at all.
The batteries on the PDA device may be too weak to provide a proper transmission.
The connection may be slow due to heavy traffic on the transaction and validation servers.
The transaction servers may be down for routine maintenance.
Your wireless service may be temporarily unavailable due to routine maintenance.
For whatever reason, WEB Connect allows you to stop an existing connection and to store Credit Card
information in the Transaction Manager for processing and validating at a later time. To do this click on the
Rotating Box to stop the connection and try again. If you cannot get validation from the servers, try at a later
time by clicking on the Store button.
Click on the Rotating Box to stop the current
connection.
See Using the Transaction Manager on how to
resubmit unapproved sales transactions.
Connecting to Server
WEB Connect for Pocket PC
Stopped Connection
page 10
Credit Card Sales with Pocket Merchant and a Physical Credit Card
Introduction
In the previous example, you made your first sale by entering the customer’s credit card and billing information.
While the Pocket PC allow you the ability to enter text using handwriting recognition or an on-screen keyboard,
there is still room for making mistakes entering an address, person's name or card number. This, compounded
with working in the field, can be a daunting task. However, WEB Connect was designed to make credit cards
sales quickly and accurately in only a few steps. As a matter of fact, you can do everything by using the corner
of a credit card instead of your stylus! This tutorial shows you how.
Setting Up Your PDA for Quick Sales
A. Automatically Launch WEB Connect
There are a number of ways to launch WEB Connect. Visit http://microsoft.handango.com.
There you can enter the Keyword LAUNCHER into the search box and find the best tool for your Pocket PC.
Some are freeware, while others are shareware require a small purchase fee.
B. Bypass the Log-On Password
WEB Connect allows you to save your password for each Merchant ID. If you are in the field or at a customer’s
location, and do not want to enter your password each time, turn this feature on.
C. Attach Pocket Merchant
Pocket Merchant is a small compact 2 in 1 Printer and Card Reader.
With Pocket Merchant all the necessary information can be extracted from
a credit card. Performing credit card transactions with an actual credit card and
obtaining signatures will also provide you with lower transactions rates from your
Merchant Account provider! To attach Pocket Merchant to your Pocket PC, follow the
instructions that came with the device.
WEB Connect for Pocket PC
page 11
Performing Quick Credit Card Sales
After following the Setting Up Your PDA for Quick Sales instructions above, you are ready to see how easy and
fast it is to take and validate credit cards for your sales.
1. After launching WEB Connect, click the OK button.
Since the Remember Password box is checked, the current Merchant Account password (i.e., account
10600) is already present. All you need to do is click on the OK button.
2. Click on the Credit Card Processing picture.
3. Swipe the Credit Card through the Pocket Merchant credit card reader (magnetic strip facing the unit).
On a successful swipe, multiple tracks of the card data are analyzed and compared for validation. Once
validation is complete, the data is automatically transferred to the PDA device and the number pad
appears.
4. Enter any amount and click on the ACCEPT button.
All data needed to process the current sale is now entered and focus is brought to the Invoice text area.
Entering an invoice is optional and need not be performed for quick sales. Entering a Tip is also
optional. At this point, the name of the card holder, card number, and expiration date appears on the
Credit Card Sale screen. In addition, Address displays CARD PRESENT and Zip Code displays 99999.
Any modifications to this screen (with the exception of the Amount and Invoice fields) will automatically
cancel card-swiped data.
Note:
Entering an invoice is optional.
Entering a Tip is also optional
Approved transactions with no invoice will be
displayed as PVP CE.
WEB Connect for Pocket PC
page 12
5. Click on the Next… button.
6. Ask the customer to verify the information and to sign in the Signature box.
Sign here.
7. Click on the Send button.
Once the credit card is approved, you are ready for another sale, or you can print a receipt and have it
signed (see Working with an Approved Credit Card for details).
Approved transactions with no invoice
display PVP CE.
WEB Connect for Pocket PC
page 13
Making an Account Transfer Sale
Introduction
This option is primarily so your business can accept checks by telephone, fax machine, or e-mail. If your
customer can physically hand you a check, YOU ARE BETTER OFF ACCEPTING IT, AND PHYSICALLY
DEPOSITING IT IN YOUR BANK.
The bad check protection statutes and laws generally apply only to physical checks, with pen-and-ink signature.
In addition, the customer can challenge and reverse the electronic check up to sixty days after it is issued. The
electronic check acceptance feature is a convenience for the reputable vendor to accept non-physical checks
from honest customers. To date, it does not offer all of the safeguards that physical checks and credit card
transactions do.
Please familiarize yourself with the procedures for entering a credit card. The procedures for an electronic
check are nearly identical except that instead of entering a credit card account number and an expiration date,
you enter the numbers on the bottom of the check.
There are three groups of numbers on the check. One is the check number, the other is the ABA or bank
routing number (also known as the transit number), and another is the Account number. This is shown in the
diagram below.
Please note that the relative positions may vary from check to check, but the check number on the bottom
always matches the number in the upper right hand corner. Additionally, the routing number can always be
found between two marks. If you attach the optional accessory Check Reader Plus™, you can simply pass a
check through the reader and have the routing number and account number appear on the Bank Account
Transfer screen. Visit http://www.merchantanywhere.com for information on this accessory and others.
This tutorial will use a fictitious savings account. Thus, we recommend that you use the MerchantAnywhere
Test Account (10600). You can, of course, use your own account and do an actual transfer.
WEB Connect for Pocket PC
page 14
Tutorial
1. Log on to your Merchant Account or the MerchantAnywhere Test Account.
2. Click on the Account Transfers picture.
This opens the Bank Account Transfer screen.
3.
Enter the following information:
Name:
Invoice:
Amy Peterson
AMS002
or leave empty (default is: PVP CE)
4. Choose Checking from the ABA/Bank Info list.
The default is checking, but you can choose checking or savings. Most of the time, your customers will
be writing checks from their checking accounts… but, occasionally, one of your customers may want to
give you the information for a savings account.
5. Click on the Wizard picture at the top left of the screen.
The Wizard will allow you to enter the Routing Number, Account Number, and the Amount of fund for
transfer. Using the explanation in the introduction above, enter the numbers exactly as they appear on
the check. WEB Connect provides the proper formatting and validation of these numbers. If you are
using a Check Reader attached to your Pocket PC, you can read the check at this point, after which,
you will be asked to enter an amount to transfer.
After entering the name, invoice and
choosing the account type, click on the
Wizard.
⇓
WEB Connect for Pocket PC
Choose an account type.
page 15
6. Fill in the remaining information.
Enter the Routing and Account numbers below, or use one of your own checks. The test account
(10600) will not actually process any checks and you will not be charged any transaction fees.
See the Introduction for details on locating the routing and account numbers.
Routing #:
Account #:
Amount $:
122-000001
1245-780042
24.95
⇓
7. Enter a Tip by clicking on the Tip Field (optional).
If you are in the service industry, you may request to have a tip added to the amount. This is optional.
Click on the Tip field and hand it to the client (The amount is shown in the caption). If a Tip is not
added, it will not be shown on the verification screen or on the printed receipt. In the example below, a
$5.00 tip is added for an amount of $24.95 (Total: $29.95).
⇓
The amount of the money transfer,
before any tip is added, is shown
here.
WEB Connect for Pocket PC
page 16
8. Click on the Next… button.
Bank Account Transfer Verification screen is displayed. Here you can request a signature before
sending the information to the transaction server for requesting payment. It is a good idea to give the
customer your PDA device at this time, so that they can verify that the account information and
amount are correct. They also add a signature (optional).
9. Click on the Send button.
Once the information is verified and the customer signs, the next step is to transmit the data to the
transaction server, which in turn, initiates an Account Transfer Request. Remember, the electronic
check acceptance feature is a convenience for a reputable vendor to accept non-physical checks from
honest customers. To date, there is no electronic verification system available that can offer all the
safeguards that are provided by physical checks and credit card transactions.
At this stage, the account transfer can either be approved or declined. In addition, if the server is
undergoing maintenance or you are in an a weak or non-wireless area, the request cannot be
completed. For approved transfers you can click on the Memo button then issue a printed receipt (See
Working with an Approved Credit Card above, for detailed information). For a declined event, such as
Non-Sufficient Funds in an account, it is recommended that you request another form of payment. The
same is true in a weak or non-wireless location. Credit Cards and physical checks are the best forms of
payment. WEB Connect allows you to store Account Transfer data for transmitting at a later time,
however, credit card sales are much more reliable.
WEB Connect for Pocket PC
page 17
Using the Transaction Manager
Introduction
The Transaction Manager screen is the area where you can view completed and pending transactions for Credit
Cards and Bank Account Transfers. It is also the entry point for allowing voids and credits of completed credit
card transactions. This section of the tutorial is designed to give you a basic over view of what the Transaction
Manager can do. The data contained in the Transaction Manager will depend on what processes you have
already performed. Thus, in most cases, the data presented here may not be identical to the data available on
your PDA device (i.e., Transaction and Authorization IDs, dates, and approval types will differ).
Tutorial
To open the Transaction Manager…
1. Log on to your Merchant Account or the MerchantAnywhere Test Account.
2. Click on the Transaction Manager picture.
This opens the Transaction Manager screen.
Overview of the Transaction Manager
Choose Credit Card Sales or Account Transfers.
Show All, Pending, or Approved Transactions.
Drop down list to display different information.
Date transaction occurred (sorted by oldest first).
Indicates an approved transaction.
Arrows to move next/previous if more than 5 transactions.
Indicates total number of records. In this example,
3 records are Credit Card Sales. The remaining are
Account Transfers.
Clicking on the Trim button will delete all records for current
Type and Status before the Trim Date.
WEB Connect for Pocket PC
Opens the calendar to select a Trim Date. The default Trim
Date is 30 days before the current date.
page 18
Issuing a Void from the Transaction Manager
Introduction
After a Credit Card transaction is completed, the transaction server submits the record for end-of-day closeout
(batch processing). If a closeout has not yet been performed, WEB Connect allows you to void a transaction.
Issuing a void or a credit depends solely on whether a closeout has occurred. The tutorial below gives an
example of issuing a void (in most cases, you can issue a void immediately after you received an Approved
Credit Card transaction).
Tutorial
1. Open the Transaction Manager.
2. Select Type: Credit Card Sales.
The list will only display Credit Card transactions that were approved. In the example below, there are
three (3) records, but only one (1) matches the selected criteria.
3. Click on the Name list.
The list contains a number of selections on how to display data in the Transaction Manager.
WEB Connect for Pocket PC
page 19
4. Click on the first item in the list.
This opens up the Credit Card: Approved screen with additional information.
5. Click on the Void/Credit button.
WEB Connect sends a request to the transaction server and determines if the batch was closed out.
Is the batched Closed?
NO
YES
Batch still opened.
Issue a void?
Batch closed.
Issue a credit?
YES - Transaction voided and
removed from the Transaction
Manager.
YES - The Credit Transaction
screen appears. Information on
how to issue a credit is shown
next.
If the batch was not closed out, a message box will ask if you would like to issue a void. If you choose
Yes, WEB Connect will re-establish the connection, void the transaction, and display a message prompt.
If you click on the No button, WEB Connect will return to the Transaction Manager and not void the
transaction. This is covered next.
WEB Connect for Pocket PC
page 20
Issuing a Credit from the Transaction Manager
Introduction
If a transaction is already closed out (i.e., the batch has been sent to the bank for processing at the end of the
day), then a void cannot be issued. In such cases, it is necessary to do a credit. WEB Connect allows you to do
full or partial credits. The tutorial below shows you how to issue a partial credit, once a transaction is already
closed out.
Tutorial
1. Enter a value for the Credit not exceeding the amount displayed.
In the example below, a value of $30.00 is entered. Click on the Void/Credit button.
2. Click on the Issue Credit… button.
The request is sent to the server.
Once approved, a message appears indicating that the credit was successful.
3. Click on the Yes button in the message prompt.
WEB Connect will delete this transaction from its records and return you to the Transaction Manager.
Transaction record Pete Peterson is removed after
issuing a credit.
One less record is displayed
WEB Connect for Pocket PC
page 21
Working with Un-Approved Transactions from the Transaction Manager
Introduction
There may be times when you are unable to perform a wireless approval for a credit card or account transfer
after taking all the information (See Working with Transactions in a Weak/Non-Wireless Area for details). In this
case, you save the information to the Transaction Manager for processing at a later date. The tutorial below
explains how to do this processing.
Tutorial
1. Open the Transaction Manager.
2. Select Type: Credit Card Sales.
Select Type: Account Transfers if you want to display the Account Transfers list.
3. Select Status: All Transactions.
If you select Pending Transaction, a list of all credit card transactions that have not yet been approved,
will be displayed.
4. Click on one from the list.
This example uses John Fairchild.
This brings up the Credit Card Verification screen. From this screen you can re-send the information
and obtain an approval code, or you can delete the record if the order was cancelled. In addition, you
can print additional copies (if you have a printer such as PocketPrinter4 or Pocket Merchant installed on
your PDA device).
Click here to edit the
current transaction.
Shows the dates when a transaction was
saved and last time information was sent
to the server for processing.
Click here to go back to
the Transaction Manager
Click here to delete this record
from the Transaction Manager.
Click here to re-send this information
for approval.
You can also edit the transaction by clicking on Edit Transaction… at the top-left of the screen. Note
that for security reasons, any changes in the amount will erase the current signature.
WEB Connect for Pocket PC
page 22
Using IR/Serial Options
Introduction
WEB Connect also has a number of other exciting features not normally found in traditional POS terminals.
These are Rep ID classification and Server-Side Signature Storage. In addition, the options screen allows you to
setup your Pocket PC to use one of our printers (Pocket Printer 4 or Pocket Merchant) and to setup a card
reader or check reader.
Assigning a Rep ID:
A Representative Identification Number (Rep ID) is ideal for companies that have multiple agents in the field,
but use only one Merchant Account. By assigning a Rep ID to each of your "Reps", you can monitor sales
performance, setup tip calculations, and create individualized sales reports. Signature Plus! (a companion
product to WEB Connect) even allows to query results based on the Rep ID!
Setting up a Printer:
WEB Connect allows you to setup a printer so that you can print receipts in the field. Internal support exists for
Pocket Printer 4 and Pocket Merchant. Pocket Printer 4 is a dedicated mobile pocket printer, where Pocket
Merchant contains all the features of Pocket Printer 4 plus a card reader. For additional information on how to
use these printers, please consult the documentation that comes with each individual unit.
Setting-Up a Card Reader / Check Reader
The default setting for WEB Connect is set for Pocket Merchant. This device attached to the COM 1 port of your
Pocket PC. The COM 1 port is generally set to the bottom connector of your Pocket PC. If you connect a Card
Reader or Check Reader to the bottom connector of your Pocket PC, make sure you have set the Card Reader
to COM 1.
Note that if the Auto-detect Connection is set for syncing your Pocket PC to your computer, each time you turn
on the power of an attached device, the PDA will try to sync to your computer, click on the Cancel button to stop
this process. If you purchased a Check Reader, Printer, or Card Reader, from Advanced Merchant Solutions
(www.merchantanywhere.com), then no changes need to be made to the device's configuration. Simply follow
the instructions that came with your package on how to install the reader to your Pocket PC.
WEB Connect for Pocket PC
page 23
Server-Side Signature Storage
There may be times when you want to store the client's signature on the server. when the signature is stored
on the server, you can retrieve it through the WEB-Based Transaction Manager (i.e., Transaction Central). The
default setting for this feature is set to OFF. It is recommended that Signatures be sent only in areas where
wireless connectivity is optimal and that a high connection speed can be established, as signature data can
contain up to 2000 bytes.
Deleting All Data for a Single Merchant Account
The IR/Serial Option screen also contains a button called: Purge all data?
There may be times when you want to switch Merchant Accounts and delete all data from an existing account.
To do this, click on the Purge all data? button. All the records stored in the Transaction Manager for the current
account will be deleted.
Click here to delete all transaction records for
the current Merchant Account.
Deleting All Merchant Accounts and Data
Rather than deleting data for a single account, you may want to remove all existing Merchant Accounts from
WEB Connect, but still keep the software on the device. This is especially important if you are transferring the
PDA device from one sales rep. to another (and they each use different Merchant Accounts). To access this
feature, you must be in the Account Activation screen. To do this…
1. Click on the OK button and return to the Menu screen.
2. Click on the LogOn text in the lower left side of the screen.
3. Click on the Merchant ID list and select New Account…
4. In both the Merchant ID and the Serial Number text areas,
enter delete
5. Click on the Activate button.
A message will display a warning and ask you to confirm your
action. By clicking on the Yes button, all data will be deleted and
WEB Connect will quit. The next time you open WEB Connect, you
will be required to activate at least one account (see Activating a
Merchant Account for detailed information).
WEB Connect for Pocket PC
page 24