1
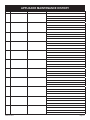
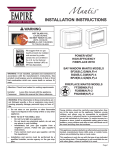
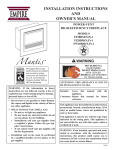
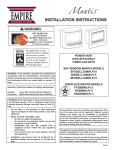
EMPIRE
Comfort Systems
™
OWNER’S MANUAL
WARNING
HOT GLASS WILL
CAUSE BURNS.
DO NOT TOUCH GLASS
UNTIL COOLED.
NEVER ALLOW CHILDREN
TO TOUCH GLASS.
POWER-VENT
HIGH-EFFICIENCY FIREPLACE
WARNING: If not installed, operated and maintained
in accordance with the manufacturer’s instructions,
this product could expose you to substances in fuel
or from fuel combustion which can cause death or
serious illness.
Installer:
Leave this manual with the appliance.
Consumer: Retain this manual for future reference.
WARNING: If the information in these instructions
are not followed exactly, a fire or explosion may result
causing property damage, personal injury or loss
of life.
— Do not store or use gasoline or other flammable
vapors and liquids in the vicinity of this or any other
appliance.
— WHAT TO DO IF YOU SMELL GAS
• Do not try to light any appliance.
• Do not touch any electrical switch; do not
use any phone in your building.
• Immediately call your gas supplier from a
neighbor’s phone. Follow the gas supplier’s
instructions.
• If you cannot reach your gas supplier, call the
fire department.
— Installation and service must be performed by a
qualified installer, service agency or the gas supplier.
BAY WINDOW MANTIS MODELS
BF28(B,C,G)M(K)(N,P)-5
BP28(B,C,G)M(K)(N,P)-5
BI28(B,C,G)M(N,P)-5
FIREPLACE MANTIS MODELS
FF28BM(K)(N,P)-3
FW28BM(K)(N,P)-3
FI28BM(N,P)-3
Young children should be carefully supervised when
they are in the same room as the appliance. Toddlers,
young children and others may be susceptible to
accidental contact burns. A physical barrier is
recommended if there are at risk individuals in the
house. To restrict access to a fireplace or stove,
install an adjustable safety gate to keep toddlers,
young children and other at risk individuals out of
the room and away from hot surfaces.
This appliance may be installed in an aftermarket,
permanently located, manufactured home (USA only)
or mobile home, where not prohibited by state or local
codes.
This appliance is only for use with the type of gas
indicated on the rating plate. This appliance is not
convertible for use with other gases, unless a certified
kit is used.
Page 1
TABLE OF CONTENTS
SECTIONPAGE
IMPORTANT SAFETY INFORMATION.......................................................................................... 3
SAFETY INFORMATION FOR USERS OF LP-GAS...................................................................... 4
Operating the Fireplace...................................................................................................... 5
How to Start the Fireplace................................................................................................ 6
How to Change Burners – Switching Burners........................................................... 6
How to Turn the Fireplace Off......................................................................................... 7
How to Operate Economy Mode........................................................................................ 7
Remote Transmitter and Receiver.................................................................................. 7
Remote Buttons...................................................................................................................... 7
Remote Display......................................................................................................................... 7
Remote Receiver..................................................................................................................... 8
Remote Setup - Install/Replace Batteries................................................................... 8
Replace the Remote Control Batteries....................................................................... 8
Replace the Remote Receiver Batteries...................................................................8-9
Remote Setup - Programming the Remote.................................................................... 9
Remote Setup - Setting the Temperature Units......................................................... 9
Starting the Fireplace - Remote...................................................................................... 9
Remote Operation - Manual Mode..................................................................................... 9
Remote Operation - Thermostat Mode......................................................................... 10
Remote Function - Lock-Out............................................................................................. 10
Remote Setup - Wall Clip.................................................................................................... 10
How to Reset the Fireplace............................................................................................. 10
Humidifier Operation........................................................................................................... 11
How to Clean the Glass Door ........................................................................................ 11
How to Remove the Glass Door - Bay Window Models...................................... 11-12
How to Remove the Glass Door - Fireplace Models.............................................. 12
Service and Maintenance.................................................................................................. 13
Circulating Air Blower................................................................................................... 13
Filter....................................................................................................................................... 13
RECOMMENDED MAINTENANCE........................................................................................... 13
WARRANTY................................................................................................................................. 14
APPLIANCE MAINTENANCE HISTORY...................................................................................... 15
Page 2
IMPORTANT SAFETY INFORMATION
THIS IS A HEATING APPLIANCE
Safety markings are frequently used in this manual to designate a degree or level of seriousness and should not be ignored.
WARNING indicates a potentially hazardous situation that if not avoided, could result in
personal injury or death.
CAUTION indicates a potentially hazardous situation that if not avoided, may result in minor or moderate injury or property damage. WARNING
This appliance must be installed and repaired by
a qualified service person who is familiar with the
proper installation and operation of the Mantis Power-Vent High Efficiency Fireplace. Installers who are
not familiar with the installation of the Mantis and
have questions, should contact Empire Comfort Systems, Inc. prior to installing the appliance to avoid
creating a hazardous operating condition.
•
Due to high temperatures the appliance should be
located out of traffic and away from furniture and
draperies.
•
Children and adults should be alerted to the hazards of high surface temperatures and should stay
away to avoid burns or clothing ignition.
•
Young children should be carefully supervised
when they are in the same room as the appliance.
Toddlers, young children and others may be susceptible to accidental contact burns. A physical
barrier is recommended if there are at risk individuals in the house. To restrict access to a fireplace or stove, install an adjustable safety gate to
keep away toddlers, young children and other at
risk individuals out of the room and away from hot
surfaces.
•
Clothing or other flammable material should not
be placed on or near the appliance.
•
Any safety screen or guard removed for servicing an
appliance, must be replaced prior to operating the
appliance.
•
Keep burner and control compartment clean.
•
For manufactured home (USA only) or mobile home
or residential installation convertible for use with
natural gas and liquefied petroleum gases when
provision is made for the simple conversion from
one gas to the other.
30067-0-0512
WARNING
Installation and repair should be done by a QUALIFIED SERVICE PERSON. The appliance should
be inspected before use and at least annually by
a qualified service person. More frequent cleaning may be required due to excessive lint from
carpeting, bedding materials, etc. It is imperative that control compartments, burners and
circulating air passageways of the appliance be kept
clean.
•
DO NOT put anything around the heater that will
obstruct the flow of combustion and ventilation air.
•
DO keep the appliance area clear and free from
combustible material, gasoline and other flammable
vapors and liquids.
•
DO examine venting system periodically and replace damaged parts.
•
DO make a periodic visual check of burner. Clean
and replace damaged parts.
•
DO NOT use this heater if any part has been under
water. Immediately call a qualified service technician to inspect the heater and to replace any part
of the control system and any gas control which
has been under water. •
DO NOT operate this appliance without the front
panel installed.
Page 3
SAFETY INFORMATION FOR USERS OF LP-GAS
LP-Gas (Propane) is a flammable gas which can cause fires
and explosions. In its natural state, propane is odorless and
colorless. You may not know all the following safety precautions
which can protect both you and your family from an accident.
Read them carefully now, then review them point by point with the
members of your household. Someday, there may not be a
minute to lose, everyone’s safety will depend on knowing exactly what to do. If, after reading the following information, you
feel you still need more information, please contact your gas
supplier.
LP-GAS WARNING ODOR
If a gas leak happens, you should be able to smell the gas because of the odorant put in the LP-Gas.
That’s your signal to go into immediate action!
•
•
•
•
Do not operate electric switches, light matches, use your
phone. Do not do anything that could ignite the gas.
Get everyone out of the building, vehicle, trailer, or area.
Do that IMMEDIATELY.
Close all gas tank or cylinder supply valves.
LP-Gas is heavier than air and may settle in low areas
such as basements. When you have reason to suspect
a gas leak, keep out of basements and other low areas.
Stay out until firefighters declare them to be safe.
•
•
Use your neighbor’s phone and call a trained LP-Gas
service person and the fire department. Even though
you may not continue to smell gas, do not turn on the
gas again. Do not re-enter the building, vehicle, trailer,
or area.
Finally, let the service man and firefighters check for escaped gas. Have them air out the area before you return.
Properly trained LP-Gas service people should repair the
leak, then check and relight the gas appliance for you.
NO ODOR DETECTED - ODOR FADE
Some people cannot smell well. Some people cannot smell
the odor of the chemical put into the gas. You must find out if
you can smell the odorant in propane. Smoking can decrease
your ability to smell. Being around an odor for a time can affect
your sensitivity or ability to detect that odor. Sometimes other
odors in the area mask the gas odor. People may not smell
the gas odor or their minds are on something else. Thinking
about smelling a gas odor can make it easier to smell.
The odorant in LP-Gas is colorless, and it can fade under
some circumstances. For example, if there is an underground
leak, the movement of the gas through soil can filter the odorant. Odorants in LP-Gas also are subject to oxidation. This
fading can occur if there is rust inside the storage tank or in
iron gas pipes.
The odorant in escaped gas can adsorb or absorb onto or
into walls, masonry and other materials and fabrics in a room.
That will take some of the odorant out of the gas, reducing its
odor intensity.
LP-Gas may stratify in a closed area, and the odor intensity
could vary at different levels. Since it is heavier than air, there
may be more odor at lower levels. Always be sensitive to the
slightest gas odor. If you detect any odor, treat it as a serious leak.
Immediately go into action as instructed earlier.
SOME POINTS TO REMEMBER
•
•
•
•
Learn to recognize the odor of LP-Gas. Your local LP-Gas
Dealer can give you a “Scratch and Sniff” pamphlet. Use
it to find out what the propane odor smells like. If you suspect that your LP-Gas has a weak or abnormal odor, call
your LP-Gas Dealer.
If you are not qualified, do not light pilot lights, perform
service, or make adjustments to appliances on the LPGas system. If you are qualified, consciously think about
the odor of LP-Gas prior to and while lighting pilot lights
or performing service or making adjustments.
Sometimes a basement or a closed-up house has a musty
smell that can cover up the LP-Gas odor. Do not try to
light pilot lights, perform service, or make adjustments in
an area where the conditions are such that you may not
detect the odor if there has been a leak of LP-Gas.
Odor fade, due to oxidation by rust or adsorption on walls
of new cylinders and tanks, is possible. Therefore, people
should be particularly alert and careful when new tanks or
cylinders are placed in service. Odor fade can occur in new
tanks, or reinstalled old tanks, if they are filled and allowed
to set too long before refilling. Cylinders and tanks which
have been out of service for a time may develop internal
Page 4
•
•
rust which will cause odor fade. If such conditions are
suspected to exist, a periodic sniff test of the gas is
advisable. If you have any question about the gas odor,
call your LP-Gas dealer. A periodic sniff test of the LPGas is a good safety measure under any condition.
If, at any time, you do not smell the LP-Gas odorant and
you think you should, assume you have a leak. Then take
the same immediate action recommended above for the
occasion when you do detect the odorized LP-Gas.
If you experience a complete “gas out,” (the container
is under no vapor pressure), turn the tank valve off
immediately. If the container valve is left on, the container
may draw in some air through openings such as pilot light
orifices. If this occurs, some new internal rusting could
occur. If the valve is left open, then treat the container as
a new tank. Always be sure your container is under vapor
pressure by turning it off at the container before it goes
completely empty or having it refilled before it is
completely empty.
30067-0-0512
Operating the Fireplace
Before you start
1. With main electrical power to the fireplace turned off, install 4
AA sized 1.5V batteries into the remote receiver. The remote
receiver is located inside the fireplace, mounted to the top of
the blower housing and secured with hook and loop tape. Set
up receiver and remote per instructions on pages 7-10. If you
do not wish to use the factory installed wireless remote and
wish to operate the fireplace manually, set the switch on the
remote receiver to the “ON” position.
If electrical power is present, the Power light on the front control panel will be illuminated. If the Power light is not illuminated, verify the fireplace is plugged in and the breaker and
the main power switch are on.
RECEIVER LOCATION
3. Verify the main gas supply to the fireplace is on. The shutoff
valve should be in the “OPEN” position.
CLOSED
ADJ.
LEARN
OFF
REMOTE
ON
OPEN
2. Verify there is electrical power to the unit. Verify the main
burner switches are in the “OFF” position and turn the main
power switch “ON”.
Main Burner Switches
Main Power Switch
30067-0-0512
Page 5
How to Start the Fireplace
1. Turn burner switches to the “ON” position. Adjust the remote
thermostat to the desired temperature or press “ON” on the
remote (if used). If the remote receiver has been set to “ON”
for manual operation, the startup sequence will begin automatically and both Front and Rear burner lights will begin to
flash.
4. If operating both of the fireplace’s burners, after the first burner is lit, the second igniter will start to glow red, the burner light
will turn off, and the burner will light. Once the burner is lit, the
light will illuminate steadily.
LEARN BUTTON
SLIDE SWITCH
OFF/REMOTE/ON
N/
SO
VER
FREQUENCY
ADJUSTMENT
ACCESS HOLE
E
SLID
OFF
Y CO
TER
T
A
B
5. The Blower will activate on low automatically when the fireplace is warm enough and the low speed blower light will illuminate. The blower will automatically advance to a higher
speed if it is needed, the blower speed will be indicated on the
front control panel.
BATTERY
COMPARTMENT
If it is not desirable to operate both burners, only turn on the
switch for the desired burner. When the startup sequence begins, only the light for the burner selected will begin to flash.
How to Change Burners – Switching Burners
If the fireplace is being operated on one burner, and it is desired
to change and operate the other burner, first turn the other burner
“ON” before turning the original burner “OFF”.
Example: If the front burner is operating and you would like to operate the rear burner instead, first turn the rear burner switch “ON”,
wait a second, then turn the front burner switch “OFF”. Following
this sequence will speed the change from one burner to the other
and prevent the fireplace from locking out and requiring a reset.
The table below outlines the input rate of both front and rear burners.
Front Burner
Input (BTUH)
Rear Burner
Input (BTUH)
Bay Window Mantis
9,000
19,000
Fireplace Mantis
13,000
15,000
Model
2. The light for the Exhaust Fan will illuminate as the fireplace
prepares to ignite.
3. In a few seconds, one of the igniters will glow red, the corresponding burner light will turn off and the burner will light.
Once the burner is lit, the light will illuminate steadily.
Page 6
30067-0-0512
How to Turn the Fireplace Off
To turn the fireplace off, simply switch the burner switch or switches
to the “OFF” position, turn the remote off, or adjust the temperature
set point down. The burners will instantly go off, but the circulating
blower will still operate until the heater cools off. It is normal for the
blower to turn on and off while it is cooling down.
Remote Transmitter and Receiver
The remote control transmitter operates on (2) 1.5V AAA batteries.
It is recommended that ALKALINE batteries be used for maximum
battery life and maximum operational performance.
How to Operate Economy Mode
When operating the fireplace with the remote thermostat, the remote operation of the front burner my be over-ridden and made to
operate continuously. To activate the Economy Mode, verify the
burner switches are in the “ON” position. Press and release the
red button that is located next to the burner switches. The button
will illuminate indicating that the Economy Mode is active.
Remote Buttons
ON Button - Turns fireplace manually ON.
OFF Button- Turns fireplace manually OFF.
MODE Button- Changes remote from manual mode to thermostat
mode.
SET Button- Adjusts temperature setting in thermostat mode.
Remote Display
1.
The front burner will activate and will remain on as long as the
button is illuminated and the burner switch remains in the “ON”
position. The rear burner will cycle with the remote.
To deactivate the Economy Mode, press and release the red button. The button will no longer be illuminated, indicating that the
Economy Mode is no longer active.
30067-0-0512
2.
DISPLAY
Indicates current room temperature.
°F OR °C
Indicates current temperature units in degrees Fahrenheit or Celsius.
3.
FLAME
Indicates burner/valve in operation.
4.
ROOM
Indicates remote is in Thermostatic mode.
5.
TEMP
Indicates that display is showing temperature reading.
6.
SET
Appears during the setting of the desired
temperature for the Thermostatic mode.
Page 7
Remote Receiver
The remote receiver operates on 4 AA-size 1.5V batteries.
It is recommended that ALKALINE batteries be used for maximum
battery life and performance.
Replace the Remote Control Batteries
Slide open the battery compartment panel located on the back of
the remote control.
The remote receiver has a 3-position slide switch for selecting the
MODE of operation: ON/REMOTE/OFF
• With the switch in the ON position (toward the LEARN button), the fireplace will remain on until the switch is placed in
the OFF or REMOTE position, or until the burner switches are
turned off.
• With the switch in the REMOTE position (centered), the fireplace will operate commands received from the remote.
• With the switch in the OFF position (away from the LEARN
button), the fireplace is off.
Note: It is suggested that the slide switch be placed in the off
position if you will be away from your home for an extended
period of time.
BATTERY COMPARTMENT
Remove the old batteries and install two AAA sized batteries into
the battery compartment.
Note: Verify that the batteries are installed in the proper
position.
LEARN BUTTON
It is recommended that ALKALINE batteries be used for maximum
battery life and performance.
Replace the Remote Receiver Batteries
SLIDE SWITCH
OFF/REMOTE/ON
N/
VER
FREQUENCY
ADJUSTMENT
ACCESS HOLE
OFF
SO
LIDE
S
Remove the lower louvered panel of the fireplace and turn the
Main power switch to the “OFF” position.
Y CO
TER
BAT
BATTERY
COMPARTMENT
Remote Setup - Install/Replace Batteries
Both the handheld remote control and the remote receiver (located
inside of the fireplace) are battery operated. These batteries will
need to be replaced periodically as part of the normal maintenance of the heater.
Lift the remote receiver from its location on top of the blower housing. The remote receiver is held onto the blower housing with hook
and loop tape.
Note: Do not disconnect the wires.
RECEIVER LOCATION
ADJ.
LEARN
OFF
Page 8
REMOTE
ON
30067-0-0512
Slide open the battery compartment panel located on the bottom
of the remote receiver.
LEARN BUTTON
Remote Setup - Setting the Temperature Units
To change the temperature units press the ON key and the OFF
key on the remote at the same time.
Note: The factory setting for the temperature units is degrees
Fahrenheit.
SLIDE SWITCH
OFF/REMOTE/ON
FF
N/O
SO
VER
FREQUENCY
ADJUSTMENT
ACCESS HOLE
E
SLID
Y CO
TER
T
A
B
BATTERY
COMPARTMENT
Remove the old batteries and install four AA sized batteries into
the battery compartment.
Note: Verify that the batteries are installed in the proper
position.
It is recommended that ALKALINE batteries be used for maximum
battery life and performance.
It may be necessary to program the remote receiver to LEARN
the security code of the transmitter upon initial use, if batteries
are replaced, or if a replacement transmitter is purchased from
your dealer. When matching security codes, be sure the slide button on the receiver is in the REMOTE position; the code will NOT
“LEARN” if the slide switch is in the OFF position. Program the
remote receiver to LEARN a new security code by pushing in the
LEARN button on the top of the remote receiver and then pressing
any button on the transmitter.
LEARN BUTTON
SLIDE SWITCH
OFF/REMOTE/ON
VER
FREQUENCY
ADJUSTMENT
ACCESS HOLE
FF
N/O
SO
LIDE
Starting the Fireplace - Remote
The remote control has two modes for operating the fireplace;
Manual and Thermostatic. When operating in Manual Mode, the
fireplace can be turned on/off manually. When operating in Thermostatic Mode, you set the desired room temperature and the remote will automatically turn the fireplace on/off to achieve the set
temperature.
To operate the fireplace with the remote, the switch on the remote
receiver must be set to “Remote” and both burner switches must
be in the “ON” position.
Note: The remote receiver emits one beep when it receives an
ON or OFF command manually, but no beep when cycling on
and off automatically in THERMOSTAT mode.
Remote Operation - Manual Mode
To turn the fireplace on press the ON key on the remote. The fireplace will begin the lighting sequence and the remote LCD screen
will show ON. After 3 seconds the LCD screen will default to display room temperature and the flame icon will appear.
To turner the fireplace off, press the remote’s OFF key. The fireplace will shut off and the LCD screen will show OF, after 3 seconds the LCD screen will default to display room temperature.
S
Y CO
TER
BAT
BATTERY
COMPARTMENT
A change in the receiver’s beeping pattern indicates the transmitter’s code has been programmed into the receiver.
If you are unsuccessful in matching the security code on the first
attempt, wait 1 - 2 minutes before trying again.
30067-0-0512
Page 9
Remote Operation - Thermostat Mode
To operate the remote in Thermostatic mode, press the MODE key
until the LCD screen shows the word ROOM.
Press and hold the SET key until the desired temperature is displayed then release the SET key. By pressing and holding the set
key the LCD screen set numbers will increase from 45° to 99° then
restart over at 45°. The LCD screen will display the set temperature for 3 seconds and the LCD screen will flash the set temperature for 3 seconds, then the LCD screen will default to display the
room temperature. The fireplace will turn ON/OFF automatically to
maintain the set temperature.
Remote Function - Lock-Out
This remote control includes a “LOCK-OUT” feature that allows
you to “LOCK-OUT” operation of the fireplace, from the TRANSMITTER.
To activate the “LOCK-OUT” feature, press and hold the ON button and the MODE button at the same time for 5 seconds. The
letters CP will appear on the LCD screen.
To disengage the “LOCK-OUT”, press and hold the ON button and
the MODE button at the same time for 5 seconds and the letters
CP will disappear from the LCD screen and the transmitter will
return to its normal operating condition.
To verify that transmitter is in the CP lock-out mode press any key
and the LCD screen will show “CP”
Note: If the fireplace is already operating in the ON or THERMOSTAT MODES, engaging the “LOCK-OUT” will not cancel
the operating MODE. Engaging the “LOCK-OUT” prevents
only the manual operation of the TRANSMITTER. If in the auto
modes, the THERMOSTAT operation will continue to operate
normally.
Remote Setup - Wall Clip
The remote can be hung on a wall using the clip provided.
To change the set temperature, press and hold the SET key until
the desired set temperature is reached then release the SET key.
To deactivate the Thermostatic Mode, press the MODE key. The
word ROOM on the LCD screen will not show when the thermostat
is not in operation.
Note: The highest SET temperature is 99° Fahrenheit
(32° Celsius) and the lowest temperature is (45° Fahrenheit (6° Celsius).
Note: The temperature setting probe is built into the remote. Place the remote in a good position to monitor the
room’s average temperature.
Note: Avoid placing the remote too close to the fireplace
as this will affect the remote’s temperature sensor.
Note: The Thermostat Feature on the remote operates
the fireplace whenever the ROOM TEMPERATURE varies +/- 2°F (1°C) from the SET temperature.
Page 10
How to Reset the Fireplace
If for any reason the fireplace needs to be reset, remove the front
louvered cover, then turn the Main Power Switch to the “OFF” position. The fireplace must remain off for 5 minutes.
Note: If the blower is running, allow it to complete its cycle and
shut down automatically before turning the main power switch
to the “OFF” position. This will ensure that the fireplace has
been properly cooled down.
After waiting 5 minutes, the Main Power Switch can be moved to
the “ON” position. Burner operation will resume.
30067-0-0512
Humidifier Operation
This fireplace has been designed with an automatic humidifier.
As the fireplace operates, condensate is created and collected inside the pump housing. The condensate is then pumped to a pan
where it evaporates into the air stream. The humidifier may not
operate with every cycle.
How to Remove the Glass Door - Bay Window Models
Remove the top of the cabinet by grasping it on the sides and lifting off of the fireplace.
While the condensate is being transferred to the pan, it is normal
to hear a slight hissing sound. The Humidifier light will be illuminated while the condensate is being transferred.
If applicable, remove the surround.
Next, open the panels on the right and left sides.
How to Clean the Glass Door
WARNING
Do not operate this fireplace without the glass door
in place. Do not operate if the glass front is broken or
damaged. Do not use the glass door if the gasket is
missing or damaged.
Over time, the glass door will need to be cleaned. For best results,
it is recommended to clean the glass with high quality fireplace
glass cleaner.
If the glass needs to be replaced, contact a qualified service person. Only glass approved by Empire Comfort Systems Inc. can be
used, any other product will void the warranty.
To clean inside the glass door, the door will need to be removed.
Then, release the four door latches, two on each side of the firebox.
CAUTION
Do not attempt to clean the glass when it is hot. Do
not strike or hit the glass.
CAUTION
Be certain the glass is cool before handling.
30067-0-0512
Page 11
Finally, hold the glass frame and carefully pull the glass door towards you. DO NOT damage or remove the gasket from the door.
Second, release the two door latches on the underside of the firebox.
Next, hold the bottom of the glass door and lift, keeping a firm grip
on the door.
How to Remove the Glass Door - Fireplace Models
First, for fireplaces equipped with the louvered front panel, remove
the lower louvered panel by lifting up, then pulling out.
Finally, keep the glass angled to the firebox, then gently pull the
glass door away from the heater. DO NOT damage or remove the
gasket from the door.
For fireplaces equipped with the FHK louverless surround, remove
the surround by lifting up, then pulling out.
Page 12
30067-0-0512
Service and Maintenance
Although most service should be conducted by a qualified service
person, there are several things that can be checked to ensure
safe and comfortable operation.
Keep the area surrounding the fireplace free from any types of
combustible materials. The filter should be checked and cleaned
on a monthly basis. All other maintenance should be conducted
by a qualified service person.
For Fireplace Models equipped with louverless FHK surrounds,
the entire surround must be removed from the fireplace. This is
accomplished by lifting and removing the surround from the support bracket hooks. Remove the filter retainers and filters from the
inside bottom flange by removing the screw holding the filter retainer in place.
Circulating Air Blower
The circulating air blower should be checked and cleaned annually by a qualified service person to ensure that your appliance is
operating efficiently. Any dirt or lint can affect the operation of the
blower.
Heat Exchanger
The heat exchanger is located on the backside of the fireplace.
The heat exchanger should be inspected and cleaned annually by
a qualified service person.
Filter
The filter is located on the inside of the lower louver panel on
Bay Window Models and on Fireplace models equipped with FIK,
FFK or FWK Surrounds. On Fireplace models equipped with the
FHK louverless surround, the filter is located on the inside bottom
flange of the surround (FHK Surrounds).
To clean the filter on fireplaces equipped with the lower louver
panel, remove the panel and disengage the filter rod from its retaining holes.
The filters may be rinsed with water or blown clean with compressed air. Allow the filters to dry completely before reinstalling
them.
RECOMMENDED MAINTENANCE
MAINTENANCE ITEM
Verify the area is free from combustible materials.
FREQUENCY OF MAINTENANCE
MONTHLY BY
HOMEOWNER
ANNUALLY BY
SERVICE PERSON
X
X
Verify the combustion and ventilation air is not restricted.
X
Verify the flue and inlet pipes do not have any cracks or holes.
X
Verify burner flame.
X
Clean the blower compartment
X
Clean the burner.
X
Verify the condensate system is clean and leak free.
X
Clean the filter
X
X
Clean the glass
X
X
Clean the heat exchanger
30067-0-0512
X
Page 13
WARRANTY
Empire Comfort Systems Inc. warranties this hearth product to be free from defects at the time of purchase and for the
periods specified below. Hearth products must be installed by a qualified technician and must be maintained and operated safely, in accordance with the instructions in the owner’s manual. Empire will not warranty any Château, Boulevard,
or Mantis fireplace that is not installed by the selling dealer or that dealer’s direct contract agents. This warranty applies
to the original purchaser only and is not transferable.
All warranty repairs must be accomplished by a qualified gas appliance technician.
Limited Lifetime Parts Warranty – Combustion Chamber, Heat Exchanger, and Factory-Installed Glass
If the combustion chamber, heat exchanger (see parts list) or factory-installed glass fails because of defective
workmanship or material, Empire will repair or replace at Empire’s option.
Limited Three-Year Parts Warranty – All Other Components
(Except Remote Controls, Thermostats, Accessories and Replacement Parts)
Should any part fail because of defective workmanship or material within three years from the date of purchase,
Empire will repair or replace at Empire’s option..
Limited One-Year Parts Warranty – Remote Controls, Thermostats, Accessories, and Parts
Should any remote control, thermostat, accessory, or other part fail because of defective workmanship within one
year from the date of purchase, Empire will repair or replace at Empire’s option.
Duties Of The Owner
The appliance must be installed by a qualified installer and operated in accordance with the instructions furnished
with the appliance.
A bill of sale, cancelled check, or payment record should be kept to verify purchase date and establish warranty
period.
Ready access to the appliance for service.
What Is Not Covered
Damages that might result from the use, misuse, or improper installation of this appliance.
Travel, diagnostic costs and freight charges on warranted parts to and from the factory.
Claims that do not involve defective workmanship or materials.
Unauthorized service or parts replacements.
Removal and reinstallation cost.
Inoperable due to improper or lack of maintenance.
How To Get Service
To make a claim under this warranty, please have your receipt available and contact your installing dealer. Provide the dealer with the model number, serial number, type of gas, and purchase verification. The installing dealer is responsible for providing service and will contact the factory to initiate any warranted parts replacements. Empire will make
replacement parts available at the factory. Shipping expenses are not covered.
If, after contacting your Empire dealer, service received has not been satisfactory, contact: Consumer Relations
Department, Empire Comfort Systems Inc., PO Box 529, Belleville, Illinois 62222, or send an e-mail to [email protected] with “Consumer Relations” in the subject line.
Your Rights Under State Law
This warranty gives you specific legal rights, and you may also have other rights, which vary from state to state.
Page 14
30067-0-0512
APPLIANCE MAINTENANCE HISTORY
Date
Dealer Name
30067-0-0512
Service Technician Name
Service Performed/Notes
Page 15
EMPIRE
Comfort Systems
Empire Comfort Systems Inc.
918 Freeburg Ave. Belleville, IL 62220
If you have a general question about our products, please e-mail us at
[email protected].
If you have a service or repair question, please contact your dealer.
www.empirecomfort.com
Page 16
30067-0-0512
EMPIRE
Comfort Systems
™
MANUEL D’UTILISATION
AVERTISSEMENT
LA VITRE CHAUDE PEUT
CAUSER DES BRÛLURES.
NE TOUCHEZ PAS À LA VITRE
JUSQU’À CE QU’ELLE
SOIT REFROIDIE.
NE PERMETTEZ JAMAIS AUX
ENFANTS DE TOUCHER LA VITRE.
VENTILATION MÉCANIQUE
FOYER À HAUTE EFFICACITÉ
AVERTISSEMENT : Si l’installation, l’usage et l’entretien de ce
produit ne sont pas faits selon les instructions du fabricant,
ce produit peut vous exposer à des matières contenues dans
le carburant ou provenant de la combustion du carburant
lesquelles peuvent causer la mort ou de sérieuses maladies.
Installateur :
Laissez ce manuel avec l’appareil.
Consommateur : Conservez ce manuel pour référence future.
AVERTISSEMENT : Si vous ne suivez pas exactement ces
instructions, un incendie ou une explosion peut se produire
causant des dommages à la propriété, des blessures
corporelles ou la mort.
—
—
—
’entreposez pas ni utilisez d’essence ni d’autres
N
vapeurs et liquides inflammables à proximité de cet
appareil ou tout autre appareil.
QUE FAIRE SI VOUS SENTEZ UNE ODEUR DE GAZ
• N’essayez par d’allumer un appareil quelconque.
• Ne touchez pas à aucun interrupteur électrique,
n’utilisez pas de téléphone dans votre immeuble.
• Appelez immédiatement votre fournisseur de gaz
en utilisant le téléphone du voisin. Suivez les
instructions du fournisseur de gaz.
• Si vous ne pouvez pas joindre le fournisseur de gaz,
appelez le service d’incendie.
L’installation et l’entretien doivent être effectués par un
installateur qualifié, une agence de service ou par le
fournisseur de gaz.
MODÈLES DE FENÊTRE EN BAIE
BF28(B,C,G)M(K)(N,P)-5
BP28(B,C,G)M(K)(N,P)-5
BI28(B,C,G)M(N,P)-5
MODÈLES DE DEVANTURE PLATE
FF28BM(K)(N,P)-3
FW28BM(K)(N,P)-3
FI28BM(N,P)-3
Les jeunes enfants doivent être surveillés attentivement
lorsqu’ils se trouvent dans la même pièce que l’appareil. Les
tout-petits, les jeunes enfants et autres personnes peuvent
être susceptibles aux brûlures de contact accidentel. Une
barrière physique est recommandée s’il y a des personnes à
risque dans la maison. Pour limiter l’accès à un foyer ou un
poêle, installez une barrière de sécurité ajustable pour garder
les tout-petits, les jeunes enfants et autres personnes à risque
de la salle et à l’écart des surfaces chaudes.
Cet appareil peut être installé dans une maison après-vente,
préfabriquée et installée à demeure (É.-U. uniquement) ou
dans une maison mobile, où il n’est pas interdit par les codes
d’État ou les codes locaux.
Cet appareil est à utiliser uniquement avec le type de gaz
indiqué sur la plaque signalétique. Cet appareil n’est pas
convertible pour une utilisation avec d’autres gaz à moins
qu’une trousse homologuée soit utilisée.
Page 1
RENSEIGNEMENTS IMPORTANTS SUR LA SÉCURITÉ
CECI EST UN APPAREIL DE CHAUFFAGE
Les marquages de sécurité sont fréquemment utilisés dans ce manuel pour désigner un degré
ou niveau de gravité et ne devront pas être ignorés.
AVERTISSEMENT indique une situation potentiellement dangereuse que si elle n’est pas
évitée, peut entraîner des blessures ou la mort.
ATTENTION indique une situation potentiellement dangereuse que si elle n’est pas évitée,
peut entraîner des blessures mineures ou modérées ou des dommages matériels.
AVERTISSEMENT
Cet appareil doit être installé et réparé par un technicien
qualifié qui est familier avec l’installation correcte et le
fonctionnement du foyer de ventilation mécanique à haute
efficacité Mantis. Les installateurs qui ne sont pas familiers
avec l’installation de Mantis et qui ont des questions, doivent
communiquer avec Empire Comfort Systems, Inc. avant
d’installer l’appareil afin d’éviter la création d’un état de
fonctionnement dangereux.
•
cause des hautes températures, cet appareil doit être
À
situé dans un endroit non encombré et loin des meubles et
rideaux.
•
es enfants et adultes doivent être avertis des dangers de
L
températures de surface élevées et devraient rester à l’écart
pour éviter des brûlures ou pour éviter d’enflammer leurs
vêtements.
•
es jeunes enfants doivent être surveillés attentivement
L
lorsqu’ils se trouvent dans la même pièce que l’appareil. Les
tout-petits, les jeunes enfants et autres personnes peuvent
être susceptibles aux brûlures de contact accidentel. Une
barrière physique est recommandée s’il y a des personnes
à risque dans la maison. Pour limiter l’accès à un foyer ou
un poêle, installez une barrière de sécurité ajustable pour
garder au loin les tout-petits, les jeunes enfants et autres
personnes à risque de la salle et à l’écart des surfaces
chaudes.
•
es vêtements ou autres matériaux inflammables ne doivent
L
pas être placés sur ou près de l’appareil.
•
Toute grille de protection ou tout écran retiré pour l’entretien
d’un appareil doit être replacé avant de remettre en marche
l’appareil.
•
Gardez propres le brûleur et le compartiment de contrôle.
•
Pour les installations dans des maisons pré-fabriquées (ÉtatsUnis seulement) ou des maisons mobiles ou résidentielles
qui peuvent être utilisées avec le gaz naturel ou le gaz de
pétrole liquéfié lorsque les dispositions nécessaires sont
prises pour effectuer une simple conversion d’un gaz à
l’autre.
Page 2
AVERTISSEMENT
L’installation et la réparation devront être effectuées par un
TECHNICIEN QUALIFIÉ. L’appareil devrait être inspecté avant
l’utilisation et au moins une fois par an par un technicien
qualifié. Un nettoyage plus fréquent peut être nécessaire en
raison des peluches provenant des tapis, matériaux de litière,
etc. Il est impératif que les compartiments de commande,
les brûleurs et les passages de circulation d’air de l’appareil
restent propres.
•
e mettez rien autour du radiateur qui pourrait obstruer le
N
débit de combustion et de la ventilation d’air.
•
ardez la zone de l’appareil libre de tout matériau
G
combustible, d’essence et d’autres vapeurs et de liquides
inflammables.
•
xaminez périodiquement le système de ventilation et
E
remplacez les pièces endommagées.
•
aites un inspection visuelle de temps en temps du brûleur.
F
Nettoyez et remplacez les pièces défectueuses.
•
N’utilisez pas ce radiateur si aucune pièce a été sous l’eau.
Appelez immédiatement un technicien de service qualifié
pour inspecter le radiateur et remplacer toute pièce du
système de commande et du contrôle du gaz qui a été sous
l’eau.
•
e faites pas fonctionner cet appareil sans le panneau avant
N
installé.
30067-0-0512
RENSEIGNEMENTS SUR LA SÉCURITÉ POUR LES
UTILISATEURS DE GAZ DE PÉTROLE LIQUÉFIÉS (GPL)
Le propane est un gaz inflammable qui peut causer des incendies
et des explosions. Dans son état naturel, le propane est inodore et
incolore. Vous ne connaissez peut-être pas toutes les précautions
de sécurité ci-dessous qui peuvent protéger à la fois vous et votre
famille d’un accident. Lisez-les attentivement dès maintenant,
ensuite passez en revue point par point les mesures de sécurité avec
les membres de votre famille. Un jour, il n’y aura pas une minute à
perdre, la sécurité de chacun dépendra de savoir exactement quoi
faire. Si, après avoir lu l’information suivante, vous voulez de plus
amples renseignements, s’il vous plaît contactez votre fournisseur
de gaz.
ODEUR AVERTISSEUSE DU GAZ DE PÉTROLE LIQUÉFIÉS
Si une fuite de gaz se produit, vous devriez être capable de sentir le gaz en raison de la substance odorante ajoutée au GPL.
C’est le signal pour passer à l’action immédiate!
•N’utilisez pas des interrupteurs électriques, allumettes; utilisez
votre téléphone. Ne faites rien qui pourrait enflammer le gaz.
•Évacuez tout le monde a l’extérieur du bâtiment, du véhicule, de
la remorque, ou des lieux. Faites cela IMMÉDIATEMENT.
•Fermez toutes les soupapes d’alimentation des réservoirs et
des bouteilles de gaz.
•Le gaz de pétrole liquéfiés est plus lourd que l’air et peut
s’accumuler dans des endroits bas comme les sous-sols. Lorsque
vous avez des raisons de suspecter une fuite de gaz, n’allez pas
dans les sous-sols ou les endroits bas. Attendez que les pompiers
vous assurent de la sûreté de ces endroits avant d’y retourner.
•Utilisez le téléphone de votre voisin et appelez un technicien
qualifié GPL et le service d’incendie. Même si vous ne pouvez
plus sentir le gaz, n’allumez pas le gaz à nouveau. Ne rentrez
pas le bâtiment, le véhicule, la remorque, ou les lieux.
•Finalement, laissez le technicien et les pompiers vérifier
les fuites de gaz. Demandez-les d’aérer les lieux avant d’y
retourner. Les techniciens de service GPL correctement formés
devront réparer la fuite, puis vérifier et rallumer l’appareil à gaz
pour vous.
AUCUNE ODEUR DÉCELÉE - FAIBLE ODEUR
Il y a des personnes qui ne peuvent pas sentir très bien. Il y
a des personnes qui ne peuvent pas sentir l’odeur chimique
mise dans le gaz. Vous devez chercher à savoir si vous
pouvez sentir la substance odorante dans le propane. Fumer
peut décroître votre capacité de sentir. Sentir une odeur pour un
certain temps peut affecter votre sensibilité ou votre capacité de
déceler cette odeur. Quelquefois d’autres odeurs, dans le même
endroit, peuvent masquer l’odeur du gaz. Il y a des personnes qui
ne peuvent pas sentir l’odeur du gaz ou que leur attention est sur
quelque chose d’autre. Penser à sentir l’odeur du gaz peut faciliter la
capacité de sentir.
La substance odorante du GPL est incolore et peut s’affaiblir selon
certaines circonstances. Par exemple, s’il y a une fuite souterraine, le
mouvement du gaz à travers le sol peut filtrer la substance odorante.
Les substances odorantes dans le GPL sont également affectées
par l’oxydation. Cet affaiblissement peut survenir s’il y a de la rouille
à l’intérieur du réservoir de stockage ou dans les tuyaux de fer pour
le gaz.
La substance odorante dans le gaz échappé peut être absorbée ou
absorbée sur ou dans les murs, la maçonnerie et d’autres matériaux
et de tissus dans une chambre. Cela enlèvera une quantité de
substance odorante du gaz, affaiblissant l’intensité de la senteur.
Le GPL peut stratifier dans un endroit fermé, et l’intensité de
l’odeur peut varier à différents niveaux. Puisqu’il est plus pesant
que l’air, l’odeur peut être plus prononcée à un bas niveau. Soyez
toujours sensible à la moindre odeur de gaz. Si vous décelez une
odeur, réagissez comme si vous aviez une sérieuse fuite. Passez
immédiatement à l’action en suivant les instructions précédentes.
QUELQUES POINTS À RETENIR
•Apprenez à reconnaître l’odeur du GPL. Votre distributeur de
propane local peut vous donner un échantillon que vous grattez
et sentez. Utilisez-le pour savoir reconnaître l’odeur du propane.
Si vous soupçonnez que votre GPL a une odeur faible ou
anormale, contactez votre distributeur de propane.
•Si vous n’êtes pas qualifié, n’allumez pas la veilleuse, ne faites
pas d’entretien, ou ne faites pas des ajustements aux appareils
sur le système GPL. Si vous être qualifié, soyez conscient de
l’odeur du GPL avant et pendant que vous allumez la veilleuse,
effectuez l’entretien ou faites les ajustements.
•Quelquefois un sous-sol ou une maison enfermée a une
senteur de moisi qui peut dissimuler l’odeur du GPL. N’allumez
pas la veilleuse, ne faites pas d’entretien, ou ne faites pas des
ajustements dans un endroit où les conditions sont telles que
vous ne pouvez pas déceler l’odeur du GPL en cas de fuite.
•L’affaiblissement d’odeur, attribuable à l’oxydation par la
rouille ou l’absorption sur les parois des nouveaux réservoirs
et bouteilles, est possible. Par conséquent, les personnes
devraient être particulièrement attentives et prudentes lorsque
de nouveaux réservoirs ou bouteilles sont mis en service.
L’affaiblissement d’odeur peut se produire dans les nouveaux
réservoirs ou dans les vieux réservoirs qui sont réinstallés, s’ils
sont remplis et inutilisés pour une longue période de temps. La
formation de rouille à l’intérieur des bouteilles et des réservoirs
30067-0-0512
qui ne sont pas utilisés pour une longue période de temps
peut provoquer un affaiblissement de l’odeur. Si vous pensez
que de telles conditions existent, un test de senteur de gaz est
recommandé périodiquement. Si vous avez des questions à
propos de l’odeur du gaz, appelez votre distributeur de propane.
En toute circonstance, un test de senteur périodique du gaz
propane est une mesure de prudence.
•Si en aucun temps vous ne sentez pas la substance odorante
du propane et que vous devriez, assumez que vous avez une
fuite. Agissez immédiatement selon les recommandations cidessus, décrivant les actions à suivre en cas de décèlement de
gaz propane.
•Si vous découvrez que le réservoir est complètement vide de gaz
(le réservoir n’a aucune pression de vapeur), fermez la soupape
du réservoir immédiatement. Si la soupape du réservoir reste
ouverte, le réservoir peut aspirer de l’air par les ouvertures, par
exemple les orifices de la veilleuse. Si ceci survient, l’intérieur
peut subir une formation supplémentaire de rouille. Si la soupape
est restée ouverte, considérez le contenant comme étant un
nouveau réservoir. Soyez toujours certain que le réservoir est
sous pression de vapeur; fermez la soupape du réservoir avant
qu’il ne soit complètement vide et faites le remplir.
Page 3
Fonctionnement du radiateur
Avant de commencer
1. Vérifiez que l’appareil est alimenté.
Si la puissance électrique est présente, le voyant d’alimentation
sur le panneau de commande avant doit être allumé. Si le
voyant d’alimentation n’est pas allumé, vérifiez que le radiateur
est branché et que le disjoncteur et l’interrupteur d’alimentation
principal sont en marche.
Comment mettre en marche le radiateur - les
deux brûleurs en marche
1. Mettez les deux interrupteurs de brûleur, avant et arrière,
en position ON et réglez la télécommande à thermostat sur
la température souhaitée ou mettez la télécommande sur
ON. Les voyants des brûleurs avant et arrière doivent être
allumés, avec le voyant du brûleur arrière clignotant.
INTERRUPTEUR
DU BRÛLEUR
AVANT
INTERRUPTEUR
DU BRÛLEUR
ARRIÈRE
ARRÊT
MARCHE
2. La lumière du ventilateur aspirant s’allumera lorsque le
radiateur se prépare à s’enflammer.
2. Vérifiez que l’alimentation principale de gaz est en
marche.
Le robinet d’arrêt doit être à la position OUVERT.
FERMER
3. Dans les 15 à 20 secondes, l’allumeur arrière sera rouge, et
le brûleur s’allumera.
4. Après que le brûleur arrière est allumé, la lumière avant
clignotera et l’allumeur va commencer à rougeoyer et le
brûleur avant s’allumera.
OUVERT
5. La lumière de la soufflante s’allumera après 3 à 5 minutes.
La soufflante s’avancera automatiquement à une vitesse plus
haute si nécessaire. La vitesse de la soufflante sera indiquée
sur le panneau de commande avant.
Page 4
30067-0-0512
Comment mettre en marche le radiateur - un
brûleur seulement
1. Allumez le brûleur arrière ou avant en appuyant sur
l’interrupteur à la position « MARCHE ». Si le brûleur arrière
est alimenté, le voyant arrière s’allume. Si le brûleur avant est
alimenté, le voyant avant s’allume.
Brûleur arrière seulement
Le tableau ci-dessous vous donne un aperçu du taux d’écoulement
pour les brûleurs d’avant et d’arrière.
Type de modèle
Capacité du
brûleur avant
(Btu/h)
Capacité du
brûleur arrière
(Btu/h)
Fenêtre en baie
9,000
19,000
Face plate
13,000
15,000
Exemple : Si le brûleur avant est en marche et que vous voulez
plus de chaleur dans la pièce et vous voulez changer le brûleur
arrière, allumez premièrement le brûleur arrière en appuyant sur
l’interrupteur à la position « MARCHE », attendez une seconde,
ensuite allumez le brûleur avant en appuyant sur l’interrupteur à la
position « ARRÊT ». Si cette séquence n’est pas suivie, il y aura
verrouillage du radiateur, et nécessitera d’être remis en marche.
Comment remettre en marche le radiateur
Brûleur avant seulement
2. La lumière du ventilateur aspirant s’allumera lorsque le
radiateur se prépare à s’enflammer.
Si pour quelque raison le radiateur doit être remis en marche,
enlevez le couvercle d’aérage du brûleur, ensuite appuyez sur
l’interrupteur d’alimentation principal à la position « OFF » (arrêt).
Le radiateur doit rester éteint pendant 5 minutes. Remarque :
Si la soufflante est en marche, laissez-la terminer son cycle
et s’éteindre automatiquement avant de mettre l’interrupteur
d’alimentation principal en position OFF. Cela permet d’assurer un
refroidissement correct du radiateur.
Après attendre 5 minutes, l’interrupteur d’alimentation principal
peut être actionné à la position « ON » (marche). Le brûleur sera
remis en marche.
3. Dans les 15 à 20 secondes, l’allumeur arrière sera rouge, et
le brûleur s’allumera.
4. La lumière de la soufflante s’allumera après 3 à 5 minutes.
La soufflante s’avancera automatiquement à une vitesse plus
haute si nécessaire. La vitesse de la soufflante sera indiquée
sur le panneau de commande avant.
Fonctionnement de l’humidificateur
Le foyer de ventilation mécanique à haute efficacité Mantis
comprend un humidificateur automatique intégré dans le
radiateur. Pendant que le radiateur fonctionne, le condensat est
créé et collecté à l’intérieur du radiateur. Le condensat est ensuite
transféré à un plateau où il évapore dans le courant d’air.
Comment changer de brûleurs
Si le radiateur fonctionne sur un brûleur, et qu’il est désiré de
changer et de faire fonctionner l’autre brûleur, il faut premièrement
mettre en marche l’autre brûleur avant d’arrêter le brûleur original.
30067-0-0512
Pendant que le condensat est transféré au plateau, il est normal
d’entendre un léger sifflement. La lumière de l’humidificateur
s’allumera pendant que le condensat est transféré.
Page 5
Comment éteindre le radiateur
Pour éteindre le radiateur, il suffit de mettre le ou les interrupteurs
de brûleur en position OFF, d’éteindre la télécommande ou de
baisser le réglage de température. Les brûleurs s’éteindront
instantanément, mais la soufflante de circulation continuera de
fonctionner jusqu’à ce que le radiateur refroidit. Il est normal pour
le brûleur de s’allumer et de s’éteindre pendant qu’il refroidit.
INTERRUPTEUR
DU BRÛLEUR
AVANT
INTERRUPTEUR
DU BRÛLEUR
ARRIÈRE
ARRÊT
MARCHE
Vérifiez que les interrupteurs des brûleurs sont à la position ARRÊT,
et qu’ils ont été depuis 5 minutes. Appuyez sur le bouton rouge
situé près des interrupteurs des brûleurs. Le bouton s’allumera.
INTERRUPTEUR
DU BRÛLEUR
ARRIÈRE
AVERTISSEMENT
Ne faites pas fonctionner cet appareil sans la porte vitrée en
place. Ne faites pas fonctionner si la porte vitrée est brisée
ou endommagée. N’utilisez pas la porte vitrée si le joint
d’étanchéité est manquant ou endommagé.
Au fil du temps, la porte vitrée doit être nettoyée. Pour de meilleurs
résultats, il est recommandé de nettoyer la vitre avec un nettoyant
pour vitres de foyer.
Comment faire fonctionner en mode
économique
INTERRUPTEUR
DU BRÛLEUR
AVANT
Comment nettoyer la porte vitrée - renseignements généraux
BOUTON
ÉCONOMIQUE
Si la vitre doit être remplacée, contactez un technicien qualifié.
Seule la vitre approuvée par l’Empire Comfort Systems Inc. peut
être utilisée, tout autre produit annule la garantie.
Pour nettoyer la porte vitrée, la porte doit être enlevée.
ATTENTION
N’essayez pas de nettoyer la vitre lorsqu’elle est chaude. Ne
frappez pas la vitre.
ATTENTION
Assurez-vous que la vitre est refroidie avant de la manipuler.
Comment nettoyer la porte vitrée - modèles de
fenêtre en baie
Premièrement, enlevez le dessus du cabinet en tenant les côtés
et soulevez-le.
ARRÊT
MARCHE
Ensuite, appuyez sur les interrupteurs des deux brûleurs à la
position MARCHE.
Le brûleur avant sera mis en marche et restera allumé. Le brûleur
arrière sera mis en marche par le thermostat.
Comment désactiver en mode économique
Pour désactiver en mode économique, appuyez et relâchez
le bouton rouge. Si cela est souhaitable, les interrupteurs des
brûleurs peuvent être éteints « ARRÊT » ou le thermostat
contrôlera la chaleur.
INTERRUPTEUR
DU BRÛLEUR
AVANT
INTERRUPTEUR
DU BRÛLEUR
ARRIÈRE
Page 6
BOUTON
ÉCONOMIQUE
ARRÊT
MARCHE
30067-0-0512
Modèles de fenêtre en baie - suite
Deuxièmement, ouvrez les panneaux des côtés à la droite et à la
gauche.
Comment nettoyer la porte vitrée - modèles de
devanture plate
Premièrement, enlevez le panneau d’aérage en le soulevant,
ensuite soulevez-le.
Ensuite, relâchez les deux loquets de chaque côté de la porte de
la chambre de combustion.
Tenez soigneusement le châssis du verre et tirez la porte
vitrée vers vous. N’endommagez pas ou n’enlevez pas le joint
d’étanchéité de la porte.
Deuxièment, relâchez les deux loquets de la porte sur la partie
inférieure de la chambre de combustion.
30067-0-0512
Page 7
Modèles de devanture plate - suite
Ensuite, tenez le bas de la porte vitrée et soulevez-le, en gardant
une prise ferme sur la porte.
COMPARTIMENT DES PILES
Comment changer les piles du récepteur de
télécommande
1. Déposez le panneau à persiennes inférieur du radiateur.
2. Mettez l’interrupteur d’alimentation principal en position OFF.
Maintenez la vitre inclinée à la chambre de combustion, ensuite
tirez la porte vitrée doucement du radiateur. N’endommagez pas
ou n’enlevez pas le joint d’étanchéité de la porte.
3. Soulevez le récepteur de télécommande du dessus du carter
de soufflante. Le récepteur de télécommande est maintenu sur
le carter de soufflante par de la bande Velcro. Ne débranchez
pas les fils.
EMPLACEMENT DU RÉCEPTEUR
ADJ.
LEARN
OFF
Comment changer les piles du système de
télécommande
La télécommande manuelle et le récepteur de télécommande
(placé à l’intérieur du radiateur) fonctionnent tous les deux sur
piles. Ces piles doivent être changées à intervalles réguliers dans
le cadre de l’entretien normal du radiateur.
REMOTE
ON
4. Faites glisser le couvercle pour ouvrir le compartiment des
piles sous le récepteur de télécommande.
COMPARTIMENT
DES PILES
Comment changer les piles de la télécommande
ON
TE
MO
RE
F
Faites glisser le couvercle pour ouvrir le compartiment des piles
au dos de la télécommande.
OF
Page 8
30067-0-0512
Service et maintenance
Bien que la plupart des services devraient être effectués par un
technicien qualifié, il y a plusieurs choses qui peuvent être vérifiées
pour assurer un fonctionnement sûr et confortable.
Les alentours du radiateur doivent être exempts de tous types
de matériaux combustibles, et le filtre doit être vérifié et nettoyé
chaque mois. Tous les autres travaux d’entretien devraient être
effectués par un technicien qualifié.
ENTRETIEN RECOMMANDÉ
FRÉQUENCE D’ENTRETIEN
ARTICLE D’ENTRETIEN
Vérifier que
combustibles.
l’endroit
est
exempt
de
matières
MENSUEL
ANNUEL
VÉRIFIER PAR LE
PROPRIÉTAIRE OCCUPANT
VÉRIFIER PAR UN
TECHNICIEN
X
X
Vérifier que la combustion et la ventilation ne sont pas
limitées.
X
Vérifier que les tuyaux de cheminée et d’entrée n’ont pas
de fissures ou de trous.
X
Vérifier la flamme du brûleur.
X
Nettoyer le compartiment du brûleur
X
Nettoyer les brûleurs.
X
Vérifier que le système de condensat est propre et
dégagé de peluche.
X
30067-0-0512
Page 9
MAINTENANCE HISTORIQUE DE L’APPAREIL
Date
Page 10
Nom du distributeur
Nom du technicien de service
Entretien effectué/notes
30067-0-0512
MAINTENANCE HISTORIQUE DE L’APPAREIL
Date
Nom du distributeur
30067-0-0512
Nom du technicien de service
Entretien effectué/notes
Page 11
EMPIRE
Comfort Systems
Empire Comfort Systems Inc.
918 Freeburg Ave. Belleville, IL 62220
Si vous avez une question générale sur nos produits, veuillez nous faire parvenir un
courriel à [email protected].
Si vous avez une question sur l’entretien ou sur la réparation, veuillez communiquer
avec le marchand.
www.empirecomfort.com
Page 12
30067-0-0512