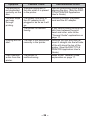
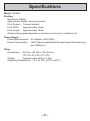
1
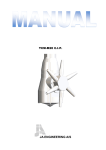
E
CW-E60
User’s Guide
In addition to CW-E60 operating precautions, these instructions
also include information about installing the software that comes
bundled with the CW-E60 and how to connect it to your computer.
For information about using the bundled software, see the
documentation on the CD-ROM that comes with the CW-E60.
Be sure to read the Safety Precautions contained in this manual
before trying to use the printer for the first time, and always
keep this manual on hand for future reference.
• CASIO COMPUTER CO., LTD. shall not be held liable for any loss or
claims by you or any other person or entity that may arise through the
use of this product.
• Reproduction of this manual in any form, either in part or its entirety, is
forbidden without the express permission of CASIO COMPUTER CO.,
LTD. You are granted permission to use this software for your own personal
use. Any and all other use of this software without the express permission
of CASIO COMPUTER CO., LTD. is forbidden under international
copyright laws.
• The contents of the manual are subject to change without notice.
• We recommend that you print on a disc* before you record anything on
it. Printing on a disc that already has data recorded on it can cause the
data to become corrupted.
• Note that CASIO COMPUTER CO., LTD. shall not be held liable for any
loss or corruption of data on discs arising through the use of this printer.
* CD-R, CD-RW, DVD-R, etc.
RCA502822-001V01
MO0603-B
–1–
Important!
The copyright of this User’s Guide and all rights related to the software shall revert
to CASIO COMPUTER CO., LTD.
• Microsoft, Windows and Windows NT are registered trademarks or trademarks of
Microsoft Corporation in the United States and other countries.
• Pentium is a registered trademark of Intel Corporation in the United States.
• Macintosh and Mac OS are registered trademarks of Apple Computer, Inc. in the
United States and other countries.
• Adobe and Adobe Acrobat are trademarks of Adobe Systems Incorporated.
• Other company and product names used herein may also be company and product
names of others.
© Copyright 2006 CASIO COMPUTER CO., LTD. All rights reserved
–2–
GUIDELINES LAID DOWN BY FCC RULES FOR USE OF THE UNIT
IN THE U.S.A. (not applicable to other areas).
NOTICE
This equipment has been tested and found to comply with the limits for a Class B
digital device, pursuant to Part 15 of the FCC Rules. These limits are designed to
provide reasonable protection against harmful interference in a residential
installation. This equipment generates, uses and can radiate radio frequency energy
and, if not installed and used in accordance with the instructions, may cause
harmful interference to radio communications. However, there is no guarantee
that interference will not occur in a particular installation. If this equipment does
cause harmful interference to radio or television reception, which can be determined
by turning the equipment off and on, the user is encouraged to try to correct the
interference by one or more of the following measures:
• Reorient or relocate the receiving antenna.
• Increase the separation between the equipment and receiver.
• Connect the equipment into an outlet on a circuit different from that to which
the receiver is connected.
• Consult the dealer or an experienced radio/TV technician for help.
Caution: Changes or modification to the product not expressly approved by CASIO
could void the user’s authority to operate the product.
FCC WARNING
Changes or modifications not expressly approved by the party responsible for
compliance could void the user’s authority to operate the equipment.
Proper connectors must be used for connection to host computer and/or
peripherals in order to meet FCC emission limits.
Cable specified for PC Windows® compatible PC to CW-E60
–3–
Declaration of Conformity
Model Number: CW-E60
Trade Name: CASIO COMPUTER CO., LTD.
Responsible party: CASIO, INC.
Address: 570 MT.PLEASANT AVENUE, DOVER, NEW JERSEY 07801
Telephone number: 201-361-5400
This device complies with Part 15 of the FCC Rules. Operation is subject to the
following two conditions: (1) This device may not cause harmful interference, and (2)
this device must accept any interference received, including interference that may
cause undesired operation.
Safety Precautions
Thank you for purchasing this quality CASIO product.
Before using it, be sure to read the following Safety Precautions. Keep the manual in
a convenient location for future reference when necessary.
Warning
This symbol indicates information that, if ignored or applied incorrectly, creates
the possibility of death or serious personal injury.
Caution
This symbol indicates information that, if ignored or applied incorrectly, creates
the possibility of personal injury or material damage.
Examples of graphic markings
indicates something you should not do. The symbol shown here indicates
you should not try to take the unit apart.
indicates something you should do. The symbol shown here indicates
you should unplug the unit from the wall outlet.
–4–
Warning
Smoke, abnormal odor, overheating, and other
abnormalities
Continued use of the product while it is emitting smoke or strange odor,
or overheating creates the risk of fire and electric shock. Immediately
perform the following steps whenever any of the above symptoms are
present.
1. Disconnect the USB cable.
2. Unplug the power cord from the wall outlet.
3. Contact your original retailer.
Power cord, AC adaptor, USB cable
Misuse of the power cord, AC adaptor, or USB cable creates the risk of
fire and electric shock.
Make sure you follow the precautions listed below.
• Use only items that are specified for the product.
• Use only a power source whose output matches the rating marked on
the plate on the back of the product.
• Never plug the power cord into a wall outlet that is shared by other
devices, or into a shared extension cord.
Power cord, AC adaptor, USB cable
Misuse of the power cord, AC adaptor, or USB cable can damage it and
create the risk of fire and electric shock. Make sure you follow the
precautions listed below.
• Never place heavy objects on these items or subject them to direct
heat.
• Never modify these items or subject them to bending.
• Do not subject these items to twisting or pulling.
• Should the power cord, AC adaptor, or USB cable or its plug ever
become damaged, contact your original retailer.
Power cord, AC adaptor, USB cable
• Never touch the power cord, AC adaptor, or USB cable or its plugs
while your hands are wet. Doing so creates the risk of electric shock.
• Never use the power cord or AC adaptor in areas where it may become
wet. Water creates the risk of fire and electric shock.
• Never place a vase or any other liquid container on top of the power
cord, AC adaptor, or USB cable. Water creates the risk of fire and
electric shock.
–5–
Warning
Dropping and rough treatment
Continued use of the product after it has been damaged due to dropping
or other rough treatment creates the risk of fire and electric shock.
Immediately perform the following steps if the product should ever become
damaged.
1. Disconnect the USB cable.
2. Unplug the power cord from the wall outlet.
3. Contact your original retailer.
Do not disassemble or modify the product.
Never try to take the product apart or modify it in any way. Doing so
creates the risk of electric shock, burn injury, or other personal injury.
Leave all internal inspection, maintenance, and repair up to your original
retailer.
Water and foreign objects
Water, liquids, or foreign objects (especially metal) getting inside the
product creates the risk of fire and electric shock. Immediately perform
the following steps if liquid or a foreign object should ever get inside the
product.
1. Disconnect the USB cable.
2. Unplug the power cord from the wall outlet.
3. Contact your original retailer.
Do not incinerate.
Never dispose of the product by incineration. Doing so creates the risk of
fire and personal injury due to explosion.
Plastic bag precaution
Never place the plastic bags in which the product comes packed over
your head. Doing so creates the risk of suffocation.
Particular care is required in households where young children are present.
–6–
Caution
Power cord, AC adaptor, USB cable
Misuse of the power cord, AC adaptor, or USB cable can damage it and
create the risk of fire and electric shock. Make sure you follow the
precautions listed below.
• Never locate these items near a stove or other source of intense heat.
• When unplugging the power cord and USB cable, be sure to grasp the
plug. Never pull on the cord or cable.
• Plug in the power cord into the wall outlet as far as it will go.
• Plug in the USB cable into the computer and the printer as far as it will
go.
• Before leaving the product unattended for long periods (such as when
you go on a trip), unplug the power cord and USB cable.
• When not using the printer, be sure to unplug the AC adaptor from the
power outlet and disconnect the USB cable from the printer's USB port.
• At least once a year, unplug the AC adaptor from the electrical outlet
and clean any dust built up between the prongs of the power plug.
Connection precaution
Connect only items that are specified for the product to its connectors.
Connecting a non-specified item creates the risk of fire and electric shock.
Keep heavy objects off.
Never place a heavy object on top of the product. Doing so can cause the
object to lose balance and fall, creating the risk of personal injury.
Location
Avoid the locations listed below for the product. Such locations create the
risk of fire and electric shock.
• Areas subject to high humidity and large amounts of dust
• Food preparation areas or other location subjected to oil steam
• Near heaters, on a heated carpet, in direct sunlight, in a closed vehicle
parked in the sun, and other areas subjected to high heat.
Avoid unstable surfaces.
Never place the product on an unstable table, desk, etc. Doing so can
cause the product to fall, creating the risk of personal injury.
High temperature precaution
Never touch the print head or other metal objects near the head. These
items become very hot, and touching them creates the risk of burn injury.
–7–
Operating Precautions
Observe the following precautions to ensure that the printer provides you with the
years of trouble-free operation for which it is designed.
• Avoid using the printer in areas exposed to direct sunlight, and in areas subjected
to high humidity, electrostatic charge, sudden temperature changes, and
temperature extremes. Operating Temperature Range: 10°C to 35°C (50°F to 95°F)
• Never subject the printer to strong impact or shock.
• Never allow paper clips, pins, or other similar objects to get inside the printer
mechanism.
• Place the printer on a level surface when printing. A tilted surface can make normal
printing impossible.
• Unclear printing can indicate a dirty print head. If printing becomes unclear, clean
the printer head referring to the "Caring for the Printer" explanation on page 24.
• Using the printer in a location where it is exposed to direct sunlight or other strong
light can cause malfunction of its photo sensor. Use the printer in a location where
it is not exposed to strong light.
–8–
Unpacking
Check to make sure all of the following items are included.
CW-E60 Printer
Application CD-ROM
DISC TITLE PRINTER
SOFTWARE
Power cord
AC adaptor (AD-2105S)
Ink ribbon cassette
Positioning guide
USB cable
User Documentation
The CW-E60 comes with the two types of user documentation described below.
■ Printed Documentation
1 CW-E60 User’s Guide (this manual)
■ PDF File Documentation (CD-ROM)
2 DISC TITLE PRINTER Application User’s Guide
–9–
About the Bundled CD-ROM
Handling Precautions
• When handling the disc, avoid getting finger smudges, dirt, scratches, etc. on either
of its surfaces.
• Should the disc become dirty, use an eyeglass cleaning cloth or some other soft
cloth to wipe it lightly from the center of the disc outwards towards its edge. Never
use phonograph record cleaner or any other cleaning agent.
• Never write on either of the disc’s surfaces with a pen or pencil, or affix a sticker to
the disc surfaces.
• Use of a disc that is cracked or deformed, or a disc that has adhesive on it is
dangerous. Never use such a disc.
Storage Precautions
• Avoid storing discs in areas subjected to high temperature, high humidity, or direct
sunlight.
• When you are not using a disc, store it in its original case or in a commercially
available CD case.
• Avoid storing a disc so its label comes in direct contact with the surface of a vinyl
case, bag, etc.
Warning!
Never play a CD-ROM disc on any device that is not specifically designed to play
back CD-ROM discs. Audio output at a high volume setting creates the risk of damaged
hearing and damage to audio speakers.
– 10 –
Minimum System Requirements
OS: Microsoft® Windows® XP, 2000 Professional, Me, 98SE, or 98
(English/French/German/Italian/Spanish Version)
Computer: IBM PC/AT with the following specifications.
• Windows XP, 2000 Professional, Me, 98SE, or 98 pre-installed
• Pentium®II 266MHz or higher CPU or CPU recommended for running the OS you
are using.
• USB port
Memory: 64MB minimum (128MB minimum recommended)
Hard disk: At least 40MB available for installation of these applications, at least
60MB available for running the applications.
Display: Color display (256 colors minimum, Full-Color recommended), compatible
with Windows XP, 2000 Professional, Me, 98SE, or 98, and capable of
being connected to your computer.
Resolution: 800 x 600 or higher
Pointing device: Mouse or other equivalent device compatible with Windows XP,
2000 Professional, Me, 98SE, or 98
Keyboard
CD drive
• The applications may not run correctly on certain system hardware and software
configurations.
• Operation under Windows 3.1, 95, and NT®, on a Macintosh®, and under Mac®
OS is not supported.
• Operation of the applications are not guaranteed on a computer upgraded to XP,
2000 Professional, Me, 98SE, or 98.
• Operation under Windows XP Professional x64 Edition is not supported.
– 11 –
Installing the Software
This document explains how to install the bundled software on a computer running
the English version of Windows XP. For details about basic Windows operations, see
the user documentation or help for your computer.
Precautions when Installing and Uninstalling
• You need to be logged in to your computer with as an administrator (Windows XP)
or with Administrative privileges (Windows 2000) in order to install or uninstall the
software.
Software and User Documentation
Printing Software
DISC TITLE PRINTER Application
User Documentation (PDF Files)
DISC TITLE PRINTER Application User’s Guide
Adobe Reader
To Install Software
Important!
• Be sure to install the software before you connect the printer to your computer.
Connecting before you install the software can result in improper operation.
• Make sure you quit all other anti-virus and other applications running on your
computer before starting installation. Installing while other applications are running
can result in incorrect installation. You can restart the applications after installation
is complete.
• If you leave an anti-virus application running, it may display error and warning
message during the installation procedure. If this happens, perform the following
steps.
1 After installation is complete, uninstall the software you just installed.
2 Exit the anti-virus application and any other applications currently running on
your computer.
3 Re-install the software.
4 After installation is complete, re-start the applications you exited in step 2.
– 12 –
■ To install the printing software
The examples in this manual show installation from a CD-ROM drive named drive D:.
1. Start up Windows, and place the DISC TITLE PRINTER SOFTWARE
CD-ROM into your computer’s CD-ROM drive.
The installer should start up automatically, and display the screen shown below.
If the installer does not start up automatically
1 On the Windows Start menu, click Run.
2 Type D: \Setup.exe. Be use to change the “D” to the actual name of your computer’s
CD drive. See the user documentation that comes with your computer for
information about the name of its CD drive.
3 Click OK.
This starts the installer on the CD-ROM.
• If you want to cancel installation, click the Cancel button on each of the installer
screens.
2. Select the language of the version you want to install, and then click
OK.
– 13 –
3. Click Next.
This displays the “Preceding License Agreement”.
Be sure to read the “Preceding License Agreement”.
4. After reading the agreement, click Yes.
This displays the “Software End User License Agreement”.
Be sure to read the “Software End User License Agreement”.
5. After reading the agreement, click Yes.
This displays the Choose Destination Location screen.
6. Check the install destination location, and then click Next.
• If you want to change the installation location, click Browse.
• Clicking Next starts installation.
7. The
InstallShield Wizard Complete screen will appear after
installation is complete. Click Finish.
Check to make sure that everything was installed correctly.
• DISC TITLE PRINTER Application: If you installed this application following the
above steps, there should be a DISC TITLE PRINTER shortcut icon on your
Windows desktop.
– 14 –
Installing Adobe Reader
Your computer must have Adobe Reader or Acrobat Reader 4.0 or higher installed in
order to view the PDF file user documentation for the DISC TITLE PRINTER. If your
computer does not have one of these readers installed, perform the following procedure to install Adobe Reader 6.0 from the CD-ROM.
■ To install Adobe Reader
1. Place the CD-ROM that comes with the printer into the CD driver of your computer.
2. When the installer screen for the printing software appears, click Cancel to
cancel it.
3. Navigate to the Adobe Reader folder on the CD-ROM, where you will find folders whose names indicate the language version: English, French, German, Italian, Spanish. Open the folder whose language matches that of your computer
operating system. In the folder, open the file named Readme_casio.txt, and
carefully read its contents. After you are finished, close the Readme_casio.txt
file.
Be sure to read the entire contents of the Readme_casio.txt file.
4. Inside the folder where the Readme_casio is located, double-click the file named
AdbeRdr60_xxx_full.exe.
• The “xxx” portion of the file name will be a three-letter code indicating the
language of the file contents.
Double-clicking the file will start installation of Adobe Reader.
Follow the instructions that appear on your computer screen to complete installation.
– 15 –
To Read the Contents of a Manual in a PDF file
1. Place the CD-ROM that comes with the printer into the CD drive of your computer.
2. When the installer screen for the printing software appears, click Cancel to
cancel it.
3. Navigate to the User’s Guide folder on the CD-ROM, where you will find folders
whose names indicate the language version: English, French, German, Italian,
Spanish. Open the folder whose language matches that of your computer operating system. Depending on the documentation you want to view, double-click
the PDF file in the folder you opened to view its contents.
• The examples in the User’s Guide use the contents of the English-language
documentation.
To Uninstall Printing Software
1. Click the Windows Start button, and then click Control Panel.
2. Double click the Add or Remove Programs icon.
This causes the Add or Remove Programs dialog box to appear.
3. In the list of installed software, click DISC TITLE PRINTER to select
it.
4. Click the Change/Remove button.
5. Click Yes.
Note
• Some files may cause a separate confirmation dialog box to appear before
they can be deleted. If you are unsure about whether you should keep a file,
select No.
6. Click OK.
This completes the printing software uninstall operation.
– 16 –
General Guide
Front
Indicator lamp
• Lights when the printer is
connected correctly to a PC.
• Flashes when printing is in
progress.
Cassette cover
Open this cover to
load or remove the
ink ribbon cassette.
Slit
Slide the disc to be
printed into the slit.
Back
USB port
Connect the bundled USB
cable here when connecting
to your PC.
AC adaptor terminal
Connect the bundled AC
adaptor here.
Print Head Release Lever Hole
– 17 –
If you are unable to remove the disc from the printer due to printer malfunction, click
the Eject button on the Main Window of the DISC TITLE PRINTER Application and
then remove the disc. If your computer is frozen up, restart it and then click the Eject
button. For details about how to use the DISC TITLE PRINTER Application software,
see the "DISC TITLE PRINTER Application User's Guide" (PDF file). If you are still
unable to remove the disc after performing the above operations, perform the following
steps to remove the disc from the printer. Normally, you should not use the following
procedure to release the print head. Use this procedure only when the print head
fails to release normally due to malfunction.
1. Insert a thin object* into the hole and slide in the direction indicated by the arrow.
• This will cause the print head to release the disc so you can remove it from the printer.
2. The release lever will return to its original position automatically.
* Use an object that is at least 30mm (1-3/16") long and no thicker than 1.5mm (1/
16"). Do not use a toothpick or other object with an easily breakable tip. Doing so
creates the risk of printer malfunction.
■ Opening and Closing the Cassette Cover
Press down on the edge of the cassete cover and then open the cover.
To close the cassette cover
• When closing the cover, hook it onto the printer at the location shown in the illustration
and then swing the cover closed.
• Press down on the cassette cover until you hear it click securely closed.
Hook
Important!
• Take care when opening and closing the cassette cover, and never try to force it
past its normal range of movement. Excessive force creates the risk of malfunction
of and damage to the printer.
– 18 –
Connecting to your Computer
Important!
• Perform the following procedures only after you have installed the software on
your computer.
• Use only the USB cable that comes bundled with the printer.
To Connect to Your Computer
1. Connect the power cord to the AC adaptor.
2. Connect the USB cable to the USB port
of your computer.
Important!
• Be sure you connect directly to the
USB port of the computer. Connecting through a hub or chaining through
another USB device may cause
misoperation.
• The first time you connect the USB
cable, you have to remove the sticker
covering the printer’s USB port.
3. Plug the AC adaptor plug into the printer’s AC adapter terminal (1), and then
plug the power cord into a household
power outlet (2).
Important!
• Use only the AC adaptor that comes
bundled with the printer.
• Take care that you do not excessively
bend or twist, or pull on either end of
the power cord (points marked A and
B in the illustration). Take care that the
power cord is not bent excessively at
these points when storing the cord. Any
of the conditions mentioned above can
cause breaks in the wiring of the cord.
– 19 –
1
2
A
B
4. Connect the USB cable to the USB port
of the printer.
Installing the USB Driver
A USB driver installation Wizard starts up automatically the first time you connect the printer to your computer after installing the DISC TITLE PRINTER application. Follow the instructions that appear on the display to install the USB
driver.
• If you are running Windows XP, the message
shown nearby will appear during USB driver
installation. When it does, click Continue to
proceed with the installation.
• If you are running Windows 2000, the “Digital
Signature Not Found” error message may
appear during USB driver installation. If it
does, click Yes to proceed with the installation.
• The above messages do not appear on a
system running Windows ME, 98SE, or 98.
– 20 –
Disconnecting from a Computer
1. Unplug the USB cable from the computer and printer.
2. Unplug the power cord from the wall outlet (1), and then unplug the AC adaptor
from the printer (2).
1
2
Important!
• Never disconnect the AC adaptor, power cord, or USB cable while a print
operation is in progress. Doing so creates the risk of printer malfunction.
– 21 –
Loading and Removing an Ink Ribbon Cassette
An ink ribbon cassette is required when printing disc labels.
You should use only the special ink ribbon cassettes that are specified for this printer.
To load the ink ribbon cassette
1. Open the cassette cover.
2. Remove the stopper from the ink ribbon cassette.
Stopper
3. If there is slack in the ink ribbon, use your fingers as shown in the illustration to
rotate the spindle of the cassette to remove the slack.
• You may need to rotate the spindle several times if there is a lot of slack.
Important!
• Never pull on the ink ribbon with excessive force or try to push the ink ribbon
into the cassette.
• Loading the ink ribbon cassette while the ink ribbon is slack creates the risk of
malfunction.
Rotate in the direction
of the arrow.
– 22 –
4. Load the ink ribbon cassette into the printer.
• Make sure that the ink ribbon passes between the print head the rubber roller
as shown in the illustration below. Press down on the ink ribbon cassette until
you hear them click securely into place.
Make sure these
lines are parallel.
Important!
• Installing the ink ribbon cassette incorrectly or failing to secure them properly
in place can cause the ribbon to break.
5. Close the cassette cover.
• Press down on the cassette cover until you hear it click securely into place.
To remove the ink ribbon cassette
1. Open the cassette cover.
2. Grasping both sides of the ink ribbon cassette, lift it straight up.
Storing a Partially Used Ink Ribbon Cassette
Install a stopper on the partially used ink ribbon cassette, place the cassette into its plastic bag, and then into its box. Store it where it will not be
exposed to dirt and dust.
Number of Prints Per Ink Ribbon Cassette
• Upper or Lower Label Only: Approximately 40
prints
• Upper and Lower Label: Approximately 20
prints
– 23 –
Upper label
Lower label
Inserting a Disc into the Printer
See the DISC TITLE PRINTER Application User's Guide for information about how
to insert a disc into the printer for printing and how to use the positioning guide.
Caring for the Printer
A dirty print head can make it impossible to obtain good printing results. Perform the
following steps to clean the print head when it becomes dirty.
Important!
• Use only a cotton swab or some other soft material to clean the print head.
1. Open the cassette cover.
2. Unplug the USB cable from the PC and printer.
3. Unplug the power cord from the wall outlet, and then unplug the AC adaptor
from the printer.
4. Use a cotton swab moistened with alcohol to clean the print head.
You can use a commercially available cassette tape recorder head cleaning kit to
clean the print head.
Print head
Clean this part of the
print head.
Cleaning the Printer Exterior
Wipe the exterior of the printer with a cloth moistened with plain water. Wring
all excess liquid from the cloth before wiping the printer.
Never use benzene, alcohol, thinner, or other volatile agents to clean the
printer exterior. Doing so can damage the case.
– 24 –
Troubleshooting
Consult this troubleshooting guide whenever you start to have problems with the
printer. If you cannot find the solution to your problem below, contact your original
retailer.
Symptom
I can't get a
connection
between the
printer and a
computer.
The printing
operation is
finished
normally, but
nothing is
printed.
Printing is not
clear.
Printing is poor
quality.
Printing is too
light.
The printed
color is
different from
the ink ribbon
color.
Possible Cause
The bundled USB cable
or the AC adaptor is not
connected properly.
The USB driver is not
installed correctly.
Though the USB driver is
installed correctly, data
communication is not
possible for some reason.
The ink ribbon is used
up.
Any of the following can
interfere with proper
printing.
• A disc printing surface
that is not smooth and
flat
• A disc printing surface
that has a design or
lines printed on it
• A disc printing surface
that supports ink jet
printing only
The ink ribbon cassette is
not loaded properly.
The color of the final
printout is affected by
both the color of the ink
ribbon and the color of
the disc you are printing
on.
– 25 –
Recommended Action
Re-connect the cable and the
AC adaptor properly.
Unplug the USB cable and the
plug it back in again.
Try using a different USB port on
your computer, or try using a
different USB cable.
Load a new ink ribbon cassette
(option).
Use a disc that meets the
requirements described in the
bundled “Printing Precautions”
or at the following Internet URL.
http://world.casio.com/ds/media/
You can also try adjusting the
print density to make it darker.
(See the DISC TITLE PRINTER
Application User's Guide)
Re-load the ink ribbon cassette
properly.
Try using a lighter color disc or a
darker color ink ribbon.
Symptom
Possible Cause
Recommended Action
The printing is
not positioned
correctly on the
disc.
The disc stops
part way
through
printing.
Improper alignment of
the disc when it is placed
in the printer.
Use the positioning guide when
aligning the disc. (See the DISC
TITLE PRINTER Application
User's Guide)
Correctly connect the power
cord and the AC adaptor.
The power cord plug or
the AC adaptor is not
plugged in as far as it will
go.
The printer is malfunctioning.
Printing will not
start.
The disc is not positioned
correctly in the printer.
I can't remove
a disc from the
printer.
The printer is
malfunctioning.
– 26 –
If you cannot easily remove the
disc from between the print
head and roller, refer to the
"General Guide" explanation on
page 17.
Remove the disc and then reinsert it straight into the left side
of the slit along the top of the
printer. (See the DISC TITLE
PRINTER Application User's
Guide)
Refer to the "General Guide"
explanation on page 17.
Specifications
Model: CW-E60
Printing
Resolution: 200dpi
Approximate Speed: 8mm per second
Print System : Thermal transfer
Print Width : Approximately 16mm
Print Length : Approximately 74mm
Actual printing speed depends on printing environment, conditions, etc.
Power Supply
Power Requirements : AC adaptor (AD-2105S)
Power Consumption : 15W (Power supplied both through household power plug
and USB port.)
Other
Dimensions : 68 (H) x 154 (W) x 126 (D) mm
(23/4"H x 61/16"W x 415/16"D)
Weight
: Approximately 540g (1.2 Ibs)
Operating Temperature : 10°C to 35°C (50°F to 95°F)
– 27 –
CASIO Europe GmbH Bornbarch
10, 22848 Norderstedt, Germany
This mark applies in
EU countries only.
CASIO COMPUTER CO., LTD.
6-2, Hon-machi 1-chome
Shibuya-ku, Tokyo 151-8543, Japan
– 28 –