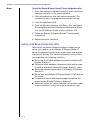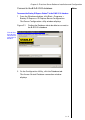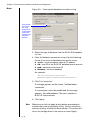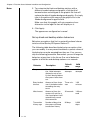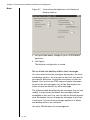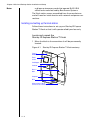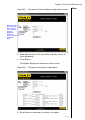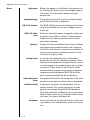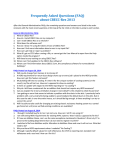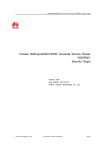
1
Copyright © 2005 Stanley Security Solutions, Inc. and Stanley Logistics, Inc. All rights reserved. Printed in the United States of America. Information in this document is subject to change without notice and does not represent a commitment on the part of Stanley Security Solutions, Inc. The software described in this document is furnished under a license agreement or nondisclosure agreement. This publication is intended to be an accurate description and set of instructions pertaining to its subject matter. However, as with any publication of this complexity, errors or omissions are possible. Please call your Stanley Security Solutions, Inc distributor or Best Access Systems at (317) 849-2250 if you see any errors or have any questions. No part of this manual and/or databases may be reproduced or transmitted in any form or by any means, electronic or mechanical, including photocopying, recording, or information storage and retrieval systems, for any purpose, without the express written permission of Stanley Security Solutions, Inc. This document is distributed as is, without warranty of any kind, either express or implied, respecting the contents of this book, including but not limited to implied warranties for the publication’s quality, performance, merchantability, or fitness for any particular purpose. Neither Stanley Security Solutions, Inc, nor its dealers or distributors shall be liable to the user or any other person or entity with respect to any liability, loss, or damage caused or alleged to be caused directly or indirectly by this publication. The Stanley logo and B.A.S.I.S. are registered trademarks of Stanley Security Solutions, Inc. Microsoft, Windows, CE, and ActiveSync are registered trademarks of Microsoft Corporation. T81188/Rev – ER-7991-40 Nov 2005 Contents 1 Introduction Getting technical support 1–1 How to use this guide 1–2 2 Overview Components and connections 2–1 Setup overview 2–2 3 First-time Server Software Installation and Configuration Gathering the essential materials and information 3–1 Setting up the Server 3–2 Setting up the Server Configuration utility 3–4 Setting up kiosk and desktop station characteristics 3–12 i 4 Kiosk and Desktop Station Installation and Setup Installing and setting up the kiosk station 4–2 Setting up the desktop station 4–7 5 Day-to-Day Maintenance Reloading cards 5–1 Checking transaction history 5–3 Maintaining the Desktop Encoder 5–6 A Glossary of Terms B Index ii C h a p t e r 1 Introduction Thank you for choosing the Stanley ID Express Station™, the world’s leading self-serve security card encoding system. Use this guide to make sure that you set up your system in the most efficient way and to get the most out of it. Getting technical support Stanley Representatives provide telephone technical support for the Stanley ID Express Station™ System. Locate the representative nearest you by calling 317-849-2250 Monday through Friday, between 7:00 am and 4:00 pm, eastern standard time, or visit us on the web at www.staneleysecuritysolutions.com. 1–1 Chapter 1: Introduction Notes How to use this guide This manual is intended for use as a training guide and a reference in the setup of Stanley ID Express Station™. Chapter 2, Overview – This chapter provides an overview of the Stanley ID Express Station™ System components and an overview of how the first-time set up process will occur. Chapter 3, First-time software installation and configuration – This chapter provides complete step-by-step instructions in the proper installation and configuration of the Stanley ID Express Station™ Server software. Chapter 4, Kiosk and Desktop Station Installation and Setup – This chapter explains the tasks necessary to install and set up both the Stanley ID Express Station™ kiosk and desktop stations on your network. Chapter 5, Day-to-Day Maintenance – This chapter explains the day-to-day tasks necessary to maintain the entire Stanley ID Express Station™ System Appendix A, Glossary of Terms – This appendix provides a list of terms that are specifically used in the Stanley ID Express Station™ System. Terms that appear in the glossary are set in italic type when they are first used. Appendix B, Index – Use the index to find an answer to a specific question. 1–2 C h a p t e r 2 Overview This chapter describes the ‘big picture’ of the Stanley ID Express Station™ system. Components and connections The Stanley ID Express Station™ System allows card holders, such as college and university students, to receive a temporary encoded card for their assigned room and/or to re-encode an existing card. This in turn, frees up administrative personnel and allows uninterrupted access to get room cards and may even speed-up the normally busy room assignment periods that occur during the beginning of semesters. 2–1 Chapter 2: Overview Notes The following are the major components of this system: ■ ■ ■ ■ ■ ■ Stanley ID Express Stations™ ◆ Kiosk Stations ◆ Desktop Stations B.A.S.I.S.® ET605 or higher Stanley ID Express Station™ server software Web server software Magnetic stripe cards B.A.S.I.S. offline locks Setup overview In the next chapter you will find complete step-by-step instructions on the first-time configuration of a Stanley ID Express Station™ System. Listed here are the major steps of that process and cross-references where you can find each corresponding task. Task 1 Install all server software components. This task begins on page 3-2. ■ Make sure that the B.A.S.I.S.® software is installed and that a database is running, see page 3-2. ■ Confirm that the server has Internet Information Services (IIS) installed and running, see page 3-3. ■ Confirm that the .NET Framework 1.1 is installed, see page 3-3. ■ Install the Stanley ID Express Station™ server software, see page 3-4. Task 2 Set up the Server Configuration Utility. This task begins on page 3-4. ■ Connect to the B.A.S.I.S.® database, see page 3-5. Set up the Identification and Verification fields, see page 3-7. ■ Define the network connections to the Stanley ID Express Station™ kiosks and desktop stations, see page 3-10. ■ Task 3 Set up all kiosk and desktop station characteristics. This task begins on page 3-12. ■ Set up kiosk and desktop station graphics, see page 3-12. ■ Set up kiosk and desktop station behaviors, see page 3-14. ■ Set up kiosk and desktop station text messages, see page 3-16. 2–2 Chapter 2: Overview Task 4 Install and setup the Stanley ID Express Station™ kiosks. This task begins on page 4-2. ■ Locate and unpack the kiosk, see page 4-2. ■ Power and test the kiosk, see page 4-3. ■ Level and secure the kiosk, see page 4-5. ■ Make kiosk network connections, see page 4-6. Task 5 Install and setup the Stanley ID Express Station™ desktop stations. This task begins on page 4-7. ■ Unpack the desktop encoder, see page 4-7. ■ Connect the desktop encoder to the PC, see page 4-8. ■ Make desktop station network connections, see page 4-9. 2–3 Notes Chapter 2: Overview Notes 2–4 C h a p t e r 3 First-time Server Software Installation and Configuration You are now ready to start setting up your Stanley ID Express Station™ System. Gathering the essential materials and information Make sure that you have the following components before you start installing the Stanley ID Express Station™ System: ■ B.A.S.I.S.® software, ET605 or higher installed. ■ Stanley ID Express Station™ kiosk ■ Optional: Stanley ID Express Station™ desktop station. A temporary desktop station, requires a secure, networked, dedicated computer. See your Stanley Representative for complete details. ■ Magnetic stripe cards 3–1 Chapter 3: First-time Server Software Installation and Configuration Notes Before installing the Stanley ID Express Station™ System, also make sure that you have completed the following checklist. Make sure that you have met with the appropriate Information Technology and Security personnel to determine the following information: ◆ ◆ ◆ ◆ ◆ Static IP address for each station Gateway and subnet mask for each station Computer name for each station URL for the server Physical location of each Stanley ID Express Station™ kiosk Make sure you have an Information Technology person available who can set up a server with the Stanley ID Express Station™ server software. Make sure you have power and network availability for each Stanley ID Express Station™ kiosk and desktop station. Setting up the Server The Stanley ID Express Station™ Server is the software that manages all kiosks and desktop stations and answers all requests for card data to be encoded. It also keeps track of all other information that is gathered by the stations such as pictures (picture data is not available on desktop stations). Make sure that the B.A.S.I.S.® software is installed and that a database is running Before going any further you must have an installation of B.A.S.I.S.® Access Control Software, ET605 or higher, on a server within your network and a B.A.S.I.S.® database must be running. If you do not yet have a complete installation or the correct version of B.A.S.I.S.®, contact your Stanley Representative. Also, the Stanley ID Express Station™ issues cards that are currently only compatible with Best Access Systems’ B.A.S.I.S.® offline locks. If you do not yet have B.A.S.I.S. offline locks installed, contact your Stanley Representative. 3–2 Chapter 3: First-time Server Software Installation and Configuration The following task must be performed by someone with Administrator rights: Notes Confirm that B.A.S.I.S.® ET605 or higher is installed. Make sure that the server has Internet Information Services (IIS) installed and running. Internet Information Services is a standard Microsoft® Windows® web service that enables you to publish information on your intranet. This service is available as part of the Windows operating system but is not installed by default. If not already installed, it can easily be installed from the Windows installation CD-ROM or from the ‘cab files’ located on your computer. Locate the Microsoft Windows operating system installation CD-ROM. You may need this disk during the IIS installation process. Installation note You may need to insert the Microsoft Windows operating system installation CD-ROM and browse for files that the wizard needs. Or the files may already be archived in the folder “x:\cabs” (where x is the drive letter). Make sure that the .NET Framework 1.1 is installed. The .NET Framework is a component of the Microsoft Windows operating system and is being used by an increasing number of software developers to build web-enabled applications. You may or may not already have version 1.1 of the .NET Framework installed. Typically the .NET Framework is updated from Windows Updates. Installation note All installations must be performed by a user that has local administrator rights. 3–3 Chapter 3: First-time Server Software Installation and Configuration Notes To install the Stanley ID Express Station™ Server Configuration utility 1 If any items were configured in previous steps, restart the computer that will run the server software. 2 Close all applications that may have auto-started. This includes any anti-virus program that may be running. 3 Insert the installation disk. 4 From the Windows desktop, click Start > Run and type in X:\stanleyidexpressstation\serverinstall\setup.exe (where x: is the CD-ROM drive letter of the installation CD). 5 Follow the Stanley ID Express Station™ setup wizard instructions. 6 Restart the server computer. Setting up the Server Configuration utility Now that all necessary software has been installed on the server, you need to use the Stanley ID Express Station™ Server Configuration utility to set up how kiosk and desktop stations will operate. The server configuration utility allows you to perform the following functions: ■ ■ ■ ■ ■ ■ 3–4 Set up the B.A.S.I.S.® database connection to Stanley ID Express Stations™. Determine what database information fields will be used to identify and verify Stanley ID Express Station™ users. Set up the network connections to all Stanley ID Express Stations™. Set up how each Stanley ID Express Station™ will look on the screen. Customize the error and help messages that will be displayed on the Stanley ID Express Stations™. Determine values for various features such as the number of times to allow a user to try to get a temporary card. Chapter 3: First-time Server Software Installation and Configuration Connect to the B.A.S.I.S.® database Notes To connect the Stanley ID Express Station™ to the B.A.S.I.S.® database 1 From the Windows desktop, click Start > Programs > Stanley ID Express > ID Express Server Configuration. The Server Configuration utility window displays Figure 3.1 Finding the Database tab to be able to connect to the B.A.S.I.S. database Click the Database tab to be able to connect to the B.A.S.I.S. database. 2 On the Configuration Utility, click the Database tab. The Access Control Database connection window displays 3–5 Chapter 3: First-time Server Software Installation and Configuration Notes Figure 3.2 Entering the database connection string Enter the database connection string parameters to let the configuration utility know where to look for the database. 3 Select the type of database that the B.A.S.I.S.® database runs on. 4 Enter the database connection string. Use the following format to structure the database connection string. ◆ server = server computer name or IP address ◆ uid = user ID of the B.A.S.I.S. database owner account ◆ pwd = password of the user ID ◆ database = name of database An example: Server=localhost;uid=lenel; pwd=multimedia;database=AccessControl 5 Click Try Connection. A message appears on the screen, ‘Valid database connection.’ If a connection cannot be established, the message appears, ‘No valid database.’ See your network or B.A.S.I.S. Administrator. 6 Click Apply. Note 3–6 Make sure to click the Apply button before proceeding to another tab in the configuration utility. You can revert to a previous state by clicking the Revert button. This action will return the configuration to the previous saved ‘Apply.’ Chapter 3: First-time Server Software Installation and Configuration Set up user identification and verification fields Notes To allow only valid B.A.S.I.S.® users to access the Stanley ID Express Station™, proper identification must be input and then verified with another piece of information. For example, you may want to ask for first and last name and then to verify, you may want to ask for the Social Security Number. Stanley ID Express Stations™ allow you to set up the user information that you want to use for this purpose. Valid identification fields that can be used either for identification or verification include: ■ ■ ■ ■ ■ ■ ■ Last name First name Middle initial Social Security Number Birth date Address State You may choose up to three fields for identification and three for verification. (Normally only two or at the most three fields are sufficient to insure a secure verification.) To set up identification and verification fields for all stations 1 From the Windows desktop, click Start > Programs > Stanley ID Express > ID Express Server Configuration. 2 Click the Fields tab. The identification and verification fields setup window appears 3–7 Chapter 3: First-time Server Software Installation and Configuration Notes Figure 3.3 Choosing which database fields will identify and verify a user Select up to three database fields to identify the user asking for Stanley ID Express Station™ access. Select up to three database fields to verify the user’s identity. When you’re satisfied with the fields and their order, click Apply. Note If you don’t see any fields listed in the left column, contact your database administrator. See page 3-5. Or, if the ‘Fields’ tab is inaccessible, the database connection has not been set up. See also page 3-5. 3 Select the identification fields in the available column and then click the right-arrow button to transfer the fields to the selected column. Use the up- or down-arrow buttons on the right to arrange the order in which the fields will appear on the Stanley ID Express Station™ Identification screen. If you change your mind, use the left-arrow button to return a field in the selected column to the available column. 4 Repeat step 3 to choose the verification fields. 5 When you’re satisfied with the identification and verification fields and their order, click Apply. The configuration is saved. 3–8 Chapter 3: First-time Server Software Installation and Configuration Although you are not required to, you can also customize the fields that you’ve chosen in three ways: ■ Label the field with a term that makes sense for the user ■ Guide the user in the entry of the data ■ Restrict the user in the proper entry of the data ■ Mask the user’s entry so that it doesn’t appear on the screen. To customize fields 1 While on the Fields screen, right-click on a field that you have selected and want to label, provide guidance, and/or mask. 2 Click Properties. The Field Definition Properties screen displays Figure 3.4 Customizing field properties Use these fields to make user data entry easier to understand and to make sure data is entered correctly and securely. The following definitions describe the fields in this window: ◆ Label – This is the text that will appear to the left of the data entry field and describes to the user what to enter. For example, in the figure above, the SSN data name is renamed as ‘Social Security Number.’ ◆ Format label – This is the text that will appear next to the Label (described above) and describes or gives an example of how to enter the data. For example, in the figure above, the Social Security Number is to be entered as ‘123-45-6789’. So for this combination of Label and Format Label, the field on the screen will appear like this: Social Security Number (123-45-6789): 3–9 Notes Chapter 3: First-time Server Software Installation and Configuration ◆ Notes Format – Use this field to enter a ‘regular expression’ formula that enforces the correct entry format. Regular expressions are a powerful, but complex subject. For information on how to compose regular expressions, see http://www.regular-expressions.info/. ◆ Mask Entry – Selecting this check box will cause an asterisk to appear in place of any text that the user enters. Use this field to mask sensitive user information. 3 Click OK. 4 Click Apply. Define network connections to the Stanley ID Express Station™ kiosks and desktop stations Now that you have established a Stanley ID Express Station™ server-to-database connection, connections also need to be defined for each Stanley ID Express Station™ kiosk and desktop station that you will be installing. You will do this by defining the station name and IP address. Confer with the network administrator if these names and IP addresses have not yet been determined. To define the network connections to the kiosk and desktop stations 1 From the Windows desktop, click Start > Programs > Stanley ID Express > ID Express Server Configuration. 2 Click the Security tab. The Network Security Setup window appears 3 – 10 Chapter 3: First-time Server Software Installation and Configuration Figure 3.5 Defining the kiosk and desktop station network addresses Enter a station description and its IP address, then click Add. 3 In the Description field, enter a kiosk or desktop station description. Commonly, stations are described based on their location. You may also want to differentiate between desktop and kiosk stations. Descriptions become especially helpful in identifying a station in the Transaction History Log. See page 5-3. Kiosk or desktop stations do not have to be installed yet for this step to be completed. 4 In the Host IP Address field and description field, enter the IP address and description of the station. 5 Click Add. The station is added to the list below. Note To cancel or re-type an entry, click on the listed station and then click Remove. You cannot remove the default entry: 127.0.0.1. 6 Repeat steps 3 – 5 for each station. 7 Click Apply. The configuration is saved. 3 – 11 Notes Chapter 3: First-time Server Software Installation and Configuration Notes Setting up kiosk and desktop station characteristics There are several graphic and functional characteristics of kiosk and desktop stations that need to be defined. The Configuration Utility will allow you to set these up. Use these to customize your stations for clearer communication and better control in automatically issuing key cards. In making these decisions, make sure to think about how these decisions will affect all stations on the network. These graphic and functional characteristics will apply to all stations; a single station cannot behave differently than another station on the same network. Once these characteristics are set up, they can always be changed or adjusted later. The types of characteristics that need to be defined include: ■ ■ ■ ■ ■ ■ ■ ■ Customize the graphics that display in the header and body area of the station screen. Doing this associates the Stanley ID Express Station™ System with your university or business. Define the number of attempts that a person is allowed to to validate their identity in getting a key card before the user is locked out. Define the amount of time that a person will be locked out. Define the number of days that transaction history is kept before it is automatically purged. Decide whether you want to show the transaction photo in the transaction history. Decide whether to issue temporary cards. Decide how long temporary cards will be valid. Customize error or information messages that display on station screens. Set up kiosk and desktop station graphics If the Stanley Security Solutions graphic is acceptable, you can skip the following procedure; it has no effect on how the system behaves. Remember you can change the appearance at any time in the future. 3 – 12 Chapter 3: First-time Server Software Installation and Configuration To customize the graphics of the station screens Notes 1 From the Windows desktop, click Start > Programs > Stanley > ID Express Station Configuration Utility. 2 If not already on the Appearance/Graphics tab, click Appearance/Graphics. The Appearance/Graphics window displays Figure 3.6 Customizing the graphics displayed on all kiosk and desktop stations Use this to replace the default Stanley graphic that appears in the top-left of the kiosk screen. Use this to replace the default background of the kiosk screen. Use this to replace the default header background of the kiosk screen. 3 To customize the kiosk and desktop stations with your own logo graphic, click the browse button in the upper right-hand corner and navigate to the graphic file that will replace the default Stanley Security Solutions logo. Or simply type in the path and file name of the graphic file in the top left logo image file field. Compatible graphic formats Compatible graphic formats include bmp, jpg, gif, and png. 4 To customize the kiosk and desktop stations with a different background graphic, click the second browse button and navigate to the graphic file that will replace the default background. Or simply type in the path and file name of the graphic file in the background image file field. Make sure that this graphic will not compete or be a distraction to the text that will be displayed on it. It should be a light background image. 3 – 13 Chapter 3: First-time Server Software Installation and Configuration Notes 5 To customize the kiosk and desktop stations with a different header background graphic, click the third browse button and navigate to the graphic file that will replace the default header background graphic. Or simply type in the path and file name of the graphic file in the header background image file field. Make sure that this graphic will not compete or be a distraction to the logo file that will display on it. 6 Click Apply. The appearance configuration is saved. Set up kiosk and desktop station behaviors Behaviors are options that limit or extend functional characteristics of the Stanley ID Express Stations™. The following table describes the behaviors or options that you can modify. In many cases the default or preset values of the behaviors may be acceptable as they are. If so, you can skip the following procedure. Remember you can change the behaviors at any time in the future. One set of behaviors applies to all kiosks and desktop stations on a network. Behavior 3 – 14 Description Default value Valid range Retry count Number of consecutive, failed attempts allowed a user to verify their identity before the system locks them out. Three attempts 0–99 attempts Retry lockout timeout Amount of time that a user is locked out after exceeding the retry count. Three minutes 1–99 minutes Idle timeout Amount of time the system will wait for a user input before it will automatically cancel the transaction 30 seconds 1–99 seconds Transaction history age Number of days that the system will keep transaction history 90 days 0–999 daysa Chapter 3: First-time Server Software Installation and Configuration Behavior Description Default value Capture photo in transaction history If selected, photos will be captured with each transaction and kept in the transaction history Selected Allow temporary key issue If selected, system allows temporary cards to be issued Selected Temp key expiration Number of days that temporary keys are valid before expirationb Three days Display room PINc If selected, the user’s PIN (personal identification number) is displayed along with the room assignment. Not selected Valid range 1–120 days a. If a value of zero is selected, no records will be purged. b. Only applies if the temporary key issue is allowed. c. To use this feature, a license for the application B.A.S.I.S.® Open IT must be purchased and installed with the appropriate B.A.S.I.S.® Open IT hot fix. To set up kiosk and desktop station behaviors 1 From the Windows desktop, click Start > Programs > Stanley > ID Express Station Configuration Utility. 2 If not already on the Behavior tab, click Behavior. The Behavior window displays 3 – 15 Notes Chapter 3: First-time Server Software Installation and Configuration Notes Figure 3.7 Customizing the behaviors on all kiosk and desktop stations 3 Using the table above, change any or all of the default behaviors. 4 Click Apply. The behavior configuration is saved. Set up kiosk and desktop station text messages You can customize the text messages displayed on the kiosk and desktop stations. You may want to do this if you need to give specific directions, or provide instructions in other languages. You can also use HTML tags and special characters as part of the text messages; they will be displayed on the screen as they would with any other web page. The following table describes the text messages that you can modify. In many cases the default text messages may be acceptable as they are. If so, you can skip the following procedure. Remember you can change text messages at any time in the future. One set of text messages applies to all kiosks and desktop stations on a network. Use up to 255 characters for a message text. 3 – 16 Chapter 3: First-time Server Software Installation and Configuration Notes Configuration screen label Appears . . . Default message text Meal card identification failed when a user’s meal card cannot be found in the database. “Student identification and verification failed.” Retry exceeded lockout when a user has exceeded the number of attempts to login. “Maximum number of attempts exceeded.” Restricted area access lockout when an unauthorized computer tries to access the kiosk or desktop station. “Authentication failed. Unauthorized access.” Transaction timeout when a user does not provide any input for a specified period of time. “Transaction timedout. User failed to respond.” Transaction cancelled when a user cancels the transaction by pressing the cancel button. “Transaction cancelled.” Successful transaction when a user receives an encoded card. “Transaction complete.” System error occurred when a hardware or software component fails. “A system error occurred. Maintenance required.” Header text at the top of all screens “Stanley ID Express Station™”a b Welcome on the opening screen “Insert Card<br> <br> or <br> <br> Press Button.”c Identification on the identification screen “Enter Identification Information.” Verification on the verification screen “Enter Verification Information.” a. The text string ‘&trade’ displays the ™ symbol on a web page. b. See http://www.w3.org/TR/1999/REC-html401-19991224/ for complete specifications on the HTML 4.01 markup language. c. The text <br> inserts a single return on a web page. 3 – 17 Chapter 3: First-time Server Software Installation and Configuration Notes To customize text messages 1 From the Windows desktop, click Start > Programs > Stanley > ID Express Station Configuration Utility. 2 Click the Appearance/Text tab. The Appearance/Text window displays Figure 3.8 Customizing the text messages on all kiosk and desktop stations Customize text messages for specific directions or use multi-lingual messaging to make sure all users can read and understand the message. 3 Using the table above change any or all of the default text messages. Use up to 255 characters for a message text. 4 Click Apply. The text messages configuration is saved. 3 – 18 C h a p t e r 4 Kiosk and Desktop Station Installation and Setup You are now ready to start setting up your Stanley ID Express Station™ Kiosk and Desktop Stations. Two kinds of Stanley ID Express Stations™ are available: ■ Kiosk stations – a publicly-available, unattended, pre configured, and dedicated kiosk that encodes existing magnetic stripe cards or dispenses temporary cards that operate B.A.S.I.S.® offline locks manufactured by Best Access Systems. ■ Desktop stations – a secured, attended production card encoder designed to connect to a desktop computer. These stations are designed to be temporarily put into service during peak user card demands such as student enrollment. These stations, like the kiosk station, encode existing magnetic stripe cards 4–1 Chapter 4: Kiosk and Desktop Station Installation and Setup Notes or dispense temporary cards that operate B.A.S.I.S.® offline locks manufactured by Best Access Systems. The Kiosk station comes assembled from the manufacturer and will need an inside location with network and power connections. Installing and setting up the kiosk station Follow these instructions to set up your Stanley ID Express Station™ Kiosk so that it will operate reliably and securely. Locate and unpack the Stanley ID Express Station™ Kiosk 1 Move the kiosk to the area where it will be permanently located. Figure 4.1 Stanley ID Express Station™ Kiosk anatomy Camera window Touchscreen Card hopper Card slot Access door Computer UPS Allow at least 3 feet of service access clearance 4–2 3 ft Chapter 4: Kiosk and Desktop Station Installation and Setup Kiosk Specifications Specification Space Requirements 1.83m H × 1.83m Wa × 0.91m D (6 ft H × 6 ft W × 3 ft D) Weight 300 lbs (approx) Notes Operating temp 0° – 40°C (32° – 104°F) Storage temp 0° – 45°C (32° – 113°F) Operating humidity 10% – 90% Storage humidity 10% – 85% Lighting Ambient Power Standard 120VAC, 20 amp wall outletb Physical security and safety Screw or bolt into the subfloor. Use the following fasteners: Wood: Stainless steel lag screw: 18–8 1/4” dia, 3” length, McMaster-Carr® #92351A554 or equivalent. Concrete, brick or masonry: Stainless steel bolt anchor: 18–8 1/4” dia, 3” length, McMaster-Carr® #92405A198 or equivalent. a. Three feet of the width requirement is for service access. b. An uninterruptible power supply (UPS) is enclosed in the kiosk station cabinet and will provide continuous power for a minimum of 10 minutes. A redundant or additional backup power source may be necessary. See your Security or Information Technology Administrator for specific requirements. Power and test kiosk 1 Open the cabinet and load blank cards into the encoder hopper as shown on the label attached to the card hopper. See Figure 4.2. 2 Place the card weight on top of the cards. 4–3 Chapter 4: Kiosk and Desktop Station Installation and Setup Notes Figure 4.2 Loading magnetic stripe cards into the card hopper Card weight Cards with stripe facing down Put the stripe towards the kiosk cabinet door Card hopper 3 Connect the network cable to an RJ-45 network jack, connected to the network where the B.A.S.I.S.® database resides. 4 Connect the power cable to the power outlet. 5 Power up all components in the kiosk – encoder, UPS, and computer. The screen displays the message, “This kiosk is currently unavailable.” You should also hear the kiosk fan running. Factorydefault screen This is the factory-default screen that displays when the kiosk station is not yet connected to a B.A.S.I.S. database. 6 Power down all components of the kiosk. 7 Close and lock the cabinet door. 4–4 Chapter 4: Kiosk and Desktop Station Installation and Setup Troubleshooting Notes Follow these instructions to troubleshoot and fix common mechanical and electrical problems. You notice . . . Caused by . . . No electrical activity (fan not running, screen blank, etc) Computer, encoder, monitor, or UPS not turned on. The screen displayed is something other than “This kiosk is currently unavailable.” Cannot plug network cable in. You should . . . Make sure that the computer is plugged into the UPS and all components inside the kiosk are turned on. Contact Stanley Technical Support.a Wrong network Make sure that jack. you connect to the correct network jack. a. Call 800-329-5209, M–F during the hours of 8:00 am – 5:00 pm EST. Level and secure kiosk 1 Move the kiosk station into position and check for leveling. 2 Make any necessary floor or wall preparations where the kiosk will be permanently located to ensure a secure and level installation. Caution Bolting the kiosk station to the floor is recommended. Failure to bolt the kiosk to the floor may cause severe injury if the kiosk station tips over. 3 Using the template that is enclosed, mark the holes to drill for bolting the kiosk station to the floor. See the Requirements section for bolting requirements for your particular floor application. 4 Move the kiosk station away and close the cabinet door. Caution Do not drill into the floor with the kiosk station in place. Doing so could damage sensitive electronic components. Close and move the kiosk station before drilling! 4–5 Chapter 4: Kiosk and Desktop Station Installation and Setup Notes 5 Drill floor mounting holes. 6 Move the kiosk station back into position and bolt the kiosk to the floor. Prepare kiosk for network connections 1 Power up all components in the kiosk – encoder, UPS, and computer. 2 See the Stanley ID Express Station™ Installer Guide for complete instructions on configuring the kiosk to run on your network or if you are familiar with networking, see the section below. Make kiosk network connections Open the cabinet door and connect the keyboard and mouse to the computer. Power up the computer if it’s not already on. Interrupt the boot sequence and login with Administrator’s rights. Configure the IP address. Identify the B.A.S.I.S.® Server IP Address using the Stanley ID Express Station™ Kiosk Configuration utility. Use this procedure: To identify the B.A.S.I.S.® Server IP address 1 From the Windows desktop, click Start > Programs > Stanley ID Express > ID Express Kiosk Configuration. The Kiosk Configuration screen appears. Figure 4.3 Identifying the B.A.S.I.S.® Server IP Address 2 Replace the localhost text with the B.A.S.I.S.® server IP address. For example it would appear: http://192.168.1.1/kiosk 3 Click Close. 4–6 Chapter 4: Kiosk and Desktop Station Installation and Setup Restart the computer. Notes Interrupt the boot sequence and login in as the user ‘Stanley’. Turn off the Internet Explorer® auto complete feature for web addresses and user names. In Internet Explorer identify the B.A.S.I.S.® Server IP Address. Setting up the desktop station Follow these instructions to set up the Stanley ID Express Station™ Desktop Encoder. You will need a dedicated PC with the following requirements: ■ Windows® XP Professional with Service Pack 1 or Service Pack 2 ■ 256 MB memory ■ Pentium 4 processor ■ Static IP address Unpack the Stanley ID Express Station™ Desktop Encoder 1 Unpack the Desktop Encoder. Figure 4.4 Stanley ID Express™ Desktop Station encoder showing how to load cards into the card hopper Card weight Card showing orientation Cards Card hopper Sliding enclosure Lock Card slot Rails 4–7 Chapter 4: Kiosk and Desktop Station Installation and Setup Desktop Encoder specifications Notes Specification Requirements Operating temp 0° – 40°C (32° – 104°F) Storage temp 0° – 45°C (32° – 113°F) Operating humidity 10% – 90% Storage humidity 10% – 85% Power Standard 120VAC, 20 amp wall outlet Connect the Desktop Encoder to the PC 1 Set up the Desktop Encoder next to the PC that it will be connected to. Make sure that the PC is connected to the network where the B.A.S.I.S.® database resides. 2 Open the Desktop Encoder by unlocking the enclosure and sliding out the enclosure to uncover the card hopper. 3 Load blank cards into the card hopper as shown in Figure 4.4. 4 Put the weight on top of the cards as shown in Figure 4.4. 5 Close and lock the Desktop Encoder. 6 Connect the Desktop Station to the COM 1 serial port on the PC. 7 Connect the power cable of the Desktop Encoder to a power outlet. To convert a standard computer with the requirements listed above to a Stanley ID Express Station™ desktop station, you will need to perform a series of tasks. These tasks include: ■ ■ ■ ■ ■ setting up .NET security configuring network IP addresses installing the Stanley ID Express Station™ kiosk application configuring kiosk networking configuring the Microsoft® Internet Explorer® browser See the Stanley ID Express Station™ Installer Guide for complete instructions on configuring the desktop station to run on your network or if you are familiar with networking, see the section below. 4–8 Chapter 4: Kiosk and Desktop Station Installation and Setup Complete the following tasks on each desktop station computer. Make desktop network connections Power up the computer if it’s not already on. Login with Administrator’s rights. Configure Microsoft .NET permissions to Full Trust. Using the Installation CD-ROM, install the Stanley ID Express Station™ Kiosk Application. If not already configured, configure the Network IP addresses. Identify the B.A.S.I.S.® Server IP Address using the Stanley ID Express Station™ Kiosk Configuration utility. Use this procedure: To identify the B.A.S.I.S.® Server URL 1 From the Windows desktop, click Start > Programs > Stanley ID Express > ID Express Kiosk Configuration. The Kiosk Configuration screen appears. Figure 4.5 Identifying the B.A.S.I.S. Server URL 2 Replace the localhost text with the B.A.S.I.S. server URL. For example it would appear: http://192.168.1.1/kiosk 3 Click Close. Restart the computer. Interrupt the boot sequence and login in as the user ‘Stanley’. Turn off Internet Explorer’s auto complete feature for web addresses and user names. In Internet Explorer, identify the B.A.S.I.S. Server IP Address. 4–9 Notes Chapter 4: Kiosk and Desktop Station Installation and Setup Notes 4 – 10 C h a p t e r 5 Day-to-Day Maintenance Now that you’ve set up your Stanley ID Express Station™ System you need to be aware of some simple day-to-day maintenance features to keep the system in good running order. Three common maintenance tasks are recommended: ■ reloading cards into the card hopper ■ checking transaction history ■ maintaining the encoder Reloading cards Stanley ID Express Station™ Kiosks have a maximum capacity to hold 300 cards; the desktop stations have a maximum capacity of 150 cards. 5–1 Chapter 5: Day-to-Day Maintenance Notes To reload cards into the kiosk or desktop encoder For the kiosk station 1 Open the cabinet door using the keys provided with your system. Figure 5.1 ID Express Station™ Kiosk showing the card hopper Card hopper Card slot For the desktop station 2 Unlock and slide the cover off of the encoder enclosure. See Figure 5.2. Figure 5.2 Desktop enclosure showing the card hopper Card hopper Encoder cover 3 Remove the card weight. See Figure 5.3. 4 Load up to 300 cards into the kiosk hopper or 150 cards into the desktop hopper. See Figure 5.3. 5–2 Chapter 5: Day-to-Day Maintenance Figure 5.3 Notes Loading the cards into the card hopper Card weight Cards with stripe facing down Card hopper Put the stripe towards the kiosk cabinet door or toward the right side of the encoder enclosure (when facing the front of the encoder). 5 Put the card weight back on top of the card stack. 6 Close and lock the cabinet door or encoder enclosure. Checking transaction history The Stanley ID Express Station™ System records all transactions and system errors in a database that you can review using the view transaction report feature. You can do this to find out: ■ How often a kiosk is being used ■ Whether the card hopper is getting low ■ Troubleshoot an error that someone reports Periodically checking the transaction history report is important to do on a daily or weekly basis. The following are the types of data that are collected: ■ ■ ■ ■ ■ Cancelled – a card transaction cancelled by the user before the transaction was completed. This occurs when the user presses the cancel button. SystemError – internal software error. RetriesExceeded – a transaction that a user tried that exceeded the number of attempts that are granted. For example, if a maximum of three tries are allowed, the fourth try will generate this error. Succeeded – a transaction resulting in an encoded card. Timeout – a transaction that a user tried that exceeded the amount of time allotted to complete the transaction. 5–3 Chapter 5: Day-to-Day Maintenance ■ Notes UnauthorizedAccess – an attempted card transaction where the user failed to enter correct identification or verification data. ■ PostError – a system error that occurs when a component is not found, such as card hopper empty or database not found. To run a transaction history report for all kiosk and desktop stations 1 From the Windows desktop, click Start > Programs > Stanley ID Express > ID Express Server Configuration. 2 Click the Behavior tab. The Behavior screen displays Figure 5.4 The Behavior screen showing the show transaction history button Click the Show Transaction History button 3 Click the Show Transaction History button. The Transaction History Report configuration screen displays 5–4 Chapter 5: Day-to-Day Maintenance Figure 5.5 Transaction History Report configuration screen Adjust the report parameters and then click Submit. Clearing the picture or thumbnails options will cause the report to generate faster. 4 Make adjustments to the start date, end date, status, or other parameter. 5 Click Submit. The Report displays at the bottom of the screen Figure 5.6 The report showing the latest data 6 Scroll down as necessary to see all of the data. 5–5 Notes Chapter 5: Day-to-Day Maintenance Notes Maintaining the Desktop Encoder Regular maintenance of the encoder in both the kiosk and the desktop station is recommended. See the online manual, CIM-4ABC Series Service Manual, located on the installation CD-ROM for instructions on maintaining the encoder. 5–6 A p p e n d i x A Glossary of Terms Use this glossary as a reference and whenever you see a word in italic type, like this: desktop station A–1 Appendix A: Glossary of Terms Notes Apply button background image B.A.S.I.S.® database Button that appears in the Server Configuration utility. Clicking this button saves the changes made to the screen. Click this button before moving to another tab. The graphic file that fills most of the kiosk window and on which the text is displayed. The B.A.S.I.S.® access control software file that contains all of the data such as users, badges, access levels, etc. B.A.S.I.S.® offline locks Electronic locks that require a magnetic stripe card, proximity card or PIN to unlock it. These programmable locks are battery-powered, offline, standalone door hardware. behaviors Graphic and functional behaviors of kiosk and desktop stations that are defined within the Configuration Utility. Use these to customize your stations for clearer communication and better control in automatically issuing key cards. desktop station A secured, attended production card encoder designed to connect to a desktop computer. These stations are designed to be temporarily put into service during peak user card demands such as student enrollment. These stations, like the kiosk station, encode existing magnetic stripe cards or dispense temporary cards that operate B.A.S.I.S.® offline locks manufactured by Best Access Systems. header background image The graphic file that fills the top portion of the kiosk window and on which the kiosk name is displayed. identification field A data entry field that is completed by a user to identify himself. The system compares this data against the corresponding B.A.S.I.S.® database field. See verification field below. Up to three identification fields can be set up. Example fields include last name, first name, birth date, etc. idle timeout Amount of time the system will wait for a kiosk user input before it will automatically cancel the transaction. A–2 Appendix A: Glossary of Terms IIS Internet Information Services. IIS is a standard Windows web service that enables the Stanley ID Express Station™ to publish information on an intranet. Internet Explorer Microsoft’s world wide web browser application. This application enables the Stanley ID Express Station™ kiosk software to run. IP address The identifier for a kiosk or desktop station on a TCP/IP network. Networks using the TCP/IP protocol route messages based on the IP address of the destination. kiosk station A publicly-available, unattended, pre configured, and dedicated kiosk that encodes existing magnetic stripe cards or dispenses temporary cards that operate B.A.S.I.S.® offline locks manufactured by Best Access Systems. .NET Framework 1.1 PIN restricted area access lockout A component of the Microsoft Windows operating system used to build web-enabled applications. Personal Identification Number. This is a series of digits entered on a keypad, used to identify the user. Dual validation B.A.S.I.S. offline locks require these codes to gain access. The message that is displayed when an unauthorized computer tries to access the kiosk or desktop station. Revert button The button that, if clicked, will return the configuration for that screen to its previous saved (or ‘applied’) state. retry count Number of consecutive, failed attempts allowed a user to verify their identity before the system locks them out. retry lockout timeout Amount of time that a user is locked out after exceeding the retry count. Server Configuration utility The application that runs on the B.A.S.I.S.® server and allows you to connect to the B.A.S.I.S.® database and define how the kiosks behave and appear. temp key expiration Number of days that temporary keys are valid before expiration. A–3 Notes Appendix A: Glossary of Terms Notes transaction history age Number of days that Stanley ID Express Station™ System will keep transaction history. transaction timeout Amount of time that a user does not provide any input. URL verification field A–4 Uniform Resource Locator. The global address of documents and other resources on the World Wide Web. The Server where the B.A.S.I.S.® database resides has a URL that identifies the address of that server. For example, the URL for the B.A.S.I.S.® server may be http://192.86.1.2. A data entry field that is completed by a user to verify his identity. The system compares this data against the corresponding B.A.S.I.S.® database field. See identification field above. Up to three verification fields can be set up. Example fields include Social Security Number, birth date, address, etc. A p p e n d Index Symbols .NET Framework confirming installed 2-2 making sure installed 3-3 .NET permissions 4-9 A appearance/graphics tab 3-13 apply button using 3-6 auto complete feature turning off in Internet Explorer 4-7, 4-9 B B.A.S.I.S Server as component 2-2 B.A.S.I.S. database connecting 4-4 connecting to 2-2, 3-5 fields of 3-8 making connection to 3-4 i x B Appendix B: Index B.A.S.I.S. offline locks as component 2-2 compatibility 3-2 B.A.S.I.S. Open IT as requirement 3-15 B.A.S.I.S. software as component 3-1 making sure installed 2-2 making sure running 3-2 background graphic 3-13 behavior tab 3-15 behaviors defined 3-14 setting up 2-2, 3-14, 3-15 using preset values 3-14 BMP as compatible graphic format 3-13 buttons apply 3-6 revert 3-6 C camera location of 4-2 card hopper loading cards in kiosk 4-8 location of in desktop encoder 4-7 location of in kiosk 4-2, 5-2 maximum capacity of 5-1 reloading cards 5-1 card weight for kiosk stations 4-3 in desktop encoder 4-7 location of 5-2 cards as component 2-2 loading in card hopper 4-8 loading in card hopper for kiosk 4-4 loading in desktop encoder 4-7 maximum capacity in card hopper 5-1 meal 3-17 orientation of in card hopper 5-3 orienting in card hopper 4-4 B–2 reloading as maintenance 5-1 reloading cards in kiosks 5-2 temporary 3-12, 3-15 characteristics setting up 2-2 types of 3-12 computer location of in kiosk 4-2 connecting desktop encoders 2-3 kiosk stations 4-4 to B.A.S.I.S. database 3-4, 3-5, 4-4 to database 3-6 customizing text messages 3-12, 3-18 D database as part of connection string 3-6 connecting to B.A.S.I.S. 3-4, 3-5 connecting to with string 3-6 fields of 3-8 database connection not set up 3-8 database connection string 3-6 example for 3-6 database fields label for 3-9 masking 3-9 selecting 3-8 database tab 3-5 default text messages 3-17 defining amount of time to lockout 3-12 IP addresses 3-2, 3-10 number of attempts 3-12 number of days transaction history kept 3-12 URL 3-2 desktop computer requirements for 4-7 desktop encoders connecting 2-3 connecting to pc 4-8 location of card hopper 5-2 setting up 4-7 specifications for 4-8 unpacking 2-3 desktop stations as component 2-2 customizing appearance for 3-13 defined 4-1 defining network connections for 3-10 loading cards in 4-8 maintaining 5-1 making network connections 4-9 power and network availability 3-2 purpose of 4-1 requirements for 4-7 setting up behaviors for 3-15 setting up characteristics for 2-2, 3-12 E entering IP addresses 3-11 F fields masking 3-9 selecting database 3-8 format defined 3-9 format label defined 3-9 G getting technical support 4-5 GIF as compatible graphic format 3-13 Appendix B: Index graphics as characteristics 2-2 background 3-13 compatible formats 3-13 logo 3-13 setting up 3-12 using for defining look of kiosk 3-12 H HTML tags using in text messages 3-16 I ID Express Station System setup overview 2-2 identification fields default text message 3-17 limit of 3-7 selecting 3-8 setting up 2-2, 3-7 identifying server at kiosk 4-9 idle timeout default value of 3-14 defined 3-14 valid range for 3-14 IIS confirming installation 2-2 installing kiosk stations 2-3, 4-2 Server Configuration utility 3-4 Internet Explorer turning off auto complete feature 4-7, 4-9 Internet Information Services confirming installation 2-2 IP addresses 4-9 defining 3-2, 3-10 description for 3-11 entering 3-11 identifying B.A.S.I.S. server for kiosk station 4-6 identifying in Internet Explorer 4-7 static as requirement 4-7 J M JPG as compatible graphic format 3-13 magstripe cards as component 2-2 maintaining ID Express Stations 5-1 three common tasks 5-1 making network connections 2-3 for desktop stations 4-9 mask entry defined 3-9 masking user entry 3-9 meal cards messages for 3-17 K kiosk stations anatomy of 4-2 as component 2-2 bolting 4-5 bolting requirements for 4-3 connecting 4-4 customizing appearance for 3-13 defined 4-1 defining network connections for 3-10 installing 2-3, 4-2 maintaining 5-1 making network connections 4-6 power and network availability 3-2 purpose of 4-1 reloading cards in 5-2 requirements of 4-3 setting up behaviors for 3-15 setting up characteristics for 2-2, 3-12 troubleshooting 4-5 L label database field 3-9 defined 3-9 languages using in text messages 3-18 loading cards in hopper for kiosk 4-4 maximum capacity for 5-1 logos using your own 3-13 N network connections for kiosk stations 4-6 making 2-3 O overview of system setup 2-2 P password as part of connection string 3-6 photos using in transaction history 3-12 PIN displaying 3-15 PNG as compatible graphic format 3-13 purging transaction history 3-12 pwd as part of connection string 3-6 R reloading cards 5-1 requirements for desktop computer 4-7 B–3 Appendix B: Index retry count default value of 3-14 defined 3-14 valid range for 3-14 retry lockout message for 3-17 retry lockout timeout default value of 3-14 defined 3-14 valid range for 3-14 revert button using 3-6 room PIN displaying 3-15 S security tab 3-10 selecting database fields 3-8 server as part of connection string 3-6 setting up 3-2 Server Configuration installing 3-4 setting up 2-2, 3-4 setting up behaviors 2-2, 3-14, 3-15 characteristics 2-2 desktop encoder 4-7 desktop station characteristics 3-12 desktop stations 2-3 graphics 3-12 identification fields 2-2, 3-7 kiosk station characteristics 3-12 kiosk stations 2-3 server 3-2 server configuration 2-2 Server Configuration utility 3-4 text messages 2-2, 3-16 verification fields 2-2, 3-7 setup overview 2-2 social security number as identification field 3-7 specifications for desktop encoder 4-8 for kiosk stations 4-3 B–4 Stanley logo as default logo 3-13 stations as component 2-2 system error message text for 3-17 system overview 2-2 T tabs appearance 3-13 behavior 3-15 cannot see fields 3-8 database 3-5 security 3-10 technical support 4-5 temporary cards allowing issue of 3-15 determining how long valid 3-12 expiration of 3-15 text messages character limit of 3-16, 3-18 customizing 3-12, 3-18 default 3-17 default message for 3-17 default system error text 3-17 for default identification field 3-17 for default verification field 3-17 setting up 2-2, 3-16 using HTML in 3-16 using other languages in 3-18 touch screen location of 4-2 transaction history checking as maintenance task 5-1 defining number of days 3-12 identifying stations in 3-11 photos in 3-15 purging 3-12 using photos in 3-12 transaction history age default value of 3-14 defined 3-14 valid range for 3-14 troubleshooting kiosk stations 4-5 U uid as part of connection string 3-6 UPS location of in kiosk 4-2 URL defining 3-2 example of 4-9 user ID as part of connection string 3-6 V verification fields limit of 3-7 selecting 3-8 setting up 2-2, 3-7 T81188/Rev – ER-7991-40 Nov 2005