1
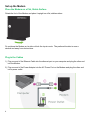
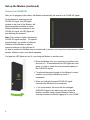
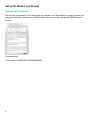
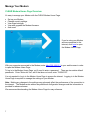
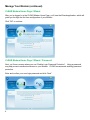
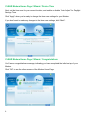
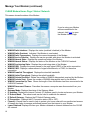
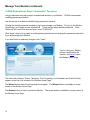
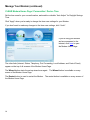
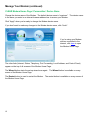
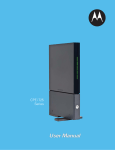
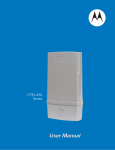
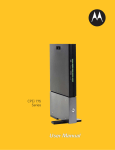
CLEAR MODEM (SERIES M) USER GUIDE GET TO KNOW YOUR CLEAR MODEM – SERIES M 3 WHAT’S IN THE BOX? INFORMATIVE LED INDICATORS USE WITH CARE 3 3 3 SET UP THE MODEM 4 PLACE THE MODEM ON A FLAT, STABLE SURFACE PLUG IN THE CABLES CONNECT TO CLEAR 4G CONNECT TO THE INTERNET 4 4 5 6 MANAGE YOUR MODEM 7 CLEAR MODEM HOME PAGE OVERVIEW CLEAR MODEM HOME PAGE / WIZARD CLEAR MODEM HOME PAGE / WIZARD / PASSWORD CLEAR MODEM HOME PAGE / WIZARD / DEVICE TIME CLEAR MODEM HOME PAGE / WIZARD / CONGRATULATIONS CLEAR MODEM HOME PAGE / STATUS / NETWORK CLEAR MODEM HOME PAGE / STATUS / NETWORK (CONTINUED) CLEAR MODEM HOME PAGE / STATUS / TELEPHONY CLEAR MODEM HOME PAGE / PERSONALIZE / PASSWORD CLEAR MODEM HOME PAGE / PERSONALIZE / DEVICE TIME CLEAR MODEM HOME PAGE / PERSONALIZE / DEVICE NAME CLEAR MODEM HOME PAGE / PERSONALIZE / RESTORE FACTORY SETTINGS CLEAR MODEM HOME PAGE / INTERNET / WIMAX SECURITY CLEAR MODEM HOME PAGE / INTERNET / INTERNET PROTOCOL CLEAR MODEM HOME PAGE / ADVANCED / FIREWALL CLEAR MODEM HOME PAGE / INTERNET / DYNAMIC DNS CLEAR MODEM HOME PAGE / PORT FORWARDING / BASIC CLEAR MODEM HOME PAGE / PORT FORWARDING / FORWARDING CLEAR MODEM HOME PAGE / LOCAL ADDRESS / DHCP SERVER CLEAR MODEM HOME PAGE / LOCAL ADDRESS / LEASE STATUS CLEAR MODEM HOME PAGE / LOCAL ADDRESS / LEASE RESERVATION CLEAR MODEM HOME PAGE / CONTROL PANEL / SOFTWARE CLEAR MODEM HOME PAGE / CONTROL PANEL / CERTIFICATE CLEAR MODEM HOME PAGE / CONTROL PANEL / SYSTEM CLEAR MODEM HOME PAGE / CONTROL PANEL / ABOUT CLEAR MODEM HOME PAGE / TELEPHONY / ACCOUNT 7 8 8 9 9 10 11 12 13 14 15 16 17 18 19 20 21 22 23 24 25 26 27 28 29 30 QUICK TIPS 31 UNDERSTANDING THE LED LIGHTS TO MAXIMIZE SIGNAL STRENGTH 1 31 31 UNABLE TO BROWSE THE INTERNET? CONNECT TO YOUR HOME WIRELESS NETWORK IMPORTANT MESSAGE FROM CLEAR 31 31 32 IMPORTANT INFORMATION 32 TECHNICAL SPECIFICATIONS 32 STILL NEED HELP? 32 FAQS AND LIVE CHAT SUPPORT TELEPHONE SUPPORT QUESTIONS ABOUT YOUR BILL? IMPORTANT INFORMATION DOCUMENT WARRANTY INFORMATION LEGAL DISCLOSURES 32 32 32 32 33 33 2 Get to Know Your CLEAR Modem – Series M What’s in the Box? CLEAR Modem - Series M Ethernet Cable Power Adapter Quick Start Guide Informative LED Indicators The LED indicators are located on the side of the CLEAR Modem – Series M (Modem). Signal Strength The Signal Strength LEDs indicate the strength of the CLEAR 4G signal (five LEDS lit indicates an excellent signal). Use with Care 3 Do not throw, drop, or dismantle the Modem. Keep the Modem out of direct sunlight. Keep pets and children from playing with the Modem. Do not immerse the Modem in water or other liquid. Make sure your hands are dry before handling the Modem. Set up the Modem Place the Modem on a Flat, Stable Surface Rotate the foot of the Modem and place it upright on a flat, stable surface. Do not place the Modem on its side or block the top air vents. The preferred location is near a window and away from obstructions. Plug in the Cables 1) Plug one end of the Ethernet Cable into the ethernet port on your computer and plug the other end into the Modem. 2) Plug one end of the Power Adapter into the AC Power Port on the Modem and plug the other end into a power outlet. 4 Set up the Modem (continued) Connect to CLEAR 4G After you’ve plugged in the cables, the Modem automatically will search for a CLEAR 4G signal. As the Modem is searching for the CLEAR 4G signal, five LED lights, located on the front of the Modem, will blink sequentially and then in unison. When the Modem is connected to the CLEAR 4G signal, the LED lights will stop blinking and remain lit. Note: The number of lights indicates the CLEAR 4G signal strength. For optimal signal strength, you should try different locations for the Modem in order to ensure a minimum of two lights are lit. It’s best to position the Modem near an outside wall or window, and away from microwaves, cordless phones, wireless routers, and stereo speakers. If at least two LED lights are not lit, try moving the Modem to another room. Move the Modem (not your computer) to another room, and wait 15 – 20 seconds after the LED lights are solid green, in order to obtain the most accurate reading of the CLEAR 4G signal. To optimize the signal strength in the Modem’s current location, try turning the Modem by small ¼” increments. When you find the strongest CLEAR 4G signal, reconnect the Modem to your computer. 5 If, for some reason, the room with the strongest CLEAR 4G signal is not where you want to put the Modem, consider using a longer Ethernet Cable or ordering a wireless router by logging in to your CLEAR online account. Set up the Modem (continued) Connect to the Internet The first time you connect to the internet with your Modem, you’ll be directed to a page to review your rate plan information, complete your CLEAR online account, and read / accept the CLEAR Terms of Service. Congratulations! You’re ready for INTERNET AWESOMENESS! 6 Manage Your Modem CLEAR Modem Home Page Overview It’s easy to manage your Modem with the CLEAR Modem Home Page. Set up your Modem. Change security settings. View signal strength. View and upgrade the Modem firmware. And more! If you’re using your Modem and are connected to the internet, click here to open the Modem Home Page. With your computer connected to the Modem, enter http://192.168.15.1 in your web browser in order to open the Modem Home Page. To log in to the Modem Home Page, you’ll need to enter a password. There are two admin default passwords. Enter “Motorola” first, and if that does not work, enter “CLEAR123”. It is not required to log in to the Modem Home Page to access the internet. Logging in to the Modem Home Page is required to manage the settings of your Modem. Note: Making any changes to the settings may adversely affect the performance of the connection to the internet. The Modem works without any additional configuration changes and the information is provided for advanced users. We recommend bookmarking the Modem Home Page for easy reference. 7 Manage Your Modem (continued) CLEAR Modem Home Page / Wizard After you’ve logged in to the CLEAR Modem Home Page, you’ll see the Wizard application, which will guide you through the first time configuration of your Modem. Click “OK” to continue. CLEAR Modem Home Page / Wizard / Password Next, you’ll see a screen where you can “Enable Login Password Protection”. Using a password may help prevent unauthorized access to your Modem. CLEAR recommends enabling password protection. Enter and confirm your new login password and click “Next”. 8 CLEAR Modem Home Page / Wizard / Device Time Next, set the time zone for your current location, and enable or disable “Auto Adjust” for Daylight Savings Time. Click “Apply” when you’re ready to change the time zone settings for your Modem. If you don’t want to make any changes to the time zone settings, click “Back”. CLEAR Modem Home Page / Wizard / Congratulations You’ll see a congratulations message, indicating you have completed the initial set up of your Modem. Click “OK” to see the other screens of the Modem Home Page. 9 Manage Your Modem (continued) CLEAR Modem Home Page / Status / Network This screen shows the status of the Modem. If you’re using your Modem and are connected to the internet, click here to open the Modem Home Page. 10 WiMAX Radio Interface: Displays the status (enabled / disabled) of the Modem. WiMAX Radio Overheat: Indicates if the Modem is overheated. WiMAX Radio Temperature: Displays the current temperate of the Modem. WiMAX Service Provider: Displays the service provider with whom the Modem is activated. WiMAX Network State: Displays the operational state of the Modem. WiMAX Network Status: Displays the status of the Modem on the CLEAR 4G network. WiMAX Provisioning State: Displays the provisioning state of the Modem. WiMAX RSSI: Displays the power present in the radio signal (RSSI) of the active connection. WiMAX CINR: Displays a measurement of signal effectiveness, or CINR, for the active connection. WiMAX Downlink Throughput: Displays the downlink bandwidth WiMAX Uplink Throughput: Displays the uplink bandwidth WiMAX Packets Received: Shows the number of WiMAX data packets received by the Modem. WiMAX Packets Sent: Shows the number of WiMAX data packets sent by the Modem. WiMAX Connection Up Time: Shows the length of time the Modem has been connected to the CLEAR 4G network. WiMAX Disconnect Reason: Describes the reason a computer was disconnected from your Modem. Gateway Mode: Displays the status of the Gateway Mode. IP Address: Displays the Internet Protocol (IP) Address used to locate and access your Modem. IP Subnet Mask: The subnet mask can be used to subdivide the network. IP Default Gateway: Displays the IP Default Gateway value. IP Connection: Displays the IP Connection status (ON or OFF). Firewall: A firewall can be used to help to protect your home network from unauthorized access. A firewall also helps to manage authorized access from the internet to your Modem. Lease Obtained: Displays the time your Modem obtained an Internet address from the CLEAR 4G network. Manage Your Modem (continued) CLEAR Modem Home Page / Status / Network (continued) Lease Expires: Displays the time your Modem's Internet Address from CLEAR 4G network will expire and be renewed. DNS Servers: Displays the server(s) your Modem will query about Internet domain names (e.g. www.clear.com). Time Server: Displays the server(s) your Modem will query to get the current time. EMS Server (Electronic Management Systems): Displays if the Modem is connected to the system. EMS Bootstrap: Displays confirmation if the Modem is bootstrapped. Device Up Time: Displays the amount of time your Modem has been powered up and running. Refresh: Click to manually refresh the screen with the current status. Auto-Refresh: Click so the browser automatically refreshes at the interval determined in the Control Panel menu. The other links (Personalize, Internet, Telephony, Port Forwarding, Local Address, and Control Panel) appear on the top of all screens of the Modem Home Page. The Wizard button starts the set-up wizard over again. The Wizard button is available on every screen of the Modem Home Page. The Restart button is used to restart the Modem. The restart button is available on every screen of the Modem Home Page. 11 Manage Your Modem (continued) CLEAR Modem Home Page / Status / Telephony Note: Telephony services are not available with the Modem. This screen can be opened, but no information will be presented, since telephony services are not available. The other links (Personalize, Internet, Status, Port Forwarding, Local Address, and Control Panel) appear on the top of all screens of the Modem Home Page. The Wizard button starts the set-up wizard over again. The Wizard button is available on every screen of the Modem Home Page. The Restart button is used to restart the Modem. The restart button is available on every screen of the Modem Home Page. 12 Manage Your Modem (continued) CLEAR Modem Home Page / Personalize / Password Using a password may help prevent unauthorized access to your Modem. CLEAR recommends enabling password protection. Use this screen to enable and disable login password protection. Change the default password required to log in and manage your Modem. To log in to the Modem Home Page, you’ll need to enter a password. There are two admin default passwords. Enter “Motorola” first, and if that does not work, enter “CLEAR123”. Click “Apply” when you’re ready to enable password protection and change the password required to log in and manage your Modem. If you don’t want to make any changes, click “Undo”. If you’re using your Modem and are connected to the internet, click here to open the Modem Home Page. The other links (Internet, Status, Telephony, Port Forwarding, Local Address, and Control Panel) appear on the top of all screens of the Modem Home Page. The Wizard button starts the set-up wizard over again. The Wizard button is available on every screen of the Modem Home Page. The Restart button is used to restart the Modem. The restart button is available on every screen of the Modem Home Page. 13 Manage Your Modem (continued) CLEAR Modem Home Page / Personalize / Device Time Set the time zone for your current location, and enable or disable “Auto Adjust” for Daylight Savings Time. Click “Apply” when you’re ready to change the time zone settings for your Modem. If you don’t want to make any changes to the time zone settings, click “Undo”. If you’re using your Modem and are connected to the internet, click here to open the Modem Home Page. The other links (Internet, Status, Telephony, Port Forwarding, Local Address, and Control Panel) appear on the top of all screens of the Modem Home Page. The Wizard button starts the set-up wizard over again. The Wizard button is available on every screen of the Modem Home Page. The Restart button is used to restart the Modem. The restart button is available on every screen of the Modem Home Page. 14 Manage Your Modem (continued) CLEAR Modem Home Page / Personalize / Device Name Change the device name of the Modem. The default device name is “mywimax.” The device name is the name you enter in an internet browser address bar to access your Modem. Click “Apply” when you’re ready to change the Modem device name. If you don’t want to make any changes to the Modem device name, click “Undo”. If you’re using your Modem and are connected to the internet, click here to open the Modem Home Page. The other links (Internet, Status, Telephony, Port Forwarding, Local Address, and Control Panel) appear on the top of all screens of the Modem Home Page. The Wizard button starts the set-up wizard over again. The Wizard button is available on every screen of the Modem Home Page. The Restart button is used to restart the Modem. The restart button is available on every screen of the Modem Home Page. 15 Manage Your Modem (continued) CLEAR Modem Home Page / Personalize / Restore Factory Settings Use this screen to reset the Modem to the default factory settings. Note: It is important to note that many device settings will be reset to the factory default settings. For example, the password required to login and manage your Modem will be reset to “CLEAR123”, the factory default setting. Click “Apply” when you’re ready to restore the Modem to the factory settings and / or check for updates. The Modem restarts when you click “Apply”. If you don’t want to restore the factory settings, click “Undo”. If you’re using your Modem and are connected to the internet, click here to open the Modem Home Page. The other links (Internet, Status, Telephony, Port Forwarding, Local Address, and Control Panel) appear on the top of all screens of the Modem Home Page. The Wizard button starts the set-up wizard over again. The Wizard button is available on every screen of the Modem Home Page. The Restart button is used to restart the Modem. The restart button is available on every screen of the Modem Home Page. 16 Manage Your Modem (continued) CLEAR Modem Home Page / Internet / WiMAX Security Warning: This screen includes settings that could negatively impact the performance of the Modem, if set incorrectly. These settings should be modified only by advanced users or if directed by CLEAR Customer Care. This screen contains your authentication method. Authentication is only required if you want to change the Modem from connecting to our production network to a test network. It is not required by CLEAR. Authentication Method: Use the drop-down box to select EAP-TLS (the default setting) or EAPTTLS/MS- CHAPv2. User Name: Enter the User Name you want to use. Password: Enter the Password you want to use. Password Confirmation: Reenter the Password you selected. Realm: Enter the Realm you want to use. Click “Apply” when you’re ready to change the WiMAX Security settings. If you don’t want to make any changes to the authentication or other security settings, click “Undo”. If you’re using your Modem and are connected to the internet, click here to open the Modem Home Page. The other links (Personalize, Status, Telephony, Port Forwarding, Local Address, and Control Panel) appear on the top of all screens of the Modem Home Page. The Wizard button starts the set-up wizard over again. The Wizard button is available on every screen of the Modem Home Page. The Restart button is used to restart the Modem. The restart button is available on every screen of the Modem Home Page. 17 Manage Your Modem (continued) CLEAR Modem Home Page / Internet / Internet Protocol Warning: This screen includes settings that could negatively impact the performance of the Modem, if set incorrectly. These settings should be modified only by advanced users or if directed by CLEAR Customer Care. Connection Mode: DHCP (Dynamic Host Configuration Protocol) is used to automatically assign IP Addresses and configuration information to wi-fi clients, thereby greatly simplifying network set up. If you desire, you may configure the range of IP Addresses that the Modem will allow to recognize the Modem. Host Name: Enter the host name to be used. Click “Apply” when you’re ready to change the Internet Protocol settings. If you don’t want to make any changes to the Internet Protocol settings, click “Undo”. If you’re using your Modem and are connected to the internet, click here to open the Modem Home Page. The other links (Personalize, Status, Telephony, Port Forwarding, Local Address, and Control Panel) appear on the top of all screens of the Modem Home Page. The Wizard button starts the set-up wizard over again. The Wizard button is available on every screen of the Modem Home Page. The Restart button is used to restart the Modem. The restart button is available on every screen of the Modem Home Page. 18 Manage Your Modem (continued) CLEAR Modem Home Page / Advanced / Firewall Warning: This screen includes settings that could negatively impact the performance of the Modem, if set incorrectly. These settings should be modified only by advanced users or if directed by CLEAR Customer Care. A firewall can be used to help to protect your home network from unauthorized access. A firewall also helps to manage unauthorized access from the internet to your Modem. Enable Firewall: Check the box to enable the firewall setting. Enable Web Login from Internet: Check the box to enable you to access your Modem from a network other than your own. Web Login Port from Internet: Choose a port number with which to connect when logging in from a network other than your own. The default is 8080. Enable ping from Internet: Check the box to enable your Modem to respond to a ping from the internet. This option should be enabled to allow testing only. Click “Apply” when you’re ready to change the firewall settings. If you don’t want to make any changes to the firewall settings, click “Undo”. If you’re using your Modem and are connected to the internet, click here to open the Modem Home Page. The other links (Personalize, Status, Telephony, Port Forwarding, Local Address, and Control Panel) appear on the top of all screens of the Modem Home Page. The Wizard button starts the set-up wizard over again. The Wizard button is available on every screen of the Modem Home Page. The Restart button is used to restart the Modem. The restart button is available on every screen of the Modem Home Page. 19 Manage Your Modem (continued) CLEAR Modem Home Page / Internet / Dynamic DNS Warning: This screen includes settings that could negatively impact the performance of the Modem, if set incorrectly. These settings should be modified only by advanced users or if directed by CLEAR Customer Care. Enable DDNS: (Dynamic Domain Name Service) allows a user with a non-static IP address to keep his / her domain name associated with an ever-changing IP address. An example is when you are hosting your own website. DDNS Service Provider: Select the service provider from the drop-down box. Click “Apply” when you’re ready to change the Dynamic DNS settings. If you don’t want to make any changes to the Dynamic DNS settings, click “Undo”. If you’re using your Modem and are connected to the internet, click here to open the Modem Home Page. The other links (Personalize, Status, Telephony, Port Forwarding, Local Address, and Control Panel) appear on the top of all screens of the Modem Home Page. The Wizard button starts the set-up wizard over again. The Wizard button is available on every screen of the Modem Home Page. The Restart button is used to restart the Modem. The restart button is available on every screen of the Modem Home Page. 20 Manage Your Modem (continued) CLEAR Modem Home Page / Port Forwarding / Basic Warning: This screen includes settings that could negatively impact the performance of the Modem, if set incorrectly. These settings should be modified only by advanced users or if directed by CLEAR Customer Care. Port Forwarding enables you to direct incoming traffic to specific LAN hosts (computers on your network) based on the protocol and port number. It is used to play Internet games or provide local services (such as web hosting) for a LAN group. Use this screen to enable Universal Plug and Play and set the DMZ IP Addresses. Enable UPnP IGD: Enable the Universal Plug and Play (UPnP) Internet Gateway Device (IGD) profile to allow certain Windows® applications to set up the “Port Forwarding” rule dynamically. This is used when NAT is enabled on the Modem. DMZ IP Address: A DMZ is a “Demilitarized Zone” between a secure internal network and an unsecured network such as the internet. Usually devices or computers that need less restrictive settings are placed in a DMZ. Enter the DMZ IP Address here. Click “Apply” when you’re ready to save the basic Port Forwarding settings. If you don’t want to make any changes to the basic Port Forwarding settings, click “Undo”. If you’re using your Modem and are connected to the internet, click here to open the Modem Home Page. The other links (Personalize, Internet, Status, Telephony, Local Address, and Control Panel) appear on the top of all screens of the Modem Home Page. The Wizard button starts the set-up wizard over again. The Wizard button is available on every screen of the Modem Home Page. The Restart button is used to restart the Modem. The restart button is available on every screen of the Modem Home Page. 21 Manage Your Modem (continued) CLEAR Modem Home Page / Port Forwarding / Forwarding Warning: This screen includes settings that could negatively impact the performance of the Modem, if set incorrectly. These settings should be modified only by advanced users or if directed by CLEAR Customer Care. Port forwarding enables you to direct incoming traffic to specific LAN hosts (computers on your network) based on the protocol and port number. It is used to play Internet games or provide local services (such as web hosting) for a LAN group. Use this tab to Add or Delete an IP address that should be used for Port Forwarding. Click “Apply” when you’re ready to change the forwarding setting. If you don’t want to make any forwarding changes, click “Undo”. If you’re using your Modem and are connected to the internet, click here to open the Modem Home Page. The other links (Personalize, Internet, Status, Telephony, Local Address, and Control Panel) appear on the top of all screens of the Modem Home Page. The Wizard button starts the set-up wizard over again. The Wizard button is available on every screen of the Modem Home Page. The Restart button is used to restart the Modem. The restart button is available on every screen of the Modem Home Page. 22 Manage Your Modem (continued) CLEAR Modem Home Page / Local Address / DHCP Server Warning: This tab includes settings that could negatively impact the performance of the Modem, if set incorrectly. These settings should be modified only by advanced users or if directed by CLEAR Customer Care. Dynamic Host Configuration Protocol (DHCP) is used to automatically assign IP Addresses and configuration information to wi-fi clients, thereby greatly simplifying network setup. If you desire, you may configure the range of IP Addresses that the Modem will allow to recognize the Modem. Enable DHCP Server: If enabled, the DHCP server on the gateway assigns IP addresses to the computers and other hosts on your network, if they have DHCP enabled. By default, the gateway server is enabled. If there is another DHCP server running on your network (on another router), disable one of the DHCP servers. DHCP Server IP Address: Enter the default “Port Forwarding” LAN Client IP Address. DHCP Starting IP Address: Sets the first IP address assigned by the DHCP server, in dotted decimal format. It must be greater than the IP address value of the gateway. DHCP Ending IP Address: Sets the final IP address assigned by the DHCP server. If the DHCP server runs out of DHCP addresses, users cannot access network resources. If this happens, increase the Ending IP or decrease the Lease Time. DHCP Lease Time: Sets the time that a network computer remains connected to the gateway using its currently assigned IP address. At the end of this time, the DHCP server renews the lease or assigns the computer a new IP address. Click “Apply” when you’re ready to change the DHCP Server settings. If you don’t want to make any changes to the DHCP Server settings, click “Undo”. If you’re using your Modem and are connected to the internet, click here to open the Modem Home Page. The other links (Personalize, Internet, Status, Telephony, Port Forwarding, and Control Panel) appear on the top of all screens of the Modem Home Page. The Wizard button starts the set-up wizard over again. The Wizard button is available on every screen of the Modem Home Page. The Restart button is used to restart the Modem. The restart button is available on every screen of the Modem Home Page. 23 Manage Your Modem (continued) CLEAR Modem Home Page / Local Address / Lease Status This screen displays the active DHCP lease, since the last reboot. following information is displayed: For each active lease, the Client Host Name: Displays the client host name. The name field is limited to 20 characters. MAC Address: Shows the Media Access Control (MAC) Address. IP Address: Shows the IP Address for each active lease. Remaining Lease Duration: Shows the amount of time remaining in the lease. Refresh: Click to manually refresh the screen with the current status. Auto-Refresh: Click so the browser automatically refreshes at the interval determined in the Control Panel menu. If you’re using your Modem and are connected to the internet, click here to open the Modem Home Page. The other links (Personalize, Internet, Status, Telephony, Port Forwarding, and Control Panel) appear on the top of all screens of the Modem Home Page. The Wizard button starts the set-up wizard over again. The Wizard button is available on every screen of the Modem Home Page. The Restart button is used to restart the Modem. The restart button is available on every screen of the Modem Home Page. 24 Manage Your Modem (continued) CLEAR Modem Home Page / Local Address / Lease Reservation Warning: This screen includes settings that could negatively impact the performance of the Modem, if set incorrectly. These settings should be modified only by advanced users or if directed by CLEAR Customer Care. This screen allows you to manage the lease reservation so that the same client receives the same IP address each time. Add or delete the Client Host Name, Mac Address, and IP Addresses. Click “Apply” when you’re ready to change the lease reservation setting. If you don’t want to make any changes to the lease reservation settings, click “Undo”. If you’re using your Modem and are connected to the internet, click here to open the Modem Home Page. The other links (Personalize, Internet, Status, Telephony, Port Forwarding, and Control Panel) appear on the top of all screens of the Modem Home Page. The Wizard button starts the set-up wizard over again. The Wizard button is available on every screen of the Modem Home Page. The Restart button is used to restart the Modem. The restart button is available on every screen of the Modem Home Page. 25 Manage Your Modem (continued) CLEAR Modem Home Page / Control Panel / Software This screen allows you to view/update your software information. Browse: Use the browse button to browse your computer for additional software packages. Once you have located the software package/ update you would like to add, click “Upgrade”. Available Software Packages: You should see the available software updates. View: If you don’t see the available software updates, click “View”. Install: Click “Install” after you’ve selected the software you would like to install. Uninstall: If you would like to remove software, select the software package you would like to remove, and then click “Uninstall”. If you’re using your Modem and are connected to the internet, click here to open the Modem Home Page. The other links (Personalize, Internet, Status, Telephony, Port Forwarding, and Local Address) appear on the top of all screens of the Modem Home Page. The Wizard button starts the set-up wizard over again. The Wizard button is available on every screen of the Modem Home Page. The Restart button is used to restart the Modem. The restart button is available on every screen of the Modem Home Page. 26 Manage Your Modem (continued) CLEAR Modem Home Page / Control Panel / Certificate This screen allows you to manage the certificates that are stored on the computer. Browse: Use to locate the certificate file on your computer. Import: Use to import the certificate once you’ve located it on your computer. Remove: Use to remove any selected certificate(s). If you’re using your Modem and are connected to the internet, click here to open the Modem Home Page. The other links (Personalize, Internet, Status, Telephony, Port Forwarding, and Local Address) appear on the top of all screens of the Modem Home Page. The Wizard button starts the set-up wizard over again. The Wizard button is available on every screen of the Modem Home Page. The Restart button is used to restart the Modem. The restart button is available on every screen of the Modem Home Page. 27 Manage Your Modem (continued) CLEAR Modem Home Page / Control Panel / System This screen allows you to manage additional features on your Modem. Language Used in User Interface: Select the language for the User Interface (CLEAR Modem Home Page) – the default language is English. Enable WiMAX Radio Interface: Check the box to enable the WiMAX Radio Interface. Enable LED: Check the box to enable the LEDs on the front of the Modem. Auto Refresh Interval: Enter, in seconds, the interval for Status Auto Refresh. The valid range is 2 seconds – 9999 seconds. Rebootstrap EMS: Check this box to reconnect the Modem with the EMS. Only perform this function when advised by and under the supervision of CLEAR Customer Care. Click “Apply” when you’re ready to change the system settings. If you don’t want to make any changes to the system settings, click “Undo”. If you’re using your Modem and are connected to the internet, click here to open the Modem Home Page. The other links (Personalize, Internet, Status, Telephony, Port Forwarding, and Local Address) appear on the top of all screens of the Modem Home Page. The Wizard button starts the set-up wizard over again. The Wizard button is available on every screen of the Modem Home Page. The Restart button is used to restart the Modem. The restart button is available on every screen of the Modem Home Page. 28 Manage Your Modem (continued) CLEAR Modem Home Page / Control Panel / About This screen displays basic properties of your Modem: Port Number: Shows the port number being used by the Modem. Model ID: Shows the Model ID of the Modem. Hardware Version: Shows the hardware version of the Modem. Serial Number: Shows the serial number of the Modem. WiMAX MAC Address: Shows the Media Access Control (MAC) Address of the Modem. LAN MAC Address: Shows the LAN MAC Address being used by the Modem. Service Provider: Shows Clearwire, the service provider for the Modem. Device Bootstrap Version: Displays the Device Bootstrap version of the Modem. Data Provisioning Version: Displays the Data Provisioning version of the Modem. Telephony Bootstrap Version: No text will be presented, since telephony services are not available on the Modem. Telephony Provisioning Version: No text will be presented, since telephony services are not available on the Modem. Refresh: Click to manually refresh the screen with the current status. Auto-Refresh: Click so the browser automatically refreshes at the interval determined in the Control Panel menu. If you’re using your Modem and are connected to the internet, click here to open the Modem Home Page. The other links (Personalize, Internet, Status, Telephony, Port Forwarding, and Local Address) appear on the top of all screens of the Modem Home Page. The Wizard button starts the set-up wizard over again. The Wizard button is available on every screen of the Modem Home Page. The Restart button is used to restart the Modem. The restart button is available on every screen of the Modem Home Page. 29 Manage Your Modem (continued) CLEAR Modem Home Page / Telephony / Account Note: Telephony services are not available with the Modem. This Telephony screens (Account, Ring Tone, Caller ID, Call Forwarding, Voice Mail, and Special Numbers) can be opened, but cannot be changed since telephony services are not available. 30 Quick Tips Understanding the LED Lights Initial Search for Service: o While the Modem is searching for CLEAR 4G service, the Signal Strength LEDs blink in a chase pattern. o While the Modem is connecting to CLEAR 4G service, the Signal Strength LEDS all blink in unison. o Once the Modem registers with CLEAR 4G service, the Signal Strength LEDS will stay lit – the more LEDS lit, the stronger the signal strength. o Troubleshooting Tips if the Modem doesn’t display at least two Signal Strength LED lights. The preferred location is near a window and away from obstructions. Move the Modem (not your computer) to another room, and wait 15 – 20 seconds after the LEDs are solid green, in order to obtain the most accurate reading of the CLEAR 4G signal. o To optimize the signal strength in the Modem’s current location, turn the Modem in ¼” increments. o When you find the strongest CLEAR 4G signal, reconnect the Modem to your computer. o If, for some reason, the room with the strongest CLEAR 4G signal is not where you want to put the Modem, consider using a longer Ethernet Cable or ordering a wireless router by logging in to your CLEAR online account. To Maximize Signal Strength It’s best to position the Modem near an outside wall or window, and away from obstructions. If at least two LED lights are not lit, try moving the Modem to another room. Unable to browse the internet? Try moving the Modem to different locations until at least two LED lights are lit. OTHERWISE, TRY THESE STEPS TO GET ONLINE Turn the Modem off for 15 seconds. Bypass any power strips and try a different power outlet. Connect the Modem directly to the computer, bypassing all routers. Note: If you can connect to the internet after removing a router from your set up, refer to the router’s manual for further assistance. Check the connection between the Modem and your computer, make sure the cable fits securely in the port, and then restart your computer. Connect to your Home Wireless Network 31 Connect one end of the Ethernet Cable to the Modem, and plug the other end into the internet port of your wireless router (instead of your computer). Plug the Power Adapter into the wireless router. Configure your computer to connect to the wireless network – check your wireless router manual for instructions. Important Message from CLEAR If your browser is stuck on a message from CLEAR, follow the on-screen instructions in order to view the message and provide any requested information. If your account is past due, click the option to make a payment. You also can make a payment through our automated payment system, by calling 888-888-3113 and selecting option 2. Important Information Technical Specifications Weight: 2.18 lbs Dimensions: 9.3 in (H) x 5.8 in (W) x .9 in (D) Hardware: o WiMAX chipset – Beceem BCS250 Bands Supported: o WiMAX 2500 MHz Antenna: o Internal Omni-Directional 5dB average gain LEDs: o Signal Strength: Five Minimum Requirements: o Activated CLEAR Service o Processor: 300MHz o RAM: 64 MB o Internet Explorer: IE 6.0 or higher Supported Operating Systems: o Windows® XP® SP2 and higher o Mac® OS8 and higher o Linux® Still need help? FAQs and Live Chat Support If you have questions about your Modem, please access the FAQs and live chat support at www.clear.com/support. Telephone Support If you still have questions, please call us at 877-956-4056. We provide automated telephone support 24/7 and live telephone support between 9am and 10pm, local time, seven days a week. Questions about your bill? When you set up your CLEAR online account, you provided CLEAR with a credit card number to which CLEAR automatically may bill your charges. However, if you desire to view your bill or to change the credit card to which your CLEAR charges are billed, it’s easy to do so. If you’re connected to the internet, just click here to login to your CLEAR online account. If you’re not connected to the internet, enter https://www.clear.com/my_account/signin.php in your web browser when you are connected to the internet. Important Information Document 32 Please read the separate “Important Information” document included with your Modem for regulatory information, safety information, and other important disclosures. Warranty Information See Section 6(d) of our Terms of Service (at www.clear.com/legal/terms) for warranty details. Legal Disclosures 33 CLEAR coverage areas are limited. Actual CLEAR network performance may vary and is not guaranteed. See Device, Support, and other pages at www.clear.com for additional information. CLEAR and the CLEAR logo are trademarks or registered trademarks of Clearwire Communications LLC. Other company, product, and brand names and trademarks are the property of their respective owners. © 2011 Clear Wireless LLC. All rights reserved.