1
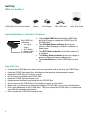
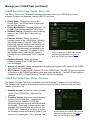
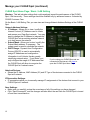
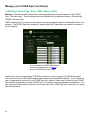
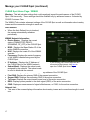
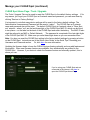
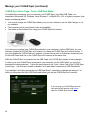
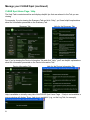
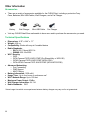
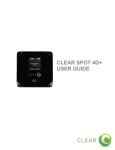
CLEAR SPOT 4G USER GUIDE SET IT UP 3 WHAT’S IN THE BOX? IMPORTANT BUTTONS / INDICATORS / FEATURES USE WITH CARE INSERT AND CHARGE THE BATTERY TURN THE CLEAR SPOT ON CONNECT YOUR DEVICE TO YOUR CLEAR SPOT CONNECT TO THE INTERNET SHARE YOUR CLEAR SPOT 3 3 3 4 4 5 5 6 MANAGE YOUR CLEAR SPOT 7 CLEAR SPOT HOME PAGE OVERVIEW CLEAR SPOT HOME PAGE / STATUS / SUMMARY CLEAR SPOT HOME PAGE / STATUS / SUMMARY (CONTINUED) CLEAR SPOT HOME PAGE / STATUS / STATISTICS CLEAR SPOT HOME PAGE / STATUS / LOG CLEAR SPOT HOME PAGE / STATUS / DEVICE INFO CLEAR SPOT HOME PAGE / STATUS / FIRMWARE CLEAR SPOT HOME PAGE / BASIC / WIZARD CLEAR SPOT HOME PAGE / BASIC / LAN SETTING CLEAR SPOT HOME PAGE / BASIC / WI-FI CLEAR SPOT HOME PAGE / BASIC / NAT SETUP CLEAR SPOT HOME PAGE / BASIC / MAC ADDRESS FILTER CLEAR SPOT HOME PAGE / WIMAX CLEAR SPOT HOME PAGE / TOOLS / ADMIN CLEAR SPOT HOME PAGE / TOOLS / UPGRADE CLEAR SPOT HOME PAGE / TOOLS / USB DATA MODE CLEAR SPOT HOME PAGE / HELP 7 8 9 10 10 11 11 12 13 14 15 16 17 18 19 20 21 QUICK TIPS 22 EXTEND THE CLEAR SPOT BATTERY LIFE MAXIMIZE SECURITY OF THE CLEAR SPOT ENSURE YOUR DEVICES RECOGNIZE YOUR CLEAR SPOT FACILITATING YOUR ABILITY TO BROWSE THE INTERNET ENSURE YOU CAN SHARE YOUR CLEAR SPOT RESETTING YOUR USERNAME AND PASSWORD IMPORTANT MESSAGE FROM CLEAR USING THE CLEAR SPOT VIA USB 22 22 22 23 23 23 23 24 OTHER INFORMATION 25 ACCESSORIES TECHNICAL SPECIFICATIONS 1 25 25 STILL NEED HELP? 26 FAQS AND LIVE CHAT SUPPORT TELEPHONE SUPPORT QUESTIONS ABOUT YOUR BILL? IMPORTANT INFORMATION DOCUMENT WARRANTY INFORMATION LEGAL DISCLOSURES 26 26 26 26 26 26 2 Set It Up What’s in the Box? CLEAR Spot 4G Personal Hotspot Battery Wall Charger Mini-USB Cable Quick Start Guide Important Buttons / Indicators / Features Mini-USB Port Indicators 4G Signal Status Wi-Fi Status Power Battery Status Button Use the Mini-USB Port with the Mini-USB Cable and Wall Charger to charge the CLEAR Spot 4G (CLEAR Spot). The 4G Signal Status Indicator glows green, yellow or red indicating an excellent, moderate, or weak signal. The Wi-Fi Status Indicator is solid blue when wi-fi is available. The Battery Status Indicator glows red, orange, or green to indicate the battery charge level. The Power Button turns the CLEAR Spot on and off. Use with Care 3 Position the CLEAR Spot on a clean, flat, secure surface, and do not drop the CLEAR Spot. Keep the CLEAR Spot away from other devices that produce electromagnetic waves. Keep the CLEAR Spot out of direct sunlight. Do not throw or dismantle the CLEAR Spot. Keep the CLEAR Spot and battery cool. Keep pets and children from playing with the CLEAR Spot. Do not immerse the CLEAR Spot or the battery in water or other liquid. Make sure your hands are dry before handling the CLEAR Spot or any of the included items. Don’t apply adhesives to the CLEAR Spot. They may cause the CLEAR Spot to overheat and may alter the antenna’s performance. Don’t operate the CLEAR Spot while driving. Set It Up (continued) Insert and Charge the Battery The battery comes partially charged, so you can use your CLEAR Spot right away. battery cover, slide in the battery so the pins align, and replace the battery cover. To use the Wall Charger, plug the small end of the Mini-USB Cable (USB Cable) into the CLEAR Spot, plug the large end into the Wall Charger, and plug the Wall Charger into an electrical outlet. Remove the To charge the CLEAR Spot battery through your computer, plug the small end of the USB Cable into the CLEAR Spot and plug the large end into an available USB Port on your computer. You can use the CLEAR Spot while charging the battery. The Power Button illuminates red while the battery is charging, and the Power Button turns green when the battery is fully charged. It takes approximately three hours to fully charge a battery that has no charge. Turn the CLEAR Spot On With the battery in your CLEAR Spot, press and hold the Power Button for two to three seconds to turn it on. While the CLEAR Spot is searching for the CLEAR 4G network, the 4G Signal Status Indicator flashes red. Once the CLEAR 4G network is found, the 4G Signal Status Indicator turns solid green, yellow, or red, indicating an excellent, moderate, or weak signal. As long as the 4G Signal Status Indicator remains steadily lit, the CLEAR Spot is connected to the CLEAR 4G network. Once the Wi-Fi Status Indicator turns blue, it means wi-fi is available and the CLEAR Spot is ready for you to connect your laptop and / or other wi-fi-enabled devices (collectively, “device”). When indoors, place the CLEAR Spot near a window or outside wall to receive the best signal. The CLEAR Spot wi-fi network range is 100 – 150 feet, so you don’t have to be next to the CLEAR Spot to connect your device. If you’re connected to the internet, click here to login into your CLEAR online account, and to use the CLEAR network diagnostics tool to help optimize the CLEAR 4G signal. If you’re not connected to the internet, enter https://www.clear.com/my_account/signin.php in your web browser when you are connected to the internet. 4 Set It Up (continued) Connect your device to your CLEAR Spot In order to identify your CLEAR Spot wi-fi network name (SSID) and network key (password), locate the MAC ID, which can be found in two places – on the label on the CLEAR Spot battery cover and under the battery. The MAC ID also might be referred to as MAC or Default Network. Make sure you write the network name and password down, so that you can remember them. With your laptop or device turned on, view the list of available wireless networks. Select the “Clear Spot xxx” network – where “xxx” are the last three digits of the CLEAR Spot MAC ID. The default password is comprised of the last eight digits of the CLEAR Spot MAC ID. When prompted, enter the password exactly as it appears, using lowercase letters. You should only need to enter the password once – after it is entered the first time, it should be remembered automatically. Your device will display a message indicating it has connected to your CLEAR Spot wi-fi network. Connect to the Internet The first time you connect to the internet, using your CLEAR Spot, you need to set up your CLEAR online account, so you can view / pay your bill. We recommend using a laptop to connect to the internet the first time. Open a new browser and you’ll be directed to a webpage to view your rate plan information, complete your CLEAR online account set-up and read / accept the CLEAR Terms of Service. Congrats! 5 You’re ready for INTERNET AWESOMENESS! Set It Up (continued) Share your CLEAR Spot It’s easy to share your CLEAR Spot with up to eight devices at the same time. Give your colleagues and friends your CLEAR Spot wi-fi network name and password. Make sure the devices with which you want to share are within range of your CLEAR Spot – usually within 100 - 150 feet. If you are sharing the CLEAR Spot wi-fi network with other devices and you turn the CLEAR Spot off, the other devices won’t be able to access the internet. If you changed the CLEAR Spot wi-fi network name and password, you can easily reset them. Instructions are in the CLEAR Spot 4G Online User Guide, in the Quick Tips / Resetting your Username and Password section. If you’re connected to the internet, click here for more information and instructions. 6 Manage your CLEAR Spot CLEAR Spot Home Page Overview It’s easy to manage your CLEAR Spot. With the CLEAR Spot Home Page, you can: Use the Setup Wizard to setup your CLEAR Spot. Change the CLEAR Spot wi-fi network name and password. Change settings, such as network signal range, security settings, and the number of connected devices. View signal strength and battery charge level. View connection time and the amount of data transmitted. View and upgrade the CLEAR Spot firmware. And more! When using your CLEAR Spot, enter http://clearspot in your web browser, to open the CLEAR Spot Home page. To login to the CLEAR Spot Home Page, you’ll need to enter a Username and Password. default Username and Password are “admin”. The We recommend bookmarking the CLEAR Spot Home Page for easy reference. If you’re connected to the internet, click here to view an online demo of the CLEAR Spot Home Page. If you printed this document or are not connected to the internet, enter the following url in your web browser when you are connected to the internet. Enter: https://empower.clearwire.com/images/images/stories/flash/Clear%20Spot%204G%20(Series%20I)%20Personal%20Hotspot%20Simul ator.swf 7 Manage your CLEAR Spot (continued) CLEAR Spot Home Page / Status / Summary The Status / Summary Tab displays helpful information about your CLEAR Spot. Auto Refresh: When the Auto Refresh box is checked, the screen automatically refreshes periodically. Internet Connection (WAN): Signal Strength: Shows the CLEAR Spot signal strength (excellent, moderate, or weak) in its current location. Connection Status: Shows the CLEAR Spot’s connection status (CONNECTED, READY, SCANNING, RF_OFF) to the CLEAR 4G network. Connection Up Time: Shows the length of time (for the current period) the CLEAR Spot has been connected to the CLEAR 4G network. Show / Hide Advanced Settings: Allows you to show or hide advanced settings (such as IP Address). If you’re using your CLEAR Spot and are connected to the internet, click here to open the CLEAR Spot Home Page. Wireless (Wi-Fi) LAN: Use this screen to view and configure basic settings of the CLEAR Spot, including the wi-fi network name, SSID broadcast setting, wi-fi network range, and other settings. Network Name (SSID): Shows the CLEAR Spot’s wi-fi network name (SSID), which is broadcast by the CLEAR Spot, to allow wi-fi-enabled devices to identify and connect to it. The default wi-fi network name is “Clear Spot xxx” where “xxx” are the last three digits of the MAC ID, which can be found on the label on the CLEAR Spot battery cover and under the battery. The MAC ID also might be referred to as MAC or Default Network. The CLEAR Spot wi-fi network name can be changed using the CLEAR Spot Home Page Setup Wizard. The CLEAR Spot wi-fi network name also can be changed on the Basic / Wireless (Wi-Fi) Tab. SSID Broadcast: Shows the current SSID Broadcast setting. When “On,” others will see the CLEAR Spot wi-fi network name in the list of available wireless networks. When “Off,” others will not see the CLEAR Spot wi-fi network name in the list of available wireless networks. Click “Change” to change the setting. Current Users: Shows the number of devices connected to the CLEAR Spot. The maximum number of devices that can be connected to the CLEAR Spot, at the same time, is eight. You can reduce the number of devices that can be connected to the CLEAR Spot by changing the setting on the Basic / Wireless (Wi-Fi) Tab (select Wi-Fi Max Clients). Wi-Fi Network Range: Shows the current wi-fi network range setting and allows you to set the CLEAR Spot for best battery life (Short), best wi-fi range (Long) or a balance of each (Medium). Click “Change” to change the setting. The wi-fi network range can be changed on the Summary Screen as well as on the Basic / Wireless (Wi-Fi) Tab. Wi-Fi Security: Shows the current wi-fi security type setting. You can choose from WPA or WEP security settings to protect access to your CLEAR Spot wi-fi network. Click “Change” to change the setting. Wi-Fi Channel: Shows the channel number being used by the CLEAR Spot. Click “Change” to change the setting. Click “Auto” for the CLEAR Spot to automatically choose the best available channel; or select a specific channel (from the drop-down box). 8 Manage your CLEAR Spot (continued) CLEAR Spot Home Page / Status / Summary (continued) General: Battery Status: Indicates whether the battery is being charged. Software Version: Shows the software version of the CLEAR Spot. The software version cannot be changed. Firmware Version: Shows the firmware version of the CLEAR Spot. Updating the firmware helps to keep the CLEAR Spot performing optimally and may add features and functionality. When new firmware versions are available, they automatically are pushed to the CLEAR Spot. However, if you desire to check the firmware version and manually update it, you may do so by opening the Tools / Upgrade Tab. Device MAC Address: Shows the MAC Address (ID) of the CLEAR Spot. A Mac Address (ID) is a unique serial number burned into network adaptors that identifies them on a network. The CLEAR Spot has the ability to specify what MAC Addresses are allowed to connect to it’s wi-fi network. The MAC ID can be found on the label on the CLEAR Spot battery cover and under the battery. The MAC ID also might be referred to as MAC or Default Network. The MAC ID can’t be changed. Current Time/Date: Shows the current date (month, day, and year) and time. 9 Manage your CLEAR Spot (continued) CLEAR Spot Home Page / Status / Statistics The Status / Statistics Tab displays information such as bytes and packets transmitted by the CLEAR Spot and errors for both WiMAX and wi-fi. Auto Refresh: When the Auto Refresh box is checked, the screen automatically refreshes periodically. WiMAX Device Statistics: RX Bytes/TX Bytes: Shows, in Bytes, the amount of WiMAX data received (RX) and transmitted (TX) by the CLEAR Spot. RX Packets/TX Packets: Shows the number of WiMAX data packets received (RX) and transmitted (TX) by the CLEAR Spot. RX Error Drop/TX Error Drop: Shows the number of WiMAX errors and dropped packets by the CLEAR Spot. Wi-Fi Device Statistics: RX Bytes/TX Bytes: Shows, in Bytes, the amount of wi-fi data received (RX) and transmitted (TX) by the CLEAR Spot. RX Packets/TX Packets: shows the number of Wi-Fi data packets received (RX) and transmitted (TX) data packets by the CLEAR Spot. RX Error/Drop & TX Error/Drop: shows the number of wi-fi errors and dropped packets by the CLEAR Spot. If you’re using your CLEAR Spot and are connected to the internet, click here to open the CLEAR Spot Home Page. CLEAR Spot Home Page / Status / Log The Status / Log Tab shows the history of actions by the CLEAR Spot and connected devices, such as connections and disconnections. Logs are a great way to find out what your CLEAR Spot is doing and where it might be having problems. Log options include: SDK, Auto CM, WiMAX, and DHCP Client. Click “Refresh” to refresh the data shown. Click “Clear” to erase the data which you then will no longer be able to retrieve. Click “Log Save” to save the information. 10 If you’re using your CLEAR Spot and are connected to the internet, click here to open the CLEAR Spot Home Page. Manage your CLEAR Spot (continued) CLEAR Spot Home Page / Status / Device Info The Status / Device Info Tab displays advanced information about your CLEAR Spot such as software, firmware, and hardware versions, MAC ID, and more: Device Name: Displays the name of the CLEAR Spot. The Device Name is factory set and can’t be changed. Device Manufacturer: Displays “Infomark,” the company that manufactured the CLEAR Spot. Software Version: Shows the current software version of the CLEAR Spot, which can’t be changed. Firmware Version: Shows the current firmware version of the CLEAR Spot. Updating the firmware helps to keep the CLEAR Spot performing optimally and may add features and functionality. When new firmware versions are available, they automatically are pushed to the CLEAR Spot. However, if you desire to check the firmware version and manually update it, you may do so by opening the Tools / Upgrade Tab. Hardware Version: Shows the current hardware version of the CLEAR Spot, which can’t be changed. If you’re using your CLEAR Spot and are connected to the internet, click here to open the CLEAR Spot Home Page. WiMAX API Version: Shows the Application Programming Interface (API) version of the CLEAR Spot, which can’t be changed. MAC Address: Shows the MAC Address (ID) of the CLEAR Spot. The MAC ID also can be found on the label on the CLEAR Spot battery cover and under the battery. The MAC ID also might be referred to as MAC or Default Network. The MAC ID can’t be changed. CLEAR Spot Home Page / Status / Firmware The Status / Firmware Tab shows information about the Software / Firmware of the CLEAR Spot. The Software and Firmware Versions also can be found on the Status / Summary and the Status /Device Information Tab. Software Version: Shows the current software version of the CLEAR Spot, which can’t be changed. Firmware Version: Shows the current firmware version of the CLEAR Spot. Updating the firmware helps to keep the CLEAR Spot performing optimally and may add features and functionality. When new firmware versions are available, they automatically are pushed to the CLEAR Spot. However, if you desire to check 11 the firmware version and manually update it, you may do so by opening the Tools / Upgrade Tab. If you’re using your CLEAR Spot and are connected to the internet, click here to open the CLEAR Spot Home Page. Manage your CLEAR Spot (continued) CLEAR Spot Home Page / Basic / Wizard The Setup Wizard guides you through the basic CLEAR Spot setup steps. You can change the administrative password, select the time zone, choose the CLEAR Spot wi-fi network name, and choose the security type. Step 1: Includes changing the administrative password, which is defaulted to “admin”. Note: You also can change the password in the Tools / Admin section of the Setup tabs at any time. Step 1 also includes setting the time zone for your location, enabling or disabling Daylight Savings Time, and choosing the Time Server setting. Time servers are Internet based sites deigned to synchronize the clocks of computers over the internet. Choosing a server closest to your physical location is recommended but not necessary. Step 2: Is where you can personalize the CLEAR Spot wi-fi network name (SSID) and choose the security setting. The default network name is “Clear Spot xxx” where “xxx” are the last three digits of the MAC ID, which can be found on the label on the CLEAR Spot battery cover and under the battery. It might be referred to as MAC or Default Network. The CLEAR Spot wi-fi network name can be 1 – 32 characters long. Once you’ve gone through the Setup Wizard, click “next” and you’ll see a screen where you should preview the new settings before you save them. If you need to make any changes, click “Prev”. If the information is correct, click “Save” to save the new settings. If you don’t want to make any changes, click “Cancel”. You will be prompted to turn your CLEAR Spot off, and then on again, so that the new settings take effect. 12 If you’re using your CLEAR Spot and are connected to the internet, click here to open the CLEAR Spot Home Page. Manage your CLEAR Spot (continued) CLEAR Spot Home Page / Basic / LAN Setting Warning: This tab includes settings that could negatively impact the performance of the CLEAR Spot, if set incorrectly. These settings should be modified only by advanced users or if directed by CLEAR Customer Care. On the Basic / LAN Setting Tab, you can view and change Network Address Settings of the CLEAR Spot. Network Address Settings: IP Address: Allows you to view / modify the Internet Protocol (IP) Address used to locate and access your Clear Spot network. You may want to change the IP Address to integrate the CLEAR Spot into an existing wireless network or to help secure the network. Subnet Mask: Allows you to view / modify the Subnet Mask address, if necessary. The subnet mask is used to subdivide the network. DHCP Range: Dynamic Host Configuration Protocol (DHCP) is used to automatically assign IP Addresses and configuration information to wi-fi clients, thereby greatly simplifying network setup. If you desire, you may configure the range of IP Addresses that the CLEAR Spot will allow to recognize the CLEAR Spot wi-fi network name. If you’re using your CLEAR Spot and are connected to the internet, click here to open the CLEAR Spot Home Page. Attached Devices: Shows the IP Address, MAC Address (ID) and IP Type of the devices connected to the CLEAR Spot wi-fi network. IP Reservation Settings: IP reservations allow you to manually manage IP assignments of the devices that connect to your CLEAR Spot wi-fi network. Save Settings: Make sure you carefully review the correctness of all of the settings you have changed. Click “Save Successful,” and the changes will take effect the next time the CLEAR Spot is turned off and then turned back on. 13 Manage your CLEAR Spot (continued) CLEAR Spot Home Page / Basic / Wi-Fi Use the Basic / Wi-Fi Tab to configure basic settings of the CLEAR Spot, including the wi-fi network name, the SSID broadcast on / off setting, the wi-fi network range, and more. Wi-Fi Settings Information: Wi-Fi Radio On/Off: The CLEAR Spot default wi-fi setting is on, but can be turned off when using the CLEAR Spot in USB Mode. For more information about using your CLEAR Spot in USB, click here or refer to the CLEAR Spot Home Page / Tools / USB Data Mode section of the Online User Guide. Network Name (SSID): Shows the CLEAR Spot wi-fi network name (SSID), which allows wi-fi-enabled devices to identify and connect to the CLEAR Spot. The default wi-fi network name is “Clear Spot xxx” where “xxx” are the last three digits of the MAC ID, which can be found on the label on the CLEAR Spot battery cover and under the battery. The wi-fi network name also can be changed using the Setup Wizard. SSID Broadcast: Shows the current SSID Broadcast setting. When “On,” others will see the CLEAR Spot wi-fi network name in the list of available wireless networks. When “Off,” others If you’re using your CLEAR Spot and are will not see the CLEAR Spot wi-fi connected to the internet, click here to network name in the list of available open the CLEAR Spot Home Page. wireless networks. Mode: View and change the type (802.11b only, 802.11g only, or both) of wi-fi-enabled devices that can connect to the CLEAR Spot wi-fi network. Select 802.11g only for the highest performance. Channel: Select “Auto” for the CLEAR Spot automatically to choose the best available channel. Alternatively, if desired, you can select a specific channel from the drop-down box. Wi-Fi Network Range: Allows you to configure the CLEAR Spot for best battery life (Short), best wi-fi Range (Long) or a balance of each (Medium). Wi-Fi Max Clients: Up to eight devices can be connected to the CLEAR Spot wi-fi network at the same time. Select the maximum number of devices (1-8) from the drop-down box. Security Setting: Use wi-fi security settings (WEP or WPA) to password-protect access to your CLEAR Spot wi-fi network. WPA provides the highest level of wi-fi security, but older wi-fienabled devices may not support WPA security. WEP security is supported by virtually all wi-fienabled devices. 14 Manage your CLEAR Spot (continued) CLEAR Spot Home Page / Basic / NAT Setup Warning: This tab includes settings that could negatively impact the performance of the CLEAR Spot, if set incorrectly. These settings should be modified only by advanced users or if directed by CLEAR Customer Care. Wi-Fi Settings Information: Port Forwarding: Port Forwarding means opening a port to the router, in order to let the outside world contact a user (or device) on the private network (LAN). Enabling Port Forwarding allows users to forward specific external ports to host devices connected to the CLEAR Spot. You will need to enter the host IP Address and Port in order to be forwarded to an external port, and then click “Add” to setup the route. DMZ Host: A DMZ is a “Demilitarized Zone” between a secure internal network and an unsecured network such as the internet. Usually devices or computers that need less restrictive settings are placed in a DMZ. Configuring this option requires the IP Address of the host. Remote Administration: This option enables you to designate a specific Remote Administration Port for connecting to the CLEAR Spot for administration purposes, from a computer not connected to the CLEAR Spot. Application: These options enable you to use FTP and SIP services. VPN Passthrough: Allows you to use a VPN connection to connect to a corporate network or other network requiring a VPN connection. 15 If you’re using your CLEAR Spot and are connected to the internet, click here to open the CLEAR Spot Home Page. Manage your CLEAR Spot (continued) CLEAR Spot Home Page / Basic / MAC Address Filter Warning: This tab includes settings that could negatively impact the performance of the CLEAR Spot, if set incorrectly. These settings should be modified only by advanced users or if directed by CLEAR Customer Care. A MAC Address (ID) is a unique serial number burned into network adaptors that identifies them on a network. The CLEAR Spot has the ability to specify what MAC Addresses are allowed to connect to its wi-fi network. If you’re using your CLEAR Spot and are connected to the internet, click here to open the CLEAR Spot Home Page. Additionally, since you can change CLEAR Spot settings, such as turning off the SSID Broadcast, users won’t see your CLEAR Spot network name when viewing available networks. If you require the use of a password to connect to your CLEAR Spot wi-fi network, others can’t connect to your CLEAR Spot network unless they know the CLEAR Spot wi-fi network name and password combination. You also can prevent other users (devices) from connecting to the CLEAR Spot wi-fi network by not giving them the password. 16 Manage your CLEAR Spot (continued) CLEAR Spot Home Page / WiMAX Warning: This tab includes settings that could negatively impact the performance of the CLEAR Spot, if set incorrectly. These settings should be modified only by advanced users or if directed by CLEAR Customer Care. The WiMAX Tab contains advanced settings of the CLEAR Spot as well as information about nearby towers and the connection strength to each one. Auto Refresh: When the Auto Refresh box is checked, the screen automatically refreshes periodically. WiMAX Network Information: Device Status: Displays the current status (CONNECTED, READY, SCANNING, RF_OFF) of the CLEAR Spot. BSID: Displays the Base Station ID of the active WiMAX connection. NAP: Displays the innate ID of the WiMAX operator. Frequency: Displays the center frequency of the WiMAX channel being used by the CLEAR Spot. IP Address: Displays the IP Address of If you’re using your CLEAR Spot and are the CLEAR Spot on the WiMAX network. connected to the internet, click here to Subnet Mask: Displays the subnet mask open the CLEAR Spot Home Page. assigned by the network. The subnet mask is used to subdivide the network. Default Gateway: Displays the default gateway address of the CLEAR Spot. First DNS: Displays the primary DNS of the present connection. Second DNS: Displays the secondary DNS of the active connection. Tx Power: Displays the output transit power level of the active connection. RSSI: Displays power present in the radio signal (RSSI) of the active connection. CINR: Displays a measurement of signal effectiveness, or CINR, for the active connection. Network List: This area of the screen displays information about nearby towers and connection strength to each one. 17 Manage your CLEAR Spot (continued) CLEAR Spot Home Page / Tools / Admin This Tools / Admin Tab displays tools such as Time Server and Time Zone settings. You can also change the Administrative Password, which is factory default to “admin.” Internet Based Time Server (NTP) Setting: Enable NTP: Enabling this feature allows the CLEAR Spot to get current time information from the time server on the network. Daylight Saving Time: Enabling this feature means the time automatically will change when Daylight Saving Time goes into / out of effect. NTP Service: The CLEAR Spot comes with a default setting of (time.windows.com) for the time server. If this time server is not working, please try one of the following alternatives: time.nist.gov, timeIf you’re using your CLEAR Spot and are nw.nist.gov, time-a.nist.gov or timeb.nist.gov. connected to the internet, click here to Time Zone: Select the time you are in. open the CLEAR Spot Home Page. Save Settings: Click “Save Settings” to apply the new settings. Changing the Administrator Password: New Password: Enter the new CLEAR Spot Administrator Password. Reenter Password: Enter the new CLEAR Spot Administrator Password again, to verify it is correct. Save Settings: Click “Save Settings” for the new Administrator Password to take effect. Save Device Configuration: Click “Save Device Configuration to File” to restore a configuration from a previously saved configuration file. 18 Manage your CLEAR Spot (continued) CLEAR Spot Home Page / Tools / Upgrade The Tools / Upgrade Tab can be used to reset the CLEAR Spot to the default factory settings. If for any reason, you forgot your CLEAR Spot wi-fi network name and password, you can reset them by clicking “Restore to Factory Settings”. It is important to note that many device settings will be reset to the factory default settings. The Administrative Username and Password will be reset to “admin”. The CLEAR Spot wi-fi network name and password also will be reset. The default CLEAR Spot wi-fi network name is “Clear Spot xxx” network – where “xxx” are the last three digits of the CLEAR Spot MAC ID, which can be found in two places – on the label on the back of the CLEAR Spot and under the battery. The MAC ID also might be referred to as MAC or Default Network. The password is comprised of the last eight digits of the CLEAR Spot MAC ID. Make sure you write these digits down so you can remember them. Note: You also can reset the CLEAR Spot setting to the factory default settings by pressing a button on the CLEAR Spot. Instructions are in the Online User Guide, in the Quick Tips / Resetting your Username and Password section. Or, click here for more information. Updating the firmware helps to keep the CLEAR Spot performing optimally and may add features and functionality. When new firmware versions are available, they automatically are pushed to the CLEAR Spot. However, if you desire to check the firmware version and manually update it, this is where you can. If you’re using your CLEAR Spot and are connected to the internet, click here to open the CLEAR Spot Home Page. 19 Manage your CLEAR Spot (continued) CLEAR Spot Home Page / Tools / USB Data Mode For additional convenience, you can connect your CLEAR Spot, via a Mini-USB Cable, to a compatible (Windows® XP, Windows Vista, Windows 7, or Mac® OS x 10.4 or higher) computer (also known as tethering) when: You need to charge the CLEAR Spot battery, but you don’t desire to use the Wall Charger or it is not available. The computer you’re using doesn’t have wi-fi capability. You desire to block others from using your CLEAR Spot wi-fi network. If you choose to connect your CLEAR Spot directly to your computer, via the USB Cable, you can choose to disable the CLEAR Spot wi-fi network or to keep the CLEAR Spot wi-fi network active. If you don’t disable the CLEAR Spot wi-fi network, you can have a total of six devices connected (one via the USB Cable and five to the CLEAR Spot wi-fi network) at the same time. While the CLEAR Spot is connected via the USB Cable, the CLEAR Spot battery is being charged. In order to use your CLEAR Spot connected to your computer, via the USB Cable, you must first download the required drivers. Follow the instructions on the Tools / Admin Tab of the CLEAR Spot Home Page. Use this tab to enable or disable “wi-fi radio when connected via USB Data Mode”. If you disabled “wi-fi when connected via USB Data Mode,” remember to change the setting to “on” when you disconnect the Mini-USB Cable and before you use the CLEAR Spot wi-fi network. If you’re using your CLEAR Spot and are connected to the internet, click here to open the CLEAR Spot Home Page. 20 Manage your CLEAR Spot (continued) CLEAR Spot Home Page / Help The Help Tab is context-sensitive and displays helpful tips that are relevant to the Tab you are viewing. For example, if you’re viewing the Summary Tab and click “Help,” you’ll see helpful explanations about the information presented on the Summary Tab. Summary Tab Help for the Summary Tab And, if you’re viewing the Device Information Tab and click “Help,” you’ll see helpful explanations about the information presented on the Device Information Tab. Device Information Tab Help for the Device Information Tab Help is available on virtually every tab of the CLEAR Spot Home Page. If help is not available, a pop-up window will display “Sorry, help is not available” (e.g., on the Log Tab, for example). 21 Quick Tips Extend the CLEAR Spot Battery Life Use the CLEAR Spot Home Page to decrease the wi-fi network range (Basic > Wireless (Wi-Fi) > wi-fi network range > short). Use the CLEAR Spot Home Page to limit the number of wi-fi users (Basic > Wireless (Wi-Fi) > wifi Max Clients). The CLEAR Spot Battery Status Indicator changes colors to indicate the charge status of the battery. o During Charging: Red LED turns ON. o Charge Complete: Green LED turns ON. o Battery level is at or below 30%: Red LED is turned ON. o Battery level is 31% - 60%: Orange LED is turned ON. o Battery level is 61% - 100%: Green LED is turned ON. Maximize security of the CLEAR Spot Use the CLEAR Spot Home Page Setup Wizard to change the wi-fi network name and password. If you’re using your CLEAR Spot and are connected to the internet, click here to open the CLEAR Spot Home Page. Use the highest level of wi-fi security your wi-fi-enabled devices support – check your wi-fienabled device’s user manual for instructions. Ensure your devices recognize your CLEAR Spot Make sure you are using the correct CLEAR Spot wi-fi network name and password. The default wifi network name is “Clear Spot xxx” where “xxx” are the last three digits of the MAC ID, which can be found in two places – on the label on the CLEAR Spot battery cover and under the battery. The MAC ID also might be referred to as MAC or Default Network. 22 When entering letters, please use lowercase. If you changed your network name and password and can’t remember them, you easily can reset them. Click here to see the instructions. If you printed this document, please refer to the Quick Tips / Resetting your Username and Password section. Make sure you have not “disabled” the SSID Broadcast setting. If you set “SSID Broadcast” to disable, other users will not see your CLEAR Spot wi-fi network name in the list of available wireless networks. Quick Tips (continued) Facilitating your ability to browse the internet First, verify that your CLEAR Spot is receiving the CLEAR 4G signal. The CLEAR Spot indicates the CLEAR 4G signal strength. The 4G indicator displays a solid green, yellow, or red light to indicate an excellent, moderate, or weak signal. As long as the 4G indicator remains steadily lit, the CLEAR Spot is connected to the CLEAR 4G network. If the CLEAR Spot displays a blinking red light, it is not receiving a CLEAR 4G signal. Try repositioning the CLEAR Spot by moving it to a different location, until it displays a solid green, yellow or red light. When indoors, the best locations to try are near a window and away from other electronic devices. Ensure you can share your CLEAR Spot Make sure you are using the correct CLEAR Spot wi-fi network name and password. They can be found on the label on the CLEAR Spot battery cover and under the battery. When entering letters, please use lowercase. Make sure you have not “disabled” the SSID Broadcast setting. If you set “SSID Broadcast” to disable, other users will not see your CLEAR Spot wi-fi network name in the list of available wireless networks. To make sure SSID Broadcast is on, go into the Status / Summary Tab of the CLEAR Spot Home Page. Make sure the wi-fi-enabled devices with which you are trying to share are within range of your CLEAR Spot – usually within 150 feet. If you are sharing the CLEAR Spot wi-fi network with other users and turn the CLEAR Spot off, the others’ devices won’t be able to access the internet. Resetting your Username and Password If you’ve changed your Username and Password, but have forgotten them, it’s easy to reset them. Turn on the CLEAR Spot. Press and hold the Power Button for approximately 15 seconds. The multicolor LED will flash green. After the LED turns solid green, release the Power Button, and the CLEAR Spot should turn off. Your Clear Spot has been reset to the default settings. The default username and password are “admin.” Note: When you reset the Clear Spot to the default settings, this also resets the CLEAR Spot wi-fi network name / SSID (Clear Spot xxx) and password (which can be found on the label on the CLEAR Spot battery cover and under the battery). Important Message from CLEAR 23 If your browser is stuck on a message from CLEAR, follow the onscreen instructions to view the message and provide any requested information. If your account is past due, click the option to make a payment. You also can make a payment through our automated payment system by calling 888-888-3113 and selecting option 2. Quick Tips (continued) Using the CLEAR Spot via USB For additional convenience, you can connect your CLEAR Spot, via a Mini-USB Cable, to a compatible (Windows XP, Windows Vista, Windows 7, or Mac OS x 10.4 or higher) computer (also known as tethering) when: You need to charge the CLEAR Spot battery, but you don’t desire to use the Wall Charger or it is not available. The computer you’re using doesn’t have wi-fi capability. You desire to block others from using your CLEAR Spot wi-fi network. If you choose to connect your CLEAR Spot directly to your computer, via the USB Cable, you can choose to disable the CLEAR Spot wi-fi network or to keep the CLEAR Spot wi-fi network active. If you don’t disable the CLEAR Spot wi-fi network, you can have a total of six devices connected (one via the USB Cable and five to the CLEAR Spot wi-fi network) at the same time. While the CLEAR Spot is connected via the USB Cable, the CLEAR Spot battery is being charged. In order to use your CLEAR Spot connected to your computer, via the USB Cable, you must first download the required drivers. Follow the instructions on the Tools / Admin Tab. If you disabled the “wi-fi while connected via USB Cable” setting, remember to change the setting to “on” when you disconnect the USB Cable and before you use the CLEAR Spot wi-fi network. If you’re using your CLEAR Spot and are connected to the internet, click here to open the CLEAR Spot Home Page. 24 Other Information Accessories There are a variety of accessories available for the CLEAR Spot, including a protective Carry Case, Batteries, Mini-USB Cables, Wall Chargers, and a Car Charger. Battery Wall Charger Mini-USB Cable Car Charger Visit any CLEAR Retail Store nationwide to learn more and to purchase the accessories you need. Technical Specifications Dimensions: 4.33” x 2.44” x .71” Weight: 4.58 oz Compatibility: Works with any wi-fi enabled device Radio Standards: o Wi-Fi: 802.11b and 802.11b o WiMAX: 802.16e-2005 Wi-Fi Security: o WEP o WPA-Personal TKIP & AES-CCMP (Pre-Shared Key or WPA-SK) o WPA2-Personal TKIP & AES CCMP (WPA2-PSK) o WPA+WPA2-Personal TKIP & AES CCMP (WPA+WPS2-PSK) Advanced Networking: o Port Forwarding o DMZ Support o MAC Filtering Battery Information: 1830 mAH Usage Time: Up to four hours of continuous use* Wi-Fi Network Range: Up to 150 feet Maximum Power Output: 23dBm Wall Charger Information: 5V / 2A Radio Standards: Wi-Fi *Actual usage time which user experiences between battery charges may vary and is not guaranteed. 25 Still need help? FAQs and Live Chat Support If you have questions about your CLEAR Spot, please access the FAQs and live chat support at www.clear.com/support. Telephone Support If you still have questions, please call us at 877-956-4056. We provided automated telephone support 24/7 and live telephone support between 9am and 10pm, local time, seven days a week. Questions about your bill? When you set up your CLEAR online account, you provided CLEAR with a credit card number to which CLEAR automatically may bill your charges. However, if you desire to view your bill or to change the credit card to which your CLEAR charges are billed, it’s easy to do so. If you’re connected to the internet, just click here to login to your CLEAR online account. If you’re not connected to the internet, enter https://www.clear.com/my_account/signin.php in your web browser when you are connected to the internet. Important Information Document Please read the separate “Important Information” document included with your CLEAR Spot for regulatory information, safety information, and other important disclosures. Warranty Information See Section 6(d) of our Terms of Service (at www.clear.com/legal/terms) for warranty details. Legal Disclosures 26 CLEAR coverage areas are limited. Actual CLEAR network performance may vary and is not guaranteed. See Device, Support, and other pages at www.clear.com for additional information. CLEAR, the CLEAR logo and CLEAR Spot are trademarks or registered trademarks of Clearwire Communications LLC. Other company, product, and brand names and trademarks are the property of their respective owners. © 2011 Clear Wireless LLC. All rights reserved.