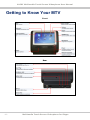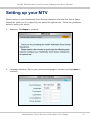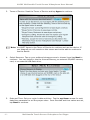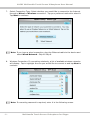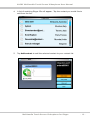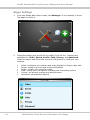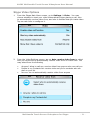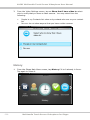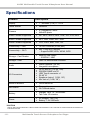
1
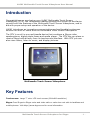
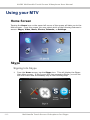
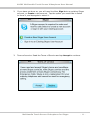
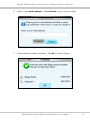
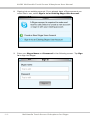
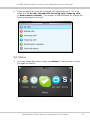
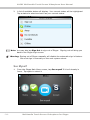
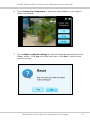
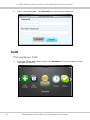
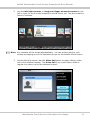
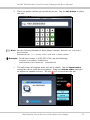
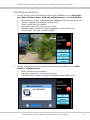
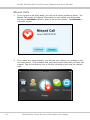
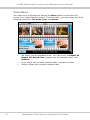
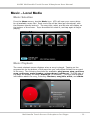
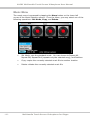
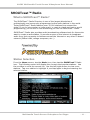
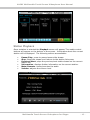
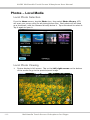
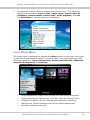
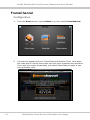
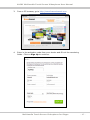
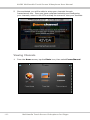
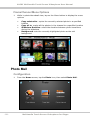
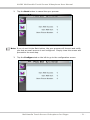
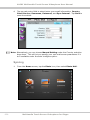
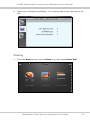
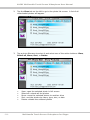
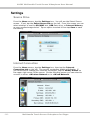
Multimedia Touch Screen Videophone for Skype VoSKY Multimedia Touch Screen Videophone for Skype User Manual Version 1.0 The following sections explain some of the symbols and notations used in this user manual and available for VoSKY Multimedia Touch Screen Videophone (Model: MTV-101) for Skype. Conventions To make sure that you perform certain operations properly, take note of the following symbols used throughout this manual: Note:Tips and additional information to help you complete an operation. Warning: Reminders on actions or configurations that should be avoided. Example: Examples to help you complete an operation. Typography Bold: Menus and menu commands, command buttons, tabs, options, and service or process names. Italics: References to other documentation. Safety and Care This product has been tested to meet or exceed the latest standards of safety for consumer hardware devices. However, to ensure your safety please read the following safety handling and care instructions. CAUTION RISK OF EXPLOSION IF BATTERY IS REPLACED BY AN INCORRECT TYPE. DISPOSE OF USED BATTERIES ACCORDING TO THE INSTRUCTIONS Warning The battery cover on the bottom is an important safety component. Please do not use the product when the cover is not well positioned. Please contact your dealer if the cover is missing. Device Setup • • • • • Always keep the product dry and free from dust. Use the product according to the instructions in this User Manual. Do not use this device near water or a heated source such as a radiator. Set up the device on a stable surface. Do not use this device in extreme temperature environments. This device should only be operated in environments between 5˚C and 35˚C. Device Care • This device is intended for use with the power adapter included with the device. Using any other power supply may be dangerous and will void your warranty. • Do not spill water or any other liquids on the device. • Unplug power and network cables from the power outlets before cleaning the device. Even with the power switch off, a small amount of electrical current will flow through the device. • If you encounter any technical problems with the device, contact VoSKY technical support at http://www.vosky.com. Table of Contents Introduction............................................................................................ 1 Key Features........................................................................................... 1 Package Contents.................................................................................... 2 System Requirements............................................................................. 3 Getting to Know Your MTV...................................................................... 4 Setting up your MTV................................................................................ 5 Using your MTV....................................................................................... 10 Home Screen........................................................................................10 Skype .................................................................................................10 Signing Into Skype...........................................................................10 Skype Main Menu.............................................................................15 Viewing Contacts..............................................................................16 Adding a Contact..............................................................................17 Skype Settings................................................................................20 Skype Video Options.........................................................................21 History...........................................................................................22 Set Status.......................................................................................23 See Myself......................................................................................24 Account Info....................................................................................28 Calls....................................................................................................30 Placing Skype Calls...........................................................................30 Calling Mobile or Landline Numbers ...................................................32 Receiving and Answering Calls...........................................................34 Call Screen Options..........................................................................35 Missed Calls....................................................................................36 Video...................................................................................................37 Video Selection................................................................................37 Video Playback.................................................................................37 Video Menu.....................................................................................38 Music – Local Media...............................................................................39 Music Selection................................................................................39 Music Playback................................................................................39 i Music Menu.....................................................................................40 SHOUTcast™ Radio................................................................................41 What is SHOUTcast™ Radio?..............................................................41 Station Selection..............................................................................41 Quick Search...................................................................................42 Advanced Search.............................................................................42 Station Playback..............................................................................43 Photos – Local Media..............................................................................44 Local Photo Selection........................................................................44 Local Photo Viewing..........................................................................44 Local Photo Menu.............................................................................45 FrameChannel.......................................................................................46 Configuration...................................................................................46 Viewing Channels.............................................................................48 FrameChannel Menu Options.............................................................50 Photo Mail............................................................................................50 Configuration...................................................................................50 Syncing..........................................................................................52 Viewing..........................................................................................53 Calendar..............................................................................................55 Calendar.........................................................................................55 Slideshow.......................................................................................55 Settings...............................................................................................56 Source Drive...................................................................................56 Internet Connection..........................................................................56 Backlight.........................................................................................57 Date & Time....................................................................................57 Language........................................................................................58 Reset Device...................................................................................58 Touchscreen Calibration....................................................................59 Specifications.......................................................................................... 60 Limited Warrant...................................................................................... 61 ii VoSKY Multimedia Touch Screen Videophone User Manual Introduction Congratulations on purchasing your VoSKY Multimedia Touch Screen Videophone (MTV). We recommend reading through this section to familiarize yourself with the features of the Multimedia Touch Screen Videophone, and to aid with proper setup and operation of the device. VoSKY introduces an innovative communication and multimedia touchscreen solution for work or home with the Multimedia Touch Screen Videophone. The MTV is an all-in-one multimedia device that combines a Skype video speakerphone, digital photo frame and media player. The MTV lets you place or receive Skype calls directly from its touchscreen interface. With MTV you can also view videos, listen to music, and display pictures. Multimedia Touch Screen Videophone Key Features Touchscreen: Large 7” color LCD touch screen (800x480 resolution) Skype: Free Skype-to-Skype voice and video calls or make low cost calls to landlines and mobile phones. Visit http://www.skype.com for more information Multimedia Touch Screen Videophone for Skype .1. VoSKY Multimedia Touch Screen Videophone User Manual Video Calls: With the integrated camera, enjoy smooth and clear Skype video calls. Video Playback: Play today’s most popular video formats straight from your Multimedia Touch Screen Videophone device. Video files can be played from your SD/MMC card or a USB flash drive. Music Playback: Listen to music anywhere you have your Multimedia Touch Screen Videophone. MTV will auto-detect all playable music files from your SD/MMC card or USB flash drive. You’ll be able to listen to all your favorite songs with crisp, clear sounds through MTV’s integrated speakers. MTV also includes SHOUTcast™ Radio streaming radio. Browse through thousands of free online streaming radio stations and listen directly on the MTV. Photo Display: Use MTV to display your favorite photos. MTV can display photos from your SD/MMC card, USB flash drive, or even pull them straight from your email account. View them one at a time or use the slideshow feature to automatically scan through all your images. MTV also supports FrameChannel, allowing you to personalize and manage the photo content displayed on your MTV through your FrameChannel account. Mobility: Multimedia Touch Screen Videophone has a built-in 802.11 b/g wireless card for total wireless connectivity. MTV also supports all major wireless security standards, including: WEP, WPA, WPA2, and WPS. A 10/100 Mb Ethernet port is also included for wired connections. Package Contents • • • • VoSKY Multimedia Touch Screen Videophone device RJ-45 CAT5e Ethernet cable Power adapter Quick Start Guide Note: A detailed user manual is available online at http://www.vosky.com/mtpsupport Note: If any of the above items is damaged or missing, you may contact your VoSKY dealer or visit http://www.vosky.com for more help. .2. Multimedia Touch Screen Videophone for Skype VoSKY Multimedia Touch Screen Videophone User Manual System Requirements • Broadband Internet network connection required. • An available wireless access point is required if connecting wirelessly. • Certain apps may require registration or account verification using a personal computer with internet access. • Select content provided, subject to change. Certain online content quality dependent upon broadband speed and delivery by content provider. Multimedia Touch Screen Videophone for Skype .3. VoSKY Multimedia Touch Screen Videophone User Manual Getting to Know Your MTV Front Rear .4. Multimedia Touch Screen Videophone for Skype VoSKY Multimedia Touch Screen Videophone User Manual Setting up your MTV When turning on your Multimedia Touch Screen Videophone for the first time a Setup Wizard will guide you to configuring your device for optimal use. Follow the guidelines below to setup your device. 1. Welcome: Tap Begin to continue. 2. Language selection: Tap on your preferred language to choose it and tap Next to continue. Multimedia Touch Screen Videophone for Skype .5. VoSKY Multimedia Touch Screen Videophone User Manual 3. Terms of Service: Read the Terms of Service and tap Agree to continue. Note: You MUST Agree to the Terms of Service to continue and use the device. If you disagree you will remain on this screen and not be able to continue to use the device. 4. Select Resource: Tap on your preferred storage source to choose it and tap Next to continue. You may select to use the Internal Memory, an external SD/MMC memory card, or an external USB flash drive. 5. Date and Time: Set your region’s date and time. Tap the up/down arrows for each date/time parameter to set the proper value. Once the date and time values are set, tap Next to continue. .6. Multimedia Touch Screen Videophone for Skype VoSKY Multimedia Touch Screen Videophone User Manual 6. Configure Network: Tap OK to configure your MTV to connect to the Internet. Note: You may skip this process by tapping Cancel and going straight to the Home screen. Warning: If you skip this step, you will need to manually setup your Internet connection through the Settings page. Without an Internet connection you will not be able to use certain features, such as: Skype, Photo Mail, etc. Multimedia Touch Screen Videophone for Skype .7. VoSKY Multimedia Touch Screen Videophone User Manual 7. Select Connection Type: Select whether you would like to connect to the Internet through a Wired or Wireless connection. Tap your preferred method to select it. Tap Next to continue. Note: If you have a wired connection, plug the Ethernet cable to the device and select Wired Network. Skip to Step 9. 8. Wireless Connection: If connecting wirelessly, a list of available wireless networks will display. Tap to highlight the one you would like to connect to and tap Next to continue. Note: If a security password is required, enter it in the following screen. .8. Multimedia Touch Screen Videophone for Skype VoSKY Multimedia Touch Screen Videophone User Manual 9. Dynamic or Static IP Address: Select whether to obtain an IP Address automatically or to manually configure an IP address yourself. If manually configuring an IP address, fill in the fields. Tap Connect to continue. 10. Setup Wizard Complete: The following screen will appear once you’ve completed the setup wizard. Tap Finish to exit the setup wizard and go to the Home screen. Multimedia Touch Screen Videophone for Skype .9. VoSKY Multimedia Touch Screen Videophone User Manual Using your MTV Home Screen Tapping the Home icon on the upper left corner of the screen will take you to the Home screen. From this screen you may select which of the following features to access: Skype, Video, Music, Photos, Calendar, or Settings. Skype Signing Into Skype 1. From the Home screen, tap the Skype icon. This will display the Skype Main Menu screen. If this is your first time accessing Skype, you will not see this screen and immediately skip to the following step. . 10 . Multimedia Touch Screen Videophone for Skype VoSKY Multimedia Touch Screen Videophone User Manual 2. If you have not done so, you will need to either Sign in to an existing Skype account, or Create a new account. Tap the option you would like to select to focus it, and tap again to select it. 3. Terms of service: Read the Terms of Service and tap Accept to continue. Multimedia Touch Screen Videophone for Skype . 11 . VoSKY Multimedia Touch Screen Videophone User Manual 4. Creating a new account: If you need to create a new account, tap Create account. Enter your name and the Skype Name you would like to use for your account. Tap Continue to go to the next step. 5. Enter your desired Skype Password (must contain at least 6 characters). Enter it again for confirmation. Tap Continue to go to the next step. . 12 . Multimedia Touch Screen Videophone for Skype VoSKY Multimedia Touch Screen Videophone User Manual 6. Enter a valid email address. Tap Continue to go to the next step. 7. Skype account creation complete. Tap OK to login to Skype. Multimedia Touch Screen Videophone for Skype . 13 . VoSKY Multimedia Touch Screen Videophone User Manual 8. Signing into an existing account: If you already have a Skype account you would like to use, select Sign in to an Existing Skype User Account. 9. Enter your Skype Name and Password in the following screen. Tap Sign in to sign into Skype. . 14 . Multimedia Touch Screen Videophone for Skype VoSKY Multimedia Touch Screen Videophone User Manual 10. You may choose to automatically sign into Skype each time the device starts. Tap on Yes to choose to automatically sign into Skype. Warning: It may take some time for your contacts to fully download on initial sign in. Please be patient while all your contacts are loading. Skype Main Menu You may access all the features of Skype from the Skype Main Menu. Tap on an icon to focus it – it will center on screen – and tap again to select it. You may also drag your finger across the screen left or right to move, and focus, other menu options. The available options are: Settings, Search, Add contact, Call phones, Contacts, History, Status, See myself, and Account. Multimedia Touch Screen Videophone for Skype . 15 . VoSKY Multimedia Touch Screen Videophone User Manual Viewing Contacts 1. From the Skype Main Menu screen, tap Contacts if it isn’t already in focus. Tap again to select it. 2. Use the left/right arrows, or drag your finger across the screen to the left or right, to scroll through the contacts. Tap the contact in focus to select it. Note: Your contacts will be sorted alphabetically. You can quickly jump to your contact by tapping one of the tab letter groups on the bottom of the screen. . 16 . Multimedia Touch Screen Videophone for Skype VoSKY Multimedia Touch Screen Videophone User Manual 3. A list of available actions is displayed on the bottom right of the screen. Tap an action to perform it. The following actions are available: Video Call, Voice Call, View Profile, Rename, Remove, and Block. Adding a Contact 1. From the Skype Main Menu screen, tap Add contact if it isn’t already in focus. Tap again to select it. Multimedia Touch Screen Videophone for Skype . 17 . VoSKY Multimedia Touch Screen Videophone User Manual 2. Select to Add a Skype Contact or to Add a telephone number. 3. Enter the Skype ID of the contact you would like to add. MTV will search for names that match the search term. Tap Search to continue. . 18 . Multimedia Touch Screen Videophone for Skype VoSKY Multimedia Touch Screen Videophone User Manual 4. A list of matching Skype IDs will appear. Tap the contact you would like to add from the list. 5. Tap Add contact to add the selected contact to your contact list. Multimedia Touch Screen Videophone for Skype . 19 . VoSKY Multimedia Touch Screen Videophone User Manual Skype Settings 1. From the Skype Main Menu screen, tap Settings if it isn’t already in focus. Tap again to select it. 2. Select the setting you would like to modify from the list. Settings are available for: Video, Sound, Profile, Calls, Privacy, and Advanced. Select an option and follow the onscreen instructions to configure your settings. • • • • • • . 20 . Video: configures the webcam and video display for Skype video calls Sound: select ring tones and sound notifications Profile: modify your personal profile Calls: modify your call options including call forwarding options Privacy: set privacy settings and blocked users Advanced: set advanced options Multimedia Touch Screen Videophone for Skype VoSKY Multimedia Touch Screen Videophone User Manual Skype Video Options 1. From the Skype Main Menu screen, go to Settings Video. You may choose whether to start your video automatically when placing a call, who to automatically receive video from, and who is notified that you have video. Tap on each item to configure it. 2. From the Video Settings screen, tap on Auto receive video from to select who you would like to automatically receive video from on video calls. You may select from the following • • • Anyone I allow to call me: receive video from anyone who can call you People in my Contacts list: receive video only from contacts who are also on your list No one: do not automatically receive video from anyone Multimedia Touch Screen Videophone for Skype . 21 . VoSKY Multimedia Touch Screen Videophone User Manual 3. From the Video Settings screen, tap on Show that I have video to select who to notify that you have a video camera. You may select from the following: • • People in my Contacts list: show only contacts who are on your contact list No one: do not show anyone that you have a video camera History 1. From the Skype Main Menu screen, tap History if it isn’t already in focus. Tap again to select it. . 22 . Multimedia Touch Screen Videophone for Skype VoSKY Multimedia Touch Screen Videophone User Manual 2. Select an option from the list to display the respective event. You may select to view All calls, Missed calls, Incoming calls, Outgoing calls, or Authorization requests. The number of new instances for a particular event is displayed to the right. Set Status 1. From the Skype Main Menu screen, tap Status if it isn’t already in focus. Tap again to select it. Multimedia Touch Screen Videophone for Skype . 23 . VoSKY Multimedia Touch Screen Videophone User Manual 2. A list of available status will display. Your current status will be highlighted. Tap a status to select and set it as your current status. Note: You may also tap Sign Out to sign out of Skype. Signing out will bring you back to the Skype login screen. Warning: Signing out of Skype manually will disable the automatic sign in feature. You must sign in manually on the next system reboot. See Myself 1. From the Skype Main Menu screen, tap See myself if it isn’t already in focus. Tap again to select it. . 24 . Multimedia Touch Screen Videophone for Skype VoSKY Multimedia Touch Screen Videophone User Manual 2. Tap on Snapshot to take a photo snapshot from the camera. The camera video feed will be displayed on the screen. Tap on Snapshot to take the photo snapshot. Tap Cancel to return to the previous menu. 3. Once a snapshot is taken, tap on Save to save it as your Skype profile picture. Tap Try again to retake the snapshot. Tap Cancel to return to the previous menu. Multimedia Touch Screen Videophone for Skype . 25 . VoSKY Multimedia Touch Screen Videophone User Manual 4. From the main See myself menu, tap on Brightness to adjust the video brightness level. Adjust the slider left/right to adjust the brightness level. Tap Ok when finished. 5. From the main See myself menu, tap on Advanced to go to the advanced video adjustment settings. There are several video adjustment parameters that can be configured: Contract, Saturation, Sharpness, and Hue. Tap on each parameter to adjust the appropriate setting. . 26 . Multimedia Touch Screen Videophone for Skype VoSKY Multimedia Touch Screen Videophone User Manual 6. Tap on Power Line Frequency to select the value based on your region’s power line settings. 7. Tap on Reset to default settings to reset all Advanced parameters to their default values. Click Yes to confirm the reset or click No to return to the previous screen. Multimedia Touch Screen Videophone for Skype . 27 . VoSKY Multimedia Touch Screen Videophone User Manual Account Info 1. From the Skype Main Menu screen, tap Account if it isn’t already in focus. Tap again to select it. 2. The following screen will display information about your account: SkypeOut, Online number, Skype Voicemail, and Change password. Tap any one of the list items to display more info about the selection. . 28 . Multimedia Touch Screen Videophone for Skype VoSKY Multimedia Touch Screen Videophone User Manual 3. Tap Change password to change the password to the current Skype account. 4. Enter your current password. Tap Continue to go to the next step. Multimedia Touch Screen Videophone for Skype . 29 . VoSKY Multimedia Touch Screen Videophone User Manual 5. Enter a new password. Tap Continue to change your password. Calls Placing Skype Calls 1. From the Skype Main Menu screen, tap Contacts if it isn’t already in focus. Tap again to select it. . 30 . Multimedia Touch Screen Videophone for Skype VoSKY Multimedia Touch Screen Videophone User Manual 2. Use the left/right arrows, or drag your finger across the screen to the left or right, to scroll to the contact you would like to call. Tap the contact in focus to continue. Note: Your contacts will be sorted alphabetically. You can quickly jump to your contact by tapping one of the tab letter groups on the bottom of the screen 3. On the following screen, tap the Video Call button to place a Skype video call to the selected contact. Tap Voice Call if you would like to make a regular (no video) call to the selected contact. Multimedia Touch Screen Videophone for Skype . 31 . VoSKY Multimedia Touch Screen Videophone User Manual 4. The call screen will appear when the call is placed. Tap the Start/Stop my video button to start/stop your video stream. Press the Volume button to adjust the speaker volume level. Tap the Microphone mute during the call icon to terminate the call. to mute the microphone. Tap the Note: The menu will automatically hide if you don’t press on the screen for several seconds. This will reveal the full screen video. Tap anywhere on the screen to unhide the menu. Calling Mobile or Landline Numbers 1. From the Skype Main Menu screen, tap Call phones if it isn’t already in focus. Tap again to select it. . 32 . Multimedia Touch Screen Videophone for Skype VoSKY Multimedia Touch Screen Videophone User Manual 2. Enter the phone number you would like to call. Tap the call button to place the call. Note: Use the following formats to dial a phone number: Domestic call: area code + phone number. International call: “+” + country code + area code + phone number Example: To dial the number 1 (408) 555-1234, tap the following: Domestic (US resident): 4085551234 International (from outside US): +14085551234 3. The call screen will appear when the call is placed. Tap the Mute button during the call to mute the microphone. Drag the volume slider left/right to adjust the speaker volume. Tap the icon to terminate the call. Multimedia Touch Screen Videophone for Skype . 33 . VoSKY Multimedia Touch Screen Videophone User Manual Receiving and Answering Calls 1. When a call comes in, the incoming call window will appear on the screen. Tap Answer to take the call without video. Tap Answer with Video to answer it and automatically start your video. Tap Decline to reject the call and return to your original screen. Note: The incoming call screen will interrupt any current action. You will return to your previous screen once the call has ended. Music and photo slideshows will pause and restart automatically. Videos will stop and will return to the video list page. 2. The call screen will appear when the call is placed. Tap the Start/Stop my video button to start/stop your video stream. Press the Volume button to adjust the speaker volume level. Tap the Mute button during the call to icon to terminate the call. mute the microphone. Tap the Note: The menu will automatically hide if you don’t press on the screen for several seconds. This will reveal the full screen video. Tap anywhere on the screen to unhide the menu. . 34 . Multimedia Touch Screen Videophone for Skype VoSKY Multimedia Touch Screen Videophone User Manual Call Screen Options 1. During a Skype call the following options are available to you: Stop/Star my video, Volume, Mute, Hold call, Dialpad tones, and View Profile. • • • • • • Start/Stop my video: starts/stop the webcam video feed during a call Volume: adjusts the speaker volume level Mute: mutes the microphone Hold call: places the current call on hold Dialpad tones: brings up a phone dialpad to send DTMF tones View Profile: view the contact’s profile 2. During a SkypeOut call the following options are available to you: Mute, Hold call, Dialpad tones. • • • Mute: mutes the microphone Hold call: places the current call on hold Dialpad tones: brings up a phone dialpad to send DTMF tones Multimedia Touch Screen Videophone for Skype . 35 . VoSKY Multimedia Touch Screen Videophone User Manual Missed Calls 1. If you receive a call while away, you will see a screen similar to below. The Missed Call screen will display information on who called you while away. Tap on the Call Back button to place a call to the contact. Tap Dismiss to close the screen. 2. If you have any missed events, you will see your History icon change to the one seen below. This indicates that you have missed calls that you have not viewed. Tap on the History icon to list the call history and view the missed calls. . 36 . Multimedia Touch Screen Videophone for Skype VoSKY Multimedia Touch Screen Videophone User Manual Video Video Selection From the Home screen, tap the Video icon. MTV will scan your source drive for all available video files. Each video will be listed as a thumbnail. The filename of the currently selected video will display on the bottom of the screen. Tap a thumbnail to select it. Tap it again to begin video playback. Video Playback Videos play back in full screen. Tap anywhere on the screen to display the overlay video controls. The following functions are available: play/pause, stop, pervious video, next video, mute speaker, volume down, volume up. Stopping the video will return you to the video selection screen. Multimedia Touch Screen Videophone for Skype . 37 . VoSKY Multimedia Touch Screen Videophone User Manual Video Menu The video menu is accessed by tapping the Menu button on the lower left corner of the Video Selection screen. From the Menu, you may select one of the following operations: Set Mode, Copy, and Delete. . 38 . • Set Mode: sets the playback mode. You can choose to Repeat All, Repeat Off, Repeat One (repeats only the selected video), and Random. • Copy: copies the currently selected video to another location • Delete: deletes the currently selected video Multimedia Touch Screen Videophone for Skype VoSKY Multimedia Touch Screen Videophone User Manual Music – Local Media Music Selection From the Home screen, tap the Music icon. MTV will scan your source drive for all available music files. Each music file will be listed as a thumbnail, with the filename directly below it. The song title, artist, and file size will display on the bottom of the screen. Tap a thumbnail to select it, and tap again to begin playing. Music Playback The music playback screen displays when a song is played. Tapping on the progress bar on the bottom of the page lets you rewind/fast forward to any part of the song. The following functions are available: play/pause, stop, previous song, next song, mute speaker, volume down, volume up. The left side of the page will display the song’s album art (if available). The right side displays information about the song, including: filename, song title, artist, and album. Multimedia Touch Screen Videophone for Skype . 39 . VoSKY Multimedia Touch Screen Videophone User Manual Music Menu The music menu is accessed by tapping the Menu button on the lower left corner of the Music Selection screen. From the Menu, you may select one of the following operations: Set Mode, Copy, and Delete. . 40 . • Set Mode: sets the playback mode. You can choose to Repeat All, Repeat Off, Repeat One (repeats only the selected song), and Random. • Copy: copies the currently selected music file to another location • Delete: deletes the currently selected music file Multimedia Touch Screen Videophone for Skype VoSKY Multimedia Touch Screen Videophone User Manual SHOUTcast™ Radio What is SHOUTcast™ Radio? The SHOUTcast™ Radio Directory is one of the largest directories of professionally and community programmed online radio stations in the world. Today SHOUTcast™ Radio features over 32,000 stations from around the globe. If you’re into popular or indie music, or want to check out local or world programming, you’re sure to find something you like on SHOUTcast™ Radio. SHOUTcast™ Radio also provides audio broadcasting software tools for those who want to create a radio station. It permits anyone on the internet to broadcast audio from their computer to listeners across the Internet or any other IP-based network (Office LANs, college campuses, etc…). Station Selection From the Home screen, tap the Music icon, then tap the SHOUTcast™ Radio icon. The following screen will display the current most popular stations. Use the scrollbar to view the current list. Use the left/right arrows to view more stations. Tap on a station to highlight it, and tap again to begin streaming the selected station. Multimedia Touch Screen Videophone for Skype . 41 . VoSKY Multimedia Touch Screen Videophone User Manual Quick Search Tap on the search bar and enter keyword(s) to search for in the SHOUTcast™ Radio directory. Tap on the Search button to perform the search. The results will be listed. You may also tap on the Popular or Recent buttons on the lower right of the screen to quickly filter through the station directory. Popular will sort the stations and list the most popular first. Recent will list the stations you have most recently listened to. Advanced Search Tap Advanced to perform an advanced search. Tap a genre to select it. Tap again to view, and select, any sub-genres. Select a bitrate to display stations that stream at the selected bitrate or higher. Tap on Go to display the stations that match the genre/bitrate selections. You may also tap on the Search bar to enter a keyword(s) to further filter out the results. Tap the Search button to perform a keyword(s)/genre/and bitrate search. Tap the Reset Filters button to clear your selections. . 42 . Multimedia Touch Screen Videophone for Skype VoSKY Multimedia Touch Screen Videophone User Manual Station Playback Once a station is selected the Playback screen will appear. The media control buttons will appear on the bottom of the screen. Information about the current station will be displayed. The following actions are available: • • • • • • Pause/Play: press to pause/resume the stream Stop: stops the stream and returns to the station list screen Previous/Next: plays the previous/next station based on the current station list Information: displays further information on the current station. Mute/Unmute: mutes/unmutes the audio Volume: adjusts the volume level Multimedia Touch Screen Videophone for Skype . 43 . VoSKY Multimedia Touch Screen Videophone User Manual Photos – Local Media Local Photo Selection From the Home screen, tap the Photo icon, then select Photo Library. MTV will scan your source drive for all photo/picture files. Each photo will be listed as a thumbnail, with the filename directly below it. Tap a thumbnail to select it. Tap it again to open it. Local Photo Viewing 1. Photos display in full screen. Tap on the left/right arrows on the bottom of the screen to go to the previous/next image. . 44 . Multimedia Touch Screen Videophone for Skype VoSKY Multimedia Touch Screen Videophone User Manual 2. Tap anywhere on the screen to display the overlay menu. The following functions are available: zoom in/out, rotate image, scale to best fit, slideshow, picture details, send by mail, music playback, and exit. Tap Slideshow to view all photos in a slideshow. Local Photo Menu The photo menu is accessed by tapping the Menu button on the lower left corner of the Local Photo Selection screen. From the Menu, you may select one of the following operations: Copy (selected/all), Delete (selected/all), Slideshow Duration, Background, and Rename. • Copy Selected/All: copy one or all files from one source to another • Delete Selected/All: deletes one or all files from the current source • Slideshow Duration: set the time between slideshow transitions • Background: set the selected photo as the device background • Rename: rename a photo file Multimedia Touch Screen Videophone for Skype . 45 . VoSKY Multimedia Touch Screen Videophone User Manual FrameChannel Configuration 1. From the Home screen, tap the Photo icon, then select FrameChannel. 2. A screen will appear with your FrameChannel Activation Code. Note down this code and do not tap the screen until you have completed the activation. If you exit this screen accidentally, just select FrameChannel again to see your activation code. . 46 . Multimedia Touch Screen Videophone for Skype VoSKY Multimedia Touch Screen Videophone User Manual 3. From a PC browser, go to http://www.framechannel.com. 4. Enter in the activation code from your device and fill out the remaining fields. Click on Sign Up to continue. Multimedia Touch Screen Videophone for Skype . 47 . VoSKY Multimedia Touch Screen Videophone User Manual 5. Once activated, you will be able to setup your channels through framechannel.com. Once you have completed selecting and configuring your channels, return to the MTV and tap the screen to view your channels. Viewing Channels 1. From the Home screen, tap the Photo icon, then select FrameChannel. . 48 . Multimedia Touch Screen Videophone for Skype VoSKY Multimedia Touch Screen Videophone User Manual 2. A list of your available channels will appear. Tap on a channel to view photos from that channel. 3. The photo slideshow will automatically begin. Tap on the screen to display the photo control panel. • • • • • Stop: stops the slideshow and returns to the channels screen Previous: tap to go back to the previous photo. Play: resume timer and slideshow Next: displays next photo. Thumbnails: tap to stop slideshow and display a thumbnail list of all photos in the channel Multimedia Touch Screen Videophone for Skype . 49 . VoSKY Multimedia Touch Screen Videophone User Manual FrameChannel Menu Options 1. While in photo thumbnail view, tap on the Menu button to display the menu options: • • • • Copy selected to: copies the currently selected photo to a specified location Copy all to: copies all the photos in the channel to a specified location Slideshow Duration: select the duration between photo transitions during the slideshow Background: sets the currently highlighted photo as the unit background Photo Mail Configuration 1. From the Home screen, tap the Photo icon, then select Photo Mail. . 50 . Multimedia Touch Screen Videophone for Skype VoSKY Multimedia Touch Screen Videophone User Manual 2. Tap the Back button to cancel the sync process. Note: If you do not hit the Back button, the sync process will timeout and notify you that an email account is not configured. Simply close this screen and proceed to the next step. 3. Tap the Configure tab on the left to go to the configuration screen. Multimedia Touch Screen Videophone for Skype . 51 . VoSKY Multimedia Touch Screen Videophone User Manual 4. Tap on each entry field to select/enter your email information: Country, Email Service, Username, Password, and Sync Interval. Tap Save to save the entries. Note: Alternatively, you can choose Manual Setting under the Country selection drop down. This will let you specify your own mail server parameters if it isn’t available under the auto configure option. Syncing 1. From the Home screen, tap the Photo icon, then select Photo Mail. . 52 . Multimedia Touch Screen Videophone for Skype VoSKY Multimedia Touch Screen Videophone User Manual 2. Photo sync will begin immediately. You may also tap on the Sync tab on the left. Viewing 1. From the Home screen, tap the Photo icon, then select Photo Mail. Multimedia Touch Screen Videophone for Skype . 53 . VoSKY Multimedia Touch Screen Videophone User Manual 2. Tap the View tab on the left to go to the photo list screen. A list of all downloaded photos will appear. 3. Tap a photo filename to select it and select one of the action buttons: View, Select all, Move, Sort, or Delete. • • • • • . 54 . View: open the selected photo in full screen Select all: selects all the photos Move: move the selected photos to another drive Sort: sort the photos by name, type, size, or date Delete: deletes the selected photos Multimedia Touch Screen Videophone for Skype VoSKY Multimedia Touch Screen Videophone User Manual Calendar Calendar From the Home screen, tap the Calendar icon. The calendar will appear with the year and month showing on top, and the month calendar below it. Click on any day to set it as the current day. Use the +/- adjustment buttons on the left to adjust the year and month. Slideshow A photo slideshow will appear to the right of the calendar. Photos will be displayed from the current storage source drive. Press the Back button to return to the Home screen. Multimedia Touch Screen Videophone for Skype . 55 . VoSKY Multimedia Touch Screen Videophone User Manual Settings Source Drive From the Home screen, tap the Settings icon. You will see the Select Source screen. If not, tap the Select Source tab on the left. From this screen you can select whether to use the SD/MMC slot, USB flash drive, or Internal Memory as your media storage device. Tap an option to select it then tap Save to save the setting. Internet Connection From the Home screen, tap the Settings icon, then tap the Internet Connection tab on the left. The current connection details will display. If you would like to change your Internet connection, tap the Modify button on the upper right corner of the screen. On the following screen you can select to connect to either a Wireless Network or to a Wired Network. . 56 . Multimedia Touch Screen Videophone for Skype VoSKY Multimedia Touch Screen Videophone User Manual Backlight From the Home screen, tap the Settings icon, then tap the Backlight tab on the left. The current brightness setting will display. Adjust the slider left/right to adjust the screen brightness to your liking. Date & Time From the Home screen, tap the Settings icon, then tap the Date/Time tab on the left. Use the up/down arrow keys to adjust the date and time. Multimedia Touch Screen Videophone for Skype . 57 . VoSKY Multimedia Touch Screen Videophone User Manual Language From the Home screen, tap the Settings icon, then tap the Language tab on the left. A list of available languages will appear. Tap on your preferred language, then tap the Save button to save the changes. Reset Device From the Home screen, tap the Settings icon, then tap the Reset tab on the left. A list of options will appear: Reset to Factory Default, Erase Internal Memory, and Device Information, Software Update. . 58 . • Reset to Factory Default: resets the unit back to its initial state • Erase Internal Memory: clears internal memory • Device Information: displays information about the device • Software Update: check for any device updates Multimedia Touch Screen Videophone for Skype VoSKY Multimedia Touch Screen Videophone User Manual Touchscreen Calibration From the Home screen, tap the Settings icon, then tap the Touchscreen Calibration tab on the left. Tap on the Start button to begin calibration. Tap on each successive + symbol that appears on screen. Tap on the Cancel button to cancel re-calibration. Multimedia Touch Screen Videophone for Skype . 59 . VoSKY Multimedia Touch Screen Videophone User Manual Specifications Feature Description Display • 7”, 800x480 (15:9) TFT LCD Touch Screen • Resistive Camera • 0.3 Megapixel CMOS • 640x480 pixels Video Formats Supported • AVI, MPG, MPEG, MP4, VOB, 3GP, 3G2, MKV Audio Formats Supported • MP3, WAV, WMA, AAC, M4A Photo Formats Supported • JPG, JPEG, BMP, PNG, GIF Connectivity – LAN • 10/100T Ethernet (RJ-45 port) Connectivity -- Wi-Fi • 802.11 b/g Wi-Fi module -Supports WEP, WPA, WPA2, WPS Storage - Card Reader • Memory card reader - SD/SDHC, MMC Storage - USB • USB 2.0 Host/Device controller Audio • Stereo Speaker (1W x2) • Integrated microphone I/O Connectors • • • • • • Switch & Buttons • On/Off switch x1 LED status • Power status • Wi-Fi/Wired status Battery • Standby Time: 75 - 85 minutes • Talk Time: 65 minutes Power • AC Adaptor: 10V/1.6A • Battery: 7.4V/1600mAh DC In Jack x1 (10V @ 1.6A) SD/SDHC/MMC slot x1 USB Type A connector x1 RJ-45 x1 Earphone Jack x1 (3.5Φ, 1/8”) Mic Jack x1 (3.5Φ, 1/8”) * CAUTION RISK OF EXPLOSION IF BATTERY IS REPLACED BY AN INCORRECT TYPE. DISPOSE OF USED BATTERIES ACCORDING TO THE INSTRUCTIONS . 60 . Multimedia Touch Screen Videophone for Skype VoSKY Multimedia Touch Screen Videophone User Manual Limited Warranty THE VOSKY MULTIMEDIA TOUCH SCREEN VIDEOPHONE (MTV) PRODUCT IS CONFIGURED IS CONFIGURED TO WORK WITH THE SKYPE SOFTWARE PROVIDED BY SKYPE SOFTWARE S.A.R.L AT THE DATE OF SHIPMENT. NOTWITHSTANDING ANYTHING TO THE CONTRARY HEREIN, VOSKY WILL HAVE NO LIABILITY IF ANY FEATURE OR UTILITY OF MTV FAILS TO PERFORM IN SUBSTANTIAL CONFORMANCE TO THE APPLICABLE SPECIFICATIONS BECAUSE OF ANY CHANGES MADE BY SKYPE ANY CHANGES MADE BY SKYPE TO ITS SOFTWARE OR FEATURES. IF THIS DISCLAIMER IS NOT ACCEPTABLE TO YOU, PLEASE RETURN THE PRODUCT IN ITS ORIGINAL BOX TO YOUR POINT OF PURCHASE WITHIN FIFTEEN (15) DAYS OF PURCHASE TO OBTAIN A REFUND. IN NO EVENT SHALL THE FOREGOING BE DEEMED TO EXPAND ANY WARRANTY OR LIMIT ANY DISCLAIMER CONTAINED HEREIN. Product Operation Regulatory Requirements: 1. Using any unauthorized softwares, hardwares, and/or any improper operation that will impact the normal functioning of the MTV are prohibit. 2. The warranty is invalid if the manufacture warranty sticker (serial number) has been altered or removed from the product. Hardware: VoSKY, warrants to the end user (“Customer”) that this hardware product will be free from defects in workmanship and materials, under normal use and service, for twelve (12) months from the date of purchase (US) or twenty-four (24) months from the date of purchase (Europe) from VoSKY, or its authorized reseller. VoSKY’s sole obligation under this express warranty shall be, at VoSKY’s option and expense, to repair the defective product or part, deliver to Customer an equivalent product or part to replace the defective item, or if neither of the two foregoing options is reasonably available, VoSKY may, in its sole discretion, refund to Customer the purchase price paid for the defective product. All products that are replaced will become the property of VoSKY. Replacement products may be new or reconditioned. VoSKY warrants any replaced or repaired product or part for ninety (90) days from shipment, or the remainder of the initial warranty period, whichever is longer. Software: VoSKY warrants to Customer that each software program licensed from it will perform in substantial conformance to its program specifications, for a period of ninety (90) days from the date of purchase from VoSKY or its authorized reseller. VoSKY warrants the media containing software against failure during the warranty period. The only updates that will be provided are at the sole discretion of VoSKY and will only be available for download at the VoSKY Web site, www.vosky.com . VoSKY’s sole obligation under this express warranty shall be, at VoSKY’s option and expense, to refund the purchase price paid by Customer for any defective software product, or to replace any defective media with software which substantially conforms to applicable VoSKY published specifications. Customer assumes responsibility for the selection of the appropriate applications program and associated reference materials. VoSKY makes no warranty or representation that its software products will meet Customer’s requirements or work in combination with any hardware or applications software products provided by third parties, that the operation of the software products will be uninterrupted or error free, or that all defects in the Multimedia Touch Screen Videophone for Skype . 61 . VoSKY Multimedia Touch Screen Videophone User Manual software products will be corrected. For any third-party products listed in the VoSKY software product documentation or specifications as being compatible, VoSKY will make reasonable efforts to provide compatibility, except where the non-compatibility is caused by a “bug” or defect in the third party’s product or from use of the software product not in accordance with VoSKY published specifications or user guide. THIS VOSKY PRODUCT MAY INCLUDE OR BE BUNDLED WITH THIRD-PARTY SOFTWARE, THE USE OF WHICH IS GOVERNED BY A SEPARATE END USER LICENSE AGREEMENT. THIS VOSKY WARRANTY DOES NOT APPLY TO SUCH THIRDPARTY SOFTWARE. FOR THE APPLICABLE WARRANTY, PLEASE REFER TO THE END-USER LICENSE AGREEMENT GOVERNING THE USE OF SUCH SOFTWARE. Obtaining Warranty Service: Customer may contact VoSKY Technical Support Center within the applicable warranty period to obtain warranty service authorization. Dated proof of purchase from VoSKY or its authorized reseller may be required. Products returned to VoSKY must be pre-authorized by VoSKY with a Return Merchandise Authorization (RMA) number marked on the outside of the package, and sent prepaid and packaged appropriately for safe shipment, and it is recommended that they be insured or sent by a method that provides for tracking of the package. The repaired or replaced item will be shipped to Customer, at VoSKY’s expense, not later than thirty (30) days after VoSKY receives the defective product. VoSKY shall not be responsible for any software, firmware, information, memory data, or Customer data contained in, stored on, or integrated with any products returned to VoSKY for repair, whether under warranty or not. WARRANTIES EXCLUSIVE: IF A VOSKY PRODUCT DOES NOT OPERATE AS WARRANTED ABOVE, CUSTOMER’S SOLE REMEDY FOR BREACH OF THAT WARRANTY SHALL BE REPAIR, REPLACEMENT, OR REFUND OF THE PURCHASE PRICE PAID, AT VOSKY’S OPTION. TO THE FULL EXTENT ALLOWED BY LAW, THE FOREGOING WARRANTIES AND CONDITIONS, EXPRESS OR IMPLIED, EITHER IN FACT OR BY OPERATION OF LAW, STATUTORY OR OTHERWISE, INCLUDING WARRANTIES, TERMS OR CONDITIONS OF MERCHANTABILITY, FITNESS FOR A PARTICULAR PURPOSE, SATISFACTORY QUALITY, CORRESPONDENCE WITH DESCRIPTION, AND NON-INFRINGEMENT, ALL OF WHICH ARE EXPRESSLY DISCLAIMED. VOSKY NEITHER ASSUMES NOR AUTHORIZES ANY OTHER PERSON TO ASSUME FOR IT ANY OTHER LIABILITY IN CONNECTION WITH THE SALE, INSTALLATION, MAINTENANCE OR USE OF ITS PRODUCTS. VOSKY SHALL NOT BE LIABLE UNDER THIS WARRANTY IF ITS TESTING AND EXAMINATION DISCLOSE THAT THE ALLEGED DEFECT OR MALFUNCTION IN THE PRODUCT DOES NOT EXIST OR WAS CAUSED BY CUSTOMER’S OR ANY THIRD PERSON’S MISUSE, NEGLECT, IMPROPER INSTALLATION OR TESTING, UNAUTHORIZED ATTEMPT TO OPEN, REPAIR OR MODIFY THE PRODUCT, OR ANY OTHER CAUSE BEYOND THE RANGE OF THE INTENDED USE, OR BY ACCIDENT, FIRE, LIGHTNING, OTHER HAZARDS, OR ACTS OF GOD. LIMITATION OF LIABILITY: TO THE FULL EXTENT ALLOWED BY LAW, VOSKY ALSO EXCLUDES FOR ITSELF AND ITS SUPPLIERS ANY LIABILITY, WHETHER BASED IN CONTRACT OR TORT (INCLUDING NEGLIGENCE), FOR INCIDENTAL, CONSEQUENTIAL, INDIRECT, SPECIAL, OR PUNITIVE DAMAGES OF ANY KIND, OR FOR LOSS OF REVENUE OR PROFITS, LOSS OF BUSINESS, LOSS OF INFORMATION OR DATA, OR OTHER FINANCIAL LOSS ARISING OUT OF OR IN CONNECTION WITH THE SALE, INSTALLATION, MAINTENANCE, USE, PERFORMANCE, FAILURE, OR INTERRUPTION OF ITS PRODUCT, EVEN IF VOSKY OR ITS AUTHORIZED RESELLER HAS BEEN ADVISED OF THE POSSIBILITY OF SUCH DAMAGES, AND LIMITS ITS LIABILITY TO REPAIR, REPLACEMENT, OR REFUND OF THE PURCHASE PRICE PAID, AT VOSKY’S OPTION. THIS DISCLAIMER OF LIABILITY FOR DAMAGES WILL NOT BE AFFECTED IF ANY REMEDY PROVIDED HEREIN . 62 . Multimedia Touch Screen Videophone for Skype VoSKY Multimedia Touch Screen Videophone User Manual SHALL FAIL OF ITS ESSENTIAL PURPOSE. Disclaimer: Some countries, states or provinces do not allow the exclusion or limitation of implied warranties or the limitation of incidental or consequential damages for certain products supplied to consumers or the limitation of liability for personal injury, so the above limitations and exclusions may be limited in their application to you. When the implied warranties are not allowed to be excluded in their entirety, they will be limited to the duration of the applicable written warranty. This warranty gives you specific legal rights which may vary depending on local law. Dispute Resolution: The customer may contact the Director of Technical Support in the event the Customer is not satisfied with VoSKY’s response to the complaint. In the event that the Customer is still not satisfied with the response of the Director of Technical Support, the Customer is instructed to contact the Director of Marketing. In the event that the Customer is still not satisfied with the response of the Director of Marketing, the Customer is instructed to contact the Chief Financial Officer and/or President. Governing Law: This Limited Warranty shall be governed by the laws of the State of California, U.S.A., excluding its conflicts of laws and principles, and excluding the United Nations Convention on Contracts for the International Sale of Goods. Multimedia Touch Screen Videophone for Skype . 63 .