1
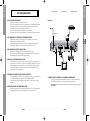
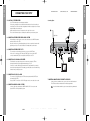
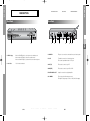
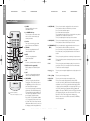
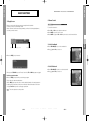
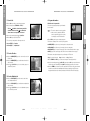
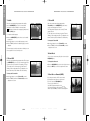
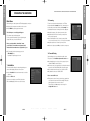
DCB-9401R COVER(NED/GB) 10/22/04 4:09 PM Page 1 DIGITAL CABLE RECEIVER MF68-00340A DCB-9401R Gebruiksaanwijzing NED Instructions for use . . . . . . . . . . . . . GB GB Gebruiksaanwijzing . . . . . . . . . . . . NED Instructions for use DCB-9401R REV. 1.0 DIGITALE KABELONTVANGER DCB-9401R_3-4(NED/GB) 10/22/04 4:10 PM Page II Gebruiksaanwijzing . . . . . . . . . . . . . NED DCB-9401R MF68-00340A_NED 10/27/04 3:10 PM Page b DCB-9401R Gebruiksaanwijzing !"#"$&')*'&+,$-,#'. NED MF68-00340A_NED 10/27/04 3:10 PM Page d DCB-9401R VEILIGHEIDSVOORSCHRIFTEN Deze STB voldoet aan de internationale veiligheidsnormen. Lees de volgende veiligheidsvoorschriften zorgvuldig door. 100-240 V wisselstroom, 50/60 Hz OVERBELASTING: Voorkom overbelasting van stopcontacten, verlengsnoeren of adapters om de kans op brand of elektrische schokken zoveel mogelijk uit te sluiten. VLOEISTOFFEN: Zorg dat de STB niet met vloeistoffen in aanraking komt. REINIGING: Trek de stekker van de STB uit het stopcontact voordat u het apparaat reinigt. Reinig de buitenkant met een doek die u licht bevochtigd hebt met water (geen oplosmiddelen). VENTILATIE: Houd de ventilatieopeningen van de STB vrij. Zorg dat de lucht vrij rond de STB kan circuleren. Plaats de STB nooit in direct zonlicht of in de buurt van een verwarming. Plaats nooit andere elektronische apparatuur op de STB. Plaats de STB op ten minste 30 mm van de muur. AANSLUITINGEN: Gebruik alleen door de fabrikant aanbevolen aansluitingen om gevaarlijke situaties of beschadiging van de apparatuur te voorkomen. REPARATIES: Probeer niet zelf reparaties uit te voeren. De garantie vervalt als u dat toch doet. Laat alle onderhoud over aan een gekwalificeerde technicus. BLIKSEM: Als de STB wordt gebruikt in een gebied waar het veel onweert, is het essentieel de netaansluiting en de modemlijn van de STB op de juiste manier te beveiligen. Respecteer tijdens onweer bovendien de veiligheidsinstructies voor alle andere apparaten (tv, audiosysteem enzovoort) die op de STB zijn aangesloten. AARDING: De CATV-kabel moet zijn geaard. Het aardingssysteem moet voldoen aan de plaatselijke voorschriften. O p m e r k i n g : Werp gebruikte batterijen weg volgens de plaatselijke voorschriften. NED-1 NED NETSPANNING: MF68-00340A_NED 10/27/04 3:10 PM Page 2 ALGEMENE KENMERKEN 1. GEBRUIKERSGEDEELTE Veiligheidsvoorschriften . . . . . . . . . . . . . . . . . . . . . . . . . . . . . . . . . 1 De STB aansluiten . . . . . . . . . . . . . . . . . . . . . . . . . . . . . . . . . . . . . . 4 Beschrijving . . . . . . . . . . . . . . . . . . . . . . . . . . . . . . . . . . . . . . . . . . . 6 Voorpaneel . . . . . . . . . . . . . . . . . . . . . . . . . . . . . . . . . . . . . . . . . . . 6 Achterpaneel. . . . . . . . . . . . . . . . . . . . . . . . . . . . . . . . . . . . . . . . . . 7 Afstandsbediening. . . . . . . . . . . . . . . . . . . . . . . . . . . . . . . . . . . . . . 8 Basisfuncties . . . . . . . . . . . . . . . . . . . . . . . . . . . . . . . . . . . . . . . . . . 10 De ontvanger bedienen . . . . . . . . . . . . . . . . . . . . . . . . . . . . . . . . . . 16 ....... ....... ....... ....... instellen ....... . . . . . . . . . . . . . . . . . . . . . . . . . . . . . . . . . . . . . . . . . . . . . . . . . . . . . . . . . . . . . . . . . . . . . . . . . . . . . . . . . . . . . . . . . . 16 16 17 17 18 18 2. TUNERGEDEELTE VHF-, UHF-BAND 50~870 MHz SYMBOOLFREQUENTIE VAN MAX 7MSPS MODULATIE-INDELING VAN 16~256 QAM LOOPOUT VOOR ANALOGE ONTVANGER 2. Kanalen indelen . . . . . . . . . . . . . . . . . . . . . . . . . . . . . . . . . . . . 19 2.1 Vernieuw Lijst. . . . . . . . . . . . . . . . . . . . . . . . . . . . . . . . . . . 19 2.2 Favoriete kanalen . . . . . . . . . . . . . . . . . . . . . . . . . . . . . . . . 19 3. VIDEOGEDEELTE 3. PIN-code wijzigen . . . . . . . . . . . . . . . . . . . . . . . . . . . . . . . . . . 20 4. Systeeminstellingen . . 4.1 Taal selecteren . . . 4.2 OSD instellen . . . . 4.3 Media instellen . . . 4.4 Timer instellen . . . 4.5 Systeeminformatie . . . . . . . . . . . . . . . . . . . . . . . . . . . . . . . . . . . . . . . . . . . . . . . . . . . . . . . . . . . . . . . . . . . . . . . . . . . . . . . . . . . . . . . . . . . . . . . . . . . . . . . . . . . . . . . . . . . . . . . . . . . . . . . . . . . . . . . . . . . . . . . . . . . . . . . . . . . . . . . . . . . . . . . . . . . . . . . . . . . . . . . . . . COMPATIBEL MET DVB-C MPEG-2 VIDEO(MP@ML) GEGEVENSSNELHEID VAN 1~15 Mb/s ONDERSTEUNT EEN HOOGTE-BREEDTEVERHOUDING VAN 4:3 (NORMAAL EN 16:9 (BREEDBEELD) 20 20 21 22 23 24 4. AUDIOGEDEELTE MPEG 1 AUDIO LAYER I & II AUDIOMODI MONO, DUBBEL, STEREO EN JOINT STEREO SAMPLINGFREQUENTIES VAN 32, 44,1 AND 48 kHz VOLUMEREGELING EN DEMPEN MET AFSTANDSBEDIENING SPDIF DIGITALE AUDIO-UITGANG 5. Mail Box <Postvak> . . . . . . . . . . . . . . . . . . . . . . . . . . . . . . . . . 24 6. Irdeto Menu . . . . . 6.1 CA Status . . . 6.2 IRD Status . . . 6.3 Loader Status . . . . . . . . . . . . . . . . . . . . . . . . . . . . . . . . . . . . . . . . . . . . . . . . . . . . . . . . . . . . . . . . . . . . . . . . . . . . . . . . . . . . . . . . . . . . . . . . . . . . . . . . . . . . . . . . . . . . . . . . . . . . . . . . . . . . . . . . 25 25 25 25 Problemen oplossen . . . . . . . . . . . . . . . . . . . . . . . . . . . . . . . . . . . . 26 Wegwerpen . . . . . . . . . . . . . . . . . . . . . . . . . . . . . . . . . . . . . . . . . . . 26 Technische specificaties . . . . . . . . . . . . . . . . . . . . . . . . . . . . . . . . . 27 NED-2 ! " # " $ & ' ) * ' & + , $ - , # ' . NED-3 NED SOFTWAREDOWNLOADS VIA NETWERK EN PC (BEVEILIGD) GEAVANCEERDE ELEKTRONISCHE PROGRAMMAHANDLEIDING MEERTALIG SCHERMMENU MEERTALIGE ONDERTITELING EN TELETEKST VOLLEDIG FUNCTIONELE INFRARODE AFSTANDSBEDIENING SCART-UITGANG LAAG STROOMVERBRUIK 4 VOORKEURSLIJSTEN AUTOMATISCH BIJGEWERKTE EPG PASS-LOOP VOOR RGB-SIGNAAL 15 TIMERS OM PROGRAMMA’S (GEBEURTENISSEN) VOOR IN-/UITSCHAKELEN TE RESERVEREN Algemene kenmerken . . . . . . . . . . . . . . . . . . . . . . . . . . . . . . . . . . . 3 Hoofdmenu . . . . . . . . . . . . . . . . . . . . . 1. Installatie . . . . . . . . . . . . . . . . . . . 1.1 Netwerk installatie . . . . . . . . . 1.2 Kinderslot . . . . . . . . . . . . . . . 1.3 Standaardinstellingen opnieuw 1.4 Software opwaarderen . . . . . . DCB-9401R DCB-9401R INHOUD MF68-00340A_NED 10/27/04 3:10 PM Page 4 1. PLAATS VAN DE ONTVANGER DCB-9401R DCB-9401R DE STB AANSLUITEN DE STB AANSLUITEN Aansluitingen De STB moet goed kunnen worden geventileerd. Plaats om oververhitting te voorkomen het apparaat niet in een volledig afgesloten kast met beperkte luchtcirculatie. Bescherm de gekozen plaats tegen direct zonlicht, overmatige vochtigheid, ruwe behandeling en huisdieren. Plaats nooit andere elektronische apparatuur op de ontvanger. De gekozen plaats moet goed toegankelijk zijn voor de kabel van uw antennesysteem. Signaalkabel 2. DE ONTVANGER OP HET KABELSYSTEEM AANSLUITEN NED Nadat uw kabelsysteem is geïnstalleerd, sluit u de coaxkabel aan op de ingang “CABLE IN” op de achterkant van de STB. Draai kabelaansluitingen altijd alleen met hand aan. Gebruik hiervoor geen steek- of andere sleutels. Gebruik een coaxkabel met een impedantie van 75 ohm. 3. DE ONTVANGER OP EEN TV AANSLUITEN Gebruik een SCART-kabel om de ontvanger op een tv aan te sluiten. Als u de tv met een SCART-kabel wilt aansluiten, sluit u de SCART-connector met de aanduiding AV1 (TV) aan op de SCART-ingang van de tv. 4. DE ANALOGE ONTVANGER AANSLUITEN Om het gebruik van de analoge ontvanger voor de weergave van analoge kanalen te vereenvoudigen, is de STB voorzien van lus via de uitgang die gemarkeerd is als “LOOP”. Sluit de coaxkabel van deze uitgang aan op de IF-ingang van de analoge ontvanger. Door de STB standby te houden kunt u via uw analoge ontvanger afstemmen op analoge kanalen en deze weergeven. 5. EEN VIDEORECORDER OF DVD-SPELER AANSLUITEN Op de achterkant van de STB is voor de aansluiting van een videorecorder of dvd-speler een SCART-aansluiting aanwezig. Deze is gemarkeerd als “AV2 (EXT)”. U kunt de videorecorder of dvd-speler met een SCART-connector op de ontvanger aansluiten. 7. SMARTCARDS VOOR IRDETO-PROGRAMMA’S AANBRENGEN Als u een gecodeerd programma wilt bekijken, hebt u een geldige Smartcard nodig. Deze STB heeft een Irdeto voor de weergave van Irdeto-programma's. Opmerking : Breng de Smartcard zodanig aan dat de goudkleurige chip omlaag wijst. 6. EEN DIGITAAL AUDIOSYSTEEM AANSLUITEN Gebruik een glasvezelkabel om de uitgang DIGITAL AUDIO OUT op de ontvanger en de ingang Optical SPDIF op het digitale audiosysteem op elkaar aan te sluiten. NED-4 ! " # " $ & ' ) * ' & + , $ - , # ' . NED-5 MF68-00340A_NED 10/27/04 3:10 PM Page 6 Achterpaneel Voorpaneel 2. Kaartsleuf 2 1 Wanneer het rode lampje brandt, wordt de set-top box (STB) in de standby-stand gezet. Wanneer het groene lampje brandt, wordt de gebruiksstand geactiveerd. Wanneer het gele lampje brandt, treedt het apparaat in werking en worden de interne systemen gecontroleerd. 1 sleuf voor een Irdeto-smartcard. 2 3 4 5 6 1. CABLE IN Op deze connector sluit u de coaxkabel van uw kabelsysteem aan. 2. LOOP Hierop kunt u een analoge ontvanger aansluiten. De ontvanger wordt geleverd met deze “LOOP”-aansluiting. 3. AV1 (TV) Hierop kunt u uw tv aansluiten. 4. AV2 (EXT) Hierop kunt u een videorecorder of dvd-speler aansluiten. 5. DIGITAL AUDIO OUT Op deze uitgang kunt u een digitale versterker aansluiten. 6. LICHTNETAANSLUITING Hier wordt het netsnoer aangesloten. Het apparaat is geschikt voor 100-240 V, 50 Hz/60 Hz. NED-6 ! " # " $ & ' ) * ' & + , $ - , # ' . NED-7 NED 1 1. LED-scherm DCB-9401R DCB-9401R BESCHRIJVING BESCHRIJVING MF68-00340A_NED 10/27/04 3:10 PM Page 8 BESCHRIJVING DCB-9401R DCB-9401R BESCHRIJVING Afstandsbediening 10. ALT (GEEL) 1. POWER Hiermee zet u de ontvanger in de modus AAN/STANDBY. Met deze toets kunt u de lijst met soundtracks voor de huidige dienst selecteren. De toets werkt op dezelfde manier als de GELE toets in het menu. Druk er één keer op om de soundtrack weer te geven. Druk er twee keer op om de videotrack weer te geven. De diensten voor sound- en videotracks zijn niet voor elk kanaal beschikbaar. Met deze toets kunt u het helpbericht in het submenu weergeven. 2. CIJFERTOETSEN (0 - 9) Hiermee kunt u cijfers intoetsen en een kanaal direct selecteren door het nummer ervan op te geven. 11. AUDIO (BLAUW) Met deze toets kunt u de audio naar het linkerkanaal, rechterkanaal of beide kanalen verplaatsen. De toets werkt op dezelfde manier als de BLAUWE toets in het menu. 4. TV/RADIO Met deze toets wisselt u tussen het tv-kanaal en het radiokanaal. 12. i (INFORMATIE) (ROOD) Met deze toets kunt u het venster met programma-informatie op het scherm weergeven. De toets werkt op dezelfde manier als de RODE toets in het menu. Druk één keer op de toets om korte programma-informatie weer te geven. Druk twee keer op de toets om uitgebreide programma-informatie weer te geven. 13. MENU Met deze toets opent u het menu of gaat u terug naar het vorige menu. 14. EXIT Met deze toets sluit u een menu af, gaat u terug naar het vorige menu of sluit u een balk. 15. OK Met deze toets bevestigt u informatie die u via het menusysteem opgeeft voor de ontvanger. De toets dient om onderdelen te selecteren. Druk erop wanneer u op uw tv een lijst met kanalen weergeeft. 16. Met deze toetsen verplaatst u de selectiebalk om opties in het menu te kiezen. 5. MUTE Met deze toets wisselt u tussen normale audio en gedempt. 6. FAV Met deze toets wisselt u tussen voorkeurslijsten. 7. EPG (elektronische programmagids) Met deze toets geeft u de gids met radioen tv-programma’s weer. 8. LAST Met deze toets gaat u direct naar het kanaal dat u als laatste in de lijst bekeken hebt. O p m e r k i n g : Plaats de batterijen met de ‘+’- en ‘-’-polen in de juiste richting. 9. TEXT (GROEN) Met deze toets selecteert u de modus voor ondertiteling en teletekst. De toets werkt op dezelfde manier als de GROENE toets in het menu. Druk er één keer op om het teletekstscherm weer te geven. Selecteer de gewenste taal met de toetsen omhoog/omlaag. U kunt teletekst op het scherm weergeven zonder de instellingen op de tv te veranderen. Teletekst kan alleen worden weergegeven op tv’s die teletekst ondersteunen. Druk twee keer op de toets. Teletekst wordt op de tv weergegeven. Dit betekent dat u de teletekst met de afstandsbediening van de tv kunt kiezen. Druk drie keer op de knop om de balk met ondertiteling weer te geven. Selecteer de gewenste taal met de toetsen omhoog/omlaag. NED-8 ! " # " $ & ' ) ! /"/#/$ 17. CH * ' & /CH Met deze toetsen gaat u naar een ander kanaal. 18. VOL+/VOL- Met deze toetsen zet u het geluid harder of zachter. 19. TIMER Met deze toets reserveert u gebeurtenissen (programma’s) in timer(s) in de EPG. Als een gebeurtenis in een timer is ingesteld, wordt deze op de begin-/eindtijd van de gebeurtenis automatisch in-/uitgeschakeld. Met deze toets worden timers in de EPG als schakeltype geactiveerd/gedeactiveerd. Nadat u het EPG-scherm met de toets EPG hebt geactiveerd, kunt u de gewenste gebeurtenis (het gewenste programma) selecteren met de toetsen # / $ en ! / ". Druk vervolgens op de toets TIMER. Als deze gebeurtenis in de timer is gereserveerd, wordt ® in de rechterhoek van de gebeurtenisnaam weergegeven. EPG bij Herhaalde gebeurtenis <Gebeurtenisherhaling> in het menu Tijd en timer instellen wordt ook weergegeven. Als er echter geen gebeurtenis in de EPG voor het kanaal voorkomt, wordt deze TIMER-toets niet ondersteund. + , $ - , # ' . NED-9 NED 3. PG+/PGHiermee kunt u omhoog en omlaag bladeren in het menu en de lijst TV/Radio. MF68-00340A_NED 10/27/04 3:10 PM Page 10 1. Weergavescherm 2. Volumeregeling Voordat u een tv-programma kunt weergeven, moet u het apparaat eerst configureren. U krijgt daarom aanvankelijk alleen menuafbeeldingen te zien. Nadat de tv-kanalen zijn geprogrammeerd, wordt de volgende informatie weergegeven wanneer u een ander kanaal kiest: Het volume regelen: ● ● ● Druk op VOL- of VOL+ om het volumeniveau in te stellen. Druk op MUTE <DEMPEN> om het geluid uit te schakelen. Druk nogmaals op MUTE <DEMPEN> of op VOL- of VOL+ om de functie Dempen uit te schakelen. NED 3. Soundtrack selecteren Signaalindicator Tijdlijn gebeurtenis (Voortgang van huidige gebeurtenis) ● Ouderlijke classificatie van gebeurtenis ● ● Druk op de GELE toets (ALT) om de lijst met soundtracks weer te geven. Druk op # / $ en OK om een track te selecteren. Druk in de weergavemodus op de RODE toets ( i ). 4. Videotrack selecteren ● Druk op de afstandsbediening op TV/RADIO om te wisselen tussen tv- en radioprogramma’s ● Uitgebreide programma-informatie ● Druk twee keer op de GELE toets (ALT) om de lijst met videotracks weer te geven. Druk op # / $ en OK om een track te selecteren. Druk twee keer op de RODE toets ( i ) terwijl u een programma bekijkt. De hiervoor beschreven balk wordt eerst weergegeven. Wanneer u nogmaals op de RODE toets ( i ) drukt, wordt er uitgebreide informatie op een andere balk weergegeven als dergelijke informatie beschikbaar is. Als deze informatie op meer dan één pagina staat, kunt u met de toetsen PG+/PG- omhoog en omlaag bladeren. Opmerking : De serviceleverancier bepaalt of deze mogelijkheid beschikbaar is. NED-10 ! " # " $ & ' ) * ' & + DCB-9401R DCB-9401R BASISFUNCTIES BASISFUNCTIES , $ - , # ' . NED-11 MF68-00340A_NED 10/27/04 3:10 PM Page 12 BASISFUNCTIES 6. Programma-informatie 5. Dienstenlijst ● ● EPG (elektronische programmagids) De elektronische programmagids bevat informatie over de kanalen. Druk twee keer op de toets OK terwijl u een programma bekijkt. Selecteer een lijst door op TV/RADIO of FAV te drukken. Het pictogram achter de naam van een kanaal geeft aan dat het om een gecodeerd kanaal gaat. Het pictogram achter de naam van een kanaal geeft aan dat het kanaal met het kinderslot is vergrendeld. ● Opmerking : 1. De serviceleverancier bepaalt of deze mogelijkheid beschikbaar is. 2. Nadat de ontvanger na een paar seconden de GMT-tijd van het signaal heeft herkend, wordt de juiste EPG-informatie weergegeven. Selecteer een kanaal door te drukken op # / $, PG+/PG-. Druk op OK om op het kanaal af te stemmen. ● De kleurtoets komt overeen met de volgende dienstenlijst. ● Groene toets (TEXT) : Voorkeuren ● Gele toets (ALT) ● : Alfabetisch 5.1 Dienstenvoorkeuren ● ● ● Druk op de bedieningseenheid op de GROENE toets (TEXT) om de lijst met voorkeuren te kiezen. Druk op de GROENE toets (TEXT) om te wisselen tussen de voorkeurenlijst en de kanalenlijst. Gebruik # / $, PG+/PG- om een voorkeursgroep of -kanaal te kiezen. ● ● GELE toets (ALT) : Met de gele toets gaat u terug naar de volgende datum. ● Met de BLAUWE toets (AUDIO) gaat u een pagina omhoog als de informatie op meer dan één pagina staat. ● Met de RODE toets ( i ) gaat u een pagina omlaag als de informatie op meer dan één pagina staat. 1 toets: 1 uur en 30 minuten 2 toetsen: 30 minuten 3 toetsen: 15 minuten Met de toets TV/RADIO of FAV kunt u wisselen tussen de verschillende programmalijsten. ● Selecteer een kanaal door te drukken op # / $, PG+/PG-. Druk vervolgens op OK om op het geselecteerde kanaal af te stemmen. U gaat terug naar de huidige gebeurtenis door op de toets LAST te drukken tijdens lopende gebeurtenissen op dit kanaal. ● Als u in het EPG-scherm bent en op de TIMER-toets van de afstandsbediening drukt terwijl er voor het huidige kanaal een gebeurtenis gaande is, wordt de timer onmiddellijk ingesteld en wordt de ingestelde timer op het EPG-scherm weergegeven. Een op deze manier ingesteld programma wordt weergegeven in het Timerveld van Tijd en timer instellen. Druk op de afstandsbediening op de GELE toets (ALT) om de alfabetische lijst te kiezen. Druk op de GELE toets (ALT) om te wisselen tussen de alfabetisch lijst en de kanalenlijst. Gebruik # / $, PG+/PG- om een alfabetisch groep of kanaal te kiezen. NED-12 GROENE toets (TEXT) : Met de groene toets gaat u terug naar de vorige datum. ● U kunt het tijdinterval als volgt instellen met de toetsen op het EPG-scherm: 5.2 Alfabetisch ● Druk op de toets EPG terwijl u een programma bekijkt. Deze functie wordt alleen met de tijd op het scherm weergegeven. ! " # " $ & ' ) * ' & + , $ - , # ' . NED-13 NED ● DCB-9401R DCB-9401R BASISFUNCTIES MF68-00340A_NED 10/27/04 3:10 PM Page 14 BASISFUNCTIES 9. Teletekst VBI Wanneer er voor het huidige programma ondertiteling beschikbaar is, drukt u op de GROENE toets (TEXT) om de huidige lijst met ondertiteling in verschillende talen weer te geven. Als er voor het huidige programma ondertiteling beschikbaar is, wordt op de balk weergegeven nadat u een ander programma (kanaal) hebt gekozen of op de RODE toets ( i ) hebt gedrukt. Wanneer er voor het huidige programma Teletekst VBI beschikbaar is, drukt u twee keer op de GROENE toets (TEXT) om de huidige lijst met talen voor teletekst weer te geven. De teletekst wordt op het tv-scherm weergegeven als de tv teletekst ondersteunt. Een [T] in de rechterhoek van de balk geeft aan dat teletekst voor deze gebeurtenis (dit programma) beschikbaar is. Zelfs als er op de balk een [T] wordt weergegeven, kan het zijn dat er als gevolg van het type uitzending geen teletekst beschikbaar is. Een andere taal voor de ondertiteling kiezen: ● ● ● Druk drie keer op de GROENE toets (TEXT) om de lijst met talen voor de ondertiteling weer te geven. Selecteer de gewenste taal met # / $. Druk op OK om de gewenste taal weer te geven. Een andere teletekst VBI kiezen: ● ● De ontvanger is dankzij het gebruiksvriendelijke menu eenvoudig te bedienen. Selecteer de gewenste Teletekst VBI met # / $. Druk op OK om de gewenste Teletekst VBI op het scherm weer te geven. 10. Geluidsmodus 8. Teletekst OSD U kunt deze modus met de BLAUWE toets (AUDIO) instellen op links, rechts of stereo. Wanneer er voor het huidige programma teletekst beschikbaar is, drukt u één keer op de GROENE toets (TEXT) om de huidige talenlijst voor teletekst weer te geven en teletekst ongeacht het type tv op het scherm af te beelden. Een [T] in de rechterhoek van de balk geeft aan dat teletekst voor deze gebeurtenis (dit programma) beschikbaar is. Zelfs als er op de balk een [T] wordt weergegeven, kan het zijn dat er als gevolg van het type uitzending geen teletekst beschikbaar is. Een andere geluidsmodus kiezen: ● ● Druk op de BLAUWE toets (AUDIO) om links, rechts of stereo te kiezen. Druk op EXIT om uw keus op te slaan en het menu te verlaten. Het teletekstscherm wijzigen: ● ● 11. Near Video on Demand (NVOD) Selecteer het gewenste teletekstscherm met # / $. Druk op OK om het gewenste teletekstscherm weer te geven. NED-14 Als het gewijzigde kanaal een NVOD-kanaal is, wordt er rechts op de balk een [N] weergegeven. In dat geval kunt u op de GELE toets (ALT) drukken. U kunt vervolgens alle NVOD-lijsten ophalen. Selecteer in die lijsten een NVOD-programma. Selecteer de gewenste kijktijd met # / $ en druk vervolgens op OK om het gewenste programma te bekijken. ! " # " $ & ' ) * ' & + , $ - , # ' . NED-15 NED 7. Ondertiteling <Subtitle> DCB-9401R DCB-9401R BASISFUNCTIES MF68-00340A_NED 10/27/04 3:10 PM Page 16 Hoofdmenu 1.1 Netwerk installatie Na installatie van het kabelsysteem en de juiste aansluiting van de STB. Voor het toevoegen van nieuwe kanalen of kanalen met een zwak signaal, is er een functie “Netwerk installatie” voorzien waarmee de gebruiker kanaalgegevens kan invoeren. Wanneer u in het menu Installatie de optie “Netwerk installatie” kiest, wordt het volgende scherm weergegeven: ● ● Steek de stekker in het stopcontact en zet de ontvanger aan. Druk op de toets MENU om het hoofdmenu te openen. Het volgende scherm verschijnt: ● ● ● Voordat u naar het menu “Installatie” gaat, moet u in het vierde menu “Systeeminstellingen” controleren of alle daar verschafte informatie op u van toepassing is. ● ● ● Druk op de GELE toets (ALT) om het helpbericht weer te geven of te verbergen. Het helpbericht wordt standaard weergegeven. 1.2 Kinderslot Met het kinderslot kunt u voorkomen dat uw kinderen naar programma’s voor volwassenen kunnen kijken. U stelt deze optie in met het menu Installatie " Kinderslot. 1. Installatie In dit menu kunt u instellingen aanpassen, nieuwe diensten toevoegen en de status van de ontvanger weergeven. ● ● Voer de frequentie in van het gezochte kanaal. Voer de netwerk-id in van het gezochte kanaal. Neem contact op met uw kabelmaatschappij. Voer de modulatie in van het gezochte kanaal. U kunt kiezen uit 16, 32, 64, 128, 256 of Automatisch. Voer de symboolfrequentie in van het gezochte kanaal. Nadat u een optie hebt geselecteerd, drukt u op OK om met scannen te beginnen. ● Selecteer in het hoofdmenu de optie “Installatie” om het vervolgmenu te kiezen. Geef de PIN-code op. ● ● Als u geen eigen PIN-code hebt opgegeven, gebruikt u de fabrieksinstelling 0000 als PIN-code. ● Selecteer de leeftijd van uw jongste kind met ! / ". Druk vervolgens op OK om deze instelling op te slaan. Alle diensten voor oudere personen worden geblokkeerd en er wordt gevraagd een PIN-code voor het kinderslot op te geven. Als u alle diensten wilt blokkeren, selecteert u “ALLES GEBLOKKEERD”. De standaardinstelling voor alle diensten is “NIETS GEBLOKKEERD”. Voer de PIN-code in. ● NED-16 ! " # " $ & ' ) * ' & + Deze melding wordt getoond als een dienst met het kinderslot is geblokkeerd. Geef de PIN-code van vier cijfers op om het verzoek te sluiten en de programma-inhoud weer te geven. De PIN-code is in de fabriek op 0000 ingesteld. U kunt deze waarde wijzigen in het menu PIN-code wijzigen. , $ - , # ' . NED-17 NED De onderwerpen van de submenu’s worden weergegeven. U hebt een PIN-code nodig voor de submenu’s Installatie, Kanalen indelen en PIN-code wijzigen. DCB-9401R DCB-9401R DE ONTVANGER BEDIENEN DE ONTVANGER BEDIENEN MF68-00340A_NED 10/27/04 3:10 PM Page 18 DE ONTVANGER BEDIENEN 1.3 Standaardinstellingen opnieuw instellen 2. Kanalen indelen Hiermee kunt u de fabrieksinstellingen herstellen als u problemen ondervindt nadat u kanaalgegevens en andere informatie hebt gewijzigd. Het menu “Kanalen indelen” heeft vijf functies. Als u wijzigingen in de kanalenlijst opslaat door Service Update te selecteren, kunt u desgewenst uw voorkeurenlijst bijstellen en kanalen bijwerken. Het volgende scherm wordt weergegeven: ● Als u in het venster met de melding op OK drukt, worden de fabrieksinstellingen van de ontvanger automatisch hersteld. Geef de PIN-code op. Als u geen eigen PIN-code hebt opgegeven, gebruikt u de fabrieksinstelling 0000 als PIN-code. 2.1 Vernieuw Lijst 1.4 Software opwaarderen Wanneer er nieuwe kanalen via uw kabelnetwerk worden gedistribueerd, worden deze kanalen in een groengekleurde lijst weergegeven. Sla deze kanalen op met Kanalen indelen " Vernieuw Lijst. Deze optie is alleen beschikbaar als uw kabelmaatschappij software voor uw STB verstuurt. U werkt de software bij door met de cursor het menu Installatie " Software opwaarderen aan te wijzen en op OK te drukken. Als er nieuwe software beschikbaar is, wordt het bericht “Start software opwaardeer procedure?” weergegeven. Er wordt bovendien aangegeven hoe lang het downloaden van de software ongeveer gaat duren. Druk op OK om dit te bevestigen en de software bij te werken. Als de recentste software al op uw STB is geïnstalleerd, wordt het bericht “Er is geen software-update nodig!” weergegeven. NED Opmerking : Al uw eerdere instellingen worden gewist. Alle instellingen en informatie, inclusief de kanaalgegevens, worden verwijderd. 2.2 Favoriete kanalen U kunt het huidige kanaal direct in de Voorkeurengroep registreren. U kunt een kanaal bovendien in meerdere voorkeurengroepen registreren. ● ● ● ● Selecteer de gewenste Voorkeurengroep (FAV1~FAV4) met de toets FAV. Selecteer de gewenste kanalenlijst met de toetsen # / $ of PG+/PG- of de cijfertoetsen in het venster TV of RADIO. Druk op de RODE toets ( i ) en registreer vervolgens het geselecteerde kanaal in de Voorkeurengroep. Druk op OK om uw keus te bevestigen. U kunt een andere tv- of radiolijst kiezen met de toets TV/RADIO, en een andere Voorkeurenlijst met de toets FAV. ● ● Wanneer u op de toets TV/RADIO drukt, wisselt u tussen de lijsten TV en Radio. Druk op de toets FAV om een andere voorkeurenlijst te selecteren. Kanalen uit een Voorkeurengroep verwijderen: ● ● Selecteer de te verwijderen kanalenlijst met # / $ of PG+/PG- of met de cijfertoetsen. Druk op de RODE toets ( i ) en verwijder het geselecteerde kanaal uit de voorkeurskanalen. Opmerking : één voorkeurenlijst kan maximaal 200 kanalen bevatten. NED-18 DCB-9401R DCB-9401R DE ONTVANGER BEDIENEN ! " # " $ & ' ) * ' & + , $ - , # ' . NED-19 MF68-00340A_NED 10/27/04 3:10 PM Page 20 DE ONTVANGER BEDIENEN 3. PIN-code wijzigen 4.2 OSD instellen Wijzig de PIN-code met de tweede optie, “PIN-code wijzigen”. U kunt de transparantie, de weergavetijd, het kleurenschema en de positie van het scherm instellen. Hiermee gaat u naar het volgende menu: ● U moet voor deze optie de huidige PIN-code bij de eerste cursor opgeven, en de nieuwe PIN-code bij de tweede cursor. Geef de PIN-code nogmaals op om de nieuwe code te bevestigen. Denk eraan dat de PIN-code uit vier cijfers moet bestaan. Selecteer een transparantieniveau. Het transparantieniveau gaat van 0 tot 100%. U kiest de gewenste waarde met ! / " of PG+/PG- of met de cijfertoetsen. Opmerking : Raadpleeg de paragraaf Systeemgegevens als u de PIN-code vergeten bent. Bewaar uw wachtwoord op een veilige plaats nadat u het hebt gewijzigd. Opmerking : Transparantie is op alle kleurenschema’s van toepassing. ● 4. Systeeminstellingen Stel in hoe lang u informatievensters op het scherm wilt weergeven. U kunt een periode instellen van 0,5 tot 60,0 seconden. U kiest de gewenste waarde met ! / " of PG+/PG- of met de cijfertoetsen. ! / "-toetsen : Bijstellen in stapjes van 0,5 seconden. PG+/PG--toetsen : Bijstellen in stapjes van 1 seconde. Met deze optie kunt u de vooraf ingestelde systeeminstellingen aan uw eigen wensen aanpassen. ● Het kleurenschema instellen: U kunt kleuren naar uw eigen voorkeur instellen. (bijv. achtergrond, tekst, symbolen, lijnen enzovoort) / "-toetsen : Selecteer een kleurenschema. Kleurenschema 1 : Verandert het menu in hemelsblauw. Kleurenschema 2 : Verandert het menu in groen. Kleurenschema 3 : Verandert het menu in donkerblauw. Aangepast : De gebruiker kiest zelf een kleur. EPG-kleuren : Hiermee worden de kleuren in het EPG-menu ingesteld. ! 4.1 Taal selecteren Met de optie “Taal selecteren” kunt u een taal kiezen voor de schermweergave, soundtracks, teletekst, ondertiteling of EPG Welke talen beschikbaar zijn hangt af van het zendstation. Als u bijvoorbeeld een andere taal voor Ondertiteling selecteert, kan deze taal voor een bepaald programma niet beschikbaar zijn. ● ● ● Opmerking : De kleurenschema’s 1, 2 en 3 kunnen in toekomstige software-upgrades worden gewijzigd. Ter wille van de gebruikersvriendelijkheid zijn er 2 schermtalen en 37 talen beschikbaar voor soundtracks, ondertiteling en EPG. Als u een andere taal wilt kiezen, selecteert u deze met ! / " en drukt u vervolgens op OK. Voor soundtracks, teletekst en ondertiteling wordt daarna de geselecteerde taal gebruikt. NED-20 ! " # " $ & ' ) * ' & + , $ - , # ' . NED-21 NED ! / "-toetsen : Bijstellen in stapjes van 1%. PG+/PG--toetsen : Bijstellen in stapjes van 10%. DE FABRIEKSINSTELLING VAN DE PIN-CODE : 0 0 0 0. DCB-9401R DCB-9401R DE ONTVANGER BEDIENEN MF68-00340A_NED 10/27/04 3:10 PM Page 22 DE ONTVANGER BEDIENEN 4.4 Timer instellen De door de gebruiker gedefinieerde modus of de EPG-kleurenmodus instellen ● ● ● ● Druk op de GROENE toets (TEXT). Het te wijzigen onderdeel verschijnt. Verplaats het te wijzigen onderdeel met de toetsen # / $. Stel de te gebruiken kleur in met de toetsen ! / ". Bevestig uw keus door op OK te drukken. 1) Extra tijd Met deze functie kunt u ervoor zorgen dat een gebeurtenis volledig binnen de gestelde tijdsgrenzen valt. Wanneer u een extra tijd instelt van 1 minuut, start de timer 1 minuut vóór de ingestelde tijd en stopt deze 1 minuut na de ingestelde tijd. Druk op de GELE toets (ALT) om het helpbericht weer te geven of te verbergen. 2) Timer ● Plaats de cursor op de gewenste positie. Druk vervolgens op # / $ of ! / " totdat het scherm op de gewenste plaats staat. Het scherm wordt naar de gewenste positie verplaatst. ● ● 4.3 Media instellen U kunt eigen media-instellingen opgeven. Plaats de cursor op dit submenu en druk op OK. ● ● ● ● ● ● ● ● Verplaats de subonderdelen met # / $ en druk op ! / " om de gewenste optie te selecteren. Bevestig uw keus door op OK te drukken. Druk op MENU/EXIT om het menu te verlaten. Selecteer het gewenste type tv: STANDAARD 4 : 3 of BREEDBEELD 16 : 9. Selecteer een conversie voor de hoogte-breedteverhouding: Letter Box, Pan & Scan, Gemengd of Volledig. Selecteer het gewenste type videosignaal: Composiet of Composiet + RGB. NED-22 ! " # " $ & ' ) * ' & + Selecteer in ‘Timer’ met ! / " een timernummer van 1-15. Druk op ! / " om de te reserveren gebeurtenisherhaling te selecteren: Dagelijks, Elke zondag, Elke maandag, Elke dinsdag, Elke woensdag, Elke donderdag, Elke vrijdag, Elke zaterdag, Eenmalig. Als u de timer in het EPG-scherm instelt, wordt bij ‘Herhaalde gebeurtenis’ EPG weergegeven. Druk op de cijfertoetsen (0-9) om de gewenste tijd in te stellen en druk op ! / " om een te reserveren schakeltijd te kiezen. Als de ‘Inschakeltijd’ identiek is aan de ‘Uitschakeltijd’, werkt de timer gedurende 24 uur. Selecteer met ! / " een tv-programma om het gebeurtenisprogramma in te stellen. Wanneer u op de toets TV/RADIO drukt, wisselt u tussen tv-programma en radioprogramma. U kunt timers instellen op Dagelijks, Elke maandag, Elke dinsdag, enzovoort. De kortste herhalingsgebeurtenis heeft voorrang. Wanneer u bijvoorbeeld timers instelt voor Eenmalig en Dagelijks, wordt Eenmalig op de betreffende dag uitgevoerd. Als de timer loopt, wordt de melding “Wordt uitgevoerd” samen met een timernummer weergegeven in Timer. , $ - , # ' . NED-23 NED Er worden 15 timers ondersteund, inclusief de timer(s) van de EPG. OSD-positie ● DCB-9401R DCB-9401R DE ONTVANGER BEDIENEN MF68-00340A_NED 10/27/04 3:10 PM Page 24 DE ONTVANGER BEDIENEN 4.5 Systeeminformatie 6. Irdeto Menu Als u contact moet opnemen met uw serviceleverancier of een helpdesk, kan u gevraagd worden om de informatie in dit menu. Plaats de cursor op dit submenu en druk op OK. De volgende informatie wordt op het scherm weergegeven. Met dit menu kunt u informatie weergeven over de smartcard en de STB. Druk op OK om het submenu te openen. NED 6.1 CA Status 5. Mail Box <Postvak> Hiermee kunt u de CA-status weergeven (Smart Card EMM/ECM-informatie). U kunt berichten lezen die naar aparte decoders zijn verstuurd. Er kunnen maximaal 10 berichten worden opgeslagen. 6.2 IRD Status U kunt de IRD-status weergeven (technische informatie over de IRD, CA, smartcard en erin geladen software). 6.3 Loader Status U kunt informatie weergeven over de IRD en de erin geladen software. NED-24 ! " # " $ & ' ) * ' & + , $ - , DCB-9401R DCB-9401R DE ONTVANGER BEDIENEN # ' . NED-25 MF68-00340A_NED 10/27/04 3:10 PM Page 26 TECHNISCHE SPECIFICATIES Voeding Probleem Mogelijke oorzaak Oplossing De lampjes op het voorpaneel branden niet. Geen stroomtoevoer. Het netsnoer is niet goed aangesloten. Sluit het netsnoer goed aan. Er zijn geen beelden op het scherm zichtbaar De ontvanger staat in de standby-stand. De RCA is niet goed op de video-uitgang van de televisie aangesloten. Er is op de televisie een onjuist kanaal of een onjuiste video-uitgang geselecteerd. Zet de ontvanger op Aan. Controleer de aansluiting. Controleer het kanaal en de video-uitgang (zie de handleiding van uw tv). Ingangsfrequentie : DEMODULATIE : SYMBOOLFREQUENTIE : Constellatie : KABELUITGANG : De audiokabel is onjuist aangesloten. Het volume staat op 0. De dempfunctie is ingeschakeld. Controleer de aansluiting. Videodecoder De afstandsbediening werkt niet Onjuiste bediening. De batterijen zijn leeg of onjuist aangebracht. Type : Ingangsspanning : Zekering : SMPS 100-240 V wisselstroom, 50/60 Hz 250 V/T1,6 AH Tuner en demodulator Systeemdecodering : Profiel en niveau : Gegevenssnelheid : Video-indelingen : Beeldresolutie : Stel het volume op de tv hoger in. Druk op MUTE <DEMPEN>. Richt de afstandsbediening op de ontvanger. Vervang de batterijen of breng ze juist aan. VHF, UHF (50~870 MHz) QAM DVB-C MAX 7 Msps 16, 32, 64, 128, 256 QAM LOOPOUT VOOR ANALOGE ONTVANGER MPEG 2 ISO/TEC 13818 (Transport Stream) MPEG 2 MP@ML (4:2:2) 1 ~ 15 Mb/s 4:3 (normaal) en 16:9 (breedbeeld) 720 (H) x 576 (B) x 50 velden/sec Audiodecoder Slechte beeldkwaliteit Het signaal is te zwak. Controleer alle kabelverbindingen. Controleer het menu “Automatisch scannen” of stel uw antenne bij. Het bericht “Bezig met zoeken naar signaal...” wordt op het scherm weergegeven Kabel niet (goed) aangesloten. Controleer de aansluiting. Het bericht “Kanaalgegevens bestaan niet.” wordt op het scherm weergegeven. Er is geen kanalenlijst geprogrammeerd. Scan kanalen. Ga naar het menu Installatie. VIDEO Interface : Impedantie : Outputniveau : PAL 2 SCART (AV1, AV2) 75 1Vp-p Foutberichten op het scherm: “Controleer de Smart Card!”; “Plaats de Smart Card!”. Smartcard: - De smartcard is niet goed geplaatst. - Er is geen smartcard geplaatst. (afhankelijk van het model) Controleer de smartcard. AUDIO-Interface : Impedantie : Outputniveau : S/PDIF (digitale audio-uitgang) SCART 600 gebalanceerd 2.0Vp-p max (instelbaar) Systeemdecodering : Geluidsmodus : Samplingfrequentie : MPEG 1 ISO/TEC 11172~3 layer I & II MONO, DUBBEL, STEREO EN JOINT STEREO 32, 44.1, 48 kHz AUDIO/VIDEO-OUTPUT VOOR BASISBAND Plaats een smartcard GEHEUGEN Flash SDRAM WEGWERPEN Het apparaat, het verpakkingsmateriaal (bijv. het piepschuim) en de batterijen moeten worden gerecycleerd. Vraag hiervoor zo nodig om informatie bij de plaatselijke instanties en werp alle afval weg in overeenstemming met de plaatselijke reglementen. NED-26 ! " # " $ & ' 2MB 8MB Afmetingen en gewicht Afmetingen (B x D x H) Gewicht (netto) ) * ' & + , $ - , # ' . 233 x 176 x 38 mm 0.95 kg NED-27 NED Geen geluid DCB-9401R DCB-9401R PROBLEMEN OPLOSSEN DCB-9401R_3-4(NED/GB) 10/22/04 4:10 PM Page IV Instructions for use . . . . . . . . . . . . . . GB DCB-9401R MF68-00340A_GB 10/22/04 5:00 PM Page b DCB-9401R Instructions for use GB MF68-00340A_GB 10/22/04 5:00 PM Page d DCB-9401R SAFETY INSTRUCTIONS This STB has been manufactured to satisfy international safety standards. Please read the following recommended safety precautions carefully. AC 100-240V~, 50/60Hz OVERLOADING: Do not overload wall outlets, extension cords or adapters as this can result in fire or electrical shock. LIQUIDS: Keep liquids away from the STB. CLEANING: Before cleaning, disconnect the STB from the wall socket. Use a cloth lightly dampened with water(no solvents) to clean the exterior. VENTILATION: Do not block the STB ventilation holes. Ensure that free airflow is maintained around the STB. Never store the STB where it is exposed to direct sunlight or near heating equipment e.g. a radiator. Never stack other electronic equipment on top of the STB. Place the STB at least 30mm from the wall. ATTACHMENTS: Do not use any attachment that is not recommended by the manufacturer; it may cause a hazard or damage the equipment. SERVICING: Do not attempt to service this product yourself. Any attempt to do so will make the warranty invalid. Refer all servicing to a qualified service agent. LIGHTNING: If the STB is installed in an area subject to intense lightning activity, protection devices for the STB mains connector and modem telephone line are essential. The individual manufacturer’s instruction for safeguarding other equipment, such as TV set, Hi-Fi, etc., connected to the STB must also be followed during lightning storms. GROUNDING: CATV cable MUST BE EARTHED. The grounding system must comply with local regulations. Note : Dispose the used batteries at designated place for environment protection. GB-1 GB MAINS SUPPLY: MF68-00340A_GB 10/22/04 5:00 PM Page 2 GENERAL FEATURES 1. USER SECTION Safety Instructions . . . . . . . . . . . . . . . . . . . . . . . . . . . . . . . . . . . . . 1 Connecting Your “STB” . . . . . . . . . . . . . . . . . . . . . . . . . . . . . . . . . . 4 Description . . . . . . . . . . . . . . . . . . . . . . . . . . . . . . . . . . . . . . . . . . . 6 Front Panel . . . . . . . . . . . . . . . . . . . . . . . . . . . . . . . . . . . . . . . . . . . 6 Rear Panel . . . . . . . . . . . . . . . . . . . . . . . . . . . . . . . . . . . . . . . . . . . 7 Remote Control Unit . . . . . . . . . . . . . . . . . . . . . . . . . . . . . . . . . . . . 8 Basic Functions . . . . . . . . . . . . . . . . . . . . . . . . . . . . . . . . . . . . . . . . 10 Operating The Receiver . . . . . . . . . . . . . . . . . . . . . . . . . . . . . . . . . 16 . . . . . . . . . . . . . . . . . . . . . . . . . . . . . . . . . . . . . . . . . . . . . . . . . . . . . . . . . . . . . . . . . . . . . . . . . . . . . . . . . . . . . . . . . . . . . . . . . . . . . . . . . . . . . . . . . . . . . . . . . . . . . . . . . . . . . . . . . . . . . . . . . . . . . . 16 16 17 17 18 18 2. TUNER SECTION VHF, UHF BAND 50~870 MHz MAX 7 Msps SYMBOL RATE 16~256 QAM Modulation Format LOOPOUT FOR ANALOG RECEIVER 2. Channel Organising . . . . . . . . . . . . . . . . . . . . . . . . . . . . . . . . . 19 2.1 Update List . . . . . . . . . . . . . . . . . . . . . . . . . . . . . . . . . . . . 19 2.2 Favorite Channels . . . . . . . . . . . . . . . . . . . . . . . . . . . . . . . 19 3. Change PIN Code . . . . . . . . . . . . . . . . . . . . . . . . . . . . . . . . . . . 20 4. System Setup . . . . . . . . 4.1 Language Selection 4.2 OSD Setting. . . . . . 4.3 Media Settings . . . . 4.4 Timer Setting . . . . . 4.5 System Information . . . . . . . . . . . . . . . . . . . . . . . . . . . . . . . . . . . . . . . . . . . . . . . . . . . . . . . . . . . . . . . . . . . . . . . . . . . . . . . . . . . . . . . . . . . . . . . . . . . . . . . . . . . . . . . . . . . . . . . . . . . . . . . . . . . . . . . . . . . . . . . . . . . . . . . . . . . . . . . . . . . . . . . . . . . . . . . . . . . . 3. VIDEO SECTION 20 20 21 22 23 24 DVB-C COMPLIANT MPEG-2 VIDEO(MP@ML) 1~15 Mb/s DATA RATE SUPPORTS ASPECT RATIO 4:3(NORMAL) AND 16:9(WIDE SCREEN) 4. AUDIO SECTION 5. Mail Box . . . . . . . . . . . . . . . . . . . . . . . . . . . . . . . . . . . . . . . . . . 24 6. Irdeto Menu . . . . . 6.1 CA Status . . . 6.2 IRD Status . . . 6.3 Loader Status . . . . . . . . . . . . . . . . . . . . . . . . . . . . . . . . . . . . . . . . . . . . . . . . . . . . . . . . . . . . . . . . . . . . . . . . . . . . . . . . . . . . . . . . . . . . . . . . . . . . . . . . . . . . . . . . . . . . . . . . . . . . . . . . . . . . . . . . MPEG 1 AUDIO LAYER I & II MONO, DUAL, STEREO AND JOINT STEREO AUDIO MODE 32, 44.1 AND 48 kHz SAMPLING FREQUENCIES VOLUME CONTROL AND MUTE FUNCTION THROUGH REMOTE CONTROL UNIT SPDIF DIGITAL AUDIO OUTPUT 25 25 25 25 Troubleshooting. . . . . . . . . . . . . . . . . . . . . . . . . . . . . . . . . . . . . . . . 26 Disposal . . . . . . . . . . . . . . . . . . . . . . . . . . . . . . . . . . . . . . . . . . . . . . 26 Technical Specifications . . . . . . . . . . . . . . . . . . . . . . . . . . . . . . . . . 27 GB-2 GB-3 GB SOFTWARE DOWNLOAD VIA Network & PC(Secured) ADVANCED ELECTRONIC PROGRAM GUIDE MULTI LANGUAGE SUPPORTED FOR OSD SUBTITLE & TELETEXT(OSD & VBI) SUPPORTED WITH MULTI LANGUAGE FULL FUNCTION INFRARED REMOTE CONTROL UNIT SCARTS OUTPUT LOW POWER CONSUMPTION 4 FAVORITE LISTS AUTO UPDATED EPG PASS LOOP FOR RGB SIGNAL 15 TIMERS TO RESERVE PROGRAMS(EVENTS) FOR TURNING ON/OFF General Features . . . . . . . . . . . . . . . . . . . . . . . . . . . . . . . . . . . . . . . 3 Main Menu . . . . . . . . . . . . . . . . . . . 1. Installation . . . . . . . . . . . . . . . 1.1 Scanning . . . . . . . . . . . . . 1.2 Parental Rating . . . . . . . . 1.3 Reset to Factory Defaults . 1.4 Software Update . . . . . . . DCB-9401R DCB-9401R CONTENT MF68-00340A_GB 10/22/04 5:00 PM Page 4 1. LOCATION OF THE RECEIVER DCB-9401R DCB-9401R CONNECTING YOUR "STB" CONNECTING YOUR “STB” Connecting Figure Your STB should be placed under proper ventilation. Don’t put in completely enclosed cabinet that will restrict the flow of air, resulting in overheating. The location should be safeguarded from direct sunlight, excess moisture, rough handling or household pets. Avoid stacking other electronic components on the top of the receiver. The location should be safely accessible by the cable from your antenna system. Signal Cable 2. CONNECTING THE RECEIVER WITH CABLE SYSTEM GB After installing your cable system, connect the coaxial cable to “CABLE IN” terminal marked at the rear of the STB. All cable connectors should be finger tightened; do not use any kind of wrench while tightening connectors. The cable should be 75ohm impedance coaxial cable. 3. CONNECTING THE RECEIVER TO TV To connect the receiver with your television, you can use SCART Cable. In the case of connecting your TV through SCART cable, connect the SCART connector marked AV1 (TV) to the respective SCART port on the TV. 4. CONNECTING YOUR ANALOG RECEIVER To facilitate the user using analog receiver to view analog channels, STB has been provided with a loop through terminal marked as “LOOP”. Connect the coaxial cable from this terminal to the IF input terminal of your analog receiver. Now by keeping the STB in standby, you will be able to tune and view analog channels from your analog receiver. 5. CONNECTING YOUR VCR or DVD To connect a VCR or DVD player, the STB has been provided with SCART at the rear marked “AV2 (EXT)”. Using a SCART connector, the VCR or DVD player can be connected to the receiver. 7. INSERTING SMARTCARDS FOR IRDETO SERVICES In order to view a scrambled service, you need to have a valid Smartcard. This STB has the Irdeto embedded to view Irdeto programmes. 6. CONNECTING DIGITAL AUDIO SYSTEM Connect a fiber optic cable between DIGITAL AUDIO OUT on the receiver and Optical SPDIF on the Digital Audio System. GB-4 N o t e : Insert the Smartcard with the gold coloured chip facing downwards. GB-5 MF68-00340A_GB 10/22/04 5:00 PM Page 6 DCB-9401R DCB-9401R DESCRIPTION DESCRIPTION Rear Panel Front Panel 1 2 1 2 3 4 5 6 GB 1. LED Display 2. Card Slot When the Red LED lights, the set-top box enters standby mode. When the Green LED lights, it enters the operation mode. When the Yellow LED lights, it starts work and check internal systems. 1 Slot for Irdeto smartcard. GB-6 1. CABLE IN This port is to connect the coaxial cable from your Cable system. 2. LOOP To enable the connection of an Analog receiver. The receiver is provided with this “LOOP” port. 3. AV1 (TV) This is used to connect to your TV. 4. AV2 (EXT) This is used to connect to your VCR or DVD. 5. DIGITAL AUDIO OUT Output for connection to a digital amplifier. 6. AC MAINS This is to plug in the AC mains power cord. The input AC voltage range is 100V to 240V, 50Hz/60Hz supply. GB-7 MF68-00340A_GB 10/22/04 5:00 PM Page 8 DESCRIPTION DCB-9401R DCB-9401R DESCRIPTION Remote Control Unit 1. POWER This is for switching the receiver ON/STANDBY mode. 10. ALT(YELLOW) This key is for selecting the soundtrack list for the current service. This key functions same as the YELLOW key on the menu. Press it once and sound track appears. Press it twice and video track appears. The sound and video track services are not provided for every channel and depend on the conditions the operator is in. This key is for displaying the help message in the sub-menu. 11. AUDIO(BLUE) This key is for changing the Audio to the left, right or both channels, This key functions same as the BLUE key on the menu. 2. 0-9 NUMERICAL keys These keys are to enter numeric values and to select the channel directly by entering its number. 12. i (INFORMATION) This key is for displaying the program information box in the screen. (RED) This key functions same as the RED key on the menu. Press it once and you can get simple information on the program. Press it twice and you can get detailed information on the channel in text box. 4. TV/RADIO This key is for toggling between the TV channel and Radio channel. 5. MUTE This key is for toggling between normal & muted audio. 6. FAV Use the key to switch between favorite lists. 7. EPG(Electronic Program Guide) EPG key displays the TV/Radio Program guide. 8. LAST This key is for calling up directly whatever channel you were watching from the list. GB-8 This key is for opening up the menu or returning to the previous menu. 14. EXIT This key is for exiting a menu or returning to the previous menu or exiting some banners. 15. OK This key is for entering and confirming any data to the receiver in the menu system. This key is for selecting the item. Press while viewing TV and a list of channels is displayed. 16. These keys are for moving the highlight bar for selecting options on the menu. ! /"/#/$ 17. CH 9. TEXT(GREEN) This key is for selecting the subtitle and Teletext mode. This key functions same as the GREEN key on the menu. Press it once and Teletext OSD banner appears. You can select the language you want using up/down keys. Teletext will be displayed on TV Screen without operating anything on TV. This Teletext can be displayed on TV which doesn’t support Teletext functionality. Press it twice. Then Teletext will be available on TV. It means that Teletext can be chosen by TV with TV RCU. Press it three times and subtitle banner will be shown. You can select the language you want using up/down keys. N o t e : When inserting batteries, make sure that the polarity(+/-) is correct. 13. MENU /CH These keys are for changing channels. 18. VOL+/VOL- These keys are for increasing or decreasing the volume. 19. TIMER This key is for reserving events(programs) into timer(s) in EPG. If a event is set in timer, it will be turned on/off automatically based on start/end time of event. This key activates/deactivates timer(s) in EPG as toggle type. After activating EPG screen by pressing ‘EPG’ key, you can select the interesting event (program) using the # / $ keys and ! / " keys. Then, press ‘TIMER’ key. If this event is reserved in the timer, ® is displayed on the right corner of this event name. ‘EPG’ on ‘event Repetition’ in ‘Time & Timer Settings’ menu is displayed, too. However, if there is no event on EPG for the channel, this TIMER key can not be supported. GB-9 GB 3. PG+/PGThese keys are for moving up or down pages on the menu and TV/Radio list. MF68-00340A_GB 10/22/04 5:00 PM Page 10 1. Display Screen 2. Volume Control Before you can view the television program, you must perform the installation. Therefore you will see only menu images at first. After the television channels have been programmed, you will see the following picture(banner) each time you switch channels: To control the volume level : ● ● ● Press VOL- or VOL+ keys to adjust the volume level. Press MUTE key to turn to silence mode. Press MUTE key again or VOL- or VOL+ keys in order to cancel the mute function. Event timelife (Progress of current event) ● Parental rating of event ● ● Press YELLOW(ALT) key to see the soundtrack list. Press # / $ and OK key to select one. Press the RED( i ) key in view mode. 4. Select Videotrack ● When you press TV/RADIO key on the Remote Control Unit, TV and RADIO program are toggled. ● Press YELLOW(ALT) key twice to see the videotrack list. Press # / $ and OK key to select one. Detailed program information ● Press the RED( i ) key twice while you are viewing a program. First you will see the banner described above. After the RED( i ) key is pressed in the second time, detailed information for current program can be displayed on another banner, if there is more information. When this information is more than one page, PG+/PG- keys can be used for page up and down. Note : This service depends on service provider. GB-10 GB-11 GB 3. Select Soundtrack Signal indicator DCB-9401R DCB-9401R BASIC FUNCTIONS BASIC FUNCTIONS MF68-00340A_GB 10/22/04 5:00 PM Page 12 BASIC FUNCTIONS 6. Program Information 5. Service List ● ● EPG-Electronic Program Guide The electronic program guide gives you information for the channels. Press OK key to while you are viewing a program. Select list by pressing TV/RADIO or FAV key. The icon behind the channel name symbolises scrambled channel, and the icon behind the channel name shows parental lock channel. ● ● Note : 1. This service depends on service provider. 2. After receiver recognized the GMT-time from the signal which takes few seconds, it can display correct EPG information. Select the channel by pressing # / $, PG+/PG-. Press OK key to watch that channel. ● The colour key corresponds the following service list. ● This function is displayed on the screen by using only time. Green(TEXT) key : Favorites Yellow(ALT) key : Alphabetical 5.1 Service Favorites ● ● ● Press EPG key while you are viewing a program. ● GREEN(TEXT) key: Green key is for moving back to the previous date. ● YELLOW(ALT) key: Yellow key is for moving to the next coming date. ● BLUE(AUDIO) key can be used for page up, if there is more information than one page. ● RED( i ) key can be used for page down, if there is more information than one page. Time interval can be adjusted by press keys as followings on EPG screen: Press the GREEN(TEXT) key on the control unit to select the Favorites list. Press the GREEN(TEXT) key to switch between favorite list and channel list. Use the # / $, PG+/PG- keys to select a favorite group or a channel that you want. 1 key: 1 hour and 30 minutes 2 key: 30 minutes ● Select the channel by pressing # / $, PG+/PG- keys and press OK key to watch this channel. Current event can be returned by pressing LAST key during moving events on this channel. ● When the TIMER key on the remote control is pressed in the EPG screen, if the current channel involves an event, timer is set immediately and the set timer is indicated on the EPG screen. A program that has been set in this way is indicated on Timer Field of Time & Timer Setting. 5.2 Service Alphabetical ● ● ● Press the YELLOW(ALT) key on the remote control unit to select the Alphabetical list. Press the YELLOW(ALT) key to switch between alphabet list and channel list. Use the # / $, PG+/PG- keys to select a Alphabetical group or a channel that you want. GB-12 3 key: 15 minutes With the TV/RADIO or FAV key you can browse among the various programs lists. GB-13 GB ● DCB-9401R DCB-9401R BASIC FUNCTIONS MF68-00340A_GB 10/22/04 5:00 PM Page 14 BASIC FUNCTIONS 7. Subtitle 9. Teletext VBI When the current broadcasting program provides subtitle, press the GREEN(TEXT) key to see the current subtitle language list. If Subtitle is available on current program, is displayed on the banner after changing program(channel) or pressing RED( i ) key. When the current broadcasting program provides Teletext VBI, press the GREEN(TEXT) key two times to see the current language list for Teletext. This Teletext will be displayed to the screen by TV, which supports Teletext. [T] at the right corner on the banner shows that Teletext is available on this event(program). Even [T] is displayed on the banner, Teletext may not be available due to broadcasting. To change the subtitle language: ● ● ● Press the GREEN(TEXT) key three times to see the subtitle language List. Use the # / $ keys to select a subtitle language you want. Press the OK key and then the subtitle language you want is displayed. To change the Teletext VBI: ● Use the # / $ keys to select a Teletext VBI you want. Press the OK key and then the Teletext VBI you want is displayed on the screen. 10. Audio Mode You can choose a mode among left, right or stereo using the BLUE(AUDIO) key. 8. Teletext OSD When the current broadcasting program provides Teletext, press the GREEN(TEXT) key once to see the current language list for Teletext in order to get teletext in OSD regardless of TV type. [T] at the right corner on the banner shows that Teletext is available on this event(program). Even [T] is displayed on the banner, Teletext may not be available due to broadcasting. To change the audio mode: To change the Teletext OSD: 11. Near Video on Demand (NVOD) ● ● ● Use the # / $ keys to select a Teletext OSD you want. Press the OK key and then the Teletext OSD you want is displayed on the screen. GB-14 Press the BLUE(AUDIO) key to select the left, right or stereo. Press the EXIT key to save and escape from this menu. If the changed channel is a NVOD service channel, [N] is displayed at the right corner on the banner. In this case, press the YELLOW(ALT) key. Then you can get all NVOD list. Select NVOD program among those lists. Select the desired time to watch using the # / $ keys, and then press the OK key to watch the desired program. GB-15 GB ● The menu display is carefully created and user friendly to assure the easy operation of the receiver by the user. ● DCB-9401R DCB-9401R BASIC FUNCTIONS MF68-00340A_GB 10/22/04 5:00 PM Page 16 Main Menu 1.1 Scanning After installing your cable system and STB with appropriate connectors. To tune-in new channels and weak signals, the STB has been provided with “Scanning” where the channel data can be entered by the user. After selecting the “Scanning” from the Installation Menu, the following screen will be displayed: ● ● Plug in the AC main power and switch on the receiver. Press MENU key to bring up the main menu. ● The sub menu topics will be displayed. For the sub-menus Installation, Channel Organising and Change PIN Code you need the PIN Code. ● Before you begin with the “Installation” menu, you should check in the 4th menu “System Setup” whether all the information there is applicable for you. ● ● ● ● To show and hide the help message, press the YELLOW(ALT) key. By default the help message is shown. 1.2 Parental Rating Parental rating protects your children from adult content. This option is set in Installation " Parental Control menu. ● 1. Installation ● The menu provides settings for customizing, adding new services and displaying the status of the receiver. ● ● ● ● Select “Installation” in the main menu mode to select the sub menu. Enter the PIN Code. Use the ! / " keys to select age of the youngest of yours children then OK to save this setting. All services sent for age greater than set, will be blocked and request to enter Parental Rating PIN code will be shown. If you want blocked all services select “ALL BLOCKED”. By default all services are “UNBLOCKED”. Please enter the PIN Code. ● If you have not entered your own PIN Code then the PIN Code 0000 applies, which was set at the factory. GB-16 Input the frequency of the Channel you want to find. Input the Network ID of the Channel you want to find. Ask your cable operator. Select the Modulation of the Channel you want to find. You can select the value of 16, 32, 64, 128, 256 or Automatic. Input the symbol rate of Channel you want to find. After select option, press OK key to start the scan process. This banner is shown if service is rated for age greater than set in Parental Control menu. Enter four digits PIN code to hide this banner and show service content. Factory PIN Code is 0000, and you can change it in Change PIN Code menu. GB-17 GB The following on screen display will appear: DCB-9401R DCB-9401R OPERATING THE RECEIVER OPERATING THE RECEIVER MF68-00340A_GB 10/22/04 5:00 PM Page 18 OPERATING THE RECEIVER 1.3 Reset to Factory Defaults 2. Channel Organising This is to recover the Factory set values in case the user has encountered some problems after changing any values of channel data and others which may be in error. The “Channel Organising” menu has five functions: Saving changes on channel list by select Service Update and it provides making four favourite lists and compose channels, as you want. The screen display will be as follows: ● At the request window, if you press OK key, the receiver will be reset to factory default settings automatically. Enter the PIN Code. If you have not entered your own PIN Code 0000 applies, which was set at the factory. Note : This cause your previous settings to be deleted! All settings and information including channel data will be deleted. 2.1 Update List This option is enabled only if your cable provider sends software for your STB. To upgrade the software, place the cursor on Installation " Software Update menu and press OK. If new software is available, banner “Start Software Updating Process ?” will be displayed. There is also information about estimated time of software download. Press OK to confirm and start Software Updating process. If there is newest software on your STB “You don’t need to update software !” will be displayed. 2.2 Favorite Channels You can immediately register the present channel to the desired Favorite Group. In addition, you can register a channel to multiple favorite groups. ● ● ● ● Select the desired Favorite Group(FAV1~FAV4) using the FAV key. Select the desired channel list using the # / $ or PG+/PGkeys or numeric keys at the TV or RADIO list window. Press the RED( i ) key and then register the selected channel at the Favorite Group. Then press the OK key for confirmation. You can change TV list or Radio list by the TV/RADIO key and change favorite list by the FAV key. ● ● When you press the TV/RADIO key, TV list and Radio list are toggled. Press the FAV key to select another favorite list. To delete channels from Favorite Group: ● ● Select a channel list to delete with # / $ or PG+/PG- keys or numeric keys. Press the RED( i ) key to delete the selected channel from the favorite channels. Note : One favorite list can contain max. 200 channels. GB-19 GB When some new channels will be transmitted to your cable network, these channels would be shown on channel list green colored. To save these channels, use Channels Organizing " Update List. 1.4 Software Upgrade GB-18 DCB-9401R DCB-9401R OPERATING THE RECEIVER MF68-00340A_GB 10/22/04 5:00 PM Page 20 OPERATING THE RECEIVER 3. Change PIN Code 4.2 OSD Setting To change the PIN Code, select the second option “Change PIN Code”. You can set the OSD transparency, the display time, Color Scheme and OSD Position. This will take you to the following menu: ● In this option, you need to enter the current PIN Code at the first cursor, and at the second cursor enter the desired PIN Code. To confirm, you need to enter the new PIN Code again. Select OSD Transparency level. The OSD Transparency level from 0 to 100%. Setting is made with the numeric keys, ! / " keys or PG+/PG- keys. ! / " keys : Setting in increment of 1%. PG+/PG- keys : Setting in increment of 10%. Please remember the PIN Code should be a 4 digit numerical value. Note : Transparency is applied to all color schemes. THE FACTORY PRESET PIN Code : 0 0 0 0. 4. System Setup Set the display duration of the information(banner) box displayed in the screen. The time ranges from 0.5 to 60.0 seconds. Setting is made with the numeric keys, ! / " keys or PG+/PG- keys. ! / " keys : Adjusting in increment of 0.5sec. PG+/PG- keys : Adjusting in increment of 1 sec. This option enables you to change the factory preset system settings as per your requirements. ● Set the Color Scheme : You can change color according to your preference. (i.e background, text, symbol, line, etc) / " keys : select the color scheme mode. Color scheme 1 : changes the menu to sky blue color. Color scheme 2 : changes the menu to green color. Color scheme 3 : changes the menu to dark brown color. User defined : Sets the color according to user preference. EPG colors : Sets the color in the EPG menu. ! 4.1 Language Selection The “Language Selection” option allows the user to select the desired language of the OSD, Soundtrack, Teletext, Subtitle or EPG. However, these languages for Soundtrack, Teletext, Subtitle and EPG depend on broadcasting. For example, even the language for Subtitle can be selected, it may not be supported because of no Subtitle on the program. ● ● Note : Color scheme 1, 2 and 3 may be changed in the future by upgrading software. To accommodate user there are 2 OSD languages available and 37 languages supported for soundtracks, subtitles and EPG. To select the desired language menu, press ! / " keys to change language and press OK. The Soundtrack, Teletext, Subtitle will vary according to the selected language. GB-20 GB-21 GB ● Note : If you forget the PIN Code, refer to ‘System information’ part. Once you change password, please do not forget and keep well. ● DCB-9401R DCB-9401R OPERATING THE RECEIVER MF68-00340A_GB 10/22/04 5:00 PM Page 22 OPERATING THE RECEIVER 4.4 Timer Setting To set User defined mode or EPG color mode ● ● ● ● Press the GREEN(TEXT) key. The item which you want to change will appear. Move the item which you want to change using the # / $ keys. Set the color you want using the ! / " keys. Press the OK key to set. 1) Guard Band Time Guard-Band time is a function to ensure, that whole event will fit in set time boundaries. 1 minute of Guard-Band Time means, that STB will start this timer operation 1 minute before set time and end 1 minute after set time. To show and hide the help message, press the YELLOW(ALT) key. 2) Timer OSD Position ● 15 timers are supported including timer(s) from EPG. ● ● ● You can set the various media settings you want. Place the cursor on this sub menu and press OK. ● ● ● ● ● ● Press the # / $ keys to move the sub items and press the ! / " keys to select the option. Press the OK key to confirm. Press the MENU/EXIT keys to exit the menu. Select the TV type according to your TV : STANDARD 4: 3 ratio or WIDE SCREEN 16 : 9 ratio type. Select the aspect ratio conversion : Letter box, Pan & Scan, Mixed or Full. Select the Video Signal Type : Composite, Composite + RGB GB-22 ● Select the timer number on ‘Timer’ using ! / " keys from 1 to 15. Press the ! / " keys to choose event repetition you want to reserve : Daily, Every Sunday, Every Monday, Every Tuesday, Every Wednesday, Every Thursday, Every Friday, Every Saturday, Once. If the timer is set from EPG screen, EPG is displayed on ‘Event Repetition’. Press the Numerical (0~9) keys to set the time you want and press the ! / " keys to choose a switch time you want to reserve. If set time on ‘Switch-on Time’ is same as one on ’Switch-off Time’, this timer works for 24 hours. Select TV program to set the event program by pressing ! / " keys. When you press the TV/RADIO key, TV program and Radio program are toggled. Even you can set timers on Daily and Every Monday or Every Sunday, etc. The priority has the repetition event which is less. For example, when you set timers on Once and daily, ‘Once’ will work in stead of ‘Daily’ at that day. If the timer is running, ‘Running’ message with a timer number is displayed on ‘Timer’. GB-23 GB Place the cursor on the position you want, and press the # / $ keys or ! / " keys until the screen moves to the position you want. The screen will move to the position you want. 4.3 Media Settings ● DCB-9401R DCB-9401R OPERATING THE RECEIVER MF68-00340A_GB 10/22/04 5:00 PM Page 24 OPERATING THE RECEIVER 4.5 System Information 6. Irdeto Menu If you have to contact your service provider or a service center they might ask for information available from this menu. Place the cursor on this sub menu and press the OK key. The following will be the on-screen display. The menu provides the information of the smartcard and the STB. Press the OK key to enter the sub menu. DCB-9401R DCB-9401R OPERATING THE RECEIVER 6.1 CA Status You can see the CA status (Smart Card EMM/ECM information). You can read the message sent to the individual decoders. We can save the maximum 10mail messages. 6.2 IRD Status You can see the IRD status (technical information about the IRD, CA, Smart Card and software loaded into it). 6.3 Loader Status You can see the information about the IRD, and software loaded into it. GB-24 GB-25 GB 5. Mail Box MF68-00340A_GB 10/22/04 5:00 PM Page 26 TECHNICAL SPECIFICATIONS Power supply Possible cause Solution of the problem No display LED on the front panel; No power supply Power cord not plugged in correctly Power cord plug in correctly No pictures on the screen Receiver in Standby mode; RCA not connected tightly to video output of television; incorrect channel or video output selected on television Set receiver to “On”; Check connection and correct; Audio cord connected incorrectly; Loudness level = 0; Muting active Check connection and correct; Remote Control does not operate directly incorrect operation; Batteries dead or inserted incorrectly Type : Input voltage : Fuse rating : SMPS AC 100-240V~, 50/60 Hz 250 V/T1.6AH Tuner & Demodulator Input Frequency : DEMODULATION : SYMBOL RATE : Constellation : CABLE OUT : Check channel and video output and correct (TV instruction manual) Increase loudness on television set; Press the MUTE key VHF,UHF BAND(50~870 MHz) QAM DVB-C MAX 7 Msps 16, 32, 64, 128, 256 QAM LOOPOUT FOR ANALOG RECEIVER Video decoder System decoding : Point remote control towards the Receiver. Replace batteries or insert correctly MPEG 2 ISO/TEC 13818 (Transport Stream) MPEG 2 MP@ML (4:2:2) 1 ~ 15 Mb/s 4:3 (normal) & 16:9 (widescreen) 720(H) x 576(V) x 50 fields/sec Profile and level : Data rate : Video formats : Picture resolution : Poor picture quality signal strength in Signal strength to low Check all wire connections. Check the the “Auto Scanning” menu, correct alignment of your antenna On-Screen Error Message “Searching for signal” cable not connected or not tight Check connection and correct On-Screen Error Message “Channel data does not exist.” Channel lists not installed Scan channels. Please go to Installation menu On-Screen Error Messages: “Please check the Smartcard”; “Please insert the Smartcard”. Smartcard: - not plugged in correctly; - not plugged in. (depend on model) Check the Smartcard. “Insert the Smartcard.” Audio Decoder System decoding : Audio mode : Sampling frequency : MPEG 1 ISO/TEC 11172~3 layer I & II MONO, DUAL, STEREO, JOINT STEREO 32, 44.1, 48 kHz BASE-BAND AUDIO/VIDEO OUTPUT DISPOSAL VIDEO Interface : Impedance : Output level : PAL 2 SCART (AV1, AV2) 75 1Vp-p AUDIO Interface : Impedance : Output level : S/PDIF (Digital Audio Output) SCART 600 balance 2.0Vp-p max (controllable) MEMORY The device, packaging material (e.g. Styrofoam) and the batteries must never be disposed of with household refuse. Please obtain appropriate information about the regulations in your community, and dispose of all refuse in accordance with regulations at the separate locations provided. Flash SDRAM 2MB 8MB PHISICAL SPECIFICATION Size (W x D x H) Weight (Net) GB-26 233 x 176 x 38 mm 0.95Kg GB-27 GB Problem No sound DCB-9401R DCB-9401R TROUBLESHOOTING