1
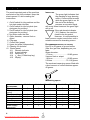
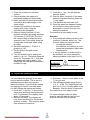
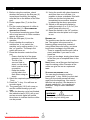
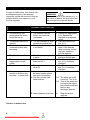
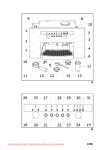
Operating instructions
COFFEE BREWER
Mode d’emploi
MACHINE À CAFÉ
Gebrauchsanleitung
KAFFEEBRÜHMASCHINE
Gebruiksaanwijzing
KOFFIEZETAPPARAAT
Bruksanvisning
KAFFEBRYGGARE
Bruksanvisning
KAFFEMASKIN
GB
FR
DE
NL
SE
NO
Matic / THa
Downloaded from CoffeeMachineManual.com Manuals
Downloaded from CoffeeMachineManual.com Manuals
Operating instructions
English
1.1 Introduction
We are delighted that you have chosen
one of our quality products. The machines
have been specifically designed for
brewing coffee and/or tea.
Please read these operating instructions
carefully to ensure correct and safe use
of the coffee-maker and benefit fully from
its use.
Keep the fold
out sheet
opened while
reading the
instructions.
Contents:
1.1
1.2
1.3
1.4
1.5
1.6
1.7
1.8
1.9
1.10
Page
INTRODUCTION ...............................2
MODELS AND TYPES ........................2
WARNINGS AND PRECAUTIONS .........3
A QUICK GLANCE AT THE MACHINE ....4
INSTALLATION AND OPERATION .........5
ADJUST THE QUANTITY OF WATER .....5
USAGE ...........................................6
CLEANING ......................................7
DESCALING ....................................7
TROUBLE SHOOTING ........................8
1.2 Models and types
These operating instructions apply to the
following coffee makers:
(For the drawings please refer to the last
page of this manual).
MTC2-021
MTC3-021
For information regarding capacity, model
and type numbers etc., please see the
type plate on the machine. Note the
information in the back of this manual.
THA10-021
THA20-021
MTC2WB-021
MTCTW-021
2
Downloaded from CoffeeMachineManual.com Manuals
1.3 Warnings and precautions
The following warnings and precautions
must be observed to ensure the safe use
of the coffee-maker:
WARNINGS
Δ Never immerse the machine in water.
Δ Remain in the vicinity of the machine
during maintenance activities, such as
descaling.
Δ Ensure the flex does not touch the hot
plate.
Δ The machine should at all times be
connected to the water supply and the
electricity mains supply in such a way
that it can easily be disconnected.
Δ The machine must always be connected
to the electricity mains so that all wires
are easy to disconnect from the mains.
Δ The manufacturer shall accept no
liability for damage resulting from
installation, use or maintenance
activities that are not described in these
operating instructions.
Δ Some parts of the equipment will
become very hot during use.
Δ Do not use any sharp objects to operate
the machine.
PRECAUTIONS
• If the equipment is not used for a long
period, it is advisable to disconnect it
from the mains.
• It is normal for some water to remain in
the machine. This should be taken into
account if the machine is moved to a
location where the temperature may fall
below freezing point.
• If all the water has been removed from
the machine, the instructions for
"Installation and operation" should be
carried out again.
• If you use an aggressive cleaner or
descaler, it is highly advisable to wear
safety goggles (face protection) and
gloves.
• Avoid spilling any descaling solution on
the outside of the machine, since this
may result in permanent damage to the
housing. However, should descaler
come into contact with the outside of the
machine, it must be removed as quickly
as possible by observing the safety
precautions described in these operating
instructions. The point of contact must
be cleaned immediately and thoroughly.
• Always wash your hands after using an
aggressive cleaner or descaler.
• Have all repair work carried out by a
qualified service engineer.
• In the case of repair and/or maintenance
activities in which the machine must be
opened, all wires including the earth wire
must be disconnected from the mains.
• The machine must have an earth
connection.
• Always use approved materials and
components during installation.
• The machine should be connected to
the water supply at all times via a tap
that can be operated manually.
• During the installation activities, always
observe local regulations and standards.
3
Downloaded from CoffeeMachineManual.com Manuals
1.4 A quick glance at the machine
The most important parts of the machine
are listed on the fold out sheet. Keep this
sheet opened while reading the
instructions.
1. On/off switch for the machine and the
hot plate under the filter.
2. On/off switch for the hot plate (see
pictogram for position).
3. On/off switch for the hot plate (see
pictogram for position).
4. Hot plate under the filter
5. Glass decanter, vacuum flask or
Airpot
6. Filter pan
7. Coffee filter (paper)
8. Upper hot plate (independent)
9. Opening for descaler
10. Control panel
10.1 Descale indicator
10.2 In use indicator
10.3 Select key (Ø)
10.4 1/0 -Key (= Start/stop key)
10.5 Display
INDICATORS
The green light indicates that
the machine is busy brewing
coffee. Coffee will be brewed
while the green light is on. At
the end of the brewing
process, an acoustic signal
will sound three times and the green light
will go off.
If the red descale indicator
(10.1) flashes, the machine
needs to be de-scaled.
However, it is still possible to
brew coffee a couple more times, until a
suitable moment for descaling occurs.
RECOMMENDED AMOUNTS OF COFFEE
Use 35 to 50 grams of ground coffee
(filter fine) per litre, depending on your
taste.
Glass decanter:
1.7 litres ............................ 60-85 grams
Vacuum flask or airpot:
1.9 litres ............................ 65-95 grams
2.2 litres .......................... 75-110 grams
The enclosed measuring spoon filled with
a level amount of coffee contains approx.
40 grams.
Measuring spoon
ACCESSORIES
Glass decanter
Filter pan +
spring
Filter paper (bag)
Cleaner
Renegite
Measuring spoon
Funnel
Water supply
connection
Matic 2
Matic 3
Tha 10/Tha 20
Matic2 WB
Matic Twin
2
1
3
1
-1
2
1
4
2
1
1
1
1
1
1
1
1
1
1
1
1
1
1
1
1
1
1
1
1
1
1
1
1
1
1
1
1
1
1
4
Downloaded from CoffeeMachineManual.com Manuals
1.5 Installation and operation
1. Place the machine on the work
surface.
2. Check whether the machine is
positioned steady and horizontally.
3. Make sure there is an earthed mains
connection and water supply in the
close vicinity.
4. Connect the machine to the water
supply (with a tap) using the
connecting hose supplied.
5. Slide an empty filter pan (6) into
position and place an empty decanter
(5) beneath it. CAUTION! The lid of
the vacuum flask or airpot must be
opened for the THA model. Keep the
mixing tube in the flask when using
an airpot.
6. Set all the switches (1, 2 and 3, if
present) to "off".
7. Put the plug in the wall socket.
(earthed).
8. Turn the machine on by setting the
switch (1) to "on". The switch lamp will
come on. The lamps (10.1, 10.2) and
the display will light up briefly. The
display will then indicate the standard
number of cups.
9. Press the 1/0 -key. You will hear an
acoustic signal.
10. Wait for about 3 minutes. If the water
has still not started flowing, press the
1
/0 -key again.
11. The decanter will now start to fill.
12. Once the water has stopped flowing,
you will hear a three-note acoustic
signal after 1 minute. Now you can
empty the decanter.
The machine is now ready for use.
Remarks:
1. Some water will always remain in the
machine, its hoses, boiler, etc. This
must be taken into account when:
− moving the machine
− the machine is situated in a room
where the temperature falls below
freezing point.
2. If, for any reason, no water is left in
the machine, you must repeat the
above procedure (from step 5 to 12).
WARNING
Ensure the flex does not touch the
heating plate.
1.6 Adjust the quantity of water
You can adjust the quantity of hot water
used to brew the coffee. This is set to a
standard amount when the machine
leaves the factory. If you think this setting
is supplying too much or too little water,
you can change the amount as follows:
1. Press the Ø- and the 1/0 -keys at the
same time and keep them pressed in
until P1 appears in the display (after
about 15 seconds).
2. Release the keys. The display will
now show the setting for the current
quantity of water . This quantity varies
from machine to machine.
3. Press the Ø-key for more water or the
1
/0 -key for less.
4. The settings available range from 0,
2, 4, 6... to 98. Two steps higher will
give you 3,3 to 5 ml extra water in the
decanter. Wait for about 20 seconds.
The machine is now ready for use.
For other settings of the hot water
quantity, see the table on the fold out
sheet at the back of this manual.
5
Downloaded from CoffeeMachineManual.com Manuals
1.7 Usage
1. Before using the machine, check
whether the spring in the filter pan (6)
is positioned correctly (the spring
must be flat on the bottom of the filter
pan).
2. Place a paper filter (7) in the filter
pan.
3. Put the required amount of coffee in
the filter (see § 1.4 RECOMMENDED
AMOUNTS OF COFFEE).
4. The enclosed measuring spoon filled
with a level amount of coffee contains
approx. 40 grams.
5. Slide the filter pan (6) into the
machine.
6. Check whether the machine is
switched on. If not, switch the
machine on by setting switch (1) to
the “on” position. The lamp in the
switch will come on.
7. Place the decanter under the filter
pan.
− Ensure that the lid of the glass
decanter is in the down position.
− The lid of the
vacuum flask or
airpot, on the other
hand, must be in the
up position.
− Keep the double
mixing tube in the
flask when using an Mixing tube
airpot.
8. Select the required quantity using the
Ø-key.
9. Press the 1/0 -key. You will hear an
acoustic signal.
10. The green light (10.2) will come on
and the coffee brewing cycle will
start.
11. When the brewing cycle has finished,
the indication lamp (10.2) will go out
and an acoustic signal will sound
three times to indicate that the coffee
can be poured.
6
Downloaded from CoffeeMachineManual.com Manuals
12. Using the model with glass decanters
and more than one hot plate, it is
possible to place a decanter filled with
coffee on another hot plate and
immediately brew another decanter
by observing the above procedure.
13. Switch on the second hot plate by
setting the switch (2 or 3) to "on" (the
switch lamp will come on).
14. Reset the switch to the “off” position,
when the extra hot plate is no longer
in use.
BREWING TEA
The machine can also be used to make
tea. The system is the same as for
brewing coffee except that, instead of
using coffee filters and coffee, you place
loose tea or tea bags in the filter pan.
− There is a special tea filter pan (with a
sieve) available if you want to use
loose tea.
− If you use tea bags, simply place these
in the filter pan or suspend them in the
decanter.
Note! Never use a filter pan that has been
used for making coffee. Remains of the
coffee can give the tea an unpleasant
taste.
STOPPING THE BREWING CYCLE
You can stop the brewing cycle by
pressing the 1/0 -key. When you next start
the cycle, the whole process will start
again from the beginning. You need to
take this into account if the decanter is
already partially full. You may have to
press the Ø-key to select a different
quantity.
WARNING
Some parts of the equipment will
become very hot during use.
1.8 Cleaning
It is important that the machine and the
accessories be kept clean. It is best to
clean the machine with a damp cloth, if
necessary with a non-abrasive and/or
corrosive detergent. The glass decanters
and the filter pan can be washed normally
and subsequently rinsed thoroughly with
water. Vacuum flasks and airpots can be
rinsed with hot water. Our Cleaner is
recommended for removing all coffee and
tea deposits.
The cleaning procedure itself is simple:
CLEANING GLASS DECANTERS
AND FILTER PAN
1. Dissolve 1 sachet of Cleaner in 5
litres of hot water (min. 80 °C).
2. Place the items to be cleaned in the
solution. For a good result, the spring
must be removed from the filter pan.
3. Leave the parts to soak (max. 30
minutes).
4. Pour the Cleaner solution away.
5. Now rinse the items with plenty of hot
water.
6. Do not forget to replace the spring in
the filter pan.
CLEANING VACUUM FLASKS AND AIRPOTS
1. Dissolve Cleaner in hot water (min.
80 °C)., approx. 5 g/l.
2. Fill the vacuum flask(s) and/or
airpot(s) with this Cleaner solution.
3. Leave the solution to soak for approx.
30 minutes and then pour it away.
4. Rinse the decanters several times
with hot water.
PRECAUTION %%
Always wear protective gloves when
using Cleaner!
1.9 Descaling
In hard water areas, chalk and limescale
will accumulate when the machine is
used. The machine is fitted with a descale
indicator that is activated if scale deposits
exceed a certain level. If this descale
indicator is activated (the lamp in the red
triangle (10.1) starts to flash), the scale
must be removed from the machine.
Correct operation can otherwise not be
guaranteed. When the red light starts to
flash, it is still possible to brew coffee a
couple more times. The operator can then
wait until a suitable time to descale the
machine.
The descaling procedure is as follows:
1. First read the instructions and
recommendations on the sachet of
the descaling agent. We recommend
using our tried and tested Renegite
descaling agent.
2. Dissolve 100 g Renegite in 0,5 litre of
hot water.
3. Slide the empty filter pan (6) into the
machine and place an empty
decanter beneath it.
4. Use the funnel to pour half of the
RENEGITE solution carefully into the
opening (9).
5. Switch the machine on using switch
(1). Use the Ø-key (10.3) to select 2
cups and press the 1/0 -key. The
solution will drip into the decanter.
6. Wait for 2 minutes. The Renegite
solution is now given time to perform
its task.
7. Repeat points 4 and 5.
8. Empty the decanter.
9. The machine must now be rinsed with
fresh water by running the normal
brewing process twice without using
any coffee. Do not forget to empty the
decanter between each rinse.
The machine is again ready for making
coffee.
PRECAUTIONS %%
• Remain in the vicinity of the machine
during all descaling activities.
• Wear gloves and face protection
during all descaling activities.
7
Downloaded from CoffeeMachineManual.com Manuals
1.10 Trouble shooting
In case of malfunction, first consult this
troubleshooting list. If the problem
cannot be solved with the aid of this list,
please consult your supplier or your
service engineer.
WARNING
If the machine is to be opened, e.g. in
the case of repairs, the plug must first
be removed from the wall socket.
TROUBLE SHOOTING LIST
MALFUNCTION:
• The machine is not
working and the switch
lamps are not on.
POSSIBLE CAUSE:
• The external fuse has
blown; the circuit has
overloaded.
• The descale indicator is
flashing.
• The descale indicator
continues to flash after
descaling.
• The accumulation of scale
exceeds the critical limit.
• The accumulation of scale
is excessive.
•
• The filter pan overflows.
• The filter pan spring is not
in place.
• Not enough water has
been set at P1.
•
• Too much water has been
set at P1.
•
• The machine does not
supply quite enough
coffee.
• The decanter overflows.
• You get only a small
amount of coffee in the
decanter - or none at all.
• The safety mechanism in
the water supply system
has come on because:
A. The flow of water has
been blocked.
B. Water pressure is too low.
SUBJECT TO MODIFICATION
8
Downloaded from CoffeeMachineManual.com Manuals
•
•
•
SOLUTION:
Change the appropriate
fuse. Operate the
machine on a separate
circuit.
Descale the machine,
see § 1.9.
Descale the machine
again. If the descale
lamp continues to flash,
ring your supplier or
service engineer.
Place the filter pan
spring in the filter pan.
The P1 quantity setting,
see § 1.6, should be
changed.
The P1 quantity setting,
see § 1.6, should be
changed.
A.1 The water tap is still
turned off. Turn it on.
A.2 Turn off the water tap.
Uncouple the supply
pipe at both ends and
remove any
blockages present.
B.
Ring the service
engineer.
700.403.207 C
COFFEE BREWING MACHINES
MACHINES A CAFE
KAFFEEBRUEHMASCHINEN
KOFFIEZETAPPARATEN
E 12−1996
Downloaded from CoffeeMachineManual.com Manuals