1
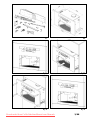
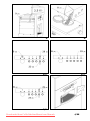
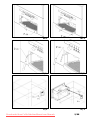
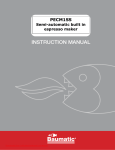
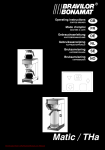
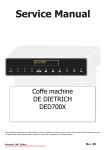
A
B
Downloaded from CoffeeMachineManual.com Manuals
2/88
C
D
E/1
E/2
F/1
F/2
Downloaded from CoffeeMachineManual.com Manuals
3/88
G
H
I/1
I/2
I/3
L
Downloaded from CoffeeMachineManual.com Manuals
4/88
M/1
M/2
N/1
N/2
O/1
Downloaded from CoffeeMachineManual.com Manuals
O/2
5/88
P/1
P/2
Q/1
Q/2
Q/3
Q/4
Downloaded from CoffeeMachineManual.com Manuals
6/88
Q/5
Q/6
Q/7
Q/8
R/1
R/2
Downloaded from CoffeeMachineManual.com Manuals
7/88
R/3
R/4
R/5
R/6
R/7
R/8
Downloaded from CoffeeMachineManual.com Manuals
8/88
S/1
S/2
S/3
Downloaded from CoffeeMachineManual.com Manuals
9/88
INDEX
12. Description of the Coffee
machine
13. Description of the control
panel
14. Recommendations
15. Instructions for the first
use
16. Accessories
(already
included)
17. Coffee drawer (optional)
18. Coffee
19. Hot water
20. Steam
21. Recipes
22. Cleaning and servicing
23. Installation
24. Appliance malfunction
25. Technical specifications
26. Technical assistance and
spare-parts.
1. DESCRIPTION OF THE
COFFEE MACHINE
(FIG. A)
1.
2.
3.
4.
5.
6.
7.
8.
9.
10.
11.
12.
Filter-holder ring nut
Steam pipe
Coffee pressing tool
Coffee grinder button
Coffee measuring device
Cabinet block button
Drip tray
Coffee container
Water reservoir
Grinding regulation knob
Filter-holder
1-cup-filter
13. 2-cup-filter
14. Measure
15. One-way nozzle
16. Two-way nozzle
17. Brita’s filter
2. DESCRIPTION OF
THE CONTROL PANEL
(FIG. B)
18.
19.
20.
21.
22.
23.
24.
25.
26.
27.
28.
29.
30.
31.
Steam tap knob
Coffee measuring knob
Switch button (ON/OFF)
Coffee button
Hot water button
Steam button
Light key
“Power ON” Warning light
Water temperature indicator
Coffee indicator
Water indicator
Steam indicator
Light indicator
Coffee measuring indicator (1
short- ,long coffee, 2 short - ,long
coffees)
3. RECOMMENDATIONS
The use of this appliance is very
easy. However, please, read
carefully and thoroughly this
instructions
manual
before
installing and operating your
coffee machine, in order to avoid
making mistakes, to get better
results and to respect the
environment.
Downloaded from CoffeeMachineManual.com Manuals
1/23
OPERATING
•
•
•
•
•
•
This appliance must be used only
by adults. Make sure that the
appliance will be out of the
reach of children.
All attempts to modify the
technical
features
of
this
appliance are very dangerous.
Keep the appliance always
well cleaned.
The external parts of this
appliance become very hot
while it is on and they still
remain hot also after its
switching off. Keep children
out of reach until the part s
have cooled down completely.
Before cleaning or making
servicing, make sure that the
plug has been removed from
the power point.
If there is something wrong, this
cannot be solved by yourself.
Repairs made by inexpert people
can
cause
damages
and
accidents. Read the contents of
this manual and, if you do not find
the information you need, please
contact your nearest aftersales service. Assistance to that
appliance must be made by
technical staff authorised by the
Manufacturer. We recommend to
require always original spareparts.
FOR INSTALLATION AND
SERVICING
•
•
•
The installation of the
appliance and its electrical
connection must only be
made
by
QUALIFIED
PERSONNEL . DISCONNECT
ELECTRICAL SUPPLY before
servicing and/or cleaning the
appliance.
After having taken the appliance
out of the packaging check that it
has not suffered damage during
transportation and that the power
cable or the plug is in good
condition. Otherwise apply to the
retailer.
The Manufacturer declines
any responsibility for failure
to observe these accident
prevention safety norms.
HOW TO RESPECT THE
ENVIRONMENT
PACKAGING
•
All the used packaging materials
are environmentally friendly and
recyclable. Please take part in the
preservation of the environment
by bringing the rubbish to the
differentiated rubbish points.
Downloaded from CoffeeMachineManual.com Manuals
2/23
DISUSED APPLIANCES
•
Disused or useless appliances
have not to be considered as
discarded goods. Thanks to the
ecological removal, a lot of
materials used for producing your
appliance can be used again.
•
Apply to your retailer for having
information about the present
possibilities of rubbish removal,
or
address
your
municipal
administration.
•
Before
discarding
the
appliance, cut off the electric
cable making the appliance
out of use.
§
It is very important to keep this
manual always together with the
appliance for any references you
might need also in the future. If
the appliance will be sold or
transferred to another person,
make sure that the manual will be
given to the new user, so that he
can get informed about the
appliance’s functioning and about
the relative recommendations.
•
CE This appliance is in accordance
with the directive BT 73/29
§
Electricity safety norms EN 603351 (August 1995 - Safety for
electrical household appliances
and similar – General Norm) and
EN 60335-2-15 (April 1996 –
Specific Norms concerning heating
liquids appliances).
-
Directive
conformity
norms:
55014-1
55014-2
61000-3-2
61000-3-3
EMC
with
89/336
in
the following
4. INSTRUCTIONS FOR
THE FIRST USE
FILL UP THE WATER RESERVOIR
•
•
•
•
-
Push the cabinet block button
(E/1).
Take the coffee machine out of
the cabinet using the special
telescopic runners (E/2).
Fill up the water reservoir (G)
situated on the left side of the
appliance with 2,5 litres of water.
Push the coffee machine into the
same relative seat as before (F/1)
and push again the cabinet block
button (F/2).
The hardness of the water:
Before filling up the water
reservoir, make sure that the
decalcifying filter Brita (A-17) has
been bathed for at least 20 min.
in cold water (please follow the
instructions indicated on the filter
packaging). After that, insert the
filter into the reservoir (see
chapter 12. Installation “Water
Connection”).
Downloaded from CoffeeMachineManual.com Manuals
3/23
-
If the machine will not be used for
long periods, change the water in
the reservoir and make the boiler
empty by making the machine
deliver about half a litre of water
(see chapter 8.Hot water).
•
FILL UP THE COFFEE BEANS
CONTAINER
•
•
•
•
•
Push the cabinet block button
(E/1).
Take the coffee machine out of
the cabinet using the special
telescopic runners (E/2).
Put into the coffee container,
situated on the right side of the
appliance, about 200 gr. of coffee
beans (H).
Push again the coffee machine
into its relative seat as before
(F/1) using the special runners.
Push again the cabinet block
button (F/2) so that the machine
will be well fastened.
•
RESET OF STANDARD VALUES
•
STARTING PROCESS
•
Turn the coffee machine on
pushing the switch button ON (B20). The red warning light (B-25)
indicates the device working
condition (lighted lamp ON/ lamp
out OFF).
Make the machine deliver hot
water (see paragraph 7. Hot
water) and wait until the air
contained in the boiler has been
completely gone out through the
steam pipe (A-2) and water
comes out (repeat many times
this operation if necessary) and
then turn the knob off (B-18).
Meanwhile the water temperature
indicator lights up
(B-26). It
indicates the water heating
process in the boiler. When the
light goes out it means that the
machine has reached the right
temperature and is ready for
coffee.
•
The coffee machine comes out of
the factory set for the ideal Italian
espresso coffee, as approved by
the coffee University of Naples
and in accordance with ILLY
standard. The setting values for
long coffee, on the contrary, are
in accordance wit h German
standard.
If these standard values have to
be reset, just turn the machine on
pushing at the same time the
switch button ON/OFF (B-20) and
the steam button (B-23). The
blinking of the indicator lights
indicates
that
the
above mentioned standard values have
been reset.
Downloaded from CoffeeMachineManual.com Manuals
4/23
REGULATION OF THE GROUND
COFFEE
•
•
•
•
•
•
The coffee machine comes out
of the factory already set on
an ideal coffee grinding level.
Push the cabinet block button
(E/1).
Take the coffee machine out of
the cabinet using the special
telescopic runners (E/2).
The grinding level can be changed
using the special regulation knob
(A-10). Turning the knob in a
clockwise direction the grinding
becomes fine and the coffee
stronger. Turning the knob
counter-clockwise the grinding
becomes coarse and the coffee
lighter.
Put again the coffee machine into
the relative seat (F/1), using the
special telescopic runners.
Push again the cabinet block
button (F/2) so that the machine
will be well fastened.
PROGRAMMING OF THE GROUND
COFFEE MEASURE
•
The coffee machine comes out
of the factory already set for
the delivery of a ground
coffee measure ideal for 1 cup
espresso.
•
•
•
The ground coffee measure can
be increased or reduced
and
once
selected
the
required
measure,
it
can
be
also
memorised. The ground measure
that can be programmed refers
only to one single coffee. Grinding
time for double coffee comes out
automatically
after
having
memorised a single coffee.
Set the coffee measuring knob (B19) on the “small cup” light on the
left (B-31), insert the 1-cup-filterholder (A-11 / A-12) under the
special funnel (A-5) and push
slightly the grinder button for
making the grinder works (A-4),
without releasing it. After 10
seconds the grinder will start
working and it is possible to
program the coffee measure, once
reached the required ground
coffee measure (recommended
measure 7g, corresponding to 6
seconds of grinding) just release
the grinder button (A-4) and the
measure will be automatically
memorised.
Useful Advice: be careful to use
the right filter suitable for the
required ground coffee measure
(A-12÷13).
Downloaded from CoffeeMachineManual.com Manuals
5/23
PROGRAMMING OF COFFEE
MEASURE IN THE CUP
•
•
•
•
•
The coffee measure in the cup
can be as one likes.
Set the coffee measuring knob (B19) on the required “coffee
measure” light and grind a certain
measure of coffee in the filterholder. Insert the filter-holder (A11) in the ring nut (A-1), and put
under it one or two cups
according
to
the
selected
program.
To access the programming stage
Keep the coffee button pressed
(B-21) for at about 5 seconds.
When the coffee starts coming
out, release the button
(meanwhile the “coffee
measure” light will be blinking)(B27).
When the required quantity is
reached push the button again (B21) and it will be automatically
stored in the control unit.
PROGRAMMING OF WATER
MEASURE
•
•
•
•
Put a container under the steam
pipe (A-2)
Turn the steam knob
counterclockwise (B-18).
To access the programming stage
Keep the water button pressed (B22) for at about 5 seconds.
Release the button when the
water starts coming out.
•
When the required quantity is
reached push the hot water
button again (B-22) and it will be
automatically stored in the control
unit.
5. ACCESSORIES
•
•
•
The coffee machine is equipped
with one filter-holder (A-11) on
which two filters can be inserted:
1-cup (A-12)
2- cup (A-13)
By using paper pods, use only a
1-cup-filter.
There is also a measure(A-14),
which is useful in order to know
exactly the
ground coffee
measure (about 7,2 g).
The machine have also two
nozzles, a 1-(A-15) and a 2-way
nozzle (A-16), that should be
alternatively screwed on the filterholder (A-11) according to what
one requires.
6. DRAWER (OPTIONAL)
•
-
The machine can optionally have
also a well-equipped drawer with
a stainless steel front panel, type
PES 8036-m. The drawer has a
lot of useful compartments:
One large compartment for cups
and saucers
A basin for coffee-grounds
A seat for all accessories (filters,
measure).
A tray
Downloaded from CoffeeMachineManual.com Manuals
6/23
7. COFFEE
USE OF COFFEE
•
•
•
•
•
•
•
Put the coffee knob (B-19) on the
required coffee measure.
Insert the filter-holder (A-11)
under the Coffee measuring
device (A-5). By pressing the
relative button (A-4), the
previously programmed coffee
measure for one or two cups will
automatically come out. Once
reached the required measure
press the ground coffee with the
pressing tool (A-3).
Insert the filter-holder (A-11)
correctly into the ring nut (A-5)
making sure that it is perfectly
fixed: turn the filter-holder handle
from leftward to rightward.
Put one/two coffee cup/s under
the filter-holder nozzle (A-15÷16).
Check that the red light of the
water temperature indicator (B26) is out or wait until it will be.
Push coffee button (B-21) and the
coffee measure that comes out
will be exactly the one selected
and previously programmed.
Take the filter-holder out of the
ring nut and remove the coffee
grounds.
USE OF COFFEE POD
(E.S.E system)
•
•
•
•
•
•
•
•
E.S.E. system means Easy Serving
Espresso and corresponds to the
international standard for brewing
coffee using coffee pods (one
throwaway portion of roasted
coffee) and a suitable coffee
machine. E.S.E. system is easy,
practical and ecological because it
doesn’t need particular servicing
and it is environmentally friendly.
Moreover it is also a clean way to
drink coffee thanks to its special
packaging that avoids coffee to
come out and can be removed
after use.
The machine can work also with
pods: one throwaway portion of
roasted coffee (for one single
coffee only).
Put the knob (B-19) on the
required coffee measure (long or
short single coffee).
Insert the one throwaway portion
pod into the filter-holder (use the
1-cup-filter)
Insert the filter-holder (A-11)
correctly into the ring nut (A-5)
making sure that it is perfectly
fixed: turn the filter-holder handle
from leftward to rightward.
Put the cup under the 1-way
nozzle (A-15).
Check that the red light of the
water temperature indicator (B26) is out or wait until it will be.
Push coffee button (B-21) and the
coffee measure that comes out
Downloaded from CoffeeMachineManual.com Manuals
7/23
•
will be exactly the one selected
and previously programmed.
Take the filter-holder out of the
ring nut and remove the pod.
HOW TO PREPARE AN EXCELLENT
ESPRESSO
•
•
•
•
•
•
To obtain an excellent espresso
cleaning and right temperature
are the most important elements.
Make sure that filter, filter-holder
and ring nut are always well
cleaned.
Except when the machine will not
be used for very long periods, it
should be kept on with the filterholder inserted into the ring nut to
keep it warm.
Warm the cups filling them up
with a little bit of water by
pushing the coffee button. In that
way the water remained in the
boiler will come out and the filterholder will be warmed.
After having made the last cup of
coffee, clean the filter-holder
making a coffee without beans in
order to remove all the remained
coffee grounds, that can change
the taste of the next coffees.
To obtain an excellent espresso
the brewing time should be of
about 20- 25 seconds. Elements
that can influence the brewing
time are the grinding level of the
coffee, the ground coffee measure
and how much the coffee has
been pressed. The machine is set
to obtain a good-quality coffee. If
•
necessary, the grinding level can
be changed as well as the ground
coffee measure, (see chapter
4.How to behave during the first
process) in order to obtain the
excellent espresso.
Useful advice: coffee is a
hygroscopical element that means
that its characteristics are strictly
connected with the weather
(humidity). Remember that the
coffee should be ground coarser
if there is a great quantity of
humidity in the air or it will
become thick and will come out
with difficulty; with a dry climate
on the contrary, the coffee should
be ground finer.
8. HOT WATER
•
•
•
•
Put a container under the steam
pipe (A-2).
Turn the steam knob counterclockwise (B-18).
Push the hot water button (B-22)
and the delivered water measure
will be the same as previously
programmed.
Close the steam knob (B-18)
9. STEAM
LIQUIDS ‘ HEATING
•
Press once the steam button
(I/1); both the steam indicator
(B-29),
and
the
water
Downloaded from CoffeeMachineManual.com Manuals
8/23
•
•
•
•
•
•
•
•
temperature indicator will be ON
(B-26).
Wait until both of them will be out
(I/2). Push the steam button
again in order to stop producing
steam (B-23).
To check if the steam has been
produced push again the steam
button (I/3); if the water
temperature
indicator
l(B-26)
remains out it means that steam
is ready to come out.
Put under the steam pipe (A-2) a
container with the liquid that has
to be warmed .
Turn the steam knob counterclockwise (B-18)
Wait until the liquid becomes
warm.
Close the steam knob (B-18)
Attention: never make coffee
when the steam is ready to
come out, if this is the case,
reset the water level in the
boiler as explained in the next
point.
Attention: after every steam
emission push the hot water
button
(B-22)
without
opening the steam knob (B18) (in this way the water
level in the boiler will be
reset).
•
•
•
•
•
•
•
•
29), and the water temperature
indicator will be ON (B-26).
Wait until both of them will be out
(I/2). Push the steam button
again in order to stop producing
steam (B-23).
To check if the steam has been
produced push again the steam
button (I/3); if the water
temperature
indicator
(B-26)
remains out it means that steam
is ready to come out.
Put under the steam pipe (A-2) a
container with the milk that has to
be warmed .
Turn the steam knob counterclockwise (B-18)
While the steam is coming out
move the container up and down,
until the milk will produce the
right foam for your cappuccino.
Close the steam knob (A-18)
Attention: never make coffee
when the steam is ready to
come out, if this is the case,
reset the water level in the
boiler as explained in the next
point.
Attention: after every steam
emission push the hot water
button
(B-22)
without
opening the steam knob (B18) (in this way the water
level in the boiler will be
reset).
HOW TO PREPARE CAPPUCCINO’S
FOAM
•
Press once the steam button
(I/1); both the steam indicator (B-
Downloaded from CoffeeMachineManual.com Manuals
9/23
10. RECIPES
ITALIAN CAPPUCCINO
This is a normal espresso coffee with
steam-heated milk that gives the
coffee a milder flavour and a rich,
frothy topping. Serve in a large cup.
Pour cold milk into a tall jug and heat
it using the steam spout if your
machine has one. Add only the froth to
the espresso coffee, to do this either
tilt the jug slightly rocking it
backwards and forwards while you
pour or use a spoon to scoop off the
froth.
You can also add a dusting of cocoa
powder to taste.
VIENNESE CAPPUCCINO
This variation is the result of age-old
Austrian tradition.
Prepare a 'long' espresso by letting the
machine run for longer than usual (3035 seconds), add hot milk followed by
whipped cream. Serve in a mediumsized cup (midway between and
espresso cup and a cappuccino cup).
Decorate with flakes of chocolate.
COLD ESPRESSO SHAKE
Frothy and extremely refreshing, this
makes a pleasant drink on hot days.
Prepare an espresso coffee, add sugar
and pour into a cocktail shaker with
large ice cubes. Shake for a few
seconds.
Serve in a tumbler or flûte.
IRISH COFFE
Any energy-giving tonic.
Warm a tall glass and mix eight parts
of hot coffee with one part whisky and
brown sugar.
Gently pour freshly whipped cream
over the back of a spoon so that it
floats on the coffee: the result is a
layer of cool white cream on top of the
hot dark coffee.
MEXICAN COFFEE
Intense and exotic.
Mix together a portion of double
cream, half a teaspoon of cinnamon, a
pinch of nutmeg and sugar in a small
cup and beat until it becomes frothy.
Place a teaspoon of chocolate syrup, a
pinch of cinnamon and the coffee into
a medium-sized cup and blend
together.
Top with a teaspoon of vanillaflavoured cream.
CAPPUCCINO ICE-CREAM
Heat 2 cups of espresso coffee, ¾ cup
of single cream and ½ cup sugar in a
pan and bring to boiling point.
Leave to cool before placing in the
freezer for 4-5 hours.
Move to the refrigerator ½ hour
before serving.
Serve two-three balls of the ice-cream
in a small bowl and decorate with
roasted coffee beans.
Downloaded from CoffeeMachineManual.com Manuals
10/23
11. CLEANING AND
SERVICING
cappuccinos.
It
should
be
removed (N/1,N/2) and washed
with a sponge in warm water.
Attention: For cleaning the
steam pipe turn always the
machine off and wait at least
20 minutes after use to make
the steam pipe cool, in order
to avoid probable burns.
OUTER PARTS
•
•
The outer parts of the machine
should be cleaned with sponges
or soft cloths to avoid scratching.
(L).
Under no circumstances use
solvents, abrasive powders or
steel wool.
WATER RESERVOIR
•
DRIP TRAY
•
•
•
Remove the drip tray from the
machine (M/1,M/2).
Make sure that the drip tray
should be periodically empty (A-7)
to avoid coming out of liquids that
can cause damages to the
underlying furniture.
Drip tray and grid can be washed
in the dishwashing machine.
FILTER / FILTER-HOLDER / RING
NUT
•
•
•
Keep filter (A-15÷16), filter-holder
(A-11) and ring nut (A-5) always
well cleaned. Clean away coffee
residue because it can change
the taste of the next coffees.
Every month wash filter and filt er
holder
in
the
dishwashing
machine.
The steam nozzle (A-2) should be
periodically cleaned. It could
become dirty inside by making
•
•
•
If the machine will not be used for
long periods, change the water in
the reservoir and make the boiler
empty by pushing many times
the coffee button (B-21).
Clean periodically the water
reservoir(A-9) to remove the fur.
The water reservoir can be
washed in the dishwashing
machine.
The decalcifying filter Brita should
be replaced after 2000 coffees or
at least after six months.
BOILER CLEANING CYCLE
•
•
-
Like all the appliances that use
water, it is easy that the coffee
machine has some fur in the
boiler.
Every six months should be made
the following process:
Fill up the water reservoir with 1,5
litres of water adding also half a
glass of vinegar or citric acid.
Make some coffee deliveries (see
paragraph 6. Coffee) without
using neither ground coffee nor
Downloaded from CoffeeMachineManual.com Manuals
11/23
-
-
pods, so that from the filter holder
should come out only water until
the reservoir will be completely
empt y.
Fill in again the reservoir with cool
water and make again the above
mentioned process (without using
coffee as before) in order to rinse
the boiler.
The coffee machine is ready for
use yet.
12. INSTALLATION
INSERTION IN THE MODULAR
FURNITURE
For the good functioning of an
appliance inserted in a modular
furniture, the furniture has to have the
suitable features.
In conformity with safety norms, the
protection to avoid contacts with the
electrical parts and the
parts
protected
only
with
functional
insulation should be guaranteed by a
correct insertion of the appliance.
All
components
that
guarantee
protection, even a cover panel (if the
appliance for example is situated at
one
extremity of the modular
furniture), should be well fastened so
that they can not be removed without
using tools.
The appliance should be installed at a
certain distance from refrigerator or
freezer, because the heat given out
from it can impair their functioning.
COMPONENTS FOR THE
INSTALLATION
The coffee machine is equipped with
the following components for the
installation (C):
1.
2.
3.
4.
5.
6.
7.
8.
9.
10.
N°2 side-plates 1mm
N°4 side-plates 2mm
N°2 telescopic runners
N°1 power unit
N°1 cabinet block flask
N°1 cabinet block bar
N°2 L-flasks
N°2 rectangular washers
N°1 line power cable
N°4 double stickers for fixing the
plates
11. N°8 screws M4X16
12. N°12 self-threading screws
13. N°4 washers
ELECTRICAL CONNECTION
•
•
•
Fix the power unit (C-4) on the
back, high on the left of the seat
by using two screws as indicated
in picture 0/1
Electrify the power unit.
Connect the line power cable to
the relative connector situated on
the back side of the appliance,
and insert it in the power unit (C4), where an electrical junction
box for the functioning with a
voltage of 230V one-phase
(O/1).has been set
Downloaded from CoffeeMachineManual.com Manuals
12/23
USE OF THE SIDE PLATES
The width of the seat in which the
coffee machine should be inserted is
determined by the thickness of the
cabinet’s sides. To compensate the
different possible measurement, the
appliance is equipped with 6 plates, 4
are 2mm in thickness and 2 are 1mm.
thick. They should be used to
compensate the internal width of the
seat. For obtaining a width of
562/560mm see picture P/1 e P/2.
INSTALLATION WITHOUT
SUPPORT
•
•
•
•
•
•
•
Put the suitable plates (P/1,P/2)
on the both sides of the
embedding seat, fixing them with
the double-sticker strips (Q/1).
Pay attention to the position of
the bevel which indicates the right
position of the plates.
Release the telescopic runners
and extract the fore part (Q/2)
Fix
the
telescopic
runners’
bearings with the screws as
shown in picture Q/3
Fix the 2 L-flasks as shown in
picture Q/4
Install the cabinet block bar using
the rectangular washers and the
specific screws M4 as shown in
picture Q/5
Install the telescopic runners on
the both sides of the machine as
shown in picture Q/6
Insert the machine: the telescopic
runners should be coupled with
•
•
•
the runners ‘ bearings which are
already fastened in the seat.
(Q/7)
Make runners run until the safety
lock should click.
Adjust the cabinet block bar if
necessary, for the right fastening
of the machine and screw tight
the screws as shown in picture
Q/8
Push the cabinet block button so
that the machine will be well
fastened (F/2).
INSTALLATION WITH SUPPORT
•
•
•
•
•
•
Put the suitable plates (P/1,P/2)
on the both sides of the
embedding seat, fixing them with
the double-sticker strips (R/1)
Pay attention to the position of
the bevel which indicates the right
position of the plates.
Release the telescopic runners
and extract the fore part (R/2)
Fix
the
telescopic
runners’
bearings with the screws as
shown in picture (R/3)
Put the little flask in the right
position and fix it with two selfthreading screws on the base of
the embedding seat as shown in
picture R/4,R/5.
Install the telescopic runners on
the both sides of the machine as
show n in picture R/6
Insert the machine: the telescopic
runners should be coupled with
the runners ‘ bearings which are
already fastened in the seat.
(R/7).
Downloaded from CoffeeMachineManual.com Manuals
13/23
•
•
•
•
Make runners run until the safety
lock should click.
With the machine completely
inserted in the seat use the
cabinet block button (A-6) and
check if it functions correctly.
Adjust the cabinet block flask if
necessary and fix it as shown in
picture R/8
Push the cabinet block button so
that the machine will be well
fastened (F/2).
WATER CONNECTION
•
•
•
•
•
•
•
•
Push the cabinet block button
(E/1) .
Take the coffee machine out of
the cabinet using the special
telescopic runners (E/2)
Remove the lid of the water
reservoir (A-9), and take the filter
Brita out (A-17)
Remove its packaging and bathe
the filter in cool water for half an
hour; then, insert it into the
special hole of the reservoir (S/1)
Insert the flexible suction water
pipe (the one with the filter) and
the ventilation pipe in the special
grooves (S/2). Drive both the
pipes into the reservoir end-plate (S/3)
Fill up the reservoir with hot water
Attention: fill it only with cool
drinkable
water:
under
no
circumstances put milk or other
liquids!
Brita’s filter can be bought by
retailers of electric household
appliances, by our technical
Service Centre’s and in shops
authorised for selling this type of
spare-parts.
13. APPLIANCE
MALFUNCTION
In case of appliance malfunction make
sure that it does not depend on:
1. Lack of electricity
2. Lack of water in the reservoir
For the damaged power cable or any
servicing, please contact the Technical
Service Centre.
14. TECHNICAL
SPECIFICATIONS
For the general measurement of the
coffee machine see pictures.
•
Width
594 mm
•
Depth
260 mm
•
Height
357 mm
•
Capacity
•
Net Weight
17 kg
•
Gross Weight
19 kg
•
Mains Voltage
220 V
•
Heating element input
Downloaded from CoffeeMachineManual.com Manuals
3 litres.
14/23
1000 W
•
Electric pump input
50 W
•
Working pressure
12 bar
•
Fuse
10 A.
12.
15. TECHNICAL
ASSISTANCE AND
SPARE-PARTS
Downloaded from CoffeeMachineManual.com Manuals
15/23