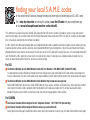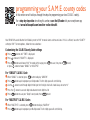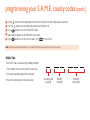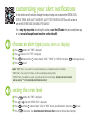
1
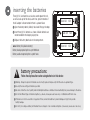
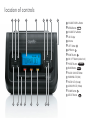
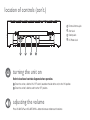
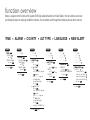
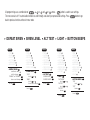
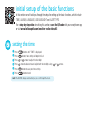
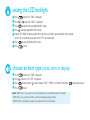
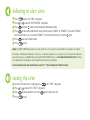
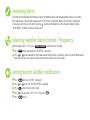
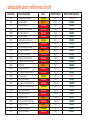
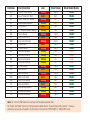
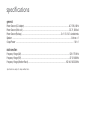
Safe & Sound
Weather Alert Clock Radio
S.A.M.E. Technology
local weather emergency information
NOAA Weather Channels
weather band plus all hazards alerts
CR2W user guide
CAUTION
RISK OF ELECTRIC SHOCK
DO NOT OPEN
CAUTION: TO REDUCE THE RISK OF ELECTRIC SHOCK, DO NOT REMOVE COVER (OR BACK).
NO USER-SERVICEABLE PARTS INSIDE. REFER SERVICING TO QUALIFIED SERVICE PERSONNEL.
The Rating Label is located at the bottom enclosure of the unit.
DANGEROUS VOLTAGE: The lightning flash with arrowhead symbol, within an equilateral triangle
is intended to alert the user to the presence of uninsulated dangerous voltage within the product’s
enclosure that may be of sufficient magnitude to constitute a risk of electric shock to persons.
ATTENTION: The exclamation point within an equilateral triangle is intended to alert the user to
the presence of important operating and maintenance (servicing) instructions in the literature
accompanying the appliance.
FCC WARNING: Changes or modifications to this equipment may cause harmful interference unless the modifications
are expressly approved in the instruction manual. The user could lose the authority to operate this equipment if an
unauthorized change or modification is made.
WARNING: TO PREVENT FIRE OR SHOCK HAZARD, DO NOT EXPOSE THIS UNIT TO RAIN OR MOISTURE.
FCC STATEMENT: This device complies with Part 15 of the FCC Rules. Operation is subject to the following two
conditions: (1) this device may not cause harmful interference, and (2) this device must accept any interference received,
including interference that may cause undesired operation.
NOTE: This equipment has been tested and found to comply with the limits for a Class B digital device, pursuant to part 15
of the FCC Rules. These limits are designed to provide reasonable protection against harmful interference in a residential
installation. This equipment generates, uses and can radiate radio frequency energy and, if not installed and used in
accordance with the instructions, may cause harmful interference to radio communications. However, there is no guarantee
that interference will not occur in a particular installation. If this equipment does cause harmful interference to radio or
television reception, which can be determined by turning the equipment off and on, the user is encouraged to try to correct
the interference by one or more of the following measures:
• Reorient or relocate the receiving antenna.
• Increase the separation between the equipment and receiver.
• Connect the equipment into an outlet on a circuit different from that to which the receiver is connected.
• Consult the dealer or an experienced radio/TV technician for help.
SURGE PROTECTORS: It is recommended to use a surge protector for AC connection. Lightning and power surges ARE
NOT covered under warranty for this product.
getting to know your
all hazards weather alert radio
For a step-by-step video describing this section, scan the QR code with your smartphone app
or visit www.hellocapello.com/weather-radio-video/#1
Congratulations on your purchase of the Capello CR2W Safe & Sound Weather Alert Clock Radio. Protect yourself
and your family or business from all hazards alerts for severe weather, natural disasters, civil emergencies and so
much more! Customize the alerts for your geographic location using S.A.M.E technology (Specific Area Message
Encoding) by programming your radio to receive alerts relevant to your area. You can eliminate unwanted broadcasts
of specific events and receive only what matters to you - 24 hours a day, 7 days a week. Stay informed of imminent
dangers; be prepared for local hazards and emergencies. Your Capello CR2W is Public Alert ™ certified, meeting the
standards of the Consumer Electronics Association for quality and reliability.
inside the box
Capello CR2W Safe & Sound Weather Alert Clock Radio, AC/DC Power Adapter, User Manual and Quick Start Guide.
AC/DC adapter connection
Connect the AC adapter (included) to an AC outlet having 120V, 60Hz AC only. Plug the small end into the DC jack on the rear of
the unit. DC 7V
caution: Do not touch the AC/DC adapter with wet hands. Fully insert the plug without exposing any part of the blade.
inserting the batteries
Three (3) ‘AA’ size batteries can also be used to power the unit,
as well as back-up for the clock, alarm time, preset memories if
the AC adapter is disconnected or there is a power failure.
Size ‘AA’ 1.5V
Open the battery door by sliding it back and lifting up the edge.
Insert three (3) ‘AA’ batteries as shown. Alkaline batteries are
recommended for the longest playing time.
Size ‘AA’ 1.5V
Replace the battery door back on the compartment.
notes: Battery life (alkaline battery):
Battery backup operating time: up to 100 hours
Battery audio-on operating time: up to 8 hours
Size ‘AA’ 1.5V
battery precautions:
Follow these precautions when using batteries in this device:
Warning - Danger of explosion if batteries are incorrectly replaced. Replace only with the same or equivalent type.
Use only the size and type of batteries specified.
Be sure to follow the correct polarity when installing the batteries as indicated. A reversed battery may cause damage to the device.
Do not mix different types of batteries together (e.g. Alkaline, Rechargeable and Carbon-zinc) or old batteries with fresh ones.
If the device is not to be used for a long period of time, remove the batteries to prevent damage or injury from possible
battery leakage.
Do not try to recharge a battery not intended to be recharged - it can overheat and rupture. (Follow battery manufacturer’s directions)
location of controls
1
2
3
4
5
6
7
8
9
10
11
12
13
14
15
16 17
VOLUME DOWN – Button
MENU Button
VOLUME UP + Button
LCD Display
Antenna
LEFT Button
UP Button
RIGHT Button
ON / OFF Switch (side of unit)
PRESET Button PRESET
BAND Button BAND
RADIO / SNOOZE Button
WARNING LED (Red)
WATCH LED (Orange)
ADVISORY LED (Yellow)
DOWN Button
SELECT Button
location of controls (con’t.)
18
19
20
External Antenna jack
Alert Jack
Cloning Jack
DC Power Jack
21
turning the unit on
Refer to location of controls diagrams before operation.
To turn the unit on, slide the ON / OFF switch, located on the side of the unit, to the ‘ON’ position.
To turn the unit off, slide the switch to the ‘OFF’ position.
adjusting the volume
Press VOLUME UP + or VOLUME DOWN – button to increase or decrease the volume.
function overview
Below is a diagram of the functions of the Capello CR2W Safe & Sound Weather Alert Clock Radio. In the next sections we will walk
you through the steps for setting up the different functions. You will need to scroll through the list below to advance to the next one.
TIME
ALARM
COUNTY
ALT TYPE
LANGUAGE
NEW ALERT
MENU
MENU
MENU
MENU
MENU
MENU
• TIME SEL
“HOUR”
to set
“MINUTE”
to save
• TIME
• TIME
• ALARM
• TIME
• ALARM
• COUNTY
• TIME
• ALARM
• COUNTY
• ALT TYPE
• TIME
• ALARM
• COUNTY
• ALT TYPE
• LANGUAGE
to exit
MENU
• ALARM
“OFF/ON”
“HOUR”
to set
“MINUTE”
to save
SEL
SEL
to exit
MENU
SEL
SEL
• COUNTY SEL
“ANY”
to set SEL
or “SINGLE”
to set SEL
after “SAME01” appears
SEL again
after “-------” appears
use
+
to input all 6 digits
to set SEL
or “MULTIPLE”
to set SEL
after “SAME01” appears
SEL again
after “-------” appears
use
+
to input all 6 digits
to set SEL
repeat for “SAME02” etc
to exit
MENU
twice
• ALT TYPE SEL
“VOICE”
to set SEL or
“SIREN”
to set SEL or
“DISPLAY”
to save SEL
• LANGUAGE SEL
“ENGLISH”
to set SEL or
PREFERRED LANGUAGE
to save SEL
to exit
to exit
MENU
MENU
• NEW ALERT SEL
“EVENT 1”
choose event 1-5 SEL
input 1st code letter
input 2nd code letter
input 3rd code letter
to save SEL
to exit
MENU
All programming uses a combination of
,+
or
and
or
arrows.
button is used to save settings.
The menu consists of 11 customizable functions to scroll through and select your personalized settings. Press
button to go
back to previous function and to exit menu mode.
DEFEAT SIREN
SIREN LEVEL
ALT TEST
LIGHT
BUTTON BEEPS
MENU
MENU
MENU
MENU
MENU
• TIME
• ALARM
• COUNTY
• ALT TYPE
• LANGUAGE
• NEW ALERT
• TIME
• ALARM
• COUNTY
• ALT TYPE
• LANGUAGE
• NEW ALERT
• DEFEAT SIREN
• TIME
• ALARM
• COUNTY
• ALT TYPE
• LANGUAGE
• NEW ALERT
• DEFEAT SIREN
• SIREN LEVEL
• TIME
• ALARM
• COUNTY
• ALT TYPE
• LANGUAGE
• NEW ALERT
• DEFEAT SIREN
• SIREN LEVEL
• ALT TEST
• TIME
• ALARM
• COUNTY
• ALT TYPE
• LANGUAGE
• NEW ALERT
• DEFEAT SIREN
• SIREN LEVEL
• ALT TEST
• LIGHT
• DEFEAT SIREN SEL
scroll event codes
select to change SEL
“ENABLE” or “DISABLE”
to save each change
to exit
MENU
SEL
SEL
• SIREN LEVEL SEL
“LOW”
to set SEL or
“HIGH”
to set SEL or
to save each change
to exit
MENU
• ALT TEST SEL
SOUND ALERT SEL
SILENCE ALERT SEL
SEL
to exit
MENU
• LIGHT SEL
“BLT NORM”
to set SEL or
“BLT ON”
to set SEL or
“BLT OFF”
to save SEL
• BUTTON BEEPS
“ON”
to set SEL or
“OFF”
to save SEL
to exit
to exit
MENU
MENU
SEL
initial setup of the basic functions
In this section we will walk you through the steps for setting up the basic functions, which include
TIME, ALARM, LANGUAGE, LED BACKLIGHT and ALERT TYPE.
For a step-by-step video describing this section, scan the QR code with your smartphone app
or visit www.hellocapello.com/weather-radio-video/#2
setting the time
Press
Press
Press
Press
Press
Press
button until “TIME” is displayed.
button; hour setting will begin to flash.
or
arrows to adjust the hour digit.
arrow to advance to and adjust both minute digits using
button to save your time setting.
button to exit.
note: The AM/PM changes automatically as you scroll through the hours.
or
arrows.
setting the alarm
Press
button until “TIME” is displayed.
Press
arrow until “ALARM” is displayed.
Press
button and “OFF” will display, press
or
arrows to make your selection,
alarm clock icon appears on display when “ON”
Press
again; hour setting will begin to flash.
Press
or
arrows to adjust the hour setting.
Press
arrow to advance to and adjust both minute digits using
or
arrows.
Press
to save your alarm setting.
Press
to exit.
note: When alarm sounds, press “MENU” button to turn off alarm or press “SNOOZE” button to delay alarm for 9 minutes.
setting the language
Press
Press
Press
Press
Press
Press
button until “TIME” is displayed.
arrow until “LANGUAGE” is displayed.
button and “ENGLISH” will display.
arrow to select another language
button to save your language setting.
button to exit.
setting the LED backlight
Press
button until “TIME” is displayed.
Press
or
arrow until “LIGHT” is displayed.
Press
button to show current BACKLIGHT setting.
Press
arrow to change BACKLIGHT setting.
Choose “BLT NORM” for blue back-light to turn on when any button is pressed and off after 5 seconds,
or “BLT ON” for continuous back-light or “BLT OFF” for no back-light.
Press
to save your BACKLIGHT setting.
Press
to exit.
choose an alert type (voice, siren or display)
Press
Press
Press
Press
button until “TIME” is displayed.
arrow until “ALT TYPE” is displayed.
button and then
arrow to choose “VOICE,” “SIREN,” or “DISPLAY, then press
to exit.
notes: “VOICE” Alert = Tone sound for 8 seconds followed by voice of weather broadcast for 3 minutes.
“SIREN” Alert = Tone sound for 5 minutes, or until cancelled by pressing any button.
“DISPLAY” Alert = No audible tone sound, only a text alert will scroll on the display.
.
button again to save.
finding your local S.A.M.E. codes
In this section we will walk you through the steps for where you can locate your local S.A.M.E. code.
For a step-by-step video describing this section, scan the QR code with your smartphone app
or visit www.hellocapello.com/weather-radio-video/#3
First, determine if you want to leave your weather alert radio preset for ANY county or counties in broadcast range, or if you want to select
specific county codes. You can obtain codes from the Federal Information Processing System (FIPS) in the USA, or Canadian Location Coded
(CLC) in Canada by selecting from the methods listed below:
S.A.M.E. (Specific Area Message Encoding) codes are six-digit identification codes assigned to each forecast region and sub-region to alert you
to adverse weather warnings, watches, advisories, covering about 80 different types of emergencies. Your All-Hazards Weather Alert Radio is
preprogrammed to receive weather and hazard alert transmissions for all S.A.M.E codes within range of your area, or it can be programmed with
up to 25 different S.A.M.E. codes for just your county or counties of your choice. For example, you can program codes of counties that are
nearby, or where relatives and/or friends live, or where you will be traveling.
For USA
The National Weather Service NOAA Weather Radio Toll-Free Number 1-888-NWS-SAME (1-888-697-7263)
An automated voice system will guide you through the menu to find your county and state 6-digit S.A.M.E code and local area broadcast to
tune your radio receiver. The voice system allows you to request additional S.A.M.E codes for other counties at the conclusion of each request.
The National Weather Service NOAA Weather Radio Website http://www.nws.noaa.gov/nwr
Select SAME Coding from side bar menu, Select SAME Codes for states, counties, territories, and Marine Areas. Select your State, and then
select County or Counties listed in alphabetic order. Your 6-digit S.A.M.E code always begins with “0” and your local weather station
broadcast frequency and call letters are also listed, some with alternate language options where available.
For CANADA
Environment Canada’s Meteorological Service Telephone Number: 1-877-789-7733 (Canada Only)
Environment Canada’s Meteorological Website: www.ec.gc.ca/weatheradio
Select Specific Area Message Encoding from side bar menu, Select your location on the active map, CLC codes will be listed for each region.
programming your S.A.M.E. county codes
In this section we will walk you through the steps for programming your local S.A.M.E. code(s).
For a step-by-step video describing this section, scan the QR code with your smartphone app
or visit www.hellocapello.com/weather-radio-video/#4
Your CR2W All Hazards Weather Alert Radio is preset to “ANY” to receive alerts and transmissions. If this is sufficient, leave the “COUNTY”
setting to “ANY.” For more options, follow the menu selections:
Customizing the S.A.M.E County Code settings
Press
button until “TIME” is displayed.
Press
arrow until “COUNTY” is displayed.
Press
button and choose “ANY” for codes within range, press
or press
arrow to choose “SINGLE” or “MULTIPLE”.
to save, then press
to exit,
For “SINGLE” S.A.M.E. Code
When “SINGLE” is selected, press
button to display “SAME 01.”
Press
button again to program your Single code. The first digit space will start blinking.
Use the
arrow to scroll through digits 0-9 to input the first digit, which will should always be set to “0.”
Press the
arrow to save each digit and advance to next digit for all 6.
Press
button to save your “Single” county code, then
to exit.
For “MULTIPLE” S.A.M.E. Codes
When “MULTIPLE” is selected, press
button to display “SAME 01.”
Press
button again to program your Multiple code. The first digit space will start blinking.
programming your S.A.M.E. county codes (con’t.)
Use the
arrow to scroll through digits 0-9 to input the first digit, which will should always be set to “0.”
Press the
arrow to save each digit and advance to next digit for all 6.
Press
button to save the first MULTIPLE Code.
Repeat steps to program up to 25 different county codes.
Press
button to save your S.A.M.E codes, then
3 times to exit.
note: The display will automatically revert to clock when no buttons are pressed for more than 55 seconds.
Helpful Tips:
The S.A.M.E. code is created using the following method:
• The first digit is the sub-county code, 0 in most areas.
• The second two digits represent the state code.
•The last three digits represent the county code.
sub-county code
(usually 0)
two digit
state code
three digit
county code
customizing your alert notifications
In this section we will walk you through the steps to setup and customize the SIREN LEVEL,
DEFEAT SIREN, NEW ALERT ADVISORY, ALERT TEST, REVIEW ALERTS as well as how to
set the WEATHER BAND CHANNEL/FREQUENCY.
For a step-by-step video describing this section, scan the QR code with your smartphone app
or visit www.hellocapello.com/weather-radio-video/#5
choose an alert type (voice, siren or display)
Press
Press
Press
Press
button until “TIME” is displayed.
arrow until “ALT TYPE” is displayed.
button and then
arrow to choose “VOICE,” “SIREN,” or “DISPLAY, then press
to exit.
button again to save.
notes: “VOICE” Alert = Tone sound for 8 seconds followed by voice of weather broadcast for 3 minutes.
“SIREN” Alert = Tone sound for 5 minutes, or until cancelled by pressing any button.
“DISPLAY” Alert = No audible tone sound, only a text alert will scroll on the display. (Except event alerts marked
with an asterisk “*” in the Selectable Alert Reference Chart)
setting the siren level
Press
Press
Press
Press
or
button until “TIME” is displayed.
arrow until “SIREN LEVEL” is displayed.
and then
arrow to choose “LOW,” or “HIGH” for each pre-defined event, then press
twice to exit. See Selectable Alert Reference Chart section for Default Volume Settings.
to save.
defeating an alert siren
Press
button until “TIME” is displayed.
Press
or
arrow until “DEFEAT SIREN” is displayed.
Press
and then
arrow to scroll through pre-defined event codes.
Press
for each event code relevant to your area to manually “ENABLE” or “DISABLE” (if you select “ENABLE”,
the event alert remains on; if you select “DISABLE”, the event alert will turn off), using the
arrow.
Press
after each setting change.
Press
to exit.
notes: The DEFEAT SIREN feature relates to an event, which may occur in a specific area, but might not be relevant to all residents.
For Example: AVW=Avalanche Warning. If you live in a county where avalanches can occur, but you are not located in a mountainous
part of that county, you can DISABLE this event using the DEFEAT SIREN function. See Selectable Alert Reference Chart for listing
of pre-defined events in alphabetical order to determine which events can be disabled.
You cannot defeat event alerts marked with an asterisk “*” in the Selectable Alert Reference Chart.
testing the siren
To test the siren to ensure it is working, press
until “TIME” is displayed.
Press
or
arrow until “ALT TEST” is displayed.
Press
button to sound the siren, then
again to silence the siren.
Press
to exit.
adding a new alert
The New Alerts function can be used to customize currently undefined future events that would otherwise display only as
??A=Unrecognized Watch, ??E = Unrecognized Emergency, ??S = Unrecognized Statement, or ??W = Unrecognized Warning.
If a new event becomes defined or anticipated, you can program it by doing the following:
Press
button until “TIME” is displayed.
Press
or
arrow until “NEW ALERT” is displayed.
Press
to display “EVENT 1” and then
arrow to choose programmable event numbers 1-5.
Press
then “---” is displayed and the first character space will start blinking. (These three characters are the event
code. Pre-defined codes cannot be saved as new alerts. See Selectable Alert Reference Chart section for a list of
pre-defined 3 letter event codes).
Use the
arrow to program the first character (A-Z, then 0-9) then
arrow to move to second and third characters.
Press
.
If the code was a pre-defined code the words “THE EVENT ALREADY EXISTS” will be displayed for a short time and then
“---” is displayed again. If this happens check the event code and return to step 5.
After successfully saving an event code “-- -- -- -- -- -- -- --“ is displayed and the first character space will start blinking
for programming a user defined event description up to 11 characters in length. Use the method of step (5) to program all
11 characters. For example: “TSA THREAT.”
Press
and “ADVISORY” will start blinking. Use
arrow change the event level from “ADVISORY” to “WARNING,”
or “ALERT.”
Press
to save your selections.
Press
button twice to exit.
reviewing alerts
The CR2W All Hazards Weather Alert Radio can store up to 10 different alerts (with overlapping effective times) in its memory.
If the radio receives a new alert while a previous alert is still in effect, it automatically displays the new alert as scrolling text.
To review past alerts that are still in effect, press the
arrow to scroll through the last 10 active alerts stored in memory.
“NO MESSAGE” will display if there are no active alerts
selecting weather band channel / frequency
While power switch is “ON,” press RADIO / SNOOZE button to activate the radio.
Press BAND button repeatedly until “WEATHER” is displayed.
Press
or
arrow repeatedly to step through weather band channels / frequencies. When you find the NWS weather
band station for your area, stop pressing the arrow and the radio will stay on that station.
setting button audible notification
Press
Press
Press
Press
Press
button until “TIME” is displayed.
or
arrow until “BUTTON BEEPS” is displayed.
button to show current setting.
arrow to choose “OFF” or “ON”, then press
.
to exit.
selectable alert reference chart
Event Code
ADR
AVA
AVW
BHW
BWW
BZW
CAE
CDW
CEM
CFA
CFW
CHW
CWW
DBA
DBW
DEW
DMO
DSW
EAN
EAT
EQW
EVI
EVA
FCW
FFA
FFS
FFW
Event Description
Level
Administrative Message
Avalanche Watch
Avalanche Warning
Biological Hazard Warning
Boil Water Warning
Blizzard Warning
Child Abduction Emergency
Civil Danger Warning
Civil Emergency Message
Coastal Flood Watch
Coastal Flood Warning
Chemical Hazard Warning
Contaminated Water Warning
Dam Watch
Dam Break Warning
Contagious Disease Warning
Practice / Demo
Dust Storm Warning
Emergency Action Notification
Emergency Action Termination
Earthquake Warning
Immediate Evacuation
Evacuation Watch
Food Contamination Warning
Flash Flood Watch
Flash Flood Statement
Flash Flood Warning
Advisory
Watch
Warning
Warning
Warning
Warning
Advisory
Warning
Warning
Watch
Warning
Warning
Warning
Watch
Warning
Warning
Advisory
Warning
Warning
Advisory
Warning
Warning
Watch
Warning
Watch
Advisory
Warning
Default Volume
Low
High
High
High *
High
High
Low
High *
High *
High
High
High *
High *
High
High *
High *
Low
High
High *
High*
High *
High *
High
High *
High
Low
High
Default Enable/Disable
Disable
ENABLE
ENABLE
ENABLE *
ENABLE
ENABLE
ENABLE
ENABLE *
ENABLE *
ENABLE
ENABLE
ENABLE *
ENABLE *
ENABLE
ENABLE *
ENABLE
Disable
ENABLE
ENABLE *
ENABLE *
ENABLE *
ENABLE *
ENABLE
ENABLE *
ENABLE
ENABLE
ENABLE
Event Code
FLA
FLS
FLW
FRW
FSW
FZW
HLS
HMW
HUA
HUW
HWA
HWW
IBW
IFW
LAE
LEW
LSW
NAT
NIC
NMN
NPT
NST
NUW
POS
RHW
RMT
RWT
SMW
SPS
Event Description
Level
Flood Watch
Flood Statement
Flood Warning
Fire Warning
Flash Freeze Warning
Freeze Warning
Hurricane Statement
Hazardous Materials Warning
Hurricane Watch
Hurricane Warning
High Wind Watch
High Wind Warning
Iceberg Warning
Industrial Fire Warning
Local Area Emergency
Law Enforcement Warning
Land Slide Warning
National Audible Test
National Information Center
Network Notification Message
National Periodic Test
National Silent Test
Nuclear Power Plant Warning
Power Outage Advisory
Radiological Hazard Warning
Required Monthly Test
Required Weekly Test
Special Marine Warning
Special Weather Statement
Watch
Advisory
Warning
Warning
Warning
Warning
Advisory
Warning
Watch
Warning
Watch
Warning
Warning
Warning
Advisory
Warning
Warning
Advisory
Advisory
Advisory
Advisory
Advisory
Warning
Advisory
Warning
Advisory
Advisory
Warning
Advisory
Default Volume
High
Low
High
High
High
High
Low
High *
High
High *
High
High
High
High *
Low *
High *
High *
Low
Low
Low
Low
Low
High *
Low
High *
Low
Low
High
Low
Default Enable/Disable
ENABLE
ENABLE
ENABLE
ENABLE
ENABLE
ENABLE
ENABLE
ENABLE *
ENABLE
ENABLE *
ENABLE
ENABLE
ENABLE
ENABLE *
ENABLE *
ENABLE *
ENABLE *
Disable
Disable
Disable
Disable
Disable
ENABLE *
ENABLE
ENABLE *
Disable
Disable
ENABLE
ENABLE
Event Code
SPW
SVA
SVR
SVS
TOA
TOE
TOR
TRA
TRW
TSA
TSW
TXB
TXF
TXO
TXP
VOW
WFA
WFW
WSA
WSW
??A
??E
??S
??W
Event Description
Level
Shelter In–Place Warning
Severe Thunderstorm Watch
Severe Thunderstorm Warning
Severe Weather Statement
Tornado Watch
911 Telephone Outage Emergency
Tornado Warning
Tropical Storm Watch
Tropical Storm Warning
Tsunami Watch
Tsunami Warning
Transmitter Backup On
Transmitter Carrier Off
Transmitter Carrier On
Transmitter Primary On
Volcano Warning
Wild Fire Watch
Wild Fire Warning
Winter Storm Watch
Winter Storm Warning
Unrecognized Watch
Unrecognized Emergency
Unrecognized Statement
Unrecognized Warning
Warning
Watch
Warning
Advisory
Watch
Advisory
Warning
Watch
Warning
Watch
Warning
Advisory
Advisory
Advisory
Advisory
Warning
Watch
Warning
Watch
Warning
Watch
Advisory
Advisory
Warning
Default Volume
High *
High
High
Low
High
Low
High *
High
High *
High *
High *
Low
Low
Low
Low
High *
High
High *
High
High
High
Low
Low
High *
Default Enable/Disable
ENABLE *
ENABLE
ENABLE
ENABLE
ENABLE
ENABLE
ENABLE *
ENABLE
ENABLE *
ENABLE *
ENABLE *
Disable
Disable
Disable
Disable
ENABLE *
ENABLE
ENABLE *
ENABLE
ENABLE
ENABLE
ENABLE
ENABLE
ENABLE *
notes: The ''Low" and "High" listed on the chart represents the default alert volume level.
The ''Disable" and "Enable" listed on the chart represents the default of Events. The events notated with an asterisk “*” have been
automatically set (users are not required to set), thus they are not shown in the “DEFEAT SIREN” or “SIREN LEVEL” menus.
test signals broadcast by NWS
In this section we will walk you through the steps for where you can locate testing information provided
by the National Weather Service and when they will be transmitting test signals.
For a step-by-step video describing this section, scan the QR code with your smartphone app
or visit www.hellocapello.com/weather-radio-video/#6
All National Weather Service (NWS) stations periodically transmit test signals. You can find out when your local NWS station broadcasts test
signals by visiting the NOAA National Weather Service at http://www.nws.noaa.gov/nwr/nwrtest.htm Alarm Test Procedures page. Click on
“Programming Office” and then select your state and county from the map. Telephone and email address provided for your local NWS contact.
During the weekly test signal, the local NWS station will give a list of counties covered by their transmitter. The NWS test signal allows everyone
with weather radio receivers to verify the operation of their equipment.
The following test signals may be sent by the NWS during testing: Required weekly test, required monthly test, system demo, and national
periodic test.
note: A test signal is transmitted periodically, usually once a week at a scheduled time. Setting “REQUIRED MONTHLY TEST” to “ENABLE”
in “DEFEAT SIREN” menu allows you to receive an audible siren, voice or display alert when NWS sends this test signal, or set to “DISABLE”
to turn reception of this NWS test signal off. Check with your local NWS broadcast to determine day and time of weekly testing.
A “YELLOW” Advisory LED will light up followed by “Weekly Test” or “Monthly Test” message on display. There will be no tone sound to avoid
confusion of an actual alarm. The visual display will confirm that your radio is working properly.
No Reception Warning: If no alerts are received for 10 days, the display will flash “CHECK RECEPTION” every 30 seconds. If this happens,
check your channel settings and county codes for setting errors. If you receive a clear signal from the NWS, try using the “ANY” county code
setting to receive all alerts for all counties.
notes: If you have trouble finding reception, please move your radio closer to a window and away from fluorescent lighting.
Metal structures may interfere with the signal. If your home or business is a metal structure, you may need an external antenna.
using the AM/FM radio
In this section we will walk you through the steps for selecting reception band, selecting stations and
how to save preset channels.
For a step-by-step video describing this section, scan the QR code with your smartphone app
or visit www.hellocapello.com/weather-radio-video/#7
There is a digital AM/FM radio built into the All Hazards Weather Alert Radio. Listen to news, sports, music and more without disrupting the
weather radio functions. If an alert is broadcast, the radio automatically switches from the AM/FM mode to the weather radio alert functions.
Power and Band Selection
While power switch is “ON,” press RADIO / SNOOZE button to activate the AM/FM radio.
Press BAND button switch from “WEATHER” to “FM” or “AM” bands as indicated on the display.
Selecting Stations
Press
or
arrow to scan through local radio stations. When you find a station you like, stop pressing the arrow
and the radio will stay on that station.
Press and hold
or
arrow to Auto-scan for available stations.
Programming Preset AM/FM Channels
You can program up to 10 AM and 10 FM radio stations into the radio’s memory. To program a memory channel, do the following:
Turn on radio on and use the
or
arrows to tune to the desired station frequency.
Press and hold the PRESET button for a few seconds until the MEMORY NUMBER (1-0) flashes on the display.
Use the
or
arrows to choose the desired memory channel number you wish to program, up to 10 each for AM and FM stations.
Press
to save your frequency selection to the chosen memory channel.
? troubleshooting
If you experience a problem with this unit, please check the chart below before calling for service.
PROBLEM
SUGGESTION
No Power
Check wall outlet and back of unit to make sure power adapter is securely plugged in at both ends.
No Volume
Check Volume Control to make sure it is not set at lowest level.
Poor Reception
Try different locations for the radio within your home or business to improve reception,
adjust antenna and/or or add additional external antenna (sold separately).
No Response to Alerts
Make sure correct S.A.M.E codes have been programmed.
Check to make sure your local broadcast tower is in service.
specifications
general:
Power Source (AC Adapter) ........................................................................................................AC 120V, 60Hz
Power Source (Main unit) ........................................................................................................... DC 7V, 300mA
Power Source (Backup). ...........................................................................................3 x 1.5V “AA” size batteries
Speaker. .........................................................................................................................................8 ohms x 1
Output Power ...................................................................................................................................... 1 W x 1
radio section:
Frequency Range (AM) .................................................................................................................520-1710KHz
Frequency Range (FM) .................................................................................................................87.5-108MHz
Frequency Range (Weather Band) ........................................................................................162.40-162.55MHz
Specifications are subject to change without notice.
notes
For step-by-step videos describing ALL the functions,
scan the QR code with your smartphone app
or visit www.hellocapello.com/weather-radio-video/#8
For further assistance, please visit our website: hellocapello.com
or contact customer service at [email protected] or 1-855-896-1795
Life Lab International Ltd.