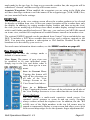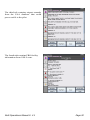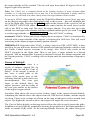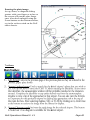
1
Anywhere Map DeX OWNERS MANUAL Elements of this product are protected under US patent numbers 6,804,585 and 7,167,782. Other patents may be pending Control Vision Corp Pittsburg Kansas www.anywheremap.com INTRODUCTION ............................................................. 3 USING ANYWHEREMAP® ............................................. 4 Direct-To Destination .................................................. 4 Adding Waypoints ....................................................... 4 Reviewing the Flight Plan ........................................... 5 The Main Map Screen:................................................ 5 Toolbars Intro: ............................................................. 7 Find Nearest Anything™ ............................................. 9 Flight Plan Manifest .................................................... 9 Flight Calculator ........................................................ 11 Emergency Mode ...................................................... 12 Personal Digital Copilot® .......................................... 12 Views ........................................................................ 13 View Settings Screen Pages..................................... 15 Airport Tab: ............................................................. 15 Airspace Tab: .......................................................... 17 Surface Features Tab: ............................................ 17 Format Tab: ............................................................. 19 Waypoint Tab: ......................................................... 21 XM WX Tab: ............................................................ 22 View Storage Tab: ................................................... 22 Zoom Options ........................................................... 22 Tools ......................................................................... 23 Settings Menus: ........................................................ 26 The Airport Information Screen ................................. 28 Airport Taxi Diagrams – Taxi Express™ ................. 33 Creating Flight Plans................................................. 34 By Selecting Waypoints .......................................... 34 Route Wizard Based Flight Plan ............................. 34 Rubber Band Flight Plan ......................................... 35 The Use Waypoint Screen ........................................ 36 VNAV Concepts ........................................................ 37 Cones of Safety® ...................................................... 38 View Settings And System Performance .................. 39 XM WX® Satellite Weather ....................................... 40 Connecting With A PAIRED Receiver ..................... 43 Re-Linking or manual Connection ........................... 43 XM Activation and Refresh ...................................... 44 XM Troubleshooting ................................................ 45 UPDATING THE DEX ......................................................... 46 POCKET PLATES®............................................................ 47 Using Pocket Plates .................................................. 47 Toolbars: ................................................................. 48 DeX Operations Manual V. 2.1 Page 2 INTRODUCTION The Anywhere DeX is a unique and high performance touch screen tablet PC device developed specifically for mobile navigation both in the aircraft as well as in an automobile. This manual contains complete operation instructions for the Anywhere Map, Pocket Plates and XM WX application built into this device. Familiarizing yourself with this device using these instructions will help you gain an excellent understanding of how this powerful device works. Initial Power up When the unit is turned on using the power switch on the side, it will boot in a matter of seconds and present the Command Center screen [CC]. Command Center Screen The CC is the main system launch pad for all functions in the DeX. To launch Anywhere Map, the main aviation navigation application, press the Anywhere Map button. To launch Pocket Plates, the instrument approach procedure application, press the Pocket Plates button. To launch the street mapping application press the Street Navigation button. The buttons at the bottom of the CC can be used to jump to the Windows desktop, rotate the screen, view this manual, and even shut the unit down. Pressing the ‘gears’ button at the top of the DeX display will return you to the Command Center screen at anytime. This is helpful when switching quickly from Anywhere Map to Pocket Plates. Shutting the unit off: It is recommended that you exit any navigation screen and return to the main system menu before turning the unit off. To exit from Anywhere Map, Pocket Plates, or Street Navigation tap the 'X' in the top right corner. From the Command Center, press the red power button in the bottom right to shut down. Only power the DeX using the factory supplied chargers and cables provided with the unit. Other chargers or cables may cause failure. DeX Operations Manual V. 2.1 Page 3 USING ANYWHEREMAP® Direct-To Destination Example: Flight from PTS to MCI Aircraft is located at PTS, Pittsburg, KS. We are flying to Kansas City International. Click on the Universal Finder button. In the window that appears, type in the airport’s identifier of MCI. There is no need to type the ICAO identification letter (K in the lower 48 states, C in Canada, etc). Notice as the identifier is typed in, the auto-complete widow below lists possible matches. When KMCI is displayed, tap on it in the list, and press the Direct-To button. . A single-waypoint flight plan is now activated direct to Kansas City. Adding Waypoints Example: Add BUM VOR as a waypoint. Tap the Universal Finder button, tap the Navaid tab, and enter BUM. Tap on Butler VOR in the list and select the Waypoint button. DeX Operations Manual V. 2.1 Page 4 A new window opens that gives you control over the order in which this item (BUM VOR) will fit into the existing flight plan. To insert BUM VOR into our existing Flight Plan, tap the “As a Waypoint” button. Refer to the website: www.anywheremap.com/DeX for training videos for more information on flight planning and other features of Anywhere Map PRO. Reviewing the Flight Plan Tap the Flight Plan icon to open the Flight Plan Manifest. This shows the entire plan and allows changes, saving, loading, and setting up of VNAV to waypoints in the flight plan. The Flight Plan Manifest is arranged by Leg number, Waypoint Name, Course, Heading, Distance, Ground Speed [calculated] and ETE [calculated]. In the example, we added a wind vector (16 kts at 160 degrees), reflected in the final calculation. Tip: On your return trip from Davis, load this flight plan and tap the Reverse button to flop the flight plan. The Main Map Screen: The main map screen is highly interactive and can be easily customized to show your choice of standard aeronautical chart items as well as numerous other Map features including Cones of Safety, a Virtual Glideslope indicator, and Obstacles as low as 400' AGL. Many of the items on the main map screen may be tapped for more information. A single tap on items such as airports, obstacles, navaids, graphical METAR flags, and MOAs/Restricted areas will bring up a small text box containing ‘quick’ information about the selected item. These text boxes will auto-hide after a few moments OR can be DeX Operations Manual V. 2.1 Page 5 cleared immediately by tapping the Clear All Tags button that appears just below the airplane icon while any text boxes are activated. Double tapping (tapping the same item twice in rapid succession) will bring up the complete details for the selected items on information screens. These show specifics; such as radio frequencies, remarks, raw textual METAR/TAF information, runway data, and Taxi Express™ GPS enabled taxiway diagrams. Information screens also allow the user to use the feature as a waypoint in a flight plan. In rough air try tapping three or four times in rapid succession on a feature to call up the information screen. Special screen areas The map screen also contains features that are always displayed and are always located in the same fixed position for easy reference regardless of user configuration. Starting in the top left, you’ll find the Flight Timer area. This area can be used to display 3 different timers. FT or Flight Timer can begin at your designated taxi/runway speed, as set in Aircraft Settings and keeps track of the time aloft. ET or Elapsed Timer is a ‘stopwatch' type function, which can be handy on approach. Double tapping on the ET (elapsed time) and then tapping YES to the Clear Elapsed Time message that comes up will clear the ET. ZT or Zulu Time can also be displayed making second-guessing your time conversion from local to Zulu time a thing of the past. Zulu time is calculated automatically using the internal NMEA GPS clock. To use this area, simply double-tap on the FT area to change modes until the desired timer is selected. The last line on the top left map screen area is the Range Indicator. The example shown illustrates a 45 nautical mile range. This distance is measured from the aircraft position on the map screen to the top arc of the compass rose. The Range value shown can be set to auto-hide in the View Settings screen. In the upper right corner of the screen you’ll find the GPS status / Groundspeed area. This area will display “NO SAT” if the internal GPS hasn’t acquired at least 3 satellites sufficient to provide a 3D position on the map screen. Once the GPS acquires your position, this area will display your ground speed and GPS altitude in feet above mean sea level (MSL). GPS acquisition time usually takes 45 seconds to 1 minute with a clear view of the sky, but can take 2-3 minutes if the unit has been transported 60 or more miles while powered OFF. Tapping KTS will quickly change the map from nautical-mile to statute-mile measurements. This results in ground speed being displayed in miles per hour or ‘MPH’ and map distances are shown in statute miles (SM). Tapping MPH will change back to nautical mile measurements. Tapping the altitude readout will recall the strength of satellite lock currently held by the internal GPS. ‘3D 10SAT’ for example can be interpreted as: 3 dimensional lock tracking 10 satellites. Tapping the GPS Signal strength again will revert to showing the Altitude. Tapping the Range readout will temporarily display a zoom adjustment panel with preset ranges and a dynamic finger slide gesture area. DeX Operations Manual V. 2.1 Page 6 At the top center of the screen the peak of the compass rose, a 3-digit number shows the current ground-track of the aircraft. If the map screen is configured to show “track up” this will correspond to the map orientation also. The lower right corner of the map screen are reserved for the active flight plan data. The lower left corner will display the estimated Time Enroute (TE) or Time of Arrival (TA) once a flight plan is activated. Tapping the ETE field on the screen will toggle it to ETA. If you have a multi leg flight plan loaded, tapping NXT will toggle between showing the time and distance to the NEXT waypoint and the final DESTINATION. The distance to the next waypoint or destination, appear in the lower right. If the map doesn’t have an active flight plan, the lower left and right corners of the map will not show these fields. When the Toolbars are hidden, these on screen numbers are displayed with large / bold letters. When the Toolbars are showing, the on-screen numbers use smaller letters. For map screen customization instructions please reference the section. Toolbars Intro: The DEX uses the touch screen for all user input. Anywhere Map features and tools have been organized into multiple banks of toolbar buttons. Advanced training on toolbars will be found in ChapterX of this manual. This section will cover the “Enroute” toolbar which contains the most commonly used buttons. Direct To: Search and “Direct To” utility for airports, navaids, waypoints, and fixes/intersections user, as well as accessing Airport Information screens. Find Nearest: Quick list lookup of closest airports, navaids, fixes, ATIS frequencies, FSS frequencies, AWOS frequencies, ATC Center and fuel prices. Flight Plan Manifest: Full details of flight legs, including save/load flight plan, Route Wizard, VNAV setup, fuel consumption, etc. Flight Calculator: Calculates density altitude, true air speed, and winds aloft. Emergency: Single tap to enter E-mode: pick airport and activate emergency descent guidance. Personal Digital Copilot: Setup reminders and warning preferences. Zoom/Backlight settings: Select Zoom mode, preset zoom levels, backlight adjustment, and night/day toggle. Tools: Leaves map screen for setup of aircraft profiles and advanced functions. ( Direct-To and Database search tool) DeX Operations Manual V. 2.1 Page 7 The Direct To / Universal Finder is a powerful way to find navigable items in the Anywhere Map database. The user may search for airports, navaids, fixes, and user waypoints. Once a waypoint has been identified, the user can easily create a direct-to flight plan, add the waypoint to an existing flight plan, or view more information about the item. The Selector tabs across the top of the finder allow the user to select the TYPE of waypoint being searched for. Select the appropriate gray tab to search for an airport, navaid, fix, or user waypoint. Identifier box: Tap in this box to enter the airport / navaid identifier or fix / user waypoint name. When you tap in this box, the on-screen keyboard will automatically appear. Use the on-screen keyboard for text entry if the desired item does not appear in the Selection box located below the Entry box. It is generally necessary to only enter the first letter or two of the identifier to find a match. If you have entered an ambiguous identifier, you must tap on the desired match in the list. You can tell when you have selected a waypoint, as the waypoint name and range/bearing will appear. When searching for an airport, DO NOT type in the regional prefix value. For instance, to find Los Angeles International airport, enter LAX, not KLAX. Not entering the “K” prefix saves typing. To hide the keyboard, tap on the airport you want in the list shown, or tap the HIDE button on the keyboard, or press the physical keyboard button below the tablet screen on the chassis of the tablet. In Alaska, some airports in Alaska use “P” as the ICAO and others use “PA” as the ICAO. Ted Stevens Anchorage (Whose Identifier with ICAO is PANC) would be entered as ANC where as Juneau Intl (whose identifier with ICAO is PAJNU) would be entered as AJN. Fav / Nearby: As the user enters partial identifiers in the “IDENTIFIER” box, the finder will find close matches and list them in the box at the left. When FAV is depressed, the close matches will be drawn from the stored list of previously viewed waypoints; when NEARBY is depressed, the close matches will be chosen based on proximity to the current map position. Range/Bearing: This box, to the right of the history/suggestion area, shows the distance and bearing from your current position to the item you have highlighted in the list box. Detailed Info: Opens the information screen for the waypoint selected. Jump To: This causes the map to be redrawn centered around the location of the selected waypoint, overriding the GPS. The map will display “GPS Disabled DeX Operations Manual V. 2.1 Page 8 PREVIEW MODE” and a blue button that says Exit Preview will appear. Tap this button to exit preview mode and return to the current GPS position. Find Nearest Anything™ This function allows you to quickly find nearby Airports, ATIS, AWOS, FSS, ATC CENTER and VOR’s. This is especially handy for looking up nearby facilities that may control SUAs or to get enroute weather information. Depressing the Only Look Ahead box will return only results along your route lying ahead of your current GPS position. With a subscription to 100LL fuel data, you’ll also be able to search for fuel prices you previously downloaded. Pressing the Include NDB box returns both VOR’s and NDB’s when the search is requested. Flight Plan Manifest A flight plan is a list of waypoints that define the route of a flight. Each flight plan will have at a minimum a START POINT and a DESTINATION. Many flights will also include intermediate WAYPOINTS, which are points along a route that define the path, generally to keep the flight path out of undesired areas such as restricted airspace. Tapping the button will open the Flight Plan Manifest screen contains a listing or manifest of the flight legs and waypoints as well as a host of management buttons. In the manifest window you can see the data that has been calculated for each leg of the flight including waypoint name, range, speed, VNAV, course (True), heading (Magnetic), time, distance, winds, and fuel used. The flight totals are shown at the bottom of the manifest area. Note: For flight planning, Anywhere Map uses cruising speed and fuel consumption values from the aircraft profile to compute course, heading, and ETE. These values must be set up in the Aircraft Settings screen ETE, course, and heading to be computed accurately. Frequently a controller may order changes to your flight plan that require addition or deletion of waypoints, re-ordering waypoints, or even entering holds. The functions on this first tab were chosen because they are the most common activities. Add WP: Opens the Direct To Finder screen so you can look-up an airport, navaid, fix or user waypoint for inclusion as a waypoint in the current flight plan. DeX Operations Manual V. 2.1 Page 9 Winds: A slider interface to enter wind speed and direction. There are two ways to use winds: 1) manual entry of the winds (available for both Anywhere Map and Anywhere Wx customers) and 2) forecast winds from the winds aloft feed in XM weather (Anywhere WX customers only). If XM is available, then the winds for the altitude selected in View Setup > Wx will be used to calculate speeds, times, and fuel. If XM is not available, then winds can be entered manually using this WINDS button. Alternatively, you can leave them at zero for a no-wind plan. Delete WP: After selecting an existing waypoint (single tap) in the flight plan manifest, this allows you to delete the waypoint. The result will be that the flight course will then run from the prior waypoint directly to the next waypoint. VNAV: After selecting a waypoint, this allows you to specify an altitude at which you want to cross the waypoint. Once set, a blue arrow will display next to the waypoint designator (upper center of map screen) showing you whether to climb or descend as you approach the next waypoint. In addition, a required rate of climb/descent number will display in the lower right corner and a target arc will arch across the flight course showing the point at which you’ll reach the specified VNAV altitude based on your current rate of climb/descent and your ground speed. For more information, see VNAV Concepts on page 37. Next WP: Allows you to select a waypoint from the manifest and make it the next waypoint in the plan. This will NOT delete any intermediate waypoints that may exist, but does set the waypoint number, bearing and distance data on the map to the waypoint selected. Anywhere Map normally “follows” your flight progress, automatically knowing which flight plan waypoint is “next”. In those cases where it gets out of sync with the pilot (such as when a waypoint is bypassed), this button allows you to synchronize the software. Hold: Toggles with UnHold. This function will PREVENT the map from advancing to the next waypoint automatically when a flight plan waypoint is passed. If ATC were to instruct you to “hold east of OSWEGO” and you were approaching this VOR from the east; tapping this button before arrival would prevent the waypoint sequencing logic in Anywhere Map from noting station passage, even though you would be over-flying the VOR on each holding pattern orbit. To resume navigating, tap the UNHOLD button when inbound to the VOR, and the next waypoint will advance automatically when crossing the VOR. Move Up: This button takes the selected waypoint/leg of the flight plan and moves it up in the order of the flight plan, allowing a re-sequencing of the waypoints in the manifest. Move Down: Takes the selected waypoint/leg of the flight plan and move it down in the order of the flight plan, allowing a re-sequencing of the waypoints in the manifest. Center CDI: Pressing this button zeroes the cross track error and gives a Direct-To to the next waypoint without canceling the rest of the Flight Plan. Route Wizard: Enter the full ICAO Airport identifier in the From and To fields. Each Via (optional waypoint) identifier should be separated by a space. For more information and an example, see Route Wizard based flight plan on page 34. DeX Operations Manual V. 2.1 Page 10 Reverse: This function will reverse the order of the flight plan for use on the return trip. Direct XXX: Pressing this button zeros cross track error and gives a Direct-To to the next waypoint, whose identifier is listed on the button without canceling the rest of the Flight Plan. Done: Closes the flight plan screen and returns to the map with any changes made in this screen implemented on the map. Load: Calls up a screen containing previously created and saved flight plans. If the desired flight plan shows on the screen, tap the filename and then tap OK. Clear: This will remove the current flight plan from the screen. This will not delete the stored flight plan from the memory. Save: After creating a flight plan on the DeX, enter this screen and type a unique filename in the “save as” box of this screen. For instance to save a flight plan from PTS to MCI you might type “PTS2MCI” in the SAVE AS box and tap the Save button. Delete: This will permanently remove the stored flight plan from the DeX memory. Done: Closes the flight plan screen and returns to the map with any changes made in this screen implemented on the map. Flight Calculator Density Altitude: To figure the Density Altitude, type in the Outside Air Temperature in Celsius (OAT). Use the slide bar underneath the text box to get close and then finetune it with the arrows on either side of the text box. When a temperature is entered, the deviation from ISA is computed and saved. If you re-enter this screen later in the flight, the temperature value will be remembered and filled in for you. Tap the Density ALT button, and it will be displayed in the gray box above the button. True Airspeed: Enter the Indicated Air Speed (IAS) in the text box in knots. Use the slide bar underneath the text box for a general number, and fine-tune it with the arrows on either side of the text box Tap the TAS button, and it will be displayed in the gray box above the button. Winds Aloft: Enter the Magnetic heading of the aircraft in the box shown. The GPS reported ground track is shown in the Track box. Tapping WINDS will cause the actual winds aloft to be calculated and displayed. This step assumes that the altitude, temperature, and airspeed have already been computed. To have a visual reminder of the wind data just entered, tap Show Vector. To hide the wind vector, go to the Flight Plan screen and tap WINDS > HIDE VECTOR. DeX Operations Manual V. 2.1 Page 11 Emergency Mode This button provides a quick way to set up a flight plan to a nearby airport, with glide prediction graphically presented. It is intended to be used in the event of an engine failure / emergency landing scenario. Tapping this button on the toolbar causes several things to happen at once. The Emergency view is automatically selected. This allows the user to customize the emergency landing screen features to their needs. The aircraft position is shifted to the center of the map screen, and the map zoom is automatically set to show all airports within gliding range on the screen. This glide range calculation is based on the glide performance of the aircraft profile, if no glide performance is set up it assumes 10:1 glide ratio. The message “EMERGENCY LANDING – TOUCH AN AIRPORT also appears. A single tap near any airport on the screen will replace the current flight plan with a new flight plan from the current aircraft location and altitude to the selected airport using the field elevation as the “VNAV target altitude”. A flight plan course line will project from the aircraft position to the airport selected and a VNAV target arc will appear in front of the aircraft on the map screen that indicates the estimated range at which the aircraft will reach field elevation. Hopefully this arc will settle beyond the field selected, indicating that the aircraft has enough altitude to reach the intended landing location. Since the VNAV calculations are based on actual GPS rate of descent and GPS groundspeed, the target arc is compensated for headwinds or tailwinds, as well as for current aircraft configuration. If you lower the landing gear the arc will move closer to the aircraft as the drag increases. The arc is averaged, based on many dynamic variables and may move around somewhat -- however in an actual emergency if it consistently falls short of the target airport runway then you will likely NOT reach the field at the current glide speed and configuration. To cancel E-mode, Tap on the Cancel Emergency Mode icon. The previous view settings and previous zoom range will be restored. The flight plan will remain direct to the airport selected during emergency mode. Personal Digital Copilot® This function allows the DeX to act as a personal flight management system by reminding the pilot to perform critical steps such as lowering the landing gear or turning on oxygen. When activated, a red or blue reminder will appear on the screen. These reminders will automatically vanish after a few seconds or after they are tapped. Additionally, you can also choose to have the DEX’s audio speaker sound an alert when the reminders pop up. Check the associated box to turn on the alarm function. DeX Operations Manual V. 2.1 Page 12 Switch Fuel Tanks: This reminds you to switch the fuel tanks. You set the time interval between switch tank reminders in the text box. Check Fuel Pump: This reminds you to check the fuel pump as you pass through 1000' AGL. Check Landing Gear: This reminds you to check the landing gear when the airplane passes through 600' AGL. Begin Descent: This reminds you when the required rate of descent to reach pattern altitude by the time you reach your destination is 500 feet per minute. Obstacle Ahead Warning: Alerts you to the presence of an obstacle that is within 500' of your GPS altitude and too close to the aircraft’s projected ground track. The warning distance is based on groundspeed. At slower airspeeds, the warning happens very near the tower; at faster speeds, it happens farther away from the threat. Spiral Dive Warning: Alerts you to an excessive rate of turn (change in track) coupled with an excessive descent rate. This combination could signal the start of a spiral dive. Oxygen Warning: Reminds you to check the oxygen system as the aircraft climbs or descends through 12,000 feet MSL. Views Allows the modification and saving of map preferences. Rather than making frequent and repetitive map display settings, you can save customized map views for specific flight needs and save them under any name for rapid recall. For example, you could save a map view for VFR Day Operations with terrain and special use airspace turned off, but weather data, airways and fixes turned on. By saving this configuration as VFR any time you select 1)VFR the preset display settings take place. You may save up to 6 different View configuration pre-sets. View 6 is reserved for Emergency Mode and the settings automatically take place when you enter Emergency Mode. To modify and save a map view: 1. Tap View Settings button, or press the >View menu and tap >View Settings item from the menu list. 2. Using the Navaid, Airport, Airspace, Geography, Format, Waypoint, and XM WX tabs, set the display features the way you want them to appear. 3. Tap the View Storage Tab. If you wish to give the map view a special name (such as IFR with WX or VFR Day) then type this name into the View Name box. Then choose either Save to Current View or Save to Different View (other than the one currently displayed next to Current View) Select which View # to assign to this configuration (View 1-5). NOTE: You should set up View 6 with the feature selections you wish to see in the Emergency Mode. DeX Operations Manual V. 2.1 Page 13 What is saved in a view? All of the information in the View Settings screens with the exception of the FULL HSI setting. Any weather display selections (show / hide NEXRAD, Metars, etc and Wind vector) What is NOT saved in a view? The zoom range (unless specified in Format>Save Current map Range with View) Aircraft profile information Software settings NOT related to the graphical display of the screen The status of the Full HSI as well as the virtual ILS and flight plan information Flight Numbers, PRESET SAMPLE VIEWS These views are preset by the factory and are a good starting point. All of these views can be customized and renamed according to the user’s preferences and flying needs. 1. VFR- This is a “sectional” looking display with shaded terrain, roads, lakes, airports, towers, and SUA’s enabled 2. TERRAIN- This is the VFR view with color coded terrain warnings and elevation values added 3. IFR- This is an “enroute chart” looking view. SUAs and class B/C/D airspace are suppressed, as is terrain. Holds and airways MEAs are added in. 4. Approach- IFR view with approach waypoints added in 5. Weather- The IFR view with weather enabled (weather systems only) 6. Emergency- A simple sparse view with Cones of Safety, DME to airport, compass rose display and terrain turned on. No SUAs or airspace information will be displayed If the UltraTAWS Expansion Pack was purchased with the DeX, View1 and View 3 are named MaxNAV, and IFR Enroute respectively and contain the actual Sectional chart and IFR Low Enroute chart imagery which can be overlaid with any of the Anywhere Map standard mapping items. If private airports are enabled in E-VIEW, when you tap on the screen to select an emergency landing field, private airports can be selected, if they are not selected to be displayed then only public airports can be selected. DeX Operations Manual V. 2.1 Page 14 View Settings Screen Pages The various screens of the view settings tool allow the user to configure what map elements are shown. Note that most map elements will automatically vanish as the map range is increased, to manage map clutter. Enabled features may not show at all zoom ranges, in deference to de-cluttering considerations. Use the View Settings button or the >Settings >View Settings menu to access the view settings tool as follows. : This tab shows all of the Aviation navigation features and aides that can be displayed. VORs and NDBs: May be shown with or without the Compass Roses and frequencies. Fixes: Show Fixes will enable normal enroute fixes. Check the boxes to show Terminal fixes and fix names. Airways: The airways may be displayed with and without the number and the MEA shown. Holds: Allows the holding patterns to be shown. Auto Size adjusts the size of the hold based on your ground speed to insure that the pattern is always drawn with one-minute legs. User Waypoints: All saved User waypoints will be shown. : Airport tab shows all of the airport information that can be displayed on the map such as elevation, frequencies, runway length, Taxi Express diagrams, textual weather, remarks, FBO services, and virtual approaches. Identifier: Displays airport identifier. Distance To: Displays distance from your current position to the airport. Enable Auto Virtual ILS: Activates the Virtual ILS “feather” when the aircraft is within 25 miles of the destination airport. Also enables the Glide Slope Indicator on the moving map screen. Marker Beacon: Displays marker beacons as circles. Localizers: Displays Localizer feather symbols for applicable runways. DeX Operations Manual V. 2.1 Page 15 ATIS and Tower: Displays Control Tower and ATIS frequencies beside the airport at close zoom levels (approx 25NM). Elevation: Displays airport elevation above sea level. Runway Length: Displays the length of the longest runway (in hundreds) next to the airport on the map, L55 means this airport has at least one 5500 foot runway. This data is only shown when zoomed in closer than 25 NM. Tower Frequency: Displays controlled airfields’ tower radio frequency on the moving map screen at zoom levels below 30nm. Hide Small: Hides non-towered airports when zoom level (radius) is > 100 nm. Private Airports: Displays Private Airports also and can be displayed as a dot only. Show Cones of Safety: Select to enable the Cones of Safety® feature. Around each airport there is a region of airspace from which an airplane can safely glide to a landing. We refer to this space as the Cone of Safety. The Cones of Safety are represented by a thin green circle around each airport. In the night mode, the Cones stand out against the dark background. The circle’s diameter varies with the aircrafts altitude above the field and with the glide performance value taken from the aircraft settings screen. If you want to display Cones of Safety for non-paved runways also, select that feature. To reduce screen clutter, you can also select to automatically hide the Cones at GPS altitudes greater than 10,000 feet AGL. Remember, the Cones of Safety are NOT compensated for winds at any altitude. They are merely assistance to making a good forced landing decision but the pilot MUST account for wind in the final airport decision. To set up the Cones of Safety, you must first go to >Settings >Aircraft Settings or select the Aircraft Settings button from the Flight Plan Manifest screen and enter the glide ratio of the aircraft into the appropriate boxes. You can usually find this information in the POH. Once you have entered this information in the appropriate boxes, then go toAirport Tab. Select the Show Cones of Safety button. The cones will now be shown around all airports. If they are not, it is because the aircraft is sitting on the ground or, if no GPS is attached, the map “thinks” the aircraft’s altitude is below that where the CoS are visible. DeX Operations Manual V. 2.1 Page 16 To check this go back to the Aircraft Settings screen and set the Cruise Altitude to some value above 3000' for example. The green CoS circles should now show on the map around each airport. Note that one can also go to the >Settings >SIM MODE settings screen and enter the altitude and heading and groundspeed and press Start to see how the Cones of Safety will appear in flight. Caution: As the Cones of Safety do not compensate for wind, it is wise to stay away from the down-wind side of the cone. The Cone converges on a “reference point” of the airport, generally the center of the airfield. The Cones of Safety® feature is protected under US Patent number 6,804,585 and other US patents. Based on the user input, in the above example the pilot can choose between KPSP or KUDD because the aircraft is within the green circle for both of those airports. You should not consider landing at KBNG because it is out of the calculated Glide range. For more information please see the CONES OF SAFETY section on page 38. : Controls the display of airspace information. In the upper area select which Class B/C/D Airspace to show. In the lower box, the Special Use Airspace is listed. These include MOA, Restricted, Alert Areas, and SFR’s (Special Flight Rules) /TFR’s (Temporary Flight Restrictions). Checking “Show Altitudes” box will show the SUA’s altitude of operation. You can also see more information about the SUA if you doubletap the center point of the airspace (at wider view levels there is a small dot there). This will show you the airspace, altitude limits, last regular hours of operation, and even the controlling facility frequency. : Display options regarding geographic features and terrain. Water, Highways, Cities, Rivers: Display water features, highways, cities, as well as their names. State Lines: Displays the US State line boundaries. Obstacles: Select to display radio towers and obstacles as low as 200' AGL with the optional data labels. DeX Operations Manual V. 2.1 Page 17 Hide Benign Obstacles: Select to hide Obstacles that range from 200' to 400' AGL. Nuclear Power Plants, Sport Stadiums: You can also choose to display loitersensitive objects such as stadiums and nuclear power plants, and may optionally display the 3 nautical mile veil that surrounds them. Urban Areas: Allows the user to see the outer boundaries of urban areas drawn in yellow as on a sectional chart. APP Freq Tags: Data Tags are approach/departure frequency tags that appear around some of the higher density airspace. When zoomed out, there is a small green dot on which you can tap to see the frequency. When zoomed in, the dot is replaced with a rectangular box in which the frequency is displayed. MaxNav Sectionals: Displays US Sectional Chart and may warn the user to disable duplicate items that the user may have also checked for display such as, Cities, Highways, Terrain, water etc. for the clearest view of the sectional possible. Low Enroute Charts: Displays US IFR Low Enroute Charts and may warn the user to disable duplicate items that the user may have also checked for display such as, Cities, Highways, Terrain, water etc. for the clearest view of the enroute chart possible. High Enroute Charts: Displays US High Altitude charts with Jet Airways. and may warn the user to disable duplicate items that the user may have also checked for display such as, Cities, Highways, Terrain, water etc. for the clearest view of the sectional possible. Terrain Elevations: Choose whether to display terrain. Terrain is depicted in colored tiles that denote elevation of a point within that tile. The size of each tile is 1 mile square (high resolution at close zoom levels). If the MaxNav™ upgrade has been purchased, the terrain tiles are 180 meters square, resulting in dramatically sharper terrain rendition. Terrain resolution increases as the zoom level is changed from wide to close. This is done to keep the map performance optimized. Terrain color is also adjustable. You can choose from light, medium, or dark. In the dark setting, lower terrain altitude will be dark green. In the light setting the low altitude terrain will be very light green. Terrain color shading transitions from green to orange to brown at higher altitudes to finally white, making the mountain tops appear white. You may wish to use a lighter terrain color during the daylight hours if you are flying in an area with low elevations to improve contrast. In higher elevations it is often better to use a darker color. DeX Operations Manual V. 2.1 Page 18 The Terrain Settings group selects additional options: Red Above: In this mode the terrain that is above and near your GPS altitude is shown in 3 special colors: Terrain 1000' to 500' below the aircraft is shown in YELLOW Terrain 500' to 200' below the aircraft is shown in ORANGE Terrain less than 200' below and all terrain above the aircraft is shown in RED Terrain that is more than 1000' below the aircraft is rendered in normal colors. Above Alt: This turns on terrain mapping only when the terrain is above your current GPS altitude. This can be useful for reducing screen clutter in mountainous areas while still seeing terrain of particular concern (above you). This mode can be used in conjunction with RED ABOVE to include the “nearby” terrain (1000' to 200' below the aircraft). Show Elevation: Turns on the display of the highest terrain value in each terrain tile. This is the highest elevation within that tile (in hundreds of feet). This is very handy for estimating the height of terrain ahead. Lat/Long Grid: Enables the drawing of Latitude and Longitude grid lines on the map. : Allows you to set various ancillary display features that either enhance the map, the data displayed, or the navigation capability. GPS Altitude: Displays GPS derived altitude in the upper right corner. Note that GPS altitude is actually very close to the correct geometric altitude, but it may vary significantly from the altitude indicated by a pressure altitude, depending upon the altitude AGL and the local deviation from ISA temperature. Temperatures +20C above ISA standard will cause the DeX Operations Manual V. 2.1 Page 19 pressure altimeter of the aircraft to read approximately 200 feet low for each 5000 feet AGL. Cross Track Error: The course deviation is shown on the map in the lower screen center in tenths of a mile. An arrow shows you in which direction your course is from your current position. VNAV: This displays required rate of descent data in the lower right corner of the map when your descent to the destination airport pattern altitude (assuming 1000' PA) is 250 ft. per minute or greater. This box must also be checked to show VNAV information in flight plans. For more information see VNAV Concepts on page 37. Lat/Long: Your current position in latitude/longitude is shown in the bottom left corner of the map. Track History: This feature leaves breadcrumbs (small dots) along the path flown. Bold Course Line: This function places a heavy black line on either side of the flight plan course line in normal flight. The course line is green for the active leg and aqua for all other legs of the flight plan. Statute Miles: This toggles all map distance data between statute miles and nautical miles, as well as all velocity data from KPH to MPH. North-Up Mode: Plane will appear in the center of the screen, and it will rotate instead of the map. Map screen will always have North at the top of the screen. Plane will have swept back wings as a visual reminder that you are in North Up mode. Day Mode: Toggles between the day color set (light background) and the night color set (black background). Turn Coord: Displays a circular Rate of Turn instrument in the lower left corner of the map. The rate of turn, in degrees per minute, is shown digitally. Rate/Climb: Displays a Rate of Climb/Descent indicator in the lower right corner of the map. Tripometer: Displays a Trip meter in the lower left corner that is the total distance flown since last reset. To reset the trip odometer, tap Tools > Odometer/Trip meter> Reset. Show Map Range: This shows which range is being displayed on the map. It displays the distance from the aircraft icon to the EFIS arc/circle. It immediately sets context for the distance between you and items being displayed on the map such as towers, airports, airspace, and especially weather. The range in nautical miles (or statute if so set) is shown in the upper left corner of the map under the flight timer. If this box is unchecked, the range value will display briefly when changing zoom ranges and will automatically hide after about five seconds to save screen real-estate. Full HSI: This will enable the HSI function to show on the screen and un-checking it will remove the HSI display leaving only the EFIS or compass rose. EFIS ARC: This option places the aircraft icon towards the bottom of the map. Unchecked this option places the aircraft icon in the middle of the moving map screen. DeX Operations Manual V. 2.1 Page 20 Compass Rose: This button will add or remove the compass rose from the screen. Show the Arc: This will draw an arc to connect the “tick” marks of the compass rose. If unchecked, the tick marks for 10 degree increments are drawn but the arc is not shown. Save Current Map Range with View: Selecting this option will save the zoom level/range that the map is being viewed at when the Save Changes to Current View is activated. Returning to a previously saved view with this option utilized will recall not only the selected display options, but also the zoom/range at which it was saved. : This tab allows you to control how waypoints are used in the creation of flight plans and also during the flight. Auto Start FP at Nearby Airport: If this box is unchecked, when you select an airport and tap FLY TO, you will be asked “Start at airport?” the current position is within approximately 3 miles of an airport. If you tap NO here, the flight plan will originate at the current GPS position on the map. If you tap YES here, the flight plan starting point will be at the “reference point” of the nearby airport. If checked it will be assumed that your answer is always YES to this question. Show Corridors: In a flight plan, waypoints designate course changes as you progress. Changing course as each waypoint is reached is usually done after you cross the waypoint (navaid, fix, etc.), which also usually results in your being off course for the next leg and having to return to the line as you start down the next leg. Show Next Waypoint as Destination: Displays the next waypoint in a flight plan at top center of the screen. The waypoint can be an airport, fix, navaid or user waypoint. If unchecked the final waypoint of the flight plan is shown at the top of the screen. Many pilots want to smooth the corner so they turn before reaching the waypoint, thereby making a nice transition from one leg to the next. However, in doing so they actually do not fly directly over the waypoint. Therefore Anywhere Map needs to know whether you just missed it (and you intend to return to it) or if you intend for the next leg to become active. The corridors have been created to allow "corner cutting" so that you can smooth the corners in your flight and still have the flight plan logic follow your progress. The corridors are depicted as gray or red lines (red if the waypoint is set as a holding waypoint) that bisect the angle made by the legs that are inbound and outbound from the waypoint. The length of the line is based on the distance between waypoints and the DeX Operations Manual V. 2.1 Page 21 angle made by the two legs. As long as you cross the corridor line, the waypoint will be considered "crossed" and the next leg will become active. Annotate Waypoints: When enabled, the waypoints you are using in the flight plan will have data tags on them even if the names of the waypoint type (VOR, NDB, Fixes, etc.) are turned off in the settings. : The Weather tab in the view settings screen allows the weather products to be selected for display or hidden from view. It does not control reception of the weather data, only the display. In addition, by setting weather display features and then saving the view, the view you are modifying will always have those weather display settings associated with it until further modified and saved. This way, you can have just METARs turned on in one view, and the full complement of weather features turned on in another view. The optional XMWX upgrade can be purchased from Control Vision and added to any DEX. It includes a WX Worx weather data receiver, and a software upgrade to the DEX. You must also purchase a subscription to XM Satellite Weather for the data broadcast to be decoded by your receiver. For much more information about weather, see the XMWX section on page 40. : Allows you to save the settings under a default or custom name. View Name: The names of your views can be modified to fit your individual setup. Simply tap in the box and delete what is there, then type in a new name. Save to Current View: Tapping this button will save all the selections on all tabs of the View Settings Screens to the View Name listed above. Save to a Different View: Tapping this button will save all the selections on all tabs of the View Settings Screens to a view other than the one listed above. Zoom Options The DeX utilizes a multi-touch capacitive touch screen. Use standard ‘pinch’ gestures to zoom in and out easily. Zooming always centers around the airplane icon. In addition, the the "RA xxNM: area of the flight numbers in the top left corner may be tapped to temporarily display a zoom screen and allow you to pick from several map ranges or use the dynamic finger adjustment tool. DeX Operations Manual V. 2.1 Page 22 Tapping will increase the range on the map screen just enough to show your entire flight plan course line all on one screen. Also handy for viewing any possible weather threats and MOA/Restricted or Class airspace you may be on course for. This feature also puts the map into Preview Mode (disables GPS temporarily). Tap Restore Map to return to the main map mode with actual GPS position displayed. After enabling zoom to entire flight plan, you can quickly and easily zoom in on any area of interest by simply pressing down and dragging diagonally to draw a box on the screen. When you’re finished, tap Restore Map in the top right corner and the map screen will return with the zoom level that you left it at (before zooming to entire flight plan) and the GPS tracking will resume. Pressing the rocker switch up or down will adjust your zoom range on the map also. Tools Tapping the Tools menu button at the top of the main map screen will give the user the following options: Direct To: Centers the CDI/zeros the cross track error, and gives a direct course line to the waypoint of choice. Advance to Next Waypoint: Makes the next leg in the flight plan active, but does not center the CDI. Airport Search: Allows the user to lookup airports using identifiers, or by the name of the city or airport. Navaid Search: Allows the user to lookup navaids using identifiers, or by the name. User Waypoints: This area is used to create, modify and delete User Waypoints. A maximum of 1,000 user waypoints is allowed. Delete WP: To delete a waypoint, first select the waypoint in the Select user waypoint screen. Tap the Delete WP button. A screen will pop up asking you Erase user waypoint? Tap Yes, this will bring up the Create/Edit User Waypoint screen with all of the boxes blank. Tap OK, this will bring you to the main map screen. The waypoint has been deleted. If waypoint cannot be deleted, make sure it is not in use in a flight plan on the screen. Import: Anywhere Map will accept other formats of waypoint files in a future release. Purge FPs: To delete all of the FPxxx waypoints in the system, simply tap the Purge FPxxx button. These waypoints are created automatically by the flight plan engine in DeX Operations Manual V. 2.1 Page 23 the software when the user uses the Direct To feature; it is the point at which you are at the time you say Direct To. Make New: Tapping the Make New button on the Select User Waypoint screen will bring up the Create/Edit User Waypoint screen. To create a waypoint at your current location, simply tap CURRENT LOC. This will place the latitude and longitude in the appropriate boxes on the screen. You can also manually enter the desired Lat/Long so the point can actually be saved and added to your flight plan before you arrive at that point. To name the waypoint, tap in the Name box, and enter a name in the box. Delete All: Tapping the Delete All button will delete ALL of the user waypoints in Anywhere Map. When this button is pushed, a box comes up that says Erase ALL user waypoints? Tapping Yes on this screen will erase all user waypoints. Tapping No on this screen will take you back to the Select User Waypoint screen. The changes will take place when you tap OK on the Select User Waypoint screen and return to the Main Map screen. Edit WP: By tapping the Edit WP button on the Select User Waypoint screen, you may edit user waypoints in Anywhere Map. First select the waypoint you want to edit in the Waypoint Name box, tap Edit WP. This will bring up the Create/Edit User Waypoint screen. You may change any of the information in the text fields, including Name, Comment, Latitude, Longitude, Range and Radial. Close: Close will take you back to the map screen. HSI Settings: Allows you to use the HSI for guidance to Airports, navaids, or along your flight plan segments. Even without a flight plan you can use the HSI to guide you to an airport or Navaid along a specific radial that you set. Universal Finder: Use the Universal Finder button to enter “target”. Once a “target” (airport or navaid) has been selected, the COURSE and AUTO buttons are enabled. Tap COURSE to pop up a screen that allows the HSI needle course setting to be entered. Tap AUTO to set the course to the radial that the aircraft is currently on relative to the target. Hide: Hide will cancel the display of the HSI needles. Slave to Flight Plan: Will cause the HSI course arrow to automatically align with the flight plan segments. DeX Operations Manual V. 2.1 Page 24 Tapping Direct To Finder pops up the Direct To Finder window so you can search for any type of navigation point to use for the HSI. Sensitivity: The Sensitivity selection sets the value of “one dot” of needle deflection on the HSI. Example: You may be approaching an airport from the west but want to intercept and track inbound to it on the 220 (SW) degree radial, just as if there were a VOR on the field. From the Setup HSI screen, tap the Universal Finder button to select the target airport. Next, tap the Course button to select the 220 radial using the slider and/or the scroll wheel on the side of the unit for fine adjustment. Tapping OK, then DONE will return you to the map screen with a configured HSI shown. For VORs and NDBs you can also set a specific radial to track to/from the Navaid by double-tapping the Navaid on the map screen and then checking the Enable box and specifying the radial/course to use. RMI Setup: From the HSI settings screen tap the Universal Finder button to select the target for the RMI needle to track and tap OK. Tap Done to return to the moving map screen with the blue configured RMI needle shown. The RMI target and distance are displayed in the lower left corner of the moving map screen. Sim Mode Settings: Sim Mode allows you to ‘fly’ a flight plan from your desk or couch for practice. Tapping this button will bring you to a new screen where you can enter your desired simulation altitude, heading, and speed. Choose Start to begin, or tap Disable to turn Sim Mode off. Weight and Balance: This section makes it easy to compute the loading of the aircraft to insure that the weight and balance is acceptable. The first time this function is used for a particular aircraft type, uncheck the Lock Settings box so arm values can be entered. Next, using the Pilot’s Operating Handbook plus any supplemental weight information from the aircraft’s Weight & Balance certificate, fill in the Arm value for each applicable part of your airplane. Enter the aircraft empty weight and moment-arm from the aircraft documents in the “Empty AC” boxes. After filling in the fields, tap Lock Settings again to prevent these values from being accidentally changed. DeX Operations Manual V. 2.1 Page 25 If the aircraft’s basic empty weight includes a full load of oil, leave the OIL field blank. Some older aircraft refer to Licensed Empty Weight that excludes drainable oil. In this case, it must be added in the Oil Quarts field. Oil may be entered in quarts, or in lbs by selecting the Type column to "O" or "W" respectively. Fuel may be entered in Gallons or pounds, the unit is selected again in the Type column. "A" equals Avgas, "J" equals Jet-A, and "W" equals weight. Once the empty weight and arm values are set up, simply enter the variable weights before each flight – fuel, front and rear seat passengers, baggage, etc. The weights will be totaled along with the moment-arms, and the loaded CG will be shown in inches, along with the loaded weight and moment arm values. The loaded values can be easily referenced against the POH loading chart to see if the aircraft is properly loaded. Tap Calculate at any time to get total Weight, Moment and Center of Gravity arm Note: The weight and balance settings are saved as part of the aircraft profile that is created and saved in Aircraft Settings. So when setting up an aircraft (especially if using Anywhere Map in more than one airplane) make sure the weight and balance data for the airplane is set up BEFORE you save the aircraft profile, or be sure to save the aircraft profile again after setting up the weight and balance data. Settings Menus: Aircraft Settings: An aircraft profile saves all of the settings that are tied to a particular aircraft in a single file that can be loaded and saved to the DEX. This is very convenient for the pilot who flies multiple aircraft. DeX Operations Manual V. 2.1 Page 26 What is saved in an Aircraft Profile? Information on the aircraft performance including Fuel Quantity and burn rate, typical cruising speed and altitude, glide range, etc. AND All of the information on the Weight and Balance Screen: To create an aircraft profile, set up the values in the Aircraft settings screen, as well as the weight and balance screen as desired, and tap the SAVE button in the aircraft settings screen. This will pop up a screen that allows you to name the aircraft settings file. In most cases the default name, which will be a combination of the aircraft make and model and tail number will suffice. To load an aircraft profile, go to the Aircraft settings screen, and tap the LOAD button. This will pop up a list of stored aircraft profiles on the system. Double tap on any entry or tap once and tap OK to select it. These parameters are used for flight plans, Cones of Safety, and flight timer operation. In addition, when you save the profile, the weight and balance data currently in use are also saved under this aircraft profile making them easily usable on subsequent flights. Fuel onboard: This is the total usable fuel on board in gallons. Cruise GPH: This is the average fuel burn in gallons per hour for the enroute portion of the flight other than the first hour. 1st Hour GPH: This is the first hour fuel burn which is normally a bit higher than cruise due to the high power settings associated with take off and climb. Cruise Speed: This is the normal cruise speed in knots. Cruise Altitude: Cruise Altitude is the altitude used for Sim Mode operations and for displaying Cones of Safety when a GPS is not connected. This is overridden by the GPS altitude when in flight. Flt Timer Spd: This is the speed at which you want the flight timer to automatically start. Usually this is set at a speed faster than taxiing, but less than rotation speed so the timer starts on the takeoff roll and stops on the landing rollout. Glide Range: These parameters set the Cones of Safety calculation. By setting the glide ratio, the Cones of Safety can be sized properly. DeX Operations Manual V. 2.1 Page 27 Glide Altitude: The altitude from which the glide range can be achieved. Load, Save, Delete: These allow the aircraft profile to be saved (takes you to the profile list screen), loaded (also goes to the profile list screen) from the existing list, and deleted from the system. Weight and balance data is saved with the profile. GPS Settings: Allows you to configure several parameters pertinent to the GPS. The factory settings are highly recommended for optimal performance. Flight Timer Min Speed: This screen also allows you to set the minimum speed that you want the Flight Timer to start. The Airport Information Screen Most navigational features on the map have more information associated with them. This additional information is shown on a “Information Screen”. Examples of features with information screens are Airports, Localizers, VOR’s, NDB’s, Fixes, SUA’s, and User Waypoints. Double tapping on an airport or searching by identifier through Direct To Finder will open up the Airport Data Screen. This screen has 8 different tabs across the top which host a wealth of information about the facility. There are several buttons on the airport information screen that can be used. Wpt/Fly To: This button will insert the airport into the flight plan. If there is no flight plan, a user waypoint will be used as the starting point and this waypoint will be added as the endpoint of a simple flight plan. If there is already a flight plan, tapping this button will cause the software to pop up the which gives several options. See Use Waypoint Screen on page 36. Jump To: Directs Anywhere Map to jump to the item you have selected. If you have a GPS connected, the map will change to “Preview Mode” when you jump because the map is no longer showing your current GPS position. To cancel and return to your current position on the map, simply tap Restore Position in the upper right corner of the map. Diagram button will open the Taxi Express, GPS enabled diagram of the airfield. See Using Taxi Express section page 33 for more about this powerful safety feature. DeX Operations Manual V. 2.1 Page 28 Airport information screen TABS. The small square taps across the top of the screen allow access to several pages of information about the airport. The tabs have been designed to be easily tappable by the finger. Touch the first tab provides runway data, field elevation, range/bearing from your current GPS position, and a simple diagram of the runways. If you have a flight plan to or from the airport, you will see the green flight plan line over the diagram. Tapping the red button on the diagram will extend the centerlines of the runways on the map screen. The second tab provides the appropriate COM radio frequencies, AWOS phone number, and Localizer frequencies (if available) for the selected airport. DeX Operations Manual V. 2.1 Page 29 The third tab contains airport remarks from the FAA database that could prove useful to the pilot. The fourth tab contains FBO facility information from 100LL.com. DeX Operations Manual V. 2.1 Page 30 The fifth tab contains current fuel pricing information for each fuel providing FBO on the field. The fuel prices and FBO facility information are updated via the Update Center utility. See Updating the DEX section for more information. The sixth tab displays local restaurant and hotel information. Most facilities listed are located either on the field, or within a few miles. DeX Operations Manual V. 2.1 Page 31 The seventh tab offers a list of Virtual Approach Procedures. These are a top-down view of the approach path with automatic VNAV assistance. These are NOT part 91 approved plates, but instead act as an excellent situational awareness tool on arrival to the selected airport even if the field doesn’t offer any actual published approach procedures. You can select “ENABLE AUTO VIRTUAL ILS” in the Airport tab of the View Settings screen to allow the software to automatically pop up a glideslope for any runway at your destination airport. See Virtual ILS Approaches section on page 36. The eighth and final tab displays the raw/undecoded METAR and TAF delivered through the XM Satellite Weather broadcast, along with the decoded METAR and graphical TAF information. This screen can also be populated via the Anywhere Link data downloads under the >WX/Download menu >Download WX option. To use Anywhere Link, you must have the DeX connected to the internet. DeX Operations Manual V. 2.1 Page 32 Airport Taxi Diagrams – Taxi Express™ Taxi-Express™ displays an aircraft’s GPS position on an airport diagram during taxi operations. This brings pilots an added measure of safety at airports they are unfamiliar with or during night operations. The Taxi-Express chart lets you monitor ground position while communicating with Tower and Ground as well as other aircraft. Taxi-Express charts are derived from FAA Terminal Procedures and are built into the DEX. Automatic Airport Diagram Prompting If the destination airport has an airport diagram, AND the aircraft lands at the destination airport, AND the flight timer stops running, the map will automatically pop up a message “AIRPORT DIAGRAM” at the bottom center of the screen. Tapping this box will automatically pop up the airport diagram. This is very convenient, as this will normally happen automatically as you turn off the runway at a busy airport. To Manually select an airport diagram Select an airport by double tapping or using the Direct-To Finder Press the DIAGRAM button in the airport information screen. The Taxi-Express diagram appears and will show your live GPS position over it if you’re near the field. To calibrate the diagram if calibration is missing or inaccurate Tap on the Caliper icon in the top toolbar Tap on the endpoint of of the runway specified at the top of the diagram screen. Tap on the opposite endpoint of the same runway as specified at the top of the diagram screen. The diagram is now calibrated and should display purple lines exactly over the runways. To close the airport diagram and return to the Anywhere Map screen Tap the red X in the upper right hand corner of the screen. DeX Operations Manual V. 2.1 Page 33 Creating Flight Plans There are many different ways to create a flight plan using Anywhere Map. This section will show several of these methods. Most of these methods can be combined to create and/or modify existing flight plans. By Selecting Waypoints To create a flight plan to any destination, simply select the destination waypoint. There are several ways to select a destination waypoint. 1. Map based flight plan: If the waypoint icon you wish to use is visible on the map screen, simply pick the destination from the screen by double tapping on it and tap the Wpt/Fly To button on the information screen that appears. 2. Using an off-screen destination. Tap the Direct-To Finder button on the side toolbar and use this tool to look up a waypoint. See the Direct-To Finder section on page 7. 3. Tap USE WAYPOINT in the finder screen to MODIFY an existing flight plan with this waypoint. Tap DIRECT TO in the finder screen to clear the existing flight plan (if any) and create a “GPS Direct” flight plan from the current location to the selected waypoint. Note that you can also tap the DETAILED INFO button in this screen and then tap the Wpt/Fly To button in the information screen that follows. 4. Using a NEARBY airport or navaid. Tap the Nearby Anything button and then tap the AIRPORT or NAVAID buttons. Double tap on any airport or navaid listed and tap the Wpt/Fly To button in the information screen that appears, then tap OK. In any of the above three cases, if a flight plan did not previously exist, pressing the WAYPOINT button will immediately create a ‘GPS Direct’ flight plan from the current map position to the selected location. IF a flight plan was active, the Use Waypoint screen will appear to ask the pilot how the waypoint is to be used in the flight plan. All of the above methods to create a flight plan will use the current map position as the flight plan Start Point. Normally the map position will be the GPS location. If another start point is desired, first select the start point (using the Direct To Finder or by double tapping the location on the map) and tap the JUMP TO button in the information screen to relocate the symbolic aircraft on the map to the desired location BEFORE selecting the destination waypoint. The Route Wizard is a quick and easy way to create a flight plan if the starting point and destination identifiers are known, along with any number of intermediate waypoints. Tap the Route Wizard button on the toolbar OR >Tools >Route Wizard and enter the starting airport identifier in the “From” box. The route wizard is the only place where you need to enter the ICAO prefix (“KOSH”, not “OSH”), as there is no other way for the system to know the ICAO region. Next, enter the airport identifier for the destination airport in the “To” box, again providing the ICAO prefix. Prefix all airport identifiers with a “K” if in the lower 48 United States, “C” for Canada, and “P” for DeX Operations Manual V. 2.1 Page 34 Alaska, for example. Use the “VIA” box to enter any intermediate waypoints that are desired, separating each entry with a space. VOR/NDB’s must be entered as 3 letters and fixes must be entered as 5 letters. Tap the OK button, and you will be returned to the Flight Plan Manifest screen with the selected route displayed. The flight plan can now be modified if needed. Here is an example of a flight from Johnson County Executive to Atkinson Municipal. Via CNU vortac: The Rubber Band Flight Planning tool is fast, easy and convenient. This tool allows ‘drag and drop’ editing of the course line, thereby creating the flight plan. If a flight plan “control point” is dragged and dropped near an airport, navaid, or fix, this waypoint will be used; if the control point is dropped in a blank area of the map, a userwaypoint is created, allowing completely arbitrary course routing, independent of normal waypoints. To use this feature, select the Rubber Band mode icon from the toolbar. In this mode a red circle appears on each waypoint in the existing flight plan, and a blue circle over the midpoints of each leg. The blue circles allow the insertion of a new waypoint by dragging the blue circle to a new location (which turns it red). The red circles (existing waypoints) can also be ‘dragged and dropped’ to change existing waypoints/destination on the fly. If no flight plan is active when the RUBBER BAND button is pressed, a single RED circle will appear under the symbolic airplane. Simply drag the red circle until it is near any DeX Operations Manual V. 2.1 Page 35 on screen navigable feature and release the touch screen. In Rubber band mode, it is possible to move the flight plan starting point to any arbitrary location by simply dragging it and dropping it. When dragging, press and hold in the circle briefly then drag slowly. The Use Waypoint Screen If a flight plan already exists and a waypoint is selected, a new menu screen will appear to clarify how the waypoint is integrated into the existing flight plan. New Flight Plan- This option will erase any current flight plan and go ‘GPS Direct-TO’ to the selected item. Next Waypoint- This option will add the selected item before all other waypoints chronologically, making it your next plotted waypoint. Waypoint- This option will automatically add the selected item into your existing flight plan in the position that Anywhere Map selects automatically. This method allows one to easily add waypoints to an already existing flight plan. This is the most common option in this screen. Destination- This option will add the selected item as the last waypoint in the existing flight plan, effectively changing the final destination to be the selected waypoint. Virtual ILS Approaches: A Virtual ILS approach simulates the localizer & glideslope of a standard ILS approach to any runway endpoint in the database. The VILS provides standard vertical guidance along a user definable glideslope, nominally 3 degrees, just like a standard ILS. The build in HSI also provides runway centerline alignment under most circumstances. WARNING: VILS procedures DO NOT necessarily provide terrain and/or obstacle clearance, and are not approved for IFR use. Not all runways have a clear approach path that will allow for a standard glideslope approach. DeX Operations Manual V. 2.1 Page 36 To activate a VILS procedure use the approach feather tab from the airport data screen (see page 31) of the desired destination airport and select the “VIRTUAL ILS” for the desired runway, then choose Activate Approach. VILS procedures can either operate in FIXED or VECTORS mode. Fixed mode will set up a flight plan to an initial approach fix (IAF) located 5 nautical miles out from the Final Approach fix, which is nominally 5 miles out. The aircraft will then be expected to fly to this fixed location, intercept the “virtual localizer” (extended runway centerline) and descend towards the runway, following the selected glideslope. Vectors mode sets up the flight plan to a “floating” IAF, located between 1 and 10 miles outbound from the FAF. This mode works much like being vectored to intercept the localizer. The course line is drawn from current location to the intercept point along the runway centerline, then along the centerline to the FAF, then along the centerline to the runway endpoint, with glideslope like guidance along the way. The approach setup screen allows one to vary the glideslope angle (3 degrees is the typical glideslope), and also allows one to vary the distance from the runway endpoint to the FAF. Think of the FAF as the outer marker. In a real ILS, one should be fully configured for landing at the FAF, and simply follow the glideslope / localizer to the runway endpoint in a stabilized approach from that point. Tap OK in this screen to create the VILS flight plan and enable the approach. To cancel the VILS, clear the flight plan using the flight plan screen. The easiest way to use the Virtual glideslope approach is to select “ENABLE AUTO VIRTUAL ILS” in the Airport tab of the View Settings screen. With this selected, the VILS for your destination airport will automatically be selected based on the runway you appear to be approaching. Note that the auto selection process “locks” at 3 miles distance from the airport, to prevent confusion at large airports with multiple runways. The rocker switch may be used to accurately choose the desired approach after a procedure is highlighted in the list box if using the unit in turbulence. VNAV Concepts The basic concept of VNAV is the TARGET ALTITUDE. Anywhere Map allows a target altitude to be assigned to any waypoint in a flight plan. If a target altitude is active for a waypoint, the software will compute the rate of climb or descent necessary to reach that altitude, based on the time-to-fix and altitude difference. When the next waypoint has a target altitude associated with it, the software will draw an up or down arrow next to the fix name at the top of the screen, indicating that a climb or descent is required. Tap >Windows >VNAV info to enable this powerful tool and the target rate of climb or descent will be shown in the lower right corner of the map screen. The value shown is not the current rate of climb/descent, but rather the rate of climb/descent NEEDED to reach the target altitude concurrently with reaching the fix. If the aircraft’s current rate of climb or descent is greater than 200 feet per minute, a VNAV target altitude arc will appear in front of the aircraft at the point in space where DeX Operations Manual V. 2.1 Page 37 the target altitude will be reached. This arc will span from about 20 degrees left to 20 degrees right of the aircraft. Note: The VNAV Arc is computed based on the running averages of many dynamic flight variables, so it will jump around a bit at first, but if the aircraft maintains a steady climb or descent, this arc will settle in to show clearly where the target altitude will be reached. To set up a VNAV target altitude, enter the Flight Plan Manifest screen. Next, tap once on the desired waypoint in the flight plan listing in this screen – this will highlight this leg of the flight plan. Then tap the VNAV button at the bottom of the screen to call up the TARGET ALTITUDE slider. Use the slider control and/or the scroll wheel on the side of the DEX to enter and ‘fine tune’ the target altitude. You may also tap in the altitude box and type in the altitude with the keyboard number pad if you wish. Tap OK to set the target altitude, or DISABLE VNAV to shut off VNAV coaching. Automatic VNAV: When you set up a flight plan to an airport, VNAV is automatically selected with a target altitude of the airport’s elevation plus 1000 feet. This will result in arriving at the airport at approximately pattern altitude. IMPORTANT: Remember that VNAV is always based on GPS ALTITUDE, it does not allow for any difference between GPS altitude and indicated altitude (which is what Air Traffic Control expects everyone to be using). Also VNAV only works on the NEXT waypoint in the flight plan. Thus if you have a target altitude to a distant waypoint, and an intermediate waypoint is inserted between the distant waypoint and the current position, VNAV coaching will not begin until the intermediate waypoint is passed. Cones of Safety® Around every airport there is a region of airspace, shaped like an inverted cone, we call the “Cone of Safety”. If the aircraft is inside of this cone, it could glide to the airport if the engine were to fail, assuming that the winds aloft were inconsequential. The cone gets larger as the altitude above the airport increases, and the radius of the cone gets smaller as the surface of the airport is approached. Anywhere Map shows the cross section of these cones at the current aircraft altitude, computing the altitude above the airport from the GPS derived altitude, and the airport elevation. These cross sections are shown on the map a light green circles around each airport. The higher the aircraft is above the airport, the larger the circle becomes. The Cone of Safety display on the map screen allows the pilot to easily assess the glidefriendliness of any flight by graphically showing the proportion of the flight path that is inside or outside of the cones. As the cruising altitude increases, the cones often grow DeX Operations Manual V. 2.1 Page 38 to overlap. By the time the aircraft is 10,000 feet AGL, there is extensive cone-of-safety overlap in most areas. In order for the cones of safety to work properly, the aircraft profile must have the glide range and glide distance parameters filled out. The glide range should be set to a distance in nautical miles, and the Glide Altitude should be set to an altitude in feet. Most Pilot Operating Handbooks have a simple chart in them, which show aircraft glide performance, with the altitude and glide range given in these units. If you know that your aircraft will glide 9 nautical miles when it is 6000 feet (that’s one nautical mile) high, enter 9 and 6000 respectively in these boxes. This is typical of most single engine aircraft. Also in order to see the cones display, cones must be enabled in the view settings, airport tab, and the DEX must think it is at a particular altitude. To preview the Cones of Safety display, you can put the DEX in Sim Mode at a particular altitude. View Settings And System Performance The rate at which the DEX refreshes the screen and responds to user input depends to a large degree on the display complexity. Ideally the DEX updates the screen once per second, however this rate is dependant on the local airspace complexity, the zoom range, and the number and type of features that are enabled for the current view. Some map features are slower to draw than others. If the map seems to be drawing slowly, consider turning off some of the following features (if they are on) or consider zooming in to a smaller range. Winds aloft vectors, State Lines, Highways, Lakes, urban area outlines, SFR’s, and Class B airspace boundaries can be very busy in some circumstances, and are the main causes of slow map performance. When customizing views, keep in mind that the more of these features that are enabled, the slower the map update rate will become particularly at long range zoom settings. DeX Operations Manual V. 2.1 Page 39 XM WX® Satellite Weather The DEX can be upgraded to display weather information originating with the National Weather Service and broadcast by XM Satellite Weather. The following XM products are currently available to DEX users. XM WX® Product Update Period US Nexrad (showing precipitation on the surface and aloft) 5 minutes Metars / TAFS / City Forecasts 12 minutes TFR/SFR 12 minutes Lightning strikes 5 minutes Winds Aloft at various altitudes 12 minutes IR Satellite photo (showing cloud coverage) 15 minutes ECHO Tops (maximum precipitation altitude) 7.5 minutes Severe Weather Storm Tracks(SCIT) 1.25 minutes BOLD FACE products are AVIATOR plan only XM weather is received by the XM weather radio and transferred to the DEX via a wireless “Bluetooth” connection. The DEX and a particular Bluetooth weather receiver must be PAIRED to enable them to automatically connect and find one another. When the DEX is started up and Anywhere Map is selected from the opening screen, the system will automatically find and connect to the PAIRED weather receiver, at which time it will begin to receive weather files. The various weather products are transmitted periodically from the XM Radio satellites and will appear on the map as soon as they are received, assuming that the products are enabled in the View Settings screen, under the weather tab. As new products are received, the display will automatically update. Note that it can take a few minutes for the first weather data to appear. It is critical that the XM WX receiver antenna be placed such that the system records a steady “GOOD” (3 bars) of signal strength. One or two bars of signal strength will result in missed weather updates and erratic performance. Products such as Nexrad color radar images, Echo Tops, and IR Satellite photo images are transparently overlaid on the aviation map. The transparency can be controlled on the View Settings XMWX tab, and can range from 10% to 90% transparent. The Nexrad product tells the pilot where areas of precipitation are located, and the image covers virtually all of the continental United States. The diagram shows areas of coverage of the US Nexrad network. DeX Operations Manual V. 2.1 Page 40 Nexrad Coverage Map Note that there are numerous small gaps in coverage, particularly in the western states. The pilot operating in those areas should consider these gaps when interpreting the Nexrad image. The Nexrad image on the DEX is presented in seven levels, representing precipitation rates ranging from very light (BLUE) to extremely heavy (PURPLE). Generally aircraft need to avoid areas of light red, dark red, or purple returns by a wide margin, as these areas are likely caused by thunderstorms and as such may also contain moderate to severe turbulence, hail, and lightning. Orange areas should be avoided as well in most cases. The DEX allows the pilot to hide the first two levels of precipitation (blue and light green), as these are generally of little concern to the IFR pilot, and often cover geographic features. Lightning strikes are drawn over the map, on top of the Nexrad image, as are winds aloft and Storm Cell Information Tags. SCITS are tappable when they appear on the map. Single tap a SCIT to see more info about the particular storm. DeX Operations Manual V. 2.1 Page 41 Included are two types of text reports: METARs which are scheduled hourly observations, and TAFs which are forecasted conditions at an airport usually during a 24 hour period. Graphical METARs can be quickly decoded based on their color. The top color indicates ceiling while the bottom color is for visibility. Blue indicates exceptionally good VFR conditions. White indicates VFR conditions. Yellow indicates Marginal VFR conditions. Red indicates IFR conditions. Magenta/Purple indicates Low IFR conditions. This Metar flag (red over yellow): would indicate IFR ceiling, with Marginal VFR visibility. Single-tapping a reporting airport or one associated with a graphical METAR on the map screen will give you a summary of the METAR showing Altimeter, Temperature / Dewpoint, Ceiling, Visibility and Wind direction and Speed. Double tapping the airport and then tapping the WX tab in the Airport Information Screen will open the weather screen for that airport, showing the full coded text METAR as created by the NWS, along with the TAF and City Forecast. The DEX will connect automatically to properly configured XMWX weather receiver. The DEX may not connect to third party XMWX receiver units, even if they are Bluetooth equipped. XM weather can be enabled or disabled in the Weather Settings screen (Settings > View Settings > Weather tab) or by tapping the WX/Download menu button, and WX Configuration item. XM may be disabled for those days when you have no need to check the weather or if you are not close to your receiver (such as at home). If no compatible XM weather box is found in the automatic search sequence, XM will be automatically disabled and may be re-enabled at any time. When XM is enabled the first time on your DEX, the unit will look for any compatible XMWX receiver. If it finds a receiver, the system will turn the blinking blue light on the XM receiver to a steady light, and ask if you wish to use this receiver. After you connect the DEX to a particular XMWX receiver, the DEX will remember that radios unique ID code and will automatically reconnect to that receiver in the future. This is referred to as being PAIRED with a receiver. DeX Operations Manual V. 2.1 Page 42 Connecting With A PAIRED Receiver Normally, your DEX will be paired with a XMWX receiver. Linking with a paired XM receiver is completely automatic and takes place in just a few seconds. The power to the Bluetooth radio system in the DEX is controlled automatically. When Anywhere Map is launched from the DEX startup screen, the Bluetooth radio is powered on by the Map software. If the DEX detects the paired receiver on power up, the Bluetooth connection with this device will automatically be established as the software starts up. If the Bluetooth radio in the DEX is off (no blue LED) the software will automatically start the Bluetooth system, this may take 15-30 seconds. The actual connection takes only a fraction of a second to establish, once the Bluetooth on the DEX is started. The XM Status area of the map screen will show each step as it happens in sequence: STARTUP- The DEX is starting up the Bluetooth radio. INIT –The DEX is searching in an attempt to connect to a WX Radio. ACT CHK – The DEX is communicating with the weather radio and is checking to see what products the radio is authorized to download. REQST -- The DEX is requesting the appropriate items for the WX Radio unit to decode for display on the map screen. If the process gets to REQST, all the hardware is working and the next thing that will show is the signal strength. During the startup step, the map will PAUSE for 15-30 seconds while the Bluetooth is being turned on. This happens only when starting Anywhere Map or immediately after the ENABLE XM button is pressed. The other steps may take another 15-30 seconds to complete, but they happen in the background as you use the map. Some of these steps may happen so quickly that they do not always show up in the XM status area. The system begins receiving weather files as soon as the signal strength graphic appears. Most weather products will then be available within five to ten minutes. If the matching XMWX weather radio is not detected within a short time, the XM weather status in the DEX is switched to NORADIO and this value is displayed in the upper left corner of the screen, and the system stops searching for the missing radio. The status of the XM weather system is set to DISABLED. At this point, the Bluetooth radio is also shut down to save power. Re-Linking or manual Connection To later connect to a Bluetooth XMWX receiver, simply power up the weather receiver, and go to the TOOLS > SETTINGS > XM Settings screen, and tap the ENABLE XMWX button. This will cause the Bluetooth connection process to be repeated and the connection process will be repeated, exactly as above, assuming that a paired XM box is found. DeX Operations Manual V. 2.1 Page 43 XM Status Messages: WX: --- = the first NEXRAD radar file has not been received yet. Normally the first radar file takes 4-6 minutes to appear on the screen WX:0m = The current radar file being displayed on the screen has just been delivered via the XM WX broadcast and is currently 0 minutes old. 3 minutes after this image is delivered the time will then show “WX: 3m” ACTXM = The WX Radio receiver has confirmed to Anywhere Map that it is not activated or that it hasn’t been used recently and doesn’t know how to decipher the current encryption of the weather files being delivered by XM satellites. See XM ACTIVATION AND REFRESH in this manual for more WX Radio Activation/Refresh instructions. XM-ANT = XM Antenna is not connected or is reported to be defective by the WX Radio box. Try removing/re-inserting the WX Radio antenna. If this message persists, the antenna may need to be replaced. Signal quality is reported by 3 green bars for GOOD signal, 2 yellow bars for FAIR signal, 1 red bar for POOR signal, and NOXMSAT which means the antenna is connected but doesn’t have any reception normally due to a poor/non-existent view of the sky. NOTE: After boot of the Anywhere Map software and connection to the WX Radio box has been established through Bluetooth, the signal quality to XM satellites will be displayed following INIT, ACT CHK, and REQST phases have completed (approx 30 seconds or less). Once an acceptable level of signal (GOOD or FAIR) has been maintained for 4-6 minutes, the first WX files will begin to show up automatically on the map screen. XM Activation and Refresh In order to use an XM weather receiver, your radio must be “activated” by a special signal from the XM radio satellites. This step is normally completed for you at Control Vision before the XM radio is shipped. However, your XM radio may “lose” its activation from time to time due to inactivity. If this happens the Wx status in the upper left corner of the screen will show ACTXM in this case, followed by the XM Radio Activation window opening automatically. It is also possible to enter the XM activation screen from the XM Settings screen. The Activation screen is used as follows: Radio ID: If the Radio Id is shown at the top, then you have a good Bluetooth connection. Continue down the items below. If you do not see the Radio ID, then please power down your system and restart it. If this screen reappears and you still don’t see the Radio ID, then call Anywhere Map Technical Support. Signal Strength: If the signal strength is GOOD (3 green bars), then your antenna is properly installed and “seeing” satellites. If signal strength is Fair or Poor, move the antenna (or turn the airplane) until it shows GOOD. This is critical to proper operation. If the signal strength is NOXMSAT, then either your antenna is not connected properly, you have a bad antenna, or the antenna is completely out of view of the satellites (the plane is in the hangar). DeX Operations Manual V. 2.1 Page 44 XM Status: If the Status shows “None”, then the unit has probably lost activation. If this has happened, call XM (800-985-9200), give them the Radio ID and ask them to refresh the radio for you. Your unit MUST be running and displaying this screen for the reactivation to work! Within about 20 minutes after XM initiates the refresh, you should see codes on this line: “M1” for Aviator Lite or “M128” for Aviator. You may see a 0 or 3 there as well. This is no problem. XM Activation: Once the codes in XM Status begin appearing, this line will change from “Not Activated” to “Partially Activated”. Once the proper codes are received, this line will show “Aviator Lite” or “Aviator”. Now simply tap DONE and you will return to the map where the XM unit will reinitialize as normal. The activation process is one in which your receiver’s identification code is sent down to the radio over the XM satellites. The receiver then stores this activation code internally for a certain time period. If you fail to keep your subscription up to date, the receiver will be deactivated and will no longer operate until it is activated by XM again. Note that to activate your radio use this screen, you must have your XM radio receiver module connected and the antenna in an area of good reception. XM Troubleshooting By far the most common cause of XM related problems is the placement of the XMWX antenna. If your XM system seems to work well heading south, but not so well when the aircraft is flying northbound, the culprit is almost always antenna placement. The XM satellites are over the equator, which means that they are about 45-50 degrees above the southern horizon in most of the United States. If the antenna is on the glareshield of many aircraft, the aircraft roof can block the satellite when the aircraft is northbound. The BirdsEye antenna holder is available from Control Vision Corp to hold the antenna near the top of the windshield to eliminate such problems. The Antenna must be placed such that the system has a steady 3 green bar (GOOD) signal strength or it will not reliably receive weather. The second most common XMWX related problem has to do with power quality to the XM radio receiver. The DEX has a built in battery, and as such, will operate reliably on less than perfect aircraft power, however the XM radio receiver has no battery and is subject to unreliable operation if the power supply is not clean and steady. A power flicker lasting 1 second will result in 5 minutes of weather data loss. Many aircraft have old, corroded cigarette lighter plugs that make a poor connection with the lighter plug. If the LED on the power adapter ever blinks or flickers the XM system will not work reliably. This problem will often result in XM TIMEOUT messages being displayed by the map system. DeX Operations Manual V. 2.1 Page 45 Updating The DeX >Help >About menu: displays the version of Anywhere Map software you’re using along with the effective dates of the 28 day GPS mapping data installed. The DeX can be connected directly to a wireless internet access point for updates. Before any updates can be installed, you must register the Anywhere Map PRO Product Activation Key. This key can be found outside the software DVD sleeve, as well as on the original invoice. Register this code online at: The user should periodically check this website for documentation updates, and other important news about the DeX product family at After registration, the username must be entered into the Anywhere Map PRO software under the >Help >Product Activation menu. Make sure the Software Activation Key matches the one used in your registration and that your case sensitive username is entered properly. You can update the database in Anywhere Map PRO by tapping >Tools >Update Database while the DeX is connected to the internet. Likewise, to update the Fuel Prices, TFRs, weather data through Anywhere Link, and MaxNAV Sectionals, select the appropriate item(s) from the same >Tools menu. Current databases can also be downloaded from from a home or office PC and transferred via an SD card or USB Jump Drive to the DeX tablet to be loaded off-line. DeX Operations Manual V. 2.1 Page 46 Pocket Plates® Pocket Plates® is an IFR expansion pack for the Anywhere Map software and is engineered to give the user seamless access to the US Terminal Procedures, (TERPs) published by NACO, the FAA charting office. Pocket Plates makes it economical and practical to have a complete, Part 91 compliant set of current approach plates available at all times. More than 16,000 procedures easily fit in the internal memory, allowing you to literally carry the equivalent of 24 pounds of printed books in the DeX. There are also several tools built into the software that can be used to enhance the plates for added situational awareness during the approach. This portion of the manual will cover installation, use, and troubleshooting tips for Pocket Plates 3. Using Pocket Plates 1. There are two ways to launch Pocket Plates on the DeX. 1. Pressing the Pocket Plates icon on the Command Center screen. 2.By selecting the Approach Feather button on any airport data screen within the Anywhere Map application. 2. Pocket Plates will always launch to the last viewed plate in a 'full plate view' format (a random plate –from factory QC testing- may be displayed when the app is used for the first time). DeX Operations Manual V. 2.1 Page 47 Panning the plate image: An up, down, or diagonal sliding gesture with your finger or stylus on the screen will pan the plate image once it has been enlarged using the Zoom buttons on the bottom toolbar, or via the rocker switch on the DeX tablet chassis. Toolbars: DeX Operations Manual V. 2.1 Page 48 If you tap Done with an empty ident box, the plate screen will clear automatically. As you enter the identifier, the auto-complete window will list probable matches for the characters entered. Do not enter the ICAO ‘K’ when typing the identifier into the top Left field. Complete the identifier or tap on the desired one from the auto-complete window to view a list of the approaches for that airport. 1. Alternate Toolbar toggle: 2-way toggle between the Display Toolbar and the Settings Toolbar. 2. Night/Day Toggle: Changes the background color of the plate from white to black. 3. Ultra TAWS toggle: Applies 90 meter Ultra TAWS data over the plan view of the plate. This feature requires the Ultra TAWS Expansion pack for Anywhere Map XP v2.1 or higher. This button will be grey if you do not have the expansion pack installed/license key entered. 4. NEXRAD toggle: Applies the current Nexrad image from Anywhere Map XP to be displayed over the plan view of the plate. The age of the Nexrad file displays on the bottom status bar of the application. This feature is only compatible with the XM Satellite Weather Nexrad file. Anywhere Link Nexrad cannot be used. Drawing Toolbar: Activates a ‘doodle’ feature making the plate image act like a piece of scrDeXh paper. This toolbar now appears over the plate image. When the toolbar is shown, you may write/draw on the plate. Click the eraser icon to clear the entire ‘doodle’. To leave your ‘doodle’ visible and return to panning mode, click the Drawing Toolbar icon again or click the X on the Drawing Toolbar to close it. Now the pan mode is re-engaged. Zoom Level 1: Fits the whole plate on the screen Zoom Level 2: Fits the plate to the width of the screen. requires a small amount of vertical panning to see the whole plate image. 8. Zoom Level 3: Max Zoom DeX Operations Manual V. 2.1 Page 49 Settings Toolbar 1. Alternate Toolbar toggle: 2-way toggle between the Display Toolbar and the Settings Toolbar. 2. Settings button: Activates the Pocket Plates Settings screen. GPS Settings, Download Settings, and WX/Terrain overlay opacity. 3. Web Update button: Activates the web update function for monthly updates to the plates. Connect your PC to the internet before starting the process. 4. Legends/Tables button: Activates the legends and tables menus of the plate books. 5. Filter Setup Button: Activates the Filter Settings to let you select the region, state, or type of approaches that you wish to keep current. The system defaults to ALL states, Regions, and Plate types. 6. Calibration button: Can be used to recalibrate plates if the geo-referenced points don’t seem to be accurate. 7. Print: Activates the print function for each plate. Most inkjet and laser printers work well. Plates will print on a half-sheet of paper. 8. About: Displays the installed version number of PP PRO and the effective dates of the plate data. 1. Updates for the Pocket Plates libraries are published every 28 days on the normal FAA/NACO cycle dates by Control Vision Corp to the Web Update Server. To obtain these updates, connect the DeX tablet PC via the built-in WiFi radio to the internet and open Pocket Plates PRO 2. From the Settings Toolbar select the Web Update button. This will connect the PP PRO application to the Web Update Server. 3. Upon automatic verification of your Pocket Plates registration/subscription, PP PRO will scan the PC to discover which database version is currently installed and which plates need to be updated on the current cycle. This process is called Validation and can take 1-3 minutes depending on PC performance. 4. Once the Validation is complete, PP PRO will automatically begin downloading updated plate data to the PC. This process can take 5-30 minutes on a high-speed internet connection depending on how many plates the government has updated since your last update*. It can take many hours to complete if you use a dial-up connection. This process can be cancelled and restarted at any time and will not lose any data received, but instead will simply pick up where it left off. DeX Operations Manual V. 2.1 Page 50 5. After the download session has completed the Pocket Plates library on the PC is now completely updated. You’ll now be given the option to update an Anywhere Travel Companion. If you use an DEX and wish to update it with the new plates follow the on-screen prompts (See the section Updating Pocket Plates on the DEX). Otherwise, click No to updating the DEX. PP PRO should now be closed and restarted for further use. Troubleshooting 1. Active Firewalls such as Norton Internet Security, Norton 360, McAfee, Zone Alarm, and Black Ice can block the ability for Pocket Plates PRO to download updates from the Web Update Server. Disabling these applications before attempting first time installations or the update process can be essential to success. 2. To enable your GPS position to be shown over the plate image ensure that the >Settings >GPS menu has the radio button selected to "Use Shared". All civilian airport plates are pre-calibrated and double-checked for quality control. SIDs, STARs, and many military airport plates may not be calibrated as very few are ‘to scale’. If the images are not scaled correctly, calibration does not work and your GPS position will definitely be inaccurate. If you encounter any plates that are not calibrated, please email the identifier to [email protected] with the subject line of DEX PlateCal. You may not receive a response, but your help is appreciated. These plates will be filtered on the next update and re-calibrated. DeX Operations Manual V. 2.1 Page 51