1
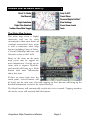
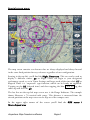
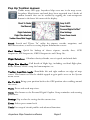
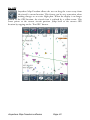
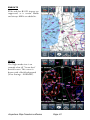
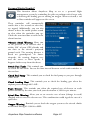
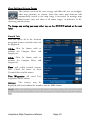
FREEDOM Anywhere Map Freedom Version 1.0.8 Anywhere Map Freedom SOFTWARE USER MANUAL Elements of this product are protected under US patent numbers 6,804,585 and 7,167,782. Other patents may be pending Control Vision Corp. Pittsburg Kansas www.anywheremap.com Sales 800-292-1160 Support 620-231-9748 NOTE: Throughout this manual you will find areas showing text that is gray on a gray background. These are coming features that will soon be activated. In many cases the button appears in the software but is inactive. Contents: USING ANYWHERE MAP® ................................................................................ 5 THE MAIN MAP SCREEN: ........................................................................................ 5 SPECIAL SCREEN AREAS ............................................................................................ 6 POP UP TOOLBAR MENUS: ............................................................................ 8 SEARCH/DIRECT-TO ............................................................................................... 9 FIND NEAREST ANYTHING™ .................................................................................. 11 FLIGHT CALCULATOR ............................................................................................ 11 FLIGHT PLAN SCREEN ........................................................................................... 13 Home Tab: ........................................................................................................ 13 Edit Tab: ........................................................................................................... 15 Plan Tab: .......................................................................................................... 17 PIN GPS ................................................................................................................ 20 VIEWS ................................................................................................................... 21 SECTIONALS .................................................................................................. 22 TERRAIN ......................................................................................................... 22 ENROUTE ....................................................................................................... 23 NIGHT ............................................................................................................. 23 PERSONAL DIGITAL COPILOT® ............................................................................... 24 VIEW SETTINGS SCREEN PAGES ............................................................................. 25 Navaid Tab: ...................................................................................................... 25 Airport Tab: ...................................................................................................... 26 Airspace Tab: ..................................................................................................... 28 Surface Map Tab: .............................................................................................. 29 Format Tab: ...................................................................................................... 31 Waypoint Tab: ................................................................................................... 35 Weather Tab: ..................................................................................................... 38 ZOOM OPTIONS .................................................................................................... 40 TOOLS................................................................................................................... 40 Weight & Balance .............................................................................................. 42 Sim Mode .......................................................................................................... 43 Flight Following ................................................................................................. 44 Aircraft Settings .................................................................................................. 45 Odometer / Tripmeter ......................................................................................... 47 Log Book ............................................................................................................ 47 WEATHER CHARTS........................................................................................ 48 Prog Charts ........................................................................................................ 48 Winds Aloft ........................................................................................................ 48 Freezing Levels ................................................................................................... 48 The Airport Information Screen ........................................................................... 49 Anywhere Map Freedom software Page 3 CREATING FLIGHT PLANS ........................................................................... 53 BY SELECTING WAYPOINTS ................................................................................... 53 ROUTE WIZARD BASED FLIGHT PLAN ................................................................... 54 THE USE WAYPOINT SCREEN ................................................................................ 54 VIRTUAL ILS APPROACHES .......................................................................... 55 CONES OF SAFETY® ........................................................................................ 56 PREFLIGHT UPDATE ..................................................................................... 57 MAP DATA UPDATES ..................................................................................... 58 REGIONAL DOWNLOADS ....................................................................................... 59 INSTALLING HIGH RESOLUTION TERRAIN ............................................................. 60 INSTALLING SECTIONAL CHARTS ........................................................................... 60 HELP SCREEN ........................................................................................................ 61 Anywhere Map Freedom software Page 4 USING ANYWHERE MAP® The Main Map Screen: The main map screen is highly interactive and can be easily customized to show your choice of standard aeronautical chart items as well as numerous other Map features including Cones of Safety, a Virtual Glideslope indicator, and Obstacles as low as 400' AGL. Many of the items on the main map screen may be tapped for more information. A single tap on items such as airports, obstacles, and navaids will bring up a black button with more information about that item. If there are many items near the touch point, several buttons will be listed, one for each item. Generally tapping on these buttons will bring up the detailed information screen for the item referenced. The black buttons will automatically vanish after a few seconds. Tapping anywhere else on the screen will instantly hide the buttons. Anywhere Map Freedom software Page 5 Special screen areas The map screen contains text features that are always displayed and always located in the same fixed position for easy reference regardless of user configuration. Starting in the top left, you’ll find the Flight Timer area. This area can be used to display 2 different timers. FT or Flight Timer can begin at your designated taxi/runway speed, as set in Timer Settings and keeps track of the time aloft. ET or Elapsed Timer is a ‘stopwatch’ type function, which can be handy on approach. Tapping on the ET (elapsed time) and then tapping the blue Clear ET tag that comes up will clear the ET. The last line on the top left map screen area is the Range Indicator. The example shown illustrates a 70 nautical mile range. This distance is measured from the aircraft position on the map screen to the top arc of the compass rose. In the upper right corner of the screen you’ll find the GPS status / Groundspeed area. Anywhere Map Freedom software Page 6 This area will display “NO SAT” if the internal GPS hasn’t acquired at least 3 satellites sufficient to provide a 3D position on the map screen. Once the GPS acquires your position, this area will display your ground speed and GPS altitude in feet above mean sea level (MSL). If the GPS service is reporting more than 10 meters of vertical uncertainty in altitude, the altitude numbers are shown in an ORANGE color. Tapping KTS will quickly change the map from nautical-mile to statute-mile measurements. This results in ground speed being displayed in miles per hour or ‘MPH’ and map distances are shown in statute miles (SM). Tapping MPH will change back to nautical mile measurements. Tapping the altitude readout will recall the strength of satellite lock currently held by the internal GPS. ‘3D 10SAT’ for example can be interpreted as: 3 dimensional lock tracking 10 satellites. Tapping the GPS Signal strength again will revert to showing the Altitude. At the top center of the screen the peak of the compass rose, a 3-digit number shows the current ground-track of the aircraft. If the map screen is configured to show “track up” this will correspond to the map orientation also. The lower left and right corners of the map screen are reserved for the active flight plan data. The lower left corner will display the Time Enroute (TE) or Time of Arrival (TA) once a flight plan is activated. Tapping the ETE field on the screen will toggle it to ETA. If you have a multi leg flight plan loaded, tapping NXT will toggle between showing the time and distance to the NEXT waypoint and the final DESTINATION. The distance to the next waypoint or destination, appear in the lower right. If the map doesn’t have an active flight plan, the lower left and right corners of the map will not show these fields. For map screen customization instructions please reference the Views Settings section. Anywhere Map Freedom software Page 7 Pop Up Toolbar menus: Unlike many GPS apps, Anywhere Map starts out in the map screen. Anywhere Map features and tools have been organized into 2 banks of toolbar buttons that can be recalled by tapping the semi-transparent button in the lower left corner of the display. Search: Search and “Direct To” utility for airports, navaids, waypoints, and fixes/intersections; as well as accessing Airport Information screens. Find Nearby: Quick list lookup of closest airports, navaids, fixes, ATIS frequencies, FSS frequencies, AWOS frequencies and Cheap Gas. Flight Calculator: Calculates density altitude, true air speed, and winds aloft. Flight Plan Manifest: Full details of flight legs, including save/load flight plan, Route Wizard, VNAV setup, fuel consumption, etc. Toolbar show/hide toggle: Show/hide left and right toolbars on edges of map screen. This button can also be double-tapped to gain quick access to the System menu screen. Pin To GPS: Brings your position back to the GPS position after scrolling around the screen. Views: Preset and saved map views. Alerts: Also known as the Personal Digital Copilot. Setup reminders and warning preferences. Settings: Tap to alter the settings for the current view Zoom: Selects preset zoom levels Tools: For setup of aircraft profiles and advanced functions. Anywhere Map Freedom software Page 8 Search/Direct-To (Direct-To and Database search tool) The Direct To / Finder is a powerful way to find navigable items in the Anywhere Map database. The user may search for airports, navaids, fixes, and user waypoints. Once a waypoint has been identified, the user can easily create a direct-to flight plan, add the waypoint to an existing flight plan, or view more information about the item. The Selector tabs across the top of the finder allow the user to select the TYPE of waypoint being searched for. Select the appropriate tab to search for an airport, navaid, fix, user waypoint or waypoint in Flight Plan. Identifier box: Tap in this box to enter the airport / navaid identifier or fix / user waypoint name. When you tap in this box, the on-screen keyboard will automatically appear. Use the on-screen keyboard for text entry if the desired item does not appear in the Selection box located below the Entry box. Generally only the first letter or two need to be entered to find an identifier. If you have entered an ambiguous identifier, you must tap on the desired match in the list. You can tell when you have selected a waypoint, as the waypoint name and range/bearing will appear. When searching for an airport, DO NOT type in the regional prefix value. For instance, to find Los Angeles International airport, enter LAX, not KLAX. Not entering the “K” prefix saves typing. To hide the keyboard, tap on the airport you want in the list shown, or tap the HIDE button on the keyboard. This is necessary to access the JUMP TO or OK or CANCEL buttons, which are under the keyboard. Anywhere Map Freedom software Page 9 In Alaska, some airports in Alaska use “P” as the ICAO and others use “PA” as the ICAO. Ted Stevens Anchorage (Whose Identifier with ICAO is PANC) would be entered as ANC whereas Juneau Intl (Whose Identifier with ICAO is PAJNU) would be entered as AJN. Range/Bearing: This information, to the right of the history/suggestion dropdown list, shows the distance and bearing from your current position to the item you have highlighted in the list box. Favorites: This is the list of your most commonly accessed identifiers. Nearby: A list of the closest identifiers to your current location. Direct To: This will create a flight plan from your current location straight to the identifier you have selected in the list. Detailed Info: Opens the information screen for the waypoint selected. Tapping this button will also add the waypoint to the “Favorites list” for faster lookup the next time this identifier is searched for. Name Search: To search for an airport by name. Use as Waypoint: This will insert the selected identifier into the existing flight plan. A second screen will come up to ask you where the waypoint should be inserted into the flight plan. Clear Favorites: This will delete all of the identifiers out of the "favorites" list. Jump To: This causes the map to be redrawn centered on the location of the selected waypoint, overriding the GPS. The map will then become a chart browser and will move the map viewing location away from the GPS location. The symbolic airplane turns into a chevron symbol and the aircraft position Anywhere Map Freedom software Page 10 Find Nearest Anything™ This function allows you to quickly find nearby Airports, ATIS, AWOS, FSS, and VOR’s. This is especially handy for looking up nearby facilities that may control SUAs or to get enroute weather information. When you choose a button, the 8 to 15 closest items will appear in a separate list. Click on the item in the list you need more information about. Cheap Fuel: This will bring up a list of the airports nearest your location that are reporting the cheapest fuel using the 100ll.com database that is shown on the airport information screen. Flight Calculator This function calculates density altitude, true air speed, and winds aloft. Enter the appropriate values in the boxes provided and it will automatically calculate the real values. Please note the Outside Air Temperature requires temperature to be entered in Celsius and Airspeed should be entered in Knots. Anywhere Map Freedom software Page 11 Anywhere Map Freedom software Page 12 Flight Plan Screen A flight plan is a list of waypoints that define the route of a flight. Each flight plan will have at a minimum two waypoints listed--a START POINT and a DESTINATION. Many flights will also include intermediate WAYPOINTS, which are points along a route that define the path, generally to keep the flight path out of undesired areas such as restricted airspace. There are many different and simple ways to create a flight plan in Anywhere Map Freedom; this flight planning screen allows for management of the flight plan once it has been created. It will also allow you to save the flight plan for use in the future. Tapping the button will open the Flight Plan Manifest screen containing a listing or manifest of the flight legs and waypoints as well as three more management tabs (Edit, Plan, and File). In the manifest window you can see the data that has been calculated for each leg of the flight including waypoint name, range, speed, VNAV, course (True), heading (Magnetic), time, distance, winds, and fuel used. The flight totals are shown at the bottom of the manifest area. Home Tab: VNAV: After selecting a waypoint in an active flight plan, this button allows you to specify an altitude at which you want to cross the waypoint. Once set, a blue arrow will display next to the waypoint designator (upper center of map screen) showing you whether to climb or descend as you approach the next waypoint. In addition any required rate of climb/descent will display in the lower right corner and a target arc will arch across the flight course showing the point at which you’ll reach the specified VNAV altitude based on your current rate of climb/descent. Anywhere Map Freedom software Page 13 Direct XXX: When an active flight plan is shown, any point in the plan may be highlighted and chosen to go direct to using this button. This is commonly used to ‘cut corners’, if ATC clears your travel path direct to a point in the plan, or simply to Center the CDI when off course. Delete WP: After selecting an existing waypoint (single tap) in the flight plan manifest, this allows you to delete the waypoint. The result will be that the flight course will then run from the prior waypoint directly to the next waypoint. Hold: Toggles with UNHOLD. This function will PREVENT the map from advancing to the next waypoint automatically when a flight plan waypoint is passed. If ATC were to instruct you to “hold east of OSWEGO” and you were approaching this VOR from the east; tapping this button before arrival would prevent the waypoint sequencing logic in Anywhere Map from noting station passage, even though you would be over-flying the VOR on each holding pattern orbit. To resume navigating, tap the UNHOLD button when inbound to the VOR, and the next waypoint will advance automatically when crossing the VOR. Next WP: Allows you to select a waypoint from the list and make it the “next waypoint” in the plan. This will NOT delete any intermediate waypoints that may exist, but does set the waypoint number, bearing and distance data on the map to the waypoint selected. Anywhere Map normally “follows” your flight progress, automatically knowing which flight plan waypoint is “next”. In those cases where it gets out of sync with the pilot (such as when a waypoint is bypassed), this button allows you to synchronize the software. Winds: Opens a screen to enter wind speed and direction. There are two ways to use winds: 1) manual entry of the winds (available for both Anywhere Map and Anywhere Wx customers) and 2) forecast winds from the winds aloft feed in XM weather (Anywhere WX customers only). If XM is available, then the winds for the altitude selected in View Setup > Wx will be used to calculate speeds, times, and fuel. If XM is not available, then winds can be entered manually using the WINDS button or you can leave them at zero for a no-wind plan. Move Up: This button takes the selected waypoint/leg of the flight plan and moves it up in the order of the flight plan, allowing a re-sequencing of the waypoints in the manifest. Move Down: Takes the selected waypoint/leg of the flight plan and move it down in the order of the flight plan, allowing a re-sequencing of the waypoints in the manifest. Anywhere Map Freedom software Page 14 Done: Closes the flight plan screen and returns to the map with any changes made in this screen implemented on the map. Note: For flight planning, Anywhere Map uses cruising speed and fuel consumption values from the aircraft profile to compute course, heading, and ETE. These values must be set up in the Aircraft Settings screen ETE, course, and heading to be computed accurately. Aircraft Settings can be configured under the File tab at the bottom of the Flight Plan screen. See Page 32 for more information. Edit Tab: Contains the buttons that allow enroute flight plan modification. Frequently a controller may order changes to your flight plan that require addition or deletion of waypoints, re-ordering waypoints, or even entering holds. The functions on this first tab were chosen because they are the most common activities. Add WP: Opens the Direct To Finder screen so you can lookup an airport, navaid, fix or user waypoint for inclusion as a waypoint in the current flight plan. Delete WP: After selecting an existing waypoint (single tap) in the flight plan manifest, this allows you to delete the waypoint. The result will be that the flight course will then run from the prior waypoint directly to the next waypoint. Anywhere Map Freedom software Page 15 Route Wizard: Enter the full ICAO Airport identifier in the From and To fields. Each Via (optional waypoint) identifier should be separated by a space. For more information and an example, see Route Wizard based flight plan on page 54. Reverse: This function will reverse the order of the flight plan for use on the return trip. Clear All: This will remove the current flight plan from the screen. This will not delete the stored flight plan from the memory. Move Up: This button takes the selected waypoint/leg of the flight plan and moves it up in the order of the flight plan, allowing a re-sequencing of the waypoints in the manifest. Move Down: Takes the selected waypoint/leg of the flight plan and move it down in the order of the flight plan, allowing a re-sequencing of the waypoints in the manifest. Done: Closes the flight plan screen and returns to the map with any changes made in this screen implemented on the map. Anywhere Map Freedom software Page 16 Plan Tab: These flight-planning functions are primarily used in the creation or modification of flight plans. The most common functions are repeated from the Edit tab. Add WP: Opens the Direct To Finder screen so you can lookup an airport, Navaid, fix or user waypoint for inclusion as a waypoint in the current flight plan. Look up the waypoint in the Finder, and then tap DETAILED info and WPT/FLY to to select ho Delete WP: After selecting an existing waypoint (single tap) in the flight plan manifest, this allows you to delete the waypoint. The result will be that the flight course will then run from the prior waypoint directly to the following. Route Wizard: Enter the full ICAO Airport identifier in the From and To fields. Each Via (optional waypoint) identifier should be separated by a space. For more information and an example, see Route Wizard based flight plan on page 54. VNAV: After selecting a waypoint, allows you to specify an altitude at which you want to cross the waypoint. Once set, a blue arrow will display next to the waypoint designator (upper center of map screen) showing you whether to climb or descend as you approach the next waypoint. In addition any required rate of climb/descent will display in the lower right corner and a target arc will arch across the flight course showing the point at which you’ll reach the specified VNAV altitude based on your current rate of climb/descent. Winds: Opens a screen to enter wind speed and direction. There are two ways to use winds: 1) manual entry of the winds (available for both Anywhere Map and Anywhere Wx customers) and 2) forecast winds from the winds aloft feed in XM weather (Anywhere WX customers only). If XM is available, then the winds for the altitude selected in View Setup > Wx will be used to calculate speeds, times, and fuel. If XM is not available, then winds can be entered manually using the WINDS button or you can leave them at zero for a no-wind plan. Anywhere Map Freedom software Page 17 Move Up: This button takes the selected waypoint/leg of the flight plan and moves it up in the order of the flight plan, allowing a re-sequencing of the waypoints in the manifest. Move Down: Takes the selected waypoint/leg of the flight plan and move it down in the order of the flight plan, allowing a re-sequencing of the waypoints in the manifest. Done: Closes the flight plan screen and returns to the map with any changes made in this screen implemented on the map. File Tab: Load: Calls up a screen containing previously created and saved flight plans. If the desired flight plan shows on the screen, tap the filename and then tap OK. Save: After creating a flight plan type a unique filename in the “save as” box of this screen. For instance to save a flight plan from PTS to MCK you might type “PTS 2 MKC” in the SAVE AS box and tap the Save button. Delete File: This will permanently remove the stored flight plan from the tablet memory. Anywhere Map Freedom software Page 18 AC Settings: Opens the Aircraft Settings screen where specific parameters about the aircraft may be entered. Multiple profiles may be created, saved, and recalled by tail number. Done: Closes the flight plan screen and returns to the map with any changes made in this screen implemented on the map. Anywhere Map Freedom software Page 19 Pin GPS Anywhere Map Freedom allows the user to drag the screen away from the aircraft’s current location. This feature can be very convenient when making changes to an active flight plan. When the display is no longer pinned to the GPS location, the aircraft icon is replaced by a yellow arrow. This arrow points to the current aircraft position. Jump back to the current GPS location by tapping on the “Pin GPS” button. Anywhere Map Freedom software Page 20 Views Anywhere Map Freedom allows for an unlimited number of customized map screen layouts to be created and saved as “VIEWS”. Views can be instantly recalled using the VIEW SELECT button on the pop-up menus. Rather than making frequent and repetitive map display settings, you can save customized map layouts for specific flight needs and save them under any name for rapid recall. For example, you could save a map view for VFR Day Operations with terrain and special use airspace turned off, but weather data, airways and fixes turned on – and call it VFR-DAY. By saving this configuration as VFR any time you select 1)VFR the preset display settings take place. You may save up to 6 different View configuration pre-sets. There are several views preset by the factory and are a good starting point. All of these views can be customized and renamed according to the user’s preferences. Anywhere Map Freedom software Page 21 SECTIONALS Featuring Control Vision’s Seamless Geo-Referenced sectional map tiles. This is a great basic VFR navigation map, shown Track up. TERRAIN This is the VFR view with color coded terrain (TAWS) warnings and elevation values added Anywhere Map Freedom software Page 22 ENROUTE SUAs and class B/C/D airspace are suppressed, as is terrain. Holds and airways MEAs are added in. NIGHT The Night mode view is an example of an all “Vector data” derived screen. This screen is drawn with a black background (View Settings – FORMAT). Anywhere Map Freedom software Page 23 Personal Digital Copilot® This function allows Anywhere Map to act as a personal flight management system by reminding the pilot to perform critical steps such as lowering the landing gear or turning on oxygen. When activated, a red or blue reminder will appear on the screen. These reminders will automatically vanish after a few seconds or after they are tapped. Additionally, you can also choose to have the audio speaker sound an alert when the reminders pop up. Check the associated box to turn on the alarm function. Obstacle Ahead Warning: Alerts you to the presence of an obstacle that is within 500' of your GPS altitude and too close to the aircraft’s projected ground track. The warning distance is based on groundspeed. At slower airspeeds, the warning happens very near the tower; at faster speeds, it happens farther away from the threat. Switch Fuel Tanks: This reminds you to switch the fuel tanks. You set the time interval between switch tank reminders in the text box. Check Fuel Pump: This reminds you to check the fuel pump as you pass through 1000' AGL. Check Landing Gear: This reminds you to check the landing gear when the airplane passes through 600' AGL. Begin Descent: This reminds you when the required rate of descent to reach pattern altitude by the time you reach your destination is 500 feet per minute. Spiral Dive Warning: Alerts you to an excessive rate of turn (change in track) coupled with an excessive descent rate. This combination could signal the start of a spiral dive. Oxygen Warning: Reminds you to check the oxygen system as the aircraft climbs or descends through 12,000 feet MSL. Anywhere Map Freedom software Page 24 View Settings Screen Pages The various screens of the view settings tool allow the user to configure what map elements are shown. Note that most map elements will automatically vanish as the map range is increased, to manage map clutter. Enabled features may not show at all zoom ranges, in deference to decluttering considerations. To change any setting you may either tap on the OFF/ON switch or the text label. Navaid Tab: This tab shows all of the Aviation navigation features and aides that can be displayed. VORs: May be shown with or without the Compass Roses and frequencies. NDBs: May be shown with or without the Compass Roses and frequencies. Fixes: will enable normal enroute fixes. Check the boxes to show Terminal fixes and fix names. User Waypoints: All saved User waypoints will be shown. Airways: The airways may be displayed with and without the number and the MEA shown. Holds: Allows the holding patterns to be shown. Auto Size adjusts the size of the hold based on your ground speed to insure that the pattern is always drawn with one-minute legs. Anywhere Map Freedom software Page 25 Airport Tab: Airport tab shows all of the airport information that can be displayed on the map such as elevation, frequencies, runway length, Taxi Express diagrams, textual weather, remarks, FBO services, and virtual approaches Identifier: identifier. Displays airport Distance To: Displays distance from your current position to the airport. Enable Auto Virtual ILS: Activates the Virtual ILS “feather” when the aircraft is within 25 miles of the destination airport. Also enables the Glide Slope Indicator on the moving map screen. Marker Beacon: Displays marker beacons as circles. Localizers: Displays Localizer feather symbols for applicable runways. ATIS and Tower: Displays Control Tower and ATIS frequencies beside the airport at close zoom levels (approximately 25NM). Elevation: Displays airport elevation above sea level. Runway Length: Displays the length of the longest runway (in hundreds) next to the airport on the map, L55 means this airport has at least one 5500 foot runway. This data is only shown when zoomed in closer than 25 NM. Tower Frequency: Displays controlled airfields’ tower radio frequency on the moving map screen at zoom levels below 30nm. Hide Small: Hides non-towered airports when zoom level (radius) is > 100 nm. Private Airports: Displays Private Airports also and can be displayed as a dot only. Anywhere Map Freedom software Page 26 Show Cones of Safety: Select to enable the Cones of Safety® feature. Around each airport there is a region of airspace from which an airplane can safely glide to a landing. We refer to this space as the Cone of Safety. The Cones of Safety are represented by a thin green circle around each airport. In the night mode, the Cones stand out against the dark background. The circle’s diameter varies with the aircrafts altitude above the field and with the glide performance value taken from the aircraft settings screen. If you want to display Cones of Safety for non-paved runways also, select that feature. To reduce screen clutter, you can also select to automatically hide the Cones at GPS altitudes greater than 10,000 feet AGL. Caution: As the Cones of Safety do not compensate for wind, it is wise to stay away from the down-wind side of the cone. The Cone converges on a “reference point” of the airport, generally the center of the airfield. They are merely assistance to making a good forced landing decision but the pilot MUST account for wind in the final airport decision. To set up the Cones of Safety, you must first go to the Aircraft Settings in the Tools menu and enter the glide ratio of the aircraft into the appropriate boxes. You can usually find this information in the POH. Once you have entered this information in the appropriate boxes, then go to this screen and select “Show CONES of Safety. The cones will now be shown around all airports. If they are not, it is because the aircraft is sitting on the ground or, if no GPS is attached, the map “thinks” the aircraft’s altitude is below that where the Cones of Safety are visible. To check this go to the aircraft settings and set the cruise altitude to some value above 3000' for example. The green Cones of Safety circles should now show on the map around each airport. Note that one can also go to the SIM MODE screen and enter the altitude and heading and groundspeed to see how the Cones of Safety will appear in flight. The Cones of Safety® feature is protected under US Patent number 6,804,585 and other US patents. For more information please see the CONES OF SAFETY section on page 56. Anywhere Map Freedom software Page 27 Airspace Tab: Controls the display airspace information. In the upper area select which Class B/C/D Airspace to show. You may also elect to have the altitudes for the airspaces shown on the mapping screen. In the lower area, the Special Use Airspace is listed. These include MOA, Restricted, Alert Areas, and SFR’s (Special Flight Rules) /TFR’s (Temporary Flight Restrictions). Checking “Show Altitudes” box will show the SUA’s altitude of operation. This will appear in a disappearing black box when one taps on the edge of the MOA. You can also see more information about the SUA if you double-tap the center point of the airspace (at wider view levels there is a small dot there). This will show you the airspace, altitude limits, last regular hours of operation, and even the controlling facility frequency. Anywhere Map Freedom software Page 28 Surface Map Tab: Display options regarding geographic features and terrain. Be sure to scroll the screen down to see all the options. Only one of the Enroutes, Sectionals or Terrain elevation graphics can be on at one time. Show Low Enroute: Enabling this button will display seamless digital US IFR Low Altitude Enroute Charts as the background image of the moving map. We recommend many other display features be disabled when using this feature as the Low Enroutes are already very feature rich, and AWM may redundantly clutter the chart. The best range to view and use this feature is 10-20 NM. Show High Enroute: Enabling this button will display seamless digital US IFR Height Altitude/Jet Enroute Charts as the background image of the moving map. We recommend many other display features be disabled when using this feature as the High Enroutes are already very feature rich, and AWM items may redundantly clutter the chart. The best range to view and use this feature is 10-20 NM. Show Sectionals: Anywhere Map is equipped with the ability to display seamless digital US VFR Sectional maps as the background image of the moving map. We recommend many other display features be disabled when using this feature as the Sectionals are already very feature rich, and AWM items may redundantly clutter the sectional. Terrain Elevations: Choose whether to display terrain. Terrain is depicted in colored tiles that denote elevation of a point within that tile. The size of each tile is 180 meters square. Terrain resolution increases as the zoom level is changed from wide to close. This is done to keep the map performance optimized. Terrain color is also adjustable. You Anywhere Map Freedom software Page 29 can choose from light, medium, or dark. In the dark setting, lower terrain altitude will be dark green. In the light setting the low altitude terrain will be very light green. Terrain color shading transitions from green to orange to brown at higher altitudes to finally white, making the mountain tops appear white. You may wish to use a lighter terrain color during the daylight hours if you are flying in an area with low elevations to improve contrast. In higher elevations it is often better to use a darker color. The unit is preset to "Medium" color values upon the initial download and in the preset "Terrain" view. The Terrain Settings group selects additional options: Show TAWS WARNINGS: TAWS stands for "Terrain Avoidance Warning System". In this mode the terrain that is above and near your GPS altitude is shown in 3 special colors: Terrain 1000' to 500' below the aircraft is shown in YELLOW Terrain 500' to 200' below the aircraft is shown in ORANGE Terrain less than 200' below and all terrain above the aircraft is shown in RED Terrain that is more than 1000' below the aircraft is rendered in normal colors. TAWS warnings can be layered over Sectional or Enroute charts or any Vector map presentation. Towers: Select to display radio towers and obstacles as well as their data labels. Other features supported in prior versions of Anywhere Map that are coming soon to Anywhere Map Freedom are as follows: Water, Highways, Cities: Display water features, highways, cities, as well as their names. Nuclear Power Plants, Sport Stadiums: You can also choose to display loitersensitive objects such as stadiums and nuclear power plants, and may optionally display the 3 nautical mile veil that surrounds them. Anywhere Map Freedom software Page 30 Map Data: Data Tags are approach/departure frequency tags that appear around some of the higher density airspace. When zoomed out, there is a small green dot on which you can tap to see the frequency. When zoomed in, the dot is replaced with a rectangular box in which the frequency is displayed. Urban Areas: Allows the user to see the outer boundaries of urban areas drawn in yellow as on a sectional chart. State Lines: Displays the US State line boundaries. Format Tab: Allows you to set various ancillary display features that enhances the map, the data displayed, or the navigation capability. GPS Altitude: Displays GPS derived altitude in the upper right corner. Note that GPS altitude is actually very close to the correct geometric altitude, but it may vary significantly from the altitude indicated by a pressure altitude, depending upon the altitude AGL and the local deviation from ISA temperature. Temperatures +20C above ISA standard will cause the pressure altimeter of the aircraft to read approximately 200 feet low for each 5000 feet AGL. Currently, Anywhere Map is set to display GPS altitude by default at all times. Cross Track Error: The course deviation is shown on the map in the lower screen center in tenths of a mile. An arrow shows you in which direction your course is from your current position. VNAV: This displays required rate of descent data in the lower right corner of the map when your descent to the destination airport pattern altitude (assuming 1000' PA) is 250 ft. per minute or greater. This box must also be checked to show VNAV information in flight plans. Anywhere Map Freedom software Page 31 Lat/Long: Your current position in latitude/longitude is shown in the bottom left corner of the map. Track History: This feature leaves breadcrumbs (small dots) along the path flown. Bold Course Line: This function places a heavy black line on either side of the flight plan course line in normal flight. The course line is green for the active leg and aqua for all other legs of the flight plan. Statute Miles: This toggles all map data between statute miles and nautical miles. North-Up Mode: Plane will appear in the center of the screen, and it will rotate instead of the map. Map screen will always have North at the top of the screen. Day Mode: Toggles between the day color set (light background) and the night color set (black background). Turn Rate Indicator: Displays a circular Rate of Turn instrument in the lower left corner of the map. The rate of turn, in degrees per minute, is shown digitally. Rate of Climb Indicator: Displays a Rate of Climb/Descent indicator in the lower right corner of the map. Tripometer: Displays a Trip meter in the lower left corner that is the total distance flown since last reset. To reset the trip odometer, tap Tools > Odometer/Trip meter> Reset. Show User Waypoints: This enables user created waypoints to be displayed on the map screen. Enable Low Memory Warning: When the device's memory gets taxed, a low memory warning will flash across the bottom of the screen. Typically this warning will only flash on and off once the memory issue has resolved itself. However, if the low memory warning flashes on and stays on, you must evaluate your device and shut off other apps that may be running in the background of the tablet device you are using. High memory programs are typically video programs such as YouTube(tm), photographic editing programs, and other GPS mapping programs such as Google Maps or one of the other aviation moving maps. Shutting all of this programs down will turn the low memory warning off. The warning is set to be on by factory default. In the future, we will enable the ability to turn this warning off with this switch. Anywhere Map Freedom software Page 32 HSI display options: Show Map Range: This shows which range is being displayed on the map. It displays the distance from the aircraft icon to the EFIS arc/circle. It immediately sets context for the distance between you and items being displayed on the map such as towers, airports, airspace, and especially weather. The range in nautical miles (or statute if so set) is shown in the upper left corner of the map under the flight timer. If this box is unchecked, the range value will display briefly when changing zoom ranges and will automatically hide after about five seconds to save screen real-estate. Full HSI: This will enable the HSI function to show on the screen and unchecking it will remove the HSI display leaving only the EFIS or compass rose. Center Airplane: This option places the aircraft icon in the middle of the moving map screen. Unchecked this option places the aircraft icon towards the bottom of the map. Compass Rose: This button will add or remove the compass rose from the screen. Show the Arc: This will draw an arc to connect the “tick” marks of the compass rose. If unchecked, the tick marks for 10 degree increments are drawn but the arc is not shown. Save Current Map Range with View: Selecting this option will save the zoom level/range that the map is being viewed at when the Save Changes to Current View is activated. Returning to a previously saved view with this option utilized will recall not only the selected display options, but also the zoom/range at which it was saved. High Visibility Compass Rose: This feature enhances the compass rose, CDI, and HSI To/From indicator on certain map background configurations. Works great on dark backgrounds in bright light conditions. Draw Projected Course from Aircraft: Activates a grey extension line from the nose of the aircraft, also called a ‘lubber line’. Anywhere Map Freedom software Page 33 Customize Airplane: This button brings up a scrolling screen with your choice of 17 different icons to represent your aircraft on the screen. Tap on the aircraft you want displayed, then tap the darkened portion of the screen outside the scroll box. The aircraft you have selected is now Anywhere Map Freedom software Page 34 Waypoint Tab: This tab allows you to control how waypoints are used in the creation of flight plans and also during the flight. This screen also allows you to turn on Rubberband Mode. Show Next Waypoint as Destination: Displays the next waypoint in a flight plan at top center of the screen. The waypoint can be an airport, fix, navaid or user waypoint. If unchecked the final waypoint of the flight plan is shown at the top of the screen. Show Corridors: In a flight plan, waypoints designate course changes as you progress. Changing course as each waypoint is reached is usually done after you cross the waypoint (navaid, fix, etc.), which also usually results in your being off course for the next leg and having to return to the line as you start down the next leg. Many pilots want to smooth the corner so they turn before reaching the waypoint, thereby making a nice transition from one leg to the next. However, in doing so they actually do not fly directly over the waypoint. Therefore Anywhere Map needs to know whether you just missed it (and if you intend to return to it) or if you intend for the next leg to become active. The corridors have been created to allow "corner cutting" so that you can smooth the corners in your flight and still have the flight plan logic follow your progress. The corridors are depicted as gray or red lines (red if the waypoint is set as a holding waypoint) that bisect the angle made by the legs that are inbound and outbound from the waypoint. The length of the line is based on the distance between waypoints and the angle made by the two legs. As long as you cross the corridor line, the waypoint will be considered "crossed" and the next leg will become active. Anywhere Map Freedom software Page 35 Annotate Waypoints: When enabled, the waypoints you are using in the flight plan will have data tags on them even if the names of the waypoint type (VOR, NDB, Fixes, etc.) are turned off in the settings. Estimate time to destination waypoint using FLT plan Spd: If this box is UNCHECKED, the estimated time to destination is computed using the total flight plan distance divided by the current ground speed. This is the method used by most GPS units, and it is conceptually very simple. This is Current Ground Speed mode. This method does not work well on “round robin” flight plans, with strong winds aloft. With the box CHECKED, the time to destination is figured using the TE to the next waypoint (using current GPS groundspeed) PLUS the sum of the TE’s for each subsequent leg shown in the flight planning screen, using the speed shown in the flight plan screen. This method is generally more accurate, but requires that the aircraft speed and winds aloft be properly entered so the resulting speed is accurate. Auto Start Flight Plan at Nearby Airports: If this box is unchecked, when you select an airport and tap FLY TO, you will be asked “Start at airport?” the current position is within approximately 3 miles of an airport. If you tap NO here, the flight plan will originate at the current GPS position on the map. If you tap YES here, the flight plan starting point will be at the “reference point” of the nearby airport. If checked it will be assumed that your answer is always YES to this question. Anywhere Map Freedom software Page 36 Rubber Band Mode Settings The Rubber Band Flight Planning tool is fast, easy, and convenient. This tool allows ‘drag and drop’ editing of the course line, thereby creating the flight plan. If a flight plan “control point” is dragged and dropped near an airport, navaid, or fix this waypoint will be used; if the control point is dropped in a blank area of the map, a user-waypoint is created, allowing completely arbitrary course routing, independent of normal waypoints. To use this feature, make sure this switch is set to the "ON" position. When a flight plan is loaded, simply touch the course line and drag to move the course line. trash can will appear on the bottom of the screen. If you want to eliminate a point in the flight plan, drag it to the trash can and it will disappear. The course line will alter to show the elimination of the deleted waypoint. Anywhere Map Freedom software Page 37 Weather Tab: This tab sets the weather display for the various forms of weather information available on Anywhere Map Freedom. Anywhere Map Internet Weather Features Show Metars: Metars will be shown with their colored flags next to the airport symbol on the mapping screen. Show Nexrad: This will allow the Nexrad weather information downloaded in the preflight download to display over the top of any of the mapping views. Light Precip.: The lowest two levels of Nexrad weather information is typically referred to as "verga", or precipitation that doesn't reach the ground. You may choose to have these lower levels shown on the mapping screens by switching this to the on position. Show Blurred Weather: Weather can be shown in either square blocks or by blurring those blocks. XM Weather Settings (Coming in July 2012) These features will be switched on once Anywhere Map Freedom is compatible with XM Weather. Anywhere Map Freedom software Page 38 View Storage Tab: Allows the user to save the customized view settings under a default or custom name. View Name: The names of your views can be modified to fit your individual setup. Simply tap in the box and type in a new name. This has been saved as "TERRAIN PLUS". Save View: Tapping this button will save all the selections on all tabs of the View Settings Screens to the View Name listed above. Delete Views: Selecting this button will delete all saved views. Anywhere Map Freedom software Page 39 Zoom Options Normally the map can be “pinch” zoomed in and out using multi touch gestures. If you want to select a specific zoom range, Tapping the button will pop up fixed range zoom options of 10nm, 25nm, 50nm and 100nm. It will also pop up a Zoom In and Zoom Out button. These will show up as black buttons on the screen and will disappear automatically after a few moments. Anywhere Map Freedom software Page 40 Tools Tapping the Tools menu button will switch from the main map screen to a page with many different buttons, shown to the right. This screen also tells you the age and expiration of the database loaded Anywhere Map Freedom software Page 41 Weight & Balance This section makes it easy to compute the loading of the aircraft to insure that the weight and balance is acceptable. The first time this function is used for a particular aircraft type, uncheck the Lock Arm box so arm values can be entered. Next, using the Pilot’s Operating Handbook plus any supplemental weight information from the aircraft’s Weight & Balance certificate, fill in the Arm value for each applicable part of your airplane. Enter the aircraft empty weight and moment-arm from the aircraft documents in the “Empty AC” boxes. After filling in the fields, tap Lock Arm again to prevent these values from being accidentally changed. If the aircraft’s basic empty weight includes a full load of oil, leave the OIL field blank. Some older aircraft refer to Licensed Empty Weight that excludes drainable oil. In this case, it must be added in the Oil Quarts field. Oil must be entered in quarts, the weight will be automatically computed. Fuel may be entered in Gallons or pounds, the method is selected by pressing either LBS or Gallons in the box at the left. Once the empty weight and arm values are set up, simply enter the variable weights before each flight – fuel, front and rear seat passengers, baggage, etc. The weights will be totaled along with the moment-arms, and the loaded CG will be shown in inches, along with the loaded weight and moment arm values. The loaded values Anywhere Map Freedom software Page 42 can be easily referenced against the POH loading chart to see if the aircraft is properly loaded. Tap Calculate at any time to get total Weight, Moment and Center of Gravity arm Note: The weight and balance settings are saved as part of the aircraft profile that is created and saved in Aircraft Settings. So when setting up an aircraft (especially if using Anywhere Map in more than one airplane) make sure the weight and balance data for the airplane is set up BEFORE you save the aircraft profile, or be sure to save the aircraft profile again after setting up the weight and balance data. Sim Mode Sim Mode allows you to ‘fly’ a flight plan from your desk or couch for practice. Tapping this button will bring you to a new screen where you can enter your desired simulation altitude, heading, and speed. Choose Start to begin, or tap Disable to turn Sim Mode off. Anywhere Map Freedom software Page 43 Flight Following This feature acts as a poor man’s autopilot, not because it controls the airplane, but because it helps you keep the airplane on a constant heading and/or altitude. You can either use current altitude or set an altitude target. You set the current heading and a target heading ‘bug’ triangle displays at the top of the screen showing you the allowable heading deviation window. Once the aircraft has strayed from course far enough for the ‘bug’ to exceed the limits, an alarm will sound and an alert box will remind you of the deviation. To shut off Flight Following, simply tap Clear All. Continuous Warnings: Deselecting this option will allow warning messages to be cleared with a single tap. Selecting this option will not allow the messages to be cleared until the fault is removed. Anywhere Map Freedom software Page 44 Aircraft Settings An aircraft profile saves all of the settings that are tied to a particular aircraft in a single file that can be loaded and saved. This is very convenient for the pilot who flies multiple aircraft. What is saved in an Aircraft Profile? All of the information on the Aircraft Settings Screen (shown to the right) AND All of the information on the Weight and Balance Screen (shown on Page 30). To create an aircraft profile, set up the values in the Aircraft settings screen, as well as the weight and balance screen as desired, and tap the SAVE button in the aircraft settings screen. This will pop up a screen that allows you to name the aircraft settings file. In most cases the default name, which will be a combination of the aircraft make and model and tail number will suffice. To load an aircraft profile, go to the Aircraft settings screen, and tap the LOAD button. This will pop up a list of stored aircraft profiles on the system. Double tap on any entry or tap once and tap OK to select it. These parameters are used for flight plans, Cones of Safety, and flight timer operation. In addition, when you save the profile, the weight and balance data currently in use are also saved under this aircraft profile making them easily usable on subsequent flights. Glide Altitude: The altitude from which the glide range can be achieved. Anywhere Map Freedom software Page 45 Glide Range: These parameters set the Cones of Safety calculation. By setting the glide ratio, the Cones of Safety can be sized properly. Cruise Altitude: Cruise Altitude is the altitude used for Sim Mode operations and for displaying Cones of Safety when a GPS is not connected. This is overridden by the GPS altitude when in flight. Cruise Speed: This is the normal cruise speed in knots. Cruise GPH: This is the average fuel burn in gallons per hour for the enroute portion of the flight other than the first hour. 1st Hour GPH: This is the first hour fuel burn which is normally a bit higher than cruise due to the high power settings associated with takeoff and climb. Fuel onboard: This is the total usable fuel on board in gallons. Flt Timer Spd: This is the speed at which you want the flight timer to automatically start. Usually this is set at a speed faster than taxiing, but less than rotation speed so the timer starts on the takeoff roll and stops on the landing rollout. Anywhere Map Freedom software Page 46 Odometer / Tripmeter Timer Settings: Allows you to setup or clear the different timers available. Flight Timer Min Speed: This screen also allows you to set the minimum speed that you want the Flight Timer to start. Elapsed Timer: Allows you to set a specific amount of time to count down from (handy for shooting approaches). Tapping in the text box will display the keyboard for numerical entry. +1Min & +15S: Used to quickly add additional time to your Elapsed Timer. Fuel tank Change Timer: Allows you to set the number of minutes between reminders to switch fuel tanks. This setting can also be accessed in Personal Digital Co-Pilot. Log Last Flight: Takes you to the Log Flight screen. Reset FT: Will clear the Flight Timer. The Flight Timer is also cleared automatically when the Anywhere Map application is closed and reopened. ET Countdown: Provides a field where you can enter a time value to count down from rather than standard stopwatch function. Reset ET: Will clear the Elapsed Time. Log Book This feature keeps a log of your flights and works hand-in-hand with the "Log Flight" button. This feature will be implemented in July 2012. Anywhere Map Freedom software Page 47 WEATHER CHARTS Please note: For this feature to display properly, one must do a "Preflight Update" before choosing this display option. Prog Charts The Prog Charts are downloaded from NOAA and include the current, 12 hour forecast, 24 hour forecast, 36 hour forecast, and 48 hour forecast. Winds Aloft The winds Aloft charts included are sea-level, 3000ft, 6000ft, 9000ft, and 12000ft levels. Freezing Levels Charts included are the Current lowest freezing level, 3 hour freezing level, 6 hour, 9 hour and 12 hour freezing levels. Anywhere Map Freedom software Page 48 The Airport Information Screen Most navigational features on the map have more information associated with them. This additional information is shown on an “Information Screen”. Examples of features with information screens are Airports, Localizers, VOR’s, NDB’s, Fixes, SUA’s, and User Waypoints. Double tapping on an airport or searching by identifier through Direct To Finder will open up the Airport Data Screen. This screen has 6 different tabs across the top which host a wealth of information about the facility. There are also several buttons along the bottom of each tabbed section that can be used. Wpt/Fly To: This button will insert the airport into the flight plan. If there is no flight plan, a user waypoint will be used as the starting point and this waypoint will be added as the endpoint of a simple flight plan. If there is already a flight plan, tapping this button will cause the software to pop up the which gives several options. See Use Waypoint Screen on page 54. Jump To: Directs Anywhere Map to jump to the item you have selected. If you have a GPS connected, the map will change to “Preview Mode” when you jump because the map is no longer showing your current GPS position. To cancel and return to your current position on the map, simply tap Restore Position in the upper right corner of the map. Airport information screen TABS. The small square taps across the top of the screen allow access to several pages of information about the airport. The tabs have been designed to be easily tapped with a finger. Touch the first tab provides runway data, field elevation, range/bearing from your current GPS position, and a simple diagram of the runways. If you have a flight plan to or from the airport, you will see the green flight plan line over the diagram. Tapping the red button on the diagram will extend the centerlines of the runways on the map screen. Anywhere Map Freedom software Page 49 The second tab provides the appropriate COM radio frequencies, AWOS phone number, and Localizer frequencies (if available) for the selected airport. The third tab contains airport remarks from the FAA database that could prove useful to the pilot. Anywhere Map Freedom software Page 50 The fourth tab contains FBO facility information from 100LL.com. The fifth tab contains current fuel pricing information for each fuel providing FBO on the field. The fuel prices and FBO facility information are updated via the Update Center utility. Anywhere Map Freedom software Page 51 The final tab displays the raw/undecoded METAR and TAF delivered through the XM Satellite Weather broadcast, along with the decoded METAR information. This tab is only available if you have the optional XM weather support upgrade. Anywhere Map Freedom software Page 52 Creating Flight Plans There are many different ways to create a flight plan using Anywhere Map. This section will show several of these methods. Most of these methods can be combined to create and/or modify existing flight plans. By Selecting Waypoints To create a flight plan to any destination, simply select the destination waypoint. There are several ways to select a destination waypoint. 1. Map based flight plan: If the waypoint icon you wish to use is visible on the map screen, simply pick the destination from the screen by touching the waypoint and tap the Wpt/Fly To button on the information screen that appears. 2. Using an off-screen destination. Tap the Direct-To Finder button on the side toolbar and use this tool to look up a waypoint. See the Direct-To Finder section on page ? 3. Tap USE WAYPOINT in the finder screen to MODIFY an existing flight plan with this waypoint. Tap DIRECT TO in the finder screen to clear the existing flight plan (if any) and create a “GPS Direct” flight plan from the current location to the selected waypoint. Note that you can also tap the DETAILED INFO button in this screen and then tap the Wpt/Fly To button in the information screen that follows. Using a NEARBY airport or navaid. Tap the Nearby Anything button and then tap the AIRPORT or NAVAID buttons. Double tap on any airport or navaid listed and tap the Wpt/Fly To button in the information screen that appears, then tap OK. 4. In any of the above three cases, if a flight plan did not previously exist, pressing the WAYPOINT button will immediately create a ‘GPS Direct’ flight plan from the current map position to the selected location. IF a flight plan was active, the Use Waypoint screen will appear to ask the pilot how the waypoint is to be used in the flight plan. All of the above methods to create a flight plan will use the current map position as the flight plan Start Point. Normally the map position will be the GPS location. If another start point is desired, first select the start point (using the Direct To Finder or by double tapping the location on the map) and tap the JUMP TO button in the information screen to relocate the symbolic aircraft on the map to the desired location BEFORE selecting the destination waypoint. Anywhere Map Freedom software Page 53 Route Wizard Based Flight Plan The Route Wizard is a quick and easy way to create a flight plan if the starting point and destination identifiers are known, along with any number of intermediate waypoints. Tap the + Create tab + Route Wizard button and enter the starting airport identifier in the “From” box. The route wizard is the only place where you need to enter the ICAO prefix (“KOSH”, not “OSH”), as there is no other way for the system to know the ICAO region. Next, enter the airport identifier for the destination airport in the “To” box, again providing the ICAO prefix. Prefix all airport identifiers with a “K” if in the lower 48 United States, “C” for Canada, and “P” for Alaska, for example. Use the “VIA” box to enter any intermediate waypoints that are desired, separating each entry with a space. VOR/NDB’s must be entered as 3 letters and fixes must be entered as 5 letters. Tap the OK button, and you will be returned to the Flight Plan Manifest screen with the selected route displayed. The flight plan can now be modified if needed. If there is a conflict regarding one of the identifiers, or if it has multiple matches in the aeronautical database, a clarification screen will open automatically. The Use Waypoint Screen If a flight plan already exists and a waypoint is selected, a new menu screen will appear to clarify how the waypoint is integrated into the existing flight plan. Anywhere Map Freedom software Page 54 Destination- This option will add the selected item as the last waypoint in the existing flight plan, effectively changing the final destination to be the selected waypoint. New Flight Plan- This option will erase any current flight plan and go ‘GPS Direct-TO’ to the selected item. Next Waypoint- This option will add the selected item before all other waypoints chronologically, making it your next plotted waypoint. Waypoint- This option will automatically add the selected item into your existing flight plan in the position that Anywhere Map selects automatically. This method allows one to easily add waypoints to an already existing flight plan. This is the most common option in this screen. Zero Cross Track- Incorporates new waypoint into Flight Plan and adjusts all other legs accordingly to begin the new leg from current position. This is very useful if you have deviated from the current flight plan and wish to proceed direct to some new waypoint, then re-join the original flight plan. Virtual ILS Approaches A Virtual ILS approach simulates the localizer & glideslope of a standard ILS approach to any runway endpoint in the database. The VILS provides standard vertical guidance along a user definable glideslope, nominally 3 degrees, just like a standard ILS. The build in HSI also provides runway centerline alignment under most circumstances. WARNING: VILS procedures DO NOT necessarily provide terrain and/or obstacle clearance, and are not approved for IFR use. Not all runways have a clear approach path that will allow for a standard glideslope approach. The easiest way to use the Virtual glideslope approach is to select “ENABLE AUTO VIRTUAL ILS” in the Airport tab of the View Settings screen. With this selected, the VILS for your destination airport will automatically be selected based on the runway you appear to be approaching. Note that the auto selection process “locks” at 3 miles distance from the airport, to prevent confusion at large airports with multiple runways. Anywhere Map Freedom software Page 55 Cones of Safety® Around every airport there is a region of airspace, shaped like an inverted cone, we call the “Cone of Safety”. If the aircraft is inside of this cone, it could glide to the airport if the engine were to fail, assuming that the winds aloft were inconsequential. The cone gets larger as the altitude above the airport increases, and the radius of the cone gets smaller as the surface of the airport is approached. Anywhere Map shows the cross section of these cones at the current aircraft altitude, computing the altitude above the airport from the GPS derived altitude, and the airport elevation. These cross sections are shown on the map a light green circles around each airport. The higher the aircraft is above the airport, the larger the circle becomes. The Cone of Safety display on the map screen allows the pilot to easily assess the glide-friendliness of any flight by graphically showing the proportion of the flight path that is inside or outside of the cones. As the cruising altitude increases, the cones often grow to overlap. By the time the aircraft is 10,000 feet AGL, there is extensive coneof-safety overlap in most areas. In order for the cones of safety to work properly, the aircraft profile must have the glide range and glide distance parameters filled out. The glide range should be set to a distance in nautical miles, and the Glide Altitude should be set to an altitude in feet. Most Pilot Operating Handbooks have a simple chart in them, which show aircraft glide performance, with the altitude and glide range given in these units. If you know that your aircraft will glide 9 nautical miles when it is 6000 feet (that’s one nautical mile) high, enter 9 and 6000 respectively in these boxes. This is typical of most single engine aircraft. Also in order to see the cones display, cones must be enabled in the view settings, airport tab, and the map must think it is at a particular altitude. To preview the Cones of Safety display, you can put the map in Sim Mode at a particular altitude. Anywhere Map Freedom software Page 56 PREFLIGHT UPDATE Freedom allows you to download key information before each flight and carry the data for use offline as the flight progress. The PREFLIGHT UPDATE button allows for the downloading of three types of data. The FUEL button will update the 100LL fuel prices from our server. It’s a good idea to do this once a day when flying. The Weather Data button will access the Anywhere Map server and download the following data: Metars / TAFS National Nexrad SFR / TFR data. It is advisable to download this data before each flight. The weather and TFR data can be overlaid on the map to greatly enhance your ability to avoid this airspace Anywhere Map Freedom software Page 57 MAP DATA UPDATES The connectivity of modern tablet computing devices makes it simple to update your FREEDOM software. The installation that comes from the App store (either Apple or Google) includes a sample 28 day “Vector” database but do not include any raster data such as sectional and enroute chart images. The raster data must be downloaded after the app is downloaded and installed. These data downloads are HUGE when you download all . The update process has been designed to allow the updates to be interrupted and restarted. If the download is interrupted after it is 50 percent of the way done, it will pick up where it left off. Anywhere Map Freedom uses the following data for a full download. Regional downloads use a fraction of these numbers. Database Expires every xx days Size (approx) Aeronautical Data 28 days 2 MB Sectional Charts 28 days ** 2 GB Enroute Low Charts 56 Days 350MB Enroute High Charts 56 Days 300MB Approach Plates 28 days ** 2.5GB 6 Months 500MB “Vector Database” (Coming June 2012) Airport Diagrams (Coming June 2012) Anywhere Map Freedom software Page 58 High Resolution Terrain NEVER 500MB ** SOME sectional charts expire every 28 days, however the individual charts are good for six months. The monthly download is approximately 10-15% of the total download, or about 300MB. *** Only some of the approach plates change in each 28 day cycle. CVC provides ONLY the changed plates to the customer, which results in significant time savings to the customer as opposed to keeping all of them up to date. Freedom will require approximately 6 GB of storage in the Tablet system for a full install. After the app is downloaded and installed, it is necessary to download and install the database components over the internet connection. As this is an enormous amount of data, it is critical to be certain that you have access to a fast internet Downloading these data files is very time consuming and can take several hours initially, even with a FAST internet connection. Regional Downloads We have shortened the download times by allowing for regional downloads. This allows you to download only the regions of the United States that you visit. The regions are overlapping, allowing those near the edges of territories to still be able to choose a single area. Selecting overlapping areas will not cause any data to be downloaded twice. Chart / Map data download Regions: NE: IN, MI, OH, WV, PA, MD, MA, NJ, NY, RI, CT, VT, NH, ME plus most of VA and KY SE: KY, VA, WV, MD, TN, NC, SC, AL, GA, FL plus part of Eastern MS and southern OH and IA SC: LA, MS, OK, AR, KS, MO, TX (excluding extreme western tip), AL & TN (west half) NC: NE, IA, IL, SD, ND, MN, WI, eastern CO, most of MO Anywhere Map Freedom software Page 59 CENTRAL: KS, MO, OK, AR, MS, LA, TX (excluding extreme western tip), IL (southern half) NW: WA, OR, ID, MT, WY, CA (N 1/3), NV, UT CO (N ½) SW: AZ, NM, TX (west), CO (south 80%), UT (south 80%), NV (south 80%), CA (south 90%) Installing High Resolution Terrain In order to see high resolution terrain it’s necessary to download the terrain files from our server. Set your tablet on external power and set it to never go to sleep. Be sure you are on a WiFi connection and are not using your data plan! Start the terrain download by tapping the TOOLS button, then DATABASE UPDATES, then TERRAIN. This is approximately a 500MB download and will take a while, even with a fast internet connection. If necessary, you can cancel at any time during the download and it will pick back up where you left off. The terrain files never expire, so there is no need to ever download them again. This is a “one time” download. Installing Sectional Charts In order to see the sectional charts, you must download them from our server as well. They are downloaded from the same page as the Terrain files. This is a very large download. The app currently does not support downloading just a small region, (this is coming in version 1.1). Once again, make sure the tablet will not auto sleep, and start the download, and be sure your internet is coming from a WiFi connection. The Sectionals take approximately 2 GB of storage. This download will take a few hours, even with a fast internet connection, so be patient. As above, you can hit cancel at any time and it will pick up where you left off. About 10% of the sectionals expire every 28 days. In the future you will only need to download those that have changed. Anywhere Map Freedom software Page 60 Help Screen This will take you to the online Help. This will open the Help Screen in the internet browser. When you press the Help Button, a window will pop up asking if you want to minimize the app. Press yes to continue to the Help screen. On this screen, you will find a link to the pdf of this manual, the most current release notes, a link to some Knowledge base articles based on the most commonly asked questions, and some basic installation instructions. Anywhere Map Freedom software Page 61