1
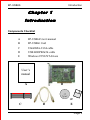
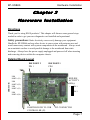
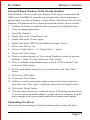
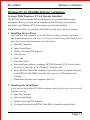
EP-USB66
PCI UltraDMA-66 &
USB Controller Card.
TRADEMARKS
All products and company names are trademarks or
registered trademarks of their respectives holders.
These specifications are subject to change without notice.
Manual Revision 1.0
August 25, 1999
EP-USB66
User Notice
No part of this product, including the product and software may be reproduced, transmitted,
transcribed, stored in a retrieval system, or translated into any language in any form
without the express written permission of EPoX Computer Company (hereinafter referred
to as EPoX) except for documentation kept by the purchaser for backup purposes.
We provide this manual “as is” without warranty of any kind, either expressed or implied,
including but not limited to the implied warranties or conditions of merchantability or
fitness for a particular purpose. In no event shall EPoX be liable for any loss of profits,
loss of business, loss of use or data, interruption of business or for indirect, special
incidental, or consequential damages of any kind, even if EPoX has been advised of the
possibility of such damages arising from any defect or error in the manual or product.
EPoX may revise this manual from time to time without notice. For updated product
release information you may visit our websites at
http://www.epox.com, http://www.epox.com.tw or http://www.epox.nl.
Products mentioned in this manual are mentioned for identification purposes only.
Product names appearing in this manual may or may not be registered trademarks or
copyrights of their respective companies. The product name and revision number are
both printed on the diagnostic card itself.
Handling Procedures
Static electricity can severely damage your equipment. Handle the EP-USB66 and any
other device in your system with extreme care and avoid unnecessary contact with system
components on the motherboard or converter card. Always work on an antistatic surface
to avoid possible damage to the motherboard from static discharge. Always have the
power supply unplugged and powered off when inserting and removing devices within the
computer chassis. EPoX assumes no responsibility for any damage to the EP-USB66
that results from failure to follow instruction or failure to observe safety precautions.
CAUTION
The EP-USB66 card is subject to
damage by static electricity. Always
observe the handling procedures.
EP-USB66
Technical Support Services
If you need additional information, help during installation or normal use of this product,
please contact your retailer. Your retailer will have the most current information about
your configuration. If your retailer cannot help, you may visit our online technical
support website and/or contact our support technicians at the locations listed below.
Contacting Technical Support
EPoX technical support is working hard to answer all of your questions online. From our
website you can find answers to many common questions, drivers, BIOS updates, tech
notes, and important technical bulletins. If you are still unable to locate the solution you
are seeking, you always have the option to contact our support technicians directly.
North American website (English language)
http://www.epox.com
[email protected]
[email protected]
European website (Multi-language)
http://www.epox.nl
[email protected]
[email protected]
Taiwan website (Chinese language)
http://www.epox.com.tw
[email protected]
[email protected]
Thank you for using EPoX products!
Copyright 1999 EPoX Computer Company. All rights reserved.
EP-USB66
Table of Contents
Chapter 1: Introduction .............................................. 5
Components Checklist .......................................... 5
Overview of EP-USB66 ......................................... 6
Chapter 2: Hardware Installation .............................. 7
Directions ............................................................... 7
Detailed Board Layout ........................................... 7
Chapter 3: Software Installation ................................ 9
Motherboard BIOS Configuration ......................... 9
Windows 95/98 UltraDMA-66 .............................. 10
Windows 95/98 USB Hub .................................... 12
Windows NT 4.0 UltraDMA-66 ........................... 13
Windows NT 4.0 USB Hub ................................. 16
Appendix A: Frequently Asked Questions ................................ 17
Additional Sources of General Information
EPoX
http://www.epox.com
http://www.epox.com.tw
http://www.epox.nl
Highpoint
http://www.highpoint-tech.com
EP-USB66
Introduction
Chapter 1
Introduction
Components Checklist
A
EP-USB66 User’s manual
B
C
D
E
EP-USB66 Card
UltraDMA-33/66 cable
USB LOOPBACK cable
Windows 95/98/NT drivers
User’s
manual
A
B
C
C
D
D -R o m
or
E
Page 5
Introduction
EP-USB66
Overview of EP-USB66
The EP-USB66 is a complete IDE and USB solution for the most demanding
hardware configurations. A combination UltraDMA-66 EIDE controller and Universal
Serial Bus (USB) Hub makes the EP-USB66 a superb addition to any PC based
system.
UltraDMA-66 Controller
The UltraDMA-66 portion built using the advanced HPT-366 PCI Host Adapter chip
is capable of up to 133 MBytes/sec burst data transfer rates on the PCI Local Bus. The
HPT-366 supports a wide range of devices such as CD-R, CD-RW, DVD, ATAPI CDROM, LS-120, Tape and ZIP devices. The controller also of course supports today’s
faster UltraDMA-66 hard drives as well as being backwards compatible with
UltraDMA-33 and PIO mode transfer rates. The controller has two IDE channels than
can support up to two EIDE devices each plus the card can coexist with any EIDE
controllers onboard your motherboard. Setup is completely automatic as the card will
autodetect the best possible transfer mode for each attached ATAPI or EIDE device.
•
•
•
•
•
UltraDMA-66 Controller Features Summary
Sustained transfer rates of up to 66 MBytes/sec.
Up to 133 MBytes/sec burst data transfer rates on the PCI Local Bus.
PCI 2.1 “Plug & Play” compatible.
Can coexist with other IDE and SCSI controllers.
LBA translation and Extended Int 13 support.
Universal Serial Bus (USB) Hub
USB is made possible by using the Texas Instruments TUSB2046 4-port USB Hub
chip. The chip includes full USB version 1.1 compliance and creates a self powered
USB Hub on the EP-USB66 PCI card. The Hub works in conjunction with your
motherboard’s (or USB controller card if present) USB port to add a total of 4 useable
ports for USB devices. This is in addition to any available USB ports that your
original USB controller has left unoccupied.
•
•
•
Universal Serial Bus (USB) Hub Features Summary
USB version 1.1 compliance
Self powered Hub
Coexists with onboard USB controller via loopback USB cable
Page 6
EP-USB66
Hardware Installation
Chapter 2
Hareware Installation
Directions
Thank you for using EPoX products! This chapter will discuss some general steps
needed in order to get your new diagnostic card installed and operational.
Safety precautions: Static electricity can severely damage your equipment.
Handle the EP-USB66 and any other device in your system with extreme care and
avoid unnecessary contact with system components on the mainboard. Always work
on an antistatic surface to avoid possible damage to the mainboard from static
discharge. Always have the power supply unplugged and powered off when inserting
and removing devices within the computer chassis.
Detailed Board Layout
IDE PORT 2
PIN 1
IDE PORT 1
PIN1
USB HUB
USB
PORT 1 (J1)
HDD IDE
ACTIVITY
LED(s)
USB
PORT 2 (J2)
1
USB
PORT 3 (J3)
IDE 1
IDE 2
USB
PORT 4 (J4)
PASSTHROUGH TO USB
CONTROLLER (J5)
PCI CONNECTOR
Page 7
Hardware Installation
EP-USB66
PCI Card Installation
Installing the EP-USB66 is a simple task. Simply remove your computer’s case cover
to gain access to the inside of the computer. The card will fit into any 32-bit PCI slot
on the motherboard. Below are some basic steps for installation.
1. Power off the computer and unplug the power supply.
2. Remove the computer’s case cover.
3. Remove the slot cover of an available PCI slot.
4. Install the EP-USB66 PCI card into the available PCI slot and secure.
5. Attach any 2 or 4 PIN LED cable to the IDE activity LED (J7) on the card
observing that the 1 printed on the card is the first PIN.
6. Attach the included USB loopback cable from an available USB connector on
your motherboard to the J5 connector on the EP-USB66.
7. Install any internal IDE drives (see below for tips) then re-attach the computer’s
case cover.
IDE Drive Installation
Configurations of drives can vary from system to system depending upon the user’s
needs. Below are some basic tips for installation.
1. Power off the computer and unplug the power supply.
2. Set any configuration jumpers (master, slave, single, etc.) that may need to be
changed on the drives. You may wish to refer to your drive’s manual for
configuration information.
3. Install/secure the drive into your computer’s case.
4. Attach the included IDE cable to the drive and also onto an IDE connector on the
EP-USB66 card. The color strip on one side of the cable designates the first PIN.
Be sure to match the first PIN on both the drives and the controller.
IDE Drive Installation Special Notes
•
•
If using UltraDMA-66 drives you must use an 80-conductor / 40-pin ‘UltraDMA66’ IDE cable (1 included) to attach the drive to the controller card.
‘UltraDMA-66’ IDE cables are not required for UltraDMA-33 or older transfer
modes but may still be used with them. But this cable is required if newer
UltraDMA-66 and older drives on to be placed on the same controller port.
Page 8
EP-USB66
Spftware Installation
Chapter 3
Software Installation
Motherboard BIOS Configuration
UltraDMA-66 Controller
The EP-USB66 has its own onboard BIOS that will automatically configure any IDE
devices attached to the card. For this reason the user does not need to configure any
additional options in their BIOS for parameters, heads, sectors, etc.
Booting of the system and to what drives and/or controllers have boot priority are
dependant upon the motherboard’s BIOS. This is usually configurable in the
motherboard’s BIOS in the “BIOS Features Setup” section using the option named
“Boot sequence” (or similar). If the user wishes drives attached to the EP-USB66 to
have boot priority over any attached to the motherboard’s IDE controllers then they
should configure this option to have ‘SCSI’ first. The motherboard’s BIOS will
consider the EP-USB66 as a SCSI device for boot purposes.
USB Hub
Since the EP-USB66 card’s onboard USB is only a Hub device and not an actual USB
controller itself no options need to be configured in your BIOS. As long as your
system has a working USB controller and you have properly attached the included
loopback cable you can use the EP-USB66’s Hub to attached more USB devices.
Page 9
Software Installation
EP-USB66
Windows 95/98 UltraDMA-66 Driver Installation
Systems With Windows 95/98 Already Installed
Usually, when you plug the EP-USB66 card adapter into your system and boot up the
Windows 95/98 system, the system will be able to detect the “HPT366 Ultra DMA
host Adapter” automatically and ask you to install the driver for HPT366. You can
follow the instructions prompted by the system to install the driver.
Otherwise, you can install the driver by the following steps:
1.
Windows 95/98 must be installed on the system prior to installing the driver.
2.
Close any running applications.
3.
Open "My Computer".
4.
Double click on the "Control Panel" icon.
5.
Double click on the "Add New Hardware" applet.
6.
Click on the "Next" button.
7.
There is a window that ask you "Do you want Windows to search for your new
hardware?", choose "No" then click on the "Next" button.
8.
There is a Window listing hardware types, select the "SCSI controllers" then
click on the "Next" button.
9.
Put the install diskette into the drive A: and then click on the "Have Disk..."
button.
10. Click on the "OK" button.
11. Click on the "Next" button.
12. If there is a window showing the settings (resources) to be used by the driver,
then click on the "Next" again. At this point, the system will install the driver.
13. Click on the "Finish" button.
14. Then the system will ask you to restart the system. If the settings reported in step
12 are not what set on the host adapter, you must adjust the settings by using the
device manager in the System control panel before restarting your computer.
Page 10
EP-USB66
Spftware Installation
Systems Without Windows 95/98 Already Installed
Install Windows 95/98 as normal. Once Windows 95/98 setup is completed the EPUSB66 card’s UltraDMA-66 controller may be listed with a yellow exclamation or
question mark in the Device Manager or Control Panel / System Icon. This is because
Windows 95/98 detected the device during setup but did not have a driver available.
1.
Windows 95/98 must be installed on the system prior to installing the driver.
2.
Close any running applications.
3.
Open "My Computer".
4.
Double click on the "Control Panel" icon.
5.
Double click on the "System" applet.
6.
Double click on the “HPT366 Ultra DMA host Adapter” device.
7.
Click on the “Drivers” tab.
8.
Click on “Update Driver...” or “Change Driver...” button.
9.
Click on the "Next" button.
10. There is a window that ask you "Do you want Windows to search for your new
hardware?", choose "No" then click on the "Next" button.
11. There is a Window listing hardware types, select the "SCSI controllers" then
click on the "Next" button.
12. Put the install diskette into the drive A: and then click on the "Have Disk..."
button.
13. Click on the "OK" button.
14. Click on the "Next" button.
15. If there is a window showing the settings (resources) to be used by the driver,
then click on the "Next" again. At this point, the system will install the driver.
16. Click on the "Finish" button.
17. Then the system will ask you to restart the system. If the settings reported in step
15 are not what set on the host adapter, you must adjust the settings by using the
device manager in the System control panel before restarting your computer.
Uninstalling the Driver
You can use the device manager in the System control panel to remove the driver.
Page 11
Software Installation
EP-USB66
Windows 95/98 USB Hub Driver Installation
Systems With or Without Windows 95/98 Already Installed
USB in any configuration requires at least Windows 95 OSR2.1 or Windows 98. If
your system uses an older version of Windows 95 before the OSR2.1 release then you
need to upgrade your operating system to at least Windows 95 OSR2.1 or use
Windows 98.
Since Windows 95 OSR2.1 (w/USB support) and Windows 98 already support USB
no further action is required by the user. Windows will be able to detect the USB
device automatically and install driver support.
Page 12
EP-USB66
Spftware Installation
Windows NT 4.0 UltraDMA-66 Driver Installation
Systems With Windows NT 4.0 Already Installed
The HPT366 based controller has been designed to let you add additional high
performance device(s) to your current computer system. Therefore your computer
should have the Windows NT 4.0 operating system already installed.
When Windows NT is up, install the UltraDMA-66 card device driver as follows:
1. Installing Device Driver
Your hard disk drive attached to the HPT366 host adapter must be partitioned
and formatted before you can access it. Please see Partitioning Your Hard Disk to
know how to partition and format a hard disk drive.
a. Open My Computer.
b. Open Control Panel.
c. Double click icon SCSI Adapters.
d. Click Drivers.
e. Click Add...
f. Click Have Disk...
g. Insert the floppy diskette containing HPT366 Windows NT 4.0 device driver
into drive A, and type in "A:\NT[Enter]", then click OK.
h. Select HPT366 Ultra DMA Controller, you will be asked to enter the full path
to the HPT366 Ultra DMA Controller files, type in A:\NT and then click
Continue.
i. When asked to restart your computer, click Yes.
2. Checking the Installation
If you want to check if the HPT366 host adapter and its device driver are correctly
installed, you can:
a. Open My Computer.
b. Open Control Panel.
c. Double click icon SCSI Adapters.
d. You should see the item HPT366 Ultra DMA Controller (started) listed.
Page 13
Software Installation
EP-USB66
3. Partitioning Your Hard Disk
If the hard disk drive attached to the HPT366 host adapter has not been
partitioned and formatted yet, you need to partition it first. To partition the hard
disk drive attached to the HPT366 host adapter, follow tips below:
a. Click the Startup button.
b. Go to Administrative Tools (Common).
c. Run Disk Administrator.
d. Select disk number you would like to partition.
e. Select the menu Partition.
f. Decide the partition size create partition of the size.
g. Exit Disk Administrator.
h. Select the new created partition (logical disk drive) and format it.
4. Troubleshooting
The boot manager for Windows NT contains recovery logic to allow you to return
to the last known good configuration. If you have changed your host adapter
configuration and Windows NT no longer boots, follow these steps to recover:
a. Undo any hardware changes you have made to the computer since it was last
operational.
b. Reboot the computer. Watch the display carefully during booting up. If the
following message appears, press the Spacebar and follow the instructions on
the display screen to continue booting with the last known good configuration:
Press spacebar NOW to invoke the Last Known Good menu
c. Once your computer is operational again, check all of the hardware and software
configuration changes you want to make. Look specially for conflicts with parts
of the existing system configuration that are not being changed.
If Windows NT can boot but the driver has not been started (see Checking the
Installation), please check the followings:
a. Make sure the host adapter is properly installed, and the device is correctly
connected to the adapter. Double check that the cable between the adapter and
the devices is correctly attached. And also check the jumper setting on the drive
is correct.
Page 14
EP-USB66
Spftware Installation
b. Make sure that a power cable is properly attached to each drive attached to the
HPT366 host adapter.
If the driver has been started and you still cannot access the hard disk drive
attached to the HPT366 host adapter, the hard disk drive might have not been
partitioned and formatted yet. You may need to partition and format it.
5. Removing a Host Adapter
Removing a host adapter can be as simple as physically removing it from the slot
when your computer is shut down. Windows NT boots and functions properly in
this configuration, but a warning message is generated every time you boot
Windows NT. To eliminate the warning message, you must update the Windows
NT software configuration, as described in the following steps:
a. Open My Computer.
b. Open Control Panel.
c. Double click SCSI Adapters.
d. Click Drivers.
e. Select HPT366 Ultra DMA Controller, then click Remove.
Systems Without Windows NT 4.0 Already Installed
1. Start Windows NT setup from CD-ROM or NT install disks.
2. When Windows NT setup asks for addtional host adapters, please select SCSI
type host adapter.
3. Then Windows NT will ask you to install device driver for that SCSI type
host adapter (HPT366).
4. Insert the driver disk into the floppy drive and allow Windows NT to read the
driver.
5. After installing HPT366 files from the floppy, users will see "HPT366 Ultra
DMA host adapter."
6. Continue installation of Windows NT.
Page 15
Software Installation
EP-USB66
Windows NT 4.0 USB Hub Driver Installation
Systems With or Without Windows NT 4.0 Already Installed
Sorry Windows NT does not support USB devices.
If you wish to take advantage of USB devices you should use Windows 95 OSR 2.1
(w/USB support), Windows 98, or Windows 2000.
Page 16
EP-USB66
Appendix
Appendix A
Fr equentl
y Ask
ed Questions
equently
Asked
Technical Support
Welcome to the EPoX technical support pages. We are working hard to answer all of
your questions. In this section you will find commonly asked questions our support
department is asked by users.
Tips to install PC cards
w Take time to ground yourself before handling your new motherboard or PC
cards. Static electricity causes intermittent/non fatal damage which may be hard
to diagnose.
w Make sure the cables are installed in the correct direction (PIN 1 = colored
stripe).
w Before installing any additional software, make sure the operating system is
completely setup and correctly identifies all motherboard devices.
Page 17
Appendix
EP-USB66
When I boot up my computer I get a floppy (or hard drive) failure.
Is my motherboard and/or EP-USB66 card bad?
With your floppy, and most other devices, it is very important that all cables line up
to pin 1. Most cables have a colored stripe on them. That color stripe must line up to
the pin 1 on the IDE controller port. If a floppy has no light come on, or the light
stays on and never turns off, then the cable is on backwards, not at all, or incorrectly,
either at the board end or the floppy end. If your hard drives or CD-ROMs are not
detected then the cables might not be right. If you have checked your cables also look
at the jumper settings on the back of the device (set for master/slave, etc).
I just installed a new hard drive, and I can't use it. Why?
Before a new hard drive can be accessed it must be properly recognized by the
motherboard BIOS if attached to the motherboard’s onboard IDE controllers. Use the
CMOS utility and perform an IDE HDD AUTODETECT or you can optionally enter
the parameters for the drive yourself. For hard drives over 512MB be sure the BIOS
uses LBA mode so the operating system can have access to the total available space.
For drive’s attached to the EP-USB66 no BIOS detection is needed as the card’s BIOS
should automatically detect any IDE device attached.
Most new hard drive's do not come partitioned or formatted. You must run FDISK.
EXE (in DOS or Windows 95/98), and create DOS partition. When complete, re-boot,
then format the hard drive. Type "format x:" without the quotes and replace x with the
drive letter of the new drive. Windows 95 OSR2 and Windows 98’s FDISK.EXE
program may ask if you want to use FAT32. This is for larger drives (over 2.1 gig).
The maximum size that a single partition may be is about 2.1 gig using DOS and
FAT16.
Windows NT users can use the Disk Administrator utility to prepare the new hard
drive for access.
Page 18
EP-USB66
Appendix
Will the IDE ports on the EP-USB66 work with my hard drive and
CD-ROM?
If your devices are 40 pin they will most likely be detected. If your hard drive is listed
as IDE, EIDE, UltraDMA-33 or UltraDMA-66 it should function fine. A wide range of
devices such as CD-R, CD-RW, DVD, ATAPI CD-ROM, LS-120, Tape and ZIP
devices are also supported.
If using UltraDMA-66 drives you must use an 80-conductor / 40-pin ‘UltraDMA-66’
IDE cable (1 included) to attach the drive to the controller card. ‘UltraDMA-66’ IDE
cables are not required for UltraDMA-33 or older transfer modes but may still be used
with them. But this cable is required if newer UltraDMA-66 and older drives on to be
placed on the same controller port.
What is FAT32 and how do I use it?
Versions of Windows 95 older than OSR2, as well as any DOS version, operate on a
file system called FAT16. The existence of large hard drives has led to large partition
sizes, which mean large cluster sizes and wasted space. Under FAT16, a smaller cluster
size is better, because a small file takes up a whole cluster if there is even one byte in
it; the leftover space is called "slack." FAT16 does not support partitions larger than
2GB.
FAT32 is an improvement, as it supports drives up to 2 Terabytes in size, and cluster
sizes are 4K for partitions smaller than 8GB. Note that the minimum size of a FAT32
partition created with FDISK is 512MB. You cannot make FDISK/FORMAT format a
drive with the FAT32 file system if it is smaller than 512MB. You must use Windows
95 OSR2.0 or higher for FAT32.
To use FAT32 you must use the FDISK utility in Windows 95 OSR2.x (a.k.a.
Windows 95 B) or Windows 98. FDISK will only allow you to put FAT32 on drives
larger than 512MB. Once inside FDISK, you must enable "large disk support," to
choose FAT32. Proceed to partition the drive as usual, selecting drive/partition sizes,
etc. After exiting FDISK and rebooting, FORMAT (use the OSR2.x or 98 version
only) the drive. NOTE that you must manually reboot after exiting the OSR2.x (or
98) version of FDISK, this is not automatic as in previous versions of FDISK. If you
do not reboot between FDISK-ing and FORMAT-ing, you will get strange-looking
error messages.
Page 19
Appendix
EP-USB66
IMPORTANT: If you wish to use FAT32 you must also use Windows 95 B (or later)
as your operating system. Previous versions of Windows 95 and all versions of OS
use FAT16 and are not compatible.
Where do I get USB drivers from?
Most versions of Windows 95 have no drivers for USB. This includes the Retail
release, the service pack 1 for the Retail release, OSR 1, and OSR 2. The new version
for OEM's, OSR 2.1 does have support. Microsoft has released both a new 2.1 CD and
an update patch that is available through OEMs. This patch is nominally called
"usbsupp.exe" although various OEMs have renamed it to their liking. This is not a
public release or download, and if you have it, it will ONLY work on versions of
OSR2 and no others. We do not have copies for release as we are a manufacturer and
not an OEM. You will need to contact your vendor to receive this update.
If you own the Windows 95 OSR2.1 software then you already possess the necessary
software. USB support can be found on the CD (directory: \OTHER\USB).
Windows 98 and Windows 2000 has built-in support for USB.
Page 20