1
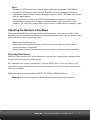
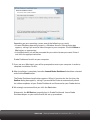
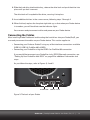
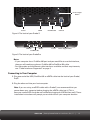
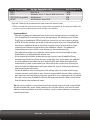
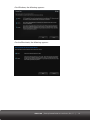
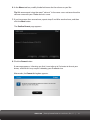
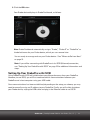
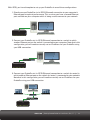
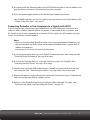
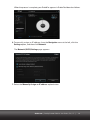
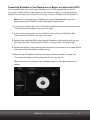
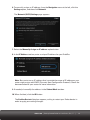
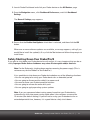
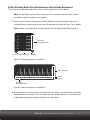
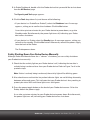
Getting Started Guide
Drobo / DroboPro / Drobo S
Data Robotics, Inc. supports lawful use of technology and does not endorse or encourage
the use of its products for purposes other than those permitted by copyright law.
Copyright 2011 Data Robotics, Inc. Data Robotics, Drobo, DroboShare, DroboPro,
DroboElite and BeyondRAID are trademarks of Data Robotics, Inc., which may be
registered in some jurisdictions. All other trademarks used are the property of their
respective owners.
Information supplied by Data Robotics, Inc. is believed to be accurate and reliable at
the time of printing, but Data Robotics, Inc. assumes no responsibility for any errors that
may appear in this document. Data Robotics, Inc. reserves the right, without notice,
to make changes in product design or specifications. Information is subject to change
without notice.
Data Robotics, Inc., 1705 Wyatt Drive, Santa Clara, CA 95054, U.S.A.
For more info, visit: http://www.drobo.com
Part # 070-00043-002
Rev 01
drobo.com | Getting Started Guide for Your Drobo / Pro / S |
1
Table of Contents
BEFORE YOU BEGIN
Checking Box Contents
Drobo
Drobo S
DroboPro
Checking System Requirements
Operating Systems Supported for Drobo/Pro/S
Cable Interfaces Supported
Checking the Hardware You Need
Selecting Hard Drives
Determining How Much Hard Drive Space You Need
Using a Router or Switch
Using an Uninterruptible Power Supply (UPS) or Power Surge Protector
SETTING UP IN JUST A FEW EASY STEPS!
Installing Drobo Dashboard
Installing Drobo Dashboard from the Resource CD
Installing Drobo Dashboard from the Website
Inserting the Hard Drives
Connecting the Cables
Connecting to Your Computer
Connecting to a Power Source
Turning on the Power and Formatting the Drives
Selecting a File System and Volume Size
Turning on Your Drobo Device and Formatting the Drives
Setting Up Your DroboPro with iSCSI
Connecting DroboPro Directly to Your Computer via iSCSI
Connecting DroboPro to Your Computer via a Switch with iSCSI
Connecting DroboPro to Your Network via a Router or Switch with iSCSI
WHERE TO GO FROM HERE
Using Best Practices
Keeping Your Software Up to Date
Safely Shutting Down Your Drobo/Pro/S
Safely Shutting Down your Drobo Device Using Drobo Dashboard
Safely Shutting Down your Drobo Device Manually
Using the Online User Guide
Using Context-Sensitive Help
Using the Knowledge Base
Getting Support
TROUBLESHOOTING YOUR SETUP
INDEX
drobo.com | Getting Started Guide for Your Drobo / Pro / S |
3
3
3
3
3
4
4
4
7
7
8
8
8
9
9
9
12
12
14
15
16
16
16
18
22
24
25
28
31
31
31
32
33
34
35
35
35
35
36
38
2
Before You Begin
Congratulations on your new Drobo/Pro/S! This Getting Started Guide will help you get your
Drobo/Pro/S set up in just a few easy steps. Before you begin, it’s a good idea to check your
system and hardware requirements. In this chapter, you will:
t$IFDLCPYDPOUFOUT
t$IFDLTZTUFNSFRVJSFNFOUT
t&OTVSFUIBUZPVIBWFUIFIBSEXBSFZPVOFFEGPSZPVS%SPCPEFWJDF
Checking Box Contents
Check your product’s box to ensure it contains all the components listed below.
Drobo
t%SPCP
th64#DBCMF
th'JSF8JSFDBCMF
thQPXFSDPSE
t(FUUJOH4UBSUFE(VJEFQSJOUFE
t%SPCP3FTPVSDF$%XIJDIJODMVEFT
the Drobo Dashboard application
Drobo S
t %SPCP4
t h64#DBCMF
t h'JSF8JSFDBCMF
t hF4"5"DBCMF
t hQPXFSDPSE
t (FUUJOH4UBSUFE(VJEFQSJOUFE
t %SPCP3FTPVSDF$%XIJDIJODMVEFT
the Drobo Dashboard application
DroboPro
t %SPCP1SP
t h64#DBCMF
t h'JSF8JSF
t h&UIFSOFUDBCMF
t hQPXFSDPSE
t (FUUJOH4UBSUFE(VJEFQSJOUFE
t %SPCP3FTPVSDF$%XIJDIJODMVEFT
the Drobo Dashboard application
drobo.com | Getting Started Guide for Your Drobo / Pro / S |
3
Checking System Requirements
Check to ensure your operating system and cable interface are supported.
Operating Systems Supported for Drobo/Pro/S
t8JOEPXT914FSWJDF1BDL
t8JOEPXT7JTUB4FSWJDF1BDL
t8JOEPXT
t8JOEPXT4FSWFS3
t8JOEPXT4FSWFS
t.BD049PSHSFBUFS*OUFM0OMZ
t.BD0494FSWFSPSHSFBUFS*OUFM0OMZ
Notes:
- For best performance, ensure you are running the latest service packs for the
appropriate Windows operating systems.
- For the most current list of supported operating systems, you can check the
specifications for your product online. Navigate to www.drobo.com/products/index.php,
click on your product and then click on the Tech Specs tab.
Cable Interfaces Supported
Your Drobo/Pro/S connects directly to your computer using one of the following connection
ports. (Your DroboPro can also connect to a router or switch.) We recommend that you use
the fastest connection you have available on your computer.
Notes:
- You can only use one connection at a time.
- If the interface you would like to use is not available on your computer, you can
purchase and install an add-on adapter card. (This is a circuit board that fits into an
expansion slot in your computer and provides the interface you want.)
eSATA
Available on Drobo S only.
External Serial Advanced Technology Attachment or eSATA is an external interface for
SATA technologies and provides fast data transfer speeds for external storage devices.
With data transfer speeds of 6 Gbit/s, eSATA is nearly twice as fast as FireWire 800 and
three times faster than USB 2.0.
drobo.com | Getting Started Guide for Your Drobo / Pro / S |
4
If you are installing an add-on adapter card to use eSATA, check with your computer
manufacturer to verify that both your computer and operating system support the
eSATA card you plan to use. Also, make sure your eSATA card supports port multiplier
(PM) functionality. For more information, visit our knowledge base at support.
datarobotics.com/app/answers/list and enter the keyword, eSATA.
Note: Because some eSATA cards do not handle hot plugging of eSATA drives well, we
recommend that during the installation process you connect and power on your Drobo
S before you start your computer. Our setup steps will prompt you for this.
USB 2.0
Available on Drobo and DroboPro.
USB (Universal Serial Bus) is a popular interface that allows you to attach additional
hardware devices to your computer in a plug-and-play style. With a data transfer rate
of 12 Mbit/s, USB 2.0 is not as fast as FireWire 800 or eSATA, but it is found on most
every computer made in the past few years.
USB 3.0
Available on Drobo S only.
USB (Universal Serial Bus) is a popular interface that allows you to attach additional
hardware devices to your computer in a plug-and-play style. USB 3.0, also known as
SuperSpeed USB, provides data transfer speeds of up to 4.8 Gbit/s, much faster than
USB 2.0.
In order to take advantage of this technology, your Drobo S must be connected to
a USB 3.0 port on your computer. If your computer does not have USB 3.0, you can
consult with your computer manufacturer to find a compatible USB 3.0 card.
Note: If your computer only has a USB 2.0 connection, then Drobo S will auto-negotiate
to USB 2.0 speeds.
drobo.com | Getting Started Guide for Your Drobo / Pro / S |
5
FireWire 800
Available on all three models: Drobo, DroboPro and Drobo S.
FireWire is Apple Inc.’s branded name for data ports designed for high-speed data
transfer. With data transfer speeds of 800 Mbit/s, FireWire 800 offers excellent
performance with your Drobo device.
If you are installing an add-on adapter card to use FireWire 800, for optimal performance,
check with your computer manufacturer to verify that both your computer and operating
system support the card you plan to use. If your computer has a FireWire 400 port then
you will need to purchase a FireWire 800 to FireWire 400 cable.
Note: Windows-based computers will not get optimal performance with the standard
Microsoft FireWire drivers.
Visit our knowledge base at support.datarobotics.com/app/answers/list and enter the
keywords FireWire performance for details on how to optimize performance with
FireWire on Windows.
iSCSI (Ethernet)
Available on DroboPro only.
iSCSI (Internet Small Computer System Interface) is an Internet Protocol (IP)-based
networking standard for connecting storage devices to computers. By using a high
performance Ethernet connection, iSCSI can be used over long distances on your
existing network infrastructure and will give you the best possible performance with
your DroboPro.
With iSCSI, you have the flexibility to set up your DroboPro in one of three
configurations: directly connecting it to your computer (for best performance),
connecting it to a switch in which another Ethernet port on the switch is connected to
your computer, or connecting it to a switch (or router) in which another Ethernet port
on the switch (or router) is connected to your network.
Installation steps and additional requirements can be found in “Setting Up Your
DroboPro with iSCSI” on page 22.
drobo.com | Getting Started Guide for Your Drobo / Pro / S |
6
Notes:
- DroboPro’s iSCSI connection supports gigabit Ethernet connections (1000 Mbit/s)
for optimal performance. Although your DroboPro will auto-negotiate the highest
connection speed available to your computer, router or switch, iSCSI does not perform
well at slower speeds.
- You can purchase an add-on gigabit Ethernet adapter card for your computer if
needed. Note, however, that a regular network adapter card is required, as Data
Robotics, Inc., does not support iSCSI-specific cards, or HBA (host bus adapter) cards.
Checking the Hardware You Need
To use your Drobo/Pro/S, you’ll need at least two hard drives. If you plan to use Dual Disk
Redundancy, which protects your data against two hard drive failures, you will need at least
three hard drives. This section helps you:
t4FMFDUUIFIBSEESJWFTUPVTF
t$IPPTFUIFBNPVOUPGESJWFTQBDFDBQBDJUZ
UPIBWFBWBJMBCMFPOUIPTFESJWFTUP
ensure your data is protected
t6OEFSTUBOECBTJDSFRVJSFNFOUTGPSBSPVUFSPSTXJUDIJGVTJOHPOFXJUIB%SPCP1SP
Selecting Hard Drives
You can use hard drives from any manufacturer and with any capacity (the space available
on the hard drive) with your Drobo device.
All Drobo devices support standard 3.5” internal SATA drives. If you are unsure, ask
your administrator or hard drive retailer or manufacturer to verify that your hard drives
meet this standard.
Drobo devices are not compatible with SSD, IDE, SCSI or PATA hard drives.
Warning: Any pre-existing data on the drives will be erased during installation.
drobo.com | Getting Started Guide for Your Drobo / Pro / S |
7
Determining How Much Hard Drive Space You Need
In order to protect your data from hard drive failure, your Drobo device requires more space than
what you will use for your data, sometimes as much as double or more the amount of space.
The best way to determine how much usable, protected storage space you will have
available for your data, based on the number and capacity of your drives, is to use our
Capacity Calculator at www.drobo.com/calculator.
A shortcut to estimating the capacity available for your data is to omit the largest drive and
then add the capacity of the remaining drives. If you plan to use Dual Disk Redundancy, omit
the largest two drives. For example:
Single Disk (Default) Redundancy
# Drives
3
4
4
Drive Capacities
Usable Protected Capacity*
250GB + 250GB + 250GB
250GB + 250GB + 250GB + 500GB
750GB + 250GB + 250GB + 500GB
= 500GB
= 750GB
= 1000GB
Dual Disk Redundancy
# Drives
4
5
5
Drive Capacities
Usable Protected Capacity*
250GB + 250GB + 250GB + 500GB
750GB + 500GB + 500GB + 500GB + 250GB
750GB + 1000GB + 500GB + 500GB + 500GB
= 6TB
= 1250GB
= 1500GB
Notes:
- Actual capacity is often less than what is shown in the examples above due to the
different systems used for rating capacity. This has nothing to do with Drobo devices.
- Know that all Drobo devices enable you to easily increase storage capacity at any
time by simply inserting additional drives or replacing smaller drives with larger ones.
Using a Router or Switch
If you are connecting a DroboPro via its iSCSI connection to a router or switch, your
router or switch needs to support gigabit Ethernet connections (1000 Mbit/s) for optimal
performance. Although your DroboPro will auto-negotiate the highest connection speed
available to your router or switch, iSCSI does not perform well at slower speeds.
Using an Uninterruptible Power Supply (UPS) or Power Surge Protector
We highly recommend you plug your Drobo device into an uninterruptible power supply
(UPS), which protects against sudden losses in power as well as power surges. We also
recommend a power surge protector, although this only protects against power surges.
drobo.com | Getting Started Guide for Your Drobo / Pro / S |
8
Setting Up in Just a Few Easy Steps!
Once you have unpacked your Drobo device from its box and ensured you meet all system
and hardware requirements, it’s time to set up your Drobo/Pro/S for use. This can be done in
just a few easy steps!
1. Install Drobo Dashboard.
2. Insert the hard drives.
3. Connect the cables.
4. Turn on the power and format the drives.
Note: If you are connecting a DroboPro via your iSCSI (Ethernet) connection, you will
have a couple of extra steps.
Installing Drobo Dashboard
Drobo Dashboard is the software companion to your Drobo device, enabling you to easily
set up and manage your Drobo/Pro/S. You install Drobo Dashboard from the Resource CD
that came with your product. During the installation process, you can set Drobo Dashboard
to automatically install version updates, which we highly recommend.
Drobo software and firmware updates can also be installed from www.drobo.com/support/updates.
Important Note: In some cases, the latest version may be released with new products
(on a Resource CD) for a short period of time before being made available on the
website. Therefore it is best to install from the Resource CD.
Note: You need to have administrator rights on the computer on which you install Drobo
Dashboard.
Installing Drobo Dashboard from the Resource CD
1. Place the Resource CD in your computer’s CD/DVD drive.
Depending on your operating system, one of the following occurs:
t5IF%SPCPXJOEPXPSUIF*OTUBMM%SPCP%BTICPBSEXJOEPXBQQFBST
t"O"VUP1MBZEJBMPHCPYBQQFBSTHJWJOHZPVUIFPQUJPOUPSVO$%8JOEPXFYF
Select this option. The Drobo window appears.
t:PVDBOPQFOUIF3FTPVSDF$%UPWJFXJUTDPOUFOUTBOEGSPNUIFSFEPVCMFDMJDLPO
CDWindow.exe. The Drobo window appears.
2. Double-click the Drobo Dashboard icon.
drobo.com | Getting Started Guide for Your Drobo / Pro / S |
9
3. A dialog box may appear, asking you to select your language from the drop-down list.
After doing so, click the OK button.
Note: If the User Account Control dialog box appears in Windows, click the Yes
button to continue.
The Drobo Dashboard Installation Wizard appears (in Windows or in Macintosh),
preparing to install.
4. Click the Next button (Windows) or the Continue button (Macintosh), as appropriate.
Note: If the Microsoft iSCSI Initiator window appears and you have a DroboPro and
plan to use its iSCSI connection, click the Yes button. Follow the instructions to install
the Microsoft iSCSI Initiator, clicking the Next button as needed. When finished, you
are returned to the InstallShield Wizard to continue installation.
5. Follow the directions of the Installation Wizard, clicking the Next or Continue button
after each page, as appropriate.
6. When you reach the ready to install page, click the Install button.
drobo.com | Getting Started Guide for Your Drobo / Pro / S |
10
Depending on your operating system, one of the following may result:
t*OTPNF8JOEPXTPQFSBUJOHTZTUFNTB8JOEPXT"DDFTT$POUSPMEJBMPHCPY
appears, asking if you want to allow changes to your computer. Click the Allow or
Yes button, as appropriate.
t*OUIF.BDJOUPTIZPVXJMMCFQSPNQUFEGPSZPVSBENJOJTUSBUPSQBTTXPSE&OUFSJU
and click the appropriate button.
Drobo Dashboard installs on your computer.
7. If you are on a Macintosh, you will be prompted to restart your computer in order to
complete installation. Do this.
8. After installation is complete, leave the Launch Drobo Dashboard check box selected
and click the Finish button.
The Drobo Dashboard application appears. When it launches for the first time, the
Confirm dialog box appears, asking if you would like Drobo to automatically check
for software updates of your Drobo Dashboard and firmware for your Drobo device.
9. We strongly recommend that you click the Yes button.
Afterwards, the All Devices page displays in Drobo Dashboard. Leave Drobo
Dashboard open as you continue with the set up procedures.
drobo.com | Getting Started Guide for Your Drobo / Pro / S |
11
Installing Drobo Dashboard from the Website
You can install Drobo Dashboard from www.drobo.com/support/updates. Note, however,
that the latest version may be released with new products (on a Resource CD) for a short
period of time before being made available on this website.
1. Using your browser on an active Internet connection, navigate to
www.drobo.com/support/updates.
2. Locate the link for the latest Drobo Dashboard software and click on it.
3. If you’re given a choice to install (or run) Drobo Dashboard or save the installation
file to your computer, choose to save the file to your computer. Locate the file
and double-click on it to begin installation. (You can delete the installation file
afterwards.)
4. If warning messages appear, asking if you’re sure you want to open and/or install
the file or program, click the OK or Run button, as appropriate, to continue with the
installation.
5. A dialog box may appear, asking you to select your language from the drop-down list.
After doing so, click the OK button.
The Drobo Dashboard Installation Wizard appears (in Windows or in Macintosh),
preparing to install.
6. Continue with the installation process, following from step 4 in the “Installing Drobo
Dashboard from the Resource CD” section.
Inserting the Hard Drives
After installing Drobo Dashboard, you are ready to insert hard drives into your Drobo/Pro/S.
For more information on hard drive requirements, see “Checking the Hardware You Need”
on page 7.
Warning: Any pre-existing data on the hard drives will be erased, as the drives will
be formatted. If you wish to keep the data, copy it to another drive or medium before
using with your Drobo device.
Note: Once you insert the drives into your Drobo device, they function as a unit or
“pack.” To access the data on them, you will need the entire pack.
drobo.com | Getting Started Guide for Your Drobo / Pro / S |
12
1. Remove the face plate from the front of your Drobo/Pro/S by pulling it off.
2. With one hand, hold the hard drive so that its connectors are positioned at the
device and toward the bottom for the Drobo and Drobo S (see Figure 1), or positioned
toward the left, for the DroboPro (see Figure 2).
Connectors
Figure 1: Installing hard drives on a Drobo or Drobo S
Connectors
Figure 2: Installing hard drives on a DroboPro
Warning: For optimal performance, keep the DroboPro in its normal horizontal
position. If placed on its side, hard drives may disconnect.
3. With your other hand, use your thumb to depress and hold open one of the drive
locks to a selected data bay. Refer to the image below.
Power
Data Bay
Data Bay Indicator
drobo.com | Getting Started Guide for Your Drobo / Pro / S |
13
4. Slide the hard drive into the data bay, release the drive lock and push the drive into
place until you feel it connect.
The drive lock will snap behind the drive, securing it into place.
5. Insert additional drives in the same manner, following steps 2 through 4.
6. When finished, replace the faceplate right side up, so that when your Drobo device
is turned on, you will be able to see the indicator lights.
You are now ready to connect cables and power on your Drobo device.
Connecting the Cables
After installing Drobo Dashboard and inserting the hard drives into your Drobo/Pro/S, you
are ready to connect the cables on your Drobo device. This section applies to:
t $POOFDUJOHZPVS%SPCPPS%SPCP4VTJOHBOZPGUIFJOUFSGBDFDPOOFDUJPOTBWBJMBCMF
(USB 2.0, USB 3.0, FireWire 800, eSATA).
t $POOFDUJOHZPVS%SPCP1SPVTJOHUIF64#PS'JSF8JSFDPOOFDUJPO
If you would like to connect your DroboPro via its iSCSI (Ethernet) connection, see
“Setting Up Your DroboPro with iSCSI” on page 22 for additional information and
steps.
As you follow the steps, refer to Figures 3, 4 and 5.
FireWire 800
USB 2.0 Power
Figure 3: The back of your Drobo.
drobo.com | Getting Started Guide for Your Drobo / Pro / S |
14
Power Toggle
Button
Power
eSATA
FireWire 800
USB 3.0
Figure 4: The back of your Drobo S.
USB 2.0
iSCSI
FireWire 800
Power
Power Toggle Button
Figure 5: The back of your DroboPro
Notes:
- If your computer has a FireWire 400 port and you would like to use that interface,
then you will need to purchase a FireWire 800 to FireWire 400 cable.
- For information on the different cable interfaces available and their requirements,
see “Cable Interfaces Supported” on page 4.
Connecting to Your Computer
1. Plug one end of the USB, FireWire 800 or eSATA cable into the back of your Drobo/
Pro/S.
2. Plug the other end into your host computer.
Note: If you are using an eSATA cable with a Drobo S, we recommend that you
power down your computer before plugging the eSATA cable into it. (This is
because some eSATA cards do not handle hot plugging of eSATA drives well.) These
installation instructions will prompt you on when to turn your computer back on.
drobo.com | Getting Started Guide for Your Drobo / Pro / S |
15
Connecting to a Power Source
1. Connect the power supply to the power connection at the back of your Drobo device.
2. Connect the other end of the power supply to a power source.
Important Note: The Drobo will start up immediately. (This is not so for the DroboPro
or Drobo S, which can be turned on via their power toggle buttons.) When the Drobo
starts up with Drobo Dashboard displayed, you will be prompted to format the drives.
Before doing this, be sure to read the following section, “Turning on the Power and
Formatting the Drives.” Steps for formatting the drives are on pg. 18.
Note: We recommend plugging into an uninterruptible power supply (UPS) or surge
protector. For more information, see “Using an Uninterruptible Power Supply (UPS)
or Power Surge Protector” on page 8.
You are now ready to turn on your Drobo device and format the drives.
Turning on the Power and Formatting the Drives
After installing Drobo Dashboard, inserting the drives into your Drobo device and connecting
cables, you are ready to turn on your Drobo device and format the drives.
Before doing the steps for this, however, it is important to know what file system formatand
volume size you will choose when you format the drives.
Selecting a File System and Volume Size
When you turn on your Drobo/Pro/S, you will be prompted to format the drives in your Drobo/
Pro/S with a particular file system. What file system formats are available to you depend on
your operating system. (See Figure 6.)
You will also be formatting your Drobo/Pro/S into at least one volume, and you will need to
choose a size for that volume. A volume is a storage area that has been formatted with a file
system format your operating system can recognize. In Windows, volumes are sometimes
called “logical drives” or “partitions.”
The largest volume size you are allowed depends on the file system format you choose and
the total capacity of the drives in your Drobo device. The following table (Figure 6) shows the
maximum volume size allowed for each file system format.
drobo.com | Getting Started Guide for Your Drobo / Pro / S |
16
File System Format
Op. Sys. Compatible With
Max Volume Size
HFS+
NTFS
/5'491$PNQBUJCMF
FAT32*
.BD049
Windows Vista, 7, Server 3000 (and later)
All Windows
"MM8JOEPXT.BD049
16TB
16TB
2TB
2TB
Figure 6: Table of file system formats and maximum volume sizes
* FAT32 is an older file system format that is generally less protective of your data than modern file
systems. It also has slower performance and file size limitations.
Important Notes:
- Volume size does not represent how much actual storage space is available on
your Drobo/Pro/S. It represents virtual storage space. For example, your Drobo/
Pro/S may be loaded with 2TB of hard drive space, but you can create a volume
of 8TB. What this enables you to do is add more capacity to your Drobo/Pro/S (by
inserting an additional drive or replacing a smaller capacity drive with a larger
capacity one) without having to format an additional volume. The additional
capacity becomes part of the same volume you formatted originally.
- Your operating system may show the virtual space you have available on your
Drobo device, as defined by the volume size.
- If the amount of available, protected storage space in your Drobo/Pro/S ever
exceeds the size of the volume that you chose (this may occur when you add one
or more additional hard disks to your Drobo/Pro/S), then Drobo Dashboard will
automatically create a new volume (or volumes) of the same size as the original
volume. Drobo Dashboard will notify you when this occurs and ask you to format
and name the new volume(s).
- For the DroboPro, after creating the initial volume, you can create and manage
multiple volumes, each with its own size and supported file format. After setting up
your volumes, each will display uniquely, rather than as a single volume. You can do
this after setup using DroboPro’s Volume Management feature. Refer to the Online
User Guide for information and steps.
Tip: For most customers, we recommend choosing the largest volume size available
for the selected file system. Note, however, that smaller volume sizes can be more
efficient and manageable in certain situations, such as when indexing, scanning or
searching volumes.
drobo.com | Getting Started Guide for Your Drobo / Pro / S |
17
Turning on Your Drobo Device and Formatting the Drives
With Drobo Dashboard installed on your host computer and cables connected, you are
ready to turn on your Drobo device and format the drives.
1. With Drobo Dashboard open on your computer, press the power toggle button on the
back of your Drobo device once.
Note: The Drobo does not have a power toggle button. If you are using a Drobo and
you have connected the power cable, it will already be powered on.
Your Drobo device powers on, and a message appears, asking if you would like to
format your drives.
Notes:
- If you are using an eSATA cable with a Drobo S, be sure your host computer is
initially turned off for this step. (This is necessary because some eSATA cards do
not handle hot plugging of eSATA drives well.) With your computer off, press the
power toggle button on the back of your Drobo S once and wait until your Drobo S
has finished powering on (when the data bay indicator lights appear a solid green
for each drive in your Drobo device). After that, power on your host computer and
launch Drobo Dashboard. A message will then appear, asking if you would like to
format your drives.
- Some Windows operating systems and the Macintosh operating system will
also prompt you to format the drives. Click Cancel or Ignore, as appropriate, and
continue with formatting from Drobo Dashboard.
2. Click the Yes button.
The Format Type page appears. Depending on your operating system the window
displays with different options.
drobo.com | Getting Started Guide for Your Drobo / Pro / S |
18
t'PS8JOEPXTUIFGPMMPXJOHBQQFBST
t'PSUIF.BDJOUPTIUIFGPMMPXJOHBQQFBST
drobo.com | Getting Started Guide for Your Drobo / Pro / S |
19
3. Select the appropriate file format for your operating system and click the Next button.
The Volume Size page appears.
4. Click and drag to slide the pointer to the size of the volume you would like to create,
and then click the Next button.
Tip: We recommend that you select the largest size available, enabling you to
increase the number and capacity of your drives without having to format an
additional volume.
The Volume Name page appears.
5. From the Drive Letter drop-down list, select the drive letter to assign to the volume.
drobo.com | Getting Started Guide for Your Drobo / Pro / S |
20
6. In the Name text box, modify the default name for the volume as you like.
Tip: We recommend using the word “volume” in the name so as not to confuse the
volume name with your Drobo device’s name.
7. If you have more than one volume, repeat steps 5 and 6 for each volume, and then
click the Next button.
The Confirm Format page appears.
8. Click the Format button.
A message appears, informing you that it can take up to 5 minutes to format your
drives, and that this may require rebooting your Drobo device.
Afterwards, the Format dialog box appears.
drobo.com | Getting Started Guide for Your Drobo / Pro / S |
21
9. Click the OK button.
Your Drobo device displays in Drobo Dashboard, as follows.
Note: Drobo Dashboard automatically assigns “Drobo,” “Drobo S” or “DroboPro” as
the default name for your Drobo device, which you can rename later.
You are ready to manage and use your Drobo device. See “Where to Go from Here”
on page 31.
Note: If you will be connecting with DroboPro via its iSCSI (Ethernet) connection,
see “Setting Up Your DroboPro with iSCSI” on page 22 for additional information and
steps.
Setting Up Your DroboPro with iSCSI
Using DroboPro with iSCSI will yield the best possible performance from your DroboPro.
However, to use iSCSI, you will first need to establish communications between your
DroboPro and a host computer using your USB cable.
Once communications has been established, depending on the setup you choose, you may
need to manually assign an IP address to your DroboPro. Finally, you will safely shut down
your Drobo device, unplug the USB cable and plug in the Ethernet cable to use iSCSI.
drobo.com | Getting Started Guide for Your Drobo / Pro / S |
22
With iSCSI, you have the option to set up your DroboPro in one of three configurations:
1. Directly connect DroboPro via its iSCSI (Ethernet) connection to your computer’s
Ethernet port for optimal performance. This assumes you have a second Ethernet
port available on your computer which is being used to connect to your network.
2. Connect your DroboPro via its iSCSI (Ethernet) connection to a switch in which
another Ethernet port on the switch is connected to your computer. Note that in this
configuration, you will need to manually set an IP address for your DroboPro using
your USB connection.
3. Connect your DroboPro via its iSCSI (Ethernet) connection to a switch (or router) in
which another Ethernet port on the switch (or router) is connected to your network.
Note that in this configuration, you will need to manually set an IP address for your
DroboPro using your USB connection.
drobo.com | Getting Started Guide for Your Drobo / Pro / S |
23
Notes:
- All three configurations require initial setup with your USB connection.
- DroboPro supports gigabit Ethernet connections (1000 Mbit/s) for optimal
performance of iSCSI. Although your DroboPro will auto-negotiate the highest
connection speed available to your computer, router or switch, iSCSI does not
perform well at slower speeds.
- You can purchase an add-on gigabit Ethernet adapter card for your computer if
needed. Note, however, that a regular network adapter card is required, as Data
Robotics, Inc., does not support iSCSI-specific cards, or HBA (host bus adapter)
cards.
- If you experience trouble with the following setup steps, check to ensure your
operating system’s firewall is set to allow inbound and outbound network
connections for the Drobo Dashboard application. In other words, check to ensure
your firewall allows .exe and related files from Drobo Dashboard to pass through.
Connecting DroboPro Directly to Your Computer via iSCSI
In this configuration, you directly connect DroboPro via its iSCSI connection to your
computer’s Ethernet port.
1. If you haven’t already done so, install Drobo Dashboard on your host computer. See
“Installing Drobo Dashboard” on page 9 for steps.
2. If you haven’t already done so, insert the hard drives into your DroboPro. See
“Inserting the Hard Drives” on page 12 for steps.
3. Connect one end of the USB cable into your DroboPro, and the other end into your
host computer. See “Connecting the Cables” on page 14 for more information.
4. Connect the power supply to the power connection at the back of your Drobo device,
and connect the other end to a power source.
5. Power on your DroboPro and format the drives when prompted. For steps, see
“Turning on the Power and Formatting the Drives” on page 16.
6. Once the connection between your DroboPro and host computer have been
established, safely shut down your DroboPro. For steps, see “Safely Shutting Down
Your Drobo/Pro/S” on page 32.
7. Unplug the USB cable from your DroboPro and host computer.
drobo.com | Getting Started Guide for Your Drobo / Pro / S |
24
8. Plug one end of the Ethernet cable to the iSCSI (Ethernet) port on your DroboPro, and
plug the other end into your Ethernet port on your computer.
9. Press the power toggle button on the back of your Drobo device once.
Your DroboPro powers on. You are ready to manage and use your Drobo device. See
“Where to Go from Here” on page 31.
Connecting DroboPro to Your Computer via a Switch with iSCSI
In this configuration, you connect your DroboPro via its iSCSI (Ethernet) connection to a
switch in which another Ethernet port on the switch is connected to your computer, and
the switch is not directly connected to a network. For this setup, you will need to manually
assign an IP address to the DroboPro.
Notes:
- You can connect multiple DroboPros to the same switch provided the DroboPros and
the host computer are on the same subnet and each DroboPro has a unique static IP
address assigned to it.
- Connecting in this way may impact performance.
1. If you haven’t already done so, install Drobo Dashboard on your host computer. See
“Installing Drobo Dashboard” on page 9 for steps.
2. If you haven’t already done so, insert the hard drives into your DroboPro. See
“Inserting the Hard Drives” on page 12 for steps.
3. Connect one end of the USB cable into your DroboPro, and the other end into your
host computer. See “Connecting the Cables” on page 14 for more information.
4. Connect the power supply to the power connection at the back of your Drobo device,
and connect the other end to a power source.
5. Power on your DroboPro and format the drives when prompted. For steps, see
“Turning on the Power and Formatting the Drives” on page 16.
drobo.com | Getting Started Guide for Your Drobo / Pro / S |
25
When the process is complete, your DroboPro appears in Drobo Dashboard as follows.
6. To manually assign an IP address, from the Navigation menu at the left, click the
Settings option, and then click Network.
The Network (iSCSI) Settings page appears.
7. Select the Manually Assign an IP address option button.
drobo.com | Getting Started Guide for Your Drobo / Pro / S |
26
8. In the IP Address text box, enter a unique IP address for your DrobPro.
9. If needed, also modify the address in the Subnet Mask text box.
10. When finished, click the OK button.
The Confirm Restart dialog box appears, asking to restart your Drobo device in
order to apply your setting changes.
11. Click the Yes button.
After your Drobo device restarts with your new settings, it displays on the Capacity
and Tools page in Drobo Dashboard.
12. Now safely shut down your DroboPro. For steps, see “Safely Shutting Down Your
Drobo/Pro/S” on page 32.
13. Unplug the USB cable from your DroboPro and computer.
14. Plug one end of the Ethernet cable to the iSCSI (Ethernet) port on your DroboPro,
and plug the other end into your Ethernet port on your switch.
15. Press the power toggle button on the back of your Drobo device once.
Your DroboPro powers on. You are ready to manage and use your Drobo device.
See “Where to Go from Here” on page 31.
Note: You can repeat these steps for each DroboPro you would like to add to your switch.
drobo.com | Getting Started Guide for Your Drobo / Pro / S |
27
Connecting DroboPro to Your Network via a Router or Switch with iSCSI
In this configuration, you connect your DroboPro via its iSCSI connection to a switch
(or router) in which another Ethernet port on the switch (or router) is connected to your
network. For this setup, you will need to manually assign an IP address to the DroboPro.
Note: In this arrangement, your DroboPro can impact network performance, and
performance of your DroboPro may be affected by network traffic.
1. If you haven’t already done so, install Drobo Dashboard on your host computer. See
“Installing Drobo Dashboard” on page 9 for steps.
2. If you haven’t already done so, insert the hard drives into your DroboPro. See
“Inserting the Hard Drives” on page 12 for steps.
3. Connect one end of the USB cable into your DroboPro, and the other end into your
host computer. See “Connecting the Cables” on page 14 for more information.
4. Connect the power supply to the power connection at the back of your Drobo device,
and connect the other end to a power source.
5. Power on your DroboPro and format the drives when prompted. For steps, see
“Turning on the Power and Formatting the Drives” on page 16.
When the process is complete, your DroboPro appears in Drobo Dashboard as
follows.
drobo.com | Getting Started Guide for Your Drobo / Pro / S |
28
6. To manually assign an IP address, from the Navigation menu at the left, click the
Settings option, and then click Network.
The Network (iSCSI) Settings page appears.
7. Select the Manually Assign an IP address option button.
8. In the IP Address text box, enter a unique IP address for your DrobPro.
Note: Be sure to use an IP address that is outside the range of IP addresses your
router might assign with DHCP (Dynamic Host Configuration Protocol). Check the
documentation for your router for more information.
9. If needed, also modify the address in the Subnet Mask text box.
10. When finished, click the OK button.
The Confirm Restart dialog box appears, asking to restart your Drobo device in
order to apply your setting changes.
drobo.com | Getting Started Guide for Your Drobo / Pro / S |
29
11. Click the Yes button.
After your Drobo device restarts with your new settings, it displays on the Capacity
and Tools page in Drobo Dashboard.
12. Now safely shut down your DroboPro. For steps, see “Safely Shutting Down Your
Drobo/Pro/S” on page 32.
13. Unplug the USB cable from your DroboPro and computer.
14. Plug one end of the Ethernet cable to the iSCSI (Ethernet) port on your DroboPro,
and plug the other end into your Ethernet port on your router or switch.
15. Press the power toggle button on the back of your Drobo device once.
Your DroboPro powers on. You are ready to manage and use your Drobo device.
See “Where to Go from Here” on page 31.
Note: You can repeat these steps for each DroboPro you would like to add to your router
or switch.
drobo.com | Getting Started Guide for Your Drobo / Pro / S |
30
Where to Go from Here
After you’ve set up your Drobo/Pro/S, you’re ready to store and back up data onto your
Drobo device. Next steps include:
t*NQMFNFOUJOHCFTUQSBDUJDFTUPNBYJNJ[FUIFTBGFUZPGZPVSEBUB
t&OTVSJOHPQUJNBMQFSGPSNBODFCZLFFQJOHZPVSTPGUXBSF%SPCP%BTICPBSEBOEZPVS
Drobo device’s firmware) up to date
t,OPXJOHIPXUP safely shut down your Drobo device
t6TJOHUIF0OMJOF6TFS(VJEFBOEDPOUFYUTFOTJUJWFIFMQUPMFBSONPSFBCPVUIPXUP
manage and use your Drobo device
t6TJOHPVSLOPXMFEHFCBTFUPBOTXFSBMNPTUBOZBEEJUJPOBMRVFTUJPO
t(FUUJOHUIFTVQQPSUZPVNBZOFFE
Using Best Practices
Although your Drobo device provides redundancy and automatically protects your data
against hard drive failure, it should only be one part of an overall, digital asset management
strategy.
To better safeguard your valuable data, we strongly encourage you to review our guide on
best practices, which can be found at www.drobo.com/support/best_practices.
Our guide offers strategies to protect data beyond hard drive failures. Following best
practices will help maximize the safety of your data.
Keeping Your Software Up to Date
To ensure optimal performance, we highly recommend that you set your Drobo device to
automatically check for software updates. (You may have already done this during the initial
setup.) This feature keeps both Drobo Dashboard and your product’s firmware current.
You can also install updates from www.drobo.com/support/updates.
Important Note: In some cases, the latest version may be released with new
products (on a Resource CD) or through Drobo Dashboard’s automatic updates
feature for a short period of time before being made available on the website.
Therefore it is best to enable Drobo Dashboard to update your software
automatically.
drobo.com | Getting Started Guide for Your Drobo / Pro / S |
31
1. Launch Drobo Dashboard and click your Drobo device on the All Devices page.
2. From the Navigation menu, click Dashboard Preferences, and click Dashboard
Settings.
The General Settings page appears.
3. Ensure that the Enable Auto Updates check box is selected, and then click the OK
button.
When one or more software updates are available, a message appears, asking if you
would like to install the update(s). If so, click the Yes button and follow the prompts to
install them.
Safely Shutting Down Your Drobo/Pro/S
If you plan to shut down your Drobo device for any reason, it is very important that you do so
safely. Improper Drobo device shutdowns may cause file corruption and/or data loss.
Note: For the Drobo only, shutting down requires removing the power supply. (This is
not necessary for the Drobo S or the DroboPro.)
It is a good idea to shut down your Drobo device before any of the following situations:
t:PVBSFOPUHPJOHUPCFVTJOHZPVS%SPCPEFWJDFGPSBOFYUFOEFEQFSJPE
t:PVBSFHPJOHUPEJTDPOOFDUUIFDBCMFT
PSQPXFSDPSE
t:PVXBOUUPNPWFZPVS%SPCPUPBOPUIFSMPDBUJPO
t:PVBSFHPJOHUPSFNPWFUIFFOUJSFEJTLQBDL
t:PVBSFHPJOHUPBQQMZPQFSBUJOHTZTUFNVQEBUFT
Note: If you are concerned about saving power, know that your Drobo device
automatically shifts into power saving mode when it has not been accessed for
15 minutes (the default setting). If you will not be using your Drobo device for an
extended period of time, however, it is a good idea to safely shut it down.
drobo.com | Getting Started Guide for Your Drobo / Pro / S |
32
Safely Shutting Down Your Drobo Device Using Drobo Dashboard
This is the recommended method for safely shutting down your Drobo device.
Note: For the Drobo, you will first need to put it in standby mode, and then remove
the power supply in order to shut it down.
1. Check that the activity light on your Drobo device is off, indicating that no data is
actively being transferred to or from your Drobo device. Refer to Figure 7 or 8, below.
Note: If data is actively being transferred, the activity light will be blinking green.
Drive Bay
Action Indicators
Power
Capacity Gauge
Activity
Figure 7: Indicator lights on a Drobo/S
Capacity Gauge
Power
Activity
Drive Bay
Action Indicators
Figure 8: Indicator lights on a DroboPro
2. Also check to ensure the drive bay action indicator lights are not blinking alternately
between yellow and green. This indicates that your Drobo device is busy working to
protect your data. Wait until these lights are a solid green.
drobo.com | Getting Started Guide for Your Drobo / Pro / S |
33
3. In Drobo Dashboard, double-click the Drobo device that you would like to shut down
from the All Devices page.
The Capacity and Tools page appears.
4. Click the Tools drop-down list, and do one of the following:
t*GZPVSEFWJDFJTB%SPCP1SPPS%SPCP4TFMFDUUIF Shutdown icon. A message
appears, asking you to confirm the shutdown. Click the Yes button.
It can take up to two minutes for your Drobo device to power down, or go into
Standby mode. But afterwards, the power light turns off, indicating your Drobo
device has shut down.
t*GZPVSEFWJDFJTB%SPCPTFMFDUUIFStandby icon. A message appears, asking you
to confirm the standby. Click the Yes button. Afterwards, remove the power supply
from the back of the Drobo.
The Drobo powers down.
Safely Shutting Down Your Drobo Device Manually
Although Drobo Dashboard allows for a “cleaner” shut down, you can safely shut down
your Drobo device manually.
1. Check that the activity light on your Drobo device is off, indicating that no data is
actively being transferred to or from your Drobo device. Refer to Figure 7 or 8 in the
previous steps.
Note: If data is actively being transferred, the activity light will be blinking green.
2. Also check to ensure the drive bay action indicator lights are not blinking alternately
between yellow and green. This indicates that your Drobo device is busy working to
protect your data. Wait until these lights are a solid green.
3. Press the power toggle button on the back of your Drobo device once. Or for the
Drobo, detach the power supply.
It can take up to two minutes for your Drobo device to power down. But afterwards,
the power light turns off, indicating your Drobo device has shut down.
drobo.com | Getting Started Guide for Your Drobo / Pro / S |
34
Using the Online User Guide
After you’ve set up your Drobo device, you’re ready to use it to store and back up data. To
learn how to manage and use your Drobo device, refer to the Online User Guide for your
product, which can be found within your Drobo Dashboard software by clicking the Help
option on the Navigation menu.
The latest version can also be found at www.drobo.com/support/documentation.php.
Using Context-Sensitive Help
When using Drobo Dashboard, you can click the Help option on the Navigation menu to
display context-sensitive help. The Help window appears, providing information particular to
the screen from which you clicked the Help button.
Using the Knowledge Base
Our searchable knowledge base provides answers to almost any question related to your
Drobo device that you can’t find in the Online User Guide.
You can access our knowledge base at support.datarobotics.com/app/answers/list.
Getting Support
To get support, first be sure to register your product at www.drobo.com/registration, if you
haven’t already done so. You can then go to www.drobo.com/support for details on how to
contact support.
You can also obtain additional hardware and phone support by purchasing DroboCare. The
DroboCare™ support program extends your peace of mind beyond the standard warranty
term and phone support included with your Drobo product purchase. To learn more about
DroboCare visit: www.drobo.com/drobocare.
Also see our DroboCare FAQ at: http://support.datarobotics.com/app/answers/detail/a_id/343.
drobo.com | Getting Started Guide for Your Drobo / Pro / S |
35
Troubleshooting Your Setup
If…
You are on steps for “Turning on Your Drobo Device and Formatting the Drives” on page 16
and your computer appears to be hung while formatting the drives with the following dialog
box displayed (and it has been more than twenty minutes)…
Then…
Use your operating system’s utility to force an end to the formatting process, power down
your computer and restart it. After your computer has re-gained power, repeat the steps in
“Turning on Your Drobo Device and Formatting the Drives” on page 16.
If this recurs, repeat the above process, but before repeating the steps in “Turning on Your
Drobo Device and Formatting the Drives” on page 3, uninstall Drobo Dashboard and re-install it
from the Resource CD.
If…
You would like to share your Drobo device between different computers, such as a
Macintosh and a Windows-based computer…
Then…
You can employ one of two methods to do this.
You can format the drives in your Drobo device with a file system that several computers
understand. Using the “FAT32” formatting option from Drobo Dashboard ensures that
Macintosh and Windows-based computers will be able to read and write data on the
Drobo device. Note, however, that FAT 32 is an older file system format that is generally less
protective of your data than modern (journaled) file systems. It also has slower performance
and file size limitations.
"MUFSOBUJWFMZCPUI.BD049BOE8JOEPXTCBTFEDPNQVUFSTIBWFCVJMUJOGJMFTIBSJOH
capabilities, which you can use to share your Drobo device with other computers on your
network. Note, however, that the computer which is sharing the Drobo device must be
turned on in order for others to access it.
drobo.com | Getting Started Guide for Your Drobo / Pro / S |
36
If…
You would like to connect to your Drobo device using a different interface than the one you
started with…
Then…
You will need to safely shut down your Drobo device, change the interface cable between
your Drobo device and computer, and power on your Drobo device again. It is very important
to shut down your Drobo device safely to avoid the risk of losing data.
Steps
1. To safely shut down your Drobo device, first check that the activity light on your Drobo
device is off, indicating that no data is actively being transferred.
Note: If data is actively being transferred, the activity light will be blinking green.
2. Also check to ensure the drive bay action indicator lights are not blinking alternately
between yellow and green. This indicates that your Drobo device is busy working to
protect your data. Wait until these lights are a solid green. You can refer to the images in
“Safely Shutting Down Your Drobo/Pro/S” on page 32.
3. In Drobo Dashboard, double-click the Drobo device that you would like to shut down from
the All Devices page.
The Capacity and Tools page appears.
4. Click the Tools drop-down list, and do one of the following:
t*GZPVSEFWJDFJTB%SPCP1SPPS%SPCP4TFMFDUUIF Shutdown icon. A message appears,
asking you to confirm the shutdown. Click the Yes button.
It can take up to two minutes for your Drobo device to power down, or go into Standby mode.
But afterwards, the power light turns off, indicating your Drobo device has shut down.
t*GZPVSEFWJDFJTB%SPCPTFMFDUUIFStandby icon and click the Yes button to confirm the
standby. Afterwards, remove the power supply from the back of the Drobo.
6. Once your Drobo device is powered off, remove the interface cable you were using and
connect the cable for the interface you would like to use. For more information and steps,
see “Connecting the Cables” on page 14.
7. With Drobo Dashboard open on your host computer, power on your Drobo device by
pressing the power toggle button at the back of the unit, or for the Drobo, reattach the
power supply.
drobo.com | Getting Started Guide for Your Drobo / Pro / S |
37
Index
best practices, 31
cables, connecting, 14
capacity, 7, 8
increasing, 8
Capacity Calculator, 8
configurations for DroboPro with iSCSI, 22, 23
connecting cables, 14
data bay, 13
data bay indicator lights, 13, 18
drive lock, 13
Drobo Dashboard, 9, 12
Dual Disk Redundancy, 8
Dynamic Host Configuration Protocol
(DHCP), 29
eSATA, 4, 14, 15
Ethernet, 6, 8, 22-25
file system format, 16, 17, 36
firewall, checking settings, 24
FireWire 400, 6, 15
FireWire 800, 6, 14
firmware, 9, 31
formatting the drives, 16, 18, 36
hard drives
- capacity, 7, 8
- inserting, 12
- SATA, 7
- selecting, 7
increasing capacity, 8
indicator lights, 14, 18, 33
inserting hard drives, 12
installing Drobo Dashboard, 9
installing software updates, 9, 31
IP address, 22-23, 25-29
iSCSI, 6, 22, 24
iSCSI, configurations with DroboPro, 23
knowledge base, 35
Online User Guide, 35
power surge protector, 8
power toggle button, 15, 16, 18
router, 8
SATA hard drives, 7
setting up DroboPro with iSCSI, 22
sharing Drobo with different computers, 36
shutting down your Drobo device, 32-34
Single Disk Redundancy, 8
software updates, 9, 12, 31
support, 35
switch, 8
switching cable interfaces, 37
system requirements, 4
troubleshooting, 36
uninterruptible power supply, 8
updates, software, 9, 12, 31
USB 2.0, 5
USB 3.0, 5
volume, 16-18
drobo.com | Getting Started Guide for Your Drobo / Pro / S |
38


![P8-14 [PDFファイル/650KB]](http://vs1.manualzilla.com/store/data/006639239_2-68b267c02cd05a3a8fdaa20015b0e399-150x150.png)