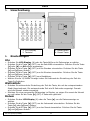
1
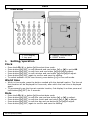
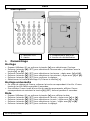
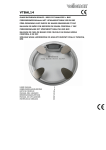
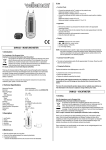
CAL9
DESKTOP CALCULATOR WITH WORLD TIME CLOCK
CALCULATOR MET WERELDKLOK
CALCULATRICE AVEC HORLOGE UNIVERSELLE
CALCULADORA CON RELOJ DEL HORARIO MUNDIAL
RECHNER MIT WELTZEITUHR
USER MANUAL
GEBRUIKERSHANDLEIDING
NOTICE D’EMPLOI
MANUAL DEL USUARIO
BEDIENUNGSANLEITUNG
00 rev A(30/07/2008)
2
5
8
11
14
1
CAL9
User manual
1.
Introduction
To all residents of the European Union
Important environmental information about this product
This symbol on the device or the package indicates that disposal of the
device after its lifecycle could harm the environment.
Do not dispose of the unit (or batteries) as unsorted municipal waste; it
should be taken to a specialized company for recycling.
This device should be returned to your distributor or to a local recycling
service. Respect the local environmental rules.
If in doubt, contact your local waste disposal authorities.
Thank you for choosing Velleman! Please read the manual thoroughly before bringing this
device into service. If the device was damaged in transit, don't install or use it and
contact your dealer.
2.
Safety Instructions
For indoor use only. Keep this device away from rain, moisture,
splashing and dripping liquids.
Keep the device away from children and unauthorised users.
There are no user-serviceable parts inside the device.
Refer to an authorized dealer for service and/or spare parts.
•
•
3.
•
•
•
•
•
4.
•
•
Damage caused by disregard of certain guidelines in this manual is not covered by the
warranty and the dealer will not accept responsibility for any ensuing defects or
problems.
Note that damage caused by user modifications to the device is not covered by the
warranty.
General Guidelines
Protect this device from shocks and abuse. Avoid brute force when operating.
Protected the device against extreme heat, dust and moisture.
Familiarise yourself with the functions of the device before actually using it.
All modifications of the device are forbidden for safety reasons.
Only use the device for its intended purpose. Using the device in an unauthorised way
will void the warranty.
Features
Clock/calculator with 4 functions:
o Calculator: 8 digits
o Clock: 12/24h selectable, world time display of 16 cities
o Date: month/day calendar, auto-leap year adjusted from 2000-2099
o Alarm: daily alarm
select desired function by gently pushing the LCD display
00 rev A(30/07/2008)
2
CAL9
5.
Overview
1. LCD display
2. key pad
6.
3. battery compartment
4. RESET button
Setting/operation
Clock
•
•
•
•
•
•
Press the LCD (1) or button [a] to select time mode.
Press button [b] (SET) to edit seconds and use button [c] or [d] to set to 00.
Press button [b] (SET) to edit hour and use button [c] and [d] to adjust.
Press button [b] (SET) to edit minutes and use button [c] and [d] to adjust.
Press button [b] (SET) again to confirm and save the setting.
To switch between 12/24 hour format, press button [=] in time edit mode.
World time
•
•
While in time mode, press the button marked with the desired location. The time at
that location will be displayed for 8 seconds, after which the local time is displayed
again.
To permanently see the time at a certain location, first display it an then press and
hold button [b] (SET) for 2 seconds.
Date
•
•
•
•
•
Press
Press
Press
Press
Press
the LCD (1) or button [a] to select date mode.
button [b] (SET) to edit the year and use button [c] or [d] to adjust.
button [b] (SET) to edit the month and use button [c] or [d] to adjust.
button [b] (SET) to edit the day and use button [c] or [d] to adjust.
button [b] (SET) again to confirm and save the setting.
00 rev A(30/07/2008)
3
CAL9
Alarm time
•
Press the LCD (1), button [a] or button [f] to select alarm time mode. ALM icon is
shown in the display.
Press button [b] (SET) to edit hour and use button [c] and [d] to adjust.
Press button [b] (SET) to edit minutes and use button [c] and [d] to adjust.
Press button [b] (SET) again to confirm and save the setting.
Press button [c] or [d] to switch the alarm on or off. When on, an icon (֠
֠) is shown
in the display.
When the alarm sounds, press any button to turn it off. It will stop automatically after
two minutes when no key is pressed.
•
•
•
•
•
Calculator
•
•
Press the LCD (1), button [a] or button [ON/C] to select calculator mode.
Press the button [ON/C] to change or cancel faulty inputs.
Key tones
•
To switch the tone of the keys on or off, simply press button [e]. When on, an icon
(music note) is shown on the display.
RESET
•
•
In highly electrostatic environment, the device may automatically reset.
When an error occurs, the device may be manually reset, by inserting a pointed object
into the opening on the back (4).
7.
•
•
Battery
Before first use, remove the battery protection tape.
To replace the battery, remove the screw form the battery cover (3) and open the
cover.
Replace the old battery with a new lithium battery type CR3032. Make sure to use
the correct polarity.
Remove the battery when the device is not in use.
Do not recharge batteries and do not throw in fire as they may explode.
•
•
•
WARNING: handle Lithium batteries with care, observe warnings
on battery casing. Dispose of batteries in accordance with local
regulations.
Keep the battery away from children.
8.
Technical Specification
power supply
1 x CR2032C Lithium battery (incl.)
dimensions
115 x 155 x 70mm
weight
200g
Use this device with original accessories only. Velleman nv cannot be held
responsible in the event of damage or injury resulted from (incorrect) use of
this device.
For more info concerning this product, please visit our website
www.velleman.eu.
The information in this manual is subject to change without prior notice.
00 rev A(30/07/2008)
4
CAL9
Gebruikershandleiding
1.
Inleiding
Aan alle ingezetenen van de Europese Unie
Belangrijke milieu-informatie betreffende dit product
Dit symbool op het toestel of de verpakking geeft aan dat, als het na zijn
levenscyclus wordt weggeworpen, dit toestel schade kan toebrengen aan
het milieu. Gooi dit toestel (en eventuele batterijen) niet bij het gewone
huishoudelijke afval; het moet bij een gespecialiseerd bedrijf terechtkomen
voor recyclage. U moet dit toestel naar uw verdeler of naar een lokaal
recyclagepunt brengen. Respecteer de plaatselijke milieuwetgeving.
Hebt u vragen, contacteer dan de plaatselijke autoriteiten inzake verwijdering.
Dank u voor uw aankoop! Lees deze handleiding grondig voor u het toestel in gebruik
neemt. Werd het toestel beschadigd tijdens het transport, installeer het dan niet en
raadpleeg uw dealer.
2.
Veiligheidsinstructies
Enkel voor gebruik binnenshuis. Houd dit toestel uit de buurt van
regen, vochtigheid en opspattende vloeistoffen.
Houd dit toestel uit de buurt van kinderen en onbevoegden.
De gebruiker mag geen onderdelen vervangen. Bestel eventuele
reserveonderdelen bij uw dealer.
•
•
3.
•
•
•
•
•
4.
•
•
De garantie geldt niet voor schade door het negeren van bepaalde richtlijnen in
deze handleiding en uw dealer zal de verantwoordelijkheid afwijzen voor defecten
of problemen die hier rechtstreeks verband mee houden.
Schade door wijzigingen die de gebruiker heeft aangebracht aan het toestel vallen niet
onder de garantie.
Algemene richtlijnen
Schud het toestel niet dooreen. Vermijd brute kracht tijdens het gebruik van dit toestel.
Bescherm dit toestel tegen regen, vochtigheid en stof.
Leer eerst de functies van het toestel kennen voor u het gaat gebruiken.
Om veiligheidsredenen mag de gebruiker geen wijzigingen aanbrengen aan het toestel.
Gebruik het toestel enkel waarvoor het gemaakt is. Bij onoordeelkundig gebruik
vervalt de garantie.
Eigenschappen
klok/calculator met 4 functies:
o calculator: 8 digits
o klok: 12/24h-weergave, wereldklok voor 16 steden
o datum: kalender met maand/dag, automatische aanpassing
schrikkeljaar 2000 ~ 2099
o alarm: dagelijks alarm
selectie van de functie met een zachte druk op het lcd-scherm
00 rev A(30/07/2008)
5
van
het
CAL9
5.
Overzicht
1. lcd-scherm
2. toetsenpaneel
6.
3. batterijvak
4. resetknop
Instelling
Klok
•
•
•
•
•
•
Druk op het lcd-scherm (1) of op knop [a] om de tijdsweergave te selecteren.
Druk op knop [b] (SET) om de seconden in te stellen. Druk op knop [c] of [d] om op
00 terug te stellen.
Druk op knop [b] (SET) om de uren in te stellen. Druk op knop [c] en [d] om te
wijzigen.
Druk op knop [b] (SET) om de minuten in te stellen. Druk op knop [c] en [d] om te
wijzigen.
Druk op knop [b] (SET) om te bevestigen.
Selecteer de 12/24h-weergave door tijdens de tijdsinstelling op knop [=].
Wereldklok
•
•
Druk tijdens de tijdsinstelling op de knop die met de gewenste locatie overeenkomt.
De overeenstemmende tijd wordt gedurende 8 seconden weergegeven. Daarna wordt
de lokale tijd opnieuw weergegeven.
Om een tijd permanent op de display weer te geven, geef eerst die tijd weer en houd
knop [b] (SET) gedurende 2 seconden ingedrukt.
Datum
•
•
•
•
•
Druk op het lcd-scherm (1) of op knop [a] om de datumweergave te selecteren.
Druk op knop [b] (SET) om het jaartal in te stellen. Druk op knop [c] of [d] om te
wijzigen.
Druk op knop [b] (SET) om de maand in te stellen. Druk op knop [c] en [d] om te
wijzigen.
Druk op knop [b] (SET) om de dag in te stellen. Druk op knop [c] en [d] om te
wijzigen.
Druk op knop [b] (SET) om te bevestigen.
00 rev A(30/07/2008)
6
CAL9
Alarm
•
Druk op het lcd-scherm (1) of op knop [a] om de alarmweergave te selecteren. Het
ALM-symbool verschijnt op de display.
Druk op knop [b] (SET) om de uren in te stellen. Druk op knop [c] of [d] om te
wijzigen.
Druk op knop [b] (SET) om de minuten in te stellen. Druk op knop [c] en [d] om te
wijzigen.
Druk op knop [b] (SET) om te bevestigen.
Druk op knop [c] of [d] om het alarm in of uit te schakelen. Het (֠
֠)-symbool
verschijnt op de display indien u het alarm inschakelt.
Druk bij het afgaan van het alarm op een knop om uit te schakelen (het alarm wordt n
2 minuten automatisch uitgeschakeld).
•
•
•
•
•
Rekenmachine
•
Druk op het lcd-scherm (1), op knop [a] of op knop [ON/C] om de rekenmachine
in te schakelen.
Toetsenvolume
•
Druk op knop [e] om het toetssignaal in of uit te schakelen. Op de display verschijnt
een (muzieknoot) indien het toetssignaal is ingeschakeld.
Resetten
•
•
De rekenmachine reset automatisch bij een elektrostatische storing.
Voor het handmatige resetten, druk met een puntig object in het gaatje achteraan het
toestel (4).
7.
•
•
•
Batterij
Verwijder eerst de beschermfolie.
Open het batterijvak (3) met een kleine schroevendraaier.
Vervang de oude batterij door een nieuwe lithiumbatterij type CR3032. Respecteer
de polariteit.
Verwijder de batterij na gebruik.
Het is verboden de batterijen te herladen. Gooi ze niet in het vuur om ontploffing te
vermijden.
•
•
LET OP: Leef alle richtlijnen op de verpakking van de batterijen na.
Houd de batterijen uit de buurt van kinderen.
8.
Technische specificaties
voeding
1 x CR2032C lithiumbatterij (meegelev.)
afmetingen
115 x 155 x 70 mm
gewicht
200 g
Gebruik dit toestel enkel met originele accessoires. Velleman nv is niet
aansprakelijk voor schade of kwetsuren bij (verkeerd) gebruik van dit
toestel. Voor meer informatie omtrent dit product, zie www.velleman.eu. De
informatie in deze handleiding kan te allen tijde worden gewijzigd zonder
voorafgaande kennisgeving.
00 rev A(30/07/2008)
7
CAL9
NOTICE D’EMPLOI
1.
Introduction
Aux résidents de l'Union européenne
Des informations environnementales importantes concernant ce produit
Ce symbole sur l'appareil ou l'emballage indique que l’élimination d’un
appareil en fin de vie peut polluer l'environnement. Ne pas jeter un appareil
électrique ou électronique (et des piles éventuelles) parmi les déchets
municipaux non sujets au tri sélectif ; une déchèterie traitera l’appareil en
question. Renvoyer les équipements usagés à votre fournisseur ou à un
service de recyclage local. Il convient de respecter la réglementation locale
relative à la protection de l’environnement.
En cas de questions, contacter les autorités locales pour élimination.
Nous vous remercions de votre achat ! Lire la présente notice attentivement avant la
mise en service de l’appareil. Si l’appareil a été endommagé pendant le transport, ne
pas l’installer et consulter votre revendeur.
2.
Prescription de sécurité
Pour usage à l’intérieur uniquement. Tenir l’appareil à l’écart de la pluie,
de l’humidité, d’éclaboussures et de jaillissements.
Garder le thermomètre hors de la portée de personnes non qualifiées et
de jeunes enfants.
Il n’y a aucune pièce maintenable par l’utilisateur. Commander des
pièces de rechange éventuelles chez votre revendeur.
•
•
3.
•
•
•
•
•
4.
•
•
La garantie ne s’applique pas aux dommages survenus en négligeant certaines
directives de cette notice et votre revendeur déclinera toute responsabilité pour les
problèmes et les défauts qui en résultent.
Les dommages occasionnés par des modifications à l’appareil par le client ne
tombent pas sous la garantie.
Directives générales
Protéger la calculatrice contre les chocs et le traiter avec circonspection pendant
l’installation et l’opération.
Tenir la calculatrice à l’écart de la poussière, l’humidité et des températures extrêmes.
Se familiariser avec le fonctionnement de l’appareil avant de l’utiliser.
Toute modification de l’appareil est interdite pour des raisons de sécurité.
N’utiliser le thermomètre qu’à sa fonction prévue. Tout autre usage peut causer des
courts-circuits, des brûlures, des électrochocs, etc. Un usage impropre annule
d'office la garantie.
Caractéristiques
calculatrice/horloge à 4 fonctions
o calculatrice : 8 digits
o horloge : affichage au format 12/24h, horloge universelle pour 16 villes
o date : calendrier avec affichage du mois/jour, ajustement automatique lors
d'une année bissextile de 2000 ~ 2099
o alarme : alarme journalière
sélection de la fonction en poussant l'afficheur LCD légèrement en avant
00 rev A(30/07/2008)
8
CAL9
5.
Description
1. afficheur LCD
2. clavier
6.
3. compartiment des piles
4. bouton de réinitialisation
Paramétrage
Horloge
•
•
•
•
•
•
Pousser l’afficheur (1) ou enfoncer la touche [a] pour sélectionner l’horloge.
Enfoncer la touche [b] (SET) pour sélectionner les secondes ; réinitialiser avec la
touche [c] ou [d].
Enfoncer la touche [b] (SET) pour sélectionner les heures ; régler avec [c] et [d].
Enfoncer la touche [b] (SET) pour sélectionner les minutes ; régler avec [c] et [d].
Enfoncer la touche [b] (SET) pour confirmer le réglage.
Sélectionner le format d’affichage 12/24 avec la touche [=].
Horloge universelle
•
•
En mode de réglage de l’heure, enfoncer la touche correspondant à la ville. L’heure
locale de la ville s’affiche pendant 8 secondes.
Pour afficher l’heure locale d’une ville de manière permanente, afficher l’heure
correspondante et maintenir la touche [b] (SET) enfoncé pendant 2 secondes.
Date
•
•
•
•
•
Pousser l’afficheur (1) ou enfoncer la touche [a] pour afficher la date.
Enfoncer la touche [b] (SET) pour sélectionner l’année ; régler avec [c] et [d].
Enfoncer la touche [b] (SET) pour sélectionner le mois ; régler avec [c] et [d].
Enfoncer la touche [b] (SET) pour sélectionner le jour ; régler avec [c] et [d].
Enfoncer la touche [b] (SET) pour confirmer le réglage.
00 rev A(30/07/2008)
9
CAL9
Alarme
•
Pousser l’afficheur (1), ou enfoncer la touche [a] ou [f] pour afficher l’alarme. ALM
s’affiche.
Enfoncer la touche [b] (SET) pour sélectionner les heures ; régler avec [c] et [d].
Enfoncer la touche [b] (SET) pour sélectionner les minutes ; régler avec [c] et [d].
Enfoncer la touche [b] (SET) pour confirmer le réglage.
Enfoncer la touche [c] ou [d] pour (dés)activer l’alarme. Le symbole (֠
֠) s’affiche
lorsque l’alarme est activée.
Enfoncer une touche pour désactiver une alarme déclenchée (l’alarme est
automatiquement désactivée après un délai de 2 minutes).
•
•
•
•
•
Calculatrice
•
Pousser l’afficheur (1), ou enfoncer la touche [a] ou [ON/C] pour afficher la
calculatrice.
Tonalités des touches
•
Enfoncer la touche [e] pour (dés)activer la tonalité des touches.
Réinitialisation
•
•
La calculatrice est automatiquement réinitialisée lors d’un dérèglement électrostatique.
Insérer un objet pointu dans le petit trou (4) pour réinitialiser manuellement la
calculatrice.
7.
•
•
•
La pile
Retirer la pellicule de protection avant usage.
Desserrer la vis et ouvrir le compartiment des piles (3).
Remplacer la pile avec une nouvelle pile au lithium type CR3032. Respecter la
polarité.
Retirer la pile après usage.
La pile n’est pas rechargeable. Ne pas jeter la pile dans le feu.
•
•
ATTENTION : Respecter les prescriptions mentionnées sur
l’emballage. Tenir la pile à l’écart des enfants.
8.
Spécification techniques
alimentation
1 pile au lithium type CR2032C (incl.)
dimensions
115 x 155 x 70 mm
poids
200 g
N’employer cet appareil qu’avec des accessoires d’origine. SA Velleman ne
sera aucunement responsable de dommages ou lésions survenus à un usage
(incorrect) de cet appareil. Pour plus d’information concernant cet article,
visitez notre site web www.velleman.eu. Toutes les informations présentées
dans cette notice peuvent être modifiées sans notification préalable.
00 rev A(30/07/2008)
10
CAL9
MANUAL DEL USUARIO
1.
Introducción
A los ciudadanos de la Unión Europea
Importantes informaciones sobre el medio ambiente concerniente a este
producto
Este símbolo en este aparato o el embalaje indica que, si tira las muestras inservibles,
podrían dañar el medio ambiente. No tire este aparato (ni las pilas, si las
hubiera) en la basura doméstica; debe ir a una empresa especializada en
reciclaje. Devuelva este aparato a su distribuidor o a la unidad de reciclaje
local. Respete las leyes locales en relación con el medio ambiente.
Si tiene dudas, contacte con las autoridades locales para residuos.
¡Gracias por haber comprado la CAL9! Lea atentamente las instrucciones del manual
antes de usarla. Si el aparato ha sufrido algún daño en el transporte no lo instale y
póngase en contacto con su distribuidor.
2.
Instrucciones de seguridad
Sólo para el uso en interiores. No exponga este equipo a lluvia,
humedad ni a ningún tipo de salpicadura o goteo.
Mantenga el aparato lejos del alcance de personas no capacitadas y
niños.
El usuario no habrá de efectuar el mantenimiento de ninguna pieza.
Contacte con su distribuidor si necesita piezas de recambio.
•
•
3.
•
•
•
•
•
4.
•
•
Daños causados por descuido de las instrucciones de seguridad de este manual
invalidarán su garantía y su distribuidor no será responsable de ningún daño u
otros problemas resultantes.
Los daños causados por modificaciones no autorizadas, no están cubiertos por la
garantía.
Normas generales
No agite el aparato. Evite usar excesiva fuerza durante el manejo y la instalación.
No exponga este aparato a polvo, humedad y temperaturas extremas.
Familiarícese con el funcionamiento del aparato antes de utilizarlo.
Por razones de seguridad, las modificaciones no autorizadas del aparato están
prohibidas.
Utilice sólo el aparato para las aplicaciones descritas en este manual. Un uso
desautorizado puede causar cortocircuitos, quemaduras, descargas eléctricas, etc.
y anula la garantía completamente.
Características
calculadora/reloj con 4 funciones
o calculadora: 8 dígitos
o reloj: visualización de las horas en formato 12/24h, reloj del horario mundial (16
ciudades)
o fecha: calendario que muestra mes/día, ajuste automático para los años
bisiestos entre 2000 y 2099
o alarma: alarma diaria
selección de la función al pulsar la pantalla LCD ligeramente
00 rev A(30/07/2008)
11
CAL9
5.
Descripción
1. pantalla LCD
2. teclado
6.
3. compartimento de pilas
4. botón de reinicialización
Ajustes
Reloj
•
•
•
•
•
•
Pulse la pantalla (1) o la tecla [a] para seleccionar el reloj.
Pulse la tecla [b] (SET) para seleccionar los segundos; reinicialice con la tecla [c] o
[d].
Pulse la tecla [b] (SET) para seleccionar las horas; ajuste con [c] y [d].
Pulse la tecla [b] (SET) para seleccionar los minutos; ajuste con [c] y [d].
Pulse la tecla [b] (SET) para confirmar el ajuste.
Seleccione el formato de visualización 12/24 con la tecla [=].
Reloj universal
•
•
En el modo de ajuste de la hora, pulse la tecla de acuerdo con la ciudad. La hora local
de la ciudad se visualiza durante 8 segundos.
Para visualizar la hora local de una ciudad de manera permanente, visualice la hora
correspondiente y mantenga pulsada la tecla [b] (SET) durante 2 segundos.
Fecha
•
•
•
•
•
Pulse
Pulse
Pulse
Pulse
Pulse
la
la
la
la
la
pantalla (1) o pulse la tecla [a] para visualizar la fecha.
tecla [b] (SET) para seleccionar el año; ajuste con [c] y [d].
tecla [b] (SET) para seleccionar el mes; ajuste con [c] y [d].
tecla [b] (SET) para seleccionar el día; ajuste con [c] y [d].
tecla [b] (SET) para confirmar el ajuste.
00 rev A(30/07/2008)
12
CAL9
Alarma
•
Pulse la pantalla (1) o pulse la tecla [a] o [f] para visualizar la alarma. ALM se
visualiza.
Pulse la tecla [b] (SET) para seleccionar las horas; ajuste con [c] y [d].
Pulse la tecla [b] (SET) para seleccionar los minutos; ajuste con [c] y [d].
Pulse la tecla [b] (SET) para confirmar el ajuste.
Pulse la tecla [c] o [d] para (des)activar la alarma. El símbolo (֠
֠) se visualiza si la
alarma está activada.
Pulse una tecla para desactivar una alarma activada (la alarma se desactiva
automáticamente después de 2 minutos).
•
•
•
•
•
Calculadora
•
Pulse la pantalla (1) o pulse la tecla [a] o [ON/C] para visualizar la calculadora.
Tono de las teclas
•
Pulse la tecla [e] para (des)activar el tono de las teclas.
Reinicialización
•
•
La calculadora se reinicializa automáticamente si hay una interferencia electrostática.
Introduzca un objeto puntiagudo en el pequeño agujero (4) para reinicializar la
calculadora de manera manual.
7.
•
•
•
•
•
La pila
Quite la película de protección antes del uso.
Desatornille el tornillo y abra el compartimento de pilas (3).
Reemplace la pila por una nueva pila de litio del tipo CR3032. Respete la polaridad.
Saque la pila después del uso.
No es posible recargar la pila. No eche la pila al fuego.
OJO: Respete las advertencias del embalaje. Mantenga las pilas
lejos del alcance de niños.
8.
Especificaciones
alimentación
1 pila de litio tipo CR2032C (incl.)
dimensiones
115 x 155 x 70mm
peso
200 g
Utilice este aparato sólo con los accesorios originales. Velleman Spain SL no
será responsable de daños ni lesiones causados por un uso (indebido) de este
aparato. Para más información sobre este producto, visite nuestra página
web www.velleman.eu. Se pueden modificar las especificaciones y el
contenido de este manual sin previo aviso.
00 rev A(30/07/2008)
13
CAL9
BEDIENUNGSANLEITUNG
1.
Einführung
An alle Einwohner der Europäischen Union
Wichtige Umweltinformationen über dieses Produkt
Dieses Symbol auf dem Produkt oder der Verpackung zeigt an, dass die
Entsorgung dieses Produktes nach seinem Lebenszyklus der Umwelt
Schaden zufügen kann. Entsorgen Sie die Einheit (oder verwendeten
Batterien) nicht als unsortiertes Hausmüll; die Einheit oder verwendeten
Batterien müssen von einer spezialisierten Firma zwecks Recycling entsorgt
werden. Diese Einheit muss an den Händler oder ein örtliches RecyclingUnternehmen retourniert werden. Respektieren Sie die örtlichen Umweltvorschriften.
Falls Zweifel bestehen, wenden Sie sich für Entsorgungsrichtlinien an Ihre
örtliche Behörde.
Wir bedanken uns für den Kauf des CAL9! Lesen Sie diese Bedienungsanleitung vor
Inbetriebnahme sorgfältig durch. Überprüfen Sie, ob Transportschäden vorliegen. Sollte
dies der Fall sein, verwenden Sie das Gerät nicht und wenden Sie sich an Ihren Händler.
2.
Sicherheitshinweise
Nur für die Anwendung im Innenbereich.
Schützen Sie das Gerät vor Regen und Feuchte. Setzen Sie das Gerät
keiner Flüssigkeit wie z.B. Tropf- oder Spritzwasser, aus
Halten Sie Kinder und Unbefugte vom Gerät fern.
Es gibt keine zu wartenden Teile. Bestellen Sie eventuelle Ersatzteile bei
Ihrem Fachhändler.
•
•
3.
•
•
•
•
•
4.
•
•
Bei Schäden, die durch Nichtbeachtung der Bedienungsanleitung verursacht
werden, erlischt der Garantieanspruch. Für daraus resultierende Folgeschäden
übernimmt der Hersteller keine Haftung.
Bei Schäden verursacht durch eigenmächtige Änderungen erlischt der
Garantieanspruch.
Allgemeine Richtlinien
Vermeiden Sie Erschütterungen. Vermeiden Sie rohe Gewalt während der Installation und
Bedienung des Gerätes.
Schützen Sie das Gerät vor Regen, Staub und extremen Temperaturen.
Nehmen Sie das Gerät erst in Betrieb, nachdem Sie sich mit seinen Funktionen
vertraut gemacht haben.
Eigenmächtige Veränderungen sind aus Sicherheitsgründen verboten.
Verwenden Sie das Gerät nur für Anwendungen beschrieben in dieser
Bedienungsanleitung sonst kann dies zu Schäden am Produkt führen und erlischt
der Garantieanspruch.
Eigenschaften
Uhr/Rechner mit 4 Funktionen:
o Rechner: 8-stellig
o Uhr: 12/24h-Display, Weltzeituhr (16 Städte)
o Datum: Kalender mit Monat/Tag, automatische Anpassung des Schaltjahrs (2000 ~ 2099)
o Alarm: tägliche Weckfunktion
Funktionswahl durch sanften Druck auf den LCD-Schirm
00 rev A(30/07/2008)
14
CAL9
5.
Umschreibung
1. LCD-Display
2. Tastatur
6.
3. Batteriefach
4. Reset-Taste
Einstellungen
Uhr
•
•
•
•
•
•
Drücken Sie LCD-Display (1) oder die Taste [a] um die Zeitanzeige zu wählen.
Drücken Sie die Taste [b] (SET) um die Sekunden einzustellen. Drücken Sie die Taste
[c] oder [d] um 00 wieder anzuzeigen.
Drücken Sie die Taste [b] (SET) um die Stunden einzustellen. Drücken Sie die Taste
[c] und [d] zum Ändern.
Drücken Sie die Taste [b] (SET) um die Minuten einzustellen. Drücken Sie die Taste
[c] und [d] zum Ändern.
Drücken Sie die Taste [b] (SET) zum Bestätigen.
Wählen Sie die 12/24Std.-Anzeige indem Sie während der Einstellung der Zeit die
Taste [=] drücken.
Weltzeituhr
•
•
Drücken Sie während der Einstellung der Zeit die Taste, die mit der entsprechenden
Stadt übereinstimmt. Die entsprechende Zeit wird 8 Sekunden angezeigt. Danach
wird die Ortszeit wieder angezeigt.
Möchten Sie eine permanente Zeitanzeige im Display, so zeigen Sie zuerst die Uhrzeit
an und halten Sie die Taste [b] (SET) 2 Sekunden gedrückt.
Datum
•
•
•
Drücken Sie das LCD-Display (1) oder die Taste [a] um die Datumsanzeige zu
wählen.
Drücken Sie die Taste [b] (SET) um die Jahreszahl einzustellen. Drücken Sie die
Taste [c] oder [d] zum Ändern.
Drücken Sie die Taste [b] (SET) um den Monat einzustellen. Drücken Sie die Taste
[c] und [d] zum Ändern.
00 rev A(30/07/2008)
15
CAL9
•
Drücken Sie die Taste [b] (SET) um den Tag einzustellen. Drücken Sie die Taste [c]
und [d] zum Ändern.
Drücken Sie die Taste [b] (SET) zum Bestätigen.
•
Alarm
•
Drücken Sie das LCD-Display (1) oder die Taste [a] um die Alarmanzeige zu wählen.
Das ALM-Symbol erscheint im Display.
Drücken Sie die Taste [b] (SET) um die Stunden einzustellen. Drücken Sie die Taste
[c] oder [d] zum Ändern.
Drücken Sie die Taste [b] (SET) um die Minuten einzustellen. Drücken Sie die Taste
[c] und [d] zum Ändern.
Drücken Sie die Taste [b] (SET) zum Bestätigen.
Drücken Sie die Taste [c] of [d] um den Alarm ein- oder auszuschalten. Das (֠
֠)Symbol erscheint im Display wenn Sie den Alarm einschalten.
Drücken Sie eine Taste wenn der Alarm ertönt, um auszuschalten (der Alarm wird
nach 2 Minuten automatisch ausgeschaltet).
•
•
•
•
•
Rechner
•
Drücken Sie das LCD-Display (1) oder die Taste [a] oder die Taste [ON/C] um den
Rechner einzuschalten.
Lautstärke der Tasten
•
Drücken Sie die Taste [e] um das Tastensignal ein- oder auszuschalten. Im Display
erscheint ein Symbol (Note) wenn das Tastensignal eingeschaltet ist.
Rücksetzen (Reset)
•
•
Der Rechner wird automatisch rückgesetzt wenn es eine elektrostatische Störung gibt.
Möchten Sie den Rechner manuell rücksetzen, drücken Sie mit einem spitzen
Gegenstand im kleinen Loch auf der Rückseite des Gerätes (4).
7.
•
•
•
Batterie
Entfernen Sie zuerst die Schutzfolie.
Öffnen Sie das Batteriefach (3) mit einem kleinen Schraubendreher.
Ersetzen Sie die alte Batterie durch eine neue Lithiumbatterie Typ CR3032.
Beachten Sie die Polarität.
Entfernen Sie die Batterie nach Gebrauch.
Es ist verboten, die Batterien wieder aufzuladen. Werfen Sie diese nicht ins Feuer
um eine Explosion zu vermeiden.
•
•
ACHTUNG: Beachten Sie die Warnungen der Verpackung. Halten
Sie die Batterien von Kindern fern.
8.
Technische Daten
Stromversorgung
1 x CR2032C Lithiumbatterie (mitgeliefert)
Abmessungen
115 x 155 x 70 mm
Gewicht
200 g
Verwenden Sie dieses Gerät nur mit originellen Zubehörteilen. Velleman NV
übernimmt keine Haftung für Schaden oder Verletzungen bei (falscher)
Anwendung dieses Gerätes. Für mehr Informationen zu diesem Produkt,
siehe www.velleman.eu. Alle Änderungen ohne vorherige Ankündigung
vorbehalten.
00 rev A(30/07/2008)
16