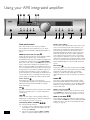
1
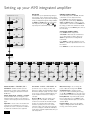
Installation: A90 integrated amplifier
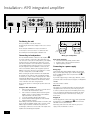
L
PHONO
R
SP2
L
230V
REMOTE
IN
2
+
R
–
3
MM
MC
L
INTEGRATED
SP1
POWER INLET
1
4 – 16 OHMS
TRIG
OUT
VOLTAGE
SELECT
+
L
4
–
R
R
PWR IN
PRE OUT
PRE/PWR
RECORD
OUT
PLAY
IN
VCR/TAPE 2
RECORD
PLAY
OUT
IN
TAPE 1
567
DVD
AV
CD
TUNER
AUX
8 9 bk bl bm bn bo bp bq br
Positioning the unit
+
Place your amplifier on a level, firm surface.
–
Arcam A90 amplifier
+
–
L
R
Avoid placing the unit in direct sunlight or near sources of heat
or damp.
Ensure adequate ventilation. Do not place the unit in an
enclosed space such as a bookcase or cabinet as both of
these will impede air flow through the ventilation slots.
+
–
+
–
Right
speaker
Connecting to loudspeakers
Left
speaker
Wiring your loudspeakers
4
The red and black terminals on the back of the amplifiers
are used to make the connections to the loudspeakers. You
can connect one or two pairs of loudspeakers to your amplifier,
provided each pair is rated between 8–16Ω. (If one or both
pairs have an impedance of less than 8Ω, the combined load
on the amplifier falls below 4Ω and could cause an overload.)
The pair designated ‘speaker 1’ (SP1) are connected to the
lower set of terminals, while the pair designated ‘speaker 2’
(SP2) are connected to the upper set of terminals. To connect
one pair of loudspeakers, use the SP1 terminals.
When connecting the speaker terminals of the amplifier with
the terminals on the speakers, make sure that like polarities
are matched (i.e., match ‘+’ with ‘+’ (usually red) and ‘–’ with ‘–’
(usually black)). Mismatching of polarities will result in a weak
central sound, unclear orientation of the instruments and the
sense of direction of the stereo being impaired.
1.
2.
3.
Loosen the terminal by turning it anti-clockwise
Insert the spade connecter under the terminal.
Tighten by turning clockwise.
Connecting to a power supply
Wrong plug?
Check that the plug supplied with the unit fits your supply and
that your mains supply voltage agrees with the voltage setting
(115V or 230V) indicated on the rear panel of the unit
before plugging in.
2
If your mains supply voltage or mains plug is different, consult
your Arcam dealer or Arcam Customer Support on +44 (0)1223
203200.
There are two options for connecting the speaker cable to the
amplifier:
The product must be earthed.
Using bare wire ended leads:
The appliance is normally supplied with a moulded mains plug
already fitted to the lead. If for any reason the plug needs to
be removed, it must be disposed of immediately and securely,
as it is a potential shock hazard when inserted into the mains
socket. Should you require a new mains lead, contact your
Arcam dealer.
1.
Strip back the insulation on the wire to reveal about 2cm
of conductor (the metal inside the cable).
2. If the conductor is stranded, twist the strands together
tightly to avoid loose strands making contact with the
adjacent terminals or the back panel.
3. Loosen the terminal by turning it anti-clockwise
4. Insert the twisted wire through the hole in the terminal.
5. Tighten by turning clockwise.
When making connections with stranded bare ended wires, take
great care that no individual strands of wire come into contact
with the adjacent terminals or with the back panel. If this
should happen, it will cause a short circuit on the output of the
amplifier and could damage the amplifier.
A90/P90
4
Using spade terminals:
Mains lead
Plugging in
Push the plug (IEC line socket) of the power cable supplied with
the unit into the socket (POWER INLET)
in the back of the
unit. Make sure it is pushed in firmly.
1
Put the plug on the other end of the cable into your power
supply socket and switch the socket on.