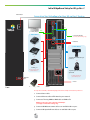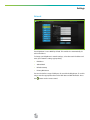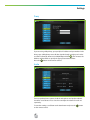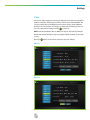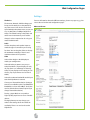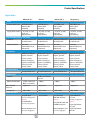
1
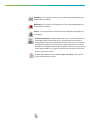
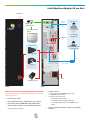
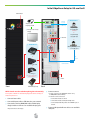
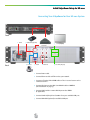
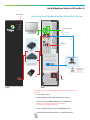
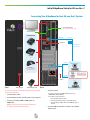
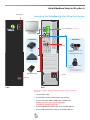
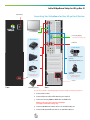
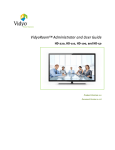
VidyoRoom™ Users Guide HD-220, HD-200, HD-100 And HD-50 System Version 2.1 Document Version 2.1-A Table of Contents 1 2 6 8 10 11 12 14 15 16 17 18 19 20 21 26 27 35 43 47 49 51 52 Document Overview Definitions The VidyoRoom Remote Control VidyoRoom On-Screen Icons Initial VidyoRoom Setup for HD-220 Rev A Initial VidyoRoom Setup for HD-220 Rev B Initial VidyoRoom Setup for HD-220 Rev C Initial VidyoRoom Setup for HD-200 Initial VidyoRoom Setup for HD-100 Rev. A Initial VidyoRoom Setup for HD-100 Rev. B Initial VidyoRoom Setup for HD-100 Rev. C Initial VidyoRoom Setup for HD-50 Rev. A Initial VidyoRoom Setup for HD-50 Rev. B Initial VidyoRoom Setup for HD-50 Rev. C Initial VidyoRoom Portal Setup Overview of the VidyoRoom Home Page Using the VidyoRoom During a Meeting Settings Web Configuration Pages Product Specifications 1080p Configuration with the VidyoRoom HD220 Appendix Regulatory Compliance Appendix Rack Mounting the HD-220 Appendix © 2010, 2011 Vidyo, Inc. All rights reserved. Vidyo, VidyoTechnology, VidyoConferencing, VidyoRouter, VidyoPortal, VidyoGateway, VidyoRoom, and VidyoDesktop are trademarks of Vidyo, Inc. All other trademarks are the property of their respective owners. All specifications subject to change without notice, system specifics may vary. All images are for representational purposes only, actual products may differ. Vidyo products are covered by U.S. Pat. Nos. 7,593,032 B3 and 7,643,560, as well as additional International patents or pending U.S. or International patent applications owned by Vidyo, Inc. Document Overview The VidyoRoom system is simple to use, easy to configure, and voice-activated with continuous presence. Flexible conference control options make it a snap to manage, using either the VidyoPortal™ or a remote control device. Welcome to Vidyo Video conferencing solutions that just work. Simply. Intuitively. Reliably. Inexpensively. From anywhere. The VidyoRoom HD-220 delivers 60 fps encoding/decoding and displays multiple HD participants. The VidyoRoom HD-100 encodes up to 30 fps and decodes up to 60 fps. The VidyoRoom HD-50 encodes and decodes up to 720p @ 30fps with Logitech Webcam Pro 9000. Both the HD-100 and HD-50 support dual monitors to display conference participants on one monitor and shared applications on the other. The level of video quality is unequaled by systems that require dedicated bandwidth. And because video conferencing ought to be a natural extension of the way people normally work, the VidyoRoom interoperates seamlessly with VidyoDesktop™ clients, making it possible for people to join a conference from their home office or wherever else they might happen to be. This guide details how to use the features of the VidyoRoom. This guide describes the features of VidyoRoom. You will learn how to: Initiate a meeting Join a meeting Place a direct (point-to-point) call to any user in the system Easily search for any user by typing the name in the search field Invite someone to a meeting Control a meeting Manage a personal My Contacts list Change settings Separate guides are available for the administrator portal and end user VidyoPortal. 1. The VidyoRoom HD-100 and VidyoRoom HD-50 are known as VIDYO-PROD-001 for regulatory compliance purposes. 2. The VidyoRoom HD-220 is known as VIDYO-PROD-002 for regulatory compliance purposes. 3. TThe VidyoRoom HD-50 Rev C, HD-100 Rev C and HD-220 Rev C are known as VIDYOPROD-003 for regulatory compliance purposes. TM 1 Definitions As a new Vidyo user, it is helpful to have a basic understanding of the following terms that are used throughout this document: Multi-tenant terminology The following terms apply if you have a multi-tenant license: Tenant — Your organization, selection of users or a “user segment.” Tenant Name — Simple identifier within the system and among other tenants. Tenant URL — The tenant’s URL is the URL/FQDN that tenants use to access their virtual portal. Destinations Places where you may interact with the VidyoConferencing System: VidyoPortal — The Web interface of the VidyoConferencing System VidyoDesktop — The Vidyo software client running on your local computer, enabling a user to participate in a conference VidyoRoom — The dedicated Vidyo endpoint appliance for use in a physical conference room Users Anyone who uses the system. There are five types of users: Super Admin — Has administrative privileges and is responsible for general portal configuration including network settings, components configuration, maintenance (backup and upgrades), tenant configuration and global settings. In a multi-tenant system, has full administrative privileges above the tenant admin and all regular tenant admin rights. Admin/Tenant Admin — Has administrative privileges. Can add, delete, manage users, set up public rooms and set up groups (define maximum participants and bandwidth for users). Operator — Can manage meeting rooms and normal users. The operator has the same rights as the administrator. A PIN Code is a 3- to 10-digit number that meeting participants must enter before being admitted to the meeting room. It can be set and changed by the admin and user. Normal — Can join meetings, control own meeting and place direct calls. Can change own password, set own PIN code and more. This guide is targeted toward such end users. VidyoRoom — The dedicated Vidyo endpoint appliance. Has the same rights as a normal user. VidyoGateway — End user for portal. Has no personal room. TM 2 Definitions Voice-Only Calls Registered and guest users can participate in a VidyoConference by phone if the administrator enables this function. The MyRoom settings page provides a phone number to join a user’s room, as do the Control Meeting page and the home page when you select My Room. Also, when you invite a participant by email, the phone number and extension appear in the invitation message. When a participant joins a conference by phone, their phone number appears in the list of participants in the VidyoRoom home page. Meeting rooms (of either type) offer attributes Meeting rooms are virtual rooms where users of the Vidyo system can gather for VidyoConferences. There are two types of meeting rooms: Personal – Each user is automatically assigned his or her own personal room. This is the equivalent of a “personal office” in the physical world. Public – Common public spaces may also be created by the operator and administrator only. These are the equivalent of conference rooms in the physical world. Meeting rooms of either type have the following attributes: Maximum Bandwidth – The maximum bandwidth connection of the room per user. Determined by the group the room is associated with. The maximum is 10000 Kbps for upstream and downstream signals. Maximum Number of Users – The maximum number of users that can be allowed into the room at once at any given time. Determined by the group the room is associated with. The default policy limit is 10 and is configurable in the VidyoPortal at the tenant level. Locked / Unlocked – A locked meeting room can have no new entrants. PIN Protected – A PIN-protected room requires the user and meeting invitees to enter the specified PIN in order to be admitted to the room. Groups Users, Public Meeting Rooms and VidyoRoom Users belong to a provisioning Group. Upon creating a VidyoRoom account, a personal room is automatically generated. Such groups are managed by the users with Administrative or Operator rights. The configurable attributes include the maximum number of participants and maximum bandwidth for the Conference Room. The values for maximum users and bandwidth apply to groups, and all meeting rooms inherit those values when they are created for a group. All personal and public rooms can have different values for the maximum number of participants only by changing the group they belong to. The TM 3 Definitions bandwidth limitation is per user, so changing the group a user belongs to might also affect their bandwidth limitation and the maximum number of participants that can be in their room. A default Group is set up with the system. It can be modified but not removed. The default group has the following factory configuration: Max Number of Participants: 10 Max Receive Bandwidth Per User (Kbps): 10000 Max Transmit Bandwidth Per User (Kbps): 10000 Note: The bandwidth limitation applies to the user, so two users can have different limitations while participating in the same conference. The maximum number of participants is limited according to the room the meeting is held in - so this applies to all users in a meeting. Direct Call (Point-to-point) You may directly call a specific user in a direct call. A direct call involves just two users; no additional users can join. When you call a meeting room and there are just two of you in the room, it is similar to being in a direct call. The difference with calling a meeting room is that others can potentially join you in the meeting. This is not so in a direct call. Note: When you are in a call, you cannot attend a meeting or place another call until you exit your current call. Meeting (conference) A meeting is an audio and video connection of a meeting room with two or more users interacting and sharing their video streams/presentations. meeting room Status Each meeting room has a status that indicates whether it is available for you to join. In addition, a room may require a PIN number to gain access. When you cannot join a room, the Join Room button is inactive. There are five room statuses: Empty — The room has no one in it and you can join it. The Join Room button is active. Full — The room is occupied and cannot accept more participants. The Join Room button is inactive. Locked — The room is locked and you cannot join it. The Join Room button is inactive. TM Occupied — The room is occupied but additional participants can join it. The Join Room button is active. 4 Definitions PIN Protected — You must enter a PIN number to join the room. The Join Room button is active, but you are denied access to the room without the correct PIN. user Status A user’s status determines whether you can place a direct call to them, join their room or invite them to attend a meeting. There are eight user statuses: Available — The user is available for a direct call, to join a room and to be invited to attend a meeting. The Call Direct button is active. Busy — The user is busy and you cannot contact them with a direct call or invite them to join your room. You can join their room if it is available (not full or locked). The Call Direct button is inactive. In room — The user is in their own room. You cannot call them directly and therefore the Call Direct button is inactive. You can join their room if it is available and you can invite them to join yours. They can leave their room and join yours if they choose to. In room/room full — The user is in their own room and the room is full. You cannot call them directly or join their room. They can leave their room and join yours if they choose to. In room/room locked — The user is in their own room and the room is locked. You cannot call them directly or join their room. They can leave their room and join yours if they choose to. In room/room PIN protected — The user is in their own room and the room is PIN protected. You cannot call them directly, but you can join their room if you have their PIN code. They can leave their room and join yours if they choose to. Offline — The contact is not logged into the VidyoPortal. The Call Direct button is inactive. You cannot place a direct call to them, but you can join their room. Legacy — End user for portal. Has no personal room. TM 5 The VidyoRoom Remote Control The VidyoRoom comes with a remote control allowing quick key shortcuts to frequent VidyoRoom activities. It also provides the input mode/keyboard for typing information. Some controls behave differently depending on whether or not you’re in a conference. Not In Conference CONNECT Displays the onscreen keyboard. ARROWS / OK Use the arrow keys to navigate on-screen. The option you navigate to will be highlighted in green when activated. Press the OK key on the remote to select the option on-screen. VOLUME / MUTE / SELFVIEW / ZOOM Volume — adjusts the sound level MUTE Mute — mutes your microphone SELFVIEW , @ - 1 2 3 Selfview — Single Screen Mode — shows preview Dual Screen Mode — shows help screen on the first monitor and turns control to the camera while preview is shown on the second monitor Zoom — acts as a page up/page down for scrolling through search results on-screen 7 ALPHA-NUMERIC KEYPAD [ . : / _ Use these keys in conjunction with the input modes on-screen to key in user names, passwords, speed dials, and search terms. MANAGE CONTROL KEYPAD Back — takes you to the previous screen in the VidyoRoom interface Manage — brings up the remote control Help screen Home — takes users to the home screen in the VidyoRoom interface Delete — acts as a backspace when typing in a form field Settings — brings up the Settings screen Toggle — no functionality is associated with this key A — multifunction key B — multifunction key C — multifunction key D — multifunction key DISCONNECT Exits meeting TM 6 The VidyoRoom Remote Control In Conference DISCONNECT Exits meeting ARROWS / OK Left/Right – pans camera Up/Down – tilts camera VOLUME / MUTE / SELFVIEW / ZOOM Volume — adjusts the sound level MUTE Mute — mutes your microphone or recording source SELFVIEW , @ - 1 2 3 Selfview — cycles through Selfview modes Single Screen Mode — picture-in-picture, docked, full screen and off Dual Screen Mode — picture-in-picture, docked and off (HD-200 and HD-220 only) Zoom — zooms your camera In/Out (if supported by camera) ALPHA-NUMERIC KEYPAD [ 7 . : / _ 1-8 — sets the number of participants viewed 0 — sets the number of participants back to auto MANAGE Shortcuts During Call: 90 - shows current Maximum Send Bandwidth 9# - increases Maximum Send Bandwidth (applicable only to current call; not saved) 9* - decreases Maximum Send Bandwidth (applicable only to current call; not saved) CONTROL KEYPAD Manage — brings up the remote control Help screen Home — resets Camera Pan, Tilt, and Zoom to default position (if supported by camera) Privacy — toggles Privacy mode, so that no one in the conference can see your video Share — toggles sharing on and off when using VGA2USB device. Press the “*” button to view shared applications in full screen. Toggle — cycles through shared sources, including none A — swaps displays when using Dual Screen mode (HD-200 & HD-220 only) B — Enables DTMF dialing mode. (P2P calls only.) C — toggles Far End Camera Control mode D — toggles between Preferred/Non-Preferred mode TM 7 VidyoRoom On-Screen Icons Various icons appear in the lower right-hand corner of the VidyoRoom’s screen to provide information on the call state and the currently selected options. Here’s a quick rundown on the icons you may encounter from time to time. Speaker Mute — Displayed when local speakers are muted (volume turned all the way down via remote control). Non-Preferred Mode Microphone Mute — Displayed when local microphone is muted mote control. via re- Privacy — Displayed when local camera is muted (Privacy mode via remote control). enabled Number of Displayed Participants – Displayed when the number of participants to view is selected via remote control (number will change based on the number of participants selected on the remote control, 1-8; 0 selects all participants and the icon disappears). Preferred Mode Not Sharing — Displayed when the VGA2USB/VGA2USB LR adapter is connected and you can share but have chosen not to by clicking the Share button on the remote . Share Ready — Displayed when the VGA2USB/VGA2USB LR adapter is connected and the Share has successfully synchronized. Press on the remote control to then share the desktop connected to the adapter (once the Share is activated this icon will scroll away and you’ll see the Remote Share icon). Remote Share — Displayed when a remote participant Share is available. It’s also displayed after a local Share is enabled using the VGA2USB/VGA2USB LR adapter. Shortcuts During Call: Press 90 on the remote keypad - Shows current Maximum Send Bandwidth Press 9# on the remote keypad - increases Maximum Send Bandwidth (applicable only to current call; not saved) Press 9* on the remote keypad - Decreases Maximum Send Bandwidth (applicable only to current call; not saved) TM 8 Recording — The conference is being recorded. (The optional VidyoReplay component must be installed.) Webcasting— The conference is being webcast. (The optional VidyoReplay component must be installed.) Secure — The audio and video streams between the VidyoRoom and endpoints is encrypted. Far End Camera Control — Displayed when you press C to enter Far End Camera Control Mode, (FECC) which allows you to remotely adjust the camera(s) on other VidyoRoom systems participating in the same conference. Press the Left and Right directional keys on the remote to scroll through the various remote VidyoRooms (if available) that have FECC enabled and select the one you wish to control and press OK. Press C again to release the Far End Camera Control and return to local camera control. No valid video capture device is available. Note: A BlackMagic card is considered a valid video capture device. TM 9 Initial VidyoRoom Setup for HD-220 Rev A Power Button Adapter, Display Port/DVI 3. Primary 4. Video Device HDMI/DVI for Sony HDMI/HDMI for Minrray Sony EVI-HD7V (1080p@30fps) & Secondary Preferred Display OR Sony EVI-HD3V (720p@60fps) 2. Ethernet OR 5. Audio Device Minrray HDCAM90-S-VY (1080p@30fps) Yamaha PJP-20UR OR 4a. VISCA 4c. DB9-Connection USB to Serial Konftel 300 4b. Use only one audio device between the above 1. Power VGA2USB (optional) Front Back NOTE: Stands must be used when placing the unit vertically. 4. Connect camera: * For video connection use HDMI/DVI cable for Sony Do not power on the HD-220 unit until Display(s) and Camera are fully connected and powered on. 1. Connect Power cable. 2. Connect Ethernet cable to ETH-O and to your network. 3. Connect the TV using HDMI/DVI cable to DVI Display dongle and then connect to an available display port. * Repeat for the second display 10 TM or HDMI/HDMI cable for Minrray * For Camera Control connection: a. Connect VISCA cable to camera b. Connect VISCA cable to USB/Serial DB9 cable c. Connect USB/Serial DB9 cable to the CAMCTRL port on the unit 5. Connect a USB SpeakerPhone cable to an available USB port. Initial VidyoRoom Setup for HD-220 Rev B Power Button Adapter, Display Port/DVI 3. Primary 4. Video Device DVI/DVI for Sony DVI/HDMI for Minrray Sony EVI-HD7V (1080p@30fps) & Secondary Preferred Display OR Sony EVI-HD3V (720p@60fps) 2. Ethernet OR 5. Audio Device Minrray HDCAM90-S-VY (1080p@30fps) Chat 150 OR 4a. VISCA 4c. DB9-Connection USB to Serial Yamaha PJP-20UR 4b. OR Konftel 300 Use only one audio device between the above Front VGA2USB (optional) 1. Power Back NOTE: Stands must be used when placing the unit vertically. 4. Connect camera: * For video connection use HDMI/DVI cable for Sony Do not power on the HD-220 unit until Display(s) and Camera are fully connected and powered on. 1. Connect Power cable. 2. Connect Ethernet cable to ETH-O and to your network. 3. Connect the TV using HDMI/DVI cable to DVI Display dongle and then connect to an available display port. * Repeat for the second display 11 TM or HDMI/HDMI cable for Minrray * For Camera Control connection: a. Connect VISCA cable to camera b. Connect VISCA cable to USB/Serial DB9 cable c. Connect USB/Serial DB9 cable to the CAMCTRL port on the unit 5. Connect USB SpeakerPhone cable to an available USB port. Initial VidyoRoom Setup for HD-220 Rev C Power Button 5. Audio Device 4. Video Device Sony EVI-HD7V (1080p@30fps) 4a. VISCA Chat 150 4b. Preferred OR OR CAM CTRL Sony EVI-HD3V (720p@60fps) 4c. DB9- Connection USB to Serial Konftel 300 OR 2. Ethernet Use only one audio device between the above Minray HDCAM90-S-VY (1080p@30fps) VGA2USB (optional) Capture Card DVI/DVI for Sony DVI/HDMI for Minrray 3. Displays Secondary 1. Power Primary Front Back AUX USB Port NOTE: Stands must be used when placing the unit vertically. 4. Connect camera: * For video connection use HDMI/DVI cable for Sony Do not power on the HD-220 unit until Display(s) and Camera are fully connected and powered on. 1. Connect Power cable. 2. Connect Ethernet cable to ETH-O and to your network. 3. Connect the TV using HDMI/DVI cable to DVI Display dongle and then connect to an available display port. * Repeat for the second display 12 TM or HDMI/HDMI cable for Minrray * For Camera Control connection: a. Connect VISCA cable to camera b. Connect VISCA cable to USB 2.0/Serial DB9 cable c. Connect USB/Serial DB9 cable to the CAMCTRL port on the unit 5. Connect USB SpeakerPhone cable to an available USB 2.0 port. (Do not use USB 3.0 ports.) Initial VidyoRoom Setup for HD-200 Connecting Your VidyoRoom for Your HD-200 System Front 1. Power 7. VGA2USB (optional) 6. Yamaha PJP-25UR (optionaL) Back 4. Camera 5. VISCA 2. Ethernet 3. Primary Display 3. Secondary Display 1. Connect Power cable. 2. Connect Ethernet cable to ETH-1 and to your network. 3. Connect to TV using DVI to HDMI cable on TV-1. A second screen can be connected to TV-2. 4. Connect HD Camera using BNC Coax HD-SDI cable to CAMERA. (See illustration on page 9.) 5. Connect VISCA cable to camera VISCA port and to SERIAL (if applicable). 6. Connect Yamaha PJP-25UR or ClearOne Chat 50 to available USB port. 7. Connect VGA2USB (optional) to available USB port. TM 13 Initial VidyoRoom Setup for HD-200 HD Camera Kit Setup Power Supply System Select BNC Coax HD-SDI VISCA Serial Cable In order for the Sony EVI-HD1 Camera to Sync with your VidyoRoom HD-200, you need to set the System Select POT screw on the rear of the camera to #2. Connect Power Supply to power input. Connect VISCA cable to VISCA IN. Connect HD-SDI BNC Coax cable to HD OUT. Audio Connection Using Yamaha PJP-25UR or ClearOne Chat 50 DC IN 5V TM 14 AUDIO OUT IN Initial VidyoRoom Setup for HD-100 Rev. A Power Button Connecting Your VidyoRoom for Your HD-100 Rev A System VGA HDMI to TV HDMI TM 3. Secondary Display D89-Connection USB to Serial 3. Primary Display SERIAL / USB CABLE VISCA ETH0 2. Ethernet LINE IN LINE OUT Chat 50 OR 4. Video Device Yamaha PJP-25UR DVI Use only one audio device between the above two CAMERA Sony EVI-HD3V VGA2USB (optional) 1. Power Front Back Do not power on the HD-100 unit until Display(s) and Camera are fully connected and powered on. 1. Connect Power cable. 2. Connect Ethernet cable to ETH-O and to your network. 3. Connect to TV using HDMI to HDMI cable on HDMI-to-TV. NOTE: A second screen can be connected to the VGA port (2nd display is for Data Share viewing only). TM 4. Connect Sony EVI-HD3V camera using HDMI/DVI cable 5. Connect USB SpeakerPhone cable to an availble USB port. 15 Initial VidyoRoom Setup for HD-100 Rev. B Power Button Connecting Your VidyoRoom for Your HD-100 Rev B System HDMI 3. Secondary Display (For Data Share viewing only) D89-Connection USB to Serial 3. Primary Display 4b. 4c. 5. Audio Device VISCA 4a. 2. Ethernet Chat 50 OR 4. Video Device Yamaha PJP-20UR HDMI/DVI for Sony OR HDMI/HDMI for Minrray Sony EVI-HD3V Konftel 300 For 720p set to #3 Use only one audio device between the above OR 1. Power Minrray HDCAM90-S-VY Front USB port VGA2USB (optional) Back 4. Connect camera: * For video connection use HDMI/DVI cable for Sony or Do not power on the HD-100 unit until Display(s) and Camera are fully connected and powered on. 1. Connect Power cable. 2. Connect Ethernet cable to ETH-O and to your network. 3. Connect to TV using HDMI to HDMI cable on HDMI-to-TV. NOTE: A second screen can be connected to the VGA port (2nd display is for Data Share viewing only). TM HDMI/HDMI cable for Minrray * For Camera Control connection: a. Connect VISCA cable to camera b. Connect VISCA cable to USB/Serial DB9 cable c. Connect USB/Serial DB9 cable to the CAM CTRL port on the unit 5. Connect USB SpeakerPhone cable to an available USB port. 16 Initial VidyoRoom Setup for HD-100 Rev. C 3. Primary Display HDMI Do Not Remove Do Not Remove Power button Connecting Your VidyoRoom for Your HD-100 Rev C System VGA 3. Secondary Display (For Data Share viewing only) 5. Audio Device 4a. VISCA CAM CTRL Audio Device 4b. 2. Ethernet Chat 50 4c. D89-Connection USB to Serial OR Chat 150 OR DVI/DVI for Sony Capture 4. Video Device Card Konftel 300 Use only one audio device between the above Sony EVI-HD3V DVI/HDMI for Minrray 1. Power Front AUX USB port VGA2USB (optional) Back 4. Connect camera: * For video connection use HDMI/DVI cable for Sony or 1. Connect Power cable. 2. Connect Ethernet cable to ETH-O and to your network. (2nd display is for Data Share viewing only). OR Minrray HDCAM90-S-VY Do not power on the HD-100 unit until Display(s) and Camera are fully connected and powered on. 3. Connect to TV using HDMI to HDMI cable on HDMI-to-TV. NOTE: A second screen can be connected to the VGA port For 720p set to #3 TM HDMI/HDMI cable for Minrray * For Camera Control connection: a. Connect VISCA cable to camera b. Connect VISCA cable to USB 2.0/Serial DB9 cable c. Connect USB/Serial DB9 cable to the CAM CTRL port on the unit 5. Connect USB SpeakerPhone cable to an available USB 2.0 port. 17 Initial VidyoRoom Setup for HD-50 Rev. A Power Button Connecting Your VidyoRoom for Your HD-50 Rev A System VGA HDMI to TV HDMI TM TM 3. Secondary Display (For data only) 3. Primary Display SERIAL / USB CABLE 5. Audio Device 4. Video Device ETH0 LINE IN LINE OUT 2. Ethernet Chat 50 Logitech Webcam Pro 9000 (preferred) OR Logitech Quickcam Pro 9000 OR Yamaha PJP-25UR Logitech Quickcam Orbit/ Sphere AF For detailed webcams list please visit Vidyo.com VGA2USB (optional) 1. Power USB port Front Back Do not power on the HD-50 unit until Display(s) and Camera are fully connected and powered on. 1. Connect Power cable. 2. Connect Ethernet cable to ETH-O and to your network. 3. Connect to TV using HDMI to HDMI cable on HDMI-to-TV. NOTE: A second screen can be connected to the VGA port (2nd display is for Data Share viewing only). TM 4. Connect USB Webcam camera cable to an available USB port. 5. Connect USB SpeakerPhone cable to an available USB port. 18 Initial VidyoRoom Setup for HD-50 Rev. B Power Button Connecting Your VidyoRoom for Your HD-50 Rev B System HDMI VGA HDMI to TV TM 3. Primary Display SERIAL / USB CABLE 3. Secondary Display 5. Audio Device (For Data Share viewing only) ETH0 LINE IN LINE OUT Chat 50 2. Ethernet 4. Video Device OR Logitech Webcam Pro 9000 (preferred) Logitech Quickcam Pro 9000 Yamaha PJP-20UR OR OR Konftel 300 Logitech Quickcam Orbit/ Sphere AF Use only one audio device between the above For detailed webcams list please visit Vidyo.com USB port 1. Power Front VGA2USB (optional) Back Do not power on the HD-50 unit until Display(s) and Camera are fully connected and powered on. 1. Connect Power cable. 2. Connect Ethernet cable to ETH-O and to your network. 3. Connect to TV using HDMI to HDMI cable or HDMI-to-TV. NOTE: A second screen can be connected to the VGA port (2nd display is for Data Share viewing only). TM 4. Connect USB Webcam camera cable to an available USB port. 5. Connect USB SpeakerPhone cable to an available USB port. 19 Initial VidyoRoom Setup for HD-50 Rev. C Power Button VGA HDMI Do Not Remove 3. Primary Display HDMI to TV TM Do Not Remove Connecting Your VidyoRoom for Your HD-50 Rev C System VGA 5. Audio Device 3. Secondary Display SERIAL / USB CABLE (For Data Share viewing only) ETH0 2. Ethernet Chat 50 4. 4. Video Video Device Device LINE IN LINE OUT OR Chat 150 LogitechHDWebcam Pro 9000 Logitech Pro Webcam C910 OR (preferred) (preferred) OR Logitech Quickcam Pro 9000 OR OR Konftel 300 Use only one audio device between the above Logitech Quickcam Orbit/ Logitech Sphere AF Quickcam Orbit/ Sphere AF For detailed detailed webcams webcams list list For please visit visit Vidyo.com Vidyo.com please AUX USB port 1. Power Front Back VGA2USB (optional) Do not power on the HD-50 unit until Display(s) and Camera are fully connected and powered on. 1. Connect Power cable. 2. Connect Ethernet cable to ETH-O and to your network. 3. Connect to TV using HDMI to HDMI cable or HDMI-to-TV. NOTE: A second screen can be connected to the VGA port (2nd display is for Data Share viewing only). TM 4. Connect USB Webcam camera cable to an available USB 2.0 port. 5. Connect USB SpeakerPhone cable to an available USB 2.0 port. 20 Initial VidyoRoom Portal Setup Configuring the VidyoRoom System You can start configuring your VidyoRoom System simply by turning it on. The Account screen displays the default IP address of your VidyoPortal and the default user name (the model of your VidyoRoom) and password that came with your VidyoRoom. You must change these as described below to use your VidyoRoom. Note: To change the network settings for the VidyoRoom, see “Network” on page 29. Enter the VidyoPortal IP address or URL. (You don’t have to type the usual “http://’) Enter the user name and password for the VidyoPortal. Scroll down to the Save button and press on the remote control. Note: If you receive any errors, please double check your User Name, Password, Server address settings and Network configuration. TM 21 Overview of the VidyoRoom Home Page From the VidyoRoom home page, you can join a meeting, invite people to join your room and place a direct (point-to-point) call to a user. The VidyoRoom home page enables you to search for users and meeting rooms, view users’ status (personal status and room status), and set up a MyContacts list for easy access. You can also choose settings that determine the language the VidyoRoom displays, configure other options and log out of VidyoRoom. 8 Contact Search field 1 My Contacts/Search Results 2 Join Room button 3 Call Direct button 4 My History tab 5 Add/Delete Contact 6 Home/Settings Links 7 Room Name/Status 8 2 7 1 5 3 4 6 Actions You Can Take from the Home page: Contact Search Field You start by searching for a user or public meeting room in the contact search field. Arrow to the contact search field with the remote control and display the onor the button. Use the keyboard to search screen keyboard by pressing by name (first/last/initials) or by extension. If you type an asterisk (*), a list of all registered users sorted alphabetically appears. Contact Suggestions List When you find a contact or public room in the suggestions list, use the arrow to select it. The contact/room status key to scroll to the name and click details appear on the right side of the screen (user status and room status). You can review this information to see if the contact or meeting room is available. TM 22 Overview of the VidyoRoom Home Page For example, the following selected user is offline and her meeting room is empty: If the contact or room is available, you can place a direct call to the user by clicking the Call Direct button or join the room by clicking the Join Room button. Note: You can create a My Contacts list as a fast way to place calls to people you meet often with. For information, see “My Contacts” below. About Meeting Room and User Statuses A meeting room must be available for you to join it and a user must be available for you to place a direct call. Room and user statuses appear on the right side of the VidyoRoom home page for a selected user or public room. Also, when a meeting room is available, the Join Room button is active, and when a user is available, the Call Direct button is active. User status and room status are independent of one another. You can join the room of a user that is not available (online) for a direct call. Likewise, you can call a user whose room is locked or full. For detailed information about room and user statuses, see “Definitions” on page 4. My Contacts My Contacts is an area of the home page beneath the Search Field that displays the following information: A list of contacts that appear as “suggestions” from your search results. The My Room button enabling you to join your room for a meeting you host. My Contacts list The permanent contacts you add to My Contacts with the Add Contacts button. The My Contacts list always remain visible so that you can easily select users to place a direct call or join their meeting room. TM 23 Overview of the VidyoRoom Home Page My History The My History tab displays a list of users you recently placed a call to. You can select one of these contacts to join their room or start a direct call. You can also add the to your My Contacts list, as described above. Join Room My History list The Join Room button enables you to join a room to participate in a meeting. You can join your VidyoRoom for a meeting you host, or join a user’s room for a meeting they host. The Join Room button becomes active when you select your own room or any private or public room that is not full, busy or locked. To join your room, arrow to My Room and click arrow to the Join Room button and click . on the remote, then To join a contact’s room, search for the contact in the Contact Search field, , then arrow to the arrow to the contact from the contact list and click Join Room button and click again. The Join Room button is active only when the selected contact’s room status allows their room to be joined, e.g., the room is empty, occupied or PIN protected. My Room Participants While you host a meeting, you see a list of participants on the right side of the home page under In My Room. When you VidyoConference with users from other tenants, you also see their tenant name. When a participant joins a conference by phone, their phone number appears in the list of participants. If a participant’s phone number is not available, “Unknown Participant” appears in the participant list. VidyoVoice (Voice-Only Calls) A participant without access to a VidyoPortal as either a registered user or guest can join a conference in your VidyoRoom from a phone. The phone number and extension for calling into your room appear in the My Room settings page and the VidyoRoom home page when you select My Room. When a participant joins a conference by phone, their phone number appears in the list of participants, even if they don’t broadcast their number. TM 24 Overview of the VidyoRoom Home Page Call Direct The Call Direct button starts a direct (point-to-point) call with one contact. When you select a contact from My Contacts, search results or history, this user’s current status appears on the right side of the VidyoRoom home page to indicate their availability. If they are available (online), arrow to the Call Direct button and click to start a call. The person you are calling sees an alert on their screen to notify them of the call. Note: A direct call involves just two users; no additional users can join. When you call a meeting room and there are just two of you in the room, it is similar to being in a direct call. The difference is that others can potentially join you in the meeting. Dialing a Legacy System A legacy system is a device such as an ordinary telephone or a conferencing system that uses traditional H.323 and SIP-based videoconferencing solutions. A legacy device has no personal room. To connect to a legacy system that does not exist as a user in the VidyoConferencing system, in the contact search field, enter its extension number followed by the IP (Internet Protocol) address of the legacy system, then click the Call Direct button. To obtain the IP address of a legacy system, contact your system administrator. Add Contact/Remove Contact Add Contact Remove Contact If you have contacts that you meet with on a regular basis, you can save them to a My Contacts list for easy selection. To add a contact to My Contacts, search for the contact, click to select the contact, and then arrow to the Add Contact button and click . Your contact appears in alphabetical order on the home page under My Contacts. If you have many contacts, you may need to scroll to view them all. You can remove a contact from My Contacts by selecting it and clicking the Remove Contact button. Settings Arrow down and over to the Settings link and press on the remote control to access your VidyoRoom settings. For more information on settings, see “Settings” on page 28. TM 25 Overview of the VidyoRoom Home Page Onscreen Keyboard You can use an on-screen keyboard for data entry in fields that display a keyboard icon and/or display the words “OK for Keyboard”. In any data entry field, such as the contact search field, click to display the onscreen keyboard. Use the up and down keys to navigate the keyboard and click to enter each character. When you are done entering information, select the Done button and click . TM 26 Using the VidyoRoom During a Meeting Upon starting or joining a meeting, the VidyoRoom will display a progress bar. Once you’ve entered a meeting, you may utilize the following functions to optimize your meeting: Toggle — Many participants may share their application screens, but you may only view one screen at a time. When shared applications are available from multiple participants, you may toggle between the multiple applications using the Toggle button on the remote control. You may select not to view any of the application shares. Pressing the “*” button allows the VidyoRoom user to view shared applications in full screen size. Selfview — For HD-220/200 To see your own video feed, press the Selfview button on the remote control. Your picture will be included in the screen layout. Press the Selfview button again to see yourself in Dual Screen Mode, and a third time to remove yourself from the layout and only view the other meeting participant(s). For HD-100 & HD-50 Toggles between Picture-in-Picture (PiP), docked, full screen and off (4 modes). Mute — Press the Mute button on the remote control to mute/unmute the sound you’re broadcasting. Settings — This button brings up remote control Help screen. Privacy — This button pauses/blinds your camera feed so that no one in the conference can see your video. Disconnect — Press the red Disconnect button on the remote control to end your session. A — Swaps the views between displays when in Dual Screen Mode. (HD-220 and HD-200 only) B — Enables DTMF dialing mode. (P2P calls only.) C – Brings up Far End Camera Control FECC, which allows VidyoRoom users to remotely control cameras on other VidyoRoom systems participating in the same conference. When controlling a far-end camera, the user can pan, tilt or zoom the remote camera to better improve the view of the remote conference room. (The VidyoRoom must have FECC enabled by its owner.) D — Toggles between Preferred Mode and Non-Preferred Mode. In Preferred Mode: the loudest speaker appears in a larger window among the number of viewed participants, when in Single Screen Mode; with Dual Screens, Preferred Mode is selected by default and toggle is not available. (HD-220 and HD-200 only) TM 27 Settings Settings enables you to maintain and change your VidyoRoom settings. Account In the Portal field of the Account page, you specify the IP address or fully qualified domain name for your VidyoRoom system. In the Name field, you set the VidyoRoom username and in the Password field you set a password. These must be entered to log into the VidyRoom. Be sure to arrow to the Save button on-screen and press on the remote control. TM 28 * You can also change your VidyoRoom settings remotely via a web interface. See page 31 for more information. Settings Network Your VidyoRoom is set to DHCP by default. This enables it to automatically obtain its IP address. To change your VidyoRoom’s network settings, select Use static IP address and enter your network’s settings appropriately: IP Address Subnet Mask Default Gateway Primary DNS Server You can also define a range of UDP ports for use with the VidyoRoom. To set this range, enter the appropriate values in the UDP Start and UDP End fields. Press button on the remote control. the TM 29 Settings Proxy If you are using a VidyoProxy, you specify its IP address and port number in the Proxy page. A VidyoProxy routes all data signals through a single port in order to traverse a firewall. Arrow to Use VidyoProxy and click , then arrow to the Address and Port fields to specify the appropriate network values. Press the button on the remote control. Audio For most speakerphone systems, both the microphone and speaker volumes should be set to about 60% to start. You can adjust the volume for each one separately. To save the settings, scroll down to the Save button and press the on the remote control. TM 30 button Settings Video You use the video settings to control your display(s) and camera by setting the number of displays, the display resolution, camera mode and bandwidth. You can also compensate for backlighting and reset the camera. Each VidyRoom model has its own selection of settings, as shown in the following screens. Arrow to the appropriate setting and click to select it. NOTE: Dual Screen Mode in HD-100 &HD-50 is only for data sharing. Both the VidyoRoom HD-100 and HD-50 support 1024x786 (XGA) resolution for the data screen. Press the button on the remote control to save your settings. HD-220 HD-200 TM 31 Settings HD-100 HD-50 Note: Note: An Administrator can set transmit and receive bandwidth limits for all users in any Group. This Group policy generally prevails. When a user is in a conference that includes a VidyoRoom, however, the Vidyoroom’s transmit bandwidth will override the Group policy. For example let’s say a Group policy is set at a maximum transmit and receive bandwidth of 1 Mbps for all members of the Group. The VidyoRoom, however, can transmit at 2 Mbps. Those participants whose Internet connections and computers can handle the higher bandwidth will receive 2 Mbps from the VidyoRoom. . 32 TM Settings Language The VidyoRoom System is available in nine languages. English German Japanese Spanish Italian Chinese French Portuguese Korean Finnish Polish Select your preferred language and press row to the Save button on-screen and press on the remote control, then aragain. My Room TM PIN To set your room to be PIN-protected, arrow to the box that says Use a PIN Code and press on the remote control. (Conversely, to unset the PIN 33 Settings requirement, press pears.) on the remote control so that the checkmark disap- Then use the remote control buttons to enter/change your PIN. Participants will be prompted to type this PIN before being admitted to your VidyoRoom, so be sure to share your PIN with invited participants prior to the meeting. Arrow to the Save button on-screen and press on the remote control. Other Prefs The Other Prefs page allows you to select between Internal IR Receiver and External IR Receiver and configure the following features: Auto-Answer Enable/Disable Allows you to configure the VidyoRoom to automatically receive calls or not. (To configure this from the web, see page 31.) Join/Exit tones The user can choose to hear a tone every time someone joins or leave the conference. Far End Camera Control This setting determines whether or not other users in a conference with your VidyoRoom can control your camera. The camera in your room must be capable of electronic tilt and pan as, for example, the Sony EVI-HD1 is for FECC to work. Enable settings access code TM You can set an access code to prevent unauthorized access to your VidyoRoom configuration settings. When a user accesses the settings from the VidyoRoom home page, they must enter this access code to be access the settings. Arrow to 34 Settings the Enable settings access code checkbox and click tings Access Code field and enter an access code. Press the , then arrow to the Set‑ button on the remote control to save your settings. Restart VidyoRoom To restart the VidyoRoom, arrow to the Restart VidyRoom button and press It will take several seconds for the VidyoRoom to restart. About The about page displays version and release information for your model of VidyoRoom. The About page will vary somewhat for each model, but contains the same kind of information. The About page for an HD-50 is shown below. TM 35 . Web Configuration Pages Rather than configure your VidyoRoom onsite in the conference room in which it resides, you can also change VidyoRoom settings remotely via a web interface. In an internet browser, enter the IP address of your VidyoRoom followed by :88 (port number). A login screen will appear. The default settings are: User name: admin Password: VidyoRoom (case sensitive) Note that you can change your password after logging in by clicking Reset Password in the navigation The next three pages show you what the Settings tab on the HD-220/200, the HD-100 and the HD-50 look like. Only the HD-50 looks different from the others. Much of what you see on these pages is fairly self-explanatory so we’ll cover only the less obvious options. TM 36 Web Configuration Pages Settings The Basics For more information about the different settings, please see pages 23-33. You can set these from the web configuration pages: The Account, Network, UDP Port Range and Proxy sections work just as they would for HD-220 & HD-200 any other server. Your choices on the Link Speed & Duplex dropdown menu, as you can see, are Auto/Auto, 100Mbps Duplex and 1Gbps. The default setting is Auto/Auto and under most circumstances you shouldn’t change it unless requested to do so by your network adminstrator. Audio Set the micrphone and speaker inputs to match the type of connection you’re using for them. You can drag the sliders to change the maximum sensitivity of the mic and maximum volume of the speakers. Video Select either Single or Dual Displays to match your configuration. Select whether you want to use 720p or 1080p Resolution. (If your display can only do 720p there’s no advantage in selecting 1080p. If your display can do 1080p you can choose 720p if you want to use less bandwidth.) Select the maximum bandwidth at which you want the VidyoRoom to transmit. Choose your Transmit Resolution. (1080p30 won’t be an available option if you Maximum Bandwidth is to less than 2Mbps. You’ll also need to click the Reset Camera option if you change Transmit Resolution.) Turning 3-Layer Mode on can provide a higher quality experience to users of mobile devices. The Apply button puts any changes you make to the settings above into effect immediately. There’s no need to reboot the VidyoRoom. TM 37 Web Configuration Pages HD-100 Other Prefs If you’re using the IR receiver built into your display set the IR Receiver to Internal. If you’re using an external IR receiver set IR Receiver to External (Did we mention that a lot of this is self-explanatory?). Auto Answer is similarly self-explanatory. Set it to On if you want the VidyoRoom to answer calls automatically. Turning Join/Exit Tones On alerts you with a tone as participants join or leave a conference. Far End Camera Control (FECC) allows remote conference participants to pan and tilt the VidyoRoom’s camera using their VidyoDesktop software so they can “look around the room” so to speak. You can turn FECC Off if you want to. Turn Auto Adjust Microphone On to increase the mic’s sensitivity up when a softspoken person speaks and turn it down a bit when things get loud. (Remote Control is an option that will be operational in a future release.) If you enable Auto Join My Meeeting the room system will automatically join its own meeting whenever it’s started. The only way to disable this behavior is to come back to this page and deselect the checkbox. The Settings Access Code can be set so that if someone wishes to change the VidyoRoom’s settings from the room GUI, they will be required to enter the access code entered in this field. TM 38 Web Configuration Pages HD-50 As you can see, the HD-50 has the same controls as its more capable siblings. The one thing it can’t do is 108o-30/60 as a Transmit Resolution In fact, it has one setting the other models don’t have, Anti Flicker. If your users use webcams that don’t have the anti-flicker feature you can enable it to handle the job for them. TM 39 Web Configuration Pages Note that the send resolution for the HD-50 is only available through the web configuration. The actual resolution and frame rate is determined by the webcam being used and can be limited by the lighting conditions: Video Resolutions Logitech QuickCam Pro 9000 Orbit AF Logitech WebCam Pro 9000 HD-720p (1280x720) 15 fps 30 fps 540p (960x540) 15 fps 30 fps 450p (800x450) 20 fps 30 fps 360p (640x360) 30 fps 30 fps Note that the Link Speed and Duplex configuration option is only available through the web configuration. The usual setting will be auto/auto, but it can be set to 100/Full if the ethernet switch is also configured to 100/Full. Logs The Logs tab provides useful information for Vidyo Customer Support in the event you need to contact them. To troubleshoot a problem they may ask you to increase the log level. (They’ll tell you exactly what to type into the Log Levels field. lf you need only to increase the levels while the issue is being resolved click the Apply Temporarily button. The log levels will return to their prior level when you reboot the VidyoRoom. TM 40 Web Configuration Pages Firmware You may be required from time to time to upgrade your VidyoRoom to a new version or recover to a previous working version. You may also need to upgrade your VidyoRoom in the event of a hardware malfunction or system failure. In this case, upgrading restores the VidyoRoom software to the last installed version. Note: When you upgrade your VidyoRoom, you lose all your network and other settings and must rec0nfigure the unit. You may want to record your current settings before beginning the upgrade process. The Firmware page displays the current installed version of the VidyRoom system and the current base image version installed on the machine. The VidyoRoom HD-50 and HD-100 can store two image files while the HD-220 can store more. To restore the VidyoRoom software to the last installed version, click a checkbox to select the image file, and then click the Re‑Image button. To upgrade using a new image from Vidyo, click the Browse button to locate the .tbv file and click the Upload & Re-Image button. The upgrade process can take up to five minutes and will automatically reboot the VidyoRoom system when successful. The upgrade progress appears in a console on the VidyoRoom monitor. You receive an alert if you are upgrading with the same image file already installed on your VidyRoom. If you are restoring the current image, acknowledge this alert and proceed with the upgrade. If you encounter a FAIL error, note the red error code in the lower left corner of the screen and contact Vidyo technical support. TM 41 Web Configuration Pages When the upgrade process completes, reconfigure your account and network settings, as described in “Initial VidyoRoom Setup” on page 21. Note: The VidyoRoom can also be re-imaged via a command-line interface if your machine is not on a network or a system failure prevents you from using the web interface. Contact Vidyo for a tech note on this procedure. Certificate The Certificate tab is used to upload a certificate authority file, including a selfsigned certificate. Note: The file loaded is CA Root Certificate file and replaces any previous CA file. There is no option to load a default CA, so if you point your VidyoRoom to another portal with a different CA, be sure to upload the correct CA in the Cer‑ tificate tab. Reset Password To reset your password, enter your new password twice to confirm. TM 42 Web Configuration Pages Shutdown When you want to shut down the VidyoRoom the word Shutdown in the menu. The Shutdown will require you to re-enter your User Id and Password before it will allow you shut down the system by clicking the Shutdown button. About The About page lists your VidyoRoom model number, serial number (HD-200 only), and version. The following About page is from an HD-100. Other models are similar in appearance. Logout When you click Logout on the menu a confirmation dialog box opens. Click OK to log out. Click Cancel to stay on the page. TM 43 Product Specifications Application HD-220 A, B, C HD-200 HD-100 A, B, C HD-50 A, B, C H.264 Annex G (SVC) H.264 Annex G (SVC) H.264 Annex G (SVC) Video Primary Video Codec H.264 Annex G (SVC) Legacy Video Codec H.264 AVC, H.263+ via the VidyoGateway H.264 AVC, H.263+ via the VidyoGateway H.264 AVC, H.263+ via the VidyoGateway H.264 AVC, H.263+ via the VidyoGateway Transmit Max Resolution & Frame Rate Main Video Up to: Up to: Up to: Up to: HD 1080P @ 30 FPS @ 4 Mbps or 2 Mbps HD 720P @ 30 FPS @ 4 Mbps, 2 Mbps or 1 Mbps HD 720P @ 30 FPS @ 2 Mbps or 1 Mbps HD 720P @ 30 FPS @ 2 Mbps, 1 Mbps or 768 Kbps HD 720P @ 60 FPS @ 4 Mbps, 2 Mbps or 1 Mbps HD 720P @ 30 FPS @ 768 Kbps 540P @ 30 FPS @ 2Mbps or 1 Mbps or 768 Kbps or 512 Kbps HD 720P @ 30 FPS @ 768 Kbps 540P @ 30 FPs @ 2Mbps, 1 Mbps, 768 Kbps or 512 Kbps 360P @ 30 FPS @ 1Mbps or 768 Kbps or 512 Kbps 540P @ 30 FPS @ 2 Mbps, 1 Mbps, 768 Kbps or 512 Kbps 360P @ 30 FPS @ 1 Mbps, 768 Kbps or 512 Kbps 450P @ 30 FPS @ 2 Mbps, 1 Mbps, 768 Kbps or 512 Kbps 360P @ 30 FPS @ 2 Mbps, 1 Mbps, 768 Kbps or 512 Kbps 360P @ 30 FPS @ 1 Mbps or 768 Kbps or 512 Kbps Receive Max Resolution & Frame Rate Main Video 2 x HD 1080P @ 30FPS or 1 x HD 720P @ 60FPS 2 x HD 720P @ 60FPS 1 x HD 720P @ 30FPS 2 x HD 720P @ 60FPS Document Video Up to QSXGA (fitted to screen resolution) Up to QSXGA (fitted to screen resolution) Up to QSXGA (fitted to screen resolution) Up to QSXGA (fitted to screen resolution) Screen Layout & Full-Screen, 16:9 Full-Screen, 16:9 Full-Screen, 16:9 Full-Screen, 16:9 Local Preview Supported Supported Supported Supported Multi Participants Views Two Screens Two Screens - Voice Activated - Voice Activated - Voice Activated - Voice Activated - Continuous Presence - Continuous Presence - Continuous Presence - Continuous Presence Multi Participants - Automatic - Automatic - Automatic - Automatic Layout Control - Manually set the - Manually set the - Manually set the - Manually set the Aspect Ratio Dual Screen Support TM number of viewable number of viewable number of viewable number of viewable sources sources sources sources Yes 44 Yes Yes (Sharing only) Yes (Sharing only) Product Specifications Application HD-220 A, B, C HD-200 HD-100 A, B, C HD-50 A, B, C Audio Primary Audio Codec SPEEX Wideband 16Khz (32Khz sampling) Legacy Audio Codecs SPEEX Wideband 16Khz (32Khz sampling) G.711 (A-, μ -Law), G.722, via VidyoGateway G.711 (A-, μ -Law), SPEEX Wideband 16Khz (32Khz sampling) G.711 (A-, μ -Law), SPEEX Wideband 16Khz (32Khz sampling) G.711 (A-, µ -Law), G.722, via VidyoGateway G.722, via VidyoGateway G.722, via VidyoGateway Remote Unit Management and Control Interface Web-based control via the VidyoPortal Web-based control via the VidyoPortal Web-based control via the VidyoPortal Web-based control via the VidyoPortal Software Update Automatic, Downloadable from VidyoPortal Automatic, Downloadable from VidyoPortal Automatic, Downloadable from VidyoPortal Automatic, Downloadable from VidyoPortal Multilingual SupportEnglish, Spanish, French, German, Italian, Portuguese, Japanese, Simplified Chinese, Korean, Finnish, Polish Multilingual SupportEnglish, Spanish, French, German, Italian, Portuguese, Japanese, Simplified Chinese, Korean, Finnish, Polish Multilingual SupportEnglish, Spanish, French, German, Italian, Portuguese, Japanese, Simplified Chinese, Korean, Finnish, Polish Multilingual SupportEnglish, Spanish, French, German, Italian, Portuguese, Japanese, Simplified Chinese, Korean, Finnish, Polish Through VidyoPortal Through VidyoPortal Through VidyoPortal User Interface Conference Control Through VidyoPortal Network and IP Protocol Maximum Data Rate SIP RFC 3261 (Future version) 4 Mbs standard (6 Mbps on demand) 6 Mbps 4 Mbps 2 Mbps NAT & Firewall Traversal Supported Supported Supported Supported Encryption AES, 128bit AES, 128bit AES, 128bit AES, 128bit Supported Camera Sony EVI-HD1 Sony EVI-HD7V (provides 1080P @ 30FPS) Preferred Sony EVI0HD3V (provides 720P @ 60FPS) TM Sony EVI-HD3V (with DVI interface) Logitech Webcam Pro 9000 Preferred (provides 720P @ 30FPS) Preferred Sony EVI-HD1 (with SDI Logitech Quickcam to HDMI Converter) Pro 9000 Minrray HDCAMV90-S-VY Minrray HDCAMV90-S-VY (provides 1080p@30fps) (provides 720p@30fps) 45 Logitech Quickcam Orbit AF Product Specifications Physical HD-220 A, B, C HD-200 HD-100 A, B, C HD-50 A, B, C Form Factor Stand-alone Chassis, (Freestanding or 19” Rack-mountable) Stand-alone Chassis (Freestanding or 19” rack-mountable)1 Stand-alone Freestanding Chassis Stand-alone Freestanding Chassis Dimensions Height 14.56” (370mm) 3.6” (91mm) 13” (330mm) 13” (330mm) Width 3.44” (87.4mm) 17.4 (442mm) 3.5” (89mm) 3.5” (89mm) Depth 12.59” (320mm) 17.1 (434mm) 12.75” (324mm) 12.75” (324mm) Gross Weight 13.0 lbs (5.89kg) 32 Lbs (14.5kg) 10.0 Lbs (4.53kg) 10.0 Lbs (4.53kg) 1 x HDMI 1 x USB Form Factor 2U Rackmount Physical Interfaces Camera In 1 x HDMI 1 x HD-SDI – BNC Camera Control 1 x RS-232 (through supplied Serial/USB dongle) 1 x RS-232 Video Out 2 x DisplayPort (through supplied DisplayPort to DVI converter) 2 x DVI-I 1 x HDMI 2 x VGA (for content) 1 x HDMI 1 x VGA (for content) Audio In 1 x 3.5mm Stereo Jack, USB 2 x RCA (Stereo) 1 x 3.5mm Stereo Jack 1 x 3.5mm Stereo Jack Audio Out 1 x 3.5mm Stereo Jack, USB 2 x RCA (Stereo) 1 x 3.5mm Stereo Jack 1 x 3.5mm Stereo Jack 6 (2 front, 4 rear) 4 (2 front, 2 rear) 5 (1 front, 4 rear) 5 (1 front, 4 rear) 1 x Gigabit EthernetSupports 10BASE-T, 100 BASE-TX, & 1000 BASE-T, RJ45 outputs 2 x Gigabit EthernetSupports 10BASE-T, 100 BASE-TX, & 1000 BASE-T, RJ45 outputs 1 x Gigabit EthernetSupports 10BASE-T, 100 BASE-TX, & 1000 BASE-T, RJ45 outputs 1 x Gigabit EthernetSupports 10BASE-T, 100 BASE-TX, & 1000 BASE-T, RJ45 outputs Auto-switching 300W AC to DC power supply w/ PFC 100-240V, 50-60Hz, 4-2Amp 520W AC to DC power supply w/ PFC 100240V, 50-60Hz, 7-3Amp Auto-switching 300W AC to DC power supply w/ PFC 100-240V, 50-60Hz, 4-2Amp Auto-switching 300W AC to DC power supply w/ PFC 100-240V, 50-60Hz, 4-2Amp USB-2 Network 1 x RS-232 (through supplied USB adapter) Power Supply TM 46 Product Specifications Physical HD-220 A, B, C HD-200 HD-100 A, B, C HD-50 A, B, C Operating Temperature Range 10 to 35°C (50 to 95°F) 10 to 35°C (50 to 95°F) 10 to 35°C (50 to 95°F) 10 to 35°C (50 to 95 °F) Non-Operating Temperature -40 to 70°C (-40 to 158°F) -40 to 70°C (-40 to 158°F) -40 to 70°C (-40 to 158°F ) -40 to 70°C (-40 to 158°F ) Humidity Range 8% to 90% (non-condensing) 8% to 90% (non-condensing) 8% to 90% (non-condensing) 8% to 90% (non-condensing) Non-Operating Humidity Range 5% to 95% (non-condensing) 5% to 95% (non-condensing) 5% to 95% (non-condensing) 5% to 95% (non-condensing) EMI/EMC: EN55022, EN55024, FCC, VCCI, Australian/ New Zealand, MIC (Korea) EMI/EMC: EN55022, EN55024, FCC, VCCI, Australian/ New Zealand, MIC (Korea) Safety: USA - TUV certified, FCC, Canada - TUV certified, Europe/CE Mark EN 60950/IEC 60950-Compliant Safety: USA - TUV certified, FCC, Canada - TUV certified, Europe/CE Mark EN 60950/IEC 60950-Compliant China: CCC Certification China: CCC Certification China: CCC Certification Environmental: RoHS compliant Environmental: RoHS compliant Environmental: RoHS compliant VIDYO-PROD-001 VIDYO-PROD-003 VIDYO-PROD-001 VIDYO-PROD-003 Operating Environment Regulatory EMI/EMC: EN55022, EN55024, FCC, VCCI, Australian/ New Zealand, MIC (Korea) Safety: USA-TUV certified, Canada-TUV certified, Europe/CE Mark EN 60950/IEC 60950-Compliant Model Number VIDYO-PROD-002 VIDYO-PROD-003 USA-UL listed, FCC , Canada-CUL listed, Europe/CE Mark EN 60950/IEC 60950-Compliant VIDYO-PROD-001 TM 47 1080p Configuration with the VidyoRoom HD220 Appendix Note: The VidyoRoom system must be version 2.0.3 or higher to support 1080p encode resolutions. To enable the 1080p/30fps transmit format for calls on the VidyoRoom HD220 system, you must properly configure both the camera and the room system. Prior to connecting the Sony EVI-HD3V or EVI-7V camera to the VidyoRoom, select the resolution desired and configure the camera to output that video format. To set the camera’s resolution, locate the POT screw control dial in the rear of the camera marked SYSTEM SELECT. The numbers on the POT dial correspond to the video resolution and frame rates output from the camera to the VidyoRoom HD220 system. The Minrray camera is set via VISCA, so VISCA must be connected. Setting Video Formats\ You set video formats on the back of the camera as shown below: Video Format Table Switch Position Video Format EVI-3V / EVI-7V 0 1080p / 60 fps 7V Only 1 1080p / 30 fps 7V Only 2 1080i / 60 fps 7V Only 3 720p / 60 fps Both 4 720p / 30 fps Both 5 VGA/60 fps (Letterbox) Both 8 1080p / 50 fps 7V Only 9 1080p / 25 fps 7V Only A 1080i / 50 fps 7V Only B 720p / 50 fps Both 720p / 25 fps Both C For configuration supporting 1080p/30fps, set the Sony EVI-HD7V camera to capture in 1080i/59.94 mode. The correct setting for this option is position #2 on the SYSTEM SELECT POT dial control. TM 48 1080p Configuration with the VidyoRoom HD220 Appendix Note: After configuring the camera, reset it to activate the new video format setting. In the VidyoRoom system user interface, navigate to the Video settings option and enable the proper camera and display resolutions, as shown below: For the Display Resolution setting, select 1080p. Note: For optimal video quality in 1080p mode, set the Maximum Transmit (TX) bandwidth to a value greater than 2Mbps. Also note that it is possible to increase the call video rate while in an active call by pressing 9# on the VidyoRoom system remote control. The VidyoRoom must be configured for a Transmit Resolution of 1080p/30. Note: If VidyoRoom HD100 or HD50 systems are to receive a 1080p/30 video format from the HD220 systems, the display resolution on those systems must be configured for 1080p resolution. TM 49 Regulatory Compliance Appendix Installation Instructions A. Elevated Operating Ambient – If installed in a closed or multi-unit rack assembly, the operating ambient temperature of the rack environment may be greater than room ambient. Therefore, consideration should be given to installing the equipment in an environment compatible with the maximumambient temperature (Tma) of 40° C. B. Reduced Air Flow – Installation of the equipment in a rack or cabinet should be such that the amount of airflow required for safe operation of the equipment is not compromised. C. Mechanical Loading – Mounting of the equipment in the rack or cabinet should be such that a hazardous condition is not achieved due to uneven mechanical loading. D. Circuit Overloading – Consideration should be given to the connection of the equipment to the supply circuit and the effect that overloading of the circuits might have on over current protection and supply wiring. Appropriate consideration of equipment nameplate ratings should be used when addressing this concern. E. Reliable Grounding – Reliable grounding (earthing) of rack-mounted equipment should be maintained. Particular attention should be given to supply connections other than direct connections to the branch circuit. (e.g., use of power strips). F. Redundant Power Supplies – Where redundant power supplies are provided with the equipment, each power supply shall be connected to a separate circuit to optimize the equipment redundancy. G. Servicing – Prior to servicing the equipment, disconnect all power supplies. H. Power Supply Cord – The power supply cord is used as the main disconnect device. Ensure that the socket outlet is located/installed near the equipment and is easily accessible. I. Circuit Overloading – This product relies on the building’s installation for short-circuit (overcurrent) protection. Ensure that a fuse or circuit breaker no larger than 120 VAC, 20A U.S. (240 VAC, 10A international) is used on the phase conductors (all current-carrying conductors). TM 50 Regulatory Compliance Appendix USA (FCC) This equipment has been tested and found to comply with the limits for a Class A digital device, pursuant to part 15 of the FCC rules. These limits are designed to provide reasonable protection against harmful interference when the equipment is operated in a commercial environment. This equipment generates and can radiate radio frequency energy and, if not installed and used in accordance with the instruction manual, may cause harmful interference to radio communications. Operation of this equipment in a residential area is likely to cause harmful interference in which case the user will be required to correct the interference at their expense. European Union (EU) Warning: This is a class A product. In a domestic environment this product may cause radio interference in which case the user may be required to take adequate measures. China (CCC) Japan (VCCI) TM 51 Rack Mounting the HD-220 Appendix Follow the steps in the order given to complete the installation process in a minimal amount of time. Please read this section in its entirety before you begin the installation procedure outlined in the sections that follow. Decide on a suitable location for the rack unit that will hold the HD-220 unit. It should be situated in a clean, dust-free area that is well ventilated. Avoid areas where heat, electrical noise and electromagnetic fields are generated. You will also need it placed near a grounded power outlet. Choosing a Setup Location A.Leave enough clearance in front of the rack to enable you to open the front door completely (~25 inches [63.5cm]). B.Leave enough clearance on top of the unit to enable intake fan to work properly (minimum of 3/8 inches [1cm], recommended clearance is 1.75” [4.44cm]) C. Leave approximately 30 inches [76.2cm] of clearance in the back of the rack to allow for sufficient airflow and ease in servicing. Rack Precautions A.Ensure that the leveling jacks on the bottom of the rack are fully extended to the floor with the full weight of the rack resting on them. B.In a single rack installation, stabilizers should be attached to the rack. C. In multiple rack installations, the racks should be coupled together. D.Always make sure the rack is stable before extending a component from the rack. E. You should extend only one component at a time - extending two or more simultaneously may cause the rack to become unstable. F. Always keep the rack’s front door closed when not servicing to maintain proper cooling. Basic HD-220 Bracket Installation Procedure The HD-220 comes with two rack mounting brackets, which are attached on each side at the front of the chassis with 3 screws. TM 52 Rack Mounting the HD-220 Appendix Installing the HD-220 into the Rack To mount the system into a rack, simply screw these brackets directly to the front of the rack (three screws for each bracket). Rack Mounting Considerations Ambient Operating Temperature If installed in a closed or multi-unit rack assembly, the ambient operating temperature of the rack environment may be greater than the ambient temperature of the room. Therefore, consideration should be given to installing the equipment in an environment compatible with the VidyoRoom’s maximum rated ambient temperature (35°C [95 °F]). Reduced Airflow Equipment should be mounted into a rack so that the amount of airflow required for safe operation is not compromised. Mechanical Loading Equipment should be mounted into a rack so that a hazardous condition does not arise due to uneven mechanical loading. Circuit Overloading Consideration should be given to the connection of the equipment to the power supply circuitry and the effect that any possible overloading of circuits might have on overcurrent protection and power supply wiring. Appropriate consideration of equipment nameplate ratings should be used when addressing this concern. TM 53 Rack Mounting the HD-220 Appendix Reliable Ground A reliable ground must be maintained at all times. To ensure this, the rack itself should be grounded. Particular attention should be given to power supply connections other than the direct connections to the branch circuit (i.e., the use of power strips, etc.). TM 54