1
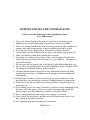
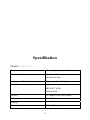
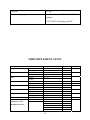
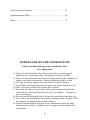
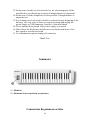
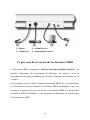
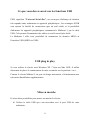
Usermanual
Bedienungsanleitung
Manuel d`Utilisation
MIDISTAR
T3
PREFACE
Congratulations on purchasing the Midistart-3 master MIDI controller keyboard.
It is one of the finest products of its kind, made after extensive research into
what customers require from a MIDI Controller.
When using your Midistart-3 in conjunction with a computer and appropriate
music software, you will be able to discover the wonderful world of Computer
Music, with a set of complete musical instruments from your sound card or
workstation.
This manual is written to help you become familiar with the features of the
Midistart-3. Please read the manual carefully to discover all the features of your
Midistart-3. After reading the manual, you will have a clear understanding of
how to transmit different MIDI messages to other instruments and equipment.
For ease of use of MIDI implementation, we strongly recommend you to have
the manual at hand when you are using the keyboard, especially if you are new
to the world of MIDI.
2
TABLE OF CONTENTS
Preface .................................................................................
2
Secure Information .............................................................
4
Userpanel .............................................................................
5
Back panel connections .........................................................
5
Something you should know before using the MIDI functions .
6
Something you should know before using the USB functions ..
6
USB plug & play ...........................................…………….
7
Switching on ..........................................................................
7
Basic Operations ....................................................................
8
Trouble Shooting ...................................................................
9
Specifications ........................................................................
11
MIDI Implementation ...........................................................
12
Index .....................................................................................
13
3
IMPORTAND SECURE INFORMATION
Please read the following secure instructions first!
Very Important!!
1. Never use the keyboard in the near of water like a swimming pool,
bathtub or wet environment like a basement or in rain or similar.
2. Never use the keyboard in the near of heating elements like a radiator or
similar, also high temperatures or direct sunbeam should be avoid.
3. Use only the power supply that is declared in our Specification
4. If you didn’t use the keyboard for a longer time please plug power off.
5. Take care that no liquid flows inside the keyboard
6. Also take care that no metal objects like a coin or paperclip and other
small objects can fall into the keyboard (e.g. by children ...) because of
electrical shortcut.
7. Do not open the keyboard, this is allowed by qualified technicians only.
8. Never leave the keyboard powered and switched on alone, because of fire
for example by thunderstorm or other reasons.
9. Children should inform about the secure information and/or an adult
should take care about, if children are to young for understanding this
information.
10. In the near of a radio or television device, are electromagnetic fields
possible they can disturb the reception. Enough distance is important!
11. In the near of Audio Amplifiers is noise possible. Enough distance is
important too.
12. For cleaning never use petrol, alcohol or solvent because damaging of the
housing. Use only a dry or little wet rag for cleaning and unplug the
power supply or USB connector, because of electrical shock.
13. Never unplug the keyboard if the power supply is powered.
14.Don´t throw the Keyboard, and also never let them crash down. Also
don’t push or trust the keyboard.
15. At a thunderstorm please unplug all connectors.
Thank You.
4
User panel:
1 = Pitch and Modulation Wheel
2 = Octave up/down buttons (no picture)
Back panel connections:
5
1 = Footpedal 2 = Soundmodul
3 = Computer 4 = Power supply
SOMETHING YOU SHOULD KNOW BEFORE
USING THE MIDI FUNCTIONS
MIDI is the acronym for Musical Instrument Digital Interface, which makes all
digital musical instruments equipped with this standardised interface capable of
exchanging their MIDI data or “talk to each other”
To explain how MIDI works on your instrument in more detail, the following
illustrations will outline the MIDI functions of the Midistart-3, which allow you
to connect the keyboard to other MIDI instruments. The versatile MIDI
capability of the Midistart-3 will offer you tremendous power in a MIDI
environment.
SOMETHING YOU SHOULD KNOW BEFORE
USING THE USB- CONNECTION
6
USB is the acronym for Universal Serial Bus, and is the standard for exchanging
data between different units. All Units communicate over one cable with the
computer and so there is no need for many cables to connect, and this will make
your work much easier.
The MIDISTART 3 will give you an USB-Interface for transfer midi data to
your computer. (Midi over USB)
USB plug & play
If you are using Windows XP / Vista or Mac OSX, you can simply switch the
keyboard´s power switch to the “on” position. Because the Midistart-3 is class
compliant, it will work without any further installation.
SWITCH ON
There are two ways to power the unit:
1.
Use USB cable to connect USB socket of computer.
2.
Use external adapter: Plug output jack of proper AC adapter into the DC
socket in the rear panel.
7
3.
Then slide power switch to ON. Display will show “001” as program
number and the unit transmit initial program number to the equipment connected
to MIDISTART-3 immediately. When you play on the keyboard, notes and its
velocity message will be transmitted. Note number corresponding to the most
left key is 36.
BASIC OPERATIONS
PITCH BEND WHEEL
Roll upward PITCH BEND wheel to increase the pitch or roll downwards the
wheel to lower the pitch smoothly by transmitting pitch bend message ranging
of 0 to 16383. Normally, the wheel stays on its centre position, i.e. no bending.
MODULATION WHEEL
Roll upward MODULATION wheel to add modulation effect ranging of 0 to
127. When the wheel stays on its lowest position, no modulation message is
transmitted.
8
Trouble Shooting
If anything doesn’t work . . .
please check following points:
Midi connection fault . . .
do you have installed your midi drivers from your soundcard ?
Look at START --> Settings --> Systemcontrol --> Multimedia --> Tab Midi
for installed Drivers. If not, you have to do this first. After that your Keyboard
should work with your computer. Attention: In some programs you have to set
the Input-Port, before you can receive Midi-data. Please check!!
Audio is delayed . . .
9
This problem is often attached to the midi device, but in reality it is a problem of
the sound card in your computer. Many sound cards have an adjustable latency
time, they are used to work with slow computers, and so audio is not interrupt.
At the installing of the sound card, the latency time is set to maximum value e.g.
512 samples, and this is too much, so your midi-notes are sounding delayed.
Adjust this value to a minimum that is possible for your computer, and you will
hear audio correct. But you can connect your keyboard to a sound expander too,
and you will see that’s no problem of your keyboard.
Midi Device is not recognize . . .
There are some misunderstandings, because a midi device is not recognizable by
computer, except USB. The midi standard does not support recognizing of
devices!
The Midistart 3 is recognized by USB but not by midi-interface, this is normal!!
Pedal doesn’t work . . .
May be you have the wrong pedal type. There are two types of pedals in the
market: One is a pedal with an open contact, and if pressed it closed, and one is
with a closed contact and opened if pressed. The keyboard needs a pedal with an
open contact!
USB doesn’t work . . .
Is powerswitch on power-on position?
Is the keyboard is recognized by USB?
If you connect the keyboard by USB, it should be recognized.
Look at „Start Æ Settings Æ System control Æ System Æ Device manager at
Audio/Video/Game controller for the keyboard settings. If not install your USB
-driver!
Do you have set midi out port at your music program?
Please Check!
10
Otherwise look for our latest USB-driver at our homepage. May be its a driver
problem.
Power supply does not work . . .
If the unit isn’t powered by power-supply, try to connect by USB-Connection. If
it works normal, the power-supply may be damaged.
If everything doesn’t help . . .
You can write an e-mail to our hotline [email protected] and we try to help
you.
SPECIFICATIONS
Model: MidistART 3
Keyboard
49 touch sensitive keys
Wheels
Pitch Bend Wheel
Modulations Wheel
Function Buttons
Octave up/down buttons
Connectors
USB
MIDI OUT (DIN)
Sustain Pedal
Power adaptor
9V/300mA (plus in centre)
Switch backpanel
ON / OFF
Display
11
Dimension
82,3 x 19,5 x 7 cm
Weight
3,4 Kg
Power sources
- with external DC 9 volt/300mA
adaptor
- self-powered by USB connection
from PC
MIDI IMPLEMENTATION:
Function
Default
Program
Change
Default
Channel
Change
Default
Note
Change
Key down
Velocity
Key up
Default
Volume
Change
Default
Reverb level
Change
Default
Chorus level
Change
Pitch bend wheel
Default
Controller
change
(Definition of the
Modulation
Transmitted
1
36 - 84
0 - 127
0 - 127
ok
1
-
12
Remark
Modulation
Format
Cn, pp
9n,
8n,
Bn,
kk,
kk,
07,
vv
Bn,
91,
vv
Bn,
93,
vv
En,
vv,
Non-registered
Non-registered
Reset controllers
Set MIDI mode
Bn, XX,
Bn, XX,
Bn, 123,
Default
Change
Mode 1
-
Bn,
Bn,
Bn,
Bn,
124,
125,
126,
127,
Notes:
1. ”n” refers to channel number, “pp” refers to program number, “kk” refers to key number,
“vv” refers to one byte data, “cc” refers to control number.
2. There are more controllers besides that listed in the table. Please refer MIDI specification for details
INDEX
Basic Operations 8
Switch on 7
Connections 5
Table of contents 3
Midi Implementation 12
Trouble shooting 9
Midi-Interface 6
USB Driver install 7
Preface 2
USB Interface 6
Secure information 4
Userpanel 5
Specification 11
13
Design and specifications subject to change without notice.
No liability for printing mistakes
Einleitung
Wir bedanken uns für den Erwerb des Midistart 3 MIDI Master Keyboards. In
Verbindung mit einem PC und der Musiksoftware ist Ihr Midistart 3 ein
komplettes Heim- Tonstudio.
Diese Anleitung soll Ihnen helfen, sich mit den Möglichkeiten des Midistart 3
leicht zurecht zu finden.
Nach dem Durchlesen dieser Anleitung sollten Sie in der Lage sein, die
verschiedenen Funktionen bedienen zu können.
Wir empfehlen Ihnen, diese Anleitung immer griffbereit in der Nähe des
Keyboards zu haben.
14
Inhalt
Einleitung ................................................................................... 14
Sicherheitshinweise .................................................................. 16
Bedienelemente ......................................................................... 17
Anschlüsse auf der Rückseite .................................................. 17
Was Sie über MIDI wissen sollten ........................................... 18
Was Sie über USB wissen sollten ............................................. 18
USB-plug & play ...............................................................
19
Einschalten ................................................................................ 19
15
Fehlerbehebung ......................................................................... 20
Spezifikationen .......................................................................... 23
MIDI Implementation ................................................................ 24
Index ........................................................................................... 25
Wichtige Sicherheitshinweise!!
Bitte lesen Sie die folgenden Sicherheitshinweise genau durch
Sehr wichtig!!!
16. Benutzen Sie das Keyboard niemals in der Nähe von Wasser wie z.b.
einem Schwimmbecken oder einer Badewanne oder in feuchten
Umgebungen wie einem Keller, Regen oder ähnlichem.
17. Benutzen Sie das Keyboard niemals in der Nähe von Heizkörpern oder
Heizgeräten oder heißen Temperaturen. Auch sollte direkte Sonneneinstahlung vermieden werden.
18. Benutzen Sie nur das in der Spezifikation angegebene Netzteil.
19. Wenn das Keyboard eine längere Zeit nicht benutzt wird, trennen Sie es
bitte von dem Stromnetz.
20. Passen Sie auf das keine Feuchtigkeit in das Gerät gelangt.
21. Passen Sie auch auf, das keine Metallgegenstände wie Münzen oder
Büroklammern usw. in das Gerät gelangen (z.b. durch Kinder...), weil
diese einen Kurzschluss verursachen könnten.
16
22. Das Öffnen des Keyboards ist qualifizierten Technikern vorbehalten.
23. Lassen Sie das Keyboard niemals eingeschaltet alleine, weil ein Brand
entstehen könnte z.b. durch einen Blitzeinschlag oder ähnlichem.
24. Informieren Sie Kinder über diese Sicherheitshinweise und /oder ein
Erwachsener sollte aufpassen, falls Kinder noch zu klein dafür sind.
25. In der Nähe von Radio oder Fernsehgeräten können Elektromagnetische
Felder den Empfang stören, halten Sie deshalb immer genügend Abstand!
26. In der Nähe von Audioverstärkern sind Brummstörungen etc möglich,
halten Sie deshalb auch hier genügend Abstand.
27. Zum Reinigen verwenden Sie niemals Benzin, Lösungsmittel oder
Alkohol, da diese das Gehäusematerial verformen oder Verfärben können.
Benutzen Sie nur einen feuchten Lappen oder ein trockenes Tuch und
stecken Sie die Stromversorgung sowie den USB Stecke aus, da ein
elektrischer Stromschlag sonst möglich ist.
28. Stecken Sie niemals die Stecker aus wenn das Gerät eingeschaltet ist.
29. Werfen Sie das Gerät niemals, und lassen Sie es nicht fallen. Auch heftige
Stöße sollten vermieden werden.
30. Bei Gewitter stecken Sie bitte alle Stecker aus.
Danke
Bedienelemente:
1 = Drehräder
2 = Octave up / down Knöpfe über Drehrädern (ohne Abbildung)
17
Anschlüsse auf der Rückseite:
1 = Fusspedal
2 = Soundmodul
3 = Computer
4 = Netzteil
Was Sie über MIDI wissen sollten
MIDI ist die Abkürzung für Musical Instrument Digital Interface, und ist der
Standard für den Datenaustausch zwischen Musikinstrumenten, die mit dem
MIDI-Anschluß ausgestattet sind.
Um Ihnen die MIDI-Funktionen Ihres Midistart 3 näher zu erläutern, folgen Sie
bitte den nachfolgenden Erklärungen. Die MIDI Konfigurationen Ihres Midistart
3 geben Ihnen in Verbindung mit anderen Instrumenten oder Ihrem Computer
enorme Möglichkeiten.
Was Sie über USB wissen sollten
18
USB steht für Universeller Serieller Bus und ist der Standard, für den
Datenaustausch vieler Peripheriegeräte geworden d. h. alle USB-Geräte
kommunizieren über einen Bus (Kabel) mit dem Computer. Man kann so viele
Kabel einsparen, und das macht die Arbeit sehr viel einfacher.
Das Midistart 3 bietet daher auch eine USB-Schnittstelle über die man die
Mididaten übertragen kann (Midi über USB).
USB-plug & play:
Wenn Sie mit Windows XP / Vista oder Mac OSX arbeiten, können Sie das
Midistart-3 direkt nach dem Anschließen an Ihren Computer, einschalten ( EinAusschalter auf „on“ ). Unter diesen Betriebssystemen ist keine
Treiberinstallation erforderlich.
Einschalten
Es gibt zwei Möglichkeiten das Gerät mit Strom zu versorgen:
1. Über den USB-Stecker den Sie mit Ihrem Computer verbinden.
2. Durch Benutzung des externen Stecker-Netzteils.
Stecken Sie den Stecker des Netzteils auf der Rückseite des Gerätes in
die dafür vorgesehene DC Buchse ein.
19
3. Schalten Sie den Power-Schalter auf „ON“
Fehlerbehebung:
Wenn es mal nicht geht . . .
dann Überprüfen Sie folgende Anweisungen:
Der Midianschluss funktioniert nicht . . .
Haben Sie die Treiber Ihrer Soundkarte installiert?
Schauen Sie mal unter „Start Æ Einstellungen Æ Systemsteuerung
Æ
Multimedia Æ Tab Midi ob ein Miditreiber Ihrer Soundkarte eingetragen ist,
falls nicht hohlen Sie dieses nach. Dieser liegt Ihrer Soundkarte bei!
Achtung: In vielen Programmen müssen Sie zuerst den Eingangs Port festlegen,
bevor Sie Mididaten empfangen können!! (Prüfen)
Midi Gerät wird nicht erkannt . . .
20
Hier gibt es leider bei vielen Leuten ein Missverständnis, denn ein Midigerät
wird nicht vom Computer „erkannt“. Viele Midigeräte haben nur einen Midi Out
Anschluss (Ausgang) und deshalb kann der Computer auch nicht das Gerät
fragen was es für ein Gerät ist wie z.B. bei USB – Geräten, denn dafür ist ein
Midi In (Eingang) erforderlich. Midi unterstützt aber generell das „Erkennen“
nicht. Das Midistart 2 besitzt einen USB Anschluss über den es erkannt wird,
aber nicht über den Midi-Anschluss. Das ist also normal.
Pedal funktioniert nicht . . .
Vielleicht haben Sie das falsche Pedal?
Es gibt ein Öffner und ein Schließer Pedal, d.h. wenn man das Pedal tritt öffnet
der Kontakt (Öffner Pedal) und im anderen Fall schließt der Kontakt. Das
Keyboard benötigt ein Schließer Pedal!!
Audiosignal kommt verzögert . . .
Dieses Problem wird meistens dem Midigerät zugesprochen, ist aber in
wirklichkeit ein Problem der Soundkarte. Bei vielen Soundkarten gibt es eine
einstellbare sogenannte Latenz oder Latenzzeit, die ist dafür erforderlich, das bei
langsamen Computern das Audiosignal nicht aussetzt. Beim Installieren der
Soundkarte wird diese meistens auf maximalen Wert gesetzt z.b. 512 Samples.
Leider wird bei so großen Latenzzeiten das Audiosignal hörbar verzögert, so das
man diesen Wert auf den kleinsten möglichen Wert herunter setzen sollte. Man
kann dieses Problem aber auch feststellen, indem man das Midigerät an einen
Soundexpander anschließt, wo man sofort hört das Midigerät in Ordnung ist.
USB funktioniert nicht . . .
Ist das Keyboard eingeschaltet?
21
Wird das Keyboard erkannt?
Wenn Sie den USB Stecker des Computers mit dem Keyboard verbinden sollte
das Keyboard erkannt werden. Schauen Sie mal unter „Start Æ Einstellungen Æ
Systemsteuerung
Æ System Æ Gerätemanager ob unter Audio/Video/
Gamecontroller das Keyboard eingetragen ist. Falls nicht, installieren Sie die
USB Treiber!
Haben Sie in Ihrem Musikprogramm die MidiOut Ports eingestellt? Überprüfen!
Und zu letzt könnte ja auch der USB-Treiber ein Problem mit Ihrem Computer
haben. Schauen Sie dann bitte auf unserer Homepage nach dem neusten Treiber
zum herunterladen nach.
Netzteil funktioniert nicht . . .
Wenn das Gerät mal keinen Strom bekommen sollte prüfen Sie ob es
über den USB-Anschluss arbeitet. Ist das der Fall, ist wahrscheinlich
das Netzteil defekt.
Wenn alle Stricke reißen . . .
Falls Ihnen das alles nicht weiterhilft gibt es ja auch noch unsere
freundliche Hotline die Ihnen bestimmt helfen kann:
[email protected]
22
Spezifikation
Model: MidistART 2
Keyboard
49 anschlagsdynamische Tasten
Wheels (Räder)
Pitch Bend Rad
Modulations Rad
Program- und Funktionsknöpfe
Oktave up / down Knöpfe
Anschlüsse
USB
MIDI OUT (DIN)
Sustain Pedal
Netzteil
9V/300mA (Plus in der Mitte)
Netzschalter
ON / OFF
Anzeige
-
Abmessungen
82,3 x 19,5 x 7 cm
23
Gewicht
3,4 Kg
Stromversorgung
- mit externem DC 9 Volt/300mA
Adapter
- Via USB-Verbindung zum PC
MIDI IMPLEMENTATION
Program
Channel
Note
Velocity
Volume
Reverb level
Chorus level
Function
Default
Change
Default
Change
Default
Change
Key down
Key up
Default
Change
Default
Change
Default
Change
Pitch bend wheel
Controller change
(Definition of the
Modulation wheel)
Default
Transmitted
1
36 - 84
0 - 127
0 - 127
ok
1
-
24
Remark
Format
Cn, pp
9n, kk, vv
8n, kk, vv
Bn, 07, vv
Bn, 91, vv
Bn, 93, vv
En, vv, vv
Modulation
Non-registered MSB
Non-registered LSB
Reset controllers
Set MIDI mode
Bn, XX,
Bn, XX,
Bn, 123, 0
Default
Change
Mode 1
-
Bn, 124, 0
Bn, 125, 0
Bn, 126, 0
Bn, 127, 0
Notes:
1. ”n” refers to channel number, “pp” refers to program number, “kk” refers to key number,
“vv” refers to one byte data, “cc” refers to control number.
2. There are more controllers besides that listed in the table. Please refer MIDI specification for details
3. Mode 1: Omni On, Poly
Mode 2: Omni On, Mono
Mode 3: Omni Off, Poly
Mode 4: Omni Off, Mono
INDEX
Anschlüsse 15
Midischnittstelle 16
Bedienelemente 15
Problembehebung 18
Einleitung 13
USB Schnittstelle 16
Einschalten 17
USB Treiber installieren 17
Fehlersuche 18
Spezifikation 22
Midi Implementation 21
25
• Änderungen der technischen Daten und des Designs sind möglich.
• Für Druckfehler wird keine Haftung übernommen
Préface
Merci d’avoir choisi le Midistart 3, clavier-maître de contrôle MIDI. En utilisant
votre Midistart 3 avec un ordinateur et un logiciel musical approprié, vous
détenez déjà un home-studio complet. Ce manuel a été rédigé pour vous aider à
vous familiariser aux puissantes caractéristiques du Midistart 3. Après lecture du
manuel, vous saurez parfaitement comment utiliser les diférentes fonctions
MIDI. Pour plus de facilité concernant l’implémentation MIDI, nous vous
recommandons de conserver le manuel à portée de main quand vous utilisez le
clavier, surtout si vous débutez dans le monde MIDI.
26
Contenu
Préface .........................................……....................................... 26
Secure Information ......................……....................................... 28
Sommaire .......................................................................…......... 29
Connexions du panneau arrière ................................................... 29
Ce que vous devez savoir sur les fonctions MIDI ..................... 30
Ce que vous devez savoir sur les fonctions USB ....................... 30
USB plug & play ……......................................................
31
Mise en marche .............................................…......................... 31
En cas de problèmes ................................................................... 32
27
Spécifications techniques .......................................................... 35
Implémentation MIDI ................................................................ 36
Index ......................................................................................... 37
IMPORTAND SECURE INFORMATION
Please read the following secure instructions first!
Very Important!!
14. Never use the keyboard in the near of water like a swimming pool,
bathtub or wet environment like a basement or in rain or similar.
15. Never use the keyboard in the near of heating elements like a radiator or
similar, also high temperatures or direct sunbeam should be avoid.
16. Use only the power supply that is declared in our Specification
17. If you didn’t use the keyboard for a longer time please plug power off.
18. Take care that no liquid flows inside the keyboard
19. Also take care that no metal objects like a coin or paperclip and other
small objects can fall into the keyboard (e.g. by children ...) because of
electrical shortcut.
20. Do not open the keyboard, this is allowed by qualified technicians only.
21. Never leave the keyboard powered and switched on alone, because of fire
for example by thunderstorm or other reasons.
22. Children should inform about the secure information and/or an adult
should take care about, if children are to young for understanding this
information.
28
23. In the near of a radio or television device, are electromagnetic fields
possible they can disturb the reception. Enough distance is important!
24. In the near of Audio Amplifiers is noise possible. Enough distance is
important too.
25. For cleaning never use petrol, alcohol or solvent because damaging of the
housing. Use only a dry or little wet rag for cleaning and unplug the
power supply or USB connector, because of electrical shock.
26. Never unplug the keyboard if the power supply is powered.
14.Don´t throw the Keyboard, and also never let them crash down. Also
don’t push or trust the keyboard.
31. At a thunderstorm please unplug all connectors.
Thank You.
Sommaire
1 = Molettes
2 = Bouttons Octave up/down (no picture)
Connexions du panneau arrière
29
1 = Pédale
2 = Module de son
3 = Ordinateur
4 = Alimentation externe
Ce que vous devez savoir sur les fonctions MIDI
L’abréviation MIDI correspond à "Musical Instrument Digital Interface", ou
Interface Numérique des Instruments de Musique, qui permet à tous les
instruments de musique possédant cette interface d’échanger des données ou "de
se parler"!
Pour expliquer, plus en détail, comment fonctionne MIDI sur votre instrument,
les illustrations suivantes exposent les fonctions MIDI du Midistart 3, qui vous
autorisent à connecter le clavier à d'autres instruments MIDI. Les nombreuses
possibilités MIDI du Midistart 3 vous apportent un maximum de contrôle dans
l'environnement MIDI.
30
Ce que vous devez savoir sur les fonctions USB
USB, signifiant "Universal Serial Bus", est un moyen d'échange de données
trés repandu entre ordinateurs et appareils périphériques. Les avantages d'USB
sont surtout la facilité de connections (par un seul cable) et la possibilité
d'alimenter les appareils périphériques, notamment le Midistart 3, par le cable
USB. Cela permet d'économiser des cables et rend le travail plus facile.
Le Midistart 3 offre cette possibilité de transmettre les données MIDI via
l'interface USB (MIDI via USB).
USB plug & play
Si vous utilisez le clavier sous Windows XP / Vista our Mac OSX, il suffira
désormais de placer le commutateur de mise en marche sur la position « on « .
Comme le clavier Midistrt 3 est pris en charge nativement, il fonctionnera sans
nécessiter dínstallation supplémentaire.
Mise en marche
Il existe deux possibilités pour mettre en marche le clavier:
4. Utiliser le cable USB que vous raccordez avec le port USB de votre
ordinateur.
31
5. Utiliser l'adaptateur externe: connectez l'adaptateur à la fiche du panneau
arrière du clavier et branchez-le sur une prise de courant.
Puis mettez le bouton de mise en marche sur "On".
En cas de Problèmes:
Si quelquechose ne marche pas. . .
alors controlez les indications suivantes:
L'interface MIDI ne fonctionne pas. . .
Avez-vous installé les pilotes de votre carte numérique audio?
Regardez sous "Démarrer Æ Paramètres Æ Panneau de configuration Æ Sons et
multimédia Æ Audio Æ MIDI" si votre interface MIDI désiré est sélectionné. Si
il ne peut pas être sélectionné, installez tous les pilotes de votre carte de son.
Ceci sont procurés avec votre carte de son.
32
Notez: sur la plupart des logiciels musicaux, vous devez définir quel port MIDIIN de l'ordinateur vous voulez utiliser avant de pouvoir recevoir des données
MIDI!!
Périphérique MIDI n'est pas reconnu par l'ordinateur. . .
Dans ce cas, il s'agit souvent de malentendus, car un périphérique MIDI ne peut
pas être "reconnu" par l'ordinateur comme par exemple des périphériques USB.
Beaucoup d'appareils MIDI ne possèdent qu'un port MIDI-OUT, donc
l'ordinateur ne peut rien "demander" à l'appareil MIDI, comme le fait par
exemple l'interface USB. L'interface MIDI ne prévoit pas que des périphériques
soient reconnus. Il est donc normal que le Midistart 3 soit reconnu via USB et
pas reconnu via MIDI.
La pédale de contrôle ne fonctionne pas. . .
Peut-être avez-vous une pédale non adaptée au Midistart 3?
Il existe deux types de pédales, celles qui ouvrent le contact électrique en les
actionnant, et ceux qui ferment le contact. Ce clavier requiert une pédale
laquelle, une fois actionnée, ferme le contact!!
Le signal audio est retardé. . .
Ce problème ne provient pas de l'appareil MIDI, il est dû à la carte audio. Pour
la plupart des cartes audio, il est possible de régler la latence. Celle-ci évite que
le signal audio soit interrompu en utilisant des ordinateurs plus lents. Après
avoir installé la carte audio, la latence est souvent réglée au maximum, par
33
exemple 512 samples. Avec une latence aussi haute, un retard du signal audio
est déjà audible. Il est donc nécessaire de réduire la latence de la carte audio afin
d'obtenir un compromis entre le retardement du signal audio et la performance
de l'ordinateur.
USB ne fonctionne pas. . .
Le clavier est-il allumé?
Le clavier a-t'il été reconnu par l'ordinateur?
En raccordant le clavier et l'ordinateur via le cable USB, l'ordinateur devrait
reconnaître le clavier (après quelques secondes).
Contrôlez sous: „Démarrer Æ Paramètres Æ Panneau de configuration Æ
Système Æ Gestionnaire de périphériques si le clavier apparaît dans la liste
"Contrôle son, vidéo et jeux". Si ce n'est pas le cas, installez les pilotes USB!
Contrôlez également si vous avez défini quels ports MIDI-OUT vous voulez
utiliser dans votre logiciel audio.
L'alimentation externe ne fonctionne pas. . .
Si le clavier n'est pas alimenté, contrôlez si le clavier fonctionne en le raccordant
via USB. Si il fonctionne, l'alimentation externe est probablement défectueuse.
Si le problème persiste. . .
vous pouvez bien sur nous contacter sous:
[email protected]
34
Spécifications techniques
Model: Midistart 2
Clavier
49 touches standard dynamiques
Molettes
Molette de Pitch Bend
Molette de Modulation
Boutons de Programme et Fonction
Buttons Octave Up/down
Connecteurs
USB
MIDI OUT (DIN)
Pédale Sustain
Adaptateur secteur
Alimentation externe
9V DC/300mA (+ au milieu)
Boutons du panneau arrière
ON / OFF
Ecran d'affichage
35
Dimensions
82,3 x 19,5 x 7 cm
Poids
3,4 Kg
Sources d'alimentation
- avec adaptateur externe 9 Volts DC/300mA
- Via raccord USB-Ordinateur
Implémentation MIDI
Function
Default
Change
Default
Channel
Change
Default
Note
Change
Key down
Velocity
Key up
Default
Volume
Change
Default
Reverb level
Change
Default
Chorus level
Change
Pitch bend wheel
Program
Transmitted
1
36 - 84
0 - 127
0 - 127
ok
36
Remark
Format
Cn, pp
9n,
8n,
Bn,
kk,
kk,
07,
vv
Bn,
91,
vv
Bn,
93,
vv
En,
vv,
Controller
Default
1
-
change
(Definition of the
Modulation
wheel)
Change
Non-registered
Non-registered
Reset controllers
Set MIDI mode
Modulation
Bn,
cc,
vv
Bn, XX,
Bn, XX,
Bn, 123,
Default
Change
Mode 1
-
Bn,
Bn,
Bn,
Bn,
124,
125,
126,
127,
Notes:
1. ”n” refers to channel number, “pp” refers to program number, “kk” refers to key number,
“vv” refers to one byte data, “cc” refers to control number.
2. There are more controllers besides that listed in the table. Please refer MIDI specification for details
3. Mode 1: Omni On, Poly
Mode 2: Omni On, Mono
Mode 3: Omni Off, Poly
Mode 4: Omni Off, Mono
INDEX
Connexions 29
Mise en marche 31
En cas de problèmes 32
Préfcae 26
Implémentation MIDI 36
Secure Information 28
Interface MIDI 30
Spécification techniques 35
Interface USB 30
Installer les pilotes USB 31
37
• Aspects extérieurs et spécifications techniques sujets à changements sans
préavis.
• Spécifications fournies sous réserve d'erreurs d'impression.
38