1
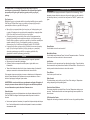
INSTALLATION ● OPERATION
OWNER’S MANUAL
Apogee Cooktop
Models MC1800G, MCD1800G,
MC2500G MCD2500G, MC3000G,
MCD3000G, MC3500G, MCD3500G,
MC2502FG, MC3002FG, MCD3502FG
CookTek Induction Systems, LLC
CookTek Induction Systems, LLC
Toll Free: +1 (888) COOKTEK
Toll Free Fax: +1 (888) COOKFAX
Phone: +1 (312) 563-9600
Fax: +1 (312) 432-6220
Toll Free: +1 (888) COOKTEK
Toll Free Fax: +1 (888) COOKFAX
Phone: +1 (312) 563-9600
Fax: +1 (312) 432-6220
www.cooktek.com
[email protected]
www.cooktek.com
[email protected]
103154
Manual Apogee 10334_A USINTL
● Não toque na placa de cerâmica (no cimo do Cooktop) imediatamente depois
da sua utilização. O calor emitido pelo tabuleiro será transferido para a placa
de cerâmica, fazendo com que esta fique quente ao toque.
● A assistência técnica deste produto só pode ser realizada por um agente de
assistência técnica autorizado ou por pessoal da CookTek. Não tente abrir a
unidade nem efectuar assistência técnica de qualquer tipo. Para informações
referentes à assistência técnica, por favor entre em contacto com a CookTek
pelo telefone 1-312-563-9600.
● O aparelho deve estar ligado à terra. Ligue apenas a uma tomada
correctamente ligada à terra. Antes de funcionar com o aparelho, leia as
instruções relativas à ligação à terra e os Requisitos para Instalação Eléctrica
na Página 3 deste folheto. Não utilize um cabo de extensão.
SPANISH
Antes de utilizar el anafe (cooktop), realice lo siguiente:
● Retire todo el material de embalaje.
● Coloque la unidad sobre una superficie seca, plana, dura, estable y no
inflamable.
● Mantenga la unidad alejada de otras fuentes de calor y deje un margen de al
menos 5 cm para que el aire circule por los lados y las partes anterior y
posterior de la unidad.
Por su seguridad, nunca corte, quite ni inutilice la conexión eléctrica (tierra) del
enchufe. No utilice nunca el anafe con un enchufe adaptador ni un cable
prolongador.
ADVERTENCIA: Se puede producir un choque eléctrico por un enchufe
conectado a tierra de manera incorrecta. Si tiene alguna duda relacionada
con las instrucciones de conexión a tierra, póngase en contacto con un
electricista cualificado.
Antes de comenzar:
Asegúrese de que el cable eléctrico está unido firmemente a la unidad CookTek
ANTES de conectar la unidad a la electricidad y antes de intentar utilizarla.
● No toque la placa cerámica (situada en la parte superior del anafe)
inmediatamente después de utilizarla. El calor de la cazuela se transferirá a la
placa cerámica y hará que ésta se caliente.
● La revisión de este producto únicamente puede realizarla un operario de
mantenimiento autorizado o el personal de CookTek. No intente abrir la unidad
ni realizar ninguna labor de mantenimiento. Para obtener información sobre el
mantenimiento, póngase en contacto con CookTek llamando al 1-312-5639600.
● Este aparato se debe conectar a tierra. Enchúfelo únicamente a una toma
conectada a tierra de manera adecuada. Antes de utilizarlo, lea las
instrucciones de conexión a tierra y los “Requisitos de la instalación eléctrica”
de la página 3 de este folleto. No utilice cables prolongadores.
22
Manual Apogee 10334_A USINTL
Dla bezpieczeństwa użytkownika nie wolno nigdy przecinać, wyjmować ani
wyłączać połączenia elektrycznego (uziemienia) z wtyczki. Stosując urządzenie
Cooktop nie wolno używać złącza pośredniego ani przedłużacza.
OSTRZEŻENIE: Niewłaściwe uziemienie wtyczki może spowodować
porażenie prądem elektrycznym. W przypadku wątpliwości dotyczących
instrukcji uziemienia należy skontaktować się z wykwalifikowanym
elektrykiem.
Przed rozpoczęciem używania:
Należy sprawdzić, czy przewód zasilania jest pewnie przymocowany do modułu
CookTek PRZED podłączeniem urządzenia do gniazdka zasilania i przed
rozpoczęciem jego używania.
● Nie dotykać płyty ceramicznej (lub wierzchniej części urządzenia Cooktop)
bezpośrednio po zakończeniu jego używania. Wysoka temperatura patelni
może przenosić się na płytę ceramiczną, stwarzając możliwość oparzenia w
przypadku jej dotknięcia.
● Obsługa serwisowa tego produktu może być prowadzona jedynie przez
upoważnionego pracownika serwisu lub przez personel firmy CookTek. Nie
podejmować samodzielnej próby otwarcia urządzenia ani nie wykonywać
żadnych napraw. Aby uzyskać informacje dotyczące obsługi serwisowej, należy
skontaktować się z firmą CookTek pod numerem 1-312-563-9600.
● Niniejsze urządzenie wymaga uziemienia. Podłączać jedynie do właściwie
uziemionego gniazda. Przed użyciem należy przeczytać instrukcję dotyczącą
uziemienia oraz część „Wymogi instalacji elektrycznej” na stronie 3 niniejszej
ulotki. Nie używać przedłużacza.
PORTUGUESE
Antes de funcionar com o seu Cooktop, faça o seguinte:
● Retire todo o material de embalagem.
● Coloque a unidade numa superfície seca, nivelada, rígida, estável e não
inflamável.
● Mantenha a unidade afastada de outras fontes de calor e deixe um espaço de
pelo menos 5 cm nos lados, frente e traseira da unidade, para circulação do ar.
Para sua segurança, nunca corte, retire nem desactive a ligação eléctrica (terra) da
ficha. Nunca utilize uma ficha adaptadora nem cabo de extensão com o Cooktop.
ADVERTÊNCIA: Uma ficha incorrectamente ligada à terra pode provocar
choque eléctrico. Se tiver alguma questão sobre estas instruções de ligação
à terra, por favor consulte um electricista qualificado.
Antes de Começar:
Por favor, certifique-se de que este cabo de energia está ligado firmemente à sua
unidade CookTek ANTES de ligar a unidade à tomada de energia e antes de tentar
funcionar com ela.
21
PREPARING YOUR COOKTEK COOKTOP FOR USE
Before operating your cooktop, do the following:
● Remove all packing material and save for subsequent shipment or in case of
concealed shipping damage.
● Place the nit on a dry, level, hard, stable, and non-flammable surface.
● Keep unit away from other heat sources and allow at least two (2) inches
clearance for air circulation at sides, front and rear of the unit. If either the air
intake or exhaust outlet is blocked, the internal temperature will rise, causeing
an error code to occur.
Grounding Instructions:
The cooktop must be porperly grounded. In the event of an electrical short circuit,
grounding reduces the risk of electric shock by providing a safe path for the electric
current. The cooktop has a power cord with a 3-prong grounding plug, which must
be used in a compatible and properly grounded outlet. It is the owner’s
responsibility to replace any 2-prong wal loutlet with a properly grounded 3-prong
wall receptacle.
For your safety, never cut, remove, or disable the electrical (ground) connection
from the plug. Never use an adapter plug or an extension cord with the cooktop.
WARNING: Electric shock can result from an imporperly grounded plug. Please
consult a qualified electrician if you have any questions about these grounding
instructions.
Before you begin:
Please make sure that this power cord is firmly attached to your CookTek unit
BEFORE plugging the unit into the power recptacle and before attmepting
operation.
ELECTRICAL INSTALLATION REQUIREMENTS*
Every installation site has different electrical wiring. Because many different local
codes exist, it is the Owner and Installer’s responsibility to comply with those
codes. CookTek is not responsible for any consequential damages as a result of
failure to comply with installation requirements.
● Read all installation instructions carefully before starting installation.
● Remove cooktop carefully from carton.
● Remove all loose packaging and accessories and save for subsequent
shipment or in case of concealed shipping damage.
● It is the responsibility of the installer to comply with all federal, state and local
codes.
● Any installation not matching the specifications discussed in this manual
automatically voids the product’s warranty.
● CookTek recmmends that a dedicated electrical line be used for each cooktop
installed. Electrical circuits should not be shared with any other electrical
equipment.
2
Manual Apogee 10334_A USINTL
INSTALLATION GUIDELINES FOR ALL COOKTOPS AND WOKS
Please follow the listed guidelines below to ensure product reliability:
Spacing Requirements:
● All units require a minimum clearance of two (2) inches or five (5) centimeters
on all four sides.
● All drop-in units require a minimum clearance of open space below the unit of
six (6) inches or fifteen (15) centimeters. The space must have openings
allowing for the flow of cool air (ambient temperature not to exceed 50˚C/122˚F)
to the cooktop/wok housing intake vents.
● The six inches can be reduced if additional fans and ducting are added to
provide forced ventilation.
● Avoid installing the unit near other equipment that generates excessive heat
that can be pulled into the CookTek unit by its fan (i.e. griddles, fryers, etc.).
● Avoid placing the unit near items that generate excessive steam that can be
pulled into the CookTek unit by its fan (i.e. pasta cookers, steam baths,
dishwashers, etc.).
Electrical Requirements:
● Line voltage should never exceed 264VAC for 240VAC units and 132VAC for
120VAC units.
● Always provide a dedicated electrical circuit for the equipment.
● Never use an extension cord or power strip.
General Maintenance:
● If your unit comes equipped with a grease filter on the bottom of the unit, please
read the section on cleaning and maintenance of the grease filter (page _).
● All units should be checked for build up and debris around the intake and
exhaust vents on the bottom of the unit.
● If debris is found on the vents, you should unplug the unit and clean away the
debris with a dry cloth to ensure proper airflow is provided to the equipment.
Air Flow and Ambient Temperature:
● Avoid ambient temperatures exceeding 50˚C/122˚F.
● Units dropped into the counter will require the following:
● Single units require a minimum 70CFM (2.0m3/min) of fresh air to the unit
● Double units require a minimum of 140CFM (4.0m3/min) of fresh air to the unit
General:
● Never leave an empty pan on the unit.
● Always turn the unit off when not in use.
3
● Questo prodotto può essere riparato esclusivamente da un tecnico autorizzato
o dal centro di assistenza CookTek. Non tentare di aprire l'unità o di eseguire
interventi di manutenzione di alcun tipo. Per informazioni sull'assistenza,
contattare la CookTek al numero 1-312-563-9600.
● Questo apparecchio deve essere collegato a terra. Collegarlo esclusivamente a
una presa elettrica dotata di messa a terra. Prima di mettere in funzione l'unità,
leggere le istruzioni di messa a terra e i Requisiti di installazione elettrica a
pagina 3 di questo opuscolo. Non utilizzare un cavo elettrico di prolunga.
NORWEGIAN
Før du bruker komfyren, må du gjøre følgende:
● Fjern all emballasje.
● Plasser enheten på et tørt, jevnt, hardt, stabilt og brannsikkert underlag.
● Hold enheten unna andre varmekilder, og la det være minst 5 cm klaring for
luftventilasjon på sidene, foran og på baksiden av enheten.
For din egen sikkerhet må du ikke kutte, fjerne eller ødelegge den elektriske
(jordede) koplingen fra kontakten. Ikke bruk en adapterkontakt eller skjøteledning
for komfyren.
ADVARSEL: Elektrisk støt kan oppstå fra kontakt som ikke er korrekt jordet.
Ta kontakt med en kvalifisert elektriker dersom du har spørsmål om disse
jordingsinstruksene.
Før du begynner:
Kontroller at strømkabelen er satt helt inn i CookTek-enheten FØR du kopler
enheten til stikkontakten og før bruk.
● Den keramiske platen (eller overflaten på komfyren) må ikke berøres
umiddelbart etter bruk. Varme fra kjeler vil overføres til den keramiske platen og
gjøre den varm.
● Dette produktet kan bare repareres av en autorisert serviceagent eller av
CookTek-ansatte. Ikke prøv å åpne enheten eller utføre reparasjoner av noe
slag. For serviceinformasjon, kontakt CookTek på tlf. 1-312-563-9600.
● Dette produktet må jordes. Må kun koples til et korrekt jordet støpsel. Før bruk
bør du lese jordingsinstruksene og kravene til elektrisk installasjon på side 3 i
denne veiledningen. Ikke bruk skjøteledning.
POLISH
Przed rozpoczęciem używania urządzenia Cooktop, należy wykonać poniższe
czynności:
● Usunąć wszystkie elementy opakowania.
● Ustawić urządzenie na suchej, poziomej, twardej, stabilnej i niepalnej
powierzchni.
● Ustawić urządzenie z dala od innych źródeł ciepła i zapewnić wokół urządzenia
wolną przestrzeń, co najmniej 0,5 cm, aby umożliwić obieg powietrza
20
Manual Apogee 10334_A USINTL
ΠΡΟΕΙΔΟΠΟΙΗΣΗ: Ένα εσφαλμένα γειωμένο φις μπορεί να έχει ως
αποτέλεσμα την ηλεκτροπληξία. Παρακαλείστε να συμβουλευτείτε αρμόδιο
ηλεκτρολόγο εάν έχετε τυχόν ερωτήσεις σχετικά με αυτές τις οδηγίες
γείωσης.
Πριν ξεκινήσετε:
Βεβαιωθείτε ότι αυτό το ηλεκτρικό καλώδιο είναι σταθερά συνδεδεμένο στη μονάδα
CookTek σας ΠΡΙΝ συνδέσετε το φις της μονάδας σε ηλεκτρική πρίζα και πριν
προσπαθήσετε να θέσετε τη μονάδα σε λειτουργία.
● Μην αγγίξετε την κεραμική πλάκα (ή το άνω μέρος του Cooktop) αμέσως μετά
τη χρήση. Η θερμότητα από την κοιλότητα θα μεταφερθεί στην κεραμική πλάκα.
Ως εκ τούτου, αυτή θα είναι πολύ ζεστή για να την αγγίξετε.
● Οι εργασίες επισκευής του προϊόντος αυτού πρέπει να πραγματοποιούνται
μόνο από εξουσιοδοτημένο αντιπρόσωπο επισκευών ή από προσωπικό της
CookTek. Μην επιχειρήσετε να ανοίξετε τη μονάδα ή να εκτελέσετε οποιαδήποτε
εργασία επισκευής σε αυτήν. Για πληροφορίες σχετικά με τις επισκευές,
επικοινωνήστε με την CookTek στον τηλεφωνικό αριθμό 1-312-563-9600.
● Η συσκευή αυτή πρέπει να είναι γειωμένη. Συνδέστε μόνο σε σωστά γειωμένη
πρίζα. Πριν τη λειτουργία, διαβάστε τις οδηγίες γείωσης και τις απαιτήσεις
ηλεκτρικής εγκατάστασης στη σελίδα 3 του παρόντος φυλλαδίου. Μη
χρησιμοποιείτε καλώδιο προέκτασης (μπαλαντέζα).
ITALIAN
Prima di mettere in funzione il piano cottura, eseguire le seguenti operazioni:
● Rimuovere tutto il materiale di imballaggio.
● Collocare l'unità su una superficie asciutta, piana, rigida, stabile e non
infiammabile.
● Tenere l'unità lontana da altre fonti di calore e lasciare almeno 5 centimetri di
spazio per consentire la circolazione dell'aria tutto intorno all'unità.
Per la propria sicurezza, non tagliare, rimuovere o disattivare mai il collegamento
elettrico di terra dalla spina. Non utilizzare mai una spina adattatore o un cavo
elettrico di prolunga per collegare il piano cottura.
AVVERTENZA: una spina elettrica non correttamente collegata all'impianto di
terra può provocare scosse elettriche. Rivolgersi a un elettricista qualificato
in caso di domande su queste istruzioni di messa a terra.
Prima di iniziare:
Assicurarsi che questo cavo di alimentazione sia collegato saldamente all'unità
CookTek PRIMA di collegare l'unità alla presa elettrica e prima di metterla in
funzione.
APOGEE INTERFACE
The controls for the Apogee are based on Capacitive Touch technology. When
attempting to press the button, place your finger on the glass over the symbol for
the feature you desire (i.e. to turn the unit on, press the “ON/OFF” symbol on the
glass.
Power Button:
Use this button to turn the unit on and off.
Mode/Select Button:
Use this button switch between Power Cook and Temperature modes. This button
is also used to confirm a selection in the menu screens.
Lock Button:
This button is used to prevent users from adjusting the settings. Press this button
three times and the only button that will work is the Power Button. When the unit is
locked, press this button three times to unlock the controls.
Timer Button:
Used to set a specific cook time.
Slider Control:
This button allows you to quickly set your Power Cook settings or Temperature
settings, depending on the operating mode.
Precision Control Buttons:
These arrow keys allow you adjust Power Cook and Temperature settings more
precisely. These buttons are also used to navigate through menu options in the
menu screens.
LCD Information Center:
Displays all vital cooking information and alerts the user of any possible problems.
● Non toccare la piastra di ceramica (o la superficie del piano cottura) subito dopo
l'uso. Il calore della pentola si trasferisce alla piastra di ceramica, rendendola
estremamente calda.
19
4
Manual Apogee 10334_A USINTL
APPROVED FOR COMMERCIAL USE
CookTek cooktops have been tested to be in conformance with UL 197 and CSA
C22.2 standards and bear the commercially rated approvals. CookTek’s cooktops
have been tested to be in conformance with the European Economic Area
standards and bear the CE marking signifying European Conformity.
COOKING BY POWER COOK (WATTAGE)*
General Operation:
Plug cooktop into a grounded, single-phase receptacle. Models will run on 100120VAC drawing up to 1800W depending on model, or on 200-240VAC drawing a
maximum of 3500W depending on model. Check rating plate on unit to erify
correct voltage and wattage. Voltages below 120VAC or 240VAC can result in less
than rated power and slower heating times.
LCD Information
LCD Information Center display when plugged in,
but in the OFF position.
NOTE: For proper operaton, an independent dedicated circuit should be used
for each unit installed. Each circuit should be protected with a 20 amp circuit
breaker. When you applicaiton requires high intense heat or you want a
quick temperature increase, the Power mode should be used.
What to Do:
● Turn the cooktop “ON” by pressing the POWER button on the glass.
● Adjust your power settings using the slider from 0-100 (MAX). You can also use
the Precision Control buttons to adjust to more precise power settings.
● Use your finger on the slider or Precision Control buttons to adjust the power
levels. The left side will lower power and the right side will increase power.
LCD Information Center will display this when in
Cook mode. The pan logo in the upper right
corner indicates an induction compatible pan is
on the unit. If there is an “X” across the pan, the
unit is indicating that there is a non-induction
compatible pan on the unit or no pan at all.
● To turn the cooktop off, press the POWER button on the glass and the LCD
Information Center will display the CookTek logo as in the picture below.
LCD Information Center display when plugged in,
but in the OFF position.
5
GERMAN
Vor Inbetriebnahme des Cooktop verfahren Sie bitte wie folgt:
● Entfernen Sie das gesamte Verpackungsmaterial.
● Stellen Sie das Gerät auf eine trockene, ebene, harte, stabile und nicht
brennbare Fläche.
● Halten Sie das Gerät von anderen Wärmequellen fern und lassen Sie um das
Gerät herum (vorne, hinten und seitlich) mindestens 5 cm für die Luftzirkulation
frei.
Zu Ihrer eigenen Sicherheit darf das Erdungskabel keinesfalls vom Stecker
abgetrennt, entfernt oder in schadhaftem Zustand verwendet werden. Benutzen Sie
für Ihren Cooktop niemals einen Steckeradapter oder ein Verlängerungskabel..
WARNHINWEIS: Ein nicht fachgemäß geerdeter Stecker kann zu einem
Stromschlag führen. Falls Sie noch Fragen zu diesen Anweisungen in
Zusammenhang mit Schutzkontakt und Erdung haben, wenden Sie sich bitte
an einen Elektrofachmann.
Bevor Sie beginnen:
Dieses Netzkabel muss fest mit dem CookTek verbunden sein, BEVOR Sie das
Gerät an die Steckdose anschließen und es in Betrieb nehmen.
● Berühren Sie die Keramikplatte (oder Oberfläche des Cooktop) nicht
unmittelbar nach Gebrauch. Die Hitze der Pfanne überträgt sich auf die
Keramikplatte, die dann ebenfalls heiß wird.
● Dieses Produkt darf nur durch bevollmächtigte Wartungstechniker oder das
Fachpersonal von CookTek gewartet werden. Versuchen Sie nicht, das Gerät
zu öffnen und selbst zu warten. Nähere Informationen zur Wartung erhalten Sie
bei CookTek unter der Rufnummer 1-312-563-9600.
● Das Gerät muss geerdet werden. Der Stecker muss in eine ordnungsgemäß
geerdete Steckdose gesteckt werden. Vor dem Öffnen lesen Sie bitte die
Anweisungen zu Schutzkontakt/Erdung und die Anforderungen an die
elektrische Installation auf Seite 3 dieses Handbuchs. Verwenden Sie kein
Verlängerungskabel.
GREEK
Πριν θέσετε το Cooktop σας σε λειτουργία, εκτελέστε τα ακόλουθα:
● Αφαιρέστε όλα τα υλικά συσκευασίας.
● Τοποθετήστε τη μονάδα σε μια στεγνή, επίπεδη, σκληρή, σταθερή και μη
εύφλεκτη επιφάνεια.
● Διατηρήστε τη μονάδα μακριά από άλλες πηγές θερμότητας και αφήστε κενό
τουλάχιστον 2 ίντσες (5 εκατοστά) για την κυκλοφορία του αέρα στα πλαϊνά, το
μπροστινό μέρος και το πίσω μέρος της μονάδας.
Για την ασφάλειά σας, ποτέ μην κόψετε, αφαιρέσετε ή απενεργοποιήσετε την
ηλεκτρική (γείωση) σύνδεση από το φις. Μη χρησιμοποιήσετε ποτέ προσαρμογέα
φις ή καλώδιο προέκτασης (μπαλαντέζα) με το Cooktop.
18
Manual Apogee 10334_A USINTL
Ennen kuin aloitat:
Varmista, että tämä virtajohto on tiukasti kiinnitetty CookTek:iin ENNEN laitteen pistokkeen työntämistä pistorasiaan ja ennen käyttökokeilua.
● Älä koske keraamista levyä (keittotason päällä) heti käytön jälkeen. Astian
kuumuus siirtyy keraamiseen levyyn kuumentaen sen liian kuumaksi koskettaa.
● Tätä tuotetta saa huoltaa ainoastaan valtuutettu huoltopiste tai CookTekin
henkilökunta. Älä yritä avata laitetta ja suorittaa sille minkäänlaisia huoltotoimia.
Tietoja huollosta saat soittamalla CookTekiin numeroon +1-312-563-9600.
● Tämä laite täytyy suojamaadoittaa. Liitä ainoastaan oikein suojamaadoitettuun
pistorasiaan. Ennen käyttöä lue maadoitusohjeet ja sähköasennusvaatimukset
tämän lehtisen sivulta 3. Älä käytä jatkojohtoa.
FRENCH
Avant d’utiliser l’appareil Cooktop, effectuer les opérations suivantes :
● Retirer tous les matériaux d’emballage.
● Placer l’appareil sur une surface sèche, plane, solide, stable et non
inflammable.
● Placer l’appareil à distance de toute autre sources de chaleur et laisser un
espace libre d’au moins 5 cm (2 pouces) des deux côtés, à l’avant et à l’arrière
de celui-ci pour permettre la circulation de l’air.
Pour votre sécurité, ne jamais couper, déconnecter ou désactiver le raccordement
électrique (terre) de la prise de courant. Ne jamais utiliser un adaptateur ou une
rallonge électrique avec l’appareil Cooktop.
MISE EN GARDE : Une prise de courant incorrectement raccordée à la terre
engendre un risque de choc électrique. Pour toute question concernant ces
instructions de mise à la terre, consulter un électricien qualifié.
Avant de commencer :
S’assurer que le câble d’alimentation est solidement fixé à l’appareil CookTek
AVANT de raccorder l’appareil à une prise de courant et d’essayer de le faire
fonctionner.
● Ne pas toucher la plaque de céramique (ou la partie supérieure de l’appareil
Cooktop) immédiatement après utilisation. La chaleur de la casserole se
transmet à la plaque de céramique, aussi celle-ci est chaude au toucher.
● L’entretien de cet appareil ne peut être effectué que par un réparateur agréé ou
par un membre du personnel de CookTek. Ne jamais essayer d’ouvrir l’appareil
ni de le réparer. Pour des informations concernant l’entretien, contacter
CookTek au +1-312-563-9600.
● Cet appareil doit être raccordé à la terre. Le brancher exclusivement à une
prise de courant correctement raccordée à la terre. Avant utilisation, lire les
instructions de raccordement à la terre, ainsi que les exigences en matière
d’installation électrique figurant à la page 3 du présent manuel. Ne pas utiliser
de câble de rallonge.
17
COOKING IN TEMPERATURE MODE
This feature is used when you need to cook to and hold at specific temperatures.
● With the unit powered on, press the MODE/SELECT button on the glass.
● Now use the Slider or Precision Control buttons to adjust to your desired
temperature from 85-500˚F and 30-260˚C.
NOTE: In Fahrenheit mode from 85-125˚, you will be able to increment in steps
●
●
●
of one. However, if you press and hold the Precision Control button down, it will
increase in steps of 2. From 125˚-MAX, it will increment by 5, and by 10 if you press
and hold the Precision Control buttons. In Celsius mode, from 30-100˚, you will be
able to increment in steps of one. However, if you press and hold the Precision
Control button down, it will increase in steps of 2. From 100˚-MAX, it will increment
by 5, and by 10 if you press and hold the Precision Control buttons.
Just as in Cook mode, you use the sider or Precision Control buttons to adjust the
temperatures. The left side will decrease the temperature and the right side will increase
the temperature.
While the unit is heating to the selected temperature, the unit will flash “HEATING” on the
screen. Once the selected temperature has been reached, the uit will display “AT TEMP.”
To exit Temperature mode, press the MODE/SELECT button on the glass and you will
return to Cook mode.
LCD Information Center will display this when in
Temperature mode. When you place an induction
compatible pan on the unit, the “X” will no longer be
on the pan logo in the top right corner.
NOTE: When you go from Cook mode to Temperature mode and back, the unit will
remember your previous power setting or temperature setting.
COOKING USING THE TIMER SETTINGS
This feature is designed to allow you to cook according to time. This will also give you an
audible alarm for cooking processes that require you to add items after a certain period of
tme. You will be able to set the timers anywhere from 1 minute to 11 hours and 59 minutes.
In the upper left hand corner of the LCD Information Center, the unit will display a clock logo
and the set time you have programmed.
NOTE: Any time you are in a menu and you want to get out of the screen without
making a selection, just press POWER and the unit will turn off and reset.
● While the unit is powered on, press the TIMER button.
● A menu will then be displayed to allow you to select a Cook Timer, Alarm Timer, or to
cancel the timer. This menu is pictured below.
6
Manual Apogee 10334_A USINTL
● Use the Precision Control Buttons to move the cursor up and down to get to the
setting you desire. For example, to set the alarm, pres the Precision Control
button on the left two times.
● Once you have moved the cursor to your choice, press the MODE/SELECT
button to move to the next screen which will allow you to set the time.
Reference the picture below of what the LCD Information Center will display
MANUAL TRANSLATION ADDENDUM
DUTCH
Doe het volgende voordat u uw kooktop gaat gebruiken:
● Verwijder al het verpakkingsmateriaal
● Zet het toestel op een droge, vlakke, harde, stabiele en onbrandbare
ondergrond
● Houd het toestel uit de buurt van andere warmtebronnen en zorg dat er aan de
voor- en achterkant en de zijkanten minstens 5 cm vrij is voor luchtcirculatie.
Voor uw veiligheid mag u nooit de elektrische (massa) aansluiting uit de stekker
snijden, verwijderen of uitschakelen. Gebruik nooit een aangepaste stekker of een
verlengsnoer met de kooktop.
● You will now select your time in hours, minutes, or both. Use the Precision
Control buttons to select your desired time. You can choose from 1 minute up
to 11 hours and 59 minutes. The slider also has present times preprogrammed
into it. To select a preprogrammed time, press your finger on the slider.
● After you have determined your desired time, press the MODE/SELECT button.
● If you have set the “cook time,” it will begin counting down regardless if you
have a pan on the unit or not. Once the time has expired, the unit will bep and
turn off.
● If you have selected the “alarm” time, the unit will count down the time
regardless if you are cooking or not. When the alarm goes off, the unit will
beep, but if there is a pan on the unit, it will continue to cook. Press the TIMER
button to turn off the timer after it has expired.
● To cancel the timer you have selected, press the TIMER button and select the
“Cancel Timer” option.
OPTIONS AND FEATURES SELECTION
This section will describe how you can customize your Apogee unit. The features
that will be covered are the lock out feature which will allow you to set the unit to a
specific temperature or cooking power and can only be adjusted by using a specific
key sequence, and the feature that will allow you to change from Fahrenheit to
Celsius and back.
To enter the Options menu, you will need to do the following:
● Turn off the unit so that the LCD Information Center is displaying the CookTek
logo.
● Place your finger on the down Precision Control button and continue to hold
your finger on the button until the unit begins to beep.
● After the unit begins beeping, remove your finger from the Precision Control
button and then press the POWER button.
Note: You will only have one to two seconds to
press the POWER button to get into the menu
screen.
● After pressing POWER, the unit will display the
screen shown on the right.
7
WAARSCHUWING: Een verkeerd geaarde stekker kan u een elektrische schok
bezorgen. Raadpleeg een erkende elektricien als u vragen heeft over deze
aardingsinstructies.
Voordat u begint:
Controleer eerst of dit snoer stevig aan uw CookTek-apparaat is bevestigd VOORDAT u de stekker van het toestel in het stopcontact steekt en u probeert het te gebruiken.
● Raak de keramische plaat (of de bovenkant van de kooktop) nooit onmiddellijk
na gebruik aan. De hitte van de pan wordt op de keramische plaat overgebracht
zodat deze heet is bij aanraking.
● Dit product mag uitsluitend worden gerepareerd door een geautoriseerd
servicebedrijf of door personeel van CookTek. Probeer niet om het toestel open
te maken of op enige wijze te repareren. Neem voor informatie over onderhoud
en reparatie contact op met CookTek op 001-312-563-9600.
● Dit toestel moet worden geaard. Alleen aansluiten op een goed geaard
stopcontact. Lees voor het gebruik de aardingsinstructies en de vereisten voor
de elektrische aansluiting op pagina 3 van dit boekje. Gebruik geen
verlengsnoer.
FINNISH
Ennen keittotason käyttöä toimi seuraavasti:
● Poista kaikki pakkausmateriaalit.
● Laita laite kuivalle, tasaiselle, kovalle, tukevalle ja palamattomalle pinnalle.
● Pidä laite erossa muista lämmönlähteistä ja jätä laitteen sivuille, eteen ja taakse
vähintään 10 cm ( 2 tuumaa) vapaa tilaa ilmalle kiertää.
Turvallisuussyistä älä koskaan leikkaa, irrota tai pura sähköliitoksia (maadoitusjohtoa) pistokkeesta. Älä koskaan käytä keittotason kanssa sovitinpistoketta tai jatkojohtoa.
VAROITUS: Väärin maadoitettu pistoke voi aiheuttaa sähköiskun. Neuvottele
valtuutetun sähköasentajan kanssa, jos sinulla on kysyttävää näistä maadoitusohjeista.
16
Manual Apogee 10334_A USINTL
TWO HOB (TWO BURNER) COOKTOPS
Operation of the two hob (two burner) cooktop is exactly the same as the single
position cooktop. Each position wil have its own, independently conrolled interface
and its own, separately controlled MODE/SELECT button. It is not necessary to
turn both positions on for the cooktop to function.
NOTE: For proper operation, a dedicated circuit should be used for each unit
installed. Each unit should be protected with a 30A minimum circuit breaker.
DROP-IN UNIT DIMENSIONS
Dimensions
inches
15
mm
A
20.67
525
B
16.16
410
C
15.13
384
D
3.74
94
E
3.63
92
F
0.25
6
G
19.64
498
H
0.36
9
J
19.81
503
K
15.30
388
L
4.74
120
● Use the Precision Control buttons to move the cursor to the desired setting and
then press the MODE/SELECT button.
● If you select “Set Temp Scale,” you will have two options to choose from Fahrenheit or Celsius. Again, use the Precision Control buttons to move the
cursor to your desired selection, and the MODE/SELECT button to confirm your
choice.
● The “Show Lock Info” will allow you to decide if
you want the key sequence to unlock the unit to
be visible when the user presses any button.
The unit will give you the option to hide or show
the key sequence, and then the unit will confirm
your choice.
● If you select the “Reset Defaults” option, the unit will then set the settings to
Fahrenheit and show lock feature.
● In order to lock the unit, you will want to press the
LOCK button three times. The unit will beep to
indicate that it has been locked.
● Anytime someone touches a key after the unit
has been locked, a message will appear on the
LCD Information Center reading “Locked.” The
unit will also remain in Locked ode even if the unit is turned off. The Lock mode
may be reset by unplugging the unit, but the unit must be on when doing this.
Simply unplugging the unit while it is powered off will not reset the Lock mode.
● The unlock sequence will be displayed as a factory default. If you change to
“Hide Unlock,” it will not be shown when the “Locked” messge appears on the
screen.
NOTE: Factory settings have the unit start in Fahrenheit and Show Unlock
mode. The standard factory unlock code requires teh lock button to be
pressed three times to unlock the unit.
IMPORTANT INFORMATION
● If a large amount of liquid is spilled onto the Apogee interface, it may respond to
the liquid on the interface. Wipe the liquid clean and allow the nit to sit for
approximately 2 seconds untouched and normal sensitivity to the buttons will
come back.
● Never heat an empty pan. It may damage the cooktop or cookware and
overheat the unit. When overheating occurs, an error code will flash on the
LCD Information Center and the cooktop will shut itself off automatically. When
the temperature returns to normal, the Cooktop will start to cook again.
● Remember to turn the cooktop off after each use.
● Keep the cooktop away from gas and electric ranges or open flames. Do not
place in the oven. If the surrounding air temperature is too high, the cooktop
will cease to function properly.
● Be sure to dry off the outside of the pan before use. Otherwise, as the pan
temperature rises, the water droplets on the outside of the pan may begin to
boil and apatter.
8
Manual Apogee 10334_A USINTL
● Do not touch the ceramic plate (or the top of the cooktop) immediately after use.
The heat from the pan will be transferred to the ceramic plate causing it to be
hot to the touch.
● Do not place any articles on the cooktop other than inductive cookware. For
example, do not place cans on top of the cooktop as they may explode.
● Do not use auminum foil on top of the cooktop.
● Do not use the cooktop near a fauct, swimming pool, sink, or other areas where
water can be found. Never store the cooktop outside or upside down.
● Do not obstruct, block, or alter the air entrance or outlet. Do not stick foreign
objects into these openings.
● Do not strike or damage the cooktop. Do not put the cooktop in your luggage.
Throwing or dropping the cooktop can damage the internal components or
crack the cooktop, voiding your warranty. If the cooktop becomes cracked,
unplug the unit immedately and do not use it.
ERROR CODES
In the event of a possible malfunction, your CookTek cooktop will display and Error
Code on the LCD Information Center and the unit will beep the numer of times
indicated by the error. Please consult the following table when encountering an
Error code. To reset the error conditions, remove the pan from the unit and press
the POWER button or unplug the unit.
Error Error Cause
1
Shorted RTD
Grease filter cleaning procedures:
Frequency
● Grease filter(s) should be removed and cleaned every two weeks. More
frequent cleaning may be necessary if they appear clogged and/or operate in
heavy grease laden environments.
Procedure
● Slide filter(s) outof the track on the bottom of the unit.
● Back flus with hot water to remoe dirt and grease.
● Shake remaining water out and let stand until completely dry.
● Reinstall filter(s) ensuring the arrow on the edge of the filter(s) is ponting into
the unit.
● NOTE: filters are also dishwasher safe.
Caution
● Do not operate the unit without the grease filter(s) installed.
● If the unit displays and error code of “E4” - the overheat error - this may indicate
a clogged filter. Follow the procedure above and let the unit cool down before
resuming operation (turn off for approximately 5 minutes).
9
Service required
2
Opened RTD
Temperature sensor failed.
Call dealer.
3
Over current
(peak)
Incompatible pan
Try different cookware. Service
may be required.
4
Open TCO
Overheating. Check airflow. Check airflow. Clear air vents.
Unplug, let cool.
Listen for fan operation.
Check to ensure the grease filter
is clean and dry. Make certain
there are no foreign objects
blocking air flow. Check the air
filter to ensure that the arrow on
the filter is pointing up.
To reset, unplug unit, wait 5
seconds, and plug in again. If
problem persists, have an
electrician monitor the line
voltage.
Service required. Turn unit off,
then on. Plug unit into outlet on
different circuit breaker. If
problem persists, service is
required.
5
Air flow
blocked
Air flow blocked. Clean
grease filter.
6
High line
voltage
Input voltage too high.
Check mains voltage.
7
Harware failure Call dealer for service.
8
Zero cross
failure
Call dealer for service.
9
Clock corrupt
Reset clock.
Reset clock.
Pan RTD
failure
Tag
communication
failure
RFID reader
failure
Pan temperature sensor
failed.
RFID pan needs repair. Service
needed for pan.
Reposition pan & cycle
power.
Ensure the RFID tag on the pan is
properly located.
Call dealer for service
Service required.
GREASE FILTER MAINTENANCE
This unit comes equipped with a grease filter(s) to protect the electronics from
contaminants.
Troubleshooting
Temperature sensor failed.
Call dealer.
Remove any pans from cooktop
surface and let unit cool. Then
turn unit off, then on. If problem
was temperature related, the unit
will return to normal operation.
Otherwise, service is required.
CARE & CLEANING
Your CookTek Induction Cooktop is easy to keep clean. Be sure to follow these
easy instructions:
● Turn the unit OFF and remove the plug from any power outlets prior to cleaning.
● When the unit is cool, wipe the surface and body with a damp cloth. Use a mild
scouring agent on the stainless steel housing such as Bon Ami or Barkeeper’s
Friend for greasy or resistant soiling. Do not use a lye-based cleaner, such as
an oven cleaner, as it may damage the cooktop.
● To clean the glass surface, use a mild detergent or glass cooktop cleansing
cream..
● Never immerse the cooktop in water or put it in the dishwasher.
Displayed Message
10
11
12
14
User
interface
error
Cycle power.
Service required.
16
Critical error
Call dealer for service.
Service required.
14
Manual Apogee 10334_A USINTL
TROUBLESHOOTING
Symptom
Probable Cause
Possible Solution
No power
(No lights or fan
noise)
●
●
●
Unit unplugged
No power to receptacle
●
●
●
●
Pan does not heat
●
●
●
Cooktop suddenly
stops heating
●
●
●
●
Pan is not induction
efficient
Pan diameter is less
than 7 inches
Pan not centered over
cooktop logo
Possible power brown
out
Circuit shared with
another electrical device
Air vents blocked or
insufficient air circulation
Safety shut-off engaged
●
●
●
Use induction efficient pan
Use a larger induction efficient pan
Center pan
●
●
Assure proper voltage/power levels
Make sure the cooktop is not
sharing a circuit with other
electrical devices
Check air vents to make sure that
they are not blocked. Make sure
that there is sufficient air flow
around the appliance.
The safety shut-off will engage if an
empty pan is left on the cooktop
surface while the unit is working at
full power. Make sure that the
cooktop surfacce is clear. Wait 1520 minutes for the unit to reset.
●
●
Pan does not get
●
hot enough even
●
though power levels
are set to maximum
- induction efficient
pan in use
Extension cord in use
●
Circuit shared with
another electrical device
Pan cooks
unevenly, does not
maintain heat level,
or overheats
Pan is not induction
efficient
Pan bottom may not be
flat enough
Pan not centered over
cooktop logo
Pan diameter is less
than 7 inches
●
●
●
●
●
13
Plug unit into appropriate
receptacle
Make sure that receptacle is
energized
Check wall switches
Check circuit breaker
Plug a different electronic device
into the receptacle to make sure
that power is present
●
●
●
●
DO NOT use extension cords.
Extension cords may affect the
power levels reaching the
appliance.
Make sure that the cooktop is not
sharing a circuit with other
electrical devices.
Use induction efficient pan
Use flatter pan
Center pan
Use a larger induction efficient pan
WARRANTY STATEMENT
All commercial cooking and holding equipment manufactured by CookTek is
warranted against defects in materials and workmanship for a period of three years
from the date of shipment from CookTek’s factory. All non-electrical equipment
such as pans, bags, and pellet assemblies are warranted against defects in
materials and workmanship for a period of 90 days from the date of shipment from
CookTek’s factory.
IMPORTANT! A valid proof of purchase, and Serial Number (s) showing date of
purchase is required to obtain Warranty Service.
This warranty is for the benefit of the original purchaser and is non-transferable.
Any defects in materials or workmanship, which are brought to the attention of
CookTek by written notification within the aforesaid warranty period will be repaired
or replaced, at CookTek’s discretion, with new or recertified products or parts. THIS
IS THE SOLE REMEDY FOR ANY BREACH OF THIS WARRANTY. IN NO
EVENT WILL COOKTEK BE LIABLE FOR DAMAGES OF ANY KIND, WHETHER
DIRECT OR INDIRECT, SPECIAL OR CONSEQUENTIAL. THIS WARRANTY IS
THE COMPLETE AND ONLY WARRANTY, EXPRESS OR IMPLIED IN LAW OR
FACT, INCLUDING BUT NOT LIMITED TO, WARRANTIES OF
MERCHANTABILITY, SUITABILITY, QUALITY, OR FITNESS FOR ANY
PARTICULAR PURPOSE. THIS WARRANTY DOES NOT INCLUDE ANY THIRD
PARTY INSTALLATION, REMOVAL OR DAMAGE COSTS including (but not
limited to) LABOR, MATERIALS AND TRAVEL FOR CAULKING IN DROP-IN
(“BUILT-IN”) UNITS, OR REPAIRS / REPLACEMENT OF FUSES, BREAKERS,
MILLWORK AND / OR COUNTER-TOPS).
This warranty is void if it is determined that upon inspection by CookTek or one its
Authorized International Distributors that the equipment has been modified,
misused, misapplied, improperly installed, or damaged in transit or by fire, flood or
act of God. Broken Glass-Ceramic tops are considered abuse and are NOT
covered. Warranty will be considered void if the serial nameplate has been
removed or defaced or if the unit has been opened or modified in any way or
service has been attempted by unauthorized personnel.
The prices charged by CookTek for its products are based upon the limitations in
this warranty. Seller’s obligation under this warranty is limited to the repair of
covered defects without charge by CookTek or one of its Authorized International
Distributors
This warranty is valid in the continental United States of America (USA) and
Canada only. It is valid only if purchased through an authorized Cooktek
Representative or Dealer. To receive Warranty Service in the USA, please call
CookTek’s Customer Service Department at 1 (888) 266-5835, or (312) 563-9600.
A Returns Authorization (RA) number will be issued along with instructions for
returning goods for service (or their replacement). The RA number must be written
clearly or printed on the outside of the return shipping container, or on the address
label when returning units for service. Units received without an RA number will be
(continued...)
10
Manual Apogee 10334_A USINTL
be refused at our shipping dock and may encounter a delay in service. Units must
be taken or shipped to the factory with transportation charges prepaid for service.
CookTek will provide return freight. If instead, the unit(s) is handled under
CookTek’s Advanced Replacement Program (ARP), CookTek will pay for shipping
both ways, but the unit(s) being replaced must be returned. Instructions and
alternate courses of action will be provided by Customer Service. Please save all
packaging materials for possible use in shipping. CookTek assumes no liabilities
whatsoever for any damages incurred in transit. PLEASE BE SURE TO USE
ADEQUATE PACKAGING AND A RELIABLE SHIPPING METHOD OR, IF USING
THE ARP PROGRAM, USE THE SAME BOX THE REPLACEMENT UNIT
ARRIVED IN FOR THE RETURN.
OUTSIDE THE USA AND CANADA
CookTek offers NO warranty outside of the USA and Canada. Warranty is
offered and performed at the discretion of CookTek’s local Authorized International
Distributor. Contact details can be found at www.cooktek.com/find-rep, or by calling
+1 (312) 563-9600.
For additional information and other details concerning warranty, please contact our
Customer Service Department at:
CookTek Induction Systems, LLC • www.cooktek.com
In the USA, Tel: (888) COOKTEK, 1 (888) 266-5835 • Fax: 1 (888) 266-5329
Outside the USA, Tel: +1 (312) 563-9600 • Fax: +1 (312) 432-6220
11
IMPORTANT SAFETY PRECAUTIONS
● To reduce the risk of fire, electric shock, or injury, please read, follow and save
all instructions.
● Never immerse cords, plugs, or appliance in water.
● Supervise carefully when appliance is used near children. Keep children away
from appliance when in operation.
● Always unplug appliance immediately after use and allow for cooling time if
handling, transporting, or storing.
● Do not use any accessories or attachments that are ot recommended by the
manufacturer. Use of unaproved accessories may cause injuries and void the
warranty.
● The pan on the appliance will heat continuously as long as the power is ON.
The pan will be hot and caution should be exercised when working on or near
the appliance.
● Do not let the power cord touch hot surfaces or hang over th edge of the
counter. Do not move the appliance with electric power is connected.
● Do not move the appliance while a hot pan or pan containing hot liuids is on top
of the appliance.
● To disconnect the appliance, press the POWER button and wait for the
CookTek logo to appear. You may then remove the plug from the outlet.
● Do not use the CookTek Induction Cooktop for anything other than its intended
use as described in this manual. This unit is designed to heat and cook food
and is not intened for laboratory or industrial use.
● Do not put food or unopened cans on the cooktop’s surface.
● This product may only be serviced by an authorized service agent or by
CookTek personnel. Do not attempt to open the unit or perorm service of any
kind. For service information, contact CookTek at +1 (312) 563-9600.
● This appliance must be grounded. Connet only to a properly grounded outlet.
Before operating, read grounding instructions and Electrial Installation
Requirements on page 2 of this manual. Do not use an extension cord.
● Do not overcook fook or leave appliance unattended while in use.
● In the unlikely event of a grease fire, smother flame by covering pan with a
tight-fitting lid, cookie sheet, or flat tray. DO NOT USE WATER. When the fire
is under control, turn off appliance and unplug from wall.
● Use only with inudction compatible and efficient cookware.
● Place cooktop on a level, hard, stable, non-flammable surface before use.
12
Manual Apogee 10334_A USINTL