1
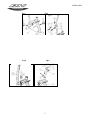
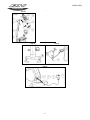
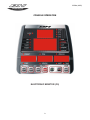
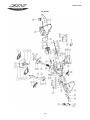
C5 Bike (H870)
BH FITNESS C5 (H- 870)
OWNER�S MANUAL
BH FITNESS
20155 Ellipse, Foothill Ranch, CA 92610
Phone: 949-206-0330, 866-325-2339 (USA & Canada)
Fax: 949-206-0013
Email: [email protected]
Web: www.bhnorthamerica.com and www.bhfitness.com
Issued: July 21, 2008 (v2)
Please save these instructions for future use
1
C5 Bike (H870)
IMPORTANT SAFETY INSTRUCTIONS
User Safety
1. Users should pass a full medical examination before they begin an exercise program. Work at the
recommended exercise level. Do not over exert yourself. If you feel any pain or discomfort, stop
exercising immediately and consult your doctor.
2. Verify that all of the parts are attached and that the nuts, bolts, pedals and bar are correctly
tightened before use.
3. Do no wear loose clothing or high heels. Tie up shoe laces.
4. The maximum weight of a user is 260 pounds (120 Kg).
5. Keep hands away from moving parts.
6. Supervise children at all times. Children are curious and vulnerable to accidents. Do not use the
unit as a toy. Close supervision is necessary when this unit is used by or near children, invalids or
disabled persons.
7. The owner is responsible for explaining safety instructions to each user.
8. The unit can only be used by one person at a time.
Bike Safety
For safety, maintain a minimum clearance around the unit. Maintain 18 inches on the front and on each
side of the unit plus 24 inches at the rear of the unit.
Install and use the unit on a flat, stable surface, with some type of protection for the floor or carpet. Do
not place it alongside walls or furniture. Check the unit before each use.
Please read all of the instructions before assembling or using this unit.
To reduce the dangers and risk of electric shock always unplug the unit from its electrical power
immediately after using, before cleaning, opening, disassembling or doing maintenance.
WARNING: To reduce the risk of fire, electric shock, injury to persons or inflicting the harm of a burn:
1. Turn all the controls to the off position, prior to removing the electrical plug from the outlet.
2. The unit should never be left unattended when plugged in. Unplug the unit from the electrical power
before leaving the room, when unused and before adding or removing parts.
3. Do not operate the unit under a blanket or pillow. Excessive heating can occur and cause fire,
electric shock, injury to persons or inflicting the harm of a burn.
4. Close supervision is necessary when this unit is used by or near children, invalids or disabled
persons.
5. Use the unit only as described in this manual. Only use attachments recommended by the
manufacturer.
6. Never operate this unit if it has a damaged electrical cord or plug. Do not operate this unit if it is not
working properly. Do not operate this unit if it has been dropped or damaged. Do not operate this
unit if it has been dropped into water. Return the unit to a service center for examination and repair.
7. Do not pull or carry the unit by the electrical cord. Do not use the cord as a handle.
8. Keep the electrical cord away from heated surfaces.
9. Never operate the unit when the air openings are blocked. Keep the air openings free of lint, hair
and the like.
10. Do not drop or insert any objects into any openings.
2
C5 Bike (H870)
11. Do not use outdoors.
12. Do not operate where aerosol (spray) products are being used or where oxygen is being
administered.
13. Connect the unit to a properly grounded 110-120V, 15 or 20 Amp dedicated outlet only.
Adapter Safety
The Adapter may have a polarized plug (one blade is wider than the other). This plug will fit only one
way into a polarized outlet. If the plug does not fully fit into the outlet, then reverse the plug. If it still
does not fit then contact a qualified electrician to install the correct outlet. Do not change the plug in any
way.
Please save these instructions.
GENERAL INFORMATION
This appliance has been tested and it complies with standard EN957 under class H.A., suitable for
semi-professional use.
3
C5 Bike (H870)
ASSEMBLY GUIDE
Fig 1
Fig 2
Fig 3
4
C5 Bike (H870)
Fig 4
Fig 5
Fig 6
Fig 7
Fig 8
Fig 9
5
C5 Bike (H870)
Fig 10
Fig 11
Fig 12
Fig 13
Fig 14
6
C5 Bike (H870)
1. ASSEMBLY INSTRUCTIONS
Take the unit out of its box and make sure that all of
the pieces are there:
The assistance of a second person is advisable for
the assembly work.
(A) Main body; (B) handlebar stem; (C) Stabiliser bar
with wheels; (D) Stabiliser bar with adjustable blocks;
(E) Monitor with handlebar; (F) Bottle Holder; (G) and
(H) Seat post covers; (I) Seat; (J) Seat base; (L) Left
pedal; (R) Right pedal; (LL) Seat height adjustment
knob;
Bag of small parts containing: (c) Self tapping screw
ST4.0x14; (d) Flatwashers M4x16; (e) Double ended
spanner (wrench); (f) Box spanner (wrench) with
screwdriver; Allen key 6 mm.; (g) Electrical
Transformer
4. FITTING THE HANDLEBAR STEM
C5 (Mod. H- 870)
Connect the two terminals (O and P) figure 5, coming
out of the handlebar stem (B) and the main body (A).
Insert the handlebar stem (B) onto the boss on the
main body (A) taking care not to pinch the cables.
Fit the bolts (a) and flat washers, as shown in figure 5,
align the handlebar stem and hand tighten.
5. FITTING THE BOTTLE HOLDER
Figure 8. Release the screws (n) on the handlebar (B),
position the bottle holder (F) and secure it by using the
screws (n) removed previously.
2. FITTING THE STABILISER BARS
6. INSTRUCTIONS FOR FITTING THE
SEAT
Rest the main body on a wad of packaging, as shown
in figure 2 (this will help with the assembly work). Take
hold of the front stabiliser bar fitted with wheels (C).
Remove the bolts (b) and their nuts and washers. Now
line up the two red dots, as shown in figure 2, and refit
the bolts (b), nuts and washers. Tighten securely.
Next, take the finish trim piece for stabiliser (G) and
rest it on the stabiliser bar with wheels (C) that you
have just assembled. Attach the trim to the bottom
using the plastic threaded screws (c) and flat washers
(d).
Next, rest the main body on a wad of packaging
material (this makes assembly easier). Take the rear
stabiliser with adjustable feet (D) and position it on the
machine’s rear stand, insert the bolts (b) with the flat
washers and nuts, tighten securely.
Then take the finish trim piece for stabiliser (G) and
rest it on the stabiliser bar with wheels (C) that you
have just assembled. Attach the trim to the bottom
using the plastic threaded screws (c) and flat washers
(d), figure 3.
Figure 9. Attach the seat (I) to the seat base (J) and
tighten the nuts (Z).
VERTICAL ADJUSTMENT.
Figure 9. In order to raise or lower the Seat post, first
loosen off the control knob (LL) on the Seat post a
little by turning it in an counterclockwise direction, pull
the control knob out and without releasing it, move the
Seat post up or down. When it is at the right height
gently release the knob and it will lock into a hole on
the Seat post. Tighten it by turning the control knob
(LL) in a clockwise direction.
HORIZONTAL ADJUSTMENT.
Figure 9. To adjust the Seat’s horizontal position,
loosen the control knob (T) on the Seat’s horizontal
bar and move the Seat, along with the bar, into the
desired position, then tighten the control knob
securely.
3. ATTACHING THE PEDALS
TILTING THE SEAT.
Figure 9. The Seat can be tilted backward or forward.
Loosen off nut (Z) located under the Seat, tilt the Seat
into the desired position and then retighten the nut
securely.
Do not adjust the tilt of the Seat while you are still
sitting on it.
Figure 4. The assembly instructions for the pedals
must be followed to the letter, fitting these incorrectly
could damage the screw thread on the pedal or the
crank. Right and left refer to the position that the user
adopts when sitting on the Seat to do the exercises.
The right-hand pedal, marked with the letter (R),
screws onto the right-hand crank (Q), also marked
with an (R), in a clockwise direction. Tighten securely.
The left-hand pedal, marked with the letter (L), screws
onto the left-hand crank, also marked with an (L), in
an counter clockwise direction. Tighten securely.
7
C5 Bike (H870)
it is level. This is achieved by screwing the adjustable
foot (U) up or down.
7. FITTING THE MONITOR
MOVEMENT & STORAGE.
C5 (Mod. H – 870).Bring the monitor (E) to the handlebar stem (B) figure
10, connect the two terminals (P / Q) coming out of the
handlebar stem (B) and the monitor (E), figure 10.
Insert the monitor (E) onto the handlebar stem (B), as
shown in figure 10, making sure not to pinch any of
the cables. Fit the bolts (s) along with the flat washers,
making sure that the handlebar is aligned correctly,
securely tighten all of the bolts on the handlebar stem
including the bolts at the base which were left hand
tight in step 4.
Figure 13. The unit is equipped with wheels (V) to
make it easier to move about. The two wheels at the
front of the unit make it easier to place the unit in any
chosen position. Store it in a dry place, preferably not
subject to changes in temperature.
LEVELLING
BH RESERVES THE RIGHT TO MODIFY THE
SPECIFICATIONS OF ITS PRODUCTS WITHOUT
PRIOR NOTICE
ELECTRICAL CONNECTION
Insert the connector (m) on the transformer (g) into the
connection hole (k) on the main body (A) (bottom, rear
of the machine) and then plug the transformer into a
120 V electric power supply, Figure 14.
Figure 12. Once the unit has been placed into its final
position, make sure that it sits flat on the floor and that
8
C5 Bike (H870)
CONSOLE OPERATION
ELECTRONIC MONITOR (C5)
9
C5 Bike (H870)
Fig 2
Fig 3
Fig 4
10
C5 Bike (H870)
By pressing the RESET key the monitor will enter
program selection status. Holding the RESET key
down for 4 seconds will reset the monitor allowing you
to select a new user by pressing the ▲/▼ and MODE
keys.
ELECTRONIC MONITOR
To give you greater control over the exercise, this
electronic monitor provides simultaneous readouts of
speed/rpm, distance, exercise time, calories burnt and
pulse rate.
CHANGING FROM ONE WORK MODE TO
ANOTHER
SWITCHING ON
Insert the jack (m) on the transformer (g) into the
connection hole (k) on the main body (A) (bottom, rear
of the machine) and then plug the transformer into a
110-120 V mains supply, Figure 14 on page 6.
Transformer (Mod. H-870: 9V, 1 Amp).
The monitor will switch on displaying the message U1
in the center of the screen. Select the user, between
U1-U4, using the ▲/▼keys and then press the MODE
key.
After which the programs available on the monitor will
appear.
If at any time during exercise you press the
START/STOP button then all of the unit’s functions will
stop. Pressing the START/STOP button again will
restart the machine.
When working with the adapter, the monitor will switch
off after the unit has been idle for 4 minutes, showing
U1 on the display.
Never leave the unit unattended when it is plugged in.
Unplug it from the electric socket when not in use.
This monitor allows you to work in 5 different modes:
Manual, Program, User, Pulse (TARGET HR) and
Steady Watt rate. In order to pass from one mode to
another press the START/STOP button to stop the
monitor, then press RESET and, with the help of the
▲/▼ buttons and MODE key, select the desired
mode.
MANUAL FUNCTION
After entering your personal data the LEDs for the
various programs will start flashing on the right hand
side of the monitor. MANUAL, PROGRAM, USER,
H.RC and WATT. Press the ▲/▼ keys to select the
manual function and press MODE. Press the START /
STOP key to start exercising and use the ▲/▼ keys to
increase or decrease the exertion level. There are 16
exertion levels. If you press the START / STOP key
while at the start screen, exercise will begin directly in
manual mode.
Important: Deposit electronic components in special
containers, Fig. 1.
Exercise level programming.If, after selecting manual mode, you press the MODE
key the level window will start flashing. By pressing
the ▲/▼ keys you can program a level for the
exercise (between 1-16 levels). Select the level and
press START / STOP to begin the exercise.
MONITOR FUNCTIONS
This electronic unit has seven function keys:
RECOVERY, FAN ON/OFF, START / STOP; RESET,
MODE; ▲; ▼. PULSE / THR is display at the top of the
monitor. The center of the screen will simultaneously
display the selected program level. There are three
windows at the bottom of the display that indicate the
SPEED / RPM; TIME; DISTANCE; WATTS /
CALORIES.
This monitor also has 1 manual program, 12 pre-set
exertion level programs; 4 user defined program (U1U4); 4 Heart Rate Control programs and 1 steady watt
rate program.
With the monitor either stopped or working the SPEED
/ RPM and TIME / CALORIES and DISTANCE /
WATT windows give alternate displays every 5
seconds.
Programming a time limit.If, after selecting manual mode, you press the MODE
key twice the time window will start flashing. By
pressing the ▲/▼ keys you can program a time limit
for the exercise (between 0-99 minutes). Select the
time and press START / STOP to begin the exercise.
The time will begin to count down until it reaches zero
and the monitor will beep several times to advise you
that you have reached the programmed value.
Programming a distance limit.If, after selecting manual mode, you press the MODE
key three times the distance window will start flashing.
By pressing the ▲/▼ keys you can program a
distance for your exercise (between 0.0 – 99.9 km).
Select the distance and press START / STOP to begin
the exercise. The distance will begin to count down
until it reaches zero and the monitor will beep several
times to advise you that you have reached the
programmed value.
STARTING THE FAN
To switch the fan on or off, press the FAN ON/OFF
key.
Whenever you finish your exercise, make sure that the
fan is switched off.
11
C5 Bike (H870)
central area of the display. Select the desired level for
this first stage using the ▲/▼ keys and then press
MODE. Repeat this procedure to program all sixteen
stages of the user program. Press and hold the MODE
key down to exit the profile set up. Press START /
STOP to start the exercise.
To program time, distance, calories and/or pulse rate,
go through the following procedure: Once you have
defined the user program: Press the ▲/▼ keys to
select the time. Press the MODE key to program the
distance. Press MODE again to program the calories.
Press the MODE key one last time to program the
pulse rate. Press START / STOP to start the exercise.
Programming a calorie limit.If, after selecting manual mode, you press the MODE
key four times the calorie window will start flashing.
By pressing the ▲/▼ keys you can program the
calories for the exercise (between 0-9990 Cal.). Select
the calories and press START / STOP to begin the
exercise. The calories will begin to count down until
they reach zero and the monitor will beep several
times to advise you that you have reached the
programmed value.
Programming the HEART RATE.If, after selecting manual mode, you press the MODE
key five times the PULSE window will start flashing.
By using the ▲/▼ keys you can program the heart
rate for the exercise (between 30-240 bpm). Select the
heart rate and press START / STOP to begin the
exercise. If the heart rate is equal to or higher than the
target value, the monitor will beep several times to
warn the user to pedal more slowly or reduce the
exertion level.
HEART RATE CONTROL PROGRAMS
Calculate your maximum Heart Rate before starting to
exercise. Do not exceed 85% of the maximum heart
rate.
•
PROGRAM FUNCTION
After entering your personal data the LEDs for the
various programs will start flashing on the right hand
side of the monitor. MANUAL, PROGRAM, USER,
HRC and WATT. Press the ▲/▼ keys to select the
PROGRAM function and press MODE. Press the
▲/▼ keys to select the program graph (1-12) that you
wish to use and then press the ENTER key. Press
START / STOP to start the exercise. By default the
jump to the next column occurs every 328 feet (0.1
km) travelled.
To program time, distance, calories and/or pulse rate,
go through the following procedure: Once the program
has been selected and before pressing the START /
STOP key, press the MODE key to program the time
using the ▲/▼ keys. In this case the time will be
divided into sixteen stages. Press the ENTER key to
program the distance. Press ENTER again to program
the calories. Press the ENTER key one last time to
program the pulse rate. Press START / STOP to start
the exercise.
You can vary the exertion level during the exercise by
pressing the ▲/▼ keys.
The maximum number of heartbeats that a person
should not exceed is referred to as the maximum
Heart Rate and this value drops with age. A
simple formula to calculate this is to subtract your
age, in years, from the number 220. The
maximum Heart Rate should be kept between
65% and 85% for correct exercise; it is not
advisable to go above 85%.
1. If you are 30 years of age, your maximum
heart rate is 220 – 30 = 190 BPM (Beats Per
Minute).
2. 190 x 0.65 = 123 BPM.
3. 190 X 0.85 = 161 BPM. Do not exceed 85%.
•
For safety reasons it is advisable to exercise at
below 85% of the maximum heart rate.
After entering your personal data the LEDs for the
various programs will start flashing on the right hand
side of the monitor. MANUAL, PROGRAM, USER,
HRC and WATT. Press the ▲/▼ keys to select the
H.R.C. function and press MODE.
Next the Male ♂ / Female ♀ symbols will appear, Select
using the ▼▲ keys and press MODE to confirm. Then
Age will appear, select using the ▼▲ keys (between 1
to 99) and press MODE to confirm. It will now ask for
your height, select using the ▼▲ keys between 40 to
78 inches (100 to 200 cm) and press MODE to confirm.
Weight will appear, select using the ▼▲ keys (between
44 to 330 lb (20 to 150 kg) and press MODE to confirm.
Select the target heart rate for the exercise. Use the
▲/▼ keys to select the desired option (55%, 75%
90% [DO NOT use 90%, DO NOT exceed 85%] or
THR) and press the MODE key. The first three
USER PROGRAM
After entering your personal data the LEDs for the
various programs will start flashing on the right hand
side of the monitor. MANUAL, PROGRAM, USER,
H.RC and WATT. Press the ▲/▼ keys to select the
USER function and press MODE. The first column of
the exercise level will start flashing to the left of the
12
C5 Bike (H870)
represent the percentage with respect to maximum
heart rate (220-age) and the fourth is used to specify
the target heart rate manually. In the first three cases,
the lower window on the display (TARGET H.R.) will
show you the calculated value for your maximum heart
rate level. If you choose THR then you should use the
▲/▼ keys to select the desired heart rate and then
press ENTER. Press START / STOP to start the
exercise. The exertion level will adjust automatically in
accordance with the selected hart rate value. If the
pulse rate is below the target value then the exertion
setting will increase by one level every 30 seconds
until it reaches the maximum 16. If the pulse rate is
above the target value the monitor will give out
warning beeps and reduce the exertion settings by
one level every 15 seconds until it reaches the
minimum 1. If the pulse rate still stays above the target
value for more than 30 seconds the monitor will beep
and stop in order to protect the user.
To program time, distance, calories and/or pulse rate,
go through the following procedure: Once the heart
rate program has been selected and before pressing
the START / STOP key, press the ENTER key to
program the time limit using the ▲/▼ keys. Press
ENTER again to program the distance. Press the
ENTER key one last time to program the calories.
Press START / STOP to start the exercise.
Your hands must be placed on the pulse sensors (R)
when using these programs.
HAND-GRIP PULSE MEASUREMENT
INSTRUCTIONS - USE
STEADY WATT RATE PROGRAM
TEST MEASUREMENTS: FITNESS
PULSE Hand-grip
On this model the pulse rate is measured by placing
both hands on the sensors (R), located on the
handlebar, as shown in Figure 2.
When both hands are placed on the sensors the heart
symbol on the right-hand side of the screen, marked
PULSE, will begin to flash and after a few seconds a
heart rate reading will be displayed.
If both hands are not placed correctly as shown in
Figure 3 then the pulse function will not work.
If a «P» appears on the screen or the heart symbol
does not flash, make sure that both hands are placed
correctly on the sensors.
TELEMETRIC PULSE RATE
The monitor is equipped to receive signals from a
telemetric pulse measurement system.
The system comprises of a receiver (D) and a
transmitter (chest band) Fig 4.
This telemetric pulse rate system takes
precedence over the Hand-grip pulse rate system
when both are used together.
See telemetric pulse rate instruction at the end of this
manual.
This electronic device is equipped with a recovery test
function. This offers you the advantage of being able
to measure how long it takes your heart rate to
recover after having finished the exercise. Upon
finishing the exercise leave your hands on the pulse
sensors (R) and press the «Recovery» button, this will
start a one minute countdown. Only the Time and
Pulse rate function read-outs will remain displayed.
The electronic device will measure your pulse rate
during this minute. The heart rate recovery time will be
displayed on the Heart rate line.
If, at any time during this minute, you decide to
abandon this test then press the «Recovery» button
and this will take you back to the main screen.
When the minute is up, the electronic device will work
out the difference and your fitness rating will be
displayed up on the screen: «F1, F2,..., F5, F6»;
where «F1» is the best (fitness «Excellent») and «F6»
the worst (fitness «Very Poor»).
Pressing the RECOVERY button will take you back to
the main screen, where the functions will be in the
same mode as when the test began.
The comparison between the worked heart rate and
the recovery heart rate provides a fast, simple method
of gauging how fit you are. Your fitness rating is a
After entering your personal data the LEDs for the
various programs will start flashing on the right hand
side of the monitor. MANUAL, PROGRAM, USER,
HRC and WATT. Press the ▲/▼ keys to select the
WATT function and press MODE. By pressing the
▲/▼ keys you can program the watts to produce for
the exercise (between 10-350 Watt). Select the watts
and press START / STOP to begin the exercise. The
exertion level for the exercise is self adjusting based
on the speed and number of watts selected. Three
symbols will help you with your training sessions:
▲ – Within the work margin, this indicates that the
speed is too high and you should slow down.
▼ – Within the work margin, this indicates that the
speed is too low and you should speed up.
------- This indicates that the watts being produced are
outside the work limit (either too high or too low) so
you should speed up or slow down accordingly. The
monitor will beep several times to indicate this status.
If the situation continues for more than three minutes,
the monitor will give six beeps and then switch itself
off, resetting the watt value back to zero.
13
C5 Bike (H870)
guideline that shows you how fast your heart recovers
after physical exertion. If you exercise regularly then
you will see your fitness rating improve.
The test does not work unless you have both hands
placed on the sensors (R) (Hand-grips). In this case
the message «F6» will appear on the screen at the
end of the test.
TROUBLESHOOTING GUIDE
Problem: The display comes on but only the Time
function works.
Solution:
a.- Make sure that the connection cable is connected.
Problem: Display segments of a function read-out are
not visible or error messages for a particular function
appear.
Solution:
a.- Finish the exercise or unplug it from the 110-120 V
electrical supply for 15 seconds and then plug it back
in.
b.- If the above steps do not help then replace the
electronic monitor.
Problem: The monitor does not switch on.
Solution:
a.- Check the 110-120 V electrical connection
b.- Check the output connection from the transformer
to the machine.
C5 (Mod. H870) Transformer 9V, 1 Amp.
c.- Check the cable connections described in the
assembly section.
Avoid leaving the electronic monitor in direct sunlight
as this might damage the liquid crystal display.
Similarly, do not expose it to water or impact.
BH RESERVES THE RIGHT TO MODIFY THE
SPECIFICATIONS OF ITS PRODUCTS WITHOUT
PRIOR
NOTICE
14
C5 Bike (H870)
INSTRUCTIONS FOR THE TELEMETRIC PULSE SENSOR
USE OF THE CHEST BAND
(Pulse sensor)
The chest band (optional extra) transmits the pulse rate by contact with the chest and sends signal to the display
clock.
PRECAUTION. Before beginning any exercise program, you should consult to your doctor and tell him about the
intensity of the exercise. If you use a pacemaker do not use the band until you have consulted with your doctor.
ASSEMBLY AND USE OF THE CHEST BAND
The key to flawless heart rate measure-ment is putting the transmitter on correctly as described below.
1. Attach the chest transmitter (E) to the elastic belt (F).
2. Adjust the strap (F) to fit tightly and comfortable.
3. Secure the strap (F) around your chest, below the breasts and lock the buckle.
4. Without detaching the elastic strip (F), pull the transmitter away from your body exposing the two grooved
areas that are located on the inside of the transmitter. Wet the grooved electrode areas with saliva, contact lens
solution or any other saline solution. Return to its original position against your skin with the Polar text in a central
up-right position.
5. After wetting the electrodes, do not slide the transmitter around on your body as this has the effect of drying the
electrodes.
It is recommend to wear the transmitter against bare skin to ensure successful operation. If a transmitter is worn
over a shirt, the shirt has to be well wetted under the electrode area to ensure proper conductivity.
Wear the band as high as possible just below the breast bone with the transmitter in the centre and the electrode
contacts flat against the skin. Doing this correctly assures a correct reading of the heart beat.
15
C5 Bike (H870)
HOW TO IMPROVE CONDUCTIVITY
The technology used for the chest transmitters is based on measuring ECG signals operation, it is important for
successful heart rate measurement that a proper electrical connection between the skin and the electrodes of
Polar Transmitter can be established and maintained during exercise. Sometimes, dry skin or hairy chest can
create a non-conductive layer between the electrodes and chest which prevents proper and reliable operation of
transmitter.
Conductivity can be easily improved through properly wetting properly the electrodes by water, saliva, contact
lens solution or other saline solution.
HOW TO GET A PROPER ECG SIGNAL FOR TRANSMITTER
It is possible, however, that despite the above mentioned recommendation, the transmitter does not work well due
to a slightly divergent ECG signal. ECG signal of some human beings can be so weak or the optimum location
may vary that transmitter has to be moved slightly to left or right in order to get sufficient voltage difference for the
proper operation of transmitter. Weak ECG signal can result from heart diseases, heart surgeries or natural
characteristic of heart and the location of the body potential vectors.
Important. Do not bend or stretch the electrode strips as this may permanently damage sensitive internal
electronic components.
Recommendation. If you have a sunken chest, the rubber electrodes may not make a good contact without
additional pressure and the result will be intermittent readings. Adding a second chest band on the transmitter can
solve this problem.
Please remember that this pulsometre, just as all devices that do not use cables, can it be affected by
electromagnetic interference. These can cause incorrect readings on your pulsometre.
Sources of interference or situations that can cause incorrect readings are:
- Your monitor picks up signals in a radius of approximately 30 inches (75 centimetres). If you are carrying out
exercises too near to another person that is wearing a pulsometre, your screen can pick up their signal. To avoid
maintain the appropriate distance.
- Television set, computers, cellular telephones, lines of high tension and electric motors can produce
Interference.
If you observe an erratic reading move away from the interference source. Your pulsometre will then return to
work correctly.
It is important to place the chest band correctly to obtain a correct measure.
CARE AND MAINTENANCE OF THE TRANSMITTER
-To maintain proper level of operation, the transmitter has to be cleaned regularly after use with a mild soap and
water solution. If you, however, want to disinfect your transmitter after use, a chlorine solution similar to that
approved for pool swimming may be used. Please avoid untested disinfecting compounds, they may cause
permanent damages to the transmitter. After disinfecting, transmitter should be cleaned by water or soap solution
to avoid allergic reactions on skin.
- After using, clean and dry your unit carefully. A weak signal can be due to dirt.
- Do not expose your band to excessive heat or cold.
- Do not leave your unit exposed to direct sunlight or in your car
- Keep your unit in a well ventilated place.
Note. Never use abrasives and other chemicals as they may cause permanent damages to the electrodes
decreasing conductivity or durability.
Storing of transmitter. It is highly recommended to store transmitter in cool and dry place to maximise the battery
life. Before storage all moisture should be wiped off.
FREQUENTLY ASKED QUESTIONS AND ANSWERS
Question 1: Heart rate readings take a long time to appear.
Answer 1:
If the heart rate readings start appearing after you start perspiring, this is an indication that the transmitter
electrodes weren’t initially wetted properly prior to commencing the exercise.
Question 2: If there is no heart rate reading, please check the following things:
16
C5 Bike (H870)
Answer 2:
a) The transmitter should be placed on the rib cage just below the breasts with the word “Polar” facing out,
reading right side up.
b) With the transmitter in position and reasonably tight around the chest of the user, pull the transmitter away from
the body and wet the electrodes with water, saliva, contact solution or other saline solution.
c) If the readings still fail to appear, please have someone else try the transmitter on and see if that person can
get it to work.
d) The following medical conditions may create problems:
•Premature ventricular contractions, tachy-cardia bursts, and arrythmias can result in strange or no heart rate
readings.
•If the customer has an implanted medical device such as a pacemaker, you must consult your physician prior to
using the Polar Transmitter.
e) The ECG signal perceived by transmitter is too weak for successful measurement. Heart diseases, heart
surgeries or natural characteristics of a heart may result in weak ECG signals. In many cases, where a weak ECG
signal is the reason for problems, the reliable operation can be obtained by moving transmitter a little bit to the left
or right. Remember to rewet electrodes.
f) Electromagnetic interference. Polar transmission can be affected by high power transmission lines or other such
devices that generate powerful magnetic fields located in the area of equipment usage. If someone of your
associates has a Polar heart rate monitor, if possible, borrow it for a while to check that unit works properly in the
area of exercise equipment. If it does not and it works outside or another area of the house, the location is very
difficult for wireless heart rate measurement and the equipment should be moved to another location.
g) Receiver has broken down for some reason.
Question 3: Irregular heart rate reading
Answer 3:
a) The most common reason for irregular readings especially at the beginning of exercise session is that there is
no proper connection between skin and the electrodes of transmitter. To ensure a proper connection, electrodes
should be wetted prior to exercising.
b) Elastic strap is too loose allowing ransmitter to move during exercise.
c) Ensure that there is no anyone else wearing a transmitter in the reception area of your receiver. If there are
other transmissions close to you crosstalk may appear, unless you are using the coded Products Polar products.
d) Pacemaker and other implanted devices may change the electrical characteristics and operation of heart so
that transmitter detects several beats instead of one beat.
e) Some people have a reversed ECG signal compared to normal a ECG signal possibly causing a transmitter to
send two pulses for each heart beat. Please turn transmitter upside-down.
f) Interferences. Electrical equipment such as monitors, motors, LED displays, transformers switches, cellular
phones and etc. generate electromagnetic noise which may cause missing or extra pulses resulting in incorrect
heart rate reading
17
C5 Bike (H870)
C5 (H-870)
18
C5 Bike (H870)
WARRANTY
USA Warranty
Warranties may vary in other countries. See your local BH Fitness Dealer.
WARRANTY SUBMITTAL
Please have the following information available when contacting your dealer or BH for warranty
support.
• A copy of the dated purchase receipt or credit card statement.
• An explanation the problem/malfunction or parts that are missing or damaged.
• Owner’s name, address and phone number.
• Model (C5 Bike) and Serial Number (when available).
Forward your information to BH North America by
FAX: (949) 206-0013
E-mail: [email protected]
Mail to: 20155 Ellipse, Foothill Ranch, California 92610, USA
For troubleshooting assistance or to confirm your claim please phone:
(949) 206-8152
(800) 475-7899 (USA only)
(866) 325-2339 (USA & Canada)
BH FITNESS extends the following exclusive, limited warranty, which shall apply only to the use of the
device in the home, or Light commercial facilities (up to six hours per day for non-membership
facilities). Any other use of the device shall void this warranty.
FRAME – Lifetime (Home Warranty)
BH Fitness warrants the Frame against defects in workmanship and materials for Lifetime from the date
of original purchase, so long as it remains in the possession of the original owner for home use.
PARTS – 5 Years (Home Warranty)
BH Fitness warrants all original parts against defects in workmanship and materials for a period of Five
years from the date of original purchase, so long as the device remains in the possession of the original
owner for home use.
LABOR – 1 Year (Home Warranty)
BH Fitness shall cover the labor cost for the repair of the device for a period of One year from the date
of original purchase, so long as the device remains in the possession of the original owner for home
use. Labor warranty does not include the travel time and or expense that may result from the unit being
outside of the seller or repair technician’s normal service zone.
19
C5 Bike (H870)
EXCLUSIVE REMEDY
The exclusive remedy for any of the above warranties shall be repair or replacement of defective parts,
or the supply of labor to cure any defect, provided that labor shall be limited to One year. All labor shall
be supplied by the local retailer and the product must be located within the retailer’s service area.
Products located outside the retailer’s service area will not be covered by the labor warranty.
EXCLUSIONS AND LIMITATIONS
This warranty applies only to the original owner and is not transferable. This warranty is expressly
limited to the repair or replacement of a defective Frame or defective part and is the sole remedy of the
warranty. The warranty does not cover normal wear and tear.
BH FITNESS expressly disclaims all other warranties, express or implied, including but not limited to all
warranties of fitness for a particular purpose or of merchantability. This warranty gives you specific legal
rights and your rights may vary from state to state.
WARRANTY REGISTRATION
Your warranty card must be completed and sent to BH FITNESS before a warranty claim can be
processed.
BH RESERVES THE RIGHT TO MODIFY THE PRODUCTS SPECIFICATIONS WITHOUT PRIOR NOTICE
Please save these instructions for future use
20