1
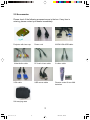
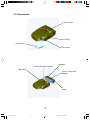
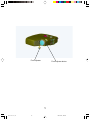
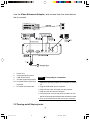
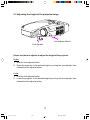
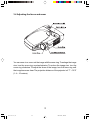
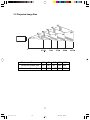
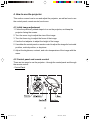
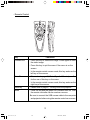
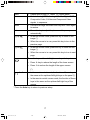
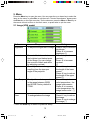
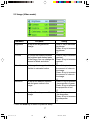
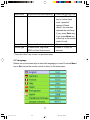
Table of Contents
1. Safety Instructions
2. The Projector
○
○
○
○
○
○
○
○
○
○
○
○
○
○
○
○
○
○
○
○
○
○
○
○
○
○
○
○
○
○
○
○
○
○
○
○
○
○
○
○
○
○
○
○
○
○
○
○
○
○
○
○
○
○
○
○
2
2.1 Features
2
2.2 Accessories
3
2.3 Appearance
4
3. Setting up the Projector
○
○
○
○
○
○
○
○
○
○
○
○
○
○
○
○
○
○
○
○
○
○
○
6
3.1 How to connect the projector
6
3.2 Turning on/off the projector
8
3.3 Adjusting the altitude of projected images
9
3.4 Adjusting the focus and zoom
10
3.5 Projected image size
11
4. How to use the Projector
○
○
○
○
○
○
○
○
○
○
○
○
○
○
○
○
○
○
○
○
○
○
12
4.1 Initial image adjustment
12
4.2 Control panel and remote controller
12
Control Panel
12
Remote Controller
5. Menu
○
○
○
○
○
○
○
○
14
○
○
○
○
○
○
○
○
○
○
○
○
○
○
○
○
○
○
○
○
○
○
○
○
○
○
○
16
5.1 Image (VGA mode)
16
5.2 Image (Video mode)
17
5.3 Display (VGA mode)
18
5.4 Display (Video mode)
19
5.5 Audio
20
5.6 Management
21
5.7 Language
6. Maintenance
22
○
○
○
○
○
○
○
○
○
○
○
○
○
○
○
○
○
○
○
○
○
○
○
○
○
○
○
○
○
○
6.1 Replacing the lamp
7. Appendix
○
○
○
○
23
23
6.2 Cleaning lens
MX3 manual.p65
1
23
○
○
○
○
○
○
○
○
○
○
○
○
○
○
○
○
○
○
○
○
○
○
○
○
○
○
○
○
24
7.1 Common problems & trouble-shooting
24
7.2 Specifications
26
1
02-12-17, 16:39
1. Safety instructions
Before you use the projector, please read this manual thoroughly and
comply with the safety instructions hereunder. Improper use may cause
fire, electric shock, injuries, or reduce the life of your projector.
Warning: Ensure the projector is grounded properly by connecting the
power cord to a grounded AC outlet. Do not defeat the safety
purpose of the grounding type plug.
Warning: Do not cover the lens when the lamp is on.
Warning: To protect your eyes, please do not look at the projector’s
light source.
Warning: To replace the lamp, please turn off and unplug the projector
first, then wait for 1 hour before replacing the lamp. Please
refer to page 23, “Replacing the lamp”, for operating
procedures.
Warning: Use the power cord that comes with your projector. Use the
grounded jack for safety.
Warning: Do not block the openings around the projector for safety.
Warning: Do not place any liquids on top of the projector. The projector
can be damaged if wet.
Warning: Do not place the projector in excessively warm or humid
areas, and avoid direct sunshine.
Warning: To avoid electric shock, do not dismantle the projector by
yourself if the projector malfunctions for any reason.
Warning: Be careful when you move or carry the projector to prevent it
from dropping.
MX3 manual.p65
2
02-12-17, 16:39
2. The projector
2.1 Features
Receives signals with resolution up to 1280x1024,75 Hz. To ensure the output quality, please adjust the setup of your computer display card to be less
than or equal to 1280x1024.
Compact size — only 3.5 lbs.
Incorporates TI single chip 0.7” DLPTM technology.
Users may replace 150W (VIP R150/P16) lamp easily.
Compatible with Mac/IBM PC.
Compatible with NTSC/NTSC4.43/PAL/PAL-M/PAL-N/HDTV.
Compatible with most interfaces comprising Y,Cr,Cb, S-Video,RCA Video/
Audio,HDTV(1080i,720P).
Fully functional remote control that can also be used as a mouse.
DVI connector can be connected to digital or standard image signals.
Soft carrying case.
MX3 manual.p65
3
02-12-17, 16:39
2.2 Accessories
Please check if the following accessories are in the box. If any item is
missing, please contact your dealer immediately.
Projector with lens cap
Power cord
M1DA-VGA+USB cable
Video/Audio cable
PC Audio in/out cable
S-video cable
VGA cable
USB mouse cable
Remote control & two AAA
batteries
Soft carrying case
MX3 manual.p65
4
02-12-17, 16:39
2.3 Components
Control panel
Zoom Ring
Lens cover
Focus Ring
Speaker
Infrared Remote Receiver
Main Body
Video Enhanced
Adapter
Screw
MX3 manual.p65
5
02-12-17, 16:39
Foot Adjuster
MX3 manual.p65
6
Foot Adjuster button
02-12-17, 16:39
3. Setting up the projector
3.1 How to connect the projector
Depending on your purpose, you can select any of the following connection
methods.
1) For displaying data only
Find the M1DA-VGA+USB cable; connect M1DA connector to the main body;
and connect the VGA and USB connectors to the computer. Take note that with
such a connection, the video and audio functions will not be available.
2) For playing video with audio effects
MX3 manual.p65
7
02-12-17, 16:39
Use the Video Enhanced Adapter, and choose from the terminals below to connect.
1.
2.
3.
4.
5.6
7.
Power cord
VGA signal input terminal
USB mouse control
S-Video signal input terminal
Composite Video signal input
terminals
PC Audio In/Out terminals
Notes
Connecting to a computer
1. Make sure that both projector and computer are turned
off.
2. Plug the USB cable into the computer.
3. Plug one end of the VGA cable into the projector.
4. Plug the other end into the computer.
5. Plug the power cord into the power connector on the
side of the projector,and plug the other end into an outlet.
6. Turn on the projector first, then turn on the computer.
3.2 Turning on/off the projector
MX3 manual.p65
8
02-12-17, 16:39
Turning on the projector
1. Remove the lens cover.
2. Make sure the signal cables are connected.
3. Plug-in the power cord; the LED indicator will flash slowly.
4. Press the Standby key on the remote control or control panel to turn on the
projector. The LED indicator stays on steady at this time.
5. The message “Warming up! Please wait.” appears on the screen of the
projector. Please wait for 20 seconds or press the Menu key. The projector
will detect the input signal source automatically.
6. If the message “No Signal!” appears on the screen, please check if the
signal source has been activated or if the signal cables have been connected.
Note When power is on, the projector will automatically detect if the projector is
overheated internally. If yes, the LED indicator flashes rapidly and the fan cools
down automatically after 8 seconds. The Standby key does not function under
this situation.
Turning off the projector
1. Press the Standby key to power off the projector lamp.
2. When you press the Standby key, you will see the message “Press Standby
Key again to power off lamp”. Then you can press the Standby key to shut
down the projector, or this message will disappear automatically after 5
seconds.
3. As soon as the lamp is off, the LED indicator flashes rapidly. The Standby
key does not function at this time.
Note: Please wait at least 2 minutes before you turn on the projector again.
You should turn on the projector only after the LED indicator flashes slowly.
4. Unplug the power cord.
Caution To protect the lamp, please do not pull out the power cord right after
the lamp is off. Please wait at least 2 minutes from the time the fan stops.
MX3 manual.p65
9
02-12-17, 16:39
3.3 Adjusting the height of the projected image
Foot Adjuster Button
Foot Adjuster
Please use the foot adjuster to adjust the height of the projector.
Higher
1. Hold the foot adjuster button.
2. Raise the projector to the desired height by moving the foot adjuster; then
release the foot adjuster button.
Lower
1. Hold the foot adjuster button.
2. Lower the projector to the desired height by moving the foot adjuster; then
release the foot adjuster button.
MX3 manual.p65
10
02-12-17, 16:39
3.4 Adjusting the focus and zoom
You can zoom in or zoom out the image with the zoom ring. To enlarge the image
size, turn the zoom ring counterclockwise. To reduce the image size, turn the
zoom ring clockwise. To adjust the focus of the image, turn the focus ring until
the image becomes clear. The projection distance of the projector is 4’7” ~ 32’9”
(1.4 ~ 10 meters).
MX3 manual.p65
11
02-12-17, 16:39
3.5 Projected Image Size
Distance to Screen
Minimum Screen Size
Maximum Screen Size
MX3 manual.p65
12
55”
35”
41”
78”
49”
58”
157” 236” 393”
99” 149” 248”
116” 174” 290”
02-12-17, 16:39
4. How to use the projector
This section covers how to use and adjust the projector, as well as how to use
the control panel, remote control, and menu.
4.1 Initial image adjustment
1 Follow the previously stated steps to turn on the projector; and keep the
projector facing the screen.
2 Turn the zoom ring to adjust the size of the image.
3 Turn the focus ring to adjust the focus of the image.
4 Use the foot adjuster to adjust the height of the image.
5 Use either the control panel or remote control to adjust the image for horizontal
position, vertical position, or keystone.
6 Adjust the brightness, contrast, and color temperature of the image with the
menu.
4.2 Control panel and remote control
There are two ways to use the projector – through the control panel and through
the remote control.
- Control Panel
MX3 manual.p65
13
02-12-17, 16:39
LED Indicator
When the projector is turned on, the LED indicator flashes. Press the Standby
key to display the image. After a few moments, the LED indicator stays on
steady.
If the LED indicator flashes quickly, the projector is most likely in an abnormal
condition. Possible reasons include:
a. If the fan is in an abnormal condition, the message “Fan lock
error occurred, Projector shutting down!” appears on the screen.
b. If the temperature becomes abnormal, the message “Thermal
error occurred, Projector shutting down!” appears on the screen.
The LED indicator flashes quickly when you start the shutdown process.
Standby
Please refer to page 8, “Turning on/off the projector”.
Enter/Sync
This key works as the Sync key under normal condition.
This key works as an Enter key in the menu.
Menu
Press this key to open the menu. Press again to close the menu.
If you do not choose any item after opening the menu, the menu will
automatically close after 20 seconds.
Keys
You can use the up and down keys to select menu options.
Usually the down key works as a Source key. You can also press this key
to select Analog RGB, Analog Y Pb Pr, Digital RGB, Composite Video, S-Video
and Component Video signals in sequence.
Keys
On the menu, press the Enter key and then the right arrow key to increase
the setup value; or the left arrow key to reduce the setup value.
MX3 manual.p65
14
02-12-17, 16:39
- Remote Control
Key
Freeze/Esc/L
Enter/R
Stand By
Mode
MX3 manual.p65
Functions
Press this key to freeze the image. Press again to clear
the static image.
Press this key to quit the menu if the menu is on the
screen.
In the remote-control mouse mode, this key works as the
left key of the mouse.
Please check page 13, “Enter/Sync” of “Control panel”,
for the use of this key on the menu.
In the remote-control mouse mode, this key works as the
right key of the mouse.
Please refer to page 8, “Turning on/off the projector”.
Press this key and the green LED indicator turns on. Then
the remote controller can be used as a mouse.
• Be sure to connect the USB mouse cable to the computer
and projector before using the remote control as a mouse.
15
02-12-17, 16:39
Menu
Source
Blank
Please refer to page 13, “Menu” of “Control panel”.
Select Analog RGB, Analog Y Pb Pr, Digital RGB,
Composite Video, S-Video and Component Video
signals in sequence.
Convert the image into blank and fully blue. Press again
Pg.Up
to restore.
Press this key to adjust the phase and frequency
automatically.
In remote control mode, press this key to zoom in the
image (*).
When the mouse is in use, press this key to turn to the
previous page.
Pg.Dn
In remote control mode, press this key to zoom out the
Auto
image (*).
When the mouse is in use, press this key to turn to next
page.
Press this key and then left/right arrow keys for keystone.
Press key to reduce the length of the lower screen.
Press to reduce the length of the upper screen.
(*)
In the remote control mode, the function of these keys is
the same as the up/down/left/right keys on the panel (*).
In the remote-control mouse mode, the function of these
keys is the same as the up/down/left/right key of the
mouse.
* Press the Auto key to return to previous setup.
MX3 manual.p65
16
02-12-17, 16:39
5. Menu
Press the Menu key to open the menu. You can press the up or down key to select the
items on the menu; or press Esc to quit the menu. To enter the submenu, please press
the Enter key or the right arrow key. On the submenu, press the Menu or Esc key on
the remote control to return to the main menu; or press twice to quit the menu.
5.1 Image (VGA mode)
Submenu
Brightness
Contrast
Keystone
Color Temp
Zoom
Purpose
Using
To adjust the brightness of image Press key to decrease
brightness.
Press to increase
brightness.(*)
To control the balance between
Press key to decrease
the brightest and darkest parts
contrast.
of the image. You can change
Press to increase
the amount of black and white
contrast.
by adjusting contrast.
(*)
To modify the biased image
Press key to reduce
resulting from the improper
the length of the lower
angle of the projector.
screen.
Press key to reduce
the length of the upper
screen.(*)
To adjust the color temperature
Press key to lower
in the range between 6500K
color temperature; the
and 9200K. Factory default is
image looks warmer.
7700K.
Press to increase
color temperature; the
image looks cooler. (*)
To enlarge/reduce the image
Press key to reduce
the image.
Press key to enlarge
the image (*)
* Press the Auto key to return to previous setup.
MX3 manual.p65
17
02-12-17, 16:39
5.2 Image (Video mode)
Submenu
Brightness
Contrast
Color Hue
Saturation
Sharpness
Purpose
Using
Press key to decrease
image.
brightness.
Press key to increase
brightness.
(*)
To control the balance between
Press key to decrease
the brightest and darkest parts
contrast.
of the image. You can change the Press key to increase
amount of black and white.
contrast.
(*)
To change the image from black Press key to decrease
& white to saturated colors.
the amount of colors in
the image.
Press key to increase
the amount of colors in
the image.
(*)
To adjust the balance between
Press key to increase
red and green colors in the
the proportion of green.
image.
Press key to increase
the proportion of red.
(*)
To adjust the sharpness of the
Press key to decrease
image.
the sharpness.
Press key to increase
the sharpness.
(*)
To adjust the brightness of
* Press the Auto key to return to previous setup.
MX3 manual.p65
18
02-12-17, 16:39
5.3 Display (VGA mode)
Submenu
Frequency
Phase
Purpose
To adjust the frequency of
data display to be the same
as the frequency of display
card of computer. Use this
function to correct the
flickering vertical lines
shown in the image.
Using
Press key for
To synchronize the signals of
Press key for
images and display cards. Use
this function to correct
adjustment (*)
adjustment (*)
inconsistent or flickering images. Press key to move
V Position
To adjust the vertical position of
the screen.
down the image.
Press key to move up
the image.
(*)
H Position
To adjust the horizontal position
of the screen.
Press key to move
the screen to left.
Press key to move
the screen to right.
(*)
Proportion
To select the aspect ratio of the
screen — 16:9 or 4:3.
Press key for
selection.
* Press the Auto key to return to previous setup.
MX3 manual.p65
19
02-12-17, 16:39
5.4 Display (Video mode)
Submenu
Keystone
Purpose
To modify the biased image
Using
Press key to reduce
resulting from the improper
angle of the projector.
the length of the lower
screen.
Press key to reduce
the length of the upper
screen.
(*)
Color Temp
To adjust the color temperature
in the range between 6500K
and 9200K. Factory default is
7700K.
Press key to lower
color temperature,the
image looks warmer.
Press to increase
color temperature; the
image looks cooler.
(*)
Proportion
To select the aspect ratio of the
screen — 16:9 or 4:3.
Press key fo
r selection.
* Press the Auto key to return to previous setup.
MX3 manual.p65
20
02-12-17, 16:39
5.5 Audio
Submenu
Volume
Purpose or Using
Press key to turn down the volume.
Press key to turn up the volume.
(*)
Treble
Press key to decrease the volume of treble.
Press key to increase volume of treble.
Bass
(*)
To adjust the medium/low frequency of audio.
Press key to decrease bass.
Press key to increase bass.
Mute
(*)
Select ”Yes” for Mute (Press right key).
* Press the Auto key to return to previous setup.
MX3 manual.p65
21
02-12-17, 16:39
5.6 Management
Submenu
OSD Location
Purpose
Using
To display the position of the
Press key for
menu on the screen.
Projection
(Projection before the
Screen)
selection (*)
Press key for
selection (*)
Default
(Projection behind the
Screen)
If you select this function, the
projector will reverse images
from left to right or vice versa.
Thus the image can be
projected from behind onto the
semi-transparent screen.
Lamp Remind
To remind you of the number of
hours that the lamp has been lit
up. This function allows you to
set up the warning message to
be displayed 30 hours before the
Press key for
selection.
end of the lamp life.
MX3 manual.p65
22
02-12-17, 16:39
Lamp Reset
To recount hours after replacing
the lamp.
Press the right key. The
message “Press Enter
key to confirm lamp
reset operation!”
appears. Please
check if the user has
replaced the new lamp.
If yes, press Enter key.
If not, press Menu key
or Esc key on the remote
control to quit.
Reset All
To return to the factory default.
Press the right key.
Source Type
To select RGB, Digit RGB,
Press key for
YPbPr or Auto Scan source.
selection.
* Press the “Auto” key to return to previous setup.
5.7 Language
Please use up and down keys to select the language you need. Press the Menu
key or Esc key on the remote control to return to the main menu.
MX3 manual.p65
23
02-12-17, 16:39
6. Maintenance
6.1 Replacing the lamp
30 hours before the end of the lamp’s life time, the warning message “Lamp life
time is up! Replacement suggested!” will display on the screen. Please replace
the lamp immediately.
Steps:
1. Power off the projector.
2. Unplug the power cord.
3. Cool down the projector for at least 30 minutes.
4. Use a screwdriver to remove the shell and screws on the lamp.
5. Remove lamp.
Remove screws from the lamp
cover with a screwdriver; and
then press down the lock to open
the cover.
Remove screws from
the lamp holder, and
pull out the handle to
replace the lamp in
the holder.
6.2 Cleaning the lens
Please follow these steps to clean the projector lens:
1 Pour an adequate amount of cleanser to a piece of clean soft material. The
lens will be damaged if you use cleansers containing particles, solvent, or
other inferior chemical solvent.
2 Wipe the lens in a circular direction.
3 Cover the lens with the cap if you are not going to use the projector right away.
MX3 manual.p65
24
02-12-17, 16:40
7. Appendix
7.1 Common problems and troubleshooting
If you are having a problem with your projector, please check the following situations described below. If you still cannot solve the problem, contact your local
distributor or our service center.
Q.: No image on the screen at all
Make sure that you have properly connected the video enhanced adapter
and the relevant cables mentioned in the previous chapters.
Make sure the plug is not bent or broken.
Please check if the lamp has been installed properly.
Please check if you have removed the lens cap and turned on the projector.
Q.: Incorrect resolution
Please check if the video card of your computer has been set at a
resolution less than 1280 X 1024.
Q.: Unsteady or flickering image
Press the Auto key of the remote controller or the Enter/Sync key of the
projector.
Use Phase on the Display menu to correct the problem.
You can also change the color setup of the display card on your computer.
Q.: Vertical flickering stripes on the image
Press the Auto key of the remote control or the Enter/Sync key of the
projector.
You can also use Frequency on the Display menu to adjust the stripes.
Reset the display mode of your display card and make it compatible with
the projector.
MX3 manual.p65
25
02-12-17, 16:40
Q.: Image becomes blurred
Adjust the focus ring of the projector.
Make sure that distance between the screen and projector is adequate (4’7”
~ 32’9” or 1.4 ~ 10 meters).
Q.: The colors projected by your projector look different from the colors of
your computer or VCR.
This is not a problem. You can adjust the brightness, color or contrast on
the menu to change colors.
Q.: When the projector is connected to a DVD player, playing a film with the
ratio 16:9, the image is reshaped.
Adjust the aspect ratio of the projector to 4:3.
Q.: Upside-down image
Open the menu; then select Management to adjust the projection direction.
Q.: Lamp burned out or cracked.
The lamp burns out when its life is over. In such a case, cracking is normal.
If your lamp burns out, please contact the licensed local distributor to
purchase a replacement. To change the lamp, follow the steps stated in
“Replacing the lamp”.
MX3 manual.p65
26
02-12-17, 16:40
7.2 Specifications
Resolution
XGA (1024*768), SXGA (1280*1024) compressed
Lamp
150W VIP, 1500 hrs lamp life
Brightness
1500 ANSI Lumens
Size
229x193x69 mm
Weight
3.5 lbs
Image size
26.4mm (0.7 inches diagonal)
Projection distance
4’7” ~ 32’9” (1.4 – 10 meters)
Throw Ratio
1.34:1 ~ 1.6:1 (Distance: Diagonal)
Zoom Ratio
1.2:1 (Manual Zoom/Focus)
Uniformity
85%
Aspect Ratio
4:3 / 16:9 screen selectable
Contrast Ratio
900:1
Horizontal Frequency
31.5 - 80 kHz
Vertical Scan Rate
56 - 85 Hz
Video compatibility
NTSC / PAL/ 480p, HDTV (720p/1080i RGBHV)
Power supply
100 to 240 VAC, 0.91A~2.2A,50 to 60 Hz
Power Consumption
220W
MX3 manual.p65
27
02-12-17, 16:40
Input Terminal
DVI (M1DA)
USB
RGB (M1DA-D-Sub 15 pin)
RS232 (M1DA)
Y/Pb/Pr (M1DA,VGA) S-Video Mini DIN 4 pin
Audio: RCA Jack
3.5mm Mini Jack
Composite Video (RCA Jack)
Output Terminal
1watt speaker
* All specifications are subject to change without notice.
This device complies with Part 15 of the FCC Rules. Operation is subject
to the following two conditions: (1) the device may not cause harmful
interference, and (2) this device must accept any interference received,
including interference that may cause undesired operation.
MX3 manual.p65
28
02-12-17, 16:40