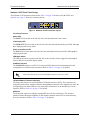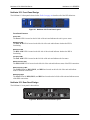
1
NetVanta 1531/1534/1544 Series
Hardware Installation Guide
1700570F1
NetVanta 1531
1700571F1
NetVanta 1531P
1702590G1
NetVanta 1534
1702591G1/G2
NetVanta 1534P
1702544G1
NetVanta 1544
1702545G1/G2
NetVanta 1544P
1700546G1#120
NetVanta 1544F with 120 VAC Power Supply
1700546G1#240
NetVanta 1544F with 240 VAC Power Supply
1200884G1
Wall Mounting Bracket (NetVanta 1531/1534/1544 Series)
1700512F1
Dual Wall Mounting Bracket
1700511F1
Rack Mounting Bracket (NetVanta 1531 Series)
1700508F1
19-inch Dual Mounting Tray
12008819E1
CompactFlash®, 1 GB
1700530F1
NetVanta 1131 RPS/EPS
1700532F1
NetVanta 1131 RPS Cable
1700533F1
NetVanta 1131 EPS Cable
1700534F1
NetVanta 1131 Dual Mounting Tray
61702590G1-34G
September 2014
Trademarks
NetVanta 1531/1534/1544 Series
Trademarks
Any brand names and product names included in this manual are trademarks, registered trademarks, or
trade names of their respective holders.
To the Holder of the Manual
The contents of this manual are current as of the date of publication. ADTRAN reserves the right to change
the contents without prior notice.
In no event will ADTRAN be liable for any special, incidental, or consequential damages or for
commercial losses even if ADTRAN has been advised thereof as a result of issue of this publication.
Software Licensing Agreement
Each ADTRAN product contains a single license for ADTRAN-supplied software. Pursuant to the
Licensing Agreement, you may: (a) use the software on the purchased ADTRAN device only and (b) keep
a copy of the software for backup purposes. This Agreement covers all software installed on the system, as
well as any software available on the ADTRAN website. In addition, certain ADTRAN systems may
contain additional conditions for obtaining software upgrades.
Changes or modifications to this unit not expressly approved by the party responsible for
compliance could void the user’s authority to operate the equipment.
901 Explorer Boulevard
P.O. Box 140000
Huntsville, AL 35814-4000
Phone: (256) 963-8000
Copyright © 2014 ADTRAN, Inc.
All Rights Reserved.
Printed in U.S.A.
2
Copyright © 2014 ADTRAN, Inc.
61702590G1-34G
NetVanta 1531/1534/1544 Series
Conventions
Conventions
Notes provide additional useful information.
Cautions signify information that could prevent service interruption or damage to the
equipment.
Warnings provide information that could prevent injury or endangerment to human
life.
61702590G1-34G
Copyright © 2014 ADTRAN, Inc.
3
Safety Instructions
NetVanta 1531/1534/1544 Series
Safety Instructions
When using your telephone equipment, please follow these basic safety precautions to reduce the risk of
fire, electrical shock, or personal injury:
1. Do not use this product near water, such as a bathtub, wash bowl, kitchen sink, laundry tub, in a
wet basement, or near a swimming pool.
2. Avoid using a telephone (other than a cordless type) during an electrical storm. There is a remote
risk of shock from lightning.
3. Do not use the telephone to report a gas leak in the vicinity of the leak.
4. Use only the power cord, power supply, and batteries indicated in the manual. Do not dispose of
batteries in a fire. They may explode. Check with local codes for special disposal instructions.
5. The socket-outlet shall be installed near the equipment and shall be easily accessible.
If any of the following conditions occur, unplug the product from the electrical outlet and replace the part
or contact your qualified service personnel:
1. The power cable, extension cable, or plug is damaged.
2. An object has fallen into the product.
3. The product has been exposed to water.
4. The product has been dropped or damaged.
5. The product does not operate correctly when you follow the operating instructions.
This equipment incorporates double pole/neutral fusing. If the neutral fuse opens and the
line fuse does not open, voltage could still be present in the unit.
These units contain no user-serviceable parts. They should only be serviced by qualified
service personnel.
Additional safety guidelines, such as Waste Electrical and Electronic Equipment (WEEE),
are given in the document NetVanta Safety and Regulatory Information available at
https://supportforums.adtran.com.
Save These Important Safety Instructions
4
Copyright © 2014 ADTRAN, Inc.
61702590G1-34G
NetVanta 1531/1534/1544 Series
FCC Radio Frequency Interference Statement
FCC Radio Frequency Interference Statement
This equipment has been tested and found to comply with the limits for a Class A digital device, pursuant
to Part 15 of the FCC rules. These limits are designed to provide reasonable protection against harmful
interference when the equipment is operated in a commercial environment. This equipment generates,
uses, and can radiate radio frequency energy and, if not installed and used in accordance with the
instruction manual, may cause harmful interference to radio frequencies. Operation of this equipment in a
residential area is likely to cause harmful interference in which case the user will be required to correct the
interference at his own expense.
Canadian Emissions Requirements
This digital apparatus does not exceed the Class A limits for radio noise emissions from digital apparatus
as set out in the interference-causing equipment standard entitled “Digital Apparatus,” ICES-003 of the
Department of Communications.
Cet appareil numérique respecte les limites de bruits radioelectriques applicables aux appareils numériques
de Class A prescrites dans la norme sur le materiel brouilleur: “Appareils Numériques,” NMB-003 edictee
par le ministre des Communications.
Toll Fraud Liability
Be advised that certain security risks are inherent in the use of any telecommunications or networking
equipment, including but not limited to, toll fraud, Denial of Service (DoS) attacks, loss or theft of data, and the
unauthorized or illegal use of said equipment. ADTRAN OFFERS NO WARRANTIES, EITHER
EXPRESSED OR IMPLIED, REGARDING THE PREVENTION, DETECTION, OR DETERRENCE OF
TOLL FRAUD, NETWORKING ATTACKS, OR UNAUTHORIZED, ILLEGAL, OR IMPROPER USE OF
ADTRAN EQUIPMENT OR SOFTWARE. THEREFORE, ADTRAN IS NOT LIABLE FOR ANY LOSSES
OR DAMAGES RESULTING FROM SUCH FRAUD, ATTACK, OR IMPROPER USE, INCLUDING, BUT
NOT LIMITED TO, HUMAN AND DATA PRIVACY, INTELLECTUAL PROPERTY, MATERIAL
ASSETS, FINANCIAL RESOURCES, LABOR AND LEGAL COSTS. Ultimately, the responsibility for
securing your telecommunication and networking equipment rests with you, and you are encouraged to review
documentation regarding available security measures, their configuration and implementation, and to test such
features as is necessary for your network.
Service and Warranty
For information on the service and warranty of ADTRAN products, visit the Support section of the
ADTRAN website at http://www.adtran.com.
61702590G1-34G
Copyright © 2014 ADTRAN, Inc.
5
Service and Warranty
6
NetVanta 1531/1534/1544 Series
Copyright © 2014 ADTRAN, Inc.
61702590G1-34G
Table of Contents
Introduction . . . . . . . . . . . . . . . . . . . . . . . . . . . . . . . . . . . . . . . . . . . . . . . . . . . . . . . . . . . . . . . . . . . . . . . 13
Physical Descriptions . . . . . . . . . . . . . . . . . . . . . . . . . . . . . . . . . . . . . . . . . . . . . . . . . . . . . . . . . . . . . .
NetVanta 1531 Series . . . . . . . . . . . . . . . . . . . . . . . . . . . . . . . . . . . . . . . . . . . . . . . . . . . . . . . . . . . .
NetVanta 1534 Series . . . . . . . . . . . . . . . . . . . . . . . . . . . . . . . . . . . . . . . . . . . . . . . . . . . . . . . . . . . .
NetVanta 1544 Series . . . . . . . . . . . . . . . . . . . . . . . . . . . . . . . . . . . . . . . . . . . . . . . . . . . . . . . . . . . .
LED Descriptions . . . . . . . . . . . . . . . . . . . . . . . . . . . . . . . . . . . . . . . . . . . . . . . . . . . . . . . . . . . . . . . .
14
14
17
22
29
Product Specifications . . . . . . . . . . . . . . . . . . . . . . . . . . . . . . . . . . . . . . . . . . . . . . . . . . . . . . . . . . . . . . 30
Unit Installation . . . . . . . . . . . . . . . . . . . . . . . . . . . . . . . . . . . . . . . . . . . . . . . . . . . . . . . . . . . . . . . . . . . . 33
Tools Required . . . . . . . . . . . . . . . . . . . . . . . . . . . . . . . . . . . . . . . . . . . . . . . . . . . . . . . . . . . . . . . . . . 34
Mounting Options . . . . . . . . . . . . . . . . . . . . . . . . . . . . . . . . . . . . . . . . . . . . . . . . . . . . . . . . . . . . . . . . 34
Supplying Power to the Unit . . . . . . . . . . . . . . . . . . . . . . . . . . . . . . . . . . . . . . . . . . . . . . . . . . . . . . . . 41
Installing a CompactFlash Card . . . . . . . . . . . . . . . . . . . . . . . . . . . . . . . . . . . . . . . . . . . . . . . . . . . . . 41
NetVanta 1131 RPS/EPS . . . . . . . . . . . . . . . . . . . . . . . . . . . . . . . . . . . . . . . . . . . . . . . . . . . . . . . . . . . . 42
NetVanta 1131 Series Shipping Contents . . . . . . . . . . . . . . . . . . . . . . . . . . . . . . . . . . . . . . . . . . . . . 42
NetVanta 1131 Front Panel Design . . . . . . . . . . . . . . . . . . . . . . . . . . . . . . . . . . . . . . . . . . . . . . . . . . 43
NetVanta 1131 Rear Panel Design . . . . . . . . . . . . . . . . . . . . . . . . . . . . . . . . . . . . . . . . . . . . . . . . . . 43
LED Behaviors . . . . . . . . . . . . . . . . . . . . . . . . . . . . . . . . . . . . . . . . . . . . . . . . . . . . . . . . . . . . . . . . . . 44
Installing the NetVanta 1131 RPS/EPS . . . . . . . . . . . . . . . . . . . . . . . . . . . . . . . . . . . . . . . . . . . . . . . 45
Rack Mounting the NetVanta 1131 . . . . . . . . . . . . . . . . . . . . . . . . . . . . . . . . . . . . . . . . . . . . . . . . . . 45
Wall Mounting the NetVanta 1131 . . . . . . . . . . . . . . . . . . . . . . . . . . . . . . . . . . . . . . . . . . . . . . . . . . . 48
Connecting the NetVanta 1131 and the NetVanta Switch . . . . . . . . . . . . . . . . . . . . . . . . . . . . . . . . . 49
Powering the NetVanta 1131 and the NetVanta Switch . . . . . . . . . . . . . . . . . . . . . . . . . . . . . . . . . . . 50
Appendix A.
61702590G1-34G
Connector Pin Definitions. . . . . . . . . . . . . . . . . . . . . . . . . . . . . . . . . . . . . . . . . . . . . . . 51
Copyright © 2014 ADTRAN, Inc.
7
Table of Contents
8
NetVanta 1531/1534/1544 Series
Copyright © 2014 ADTRAN, Inc.
61702590G1-34G
List of Figures
Figure 1.
Figure 2.
Figure 3.
Figure 4.
Figure 5.
Figure 6.
Figure 7.
Figure 8.
Figure 9.
Figure 10.
Figure 11.
Figure 12.
Figure 13.
Figure 14.
Figure 15.
Figure 16.
Figure 17.
Figure 18.
Figure 19.
Figure 20.
Figure 21.
Figure 22.
Figure 23.
Figure 24.
Figure 25.
NetVanta 1531 Front Panel Layout . . . . . . . . . . . . . . . . . . . . . . . . . . . . . . . . . . . . . . . . . . . .
NetVanta 1531 Rear Panel Layout . . . . . . . . . . . . . . . . . . . . . . . . . . . . . . . . . . . . . . . . . . . . .
NetVanta 1531P Front Panel Layout . . . . . . . . . . . . . . . . . . . . . . . . . . . . . . . . . . . . . . . . . . .
NetVanta 1531P Rear Panel Layout . . . . . . . . . . . . . . . . . . . . . . . . . . . . . . . . . . . . . . . . . . .
NetVanta 1534 Front Panel Layout . . . . . . . . . . . . . . . . . . . . . . . . . . . . . . . . . . . . . . . . . . . .
NetVanta 1534 Rear Panel Layout . . . . . . . . . . . . . . . . . . . . . . . . . . . . . . . . . . . . . . . . . . . . .
NetVanta 1534P Front Panel Layout . . . . . . . . . . . . . . . . . . . . . . . . . . . . . . . . . . . . . . . . . . .
NetVanta 1534P Rear Panel Layout . . . . . . . . . . . . . . . . . . . . . . . . . . . . . . . . . . . . . . . . . . .
NetVanta 1544 Front Panel Layout . . . . . . . . . . . . . . . . . . . . . . . . . . . . . . . . . . . . . . . . . . . .
NetVanta 1544 Rear Panel Layout . . . . . . . . . . . . . . . . . . . . . . . . . . . . . . . . . . . . . . . . . . . . .
NetVanta 1544P Front Panel Layout . . . . . . . . . . . . . . . . . . . . . . . . . . . . . . . . . . . . . . . . . . .
NetVanta 1544P Rear Panel Layout . . . . . . . . . . . . . . . . . . . . . . . . . . . . . . . . . . . . . . . . . . .
NetVanta 1544F Front Panel Layout . . . . . . . . . . . . . . . . . . . . . . . . . . . . . . . . . . . . . . . . . . .
NetVanta 1544F Rear Panel Layout . . . . . . . . . . . . . . . . . . . . . . . . . . . . . . . . . . . . . . . . . . .
NetVanta Rack Mounting Brackets and Kensington Lock Slot . . . . . . . . . . . . . . . . . . . . . . . .
Dual Mounting Tray . . . . . . . . . . . . . . . . . . . . . . . . . . . . . . . . . . . . . . . . . . . . . . . . . . . . . . . .
NetVanta 1531/1531P/1534/1544 Wallmount Installation . . . . . . . . . . . . . . . . . . . . . . . . . . .
NetVanta 1531/1531P/1534/1544 Dual Wallmount Installation . . . . . . . . . . . . . . . . . . . . . . .
NetVanta 1534P/1544P/1544F Wallmount Installation . . . . . . . . . . . . . . . . . . . . . . . . . . . . .
CompactFlash Card Installation . . . . . . . . . . . . . . . . . . . . . . . . . . . . . . . . . . . . . . . . . . . . . . .
NetVanta 1131 Front Panel Layout . . . . . . . . . . . . . . . . . . . . . . . . . . . . . . . . . . . . . . . . . . . .
NetVanta 1131 Rear Panel Layout . . . . . . . . . . . . . . . . . . . . . . . . . . . . . . . . . . . . . . . . . . . . .
Rack Mounting the NetVanta 1131 Using the Brackets . . . . . . . . . . . . . . . . . . . . . . . . . . . . .
Rack Mounting the NetVanta 1131 Using the Dual Mounting Tray . . . . . . . . . . . . . . . . . . . .
Wall Mounting the NetVanta 1131 . . . . . . . . . . . . . . . . . . . . . . . . . . . . . . . . . . . . . . . . . . . . .
61702590G1-34G
Copyright © 2014 ADTRAN, Inc.
15
15
16
17
18
19
20
21
24
25
25
27
27
28
35
36
38
39
40
41
43
43
46
47
48
9
List of Figures
10
NetVanta 1531/1534/1544 Series
Copyright © 2014 ADTRAN, Inc.
61702590G1-34G
List of Tables
Table 1.
Table 2.
Table A-1.
Table A-2.
Table A-3.
Front Panel LED Descriptions . . . . . . . . . . . . . . . . . . . . . . . . . . . . . . . . . . . . . . . . . . . . . . . . 29
Front Panel LED Behaviors . . . . . . . . . . . . . . . . . . . . . . . . . . . . . . . . . . . . . . . . . . . . . . . . . . 44
CONSOLE Port Pinouts . . . . . . . . . . . . . . . . . . . . . . . . . . . . . . . . . . . . . . . . . . . . . . . . . . . . . 51
1000Base-T Gigabit Ethernet Port Pinouts . . . . . . . . . . . . . . . . . . . . . . . . . . . . . . . . . . . . . . 51
SFP Slot Pinouts . . . . . . . . . . . . . . . . . . . . . . . . . . . . . . . . . . . . . . . . . . . . . . . . . . . . . . . . . . 52
61702590G1-34G
Copyright © 2014 ADTRAN, Inc.
11
List of Tables
12
NetVanta 1531/1534/1544 Series
Copyright © 2014 ADTRAN, Inc.
61702590G1-34G
1.
INTRODUCTION
The NetVanta 1531/1534/1544 Series Gigabit Switches include the NetVanta 1531, NetVanta 1531P
(Power over Ethernet (PoE)), NetVanta 1534, NetVanta 1534P (PoE), NetVanta 1544, NetVanta 1544P
(PoE), and NetVanta 1544F.
In this document, the term NetVanta 1531/1534/1544 Series means all of the units
collectively. If a statement only applies to one particular switch, the text refers to that
switch individually.
This hardware installation guide lists the NetVanta 1531/1534/1544 Series units’ physical characteristics
and product specifications, introduces basic functionality, and provides installation instructions.
•
•
•
•
Physical Descriptions on page 14
Product Specifications on page 30
Unit Installation on page 33
NetVanta 1131 RPS/EPS on page 42
For additional information on mounting options, suppling power, upgrading memory, installing a CompactFlash
card, and installing the NetVanta 1131 RPS/EPS refer to the following sections:
•
•
•
•
Mounting Options on page 34
Supplying Power to the Unit on page 41
Installing a CompactFlash Card on page 41
Installing the NetVanta 1131 RPS/EPS on page 45
For information on switch configuration for a specific application, refer to the configuration guides provided on
the ADTRAN Support Community. For details on the command line interface (CLI), refer to the AOS
Command Reference Guide. All other related documents are also available online at
http://supportforums.adtran.com.
61702590G1-34G
Copyright © 2014 ADTRAN, Inc.
13
Physical Descriptions
2.
NetVanta 1531/1534/1544 Series
PHYSICAL DESCRIPTIONS
NetVanta 1531 Series
The NetVanta 1531 Series is a Layer 3 Lite managed switch. The entire series runs ADTRAN Operating
System (AOS), is managed through an EIA-232 CONSOLE port (DB-9), Telnet session, or web-based
graphical user interface (GUI), and is RoHS compliant (telecommunications exemption). The
NetVanta 1531 Series units are described in the following sections.
The NetVanta 1531 Series is housed in a 1U-high, rack-mountable metal enclosure that is half the width of a
standard 19-inch rack, allowing two units to be mounted side by side using an optional dual mounting tray. It
includes a universal AC power supply and the front panel contains 10 10/100/1000Base-T Ethernet interfaces
that are accessed via standard RJ-45 connectors. Two 1000Base-X small form-factor pluggable (SFP) slots
(supporting industry standard small SFP modules) are available on the front panel for high-speed uplink via
fiber. The NetVanta 1531 EIA-232 CONSOLE port (DB-9) is located on the front panel.
SFP Module Slots
The NetVanta 1531 Series units support two 1000Base-X SFP slots on the front panel that accept a number of
industry standard SFP modules. The SFP modules provide Gigabit Ethernet fiber connectivity for high-speed
uplinks or switch stacking. For a list of supported SFP modules, visit the ADTRAN website at
http://www.adtran.com.
Power over Ethernet
The NetVanta 1531P unit provides the same basic functionality as the NetVanta 1531 product. PoE provides the
ability to detect attached powered devices (PDs), and deliver 48 VDC to the PD via Ethernet cabling. The
NetVanta 1531P is fully compliant with the IEEE 802.3af PoE and IEEE 802.3at PoE+ standards. By default,
the PoE switch discovers and provides power to IEEE-compliant PDs. The NetVanta 1531P also supports legacy
PDs.
NetVanta 1531 Series Shipping Contents
Each NetVanta 1531 Series unit is shipped in its own cardboard shipping carton. Open each carton carefully, and
avoid deep penetration into the carton with sharp objects.
After unpacking the unit, inspect it for possible shipping damage. If the equipment has been damaged in transit,
immediately file a claim with the carrier and contact ADTRAN Customer Service (refer to the Support page on
the ADTRAN website at http://www.adtran.com/support).
Domestic shipments of the NetVanta 1531 Series includes the following items:
•
•
•
NetVanta 1531 base unit
A detachable power cable with a grounded, three-prong plug
Quick start guide
International shipments of the NetVanta 1531 Series includes the following items:
•
•
•
14
NetVanta 1531 base unit
All necessary power cords
Quick start guide
Copyright © 2014 ADTRAN, Inc.
61702590G1-34G
NetVanta 1531/1534/1544 Series
Physical Descriptions
NetVanta 1531 Front Panel Design
The NetVanta 1531 front panel is shown below. Table 1 on page 29 describes all of the LEDs, and
Appendix A on page 51 shows the connector pinouts.
1
2
3
4
5
6
7
8
9
10
11
12
STAT
CONSOLE
NetVanta1531
Figure 1. NetVanta 1531 Front Panel Layout
Front Panel Features
Status LED
The STAT LED is located on the left side of the unit and indicates the unit’s status.
CONSOLE Interface
The CONSOLE interface is an EIA-232 serial port (DCE) that provides local management and
configuration (via a DB-9 female connector). Refer to Table A-1 on page 51 for pinouts.
Connection directly to an external modem requires a cross-over cable.
10/100/1000Base-T Ethernet Interfaces
The front panel contains 10 10/100/1000Base-T Ethernet interfaces (RJ-45). These interfaces are
arranged in stacked pairs, with the numbers 1 through 10 screened from left to right directly above the
corresponding ports. Status LEDs for each stacked pair of interfaces are located directly over the
interfaces. Refer to Table A-2 on page 51 for pinouts.
SFP Slots
The front panel contains two industry standard SFP slots for fiber or copper connectivity. The
interfaces numbered 11 and 12 support 1000Base-X SFP modules and their status LEDs are located
directly above the interfaces. Refer to Table A-3 on page 52 for pinouts.
NetVanta 1531 Rear Panel Design
The NetVanta 1531 rear panel is shown below.
AC INPUT
Figure 2. NetVanta 1531 Rear Panel Layout
Rear Panel Interface
Power Connection
The rear panel has a power input to the AC universal power supply. Please refer to Supplying Power to
the Unit on page 41 for connection details.
61702590G1-34G
Copyright © 2014 ADTRAN, Inc.
15
Physical Descriptions
NetVanta 1531/1534/1544 Series
NetVanta 1531P Front Panel Design
The NetVanta 1531P front panel is shown below. Table 1 on page 29 describes all of the LEDs, and
Appendix A on page 51 shows the connector pinouts.
1
2
3
4
5
6
7
8
9
10
11
12
STAT
LINK/ACT
PoE
CONSOLE
NetVanta1531P
Figure 3. NetVanta 1531P Front Panel Layout
Front Panel Features
Status LED
The STAT LED is located on the left side of the unit and indicates the unit’s status.
Link/Activity LED
The LINK/ACT LED is located on the left side of the unit and indicates that the port LEDs 1 through
8 are displaying link/activity status.
Power over Ethernet LED
The PoE LED is located on the left side of the unit and indicates that the port LEDs 1 through 8 are
displaying PoE status.
LED Mode Switch
The LED mode switch is located on the left side of the unit and is used to toggle Ports 1 through 8
between link/activity and PoE display modes.
CONSOLE Interface
The CONSOLE interface is an EIA-232 serial port (DCE) that provides local management and
configuration (via a DB-9 female connector). Refer to Table A-1 on page 51 for pinouts.
Connection directly to an external modem requires a cross-over cable.
10/100/1000Base-T Ethernet Interfaces
The front panel contains 10 10/100/1000Base-T Ethernet interfaces (RJ-45). These interfaces are
arranged in stacked pairs, with the numbers 1 through 10 screened from left to right directly above the
corresponding ports. Status LEDs for each stacked pair of interfaces are located directly over the
interfaces. Refer to Table A-2 on page 51 for pinouts.
SFP Slots
The front panel contains two industry standard SFP slots for fiber connectivity. The interfaces
numbered 11 and 12 support 1000Base-X SFP modules and their status LEDs are located directly
above the interfaces. Refer to Table A-3 on page 52 for pinouts.
16
Copyright © 2014 ADTRAN, Inc.
61702590G1-34G
NetVanta 1531/1534/1544 Series
Physical Descriptions
NetVanta 1531P Rear Panel Design
The NetVanta 1531P rear panel is shown below.
AC INPUT
Figure 4. NetVanta 1531P Rear Panel Layout
Rear Panel Interface
Power Connection
The rear panel has a power input to the AC universal power supply. Please refer to Supplying Power to
the Unit on page 41 for connection details.
NetVanta 1534 Series
The NetVanta 1534 Series is a Layer 3 Lite managed switch. The entire series runs AOS, is managed through
an EIA-232 CONSOLE port (DB-9), Telnet session, or GUI, and is RoHS compliant (telecommunications
exemption). The NetVanta 1534 Series units are described in the following sections.
The NetVanta 1534 is housed in a 1U-high, rack-mountable metal enclosure that is half the width of a standard
19-inch rack, allowing two units to be mounted side by side using an optional dual mounting tray. It includes a
universal AC power supply and the front panel contains 24 10/100/1000Base-T Ethernet interfaces that are
accessed via standard RJ-45 connectors. Two 1000Base-X SFP slots and two 2500Base-X slots (all supporting
industry standard small SFP modules) are available on the rear panel for high-speed uplink via fiber or copper.
The NetVanta 1534 EIA-232 CONSOLE port (DB-9) is located on the rear panel.
The NetVanta 1534P is housed in a 1U-high, rack-mountable metal enclosure that can be mounted in a standard
19-inch rack and includes a universal AC power supply. The front panel contains 24 10/100/1000Base-T
Ethernet interfaces that are accessed via standard RJ-45 connectors. Two 1000Base-X SFP slots and two
2500Base-X slots (all supporting industry standard SFP modules) are also available on the front panel for
high-speed uplink via fiber or copper. The NetVanta 1534P EIA-232 CONSOLE port (DB-9) is located on
the front panel.
Redundant Power Supply
All NetVanta 1534 and 1534P units provide a connection for an optional RPS on the rear panel. The
NetVanta 1131 RPS/EPS (P/N 1700530F1) is sold separately. When connected, the RPS will provide 120 W of
backup power should the internal power supply fail. The units will automatically switch to RPS when needed,
providing uninterrupted power to the unit.
Extended Power Supply
The NetVanta 1534P unit also provides a connection for an optional EPS on the rear panel. The NetVanta 1131
RPS/EPS (P/N 1700530F1) is sold separately. When an EPS is connected, the internal and external supplies will
use load sharing to provide up to 740 W of power for PoE applications. In the event that the internal power
supply fails, the EPS will provide up to 370 W of power for PoE applications. The units will automatically
switch to EPS when needed, providing uninterrupted power to the unit.
61702590G1-34G
Copyright © 2014 ADTRAN, Inc.
17
Physical Descriptions
NetVanta 1531/1534/1544 Series
SFP Module Slots
The NetVanta 1534 Series units support two 1000Base-X and two 1000/2500Base-X SFP slots on either the
front or back panel that accept a number of industry standard SFP modules. The SFP modules provide Gigabit
Ethernet fiber connectivity for high-speed uplinks or switch stacking. For a list of supported SFP modules, visit
the ADTRAN website at http://www.adtran.com.
Power over Ethernet
The NetVanta 1534P unit provides the same basic functionality as the NetVanta 1534 product. PoE provides the
ability to detect attached powered devices (PDs), and deliver 48 VDC to the PD via Ethernet cabling. The
NetVanta 1534P is fully compliant with the IEEE 802.3af PoE and IEEE 802.3at PoE+ standards. By default,
the PoE switch discovers and provides power to IEEE-compliant PDs. The NetVanta 1534P also supports legacy
PDs.
NetVanta 1534 Series Shipping Contents
Each NetVanta 1534 Series unit is shipped in its own cardboard shipping carton. Open each carton carefully, and
avoid deep penetration into the carton with sharp objects.
After unpacking the unit, inspect it for possible shipping damage. If the equipment has been damaged in transit,
immediately file a claim with the carrier and contact ADTRAN Customer Service (refer to the Support page on
the ADTRAN website at http://www.adtran.com/support).
Domestic shipments of the NetVanta 1534 Series includes the following items:
•
•
•
•
NetVanta 1534 base unit
A detachable power cable with a grounded, three-prong plug
Quick start guide
Two 19-inch rack mounting brackets with four mounting screws
International shipments of the NetVanta 1534 Series includes the following items:
•
•
•
•
NetVanta 1534 base unit
All necessary power cords
Quick start guide
Two 19-inch rack mounting brackets with four mounting screws
NetVanta 1534 Front Panel Design
The NetVanta 1534 front panel is shown below. Table 1 on page 29 describes all of the LEDs, and
Appendix A on page 51 shows the connector pinouts.
25
26
27
28
STAT
RPS
VCID
1
2
3
4
5
6
7
8
9
10
11
12
13
14
15
16
17
18
19
20
21
22
23
24
NetVanta 1534
Figure 5. NetVanta 1534 Front Panel Layout
18
Copyright © 2014 ADTRAN, Inc.
61702590G1-34G
NetVanta 1531/1534/1544 Series
Physical Descriptions
Front Panel Features
Link/Activity LEDs
The link/activity LEDs labeled 1 through 24 are located above the 10/100/1000Base-T Ethernet
interfaces and indicates when there is activity on the interface. The link/activity LEDs labeled 25
through 28 indicate when there is activity on the SFP interfaces (located on the rear panel of the unit).
When the LED mode switch has been activated, these LEDs will display VCID (future release).
Status LED
The STAT LED is located on the left side of the unit and indicates the unit’s status.
Redundant Power Supply LED
The RPS LED is located on the left side of the unit and indicates when the unit is receiving power
from the RPS.
VCID LED (Future Release)
The VCID LED is located on the left side of the unit and indicates that the port LEDs are displaying
VCID.
LED Mode Switch (Future Release)
The LED mode switch is located on the left side of the unit and is used to toggle Ports 1 through 28
between link/activity and VCID display modes.
10/100/1000Base-T Ethernet Interfaces
The front panel contains 24 10/100/1000Base-T Ethernet interfaces (RJ-45). These interfaces are
arranged in stacked pairs, with the numbers 1 through 24 screened from left to right directly above the
corresponding ports. Status LEDs for each stacked pair of interfaces are located directly over the
interfaces. Refer to Table A-2 on page 51 for pinouts.
NetVanta 1534 Rear Panel Design
The NetVanta 1534 rear panel is shown below.
RPS - 12VDC
25
1G
26
27
2.5G
28
Figure 6. NetVanta 1534 Rear Panel Layout
Rear Panel Interfaces
SFP Slots
The rear panel contains four industry standard SFP slots for fiber or copper connectivity. The
interfaces numbered 25 and 26 support 1000Base-X SFP modules and their status LEDs are located on
the front panel of the unit. The interfaces numbered 27 and 28 support both 1000Base-X and
1000/2500Base-X SFP modules and their status LEDs are also located on the front panel of the unit.
Refer to Table A-3 on page 52 for pinouts.
61702590G1-34G
Copyright © 2014 ADTRAN, Inc.
19
Physical Descriptions
NetVanta 1531/1534/1544 Series
CONSOLE Interface
The CONSOLE interface is an EIA-232 serial port (DCE) that provides local management and
configuration (via a DB-9 female connector). Refer to Table A-1 on page 51 for pinouts.
Connection directly to an external modem requires a cross-over cable.
RPS
The rear panel has a power input to a +12 VDC RPS. The RPS LED, located on the front panel of the
unit, indicates when the unit is being powered from the RPS.
Power Connection
The rear panel has a power input to the AC universal power supply. Please refer to Supplying Power to
the Unit on page 41 for connection details.
NetVanta 1534P Front Panel Design
The NetVanta 1534P front panel is shown below. Table 1 on page 29 describes all of the LEDs, and
Appendix A on page 51 shows the connector pinouts.
1
2
3
4
5
6
7
8
9
10
11
12
13
14
15
16
17
18
19
20
21
22
23
24
STAT
RPS
EPS
LINK/ACT
25
26
27
28
PoE
VCID
1G
NetVanta 1534P
2.5G
Figure 7. NetVanta 1534P Front Panel Layout
Front Panel Features
Status LED
The STAT LED is located on the left side of the unit and indicates the unit’s status.
Redundant Power Supply LED
The RPS LED is located on the left side of the unit and indicates when the unit is receiving power
from the RPS.
Extended Power Supply LED
The EPS LED is located on the left side of the unit and indicates when the unit is receiving power from
the EPS.
Link/Activity LED
The LINK/ACT LED is located on the left side of the unit and indicates that the port LEDs are
displaying link/activity status.
Power over Ethernet LED
The PoE LED is located on the left side of the unit and indicates that the port LEDs are displaying PoE
status.
VCID LED (Future Release)
The VCID LED is located on the left side of the unit and indicates that the port LEDs are displaying
VCID.
20
Copyright © 2014 ADTRAN, Inc.
61702590G1-34G
NetVanta 1531/1534/1544 Series
Physical Descriptions
LED Mode Switch (Future Release)
The LED mode switch is located on the left side of the unit and is used to toggle Ports 1 through 48
between link/activity and VCID display modes.
CONSOLE Interface
The CONSOLE interface is an EIA-232 serial port (DCE) that provides local management and
configuration (via a DB-9 female connector). Refer to Table A-1 on page 51 for pinouts.
Connection directly to an external modem requires a cross-over cable.
10/100/1000Base-T Ethernet Interfaces
The front panel contains 24 10/100/1000Base-T Ethernet interfaces (RJ-45). These interfaces are
arranged in stacked pairs, with the numbers 1 through 24 screened from left to right directly above the
corresponding ports. Status LEDs for each stacked pair of interfaces are located directly over the
interfaces. Refer to Table A-2 on page 51 for pinouts.
SFP Slots
The front panel contains four industry standard SFP slots for fiber or copper connectivity. These
interfaces are numbered 25 through 28 and their status LEDs are located directly above these numbers.
Refer to Table A-3 on page 52 for pinouts.
NetVanta 1534P Rear Panel Design
The NetVanta 1534P rear panel is shown below.
EPS - 50VDC
RPS - 12VDC
100-250VAC
50/60Hz
Figure 8. NetVanta 1534P Rear Panel Layout
Rear Panel Interfaces
EPS
The rear panel has a power input to a +50 VDC EPS. The EPS LED, located on the front panel of the
unit, indicates when the unit is being powered from the EPS.
RPS
The rear panel has a power input to a +12 VDC RPS. The RPS LED, located on the front panel of the
unit, indicates when the unit is being powered from the RPS.
Power Connection
The rear panel has a power input to the AC universal power supply. Please refer to Supplying Power to
the Unit on page 41 for connection details.
61702590G1-34G
Copyright © 2014 ADTRAN, Inc.
21
Physical Descriptions
NetVanta 1531/1534/1544 Series
NetVanta 1544 Series
The NetVanta 1544 Series is a Layer 3 managed switch. The entire series runs AOS, is managed through an
EIA-232 CONSOLE port (DB-9), Telnet session, or GUI, and is RoHS compliant (telecommunications
exemption). The NetVanta 1544 Series units are described in the following sections.
The NetVanta 1544 is housed in a 1U-high, rack-mountable metal enclosure that is half the width of a standard
19-inch rack, allowing two to be mounted side by side using an optional dual mounting tray. The NetVanta 1544
includes a universal AC power supply and the front panels contain 24 10/100/1000Base-T Ethernet interfaces
that are accessed via standard RJ-45 connectors. Four industry standard 1000/2500Base-X SFP slots (supporting
industry standard SFP modules) are available on the rear panel for high-speed uplink via fiber or copper. The
NetVanta 1544 EIA-232 CONSOLE port (DB-9) is located on the rear of the unit.
The NetVanta 1544P is housed in a 1U-high, rack-mountable metal enclosure that can be mounted in a standard
19-inch rack. The NetVanta 1544P includes a universal AC power supply and the front panels contain
24 10/100/1000Base-T Ethernet interfaces that are accessed via standard RJ-45 connectors. Four industry
standard 1000/2500Base-X SFP slots (supporting industry standard SFP modules) are also available on the front
panel for high-speed uplink via fiber or copper. The NetVanta 1544P EIA-232 CONSOLE port (DB-9) is
located on the front of the unit.
The NetVanta 1544F is housed in a 1U-high, rack-mountable metal enclosure that can be mounted in a standard
19-inch rack and is available with either a 120 VAC or 240 VAC power supply. The front panel contains
24 100/1000Base-X SFP interfaces that are accessed via fiber or copper using industry standard SFP modules.
Four industry standard 1000/2500Base-X SFP slots (also supporting industry standard SFP modules) are also
available on the front panel for high-speed uplink via fiber or copper. The NetVanta 1544F has expandable
memory via CompactFlash. The NetVanta 1544F EIA-232 CONSOLE port (DB-9) is located on the front of
the unit.
Redundant Power Supply
All NetVanta 1544 and 1544P units provide a connection for an optional RPS on the rear panel. The
NetVanta 1131 RPS/EPS (P/N 1700530F1) is sold separately. When connected, the RPS will provide 120 W of
backup power should the internal power supply fail. The units will automatically switch to RPS when needed,
providing uninterrupted power to the unit.
Extended Power Supply
The NetVanta 1544P unit also provides a connection for an optional EPS on the rear panel. The NetVanta 1131
RPS/EPS (P/N 1700530F1) is sold separately. When an EPS is connected, the internal and external supplies will
use load sharing to provide up to 740 W of power for PoE applications. In the event that the internal power
supply fails, the EPS will provide up to 370 W of power for PoE applications. The units will automatically
switch to EPS when needed, providing uninterrupted power to the unit.
SFP Module Slots
The NetVanta 1544 Series units support four 1000/2500Base-X SFP slots on either the front or back panel that
accept a number of industry standard SFP modules. The SFP modules provide Gigabit Ethernet fiber
connectivity for high-speed uplinks or switch stacking. As well as the four 1000/2500Base-X SFP slots, the
NetVanta 1544F units support 24 100/1000Base-X SFP interfaces that are accessed via fiber or copper using
industry standard SFP modules. For a list of supported SFP modules, visit the ADTRAN website at
http://www.adtran.com.
22
Copyright © 2014 ADTRAN, Inc.
61702590G1-34G
NetVanta 1531/1534/1544 Series
Physical Descriptions
Power over Ethernet
The NetVanta 1544P device provides the same basic functionality as the NetVanta 1544 product. PoE provides
the ability to detect attached PDs, and deliver 48 VDC to the PD via Ethernet cabling. The NetVanta 1544P is
fully compliant with the IEEE 802.3af PoE and IEEE 802.3at PoE+ standards. By default, the PoE switch
discovers and provides power to IEEE-compliant PDs. The NetVanta 1544P also supports legacy PDs.
CompactFlash
The NetVanta 1544F’s CompactFlash slot, located on the rear panel, allows nonvolatile memory expansion with
supported densities ranging from 64 MB to 1 GB.
NetVanta 1544 Series Shipping Contents
Each NetVanta 1544 Series unit is shipped in its own cardboard shipping carton. Open each carton carefully, and
avoid deep penetration into the carton with sharp objects.
After unpacking the unit, inspect it for possible shipping damage. If the equipment has been damaged in transit,
immediately file a claim with the carrier and contact ADTRAN Customer Service (refer to the Support page on
the ADTRAN website at http://www.adtran.com/support).
Domestic shipments of the NetVanta 1544 Series includes the following items:
•
•
•
•
NetVanta 1544 base unit
A detachable power cable with a grounded, three-prong plug
Quick start guide
Two 19-inch rack mounting brackets with four mounting screws
International shipments of the NetVanta 1544 Series includes the following items:
•
•
•
•
NetVanta 1544 base unit
All necessary power cords
Quick start guide
Two 19-inch rack mounting brackets with four mounting screws
61702590G1-34G
Copyright © 2014 ADTRAN, Inc.
23
Physical Descriptions
NetVanta 1531/1534/1544 Series
NetVanta 1544 Front Panel Design
The NetVanta 1544 front panel is shown below. Table 1 on page 29 describes all of the LEDs, and
Appendix A on page 51 shows the connector pinouts.
25
26
27
28
STAT
RPS
VCID
1
2
3
4
5
6
7
8
9
10
11
12
13
14
15
16
17
18
19
20
21
22
23
24
Figure 9. NetVanta 1544 Front Panel Layout
Front Panel Features
Link/Activity LEDs
The link/activity LEDs labeled 1 through 24 are located above the 10/100/1000Base-T Ethernet
interfaces and indicates when there is activity on the interface. The link/activity LEDs labeled 25
through 28 indicate when there is activity on the SFP interfaces (located on the rear panel of the unit).
When the LED mode switch has been activated, these LEDs will display VCID status (future release).
Status LED
The STAT LED is located on the left side of the unit and indicates the unit’s status.
Redundant Power Supply LED
The RPS LED is located on the left side of the unit and indicates when the unit is receiving power
from the RPS.
VCID LED (Future Release)
The VCID LED is located on the left side of the unit and indicates that the port LEDs are displaying
VCID.
LED Mode Switch (Future Release)
The LED mode switch is located on the left side of the unit and is used to toggle Ports 1 through 28
between link/activity and VCID display modes.
10/100/1000Base-T Ethernet Interfaces
The front panel contains 24 10/100/1000Base-T Ethernet interfaces (RJ-45). These interfaces are
arranged in stacked pairs, with the numbers 1 through 24 screened from left to right directly above the
corresponding ports. Status LEDs for each stacked pair of interfaces are located directly over the
interfaces. Refer to Table A-2 on page 51 for pinouts.
24
Copyright © 2014 ADTRAN, Inc.
61702590G1-34G
NetVanta 1531/1534/1544 Series
Physical Descriptions
NetVanta 1544 Rear Panel Design
The NetVanta 1544 rear panel is shown below.
RPS - 12VDC
25
26
28
27
Figure 10. NetVanta 1544 Rear Panel Layout
Rear Panel Interfaces
SFP Slots
The rear panel contains four industry standard SFP slots for fiber or copper connectivity. These
interfaces are numbered 25 through 28, support both 1000Base-X and 1000/2500Base-X SFP
modules, and their status LEDs are located on the front panel of the unit. Refer to Table A-3 on page 52
for pinouts.
CONSOLE Interface
The CONSOLE interface is an EIA-232 serial port (DCE) that provides local management and
configuration (via a DB-9 female connector). Refer to Table A-1 on page 51 for pinouts.
Connection directly to an external modem requires a cross-over cable.
RPS
The rear panel has a power input to a +12 VDC RPS. The RPS LED, located on the front panel of the
unit, indicates when the unit is being powered from the RPS.
Power Connection
The rear panel has a power input to the AC universal power supply. Please refer to Supplying Power to
the Unit on page 41 for connection details.
NetVanta 1544P Front Panel Design
The NetVanta 1544P front panel is shown below. Table 1 on page 29 describes all of the LEDs, and
Appendix A on page 51 shows the connector pinouts.
1
2
3
4
5
6
7
8
9
10
11
12
13
14
15
16
17
18
19
20
21
22
23
24
STAT
RPS
EPS
LINK/ACT
25
26
27
28
PoE
VCID
NetVanta 1544P
1G
2.5G
Figure 11. NetVanta 1544P Front Panel Layout
Front Panel Features
Status LED
The STAT LED is located on the left side of the unit and indicates the unit’s status.
61702590G1-34G
Copyright © 2014 ADTRAN, Inc.
25
Physical Descriptions
NetVanta 1531/1534/1544 Series
Redundant Power Supply LED
The RPS LED is located on the left side of the unit and indicates when the unit is receiving power
from the RPS.
Extended Power Supply LED
The EPS LED is located on the left side of the unit and indicates when the unit is receiving power from
the EPS.
Link/Activity LEDs
The LINK/ACT LED is located on the left side of the unit and indicates that the port LEDs are
displaying link/activity status.
Power over Ethernet LED
The PoE LED is located on the left side of the unit and indicates that the port LEDs are displaying PoE
status.
VCID LED (Future Release)
The VCID LED is located on the left side of the unit and indicates that the port LEDs are displaying
VCID.
LED Mode Switch
The LED mode switch is located on the left side of the unit and is used to toggle Ports 1 through 48
between link/activity and VCID display modes.
CONSOLE Interface
The CONSOLE interface is an EIA-232 serial port (DCE) that provides local management and
configuration (via a DB-9 female connector). Refer to Table A-1 on page 51 for pinouts.
Connection directly to an external modem requires a cross-over cable.
10/100/1000Base-T Ethernet Interfaces
The front panel contains 24 10/100/1000Base-T Ethernet interfaces (RJ-45). These interfaces are
arranged in stacked pairs, with the numbers 1 through 24 screened from left to right directly above the
corresponding ports. Status LEDs for each stacked pair of interfaces are located directly over the
interfaces. Refer to Table A-2 on page 51 for pinouts.
SFP Slots
The front panel contains four industry standard SFP slots for fiber or copper connectivity. These
interfaces are numbered 25 through 28 and their status LEDs are located directly above these numbers.
Refer to Table A-3 on page 52 for pinouts.
26
Copyright © 2014 ADTRAN, Inc.
61702590G1-34G
NetVanta 1531/1534/1544 Series
Physical Descriptions
NetVanta 1544P Rear Panel Design
The NetVanta 1544P rear panel is shown below.
EPS - 50VDC
100-250VAC
50/60Hz
RPS - 12VDC
Figure 12. NetVanta 1544P Rear Panel Layout
Rear Panel Interfaces
EPS
The rear panel has a power input to a +50 VDC EPS. The EPS LED, located on the front panel of the
unit, indicates when the unit is being powered from the EPS.
RPS
The rear panel has a power input to a +12 VDC RPS. The RPS LED, located on the front panel of the
unit, indicates when the unit is being powered from the RPS.
Power Connection
The rear panel has a power input to the AC universal power supply. Please refer to Supplying Power to
the Unit on page 41 for connection details.
NetVanta 1544F Front Panel Design
The NetVanta 1544F front panel is shown below. Table 1 on page 29 describes all of the LEDs, and
Appendix A on page 51 shows the connector pinouts.
2
1
1
4
3
3
6
5
5
7
8
7
9
10
9
12
11
11
14
13
13
15
16
15
17
18
17
20
19
19
22
21
21
23
24
23
25
26
27
28
STAT
2
NetVanta 1544F
4
6
8
10
12
14
16
18
20
22
24
Figure 13. NetVanta 1544F Front Panel Layout
Front Panel Features
Status LED
The STAT LED is located on the left side of the unit and indicates the unit’s status.
CONSOLE Interface
The CONSOLE interface is an EIA-232 serial port (DCE) that provides local management and
configuration (via a DB-9 female connector).
Connection directly to an external modem requires a cross-over cable.
61702590G1-34G
Copyright © 2014 ADTRAN, Inc.
27
Physical Descriptions
NetVanta 1531/1534/1544 Series
100/1000Base-X SFP Interfaces
The NetVanta 1544F front panel contains 24 100/1000Base-X SFP interfaces. These interfaces are
arranged in stacked pairs, with the numbers 1 through 24 screened from left to right directly above or
below the corresponding port. Status LEDs for each stacked pair of interfaces are located directly over
the interfaces.
1000/2500Base-X SFP Slots
The NetVanta 1544F front panel contains four 1000/2500Base-X SFP interfaces. These interfaces are
numbered 25 through 28 and their status LEDs are located directly under these numbers.
Rear Panel Design
The NetVanta 1544F rear panel is shown below.
100-200VAC
50/60Hz
CompactFlash
Figure 14. NetVanta 1544F Rear Panel Layout
NetVanta 1544F Rear Panel Interfaces
CompactFlash
The CompactFlash slot allows nonvolatile memory expansion with supported densities ranging from
64 MB to 1 GB.
Power Connection
The rear panel has a power input to the AC power supply; either 120 VAC or 240 VAC input
depending on application. Please refer to Supplying Power to the Unit on page 41 for connection
details.
28
Copyright © 2014 ADTRAN, Inc.
61702590G1-34G
NetVanta 1531/1534/1544 Series
Physical Descriptions
LED Descriptions
The following table describes LED activity.
Table 1. Front Panel LED Descriptions
LED
Color
STAT
Indication
Off
Green (flashing)
Green (solid)
Red (solid)
RPS
(1534/1534P/1544/
1544P units only)
EPS
(1534P/1544P units
only)
LINK/ACT
(PoE units only)
PoE
(PoE units only)
VCID
(1534/1534P/1544/
1544P only)
(Future Release)
Port LEDs in
Link/Activity Mode
(1 - 12 1531 Series or
1 - 28 1534/1544
Series)
Port LEDs in
PoE Mode
(1 - 8 1531P or
1 - 24 1534P/1544P)
Port LEDs in
VCID Mode
(1 - 8 1534/1544
Series)
(Future Release)
Off
Green (solid)
Red (solid)
Off
Green (solid)
Red (solid)
Off
Green (solid)
Off
Green (solid)
Off
Green (solid)
Unit is not receiving power.
On power up, the STAT LED flashes rapidly for five
seconds, during which time the user may escape to boot
mode from the CONSOLE port.
Power is on and self-test passed.
Power is on, but the self-test failed or the application code
could not be booted.
RPS is not connected.
RPS is connected and the internal supply is functioning.
RPS is connected and the internal supply has failed.
EPS is not connected.
EPS is connected and the internal supply is functioning.
EPS is connected and the internal supply has failed.
Link status/activity is not being displayed.
Link status/activity is being displayed.
PoE status is not being displayed.
PoE status is being displayed.
VCID is not selected.
VCID is selected. The port LED that corresponds to the
unit’s VCID will display green.
Off
Green (solid)
Amber (flashing)
The port is not connected.
The link is up and the port is enabled.
There is activity on the port.
Off
Green (solid)
Red (solid)
The port is not delivering power.
The port is delivering power.
The port has detected a PoE fault.
Off
Green (solid)
ActivChassis is disabled on this device.
The device has been admitted to the ActivChassis and the
port LED (1 through 8) that corresponds to the unit’s
assigned VCID value is lit.
The device has not been admitted to the ActivChassis and
the port LED (1 through 8) that corresponds to the unit’s
assigned VCID value is lit.
Red (solid)
Ports 25 through 28 are always in LINK/ACT mode.
61702590G1-34G
Copyright © 2014 ADTRAN, Inc.
29
Product Specifications
3.
NetVanta 1531/1534/1544 Series
PRODUCT SPECIFICATIONS
Physical Interface
Ethernet Ports
•
•
•
•
Up to 24 10/100/1000Base-T Ethernet interfaces
24 100/1000Base-X SFP interfaces (NetVanta 1544F)
Up to 4 SFP interfaces
Autorate/duplex/MDI/MDI-X
Console Port
•
DB-9, EIA-232
Switching
•
•
•
•
Layer 3 Lite switching capability (NetVanta 1531/1534)
Layer 3 switching capability (NetVanta 1544)
Nonblocking
8 k (NetVanta 1534) or 16 k (NetVanta 1531/1544) medium access control (MAC) addresses
Maximum Forwarding Bandwidth
•
•
•
NetVanta 1531: 24 Gbps
NetVanta 1534: 62 Gbps
NetVanta 1544: 68 Gbps
Diagnostics
•
•
•
•
•
Port mirroring
Link Layer Discovery Protocol (LLDP) (802.1ab)
LLDP-Media Endpoint Discovery (LLDP-MED)
Ping
Cable diagnostics
Front Panel Status LEDs
•
•
Power status
LAN: link, activity
Port Statistics
•
•
•
Number of TX/RX frames
Number of collisions
Number of errors
Spanning Tree Support
•
•
802.1d spanning tree
802.1w rapid spanning tree
Link Aggregation
•
•
30
802.3ad link aggregation
Support for six trunk groups, 8 ports per group
Copyright © 2014 ADTRAN, Inc.
61702590G1-34G
NetVanta 1531/1534/1544 Series
Product Specifications
Quality of Service (QoS)
•
•
•
802.1p and DiffServ
Four output queues per egress port
Weighted round robin (WRR) and strict priority
VLAN Support
•
•
•
Port-based virtual local area networks (VLANs)
802.1Q tagged trunked VLANs
Support for up to 255 active VLANs
Storm Control
•
Broadcast, unicast, and multicast
Administration
•
•
•
•
•
•
•
Familiar CLI
GUI
n-Command® support
SNMP v3
SYSLOG logging
Email alerts (Simple Mail Transfer Protocol (SMTP))
Tool command language (Tcl) scripting
Network Access Control
•
Port authentication (802.1x)
Wi-Fi Controller
•
Controls up to 24 NetVanta wireless access points (WAPs)
Environment
•
•
•
Operating Temperature: 0°C to 50°C (32°F to 122°F)
Storage Temperature: -20°C to 70°C (-4°F to 158°F)
Relative Humidity: Up to 95 percent, noncondensing
Physical
•
•
•
•
•
•
•
•
•
Chassis: 1U, 19-inch, rack-mountable metal enclosure
Dimensions NetVanta 1531/1531P/1534/1544: 1.7-inch H x 8.0-inch W x 11.0-inch D
Dimensions NetVanta 1544F: 1.7-inch H x 17.2-inch W x 9.2-inch D
Dimensions NetVanta 1534P/1544P: 1.7-inch H x 17.2-inch W x 10.0-inch D
Internal AC power NetVanta 1534/1544: 100 to 250 VAC, 50/60 Hz, 40 W maximum
Internal AC power NetVanta 1531/1531P/1534P/1544P: 110 to 240 VAC, 50/60 Hz,
370 W maximum
Internal AC power NetVanta 1544F: Either 120 or 240 VAC, 50/60 Hz, 40 W maximum
Redundant power supply (NetVanta 1534/1534P/1544/1544P): 12 VDC
Extended power supply (NetVanta 1534P/1544P): 50 VDC
61702590G1-34G
Copyright © 2014 ADTRAN, Inc.
31
Product Specifications
NetVanta 1531/1534/1544 Series
Compliance
• FCC Part 15 Class A
• EN 55022 Class A
• EN 55024
• EN 61000-3-2
• EN 61000-3-3
• ICES 003 Class A
• EN 300 386
• AS/NZS CISPR22 Class A
• UL/CUL 60950-1
• EN 60950-1
• IEC 60950-1
• AS/NZS 60950.1
• RoHS compliant (telecommunications exemption)
32
Copyright © 2014 ADTRAN, Inc.
61702590G1-34G
NetVanta 1531/1534/1544 Series
4.
Unit Installation
UNIT INSTALLATION
The instructions and guidelines provided in this section cover hardware installation topics, such as mounting
options and supplying power to the unit. These instructions are presented as follows:
•
•
•
•
•
Tools Required on page 34
Mounting Options on page 34
Supplying Power to the Unit on page 41
Installing a CompactFlash Card on page 41
Installing the NetVanta 1131 RPS/EPS on page 45
For information on switch configuration for a specific application, refer to the configuration guides provided on
the ADTRAN Support Community. For details on the command line interface (CLI), refer to the
AOS Command Reference Guide. All other related documents are also available online at
http://supportforums.adtran.com.
For more information and help installing your NetVanta ActivReach product, go to
http://www.adtran.com/activreach-help.
To prevent electrical shock, do not install equipment in a wet location or during a
lightning storm.
• The NetVanta 1531/1534/1544 Series is intended to be installed, maintained, and
serviced by qualified service personnel only and should be installed in a restricted
access location as described in UL/IEC 60950-1.
• Do not remove the cover on the RPS or EPS connectors on the rear of the unit. These
connectors are reserved for future use.
• The NetVanta 1600 Series may be connected to multiple power sources. Disconnect all
power sources, including any EPS and RPS connections, prior to servicing the unit.
• Ethernet cables are intended for intrabuilding use only. Connecting an ADTRAN
unit directly to Ethernet cables that run outside the building in which the unit is
housed will void the user's warranty and could create a fire or shock hazard. To
connect an ADTRAN unit to Ethernet cables that run outside the building,
ADTRAN's Ethernet Port Protection Device (EPPD) (P/N 1700502G1) must be
connected between the unit and the outside plant cable. Use of any Ethernet
protector other than ADTRAN's for this purpose will void the user's warranty.
• PoE cables are intended for intrabuilding use only. Connecting an ADTRAN PoE
unit directly to PoE cables that run outside the building in which the unit is housed
will void the user's warranty and could create a fire or shock hazard.
• For outdoor PoE applications, ensure any PoE injector used is approved and
rated for outdoor/exposed wiring applications. Use of a PoE injector that is not
rated for outdoor/exposed wiring applications will void the user's warranty and
could create a fire or shock hazard.
61702590G1-34G
Copyright © 2014 ADTRAN, Inc.
33
Unit Installation
NetVanta 1531/1534/1544 Series
Tools Required
The customer-provided tools required for the hardware installation of the NetVanta are:
•
•
Ethernet cables
Phillips-head screwdriver
To access the CLI of the NetVanta, you will also need a PC with VT-100 terminal emulation
software and a console port cable. Instructions on how to access the CLI are available in
the quick start guide shipped with your unit or online on the ADTRAN Support Community.
Mounting Options
The NetVanta 1531/1534/1544 Series units can be installed in rackmount, wallmount, or tabletop
configurations. The following sections provide step-by-step instructions for rack mounting and wall mounting.
Rack Mounting the NetVanta 1531/1534/1544 Series
The NetVanta 1531/1534/1544 Series are 1U-high, rack-mountable units that can be installed into a 19-inch
equipment rack. NetVanta 1531 mounting brackets (P/N 1700511F1) must be purchased separately.
NetVanta 1534 and NetVanta 1544 mounting brackets are shipped with the units. The NetVanta 1531 Series,
NetVanta 1534, and NetVanta 1544 can be rack mounted with two units side by side using the optional dual
mounting tray (P/N 1700508F1).
The following steps guide you in mounting the NetVanta into a rack.
•
•
•
•
•
34
If installed in a closed or multi-unit rack assembly, the operating ambient temperature
of the rack environment may be greater than room ambient temperature. Therefore,
consideration should be given to installing the equipment in an environment compatible
with the maximum ambient temperature specified by the manufacturer.
Installation of the equipment in a rack should be such that the amount of air flow
required for safe operation of the equipment is not compromised.
Be careful not to compromise the stability of the equipment mounting rack when
installing this product.
Consideration should be given to the connection of the equipment to the supply circuit
and the effect that overloading the circuit might have on overcurrent protection and
supply wiring. Appropriate consideration of equipment nameplate ratings should be
used when addressing this concern.
Reliable grounding of rack-mounted equipment should be maintained. Particular
attention should be given to supply connections other than direct connections to the
branch circuit (e.g., use of power strips).
Copyright © 2014 ADTRAN, Inc.
61702590G1-34G
NetVanta 1531/1534/1544 Series
Unit Installation
Rack Mounting the NetVanta Using the Rack Mounting Brackets
Step
Action
1
Install the rack mounting brackets on the NetVanta. To avoid damaging the unit, use only the
screws shipped with the mounting brackets when attaching them to the chassis. (Figure 15
shows installing the mounting brackets on the NetVanta 1534/1544. The installation of the
mounting brackets is similar for the NetVanta 1531/1531P and NetVanta 1534P/1544P.)
2
To allow proper grounding, scrape the paint from the rack around the mounting holes where the
NetVanta will be positioned.
3
Position the NetVanta in a stationary equipment rack. This unit occupies 1U of space.
4
Have an assistant hold the unit in position as you install two mounting bolts through the unit’s
brackets and into the equipment rack using a #2 Phillips-head screwdriver.
5
Apply power to the unit (refer to Supplying Power to the Unit on page 41).
The NetVanta 1531/1531P/1534/1544 Series units have a Kensington lock slot that accepts
a lock and cable security device (see Figure 15). Consult the manual shipped with your
Kensington lock for installation instructions.
Kensington Lock
Kensington Lock Slot
Figure 15. NetVanta Rack Mounting Brackets and Kensington Lock Slot
61702590G1-34G
Copyright © 2014 ADTRAN, Inc.
35
Unit Installation
NetVanta 1531/1534/1544 Series
Rack Mounting the NetVanta 1531/1531P/1534/1544 Using the Dual Mounting Tray
Step
Action
1
Install the mounting tray (P/N 1700508F1) in a stationary 19-inch equipment rack using the
screws provided.
2
To allow proper grounding, scrape the paint from the rack around the mounting holes where the
tray will be positioned.
3
Position two NetVanta units side by side on the mounting tray lining up the holes in the front of the
NetVantas with the holes in the tabs on the front of the tray (see Figure 16).
4
Insert the provided screws through the tabs into the NetVanta units securing them with a
screwdriver.
5
Apply power to the units (refer to Supplying Power to the Unit on page 41).
The NetVanta 1531/1531P/1534/1544 Series units have a Kensington lock slot that accepts
a lock and cable security device (see Figure 15). Consult the manual shipped with your
Kensington lock for installation instructions.
Figure 16. Dual Mounting Tray
36
Copyright © 2014 ADTRAN, Inc.
61702590G1-34G
NetVanta 1531/1534/1544 Series
Unit Installation
Wall Mounting the NetVanta 1531/1531P/1534/1544 Units
By following these instructions exactly, the NetVanta 1531/1534/1544 Series units can be safely mounted on the
wall. The brackets for wall mounting a single unit (P/N 1200884G1) are shipped with NetVanta 1534/1544
Series units but must be purchased separately for the NetVanta 1531 Series. The NetVanta
1531/1531P/1534/1544 units can be mounted on the wall in a stacked configuration. The brackets for wall
mounting two units (P/N 1700512F1) must be purchased separately. For instructions on wall mounting a single
NetVanta 1531/1531P/1534/1534P/1544, refer to the instructions and Figure 17 on page 38. For instructions on
dual wall mounting the NetVanta 1531/1531P/1534/1534P/1544, refer to the instructions and Figure 18 on page
39. For instructions on wall mounting the NetVanta 1534P/1544P/1544F units, refer to the instructions and
Figure 19 on page 40.
•
•
•
61702590G1-34G
To avoid damaging the unit, use only the screws included in the shipment when
attaching mounting ears to the chassis.
When wall mounting the NetVanta, care must be taken not to damage the power cord.
Do not attach the power cord to the building surface or run it through walls, ceilings,
floors, or openings in the building structure.
The socket-outlet must be installed near the equipment and must be easily accessible.
Copyright © 2014 ADTRAN, Inc.
37
Unit Installation
NetVanta 1531/1534/1544 Series
Instructions for Wall Mounting a Single NetVanta 1531/1531P/1534/1544
Step
Action
1
Attach the mounting brackets (P/N 1200884G1) to the chassis using the provided screws (see
Figure 17).
2
Decide on a location for the NetVanta. NetVanta 1531/1531P/1534/1544 units are mounted
with the front panel facing down, left, or right (see Figure 17). Keep in mind that the unit needs
to be mounted at or above eye level so that the LEDs are viewable.
3
Prepare the mounting surface by attaching a board (typically plywood, 3/4-inch to 1-inch thick)
to a wall stud using #6 to #10 (2.5-inch or greater in length) wood screws.
Important! Mounting to a stud ensures stability. Using sheetrock anchors may not provide
sufficient long-term stability.
4
Have an assistant hold the unit in position as you install two #6 to #10 wood screws (1 inch or
greater in length) through the unit’s brackets and into the mounted board.
5
Proceed to the steps given in Supplying Power to the Unit on page 41.
Figure 17. NetVanta 1531/1531P/1534/1544 Wallmount Installation
38
Copyright © 2014 ADTRAN, Inc.
61702590G1-34G
NetVanta 1531/1534/1544 Series
Unit Installation
Instructions for Dual Wall Mounting NetVanta 1531/1531P/1534/1544
Step
Action
1
Attach the mounting brackets (P/N 1700512F1) to the two chassis using the provided screws
(see Figure 18).
2
Decide on a location for the NetVanta. NetVanta 1531/1531P/1534/1544 units are mounted
with the front panel facing down, left, or right (see Figure 18). Keep in mind that the unit needs
to be mounted at or above eye level so that the LEDs of both units are viewable.
3
Prepare the mounting surface by attaching a board (typically plywood, 3/4-inch to 1-inch thick)
to a wall stud using #6 to #10 (2.5-inch or greater in length) wood screws.
Important! Mounting to a stud ensures stability. Using sheetrock anchors may not provide
sufficient long-term stability.
4
Have an assistant hold the units in position as you install two #6 to #10 wood screws (1 inch or
greater in length) through the unit’s brackets and into the mounted board.
5
Proceed to the steps given in Supplying Power to the Unit on page 41.
Ensure that the proper mounting orientation is followed for both units being installed in
the dual wallmount configuration. Refer to the appropriate hardware installation guide for
installation instructions for each unit.
Figure 18. NetVanta 1531/1531P/1534/1544 Dual Wallmount Installation
61702590G1-34G
Copyright © 2014 ADTRAN, Inc.
39
Unit Installation
NetVanta 1531/1534/1544 Series
Instructions for Wall Mounting the NetVanta 1534P/1544P/1544F
Step
Action
1
Using the screws shipped with the bracket, attach the wallmount brackets to the chassis so that
the portion of the bracket with the mounting holes is flush with the bottom of the chassis (see
Figure 19).
2
Decide on a location for the NetVanta. NetVanta 1534P/1544P/1544F units are mounted with
the front panel facing left (see Figure 19). Keep in mind that the unit needs to be mounted at or
above eye-level so that the LEDs are viewable.
3
Prepare the mounting surface by attaching a board (typically plywood, 3/4-inch to 1-inch thick)
to a wall stud using #6 to #10 (2.5-inch or greater in length) wood screws.
Important! Mounting to a stud ensures stability. Using sheetrock anchors may not provide
sufficient long-term stability.
4
Have an assistant hold the unit in position as you install two #6 to #10 (1-inch or greater in
length) wood screws through the unit’s brackets and into the mounted board (see Figure 19).
5
Proceed to the steps given in Supplying Power to the Unit on page 41.
NetVanta 1544P
STAT
RPS
EPS
LINK/ACT
PoE
VCID
1
2
3
4
5
6
7
8
9
10
11
12
13
14
15
16
17
18
19
20
21
22
23
24
25
26
1G
27
28
2.5G
25
1G
26
27
2.5G
28
Figure 19. NetVanta 1534P/1544P/1544F Wallmount Installation
40
Copyright © 2014 ADTRAN, Inc.
61702590G1-34G
NetVanta 1531/1534/1544 Series
Unit Installation
Supplying Power to the Unit
The NetVanta 1531 Series, NetVanta 1534 Series, NetVanta 1544, and NetVanta 1544P units come equipped
with an auto-sensing 100 to 250 VAC, 50/60 Hz power supply for connecting to a properly grounded power
receptacle. The NetVanta 1544F comes equipped with either a 120 VAC or 240 VAC power supply for
connecting to a properly grounded power receptacle. All necessary power cords are shipped with the units. To
power these units, connect the power cable to an appropriate AC power source.
Installing a CompactFlash Card
The CompactFlash slot (NetVanta 1544F only) supports only ADTRAN-provided 1 GB CompactFlash
cards (P/N 1200819E1). Follow these instructions when installing a card.
The CompactFlash card is hot-swappable and can be inserted or removed while power is
applied to the unit.
Instructions for Installing a CompactFlash Card
Step
Action
Slide the module into the CompactFlash slot until the card is firmly seated against the chassis.
2
The CompactFlash options will now be available in the AOS GUI and CLI.
sh
tFla
pac
Com
1
Figure 20. CompactFlash Card Installation
61702590G1-34G
Copyright © 2014 ADTRAN, Inc.
41
NetVanta 1131 RPS/EPS
5.
NetVanta 1531/1534/1544 Series
NETVANTA 1131 RPS/EPS
The NetVanta 1131 RPS/EPS has three RPS outputs and one EPS output for use with RPS/EPS equipped
NetVanta switches. Important: Refer to the NetVanta 1131 product on www.adtran.com for a list of supported
switches. The RPS outputs provide redundant or backup power for a switch’s internal power supply. The EPS
output provides backup power for a Power over Ethernet (PoE) switch’s internal PoE supply, as well as extended
or supplemental power to provide full PoE for 48-port switches (up to 740 W of power).
The NetVanta 1131 does not activate RPS power until a failure is detected on the switch for which it is providing
redundancy. Once RPS power is being supplied to a switch, if a second switch fails, the power will not transfer
to the second switch. In the event that multiple connected switches lose power simultaneously, RPS power will
be supplied to the first failed switch detected.
The NetVanta 1131 is housed in a 1U-high, metal enclosure that can be wall mounted, rack mounted singly
using the provided rackmount brackets, or rack mounted two side by side using the optional dual mounting tray
(P/N 1700534F1).
The NetVanta 1131 and the NetVanta switch with which it is associated should be
installed in a restricted access location as described in UL 60950-1.
NetVanta 1131 Series Shipping Contents
Each NetVanta 1131 RPS/EPS unit is shipped in its own cardboard shipping carton. Open each carton carefully,
and avoid deep penetration into the carton with sharp objects.
After unpacking the unit, inspect it for possible shipping damage. If the equipment has been damaged in transit,
immediately file a claim with the carrier and contact ADTRAN Customer Service (refer to the Support page on
the ADTRAN website at http://www.adtran.com/support).
Domestic shipments of the NetVanta 1131 include the following items:
•
•
•
•
•
NetVanta 1131 base unit
Two 19-inch rack mounting brackets and eight screws
Two wall mounting brackets and four screws
A detachable power cable with a grounded, three-prong plug
Quick start guide
International shipments of the NetVanta 1638 include the following items:
•
•
•
•
•
42
NetVanta 1131 base unit
Two 19-inch rack mounting brackets and eight screws
Two wall mounting brackets and four screws
All necessary power cords
Quick start guide
Copyright © 2014 ADTRAN, Inc.
61702590G1-34G
NetVanta 1531/1534/1544 Series
NetVanta 1131 RPS/EPS
NetVanta 1131 Front Panel Design
The NetVanta 1131 front panel is shown below. Table 2 on page 44 describes all of the LED behaviors.
POWER
EPS ALM
RPS ALM
FAN ALM
EPS CONN
CONN
RPS1
STAT
CONN
RPS2
STAT
CONN
RPS3
STAT
Figure 21. NetVanta 1131 Front Panel Layout
Front Panel Features
Power LED
The Power LED is located on the left side of the unit and indicates the unit’s power status.
EPS Alarm LED
The EPS ALM LED is located on the left side of the unit and indicates whether the EPS is
functioning.
RPS Alarm LED
The RPS ALM LED is located on the left side of the unit and indicates whether the RPS is
functioning.
Fan Alarm LED
The FAN ALM LED is located on the left side of the unit and indicates the fan status.
EPS Connection LED
The EPS CONN LED is located on the left side of the unit and indicates status of the EPS connection.
RPS Connection LEDs
The CONN LEDs for RPS1, RPS2, and RPS3 are located on the left side of the unit and indicate
status of the RPS connections.
RPS Status LEDs
The STAT LEDs for RPS1, RPS2, and RPS3 are located on the left side of the unit and indicate status
of the RPS connections.
NetVanta 1131 Rear Panel Design
The NetVanta 1131 rear panel is shown below.
E
P
S
POWER
RPS1
RPS2
RPS3
Figure 22. NetVanta 1131 Rear Panel Layout
61702590G1-34G
Copyright © 2014 ADTRAN, Inc.
43
NetVanta 1131 RPS/EPS
NetVanta 1531/1534/1544 Series
Rear Panel Interfaces
Power Connection
The NetVanta 1131 has a power input (labeled POWER) to the AC universal power supply. Refer to
Powering the NetVanta 1131 and the NetVanta Switch on page 50 for connection details.
Redundant Power Connections
The rear panel contains three RPS receptacles labeled RPS1, RPS2, and RPS3 that can be connected
to NetVanta switches using the NetVanta 1131 RPS cable P/N 1700532F1 (purchased separately).
Extended Power Connection
The rear panel contains one EPS receptacle labeled EPS that can be connected to NetVanta switches
using the NetVanta 1131 EPS cable P/N 1700533F1 (purchased separately).
LED Behaviors
The following table describes LED activity for the NetVanta 1131 RPS/EPS.
Table 2. Front Panel LED Behaviors
LED
Power
RPS ALM
EPS ALM
FAN ALM
RPS CONN (1 - 3)
RPS STAT (1 - 3)
EPS CONN
44
Color
Indication
Off
The unit is not receiving power.
Green (solid)
The unit is receiving power.
Off
The RPS is functioning properly.
Red (solid)
The RPS has failed.
Off
The EPS is functioning properly.
Red (solid)
The EPS has failed.
Off
The fans are functioning properly and the system temperature
is acceptable.
Red (solid)
The fans have failed.
Off
There is no connection to the switch.
Green (solid)
There is a valid connection to the switch.
Off
Power is not being provided to the associated port.
Amber (solid)
Power is being provided to the associated port.
Amber (flashing)
A fault condition exists on the associated port.
Off
There is no connection to the switch.
Green (solid)
There is a valid connection to the switch.
Copyright © 2014 ADTRAN, Inc.
61702590G1-34G
NetVanta 1531/1534/1544 Series
NetVanta 1131 RPS/EPS
Installing the NetVanta 1131 RPS/EPS
The instructions and guidelines provided in the following sections cover hardware installation topics, such as
mounting options and supplying power to the NetVanta 1131.
Rack Mounting the NetVanta 1131
The NetVanta 1131 can be installed into a 19-inch equipment rack by following these steps:
•
•
•
•
•
•
•
61702590G1-34G
The NetVanta 1131 is intended to be installed, maintained, and serviced by qualified
service personnel only and is for use with NetVanta switches only.
If installed in a closed or multi-unit rack assembly, the operating ambient temperature
of the rack environment may be greater than room ambient temperature. Therefore,
consideration should be given to installing the equipment in an environment
compatible with the maximum specified 50°C ambient temperature.
Installation of the equipment in a rack should be such that the amount of air flow
required for safe operation of the equipment is not compromised.
Be careful not to compromise the stability of the equipment mounting rack when
installing this product.
Consideration should be given to the connection of the equipment to the supply circuit
and the effect that overloading the circuit might have on overcurrent protection and
supply wiring. Appropriate consideration of equipment nameplate ratings should be
used when addressing this concern.
Reliable grounding of rack-mounted equipment should be maintained. Particular
attention should be given to supply connections other than direct connections to the
branch circuit (e.g., use of power strips).
This equipment incorporates double pole/neutral fusing. If the neutral fuse opens and
the line fuse does not open, voltage could still be present in the unit. Line and neutral
are provided with fuses for overcurrent protection.
Copyright © 2014 ADTRAN, Inc.
45
NetVanta 1131 RPS/EPS
NetVanta 1531/1534/1544 Series
Single Rackmount
Instructions for Rack Mounting the NetVanta 1131 (Single Mount)
Step
Action
1
Securely fasten the rackmount brackets to the NetVanta 1131 using the screws provided with
the unit. The brackets can be attached in flush mount, 2-inch mount, and mid-mount positions
(see Figure 23) depending on your installation requirements.
Important! To avoid damaging the unit when attaching the mounting brackets, use only the
screws supplied with the unit.
2
To allow proper grounding, scrape the paint from the rack around the mounting holes where the
unit will be positioned.
3
Position the unit in a stationary equipment rack either above or below the NetVanta switch.
4
Have an assistant hold the unit in position as you install two appropriate mounting bolts through
the unit’s brackets and into the equipment rack.
5
Proceed to the steps given in Connecting the NetVanta 1131 and the NetVanta Switch on
page 49.
.
Front Mount
2-inch Mount
Mid-mount
Figure 23. Rack Mounting the NetVanta 1131 Using the Brackets
46
Copyright © 2014 ADTRAN, Inc.
61702590G1-34G
NetVanta 1531/1534/1544 Series
NetVanta 1131 RPS/EPS
Dual Rackmount
Instructions for Rack Mounting the NetVanta 1131 (Dual Mount)
Step
Action
1
Install the dual mounting tray (P/N 1700534F1 purchased separately) in a stationary equipment
rack using the mounting brackets and four screws provided.
2
To allow proper grounding, scrape the paint from the rack around the mounting holes where the
tray will be positioned.
3
Position two NetVanta 1131 units side by side on the dual mounting tray lining up the holes in
the front of the units with the holes in the tabs on the front of the tray (see Figure 24).
Important! To avoid damaging the unit when attaching it to the dual mounting tray, use only the
screws supplied with the tray.
4
Insert the provided screws through the tabs into the units securing them with a screwdriver.
5
Proceed to the steps given in Connecting the NetVanta 1131 and the NetVanta Switch on
page 49.
Figure 24. Rack Mounting the NetVanta 1131 Using the Dual Mounting Tray
61702590G1-34G
Copyright © 2014 ADTRAN, Inc.
47
NetVanta 1131 RPS/EPS
NetVanta 1531/1534/1544 Series
Wall Mounting the NetVanta 1131
The NetVanta 1131 can be mounted on a wall by following these steps:
Instructions for Wall Mounting the NetVanta 1131
Step
Action
1
Attach the wallmount brackets so that the portion with the mounting holes is flush with the
bottom of the chassis.
2
Decide on a location for the unit. NetVanta 1131 units are mounted with the front panel facing
left (see Figure 25). Keep in mind that the unit needs to be mounted at or above eye-level so
that the LEDs are visible.
3
Prepare the mounting surface by attaching a board (typically plywood, 3/4-inch to 1-inch thick)
to a wall stud using #6 to #10 (2.5-inch or greater in length) wood screws.
Important! To avoid damaging the unit when attaching the mounting brackets, use only the
screws supplied with the unit.
4
Have an assistant hold the unit in position as you install two #6 to #10 (1-inch or greater in
length) wood screws through the unit’s brackets and into the mounted board (see Figure 25).
5
Proceed to the steps given in Powering the NetVanta 1131 and the NetVanta Switch on
page 50.
Figure 25. Wall Mounting the NetVanta 1131
48
Copyright © 2014 ADTRAN, Inc.
61702590G1-34G
NetVanta 1531/1534/1544 Series
NetVanta 1131 RPS/EPS
Connecting the NetVanta 1131 and the NetVanta Switch
Follow these instructions to connect your NetVanta 1131 RPS/EPS to your NetVanta switch.
Instructions for Connecting the NetVanta 1131 to the NetVanta Switch
Step
Action
1
Ensure that all power sources have been removed from the NetVanta 1131 and the NetVanta
switch(es) to be connected.
2
With a Phillips head screwdriver, remove the cover plates from both the NetVanta 1131
RPS/EPS receptacles and the NetVanta switch’s RPS/EPS receptacles on the rear panels of
the units.
Important! Do not remove the cover plates from the RPS/EPS receptacles unless you plan to
use them.
3
Insert one end of the RPS cable (P/N 1700532F1 sold separately) into a receptacle labeled
RPS1, RPS2, or RPS3 located on the rear panel of the NetVanta 1131. Press the connector
until the pins are fully inserted and the base of the connector is flush with the unit.
Important! Do not use excessive force. If the connector does not insert easily, check to ensure
you are inserting the correct connector into the unit.
4
Insert the connector on the other end of the RPS cable into the receptacle labeled RPS located
on the rear panel of the NetVanta switch. Press the connector until the pins are fully inserted
and the base of the connector is flush with the unit.
5
If you plan to use the NetVanta 1131 as an EPS, repeat Steps 1 through 4 using the EPS cable
(P/N 1700533F1 sold separately) and the receptacles labeled EPS located on the rear panels
of the NetVanta 1131 and the NetVanta switch and an EPS cable.
6
To remove an RPS or EPS cable from the unit, pinch the sides of the connector and pull gently
to release it from the receptacle.
7
Proceed to Powering the NetVanta 1131 and the NetVanta Switch on page 50.
61702590G1-34G
Copyright © 2014 ADTRAN, Inc.
49
NetVanta 1131 RPS/EPS
NetVanta 1531/1534/1544 Series
Powering the NetVanta 1131 and the NetVanta Switch
Follow these instructions to power your NetVanta 1131 RPS/EPS and your NetVanta switch.
• This unit shall be installed in accordance with Articles 300 and 400 of NEC NFPA 70.
• Power to the AC system must be from an appropriately rated and grounded source.
• Maximum recommended ambient operating temperature is 50oC.
Instructions for Powering the NetVanta 1131 and the NetVanta Switch
Step
Action
1
Plug the female end NetVanta switch’s power cord (provided with the unit) into the power
receptacle on the rear panel of the unit.
2
Connect the other end (3-prong plug) of the NetVanta switch’s power cord to the proper 110 to
240 VAC grounded receptacle.
3
Plug the female end of the NetVanta 1131 unit’s power cord (provided with the unit) into the
power receptacle labeled Power on the rear panel of the unit.
4
Connect the other end (3-prong plug) of the unit’s power cord to the proper 110 to 240 VAC
grounded receptacle.
Your NetVanta unit is now ready to be configured and connected to the network. For information on switch
configuration for a specific application, refer to the configuration guides provided on the ADTRAN Support
Community. For details on the command line interface (CLI), refer to the AOS Command Reference Guide. All
other related documents are also available online at http://supportforums.adtran.com.
50
Copyright © 2014 ADTRAN, Inc.
61702590G1-34G
APPENDIX A.
CONNECTOR PIN DEFINITIONS
The following tables provide the pin assignments for the base unit.
Base Unit Pinouts
Table A-1. CONSOLE Port Pinouts
Pin
Name
Description
1
DCD
2
RD
Receive Data (output)
3
TD
Transmit Data (input)
4
DTR
5
SG
6
DSR
7
—
8
CTS
9
—
Data Carrier Detect (output)
Data Terminal Ready (input)
Signal Ground
Data Set Ready Tied to pin 1 (output)
Unused
Clear to Send Tied to pin 1 (output)
Unused
Table A-2. 1000Base-T Gigabit Ethernet Port Pinouts
Pin
Name
1
TRD0+
Transmit/Receive Positive
2
TRD0-
Transmit/Receive Negative
3
TRD1+
Transmit/Receive Positive
4
TRD2+
Transmit/Receive Positive
5
TRD2-
Transmit/Receive Negative
6
TRD1-
Transmit/Receive Negative
7
TRD3+
Transmit/Receive Positive
8
TRD3-
Transmit/Receive Negative
61702590G1-34G
Description
Copyright © 2014 ADTRAN, Inc.
51
Appendix A. Connector Pin Definitions
NetVanta 1531/1534/1544 Series
Table A-3. SFP Slot Pinouts
52
Pin
Name
Pin
Name
1
GND
11
GND
2
TX_FAULT
12
RX_DAT-
3
TX_DISABLE
13
RX_DAT+
4
I2C_SDA
14
GND
5
I2C_SCL
15
VddR
6
MOD_DEF(0)
16
VddT
7
RATESEL
17
GND
8
RX_LOS
18
TX_DAT+
9
GND
19
TX_DAT-
10
GND
20
GND
Copyright © 2014 ADTRAN, Inc.
61702590G1-34G