1
Planning & Design: XXL and XL PANEL ready (FI) Dishwashers
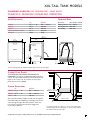
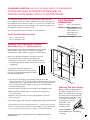
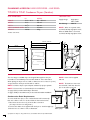
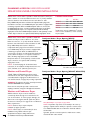
Fitting the ASKO accessory door panel or custom door panel with a 4˝ (102 MM) REVEAL
Custom Panel
Dimensions
The ASKO panel ready models can be installed with a fully-integrated,
buyer-supplied custom door panel or ASKO accessory panel (see page 10)
that extends from the reveal / toe kick to the counter top. The unit comes
with everything needed to make installing the door panel easy. The door is
predrilled for the panel´s mounting screws.
Width:
Height:
23 5 / 8 ˝ min* (600 mm)
30 1/ 8 ˝ (765 mm
(Measured from the top
of the panel to the
lower edge of the kitchen cabinet.)
Thickness: ¾˝ (19 mm)
The custom panel should be a minimum of ¾˝ (19 mm) thick.
Items Provided With The Unit
• Two 3 / 8˝ (10 mm) screws
• Six 1 ¾˝ (44 mm) screws
Installing The Custom Panel or ASKO
Accessory Panel – 4˝ (102mm) Reveal
2 1/8˝
(54 mm)
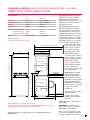
Before fitting the door panel, the dishwasher must be installed
underneath the cabinet. After you´ve made the required
measurements, pull the machine out again to install the panel.
C
A
30 1/8˝
(765 mm)
B
IMPORTANT! The custom panel must not
obstruct the fan exhaust vent; otherwise, moisture
from the vent could eventually damage the cabinet
and create drying problems.
10 7
(276 /8˝
mm
)
3.Hook the panel screws (B) into the keyholes on the dishwasher door.
4.Slide the panel to the left until it is centered in the opening, and
secure the screws.
5.Open the door and use the six screws (D) supplied to secure the
panel to the door.
NOTE: Refer to page 10 for information regarding spring weights and part numbers
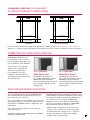
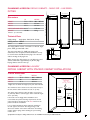
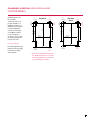
Max panel width cannot exceed cutout dimensions less 1/ 8 ˝ (3 mm) reveal on each side.
With use of optional FI trim kit. Custom door panel height or position should adjust
to conceal upper trim (if applied). Refer to page 30 for FI trim kit information.
**
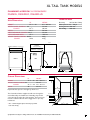
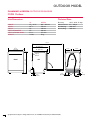
Specifications are subject to change without notice. See installation instructions for
additional details.
10 7
(276 /8˝
mm
)
C
7 11/16˝
(195 mm)
D
B
C
17 ½˝
(445 mm)
Turbo fan
exhaust vent
2.The two short screws (B) go into the back of the panel, 15˝ (381
mm) (no top trim) or 15 3 / 8˝ (391 mm) (with top trim) from the upper edge
of the panel and 10 7/ 8˝ (276 mm) from the center of the panel. Insert the
short screws into the panel, leaving 1/ 8˝ (3 mm) of space between the
screw head and the panel.
* 15˝ or 15 3/8˝ **
(381 or 391 mm)
D
Refer to the illustration at right for instruction references.
1.Fit the handle (A) onto the panel according to the
manufacturer´s instructions. (NOTE: A handle should be
used rather than a knob, because a knob does not provide
enough grip.)
D
23 5
(60 /8˝ mi
0 m n*
m)
3
/8˝
(10 mm)
¾˝
(19 mm)
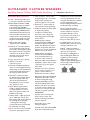
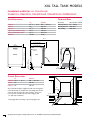
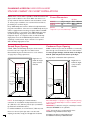
Adjusting The Door Springs
Before you push the dishwasher into
the cabinet opening, test the door to
make sure it stays in place at any angle.
If necessary, pull out the machine and
adjust the tension of the door springs
on the sides of the machine
by moving them one hole
further back or by
twisting the spring
to make it shorter.
Shorten
Models D5894XXLFI
& D5554XXLFI feature front-adjusting
door springs
*
27