1
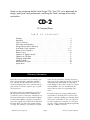
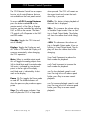
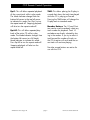
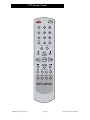
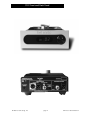
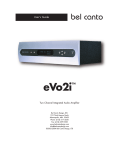
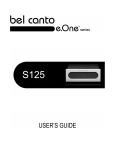
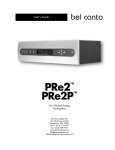
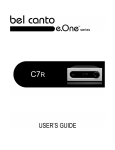
bel canto
User's Guide
CD-2
™
e.One Series
™
CD Transport/Player
Bel Canto Design, LTD.
221 North First Street
Minneapolis, MN 55401
Phone: (612) 317.4550
Fax: (612) 359.9358
www.belcantodesign.com
[email protected]
©2007 Bel Canto Design, LTD
Thank you for purchasing the Bel Canto Design CD-2. Your CD-2 sets a benchmark for
design, quality and sonic performance, continuing Bel Canto’s heritage of musicality
and realism.
CD-2
CD Transport/Player
T A B L E
O F
C O N T E N T S
Warranty . . . . . . . . . . . . . . . . . . . . . . . . . . . . . . . . . . . . . . . . . . . . . . . . . . . . .3
Unpacking . . . . . . . . . . . . . . . . . . . . . . . . . . . . . . . . . . . . . . . . . . . . . . . . . . . . 4
Power Connection . . . . . . . . . . . . . . . . . . . . . . . . . . . . . . . . . . . . . . . . . . . . . . 4
Initial Setup and Placement . . . . . . . . . . . . . . . . . . . . . . . . . . . . . . . . . . . . . . . . 5
Design Features and Conditioning . . . . . . . . . . . . . . . . . . . . . . . . . . . . . . . . . . . 5
Front Panel Control Operation . . . . . . . . . . . . . . . . . . . . . . . . . . . . . . . . . . . .6 - 7
Remote Control Operation . . . . . . . . . . . . . . . . . . . . . . . . . . . . . . . . . . . . . . .8 - 9
Remote Control . . . . . . . . . . . . . . . . . . . . . . . . . . . . . . . . . . . . . . . . . . . . . . . .10
Operation as Digital Transport . . . . . . . . . . . . . . . . . . . . . . . . . . . . . . . . . . . . .11
Operation as CD Player . . . . . . . . . . . . . . . . . . . . . . . . . . . . . . . . . . . . . . . . . .11
Changing Sample Rate . . . . . . . . . . . . . . . . . . . . . . . . . . . . . . . . . . . . . . . . . . .12
Operation Notes . . . . . . . . . . . . . . . . . . . . . . . . . . . . . . . . . . . . . . . . . . . . . . .13
Rear Panel/Front Panel . . . . . . . . . . . . . . . . . . . . . . . . . . . . . . . . . . . . . . . . . . .14
Specifications . . . . . . . . . . . . . . . . . . . . . . . . . . . . . . . . . . . . . . . . . . . . . . . . .15
Warranty Information
owner who has returned the warranty sheet along
with a copy of the original sales receipt, covering all
internal parts and workmanship. This warranty is
void if damage is due to abuse, neglect, or unauthorized modification. The cost associated with the
return of this unit is the sole responsibility of the
owner.
Please take a moment to fill out your warranty registration sheet. Returning this registration validates
your warranty. This information will not be sold or
released outside Bel Canto. Your comments and suggestions help us continue to improve upon our products and services.
Bel Canto products are automatically covered by a
90 day factory warranty. With no additional cost,
you have the option to extend your warranty by completing and returning the enclosed warranty registration form within 30 days of purchase, along with a
copy of the original sales receipt from an authorized
Bel Canto dealer. This will ensure prompt warranty
coverage. This warranty is only valid to the original
© 2007 bel canto design, Ltd.
Bel Canto products are uniquely identified with a
serial number on the back panel of each unit. This
number is required to validate your warranty. Please
reference the serial number if service is required. If
you have any questions, comments, or if we can be
of service, please contact us Monday through Friday
9:00 a.m. - 5:00 p.m. CT/USA.
page 3
CD-2 User’s Guide 0607revA
Unpacking your CD-2
CD-2 box contents include the following:
1 (one) - CD-2 CD player
1 (one) - Magnetic Puck
1 (one) - BNC to RCA Adapter for the SPDIF output
1 (one) - CD-2 User’s Guide and Warranty Sheet
1 (one) - 12V Universal Power Supply and Power cord
1 (one) - Remote Control
Carefully unpack each piece and check
for shipping damage. If there is any
damage, or if anything is missing,
please contact your dealer, distributor or
Bel Canto Design.
IMPORTANT: Save all packing
materials as the packing is specially designed to protect the unit during
transportation or shipping. If the packaging becomes lost or damaged, please
contact your dealer, distributor or Bel
Canto before attempting to transport
your unit.
Never Pack the CD-2 with the
Magnetic Puck on the Turntable.
Power Connection
This cd player, like any electrical component, can be dangerous and cause
injury unless correct handling procedures are observed and used. Before
powering this cd player it is necessary
to read and follow proper setup and
procedures.
The power supply for the CD-2 is a universal supply. The power cable should
have the correct plug for your local
power system. If you believe this to not
be true, please contact your dealer
immediately.
Warning!
Do not connect power to this
cd player yet!
© 2007 bel canto design, Ltd.
page 4
CD-2 User’s Guide 0607revA
Placement and Initial Setup
Placement on top of your audio furniture
or on a shelf with at least 6 inches of
clearance above the CD-2 will insure
that you can access the top loading CD
transport mechanism. Placement in a relatively sheltered environment will insure
that the CD-2 can operate un-impeded
by dust or animals.
Because the CD-2 runs cool it can be
placed in many system locations without
compromise. We do not recommend
placing weights or other objects directly
on the CD-2. This may mar or scratch
the chassis finish. Do not use harsh
chemicals when cleaning the outside of
your CD-2.
IMPORTANT: Make all connections and settings before powering your unit.
Design Features
• 24/192 integrated DAC with 112dB
of dynamic range
• Ultra low noise second stage independant regulation for the analog sections
• High speed isolation transformers on
AES and SPDIF digital outputs for optimum interface to outboard DAC
• Selectable Fixed or Variable analog
outputs can drive amplifier directly
• 4Vrms Balanced and 2Vrms single
ended analog outputs
• Single front panel control for simple
operation
• Comprehensive drive functions available from full-system remote control
• Ultra-efficient Green Technology design
with 3W standby and 5W operating
power dissipation
The Bel Canto CD-2 is designed to recover the digital audio data from a CD errorfree and with extremely low jitter
• Ultra-ClockTM architecture recovers the
data with minimal clock jitter
• CD-PRO2 top load mechanism for quality and longevity
• 24/96 upsampling maximizes dynamic range potential from inboard and outboard DACs
• 4-layer PC board design for superior
signal routing, grounding and power
supply routing
• Outboard regulated power supply provides firm foundation for multiple local
regulators
• Multi-stage power supplies for precise
power to the sensitive analog circuitry
Conditioning
formance keep the CD-2 powered up at
all times.
The CD-2’s sonic performance will
start to stabilize after 100 hours of
continuous power up. For optimum per© 2007 bel canto design, Ltd.
page 5
CD-2 User’s Guide 0607revA
CD-2 Care and Warnings
designed for cleaning Optical Disc player lenses. You can use a small puff of
clean air to remove minor dust buildup
or just play a CD and the motion of the
CD should keep the lens clear of dust. If
you are concerned about dust buildup in
your environment you can leave a blank
CD in place to cover the mechanism
when not using the CD-2.
DO NOT ATTEMPT to OPERATE the
CD-2 WITHOUT a CD in PLACE
If you attempt to take the CD-2 out of
standby when no CD is present it will go
back into standby. The CD Laser is inactive whenever the CD-2 is in Stop or
Standby mode. The Laser will not operate without a CD and the Magnetic Puck
on the turntable. You can ONLY take the
CD-2 output of Standby with a CD in
place on the unit and the Magnetic Puck
on the CD.
REPAIR of the CD-2 MECHANISM
DUE to MISHANDLING is NOT
COVERED by the CD-2 WARRANTY
Following these guidelines will result in
many years of reliable operation. The
CD-2 mechanism is a professional grade
device and is inherently a high reliability
device.
NEVER REMOVE the CD-2 MAGNETIC PUCK while the CD is SPINNING
NEVER PRESS DOWN on the CD-2
turntable as this will damage the
turntable mechanism.
Note that there are no user serviceable parts inside the CD-2
chassis.
NEVER DROP the MAGNETIC
PUCK or ANY OTHER OBJECT on
the TURNTABLE
Opening the chassis will void the warranty.
NEVER PACK or SHIP the CD-2
with the MAGNETIC PUCK on the
TURNTABLE
There are no fuses inside the CD2.
Use only with the supplied power supply. Use with a different supply will void
the warranty.
Undo pressure or shock to the turntable
will damage the mechanism. Repair of
the mechanism for this damage is not
covered under the CD-2 warranty.
If you have a problem with the operation of your CD-2 contact Bel Canto
Design or your dealer/distributor for
service.
Also, NEVER TOUCH the LENS of
the CD MECHANISM or clean it with
anything other than specific cloth
© 2007 bel canto design, Ltd.
page 6
CD-2 User’s Guide 0607revA
CD-2 Front Panel Operation
rotating the control. This works while in
Pause, Play or Stop modes.
CD-2 Operating Mode Display:
Several Operating Modes are displayed
using the left-most 7-segment display:
To Pause while playing press the control once.
Two Vertical Lines Indicate Pause, a
Square indicates Stop, a Blinking
Segmented Square indicates Play.
To Stop at any time press the control
twice. The CD-2 will remain on the current track on re-start the track when Play
is started.
Standby is indicated by two dashes - -
A center press on the control will be
acknowledged by the display brightening momentarily.
CD-2 in Fixed Output Mode
(Fixed/Variable IN):
Upon application of power the CD-2
goes through a display check and
comes up in Standby, indicated by two
dashes on the display - -.
When in Play mode the mode indicator
shows a square with sequenced blinking
segments.
Place a CD on the CD-2 and then place
the magnetic puck on the CD. It will
automatically center and clamp itself in
place.
Stop is indicated by a stationary square.
The CD will be stopped. In Play and
Pause modes the CD will continue to
rotate.
Press the center of the front panel control
for 2-3 seconds, you will then see the
firmware revision displayed for a couple
of seconds and the CD will spin while 4
dashes are displayed. Once the CD
Table Of Contents is read the display
will indicate the total CD time and the
number of tracks.
CD-2 in Variable Output Mode
(Fixed/Variable OUT):
Operation will be the same as above
accept that rotating the front panel control while in Stop or Play mode will indicate the volume level and then change
the volume up or down as the control is
rotated.
A 01 display indicating track 1 with 2
vertical dashes || in the left hand mode
indicator display will indicate that the
CD-2 is in Pause mode and is ready to
play the CD.
Rotating the control in Pause mode will
change the track number to be played.
The volume display will stay lit for several seconds and then the display will go
back to the mode indicator/track number display.
Initiate Play by pressing the front panel
control once. Scan to a new track by
© 2007 bel canto design, Ltd.
page 7
CD-2 User’s Guide 0607revA
CD-2 Remote Control Operation
The CD-2 Remote Control has a comprehensive set of control features that are
not available on the front panel control.
when pressed. The CD-2 will remain on
the current track and re-start the track
when Play is pressed.
To access all CD-2 control features
press the button marked CD on the
remote control. e.One Dac or Preamp
functions can be controlled by selecting
DAC or PRE on the remote. The Main
CD controls will still operate in the DAC
and PRE modes.
PLAY>: This button initiates playback of
the track that is displayed.
Standby: Toggles the CD-2 into and
out of Standby.
Display: Toggles the Display on and
off. When in Off mode the Display will
come on momentarily when changing
the CD-2 operation.
Mute: When in variable output mode
this will toggle the analog outputs from
Soft to Hard Mute and Un-muted modes.
Soft mute is indicated by two decimal
points in the far right of the diaply . .
and Hard mute is indicated by 4 decimals on the display . . . .
Pause ||: This toggles the Pause mode
on and off. The Mode Indicator will
show the pause or play mode as appropriate.
Stop: The solid square indicates Stop
and will place the CD-2 in Stop mode
© 2007 bel canto design, Ltd.
VOL>: This increases the volume setting
in Variable Output mode. It has no function in Fixed Output Mode. The display
will show the volume level while changing.
<VOL: This decreases the volume setting in Variable Output mode. It has no
function in Fixed Output Mode. The display will show the volume level while
changing.
|<<: Track Decrement to reduce the
track number for playback.
>>|: Track Increment to increase the
track number for playback.
<<: To slow playback speed in real
time. Pressing twice will reduce speed
further, press Play to resume normal
playback.
>>: To increase playback speed in real
time. Pressing twice will increase speed
further, press Play to resume normal
playback.
page 8
CD-2 User’s Guide 0607revA
CD-2 Remote Control Operation
TIME: This allows placing the Display in
a mode that shows the track time played
while the CD is playing or Paused.
Pressing the TIME button will change the
Display back to standard mode.
Rpt1: This will allow repeated playback
of the current track while in play mode.
The Mode Indicator changes from the
bottom left corner to the top left corner
to indicate this mode. Press Rpt1 to turn
the repeat mode off. Stopping playback
will also turn the repeat mode off.
Number Buttons: The 1-9 and 0 buttons can be used to randomly select any
track number for playback. Track 10
and above are directly selected by keying in the number. If you try to select a
track beyond the number of tracks on
the CD no action will result and the current track will continue playing.
Rpt All: This will allow repeated playback of the entire CD while in play
mode. The Mode Indicator changes from
the bottom left corner to a full height
Mode Indicator to indicate this mode.
Press Rpt All to turn the repeat mode off.
Stopping playback will also turn the
repeat mode off.
© 2007 bel canto design, Ltd.
No other remote buttons are active for
use with the CD-2.
page 9
CD-2 User’s Guide 0607revA
CD-2 Remote Control
$)30,!9
34"9
#$
-54%
02%
$!#
#(
6/,
0,!9
6/,
#(
"AL,
2PT
2PT!LL
4IME
0HASE
"AL2
BELCANTO
© 2007 bel canto design, Ltd.
page 10
CD-2 User’s Guide 0607revA
CD-2 Operation as Digital Transport
The CD-2 produces a low jitter 24/96
data-stream from any of the 3 digital outputs. 110 ohm AES/EBU balanced, 75
ohm BNC SPDIF or the high speed
TOSLINK output can be used as
required. Any or all of the outputs can
be connected to any digital playback
device.
scrolling the Volume control level to 0.0
then pressing the Fixed/Variable button
IN to the Fixed position.
While using the CD-2 as a Digital
Source you can disable the analog output section by selecting Variable Output,
A BNC to RCA female adaper is included for use with RCA terminated cables
on the SPDIF digital output.
Note that if your external DAC does not
accept 96kHz data then you can set the
sample rate to 48kHz. See page 12 for
further information.
CD-2 Operation as CD Player
The high dynamic range analog outputs
of the CD-2 can be used to drive an
amplifier directly. This is best achieved
by using the 4Vrms balanced outputs
directly into the balanced inputs of your
power amplifier.
For use into an analog preamplifier
scroll the volume level to 100.0 and
press the Fixed/Variable button to the IN
position and use the volume control on
the analog preamplifier to control system
level.
Place the Fixed/Variable button in the
OUT position. You can then control the
volume level of your CD playback
through the volume control of the CD-2.
The RCA outputs can also be used
directly into the RCA jack of an amplifier
with 6 dB lower output level.
Note that if you are only using the analog outputs on the CD-2 you may want
to try setting the sample rate to 192kHz
for optimum sound quality. See page 12
for further information.
© 2007 bel canto design, Ltd.
page 11
CD-2 User’s Guide 0607revA
CD-2 Sample Rate Setting
The default 96kHz sample rate setting
can be modified by using the remote
control. While the 96kHz sample rate is
optimum for many applications there are
several conditions which may benefit
from either the lower 48kHz or higher
192kHz settings.
1) If using the CD-2 with an external
DAC that will not accept the 96kHz sample rate then set the CD-2 sample rate to
48kHz.
2) If using the CD-2 analog outputs then
you can optimize the sonic performance
of the internal DAC by operating the
CD-2 at the higher 192kHz sample rate.
The digital outputs are disabled
when the 192 rate is chosen.
3) If using the CD-2 as the transport for
driving a Bel Canto Dac3 we recommend that you leave the sample rate setting at the factory 96kHz setting.
Note that in all Sample Rate settings the
bit depth for the CD-2 output is 24 bits.
© 2007 bel canto design, Ltd.
Changing the Sample Rate setting:
1) Put the CD-2 in Standby
2) With the remote in the CD mode
press the lower 4 buttons in sequence
(Bal L, TIME, PHASE, Bal R)
3) The display will show the current sample rate setting (96 is the factory setting)
4) Use the CH up and CH down arrow
buttons to scroll to a different setting (4896 or 192)
5) Either press the Standby button to
save the setting and take the CD-2 out of
standby or wait for the display to time
out and take the CD-2 out of standby.
The CD-2 will now be operating at thechosen sample rate.
The 192kHz setting is used only
when using the CD-2 analog outputs.
page 12
CD-2 User’s Guide 0607revA
CD-2 Operation Notes
The precision machined and polished
turntable axis is designed to center the
magnetic puck for stable rotation, minimizing a potential source of low frequency jitter. This axis is polished to prevent
scratching of the CD surface because of
contact with the axis when placing or
removing a CD from the turntable.
You can store the magnetic puck either
on the top surface of the CD-2 top cover
or on the turntable axis when not playing a CD.
You could use a blank CD-rom as a
cover over the CD mechanism when not
using the CD-2.
Because of the comprehensive de-jitter
circuitry in the CD-2 we have found that
the CD-2 is not sensitive to ambient light.
The low level jitter of the audio output
© 2007 bel canto design, Ltd.
data stream is primarily dependent on
the Ultra-Clock jitter specification.
There will be low level pops on the analog outputs when disconnecting or reconnecting the external power supply.
The CD-2 incorporates a hard mute circuit to minimize these pops but there is
some residual level. To avoid any pops
mute the preamplifier or power down
the amplifier that the CD-2 is connected
to whenever attaching or disconnecting
the power supply for the CD-2.
Note that mechanical noises from the
CD-2 linear tracking mechanism are normal when changing tracks and that there
is a very low level motor noise while
playing the CD. The CD rotating speed
also will change as the CD plays to the
outside tracks. The CD rotation slows on
the higher numbered tracks.
page 13
CD-2 User’s Guide 0607revA
CD-2 Front and Back Panel
© 2007 bel canto design, Ltd.
page 14
CD-2 User’s Guide 0607revA
CD-2 Specifications
Disc Compatibility . . . . . . . . . . . . . . . . .CD-DA (Red Book IEC908), CD-R and CD-RW discs
Digital Outputs
Maximum Data Rate/Bit Depth . . . . . . . . . . . . . . . . . . . . . . . . . . . . . . . . . .96Khz/24bit
Digital Output types . . . . . . . . . . . . . . . . . . . . . . . . . AES/EBU XLR, SPDIF BNC, TOSLINK
AES/EBU Digital Output Level . . . . . . . . . . . . . . . . . . . . . . . . . . . . . . . . . . . . . 2.7V p-p
PDIF Digital Output Level . . . . . . . . . . . . . . . . . . . . . . . . . . . . . . . . . . . . . . . . .1.2V p-p
All Digital outputs are galvanically isolated
Analog DAC Outputs
Data Rate/Bit Depth . . . . . . . . . . . . . . . . . . . . . . . . . . . . . . . . . . . . . . . . . . .96Khz/24bit
Output Levels . . . . . . . . . . . . . . . . . . . . . . .Single Ended RCA 2Vrms, Balanced XLR 4Vrms
Dynamic Range . . . . . . . . . . . . . . . . . . . . . . . . . . . . . . . . . . . . . . . . .112dB A-Weighted
THD+N: . . . . . . . . . . . . . . . . . . . . . . . . . . . . . . . . . . . . . . . . . . . . . . . . . . . . . .<0.002%
Output Impedance . . . . . . . . . . . . . . . . . . . . . . . . . . . . . . . .RCA 100ohms, XLR 200 ohms
Frequency Response . . . . . . . . . . . . . . . . . . . . . . . . . . . . . . . . . . .20Hz-20Khz +/-0.1 dB
Ultra-Clock
Accuracy . . . . . . . . . . . . . . . . . . . . . . . . . . . . . . . . . . . . . . . . . . . . . . . . . . . . .0.0001%
Jitter . . . . . . . . . . . . . . . . . . . . . . . . . . . . . . . . . . . . . . . . . . . . . . . . . . . . . . . . .1pS rms
Features
Slow roll-off linear phase digital filter
Fixed or adjustable analog output
External regulated power supply
CD-Pro2LF mechanism
Idle power draw . . . . . . . . . . . . . . . . . . . . . . . . . . . . . . . . . . . . . . . . . . . . . . . . 5 Watts
Power Requirements . . . . . . . . . . . . . . . . . .120 VAC 50-60 Hz or 220-240 VAC 50-60 Hz
Dimensions . . . . . . . . . . . . . . . . .8.5” W x 12.5” D x 4.5” H (216 mm x 318 mm x 115 mm)
Weight . . . . . . . . . . . . . . . . . . . . . . . . . . . . . . . . . . . . . . . . . . . . . . . . . . .18lbs. (8.2 kg)
© 2007 bel canto design, Ltd.
page 15
CD-2 User’s Guide 0607revA
Bel Canto Design, LTD.
221 North First Street
Minneapolis, MN 55401
Phone: (612) 317.4550
Fax: (612) 359.9358
www.belcantodesign.com
[email protected]
© 2007 Bel Canto Design, LTD
CD-2™ is a trademark of Bel Canto Design, LTD