1
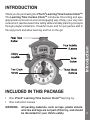
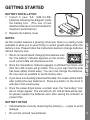
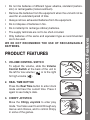
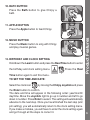
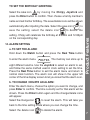
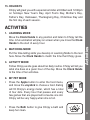
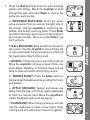
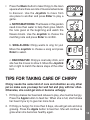
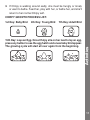
Learning Time Cuckoo Clock TM
INTRODUCTION
Introduction
Thank you for purchasing the VTech® Learning Time Cuckoo ClockTM!
The Learning Time Cuckoo ClockTM introduces time telling and ageappropriate curriculum in a fun and engaging way. Chirpy, your very own
cuckoo bird, teaches basic time telling skills and daily planning concepts
through playful animations. Cheerful music and fun pet games add to
the enjoyment and allow learning and fun on the go!
INCLUDED IN THIS PACKAGE
• One VTech® Learning Time Cuckoo ClockTM learning toy
• One instruction manual
WARNING: All packing materials, such as tape, plastic sheets,
wire ties and tags are not part of this toy, and should
be discarded for your child’s safety.
GETTING STARTED
NOTES:
As this product features a growing virtual pet, there is a saving mode
available to allow you to save Chirpy’s current growth status when the
battery is low. Please follow the instructions below to change batteries
without memory loss:
1. We do not recommend changing the batteries until
the “low battery” indicator appears on the screen
as all current data will otherwise be lost.
2. Once the “low battery” indicator appears, it will flash four times, and
then the LCD screen will go blank. This is your sign that the data
has been safely stored away. You can now change the batteries.
Do it as soon as possible to avoid memory loss.
3. If you have successfully preserved the data, the screen will be blank
after putting the new batteries in. Press any button on the clock to
activate it and resume play.
4. Once the power drops below a certain level, the “low battery” icon
will no longer appear. The unit will turn-off, and all data will be lost.
So please replace the batteries soon after seeing the indicator to
prevent this.
BATTERY NOTICE
• Install batteries correctly observing the polarity (+, -) signs to avoid
leakage.
• Do not mix old and new batteries.
Getting Started
BATTERY INSTALLATION
1. I n s t a l l 3 n e w ‘ A A ’ ( A M - 3 / L R 6 )
batteries following the diagram inside
the battery box. (The use of new
alkaline batteries is recommended for
maximum performance.)
2. Replace the battery cover.
PRODUCT FEATURES
1. VOLUME CONTROL SWITCH
To adjust the volume, slide the Volume
Control Switch at the back of the unit to
the left for low volume (
) or to the right
for high volume (
).
Product Features
• Do not mix batteries of different types: alkaline, standard (carbonzinc) or rechargeable (nickel-cadmium).
• Remove the batteries from the equipment when the unit will not be
used for an extended period of time.
• Always remove exhausted batteries from the equipment.
• Do not dispose of batteries in fire.
• Do not attempt to recharge ordinary batteries.
• The supply terminals are not to be short-circuited.
• Only batteries of the same and equivalent type as recommended
are to be used.
WE DO NOT RECOMMEND THE USE OF RECHARGEABLE
BATTERIES.
2. REAL TIME BUTTON
Press the Real Time button to enter clock
mode and hear the current time. Press it
again to see today’s date.
3. CHIRPY JOYSTICK
Move the Chirpy Joystick to enter play
mode. You’ll also use it to scroll through any
menus and choices, and to control Chirpy
in some of the games.
4. CLOCK HANDS
Turn the Clock Hands to learn how to tell
the time.
Press the Enter button to hear the current
time or to confirm your choice in the menus
and games.
6. LEARN BUTTON
Press the Learn button to enter Learning
Mode.
7. MATCH BUTTON
Press the Match button to enter Matching
Mode.
Product Features
5. ENTER BUTTON
8. ACTIVITY BUTTON
Press the Activity button to enter Activity
Mode.
9. BALL BUTTON
Press the Ball button to play games with
Chirpy.
10.BATH BUTTON
Press the Bath button to give Chirpy a
bath.
11.APPLE BUTTON
Press the Apple button to feed Chirpy.
12.MUSIC BUTTON
Press the Music button to sing with Chirpy
and play musical games.
13.BIRTHDAY AND CLOCK SETTING
Hold down the Learn button and press the Real Time button to enter
the birthday and clock setting menu.
Press the Real
Time button again to exit this menu.
TO SET THE TIME AND DATE:
Select the clock icon
Product Features
by moving the Chirpy Joystick and press
the Enter button to confirm.
The date and time will appear in the following order: year/month/
day/time. Move the Joystick right to go up in number and left to go
down in number. Press Enter to select. The setting will automatically
advance to the next step. Once you have finished the last step (am/
pm setting), you will automatically return to the clock setting menu.
If you make a mistake, you will have to enter the clock setting again
and go through all the steps to correct it.
TO SET THE BIRTHDAY GREETING:
Select the cake icon
by moving the Chirpy Joystick and
press the Enter button to confirm. Then choose a family member’s
name and set his/her birthday. The save/delete icons will be shown
automatically after inputting the date. Select the save icon
to
to delete the
setting. Chirpy will celebrate the birthday at 8:00am and 12:00pm
on the corresponding day.
14.ALARM SETTING
a. TO SET THE ALARM:
Hold down the Match button and press the Real Time button
to enter the alarm menu.
The memory can store up to
eight different alarms. Use the Joystick to select an alarm to set,
and follow the same method used in clock setting to set the time.
Press the Real Time button to exit the alarm menu and return to
normal clock function. The alarm icon will show in the upper left
corner of the time display screen to let you know that the alarm is on.
b. TO CHANGE / DELETE AN ALARM:
Enter the alarm menu, choose the option you want to change, and
press Enter to confirm. The time currently set for that alarm will be
shown. Press the Enter button again and the change/delete icons
will appear.
Select the change icon
Product Features
save the setting; select the delete icon
to reset the alarm. This will take you
back to the time setting mode where you can change the time.
Select the delete icon
to delete the alarm.
15.HOLIDAYS
Chirpy will greet you with a special reminder at 8:00am and 12:00pm
on holidays: New Year’s Day, April Fool’s Day, Mother’s Day,
Father’s Day, Halloween, Thanksgiving Day, Christmas Day and
the first day of each season.
ACTIVITIES
1. LEARNING MODE
Move the Clock Hands to any position and listen to Chirpy tell the
time. A fun animation will play on screen when you move the Clock
Hands to the start of every hour.
2. MATCHING MODE
Put the time-telling skills you develop in Learning Mode to the test
here. Move the Clock Hands to match the time that Chirpy gives.
3. ACTIVITY MODE
Follow Chirpy as she goes about her daily routine. Chirpy will tell you
what she does at a given hour of the day. Move the Clock Hands
to the time of her activities.
Activities
4. MY PET MODE
• Press the Apple button to enter the food menu,
and move the Joystick to choose a food. Eating
will fill Chirpy’s energy meter, which has a total
of four dots. Every hour that passes and every
few games that are played will consume one dot.
Chirpy will be very happy when she is full.
• Press the Bath button to give Chirpy a bath and
keep her clean.
a. SNOWMAN MATCHING: Build the exact
same snowman that you see on the right side of
the screen. Use the Joystick to match the top,
middle, and bottom piece by piece. Press Enter
to confirm the match and move on to the next part,
but choose carefully. Once you press Enter, you
can’t go back.
b. BALL BOUNCING: Balls will fall from the top of
the screen. Use the Joystick to move Chirpy left
or right underneath the balls and bounce them off
her head before they hit the ground.
c. SCHOOL: Chirpy can learn cool tricks at school.
Move the Joystick to choose a class. Chirpy can
study Magic, Reading, or Painting. Keep coming
back to class and watch what Chirpy learns!
d. BUBBLE BURST: Press the Enter button to
jump and get the bubbles while avoiding the thorns
and stones.
e. APPLE ORCHARD: Apples and leaves are
falling from the tree, and Chirpy waits underneath
to catch her favorite treat. Move the Joystick to
collect the apples and avoid the leaves.
f. CLUBHOUSE: When Chirpy grows up, she can
visit the clubhouse to make a new friend. Keep
coming back and watch them have fun together.
Activities
• Press the Ball button to enter the park and play
games with Chirpy. Move the Joystick to stroll
through the park and press Enter to choose the
game you want to play.
a. NOTES MATCHING: The flowers in this garden
need more than water to help them grow. Match
the note given at the beginning and watch the
flowers bloom. Use the Joystick to choose the
matching note and press Enter to confirm.
b. SING ALONG: Chirpy wants to sing for you!
Move the Joystick to choose a song and press
Enter to select.
c. DANCING FUN: Chirpy is one funky chick, and
she has the moves to show it. Move the Joystick
left or right to match the dance steps of the other
bird.
Activities
• Press the Music button to take Chirpy to the town
square where there are lots of musical adventures
to discover. Use the Joystick to move from
one place to another and press Enter to play a
game.
TIPS FOR TAKING CARE OF CHIRPY
Chirpy needs the same kind of care and attention as any other
pet so make sure you keep her well fed and play with her often.
Otherwise, she could get sick or become unhappy.
1. If Chirpy shakes her head and refuses to play, she must be hungry.
Press the Apple button to feed her. When she is full, she’ll shake
her head if you try to give her more food.
2. If Chirpy is hungry for more than 3 days, she will get sick and stop
growing. Press the Apple button to feed her. She will continue to
grow when she becomes healthy again.
10
3. If Chirpy is walking around sadly, she must be hungry or lonely
or want to bathe. Feed her, play with her, or bathe her, and she’ll
return to her normal Chirpy self.
CHIRPY GROWTH PROCESS LIST:
4th Day: Young Bird
7th Day: Adult Bird
15th Day: Lays an Egg. Once Chirpy sits on her nest to lay an egg,
press any button to see the egg hatch and a new baby bird appear.
The growing cycle will start all over again from the beginning.
Activities
1st Day: Baby Bird
11
CARE & MAINTENANCE
2. Keep the unit out of direct sunlight and away from any direct heat
source.
3. Remove the batteries when the unit is not in use for an extended
period of time.
4. Do not drop the unit on hard surfaces and do not expose the unit
to moisture or water.
TROUBLESHOOTING
If for some reason the program/activity stops working or malfunctions,
please follow these steps:
1. Interrupt the power supply by removing the batteries.
2. Let the unit stand for a few minutes, then replace the batteries.
3. The unit should now be ready to play again.
4. If the product still does not work, replace with a new set of
batteries.
If the problem persists, please call our Consumer Services Department
at 1-800-521-2010 in the U.S. or 1-877-352-8697 in Canada, and a
service representative will be happy to help you.
Care & Maintenance / Troubleshooting
1. Keep the unit clean by wiping it with a slightly damp cloth.
12
IMPORTANT NOTE:
Creating and developing Preschool Learning™ products is
accompanied by a responsibility that we at VTech® take very
seriously. We make every effort to ensure the accuracy of the
information which forms the value of our products. However, errors
sometimes can occur. It is important for you to know that we stand
behind our products and encourage you to call our Consumer
Services Department at 1-800-521-2010 in the U.S. or 1-877-3528697 in Canada, with any problems and/or suggestions that you
might have. A service representative will be happy to help you.
This equipment has been tested and found to comply with the limits for
a Class B digital device, pursuant to Part 15 of the FCC Rules. These
limits are designed to provide reasonable protection against harmful
interference in a residential installation. This equipment generates, uses
and can radiate radio frequency energy and, if not installed and used in
accordance with the instructions, may cause harmful interference to radio
communications. However, there is no guarantee that interference will
not occur in a particular installation. If this equipment does cause harmful
interference to radio or television reception, which can be determined by
turning the equipment off and on, the user is encouraged to try to correct
the interference by one or more of the following measures:
Note
Note:
• Reorient or relocate the receiving antenna
• Increase the separation between the equipment and receiver
• Connect the equipment into an outlet on a circuit different from that
to which the receiver is connected
• Consult the dealer or an experienced radio/TV technician for help
Caution : Changes or modifications not expressly approved by the party
responsible for compliance could void the user’s authority to operate
the equipment.
13