1
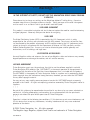
Magellan eXplorist 300
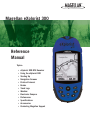
Reference
Manual
Topics:
•
•
•
•
•
•
•
•
•
•
•
•
•
eXplorist 300 GPS Receiver
Using the eXplorist 300
Starting Up
Navigation Screens
Points of Interest
Routes
Track Logs
Weather
Electronic Compass
Preferences
Specifications
Accessories
Contacting Magellan Support
*** Warnings ***
IN THE INTEREST OF SAFETY, DO NOT USE THIS NAVIGATION DEVICE WHILE DRIVING
A VEHICLE.
Please do not try to change any settings on the Magellan® eXplorist™ while driving. Come to a
complete stop or have a passenger make any changes. Taking your eyes off the road is dangerous
and can result in an accident in which you or others could be injured.
USE GOOD JUDGMENT
This product is an excellent navigation aid, but it does not replace the need for careful orienteering
and good judgment. Never rely solely on one device for navigating.
USE CARE
The Global Positioning System (GPS) is operated by the U.S. Government, which is solely
responsible for the accuracy and maintenance of the GPS network. The accuracy of position fixes
can be affected by the periodic adjustments to GPS satellites made by the U.S. government and is
subject to change in accordance with the Department of Defense civil GPS user policy and the
Federal Radionavigation Plan. Accuracy can also be affected by poor satellite geometry and
obstructions, such as buildings and large trees.
USE PROPER ACCESSORIES
Use only Magellan cables and antennas; the use of non-Magellan cables and antennas may severely
degrade performance or damage the receiver, and will void the warranty.
LICENSE AGREEMENT
Thales Navigation grants you, the purchaser, the right to use the software supplied in and with
Thales Navigation GPS products (the “SOFTWARE”) in the normal operation of the equipment in
accordance with the terms of the End User License Agreement that is included with the product.
The SOFTWARE is the property of Thales Navigation and/or its suppliers and is protected by United
States copyright laws and international treaty provisions; therefore, you must treat the SOFTWARE
like any other copyright material.
You may not use, copy, modify, reverse engineer or transfer this SOFTWARE except as expressly
provided in the license. All rights not expressly granted are reserved by Thales Navigation and/or its
suppliers.
* * *
No part of this guide may be reproduced or transmitted in any form or by any means, electronic or
mechanical, including photocopying and recording, for any purpose other than the purchaser’s
personal use without the prior written permission of Thales Navigation.
* * *
Operation is subject to the following two conditions: (1) this device may not cause interference, and
(2) this device must accept any interference, including interference that may cause undesired
operation of the device.
© 2004 Thales Navigation, Inc. All rights reserved.
The Magellan Logo, Magellan, eXplorist and TrueFix are trademarks of Thales Navigation.
631206-01 B
Table of Contents
i
eXplorist 300 GPS Receiver . . . . . . . . . . . . . . . . . . . . . . . . . . . . . . . . . 1
Features of the Magellan eXplorist GPS receiver . . . . . . . . . . . . . . . . . . 1
Button Descriptions . . . . . . . . . . . . . . . . . . . . . . . . . . . . . . . . . . . . . . 2
Installing the Batteries . . . . . . . . . . . . . . . . . . . . . . . . . . . . . . . . . . . . 4
Using the eXplorist 300 . . . . . . . . . . . . . . . . . . . . . . . . . . . . . . . . . . . . 5
Going to a Destination
Saving Your Position . .
Tracing Your Steps . . .
Additional Features. . .
Summary . . . . . . . . . .
.
.
.
.
.
.
.
.
.
.
.
.
.
.
.
.
.
.
.
.
.
.
.
.
.
.
.
.
.
.
.
.
.
.
.
.
.
.
.
.
.
.
.
.
.
.
.
.
.
.
.
.
.
.
.
.
.
.
.
.
.
.
.
.
.
.
.
.
.
.
.
.
.
.
.
.
.
.
.
.
.
.
.
.
.
.
.
.
.
.
.
.
.
.
.
.
.
.
.
.
.
.
.
.
.
.
.
.
.
.
.
.
.
.
.
.
.
.
.
.
.
.
.
.
.
.
.
.
.
.
.
.
.
.
.
.
.
.
.
.
.
.
.
.
.
.
.
.
.
.
.
.
.
.
.
.
.
.
.
.
.
.
.
.
.
.
.
.
.
.
.
.
.
.
.
.
.
.
.
.
5
6
7
8
8
Starting Up. . . . . . . . . . . . . . . . . . . . . . . . . . . . . . . . . . . . . . . . . . . . . . 9
Turning the eXplorist On . . . . . . . . . .
Turning the eXplorist Off . . . . . . . . . .
Turning the Display Backlight On/Off .
Using the eXplorist for the First Time .
Conclusion. . . . . . . . . . . . . . . . . . . .
.
.
.
.
.
.
.
.
.
.
.
.
.
.
.
.
.
.
.
.
.
.
.
.
.
.
.
.
.
.
.
.
.
.
.
.
.
.
.
.
.
.
.
.
.
.
.
.
.
.
.
.
.
.
.
.
.
.
.
.
.
.
.
.
.
.
.
.
.
.
.
.
.
.
.
.
.
.
.
.
.
.
.
.
.
.
.
.
.
.
.
.
.
.
.
.
.
.
.
.
.
.
.
.
.
.
.
.
.
.
.
.
.
.
.
.
.
.
.
.
.9
.9
.9
10
13
Navigation Screens . . . . . . . . . . . . . . . . . . . . . . . . . . . . . . . . . . . . . . 14
Accessing the Navigation Screens . . . .
Map Screen . . . . . . . . . . . . . . . . . . . .
Map Screen Overview. . . . . . . . . . .
Changing Map Scale . . . . . . . . . . .
Map Screen Modes . . . . . . . . . . . .
Showing or Hiding Map Information
Customizing the Map Information . .
Changing the Map Orientation . . . .
Changing the Primary Usage. . . . . .
Compass Screen. . . . . . . . . . . . . . . . .
Compass Screen Overview . . . . . . .
Customizing the Information Fields .
Position Screen . . . . . . . . . . . . . . . . .
Position Screen Overview . . . . . . . .
Resetting the Trip Odometer . . . . . .
Satellite Status Screen . . . . . . . . . . . .
.
.
.
.
.
.
.
.
.
.
.
.
.
.
.
.
.
.
.
.
.
.
.
.
.
.
.
.
.
.
.
.
.
.
.
.
.
.
.
.
.
.
.
.
.
.
.
.
.
.
.
.
.
.
.
.
.
.
.
.
.
.
.
.
.
.
.
.
.
.
.
.
.
.
.
.
.
.
.
.
.
.
.
.
.
.
.
.
.
.
.
.
.
.
.
.
.
.
.
.
.
.
.
.
.
.
.
.
.
.
.
.
.
.
.
.
.
.
.
.
.
.
.
.
.
.
.
.
.
.
.
.
.
.
.
.
.
.
.
.
.
.
.
.
.
.
.
.
.
.
.
.
.
.
.
.
.
.
.
.
.
.
.
.
.
.
.
.
.
.
.
.
.
.
.
.
.
.
.
.
.
.
.
.
.
.
.
.
.
.
.
.
.
.
.
.
.
.
.
.
.
.
.
.
.
.
.
.
.
.
.
.
.
.
.
.
.
.
.
.
.
.
.
.
.
.
.
.
.
.
.
.
.
.
.
.
.
.
.
.
.
.
.
.
.
.
.
.
.
.
.
.
.
.
.
.
.
.
.
.
.
.
.
.
.
.
.
.
.
.
.
.
.
.
.
.
.
.
.
.
.
.
.
.
.
.
.
.
.
.
.
.
.
.
.
.
.
.
.
.
.
.
.
.
.
.
.
.
.
.
.
.
.
.
.
.
.
.
.
.
.
.
.
.
.
.
.
.
.
.
.
.
.
.
.
.
.
.
.
.
.
.
.
.
.
.
.
.
.
.
.
.
.
.
.
.
.
.
.
.
.
.
.
.
.
.
.
.
14
14
15
15
15
16
17
18
19
20
20
21
22
22
23
24
Table of Contents
ii
Points of Interest . . . . . . . . . . . . . . . . . . . . . . . . . . . . . . . . . . . . . . . . 25
Marking Your Position . . . . . . . . . . . . . . . . . . . . . . . . . . . .
Quick-Marking Your Position . . . . . . . . . . . . . . . . . . . . .
Marking Your Position (Personalized) . . . . . . . . . . . . . . .
Making POIs for Locations Other Than Your Present Position
Marking a Position by Entering Coordinates . . . . . . . . . .
Marking a Position using the Map Cursor. . . . . . . . . . . .
Marking a Position from a Map Object. . . . . . . . . . . . . .
The POI Database. . . . . . . . . . . . . . . . . . . . . . . . . . . . . . .
Searching for a User-Entered POI . . . . . . . . . . . . . . . . .
Searching for a Preloaded POI using Nearest . . . . . . . . .
Searching for a Preloaded POI using Alphabetical . . . . .
Editing a User-Created POI . . . . . . . . . . . . . . . . . . . . . . . .
Deleting a User-Created POI . . . . . . . . . . . . . . . . . . . . . . .
Viewing a User-Created POI on the Map Screen . . . . . . . . .
Copying a Preloaded POI. . . . . . . . . . . . . . . . . . . . . . . . . .
Viewing a Preloaded POI on the Map Screen. . . . . . . . . . . .
.
.
.
.
.
.
.
.
.
.
.
.
.
.
.
.
.
.
.
.
.
.
.
.
.
.
.
.
.
.
.
.
.
.
.
.
.
.
.
.
.
.
.
.
.
.
.
.
.
.
.
.
.
.
.
.
.
.
.
.
.
.
.
.
.
.
.
.
.
.
.
.
.
.
.
.
.
.
.
.
.
.
.
.
.
.
.
.
.
.
.
.
.
.
.
.
.
.
.
.
.
.
.
.
.
.
.
.
.
.
.
.
.
.
.
.
.
.
.
.
.
.
.
.
.
.
.
.
25
25
26
27
27
28
28
29
29
30
31
32
33
34
35
36
Routes . . . . . . . . . . . . . . . . . . . . . . . . . . . . . . . . . . . . . . . . . . . . . . . . 37
GOTO Routes . . . . . . . . . . . . . . . . . . . . . . . . . . . . . . . . . . . . . . . . . . 37
Creating a GOTO Route . . . . . . . . . . . . . . . . . . . . . . . . . . . . . . . . 38
Creating a GOTO Route from the Map Cursor . . . . . . . . . . . . . . . . . 39
Creating a GOTO Route to a Map Object . . . . . . . . . . . . . . . . . . . . 40
Multi-Leg Routes . . . . . . . . . . . . . . . . . . . . . . . . . . . . . . . . . . . . . . . 41
Creating a Multi-leg Route . . . . . . . . . . . . . . . . . . . . . . . . . . . . . . 42
Activating/Deactivating a Route. . . . . . . . . . . . . . . . . . . . . . . . . . . 43
Changing the Destination Leg of an Active Route . . . . . . . . . . . . . . 44
Editing a Saved Route . . . . . . . . . . . . . . . . . . . . . . . . . . . . . . . . . 45
Reversing a Route . . . . . . . . . . . . . . . . . . . . . . . . . . . . . . . . . . . . 46
Deleting a Route . . . . . . . . . . . . . . . . . . . . . . . . . . . . . . . . . . . . . 47
Copying a Route . . . . . . . . . . . . . . . . . . . . . . . . . . . . . . . . . . . . . 48
Viewing a Route on the Map . . . . . . . . . . . . . . . . . . . . . . . . . . . . . 49
Table of Contents
iii
Track Logs . . . . . . . . . . . . . . . . . . . . . . . . . . . . . . . . . . . . . . . . . . . . . 50
Track Logs . . . . . . . . . . . . . . . . . . . . . . . . . . . .
Stopping and Resuming Active Track Logging
Starting a New Active Track Log . . . . . . . . . .
Saving an Active Track Log. . . . . . . . . . . . . .
Creating a BackTrack Route . . . . . . . . . . . . .
Clearing the Active Track . . . . . . . . . . . . . . .
Converting the Track Log to a Route . . . . . . .
Viewing the Track Log on the Map. . . . . . . . .
Working with Saved Track Logs . . . . . . . . . . . . .
Following Saved Track Logs . . . . . . . . . . . . .
Reversing a Saved Track Log . . . . . . . . . . . .
Deleting a Saved Track Log . . . . . . . . . . . . .
.
.
.
.
.
.
.
.
.
.
.
.
.
.
.
.
.
.
.
.
.
.
.
.
.
.
.
.
.
.
.
.
.
.
.
.
.
.
.
.
.
.
.
.
.
.
.
.
.
.
.
.
.
.
.
.
.
.
.
.
.
.
.
.
.
.
.
.
.
.
.
.
.
.
.
.
.
.
.
.
.
.
.
.
.
.
.
.
.
.
.
.
.
.
.
.
.
.
.
.
.
.
.
.
.
.
.
.
.
.
.
.
.
.
.
.
.
.
.
.
.
.
.
.
.
.
.
.
.
.
.
.
.
.
.
.
.
.
.
.
.
.
.
.
.
.
.
.
.
.
.
.
.
.
.
.
.
.
.
.
.
.
.
.
.
.
.
.
.
.
.
.
.
.
.
.
.
.
.
.
.
.
.
.
.
.
.
.
.
.
.
.
50
51
52
53
54
55
56
57
58
58
58
59
Weather . . . . . . . . . . . . . . . . . . . . . . . . . . . . . . . . . . . . . . . . . . . . . . . 60
Weather Screen . . . . . . . . . . . . . . . . . . . . . . . . . . . . . . . . . . . . . . . . 60
Accessing the Weather Screen . . . . . . . . . . . . . . . . . . . . . . . . . . . 60
Calibrating the Pressure Altimeter . . . . . . . . . . . . . . . . . . . . . . . . . 61
Electronic Compass . . . . . . . . . . . . . . . . . . . . . . . . . . . . . . . . . . . . . . 62
Calibrating the Compass . . . . . . . . . . . . . . . . . . . . . . . . . . . . . . . . . . 63
Turning the Compass Off/On . . . . . . . . . . . . . . . . . . . . . . . . . . . . . . . 64
Preferences . . . . . . . . . . . . . . . . . . . . . . . . . . . . . . . . . . . . . . . . . . . . 65
Restarting the GPS . . . . . . . . . . . . . . . . . .
Setting the Map Units. . . . . . . . . . . . . . . .
Selecting Navigational Units of Measure
Selecting the North Reference . . . . . . .
Selecting the Coordinate System. . . . . .
Selecting the Map Datum. . . . . . . . . . .
Using the Power Management Tool. . . . . . .
Setting the Power-Off Timer . . . . . . . . .
Setting the Light Timer . . . . . . . . . . . .
Personalizing the eXplorist . . . . . . . . . . . .
Selecting Languages . . . . . . . . . . . . . . . . .
.
.
.
.
.
.
.
.
.
.
.
.
.
.
.
.
.
.
.
.
.
.
.
.
.
.
.
.
.
.
.
.
.
.
.
.
.
.
.
.
.
.
.
.
.
.
.
.
.
.
.
.
.
.
.
.
.
.
.
.
.
.
.
.
.
.
.
.
.
.
.
.
.
.
.
.
.
.
.
.
.
.
.
.
.
.
.
.
.
.
.
.
.
.
.
.
.
.
.
.
.
.
.
.
.
.
.
.
.
.
.
.
.
.
.
.
.
.
.
.
.
.
.
.
.
.
.
.
.
.
.
.
.
.
.
.
.
.
.
.
.
.
.
.
.
.
.
.
.
.
.
.
.
.
.
.
.
.
.
.
.
.
.
.
.
.
.
.
.
.
.
.
.
.
.
.
.
.
.
.
.
.
.
.
.
.
.
.
.
.
.
.
.
.
.
.
.
.
.
.
.
.
.
.
.
.
.
.
.
.
.
.
.
.
.
.
.
.
.
.
66
68
68
69
70
71
72
72
73
74
75
Table of Contents
Clearing Memory . . . . . . . . . . . . . . . . . . . . . . . . . . . . . .
Clearing All Track Logs. . . . . . . . . . . . . . . . . . . . . . . .
Clearing All User-Entered POIs and Routes . . . . . . . . .
Clearing All Routes . . . . . . . . . . . . . . . . . . . . . . . . . .
Clearing All Track Logs, User-Entered POIs, and Routes
Reseting the eXplorist to Factory Defaults . . . . . . . . . .
iv
.
.
.
.
.
.
.
.
.
.
.
.
.
.
.
.
.
.
.
.
.
.
.
.
.
.
.
.
.
.
.
.
.
.
.
.
.
.
.
.
.
.
.
.
.
.
.
.
.
.
.
.
.
.
76
76
77
77
77
78
Specifications . . . . . . . . . . . . . . . . . . . . . . . . . . . . . . . . . . . . . . . . . . 79
Accessories . . . . . . . . . . . . . . . . . . . . . . . . . . . . . . . . . . . . . . . . . . . . 81
Contacting Magellan Support . . . . . . . . . . . . . . . . . . . . . . . . . . . . . . . 82
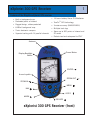
eXplorist 300 GPS Receiver
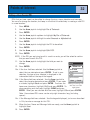
1
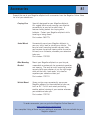
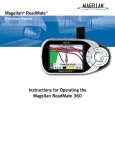
Features of the Magellan eXplorist GPS receiver:
• Built-in background map
• 14 hour+ battery life on 2 AA batteries
• Preloaded points of interest
• TrueFix™ GPS technology
• Rugged design, rubber-protected
• 3 meter accuracy (WAAS/EGNOS)
• 8 MB of background map
• Multiple track logs
• 2-axis electronic compass
• Stores up to 500 points of interest and
20 routes
• Superior tracking with 14 parallel channels
• Pocket-sized and waterproof to IPX-7
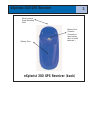
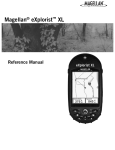
Antenna
Power Button
Display Backlight
Button
ENTER
Arrow Joystick
ZOOM OUT
ZOOM IN
MENU
NAV
GOTO
MARK
ESCAPE
eXplorist 300 GPS Receiver (front)
eXplorist 300 GPS Receiver
2
Button Descriptions:
Power
Turns the eXplorist on or off.
Backlight
Turns the display backlight on. Sequences from off to low to high
intensity.
ENTER
Used to access highlighted menu items or accept highlighted
buttons.
ESCAPE
Cancels data inputs.
Closes the accessed function and goes back to the last viewed
screen.
Steps backward through the navigation screens.
ZOOM IN
Used on the Map screen to zoom in on the map displayed. The
map display can be zoomed in to 100 ft. (35.0 m).
Also used to quickly step through the list of POIs when doing an
alphabetical search.
ZOOM OUT
Used on the Map screen to zoom out on the map displayed. The
map display can be zoomed out to 1700 mi (2700 km).
Also used to quickly step through the list of POIs when doing an
alphabetical search.
MENU
Brings up a menu with available options. Options can be selected
by using the arrow joystick to highlight the option and pressing
ENTER to access it.
NAV
Steps through the navigation screens. (Map screen > Compass
screen > Position screen > Satellite Status screen)
MARK
Used to save your present position as a point of interest. Points of
interest that you save are stored in the My Points of Interest portion
of the database.
GOTO
Creates a one-leg route from your present position to a destination
selected from the Points of Interest database or by using the cursor
on the background map.
Arrow joystick
Pans the cursor on the Map screen.
Moves the highlight bar to select menu options and data-entry
fields.
eXplorist 300 GPS Receiver
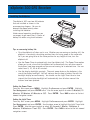
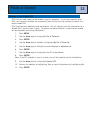
3
Wrist Lanyard
Strap Mounting
Hole
Battery Door
Battery Door
Fastener
(Unscrew to
open battery
door to install
batteries.)
eXplorist 300 GPS Receiver (back)
eXplorist 300 GPS Receiver
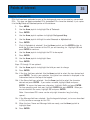
4
Installing the Batteries
The eXplorist 300 uses two AA batteries
that are installed as shown in the
accompanying diagram. Be sure to
observe the proper polarity when
installing the batteries.
Under normal operating conditions you
can expect to get more than 14 hours of
battery life when using fresh batteries.
Tips on conserving battery life:
• Turn the eXplorist off when not in use. Whether you are moving or standing still, the
eXplorist is constantly calculating position fixes and using power at the same rate.
So if you are going to be at the same position for any length of time, turn the
eXplorist off.
• Use the Power Timer to automatically turn the eXplorist off. The Power Timer option
allows you to set a time that the eXplorist will automatically turn off when none of
the buttons have been pressed and you are not moving for a selected time. You can
select from 5, 10, 30 or 60 minutes.
• Use the display backlight sparingly. The most severe drain on the batteries is the
use of the display backlight. You will notice a drastic drop in battery life with the
backlight display on continuously. You should use the Light Timer to set a time
interval that the display backlight will automatically turn off when none of the
buttons have been pressed.
Setting the Power Timer
From any Nav screen press MENU. Highlight Preferences and press ENTER. Highlight
Pwr Management and press ENTER twice. Use the arrow joystick to select 5 Minutes, 10
Minutes, 30 Minutes, 60 Minutes or Off. Press ENTER. Press NAV to return to the last
viewed navigation screen.
Setting the Light Timer
From any Nav screen press MENU. Highlight Preferences and press ENTER. Highlight
Pwr Management and press ENTER. Use the down arrow to highlight the Light Timer field.
Press ENTER. Use the arrow joystick to select 30 Seconds, 1 Minute, 2 Minutes, 4
Minutes, 10 Minutes or Timer Off. Press ENTER. Press NAV to return to the last viewed
navigation screen.
5
Using the eXplorist 300
The eXplorist 300 uses information from the GPS satellites orbiting the earth to provide you
with detailed information about your exact location. This is the foundation that your
eXplorist will use to provide you with the necessary information to arrive at your destination.
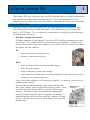
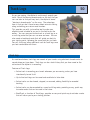
Going to a Destination
The most common use of your eXplorist will be to provide you with the navigation tools
you’ll need to arrive at your chosen destination. The simplest route, and the one used
most, is a GOTO route. This is a route that is computed as a straight line from where you
are to where you want to go.
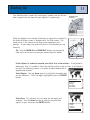
Step One: Compute Your Position
The basic operation of your eXplorist is to use the GPS satellites to compute your present position. This is done internally in the software of your eXplorist. The only thing
that you need to do is to give your eXplorist a clear view of the sky so that it can receive
the signals from the satellites.
Do:
• Point the antenna up toward the sky.
• Maintain a clear view of the sky.
Don’t:
• Cover the antenna with your hand or other objects.
• Point the antenna down.
• Stand under trees or other heavy foliage.
• Stand where the satellite signals are being blocked by large obstructions (such as
buildings, in a narrow canyon, etc.)
If you find that the eXplorist is not computing a position, just move to a place that has
a better view of the sky.
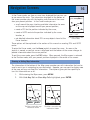
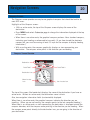
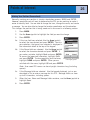
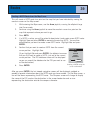
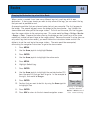
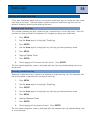
Anytime that you want to view the status of the satellites and
their signal strength, switch to the Satellite Status screen. Here,
you will graphically see the satellites and their relative signal
strength. You need at least three satellites with good signal
strength (indicated by black bars) to compute your position. A
computed position with only three satellites is termed a 2D position fix. Positions that use four or more satellites are called 3D
position fixes.
3D Position Fix
Tracking 7....
Using the eXplorist 300
6
Step Two: Where Do You Want To Go?
Now that the eXplorist knows where you are, you need to tell it where you want to go.
There are many different ways you can do this, but the simplest and most commonly
used is a “GOTO” route. This is a one-leg route with a beginning (where you are now)
and a destination (where you want to go). The destination is selected by using the
Points of Interest database. This database has two main options: positions you have
saved (My Points of Interest) or points of interest that have been preloaded into your
eXplorist (Background Map).
Creating a GOTO route is as simple as pressing the GOTO button and selecting the destination from the points of interest database.
Step Three: Calculating Movement
As you move, your eXplorist is constantly calculating new positions, comparing the new
position to the previous position and calculating such things as heading and speed.
This is all done in the eXplorist’s software communicating with the satellites and is
instantaneously shown on your display.
Step Four: Providing Directions
Your eXplorist constantly computes a direct line from your present position to your destination. From there, it will provide you instructions to guide you along that straight path.
Unless you are on a large body of water, it will be unlikely that you will be able to follow
these instructions exactly. To compensate for that, your eXplorist automatically updates
the route, providing you with up-to-date information about getting to your destination.
GOTO routes are the simplest and most commonly used feature of your eXplorist 300. With
just the GOTO button the eXplorist will provide you with the tools needed to get to any point of
interest stored in your database.
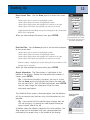
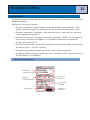
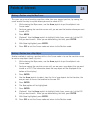
Saving Your Position
Another commonly used feature of the eXplorist is saving your position to the points of interest
database. This feature is accessed by pressing the MARK button. When saving your position,
you can also add attributes like a selected icon or a name for the point of interest. This will
help you to find this spot in the future when accessing it from the points of interest database.
Suppose that you have set up camp for the night. Tomorrow, you plan on doing some
nature exploring and you want to be able to come back to the campsite when you are
done. Press the MARK button and set the name of the point of interest to “Camp”.
After your hiking is done, simply use the GOTO button and select “Camp” from the list
of My Points of Interest. It’s that simple to find your way back.
While out fishing on the lake, you come across the perfect spot for catching your limit.
Next year, you want to be able to come back to this same spot. Turn on your eXplorist
and after it has computed your position, press the MARK button to save it. This time
you can enter the name “Catfish1” and save your point of interest. Next year you can
be back at the same hot spot with just a press of the GOTO button.
Using the eXplorist 300
7
A simpler example, and one you can do at just about any time, is finding your car in that
ocean of other cars in the shopping mall parking lot. Just park your car, step outside and
let your eXplorist compute your position. (Make sure that you have a clear view of the
sky.) Using the MARK button, save this position with the name “Car”. When you are
done shopping, just go outside the mall and create a GOTO with the destination “Car”.
No matter where you parked, your eXplorist will guide you back, simply and easily.
Tracing Your Steps
Hikers, mountain bikers and outdoor enthusiasts often need the option of leaving a trail of
breadcrumbs that they can follow back to where they started. The eXplorist has a feature
called BackTrack that enables you to do just that.
It was mentioned earlier that your eXplorist is constantly computing your present position and
that you can save your position by using the MARK button. Now, imagine that your eXplorist
automatically saved your computed positions as you moved along the trail. Pretty soon there
would be a set of saved positions, like breadcrumbs, that represents the trail you have taken.
This is exactly what the eXplorist does. It saves the computed positions as hidden points of
interest and strings them together to represent your travels. This is called your Track, and the
hidden points of interest are your Track Log.
What your eXplorist enables you to do is to use this Track, reverse it and navigate you along the
same path that you followed to get you back to your destination.
You might drive to the ranger station and follow the trail that leads you to the waterfalls
you have been wanting to see. With your eXplorist turned on and able to compute position fixes, you continue along the trail. The trail winds along and has many smaller
trails attached to it. As the day progresses you arrive at the falls. When it’s time to
head back to your car, you access your Track Logs list and select the Active Track log.
Now, press MENU, highlight BackTrack and press ENTER. Your eXplorist will now
seamlessly guide you along the path, tracing your footsteps, back to where you started.
Another nice feature of Track Logs, which you may find useful, is that you are able to
save the Track Logs and recall them at any time. In the above example at the waterfall,
you could save that track and use it anytime you wanted to go back.
Using the eXplorist 300
8
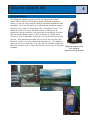
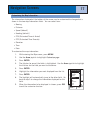
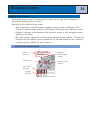
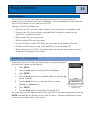
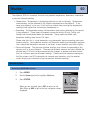
Additional Features
Your Magellan eXplorist contains all of the features you would
expect from a high-quality Magellan-brand handheld navigation
device, as well as many more to make your outdoor experience more
enjoyable. You have the ability to customize the navigation screens,
enabling you to view the information that is important to you. The
eXplorist makes full use of the Map screens, enabling you to
graphically see your position, the route you are navigating, the path
that you have trekked (Track), as well as points of interest icons.
There is a built-in odometer so that you can log the distance of your
journey. User preferences enable you to set up and maintain your
eXplorist so that it fits your needs and requirements. The eXplorist
gives you all of this and more in an easy-to-use, portable navigation
tool that includes built-in help files that you can access in the great Magellan eXplorist 300
outdoors.
with optional
swivel mounting bracket
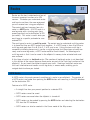
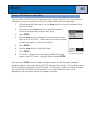
Summary
Go from this...
to this...
with this.
9
Starting Up
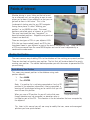
Turning the eXplorist On
To turn the eXplorist on, press the POWER button on the top right
side. To prevent the eXplorist from being turned on accidentally,
draining the batteries, you need to press ENTER when the Startup
screen is displayed. You have approximately 30 seconds between
pressing the POWER button and pressing the ENTER button,
otherwise the eXplorist will automatically turn itself off.
Turning the eXplorist Off
To turn the eXplorist off, press the POWER button on the top right
side.
There is a 5-second countdown after you press the POWER button. If
you change your mind and decide to leave the eXplorist on, just press
the ESC button. If you press the POWER button during this
countdown period, the eXplorist will immediately turn off.
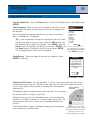
Turning the Display Backlight On/Off
The display backlight has three levels of intensity: off, low and high. When the eXplorist is
first turned on, the display backlight is off. Press the LIGHT button on the top left side of
the eXplorist to turn the backlight on low. Pressing the LIGHT button a second time sets the
backlight to high. To turn off the backlight, press the LIGHT button again.
Backlight
intensity changes
each time you
press the LIGHT
button.
REMEMBER: Using the display backlight causes severe drain on
the batteries.
Starting Up
10
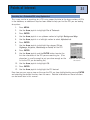
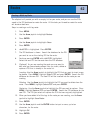
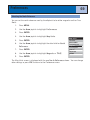
Using the eXplorist for the First Time
Turn the eXplorist on. Press the Power button. When the Startup screen is displayed, press
ENTER.
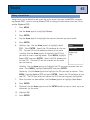
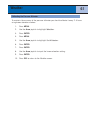
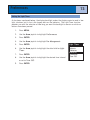
Select Language. When you turn on the eXplorist for the first time,
you are given the option of selecting one of the ten languages that
will be used.
Language
English
Français
Deutsch
Nederlands
Suomi
Español
Italiano
Português
Svenska
Norsk
You can change the language selection at any time by accessing
Menu > Preferences > Languages.
Tip: If you accidentally change the language but you can’t read
the text and need to change it back, press the NAV button until
the Satellite Status screen is displayed. Press MENU. Use the
PRESS
Arrow joystick to highlight the fourth line and press ENTER. Use
Use arrow joystick to move
the Arrow joystick to highlight the fifth line and press ENTER.
the highlight up and down.
The Language Select screen will be displayed.
Press ENTER to accept.
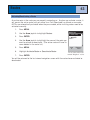
Read Warning. When you agree to the warning statement, press
ENTER to continue.
WARNING!
All data is provided
for reference only.
You assume full
responsibility and
risk when using this
device.
PRESS
TO AGREE
Press ENTER to continue.
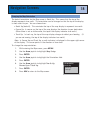
Compute Initial Position. For this operation, it is best if you are outside and have a clear,
unobstructed view of the sky. Without a clear view, this will take much longer and could
result in the eXplorist being unable to compute the initial position
Finding Satellites
Tracking 0...
automatically.
The eXplorist begins to compute your initial position. This may take a
few minutes while it is doing a cold start.
Normally, when you first turn the eXplorist on it will compute your
position in a matter of seconds as it is able to do a warm start. (An
explanation of cold start vs. warm start is provided following this
section.)
The Satellite Status screen is displayed, showing you the progress
of the collection of satellite data.
Satellite Status screen shows
how many satellites are being
tracked, as well as the
relative strength of the signal.
Starting Up
The Satellite Status screen will continuously update, and you will be
able to graphically see how well your eXplorist is performing.
When the eXplorist has enough information to compute a position fix,
the Satellite Status screen is replaced with the Map screen. The
arrow cursor in the center of the Map screen represents your
position. As you move, the arrow will point in the direction you are
traveling.
Tip: Use the ZOOM IN and ZOOM OUT buttons to change the
map scale so that you may see your present position better.
11
3D Position Fix
Tracking 7....
Cumberland River
62
River
62
641
3.50mi
Heading
Speed
060 M
48.0 MH
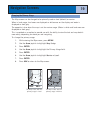
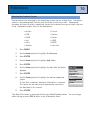
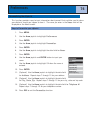
If the eXplorist is unable to compute your initial fix in a few minutes: If the eXplorist
determines that it is unable to track the satellites within a few minutes, it will present
you with the following screens in an effort to better determine its
Region
approximate location.
Select Region. Use the Arrow joystick to highlight the region that
you are located in. With the region highlighted, press the ENTER
button.
Enter Coord
USA
Americas
Europe
Asia East
Asia West
Area
Select Area. This displays a list of areas for the region you
selected. Use the Arrow joystick to highlight the area that
applies to you, and press the ENTER button.
Alabama
Alaska
Arizona
Arkansas
California
Colorado
Starting Up
12
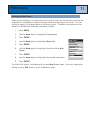
Enter Current Time. Use the Arrow joystick to enter the current
time.
Arrow
Arrow
Arrow
Arrow
Joystick
Joystick
Joystick
Joystick
Up: Increases the highlighted number
Down: Decreases the highlighted number
Right: Moves the highlight one character to the right
Left: Moves the highlight one character to the left
Time
37° 00.000N
119° 00.000W
0FT
09:06AM
16 JAN 04
Toggle between AM and PM by moving the arrow joystick up or down when
AM or PM is highlighted.
When you have entered the correct time, press ENTER.
Enter the Date. Use the Arrow joystick to set the date displayed
to the current date.
Arrow
Arrow
Arrow
Arrow
Joystick
Joystick
Joystick
Joystick
Up: Increases the highlighted number
Down: Decreases the highlighted number
Right: Moves the highlight one character to the right
Left: Moves the highlight one character to the left
Done
The latitude and longitude
that represents the center
of the region and area you
selected is displayed.
Date
37°00.000N
119°00.000W
0FT
10:16AM
16 JAN 04
When the month is highlighted, use the arrow joystick up or down to scroll
through the list of months.
Done
When you have entered the correct date, press ENTER.
Accept Information. The Done button is highlighted at the
bottom of the display. Review the information you entered; if
correct, press ENTER.
Tip: If the time or the date is incorrect, you can fix it now.
Use the Arrow joystick to highlight the time or the date field
that you want to fix. With the field highlighted, press ENTER.
You can now change the information using the same
technique used before.
The Satellite Status screen is displayed again, and the eXplorist
will try to compute your position using the information you just
provided.
Tip: If you notice that the satellite signal strength bars are
still not changing, try moving to a new location where you
have a clearer view of the sky.
As before, when the eXplorist computes the initial position, the
Map screen will be displayed, with your computed position
indicated by the arrow cursor in the middle of the display.
Date
37° 00.000N
119° 00.000W
0FT
10:16AM
21 MAY 04
Done
Finding Satellites
Tracking 0...
Starting Up
13
Cold vs. Warm Start. When the eXplorist is turned on, one of the first things it does is
to find out which satellites are overhead, along with their relative position. It does this
by using a built-in satellite almanac. This almanac, when given the current date, time
and approximate position, can provide the eXplorist with information on which satellites
are overhead and their approximate relationship to the eXplorist. Now with information
on satellite availability, the eXplorist can begin setting its internal satellite channels to
receive satellite transmissions.
Cold Start. Cold start is defined as when the eXplorist does not have an
approximate position to use when referring to its almanac. This can occur when:
• The eXplorist is turned on for the first time after purchase. The memory is
cleared prior to shipping so that any position that may have been in the
eXplorist is set to a null value.
• If you have cleared the eXplorist's memory (found in Preferences) all of
the memory will be cleared and the last computed position will be set to a
null value.
• If you have traveled with your eXplorist with it turned off, the last position
saved may be so far away that when the eXplorist begins looking for
satellites, the ones it is expecting to find are not there. (As a rule of
thumb, any time you move for more than 500 mi [804.7 km] with the
eXplorist turned off, there is a good chance that it will start up using a
cold start.
A cold start should take no more than 2-3 minutes to compute the initial position
fix.
Warm Start. Warm starts are when the last position calculated before the
eXplorist was turned off is still in memory and you are in the same approximate
position. Most of the time that the eXplorist is turned on, it will be in its warmstart mode. With a clear view of the sky, the eXplorist should compute its
position in a matter of seconds.
Conclusion
This concludes the initial startup procedure for the Magellan eXplorist 300. Once the Map
screen is displayed, you have successfully initialized the eXplorist and are ready to go.
Now would be a good time to familiarize yourself with the different navigation screens
(using the NAV button) and to set any preferences that may be different from the factory
defaults.
14
Navigation Screens
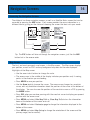
Accessing the Navigation Screens
The eXplorist has three navigation screens, as well as a Satellite Status screen that can be
accessed by pressing the NAV button. Each screen provides the same information in a
different format, giving you the choice of choosing the screen that best suits your needs.
To: Canyon
Speed
Glendora
210
NAV
San Dimas
4.3
M
H
Location
Distance
5.84
M
I
NAV
34°06.556N
117°49.563W
Elevation
Accuracy
25 F T
1292 F T
ent
Date/Time
10
vina
10
ESC
ESC
1.60mi
Heading
Trip Odometer
Speed
o
352 M
01 FEB 04
03:30:36 PM
M
Battery
0000.0 MI
4.3 H
3D Position Fix
Tracking 7....
ESC
NAV
ESC
NAV
Tip: The ESC button will also set through the navigation screens, just like the NAV
button but in the reverse order.
Map Screen
The first, and most commonly used screen, is the Map screen. The Map screen displays
your position, as well as POI’s and any background map data for the area displayed.
Highlights of the Map screen:
• Use the zoom in/out buttons to change the scale.
• The arrow cursor in the middle of the display indicates your position and, if moving,
points in the direction you are heading.
• Press MARK to save your position.
• Use the Arrow joystick to move the cursor. The arrow cursor changes to a crosshair
cursor, with any available information about the position of the cursor at the bottom of
the display. You can also save the position of the crosshair cursor as a POI by pressing
the MARK button.
• Press ESC when you are done panning with the crosshair cursor to display your present
position with the arrow cursor.
• Press MENU and select Hide Map Info or Show Map Info to turn the information
boxes at the bottom of the screen on or off.
• Press MENU and select Customize page to change the information displayed at the
bottom of the screen.
• Press MENU and select Map Setup to change the orientation of the screen and the
primary usage (land or marine).
Navigation Screens
15
Map Screen Overview
Route
Marker
Glendora
210
Track Indicator
San Dimas
Position Cursor
ent
10
vina
10
Map Scale
1.60mi
Heading
352
Data Field 1
Speed
o
M
M
4.3 H
Pan Cursor (used when
in Cursor Mode)
Hourglass (used when position
is unknown and eXplorist is
trying to compute the
position)
Data Field 2
Changing Map Scale
Press the Zoom In or the Zoom Out buttons to change how much of the map is
displayed on the screen. The map scale indicator in the bottom left corner of the map
indicates the relative distance between the two end-points of the scale. The scale can
be changed from 1700 mi (2700 km) to 100 ft (35.0 m).
Tip: Press and hold the Zoom In or the Zoom Out buttons to rapidly step through
the map scales.
Map Screen Modes
The Map screen has two modes that it can be in: position or cursor. In the Position
mode the Map screen displays your position, indicated by the arrow icon in the center
of the map. The arrow not only displays your position but also,
when moving, will point in the direction you are heading.
The Position mode is the default mode for the Map screen.
Whenever you enter the Map screen it will be in the Position
mode.
Glendora
210
San Dimas
ent
10
vina
10
1.60mi
Heading
Speed
o
352 M
M
4.3 H
The Map screen in the
Position Mode
Navigation Screens
16
In the Cursor mode, you have a cursor icon displayed that you can use
to pan around the map. The information displayed at the bottom of
the screen provides you with the heading and distance of the cursor
from your present position. In the Cursor mode you can:
30
San Dimas
10
• scroll around the map, checking available information for areas
on the map not displayed around your present position,
10
Pomona
60
57
• create a POI for the position indicated by the cursor,
1.60mi
• create a GOTO route to the position indicated by the cursor
location, or
• get detailed information about POIs or map objects found at the
cursor location.
60
Cursor
o
114 M 7.31MI
The Map screen in the
Cursor Mode
These options will be explained in the section of this manual on creating POIs and GOTO
routes.
To enter the Cursor mode, use the Arrow joystick to move the cursor. As soon as the
joystick is moved, a crosshair cursor is displayed and the bottom of the screen changes to
provide information about the cursor position.
To exit the cursor mode, press the ESC button. When pressed, the Map screen is returned
to the Position mode, with your present position displayed in the center of the screen.
Showing or Hiding Map Information
The information at the bottom of the Map screen provides you with information that can be
used to assist you in navigating to your destination. However, you may want to display more
of the map and may not need this information. The eXplorist gives you the capability to
turn this information on or off.
1.
While viewing the Map screen, press MENU.
2.
With Hide Map Info or Show Map Info highlighted, press ENTER.
Glendora
Glendora
210
San Dimas
210
ent
San Dimas
ent
10
vina
10
vina
10
10
1.60mi
Heading
alley
Speed
o
352 M
57
M
4.3 H
The Map screen with map
information shown
1.60mi
I-210
The Map screen with map
information hidden
Navigation Screens
17
Customizing the Map Information
The information displayed at the bottom of the screen can be customized to change what is
shown in the two map information fields. You can select from:
• Bearing
• Distance
• Speed [default]
• Heading [default]
• ETA (Estimated Time of Arrival)
• ETE (Estimated Time Enroute)
• Elevation
• Time
• Date
To customize the map information:
1.
While viewing the Map screen, press MENU.
2.
Use the Arrow joystick to highlight Customize page.
3.
Press ENTER.
4.
The title bar for one of the fields is highlighted. Use the Arrow joystick to highlight
the title bar for the field you want to customize.
5.
Press ENTER.
6.
Highlight the information you want displayed from the list.
Customize page
Glendora
7.
Press ENTER.
8.
The highlight will automatically jump to the other field. Go
back to step 5 to change the information displayed for this
field.
9.
When the information to be displayed is chosen, press ESC
to exit the customize function.
Bearing
Distance
210
Speed
Heading
ent
ETA
ETE
vina
Elevation
10
Time
1.60mi
Date
Heading
San Dimas
10
Speed
o
352 M
M
4.3 H
Navigation Screens
18
Changing the Map Orientation
The default orientation for the Map screen is North Up. This means that the top of the
display represents true north. This orientation can be changed so that the top of the display
is more useful to you. You can choose from:
• North Up [default]. This orientates the top of the map display to represent true north.
• Course Up. In course up, the top of the map displays the direction to your destination.
(When there is not an active route, the top of the display indicates true north.)
• Track Up. In track up, the top of the map display changes to reflect your heading.
you are not moving, the top of the display indicates true north.)
(If
Note: In Course Up and Track Up, a north indicator is displayed in the upper right corner
of the display. This arrow points in the direction of true north.
To change the map orientation:
1.
While viewing the Map screen, press MENU.
2.
Use the Arrow joystick to highlight Map Setup.
3.
Press ENTER.
4.
Use the Arrow joystick to highlight the Orientation field.
5.
Press ENTER.
6.
Use the Arrow joystick to highlight North Up,
Course Up or Track Up.
7.
Press ENTER.
8.
Press NAV to return to the Map screen.
Orientation
North Up
Course Up
Track Up
Navigation Screens
19
Changing the Primary Usage
The Map screen can be changed to be primarily used on land (default) or marine.
When in land usage, land areas are displayed as white areas on the display and water is
displayed as dark gray.
The opposite is true when the map is set for marine usage. (Water is white and land areas are
displayed as dark gray.)
This is provided as an option to provide you with the ability to view the text and map details
more easily, depending on where you are navigating.
To change the primary usage:
1.
While viewing the Map screen, press MENU.
2.
Use the Arrow joystick to highlight Map Setup.
3.
Press ENTER.
4.
Use the Arrow joystick to highlight the Primary Usage field.
5.
Press ENTER.
6.
Use the Arrow joystick to highlight Marine or Land.
7.
Press ENTER.
8.
Press NAV to return to the Map screen.
South Lake Tahoe
South Lake Tahoe
Rocky Slo
50
Rocky Slo
50
88
50
88
50
89
89
88
88
3.50mi
3.50mi
Heading
030°M
Speed
48.0
Heading
M
H
The Map screen with the
primary usage in Land
030°M
Speed
48.0
M
H
The Map screen with the
primary usage in Marine
Navigation Screens
20
Compass Screen
The Compass screen provides an easy-to-use graphical compass that should be familiar to
most GPS users.
Highlights of the Compass screen:
• With an active route, the top of the Compass screen displays the name of the
destination.
• Press MENU and select Customize page to change the information displayed at the top
of the screen.
• When there is no active route, the graphical compass performs like a standard compass,
indicating your heading as referenced to true north. (If you have turned the electronic
compass off, you must be moving at least 0.5 mph for the compass to display heading
information.)
• With an active route, the compass graphically displays an icon representing your
destination. The compass arrow points in the direction you are heading.
Compass Screen Overview
Destination
To: VIEW
Speed
Data Field 1
2.8
Distance
0.84 MI
M
H
N
Destination Icon
E
W
Moon Locator
Icon
Data Field 2
S
Sun Locator Icon
The top of the screen (the header bar) displays the name of the destination if you have an
active route. Without an active route, the destination name is blank.
Also, two navigation information fields (customizable) displayed.
When there is no active route, the graphical compass indicates the direction you are
travelling. (When you are not moving, the compass points to the last computed heading.)
When there is an active route, an icon representing the destination is displayed outside the
compass diameter, with the compass arrow pointing in the direction you are heading. When
the compass arrow points directly to the destination icon, you are going in the direction of
your destination.
Navigation Screens
21
Customizing the Information Fields
The information displayed at the top of the screen can be customized to information that is
important to you. You can select from:
• Bearing
• Distance [default]
• Speed [default]
• Heading
• ETA (Estimated Time of Arrival)
• ETE (Estimated Time Enroute)
• Elevation
• Time
• Date
To customize the map information:
1.
While viewing the Compass screen, press MENU.
2.
Use the Arrow joystick to highlight Customize page.
3.
Press ENTER.
4.
The title bar for one of the fields is highlighted. Use the Arrow joystick to highlight
the title bar for the field you want to customize.
5.
Press ENTER.
6.
Highlight the information you want displayed from the list.
7.
Press ENTER.
8.
The highlight will automatically jump to the other field. Go
back to step 5 to change the information displayed for this
field.
9.
When the information to be displayed is chosen, press ESC
to exit the customize function.
VIEW
Customize page
Bearing 0.84
2.8
Distance
210
Speed
Heading
ETA
ETE
Elevation
10
Time
Date
San Dimas
Speed
Navigation Screens
22
Position Screen
The Position screen provides detailed position information in a text format that is familiar to
seasoned navigators.
Highlights of the Position screen:
• Position is displayed in textual format using the coordinate system selected. (See
Setting Coordinate System for information on how to select the coordinate system.)
• Elevation information is displayed. (Accurate when four or more satellites are being
used to compute the position.)
• Computed accuracy of the position computed is displayed. WAAS is also displayed in
the Accuracy field when the eXplorist is using WAAS information to increase the
accuracy of the position fix.
• Date and time are shown, automatically adjusted from time information supplied from
the atomic clocks in the GPS satellites.
• A resettable trip odometer keeps track of the distance you’ve travelled.
• A graphical battery indicator provides you with information on the current condition of
the AA batteries in the eXplorist.
Position Screen Overview
Location
Coordinates
of present position
34°06.556N
117°49.563W
Elevation
Elevation
of present position
1292
F
Accuracy
25 F T
T
Date/Time
01 FEB 04
03:30:36 PM
Trip Odometer
Trip Odometer
Accuracy of
position fix
0000.0
M
I
Current date
and time
Battery
Battery life
indicator
Navigation Screens
23
Resetting the Trip Odometer
Whenever you begin a trip and you want to record how far you have travelled, you will want to
reset the trip odometer to zero.
To reset the trip odometer:
1.
While viewing the Position screen, press MENU.
2.
Use the Arrow joystick to highlight Reset Trip.
3.
Press ENTER.
4.
Use the Arrow joystick to highlight Yes.
5.
Press ENTER.
Warning
RESET
TRIP
TO 000?
Yes
No
Warning page offers you
the opportunity to change
your mind.
Navigation Screens
24
Satellite Status Screen
The Satellite Status screen is a handy way to visually see just how well the eXplorist is
tracking and receiving satellite signals.
Highlights of the Satellite Status screen:
• Type of position fix and the number of satellites being tracked is displayed. [A 2D
Position Fix requires three satellites; a 3D Position Fix requires four satellites or more.]
• Graphical indication of the location of the satellites, as well as their assigned number
identifiers, are shown.
• Bar chart supplies information as to the signal strength for each satellite. [A hollow bar
indicates that the satellite is being tracked but has not been locked on yet; a solid bar
indicates that the satellite has been locked on.
Satellite Status Screen Overview
Status of
position fix
Satellite icon
Signal level
bar graph
Satellite
identifier
3D Position Fix
Tracking 7....
Number of
satellites being
tracked
Current location
indicator
25
Points of Interest
Whether driving in a car, hiking on the trail or out
for an afternoon sail, you are going to want to save
places you’ve been in your eXplorist so that you can
go back to them in the future. This is the
fundamental starting point for any GPS navigator.
Saving these places is called “Marking your
position” or just MARK for short. The saved
positions are called points of interest, or just POIs.
(You may have heard the term “waypoints” to
describe marked positions. Waypoints and points of
interest are identical.)
There are two types of POIs in your eXplorist 300:
POIs that you have marked (saved) and POIs that
have been stored in your eXplorist as part of the built-in background map. These two classes
of POIs are accessed from the same MENU option and can be used independently or
combined to create routes.
Marking Your Position
The most common way of adding POIs to the database will be marking your present position.
There are two levels of marking your position. The first that will be described will be quickmarking your position. The second method provides you with the means to personalize POIs
you are saving.
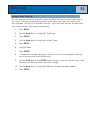
Quick-Marking Your Position
This saves your present position in the database using mark
position defaults.
1.
Press MARK.
2.
Press ENTER.
Note: If a position fix is not being computed or if only a 2D
position fix (no elevation information) is being computed, a
warning will be displayed asking you to confirm that you still
want to save this position.
Mark
Icon
Name
POI001
Location
34°06.560N
117°49.566W
Elevation
924 FT
Message
CREATE MESSAGE?
Save
Cancel
Sample Mark Screen
When you save a 2D position fix you will notice that even
though elevation was not computed, an elevation value is
included as part of the POI. This elevation is the last elevation that was computed by
the eXplorist.
Tip: Later in this manual you will see a way to modify the icon, name and message of
positions you have quick-marked.
Points of Interest
26
Marking Your Position (Personalized)
Normally, marking your position is simply a two-button process, MARK and ENTER.
However, sometimes you will want to personalize the POI you are marking to make it
easier to identify later. You are able to change the icon, change the name, and create
a message. You are also able to change the location coordinates and the elevation.
This changes the position that is being saved and is discussed in a following section.
1.
Press MARK.
2.
Use the Arrow joystick to highlight the field you want to change.
3.
Press ENTER.
4a. If the icon field was selected: Use the Arrow joystick
to select the icon desired and press ENTER. To aid in
your selection, the type of icon selected is displayed in
the information block at the top of the keypad.
Mark
Icon
Name
POI003
Location
34°06.560N
117°49.566W
Elevation
924 FT
4b. If the Name field was selected: Use the Arrow joystick Message
CREATE MESSAGE?
to select the character desired and press ENTER. If
you make a mistake, highlight Back and press ENTER.
Save
Cancel
To access the lower-case characters, highlight Shift
and press ENTER. To clear everything and start over, Mark Screen with Name
field highlighted.
highlight CLEAR and press ENTER. When you are
satisfied with the name, highlight OK and press ENTER.
Note: User-saved POI names can be only eight characters long (including
spaces).
4c. If the Message field was selected. Use the keypad displayed, just as was
described in 4b, to enter a message for this POI. Message fields can have
up to 30 characters, including spaces.
5.
When the Icon, Name and Message fields are done, use the Arrow joystick to
highlight Save.
6.
Press ENTER.
Points of Interest
27
Making POIs for Locations Other Than Your Present Position
Sometimes, you may want to save a position that is not your present position. The eXplorist
offers you two ways of doing that. You can modify the coordinates of your present position or
you can use the Cursor mode of the Map screen to pan to the location you want to mark.
Marking a Position by Entering Coordinates
This method of marking a position would normally be used when you have gotten the
coordinates for the position from a map or chart. It is also possible that you have gotten the
coordinates from a friend and want to save this POI in your eXplorist database.
Before beginning, make sure that your eXplorist has been set to use the same coordinate
system system of the coordinates you plan to enter. If not, you will have to go to
Preferences and change the coordinate system used by your eXplorist.
1.
Press MARK.
2.
Use the Arrow joystick to highlight the Location field.
3.
Press ENTER.
4.
Depending on the coordinate system used, the information
will be different but the process is the same. Use the Arrow
joystick in an up/down motion to increase or decrease the
value at the cursor point. To move the cursor point left or
right, use the Arrow joystick in a left/right motion.
Input the data on the first line of the Location field. When
done, press ENTER and the cursor will drop to the second
line. Continue inputting the data for the second line of the
Location field.
5.
Press ENTER.
6.
Use the Arrow joystick to highlight Save.
7.
Press ENTER to save the new POI.
Mark
Icon
Name
CAMP
Location
34°06.560N
117°49.566W
Elevation
924 FT
Message
CREATE MESSAGE?
Save
Cancel
Entering new positioning
coordinates
Note: While not described here, you can change the icon, name and elevation, and you
can add a message, just as described in Marking Your Position (Personalized).
Points of Interest
28
Marking a Position using the Map Cursor
This gives you a way of marking a position, other than your present position, by moving the
cursor around the map to a place where you want to create a POI.
1.
While viewing the Map screen, use the Arrow joystick to put the eXplorist into
Cursor mode.
2.
Continue moving the crosshair cursor until you are over the location where you want
to add a POI.
3.
Press MARK.
4.
[Optional] Use the Arrow joystick to highlight fields (icon, name, etc.) of the POI
that you want to edit. When you are done editing the field, press ENTER.
5.
With Save highlighted, press ENTER.
6.
Press ESC to exit the Cursor mode and return to the Position mode.
Marking a Position from a Map Object
Another method of marking a position while in the Cursor mode is to use the crosshair cursor
to mark a map object (road, city, etc.).
1.
While viewing the Map screen, use the Arrow joystick to put the eXplorist into
Cursor mode.
2.
Continue moving the crosshair cursor until you are over a map object that you want
to add as a POI. (The information about the map object will be displayed at the
bottom of the display.)
3.
Press ENTER.
4.
Use the Arrow joystick to select, from the list of map objects for that location, the
one you want to use as the baseline for the new POI.
5.
Press ENTER.
6.
The Save option will be highlighted.
7.
Press ENTER.
8.
[Optional] Use the Arrow joystick to highlight fields (icon, name, etc.) of the POI
that you want to edit. When you are done editing the field, press ENTER.
9.
With Save highlighted, press ENTER.
10. Press ESC to exit the Cursor mode and return to the Position mode.
Points of Interest
29
The POI Database
All of the POIs that you have saved and background map POIs that came with your
eXplorist, can be accessed using the POI database. Once the database has been accessed
and the POI selected, you can view or edit the POI.
Highlights of the POI database are:
• Searching for POIs you have saved, nearest to your position or in alphabetical order.
• Searching for POIs that have been preloaded into the eXplorist, nearest to your
position or in alphabetical order.
• Ability to edit POIs you have saved.
• Ability to delete POIs you have saved.
• Function letting you view a POI (ones you have saved or preloaded) on the map.
• Provides another means to save a preloaded POI as a user-entered POI.
• While viewing the list of POIs, the bearing and distance from your present position is
displayed at the bottom of the screen.
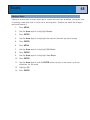
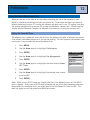
Searching for a User-Entered POI
When searching for a POI that you have entered, you have two options
to choose from: nearest or alphabetical.
1.
Press MENU.
2.
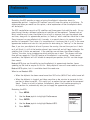
Use the Arrow joystick to highlight Pts of Interest.
3.
Press ENTER.
4.
Use the Arrow joystick in an up/down motion to highlight My
Pts of Interest.
5.
Use the Arrow joystick in a left/right motion to select
Nearest or Alphabetical.
6.
Press ENTER.
7.
Use the Arrow joystick to highlight the desired POI.
Pts of Interest
My Pts of Interest
Background Map
Find By
Alphabetical
POI database set to search
for user-entered POIs
alphabetically
From here you can edit, delete or view on the map the POI you have highlighted by pressing
ENTER and selecting the desired function from the menu. Detailed information on these
functions can be found later in this manual.
Points of Interest
30
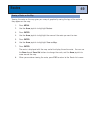
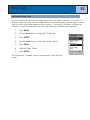
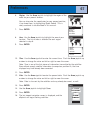
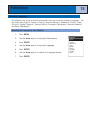
Searching for a Preloaded POI using Nearest
Searching for a preloaded POI using the Nearest option is similar to searching for userentered POIs with an additional step. Preloaded POIs have been categorized into five
categories (Cities, Highways, Airports, Waterways and Parks) and you need to select the
category that the POI will be found in.
1.
Press MENU.
2.
Use the Arrow joystick to highlight Pts of Interest.
3.
Press ENTER.
4.
Use the Arrow joystick in an up/down motion to highlight
Background Map.
5.
Use the Arrow joystick in a left/right motion to select
Nearest.
6.
Press ENTER.
7.
Use the Arrow joystick to highlight the category (Cities,
Highways, Airports, Waterways or Parks) for the POI.
8.
Press ENTER.
9.
Use the Arrow joystick to highlight the POI desired.
Cities
San Dimas
Glendora
Pomona
Vincent
West Covina
Valinda
Montclair
Baldwin Park
Bearing
086°M
Distance
1.05 MI
List of cities, nearest to
the present position
Points of Interest
31
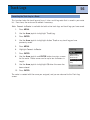
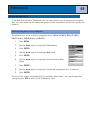
Searching for a Preloaded POI using Alphabetical
This is very similar to searching for a POI using nearest but due to the large numbers of POIs
in the database, an additional step has been added to help you find the POI you are looking
for quicker.
1.
Press MENU.
2.
Use the Arrow joystick to highlight Pts of Interest.
3.
Press ENTER.
4.
Use the Arrow joystick in an up/down motion to highlight Background Map.
5.
Use the Arrow joystick in a left/right motion to select Alphabetical.
6.
Press ENTER.
7.
Use the Arrow joystick to highlight the category (Cities,
Highways, Airports, Waterways or Parks) for the POI.
8.
Press ENTER.
9.
Use the Arrow joystick and the ENTER button to enter the
first few characters of the POI you are searching for. (Five
characters is usually enough to put you close enough on the
list to the POI you are looking for.)
Cities
ABBEVILLE
<-
->
Keyboard used to narrow
the search
10. Use the Arrow joystick to highlight OK.
11. Press ENTER.
12. Use the Arrow joystick to highlight the POI desired.
From here you can copy or view on the map the POI you have highlighted by pressing ENTER
and selecting the desired function from the menu. Detailed information on these functions
can be found later in this manual.
Points of Interest
32
Editing a User-Created POI
POIs that you have saved can be edited to change the icon, name, elevation and message.
You can also change the location, but keep in mind that this effectively is creating a new POI
in a new location.
1.
Press MENU.
2.
Use the Arrow joystick to highlight Pts of Interest.
3.
Press ENTER.
4.
Use the Arrow joystick up/down to highlight My Pts of Interest.
5.
Use the Arrow joystick left/right to select Nearest or Alphabetical.
6.
Press ENTER.
7.
Use the Arrow joystick to highlight the POI to be edited.
8.
Press ENTER.
9.
Use the Arrow joystick to highlight Edit POI.
10. Press ENTER.
NOTE: If the POI you are trying to edit is used in a route, you will be asked to confirm
that you want to edit this POI.
11. Use the Arrow joystick to highlight the field you want to
change.
12. Press ENTER.
13a. If the Icon field was selected: Use the Arrow joystick to
select the icon desired and press ENTER. To aid in your
selection, the type of icon selected is displayed in the
information block at the top of the keypad.
Mark
Icon
Name
MAGELLAN
Location
34°06.560N
117°49.566W
Elevation
924 FT
Message
CREATE MESSAGE?
13b. If the Name field was selected: Use the Arrow joystick to
Save
Cancel
select the character desired and press ENTER. If you make
a mistake, highlight Back and press ENTER. To access the
Editing an existing POI
with the Icon field
lower-case characters, highlight Shift and press ENTER. To
highlighted
clear everything and start over, highlight CLEAR and press
ENTER. When you are satisfied with the name, highlight OK and press ENTER.
Note: User-entered POI names can be only eight characters long (including
spaces).
13c. If the Message field was selected: Use the keypad displayed, just as was described
in 13b, to enter a message for this POI.
14. When the Icon, Name and Message fields are ready, use the Arrow joystick to
highlight Save.
15. Press ENTER.
Points of Interest
33
Deleting a User-Created POI
POIs that you have saved can be deleted using this operation. If you have created a lot of
POIs, you may wish to delete any unnecessary ones so that you may more easily search for a
newly created POI.
POIs that have been deleted cannot be restored. You will need to input the information for a
deleted POI if you will want it again. To prevent accidental deletion, a confirmation window
will be displayed, confirming the deletion.
1.
Press MENU.
2.
Use the Arrow joystick to highlight Pts of Interest.
3.
Press ENTER.
4.
Use the Arrow joystick up/down to highlight My Pts of Interest.
5.
Use the Arrow joystick left/right to select Nearest or Alphabetical.
6.
Press ENTER.
7.
Use the Arrow joystick to highlight the POI to be deleted.
8.
Press ENTER.
Note: If the POI selected is used in a route, you will be asked to confirm the deletion.
9.
Use the Arrow joystick to highlight Delete POI.
10. Confirm the deletion by highlighting Yes, or cancel the deletion by highlighting No.
11. Press ENTER.
Points of Interest
34
Viewing a User-Created POI on the Map Screen
POIs that you have saved can be viewed on the Map screen to assist you in locating the POI.
1.
Press MENU.
2.
Use the Arrow joystick to highlight Pts of Interest.
3.
Press ENTER.
4.
Use the Arrow joystick up/down to highlight My Pts of Interest.
5.
Use the Arrow joystick left/right to select Nearest or Alphabetical.
6.
Press ENTER.
7.
Use the Arrow joystick to highlight the POI to be viewed.
8.
Press ENTER.
9.
Use the Arrow joystick to highlight View on Map.
10. Press ENTER.
11. The Map screen will be displayed in the Cursor mode. The cursor will be directly
over the POI you have selected. You may use the Zoom buttons to change the scale
of the map displayed; and if your position icon is within range, it will be shown.
12. Press ESC to return to the list of POIs found in step 7.
Note: Remember that pressing the NAV button will return you to the last viewed Map
screen. In step 12 if you are finished with the POIs in the POI database, you could
press NAV to close the POI database and return to the last viewed Map screen.
Points of Interest
35
Copying a Preloaded POI
POIs that have been preloaded as part of the background map can be saved as user-entered
POIs. This does not delete preloaded POIs (preloaded POIs cannot be deleted) it just copies
it to the My Points of Interest portion of the database.
1.
Press MENU.
2.
Use the Arrow joystick to highlight Pts of Interest.
3.
Press ENTER.
4.
Use the Arrow joystick up/down to highlight Background Map.
5.
Use the Arrow joystick left/right to select Nearest or Alphabetical.
6.
Press ENTER.
7.
[Only if Alphabetical selected] Use the Arrow joystick and the ENTER button to
enter the first few characters of the POI you are searching for. Highlight OK and
press ENTER to continue.
8.
Use the Arrow joystick to highlight the POI to be copied.
9.
Press ENTER.
10. Use the Arrow joystick to highlight Save.
11. Press ENTER.
Steps 12 through 14 are optional.
12. Use the Arrow joystick to highlight the field you want to change.
13. Press ENTER.
14a. If the Icon field was selected: Use the Arrow joystick to select the icon desired and
press ENTER. To aid in your selection, the type of icon selected is displayed in the
information block at the top of the keypad.
14b. If the Name field was selected: Use the Arrow joystick to select the character
desired and press ENTER. If you make a mistake, highlight Back and press
ENTER. To access the lower-case characters, highlight Shift and press ENTER.
To clear everything and start over, highlight CLEAR and press ENTER. When you
are satisfied with the name, highlight OK and press ENTER.
Note: User-entered POI names can be only eight characters long (including
spaces).
14c. If the Message field was selected: Use the keypad displayed, just as was described
in 14b, to enter a message for this POI.
15. When the Icon, Name and Message fields are ready, use the Arrow joystick to
highlight Save.
16. Press ENTER.
Points of Interest
36
Viewing a Preloaded POI on the Map Screen
POIs that have been preloaded as part of the background map can be viewed on the Map
screen to assist you in locating the POIs.
1.
Press MENU.
2.
Use the Arrow joystick to highlight Pts of Interest.
3.
Press ENTER.
4.
Use the Arrow joystick up/down to highlight Background Map.
5.
Use the Arrow joystick left/right to select Nearest or Alphabetical.
6.
Press ENTER.
7.
[Only if Alphabetical selected] Use the Arrow joystick and the ENTER button to
enter the first few characters of the POI you are searching for. Highlight OK and
press ENTER to continue.
8.
Use the Arrow joystick to highlight the POI to be viewed.
9.
Press ENTER.
10. Use the Arrow joystick to highlight View.
11. Press ENTER.
12. The Map screen will be displayed in the Cursor mode. The cursor will be directly
over the POI you have selected. You may use the Zoom buttons to change the scale
of the map displayed; and if your position icon is within range, it will be shown.
13. Press ESC to return to the detail screen of POIs found in step 8.
Note: Remember that pressing the NAV button will return you to the last viewed Map
screen. In step 13 if you are finished with the POIs in the POI database, you could
press NAV to close the POI database and return to the last viewed Map screen.
Routes
37
Routes are the least understood and one of
the most important functions of a GPS
receiver. The better you understand routes
and how to use them, the more enjoyment
you will receive from using your eXplorist.
The easiest and most common form of a
route is a GOTO route. A GOTO route is a
one-leg route with a starting point (your
present position) and a destination (a POI
you select). This route is useful when you
want to go to a specific preloaded or userentered POI.
The next type of a route is a multi-leg route. The easiest way to understand multi-leg routes
is to know that they are GOTO routes stuck together. If a GOTO route is from A to B than a
multi-leg route goes from A to B, B to C, C to D, and so on. (Using the term multi-leg is
somewhat misleading because as it can be a single-leg route; but these types of routes are
rarely used as one-leg routes, a GOTO route would be used instead.) An advantage of a
multi-leg route is that it can be saved in the eXplorist’s memory to be activated and used
over and over.
A third type of route is a backtrack route. (The creation of backtrack routes is not described
in this section of the manual because these routes are part of the Track Log functions of the
eXplorist.) As you travel the eXplorist records your track. Creating a backtrack route uses
this track information and creates a multi-leg route, in reverse order, enabling you to
navigate back to where you started.
GOTO Routes
A GOTO route is the most commonly used form of a route in your eXplorist. The creation of
a GOTO route is no harder than pressing the GOTO button and searching in the POI database
for the destination POI.
Features of a GOTO route:
• A straight line from your present position to a selected POI.
• GOTO routes cannot be saved.
• GOTO routes are erased when the eXplorist is turned off.
• GOTO routes can be created by pressing the GOTO button and selecting the destination
POI from the POI database.
• GOTO routes can also be created in the Cursor mode of the Map screen.
Routes
38
Creating a GOTO Route
The instructions here describe the most common and easiest way to create a GOTO
route.
1.
Press GOTO.
2.
Use the POI database to select the POI to be the
destination.
Note: Detailed instructions for searching the POI
database can be found in the Points of Interest section
of this manual.
South Lake Tahoe
Rocky Slo
50
CABIN
50
88
89
88
3.
With the POI highlighted, press ENTER.
4.
If you already have a GOTO you will be asked to
confirm the creation of this GOTO.
3.50mi
Heading
030°M
Speed
48.0
M
H
Map screen with a GOTO
route active. Notice the
line on the screen that
graphically displays the
route.
After you press ENTER, the last viewed navigation screen will be
displayed, updated as needed to provide information about the
GOTO route you have created. On the Map screen, a line will be
drawn representing the GOTO route. The Compass screen will
change to display the name of the POI used as the destination in the screen header
bar and an icon representing the destination outside the diameter of the compass.
Routes
39
Creating a GOTO Route from the Map Cursor
This will create a GOTO route to a point on the map that you have indicated by moving the
crosshair cursor on the Map screen.
1.
While viewing the Map screen, use the Arrow joystick, causing the eXplorist to go
into Cursor mode.
2.
Continue using the Arrow joystick to move the crosshair cursor to a point on the
map that represents where you want to go.
3.
Press GOTO.
4.
If a GOTO is active, you will be asked to deactivate it and create a new GOTO route.
Highlight Yes and press ENTER to overwrite the existing GOTO. You are then
asked whether you want to create a new GOTO route. Highlight Yes and press
ENTER.
5.
Confirm that you want to create a GOTO from the current
cursor position. Highlight Yes.
(If you highlight No and press ENTER, the eXplorist assumes
that you still want to create a GOTO, just not to the current
cursor position. The POI database screen will be displayed
so you can search the database for the POI you want to use
as the destination.)
6.
Press ENTER.
Attention
Goto
current
cursor
position?
Yes
No
Creating a GOTO using the
cursor confirmation
After you press ENTER, the last viewed navigation screen will be displayed, updated as
needed to provide information about the GOTO route you have created. On the Map screen, a
line will be drawn representing the GOTO route. The Compass screen will change to display
the name of the POI used as the destination in the screen header bar and an icon
representing the destination outside the compass diameter.
Routes
40
Creating a GOTO Route to a Map Object
This will create a GOTO route to a map object (city, highway, user POI, etc.) that you have
indicated by moving the crosshair cursor on the Map screen over the map object.
1.
While viewing the Map screen, use the Arrow joystick, causing the eXplorist to go
into Cursor mode.
2.
Continue using the Arrow joystick to move the crosshair
cursor to the map object that you want to go.
3.
Press ENTER.
4.
Use the Arrow joystick to highlight the map object that you
want to use as the GOTO. (Some areas of the map may have
multiple map objects in the same location.)
5.
Press ENTER.
6.
Use the Arrow joystick to highlight Goto.
7.
Press ENTER.
8.
If a GOTO is active, you will be asked to deactivate it and
create a new GOTO route. Highlight Yes and press ENTER.
Detail Info
Glendora
34°08.437N
117°51.845W
Glendora
CA
Save
Goto
Sample City Detail screen
with Goto highlighted
After you press ENTER, the last viewed navigation screen will be displayed, updated as
needed to provide information about the GOTO route you have created. On the Map screen, a
line will be drawn representing the GOTO route. The Compass screen will change to display
the name of the POI used as the destination in the screen header bar and an icon
representing the destination outside the compass diameter.
Routes
41
Multi-Leg Routes
Multi-leg routes can be used to navigate to a final destination using multiple legs. An
example would be leaving the dock, motoring over to buoy 1, then the bait boat and finally to
a fishing hot spot. This route would go from Dock to Buoy 1, Buoy 1 to Bait, Bait to Fish.
Features of a multi-leg route:
• Multi-leg routes can be saved in memory. (A maximum of 20 routes can be saved. Each
saved route can have up to 29 legs in the route.)
• Multi-leg routes remain active even after the eXplorist has been turned off.
• Multi-leg routes can be edited, reversed, deleted or viewed on the map.
• When a multi-leg route is active, you can switch which leg will be used as the next
destination point. In the above example, you could skip going to Buoy 1 by selecting
the Bait leg when the route is active.
Routes
42
Creating a Multi-leg Route
The eXplorist will provide you with an empty list for your route, and you can use the POIs
saved in the POI database to create the route. All the tools you’d need to create the route
will be described here.
Steps in creating a multi-leg route:
1.
Press MENU.
2.
Use the Arrow joystick to highlight Routes.
3.
Press ENTER.
4.
Use the Arrow joystick to highlight <New>.
5.
Press ENTER.
6.
<Add POI> is highlighted. Press ENTER.
7.
The POI database is shown. Search the database for the POI
you want to use as the starting POI for the route.
8.
Continue pressing ENTER with <Add POI> highlighted.
Select the next POI for the route from the POI database.
9.
[Optional] As you are creating the route you may want to
edit what you have already entered. You can insert, delete or
replace a POI that is already in the route list.
Create Route
<Add POI>
Save Route
Leg
Bearing
Distance
Create Route screen
Inserting: Use the Arrow joystick to highlight the POI that you want to insert a new
leg before. Press MENU, highlight Insert POI and press ENTER. Search the POI
database for the new POI. The new POI will be inserted into the route you are
creating.
Deleting: Use the Arrow joystick to highlight the POI you want to delete from the
route. Press MENU, highlight Delete POI and press ENTER.
Replacing: Use the Arrow joystick to highlight the POI you want to replace. Press
MENU, highlight Replace POI and press ENTER. Search the POI database for the
new POI. The POI you select will replace the POI that was originally highlighted.
10. When you have added all of the legs to the route you are creating, use the Arrow
joystick to highlight Save Route.
11. Press ENTER.
12. Use the Arrow joystick and the ENTER button to input a name, up to ten
characters, for the route.
13. Highlight OK.
14. Press ENTER.
Routes
43
Activating/Deactivating a Route
An active route is the route you are presently navigating on. Anytime you activate a route, it
will remain the active route until you either turn it off (deactivate) or activate a new route.
GOTOs are automatically activated when they are created, while multi-leg routes need to be
activated manually.
1.
Press MENU.
2.
Use the Arrow joystick to highlight Routes.
3.
Press ENTER.
4.
Use the Arrow joystick to highlight the name of the route you
want to activate or deactivate. (The active route will have its
name bolded in the route list.)
5.
Press MENU.
6.
Highlight Activate Route or Deactivate Route.
7.
Press ENTER.
Route List
1 Tahoe Camp
2 Trout Spot
3 Magellan
<New>
Legs
3
Distance
4.95 MI
List of routes with route
named “Magellan” active.
You will be returned to the last viewed navigation screen with the route chosen activated or
deactivated.
Routes
44
Changing the Destination Leg of an Active Route
When a route is created it can have many different legs to it, each leg with its own
destination. If during your travels you want to skip some of the legs, you can select the leg
that you want to proceed to next.
An example would be that your planned route starts at your campsite. The first leg goes to
the bridge. The second leg goes across the bridge to the stone marker. Leg 3 leaves the
stone marker and takes you to the ranger station. To finish out the route, the final leg goes
from the ranger station to the swimming area. This route would be Camp > Bridge > Marker
> Ranger > Swim. Suppose that after crossing the bridge you don’t want to go to the stone
marker but instead you want to go to the ranger station. Because the route is active (you can
only select legs from active routes), you would follow the instructions below and tell the
eXplorist to set the next leg to the ranger station. The route would be recomputed,
eliminating the navigation instructions to go to the stone marker.
1.
Press MENU.
2.
Use the Arrow joystick to highlight Routes.
3.
Press ENTER.
4.
Use the Arrow joystick to highlight the active route.
5.
Press MENU.
6.
Highlight Select Leg.
7.
Press ENTER.
8.
Use the Arrow joystick to highlight the next destination POI
from the route list that you want to go to. In the example to
the right, that would be Ranger.
9.
Press ENTER.
10. Confirm that you want to do this by using the Arrow joystick
to highlight Yes.
11. Press ENTER.
12. Press NAV to return to the last viewed navigation screen.
Enter to Select
Camp
Bridge
Marker
Ranger
Swim
3
Leg
Bearing Distance
272°M
3.06 MI
Route leg list with Ranger
selected. Note that
Marker is bold because it
is the current active leg.
Routes
45
Editing a Saved Route
Saved routes can be edited to add a new leg at the end of the route (<Add POI>) remove a
leg (Delete POI), insert a new leg (Insert POI) or change the destination from one POI to
another (Replace POI).
1.
Press MENU.
2.
Use the Arrow joystick to highlight Routes.
3.
Press ENTER.
4.
Use the Arrow joystick to highlight the name of the route you want to edit.
5.
Press ENTER.
6.
Adding a Leg: Use the Arrow joystick to highlight <Add
POI>. Press ENTER. Search the POI database for the new
POI. The new POI will be added to the end of the route.
Inserting: Use the Arrow joystick to highlight the POI that
you want to insert a new leg before. Press MENU, highlight
Insert POI and press ENTER. Search the POI database for
the new POI. The new POI will be inserted into the route
you are creating.
Menu
Insert POI
Delete POI
Replace POI
Help
Deleting: Use the Arrow joystick to highlight the POI you want to delete from the
route. Press MENU, highlight Delete POI and press ENTER.
Replacing: Use the Arrow joystick to highlight the POI you want to replace. Press
MENU, highlight Replace POI and press ENTER. Search the POI database for the
new POI. The POI you select will replace the POI that was originally highlighted.
7.
When the route has been edited, use the Arrow joystick to highlight Save Route.
8.
Press ENTER.
9.
[Optional] Use the Arrow joystick and the ENTER button to input a name, up to ten
characters, for the route.
10. Highlight OK.
11. Press ENTER.
Routes
46
Reversing a Route
Reversing a route takes a saved route and recreates it in reverse order. The sample route that
was discussed earlier, Camp > Bridge > Marker > Ranger > Swim, would now be Swim >
Ranger > Marker > Bridge > Camp.
1.
Press MENU.
2.
Use the Arrow joystick to highlight Routes.
3.
Press ENTER.
4.
Use the Arrow joystick to highlight the name of the route you want to reverse.
5.
Press MENU.
6.
Highlight Reverse Route.
7.
Press ENTER.
Routes
47
Deleting a Route
The eXplorist can hold up to 20 different routes. When you have 20 routes saved, you will
need to delete one before you can create a new one.
1.
Press MENU.
2.
Use the Arrow joystick to highlight Routes.
3.
Press ENTER.
4.
Use the Arrow joystick to highlight the name of the route you want to delete.
5.
Press MENU.
6.
Highlight Delete Route.
7.
Press ENTER.
8.
Highlight Yes to confirm deletion, or No to cancel deletion.
9.
Press ENTER.
Warning
Delete
route ?
Yes
No
Routes
48
Copying a Route
Copying a route makes an exact duplicate of a route that can then be edited, saving you time
in creating a new route that is similar to an existing route. Another use would be to copy a
route and reverse it.
1.
Press MENU.
2.
Use the Arrow joystick to highlight Routes.
3.
Press ENTER.
4.
Use the Arrow joystick to highlight the name of the route you want to copy.
5.
Press ENTER.
6.
Press MENU.
7.
Use the Arrow joystick to highlight Edit Route.
8.
Press ENTER.
9.
Use the Arrow joystick to highlight Save Route.
10. Press ENTER.
11. Use the Arrow joystick and the ENTER button to input a new name, up to ten
characters, for the route.
12. Highlight OK.
13. Press ENTER.
Routes
49
Viewing a Route on the Map
Viewing the route on the map gives you a way of graphically seeing the legs of the route as
they appear on the map.
1.
Press MENU.
2.
Use the Arrow joystick to highlight Routes.
3.
Press ENTER.
4.
Use the Arrow joystick to highlight the name of the route you want to view.
5.
Press ENTER.
6.
Use the Arrow joystick to highlight View on Map.
7.
Press ENTER.
The route is displayed with the map scaled to display the entire route. You can use
the Zoom In and Zoom Out buttons to change the scale, and the Arrow joystick to
move around the map.
8.
When you are done viewing the route, press ESC to return to the Route List screen.
Track Logs
50
As you are moving, the eXplorist continuously records your
track. Much like leaving breadcrumbs on the trail that you
can use later to find your way back, the eXplorist leaves
“electronic breadcrumbs” on the map. The advantage
here is that you don’t have to worry about animals coming
along and eating your return route markers.
This provides you with just another tool to make your
eXplorist more valuable to you out in the field or on the
waters. You can save your active track as a track log or as
a multi-leg route that you can use over and over. You can
also create a backtrack route that will guide you back to
your starting point, following the same path you just took.
You will find many other additional uses for track logs once
you feel comfortable with them.
Track Logs
As mentioned above, track logs are records of your travels using electronic breadcrumbs to
record where you have been. Track logs can be a track history that you have saved or the
active track the eXplorist is recording.
Features of Track Logs:
• Active track is recording your travels whenever you are moving unless you have
intentionally turned it off.
• Up to five track logs can be saved and recalled at a later date.
• Active tracks can be cleared, stopped, or resumed, adding flexibility to recorded
tracking.
• Active tracks can be converted to a saved multi-leg route, providing a easy, quick way
to create routes that can be used in the future.
• BackTrack, a function of Track Logs, provides an easy and quick way to activate a route
that will return you to your starting position.
Track Logs
51
Stopping and Resuming Active Track Logging
This provides the ability to turn off the recording of the active track and then to start it up
again.
1.
Press MENU.
2.
Use the Arrow joystick to highlight Track Log.
3.
Press ENTER.
4.
With Active Track highlighted, press MENU.
5.
Highlight Stop Logging or Resume Logging.
Track Log
Note: Stop Logging is displayed only when the active track
is being recorded; Resume Logging appears only when the
active track is not being recorded.
6.
Press ENTER.
Active Track
Apr-24
Apr-28
Legs
Distance
8
10.4 MI
Track Log List with
information at the bottom
in a straight line from the point for the number of legs and
stopped to the point where it has the distance of the track
log highlighted
unless more than four hours
Note: The eXplorist will fill
where the track logging was
been resumed. This is true
have elapsed between the stop and the Resume Logging
command. In that case, the eXplorist will not draw a straight
line from the stop to the resume points of the track.
Track Logs
52
Starting a New Active Track Log
Before you can start a new active track log, you need to stop the one that is presently
recording.
1.
Press MENU.
2.
Use the Arrow joystick to highlight Track Log.
Track Log
3.
Press ENTER.
Active Track
Apr-24
Apr-28
4.
Use the Arrow joystick to highlight Active Track.
5.
Press MENU.
6.
Highlight Stop Logging. (If Resume Logging is displayed,
the Track Log has already been stopped. Go to step 10.)
7.
Press ENTER.
8.
Use the Arrow joystick to highlight Active Track.
9.
Press MENU.
10. Highlight New Track.
11. Press ENTER.
Legs
3
Distance
525 F T
Active route menu with
New Track highlighted.
Track Logs
53
Saving an Active Track Log
This will save your active track log with a name you enter that you can use at some time in
the future. This does not erase your presently active route; only saves the current active
track and adds it to the list of available track logs. Up to five track logs can be saved, each
with a name no more than seven characters long.
1.
Press MENU.
2.
Use the Arrow joystick to highlight Track Log.
3.
Press ENTER.
4.
Use the Arrow joystick to highlight Active Track.
5.
Press MENU.
6.
Highlight Save.
7.
Press ENTER.
8.
If there are not enough track points to save, an alert will be displayed, informing
you of the same and canceling the save.
9.
Use the Arrow joystick and ENTER button to assign a name for the track log. Track
log names can be up to seven characters in length.
10. Use the Arrow joystick to highlight OK when the name has been entered.
11. Press ENTER.
Track Logs
54
Creating a BackTrack Route
BackTrack routes use your active track to create a route back to where you started, turning
around and following the electronic breadcrumb trail that the eXplorist dropped.
1.
Press MENU.
2.
Use the Arrow joystick to highlight Track Log.
3.
Press ENTER.
4.
Use the Arrow joystick to highlight Active Track.
5.
Press MENU.
6.
Highlight BackTrack.
7.
Press ENTER.
8.
[Track logging is turned off alert status] Press ENTER.
Track Log
Active Track
Stop Logging
Save
BackTrack
Clear Track
Convert to Route
View on Map
Help
0.00
After BackTrack has been activated, the last viewed navigation screen will be displayed. The
eXplorist will now begin computing the navigation information needed to guide you back to
your starting point.
NOTE: When you have an active BackTrack route, the eXplorist will not be recording track
information. The previously mentioned options–Stop Logging, Resume Logging, New Track–
will not be available. The eXplorist will automatically begin recording your track when:
• You have arrived at your destination.
• You activate a new route (GOTO or from Route menu).
• You deactivate the BackTrack. To deactivate a BackTrack:
Press MENU
Highlight Track Log, press ENTER
Highlight Active Track, press MENU
Highlight Deactivate, press ENTER
Press ENTER.
Track Logs
55
Clearing the Active Track
The active track can get to be very large, especially if you haven’t cleared it in a while. It is
recommended that if you plan to use BackTrack or to save the upcoming track log you should
clear the active track before beginning your journey. If you do not, the other functions will
still work, but you will probably have a lot more track log information than you want.
1.
Press MENU.
2.
Use the Arrow joystick to highlight Track Log.
3.
Press ENTER.
4.
Use the Arrow joystick to highlight Active Track.
5.
Press MENU.
6.
Highlight Clear Track.
7.
Press ENTER.
The active track is cleared, and you are returned to the Track Log
screen.
Track Log
Active Track
Stop Logging
Save
BackTrack
Clear Track
Convert to Route
View on Map
Help
0.00
Track Logs
56
Converting the Track Log to a Route
This function takes the track log and turns it into a multi-leg route that is saved in your route
list. From here, the route can be edited if necessary.
Note: Convert to Route is available for both active track logs and track logs you have saved.
1.
Press MENU.
2.
Use the Arrow joystick to highlight Track Log.
3.
Press ENTER.
4.
Use the Arrow joystick to highlight Active Track or any track log you have
previously saved.
5.
Press MENU.
6.
Highlight Convert to Route.
7.
Press ENTER.
8.
Use the Arrow joystick and ENTER button to assign a name
for the route. Route names can be up to ten characters in
length.
9.
Use the Arrow joystick to highlight OK when the name has
been entered.
Track Log
Apr-24
Follow Track
Reverse Track
DeleteTrack
Convert to Route
View on Map
Help
0.00
10. Press ENTER.
The route is created with the name you assigned, and you are returned to the Track Log
screen.
Track Logs
57
Viewing the Track Log on the Map
Selecting View on Map displays the track log chosen and plots it on the Map screen. This
gives you the opportunity to graphically view the track log.
Note: View on Map is available for both active track logs and track logs you have saved.
1.
Press MENU.
2.
Use the Arrow joystick to highlight Track Log.
3.
Press ENTER.
4.
Use the Arrow joystick to highlight Active Track or any track log you have
previously saved.
5.
Press MENU.
6.
Highlight View on Map.
7.
Press ENTER.
The Map screen is displayed, in the Cursor mode, with the selected track log displayed on
the screen. The ZOOM IN and ZOOM OUT buttons can be used to change the map scale,
and the cursor can be moved by using the Arrow joystick.
When you have finished viewing the track, press ESC to return to the Track Log screen.
Track Logs
58
Working with Saved Track Logs
It has been mentioned before that you can convert saved track logs to a route and view saved
track logs on the map. There are three functions unique to saved track logs that you can
perform: following, reversing and deleting the track.
Following Saved Track Logs
This function provides you with a means to use a saved track as a multi-leg route. Once this
function has been activated, the eXplorist will navigate you along your saved track.
1.
Press MENU.
2.
Use the Arrow joystick to highlight Track Log.
3.
Press ENTER.
4.
Use the Arrow joystick to highlight any track log you have previously saved.
5.
Press MENU.
6.
Highlight Follow Track.
7.
Press ENTER.
8.
{Track logging will be turned off alert status.] Press ENTER.
The last viewed navigation screen is displayed with the track log selected being used as an
active route.
Reversing a Saved Track Log
Reversing a saved track log is identical to following a saved track log, with the exception that
the route created is reversed from the original track log.
1.
Press MENU.
2.
Use the Arrow joystick to highlight Track Log.
3.
Press ENTER.
4.
Use the Arrow joystick to highlight any track log you have previously saved.
5.
Press MENU.
6.
Highlight Reverse Track.
7.
Press ENTER.
8.
{Track logging will be turned off alert.] Press ENTER.
The last viewed navigation screen is displayed with the reversed track log selected being used
as an active route.
Track Logs
Deleting a Saved Track Log
Use this function to remove track logs that have been previously saved and are no longer
needed.
1.
Press MENU.
2.
Use the Arrow joystick to highlight Track Log.
3.
Press ENTER.
4.
Use the Arrow joystick to highlight any track log you have previously saved.
5.
Press MENU.
6.
Highlight Delete Track.
7.
Press ENTER.
The saved track log is deleted, and you are returned to the Track Log screen.
59
60
Weather
The eXplorist 300 has a weather function that provides temperature, barometric information
a pressure altimeter reading.
• Temperature. Temperature is displayed graphically as well as textually. Temperature
measurements can be affected by the internal temperature of the eXplorist. If you
leave your eXplorist in the sun, it will build up internal heat causing the temperature
readings to be higher than the ambient temperature is.
• Barometer. The barometer displays the barometric pressure as detected by the sensors
in your eXplorist. Three states of barometric pressure activity (Rising, Falling and
Steady) are also displayed below the barometer. These states are based upon
barometric readings over the last 24 hours.
Please note that this is a true barometer, using barometric pressure readings from your
present position. Some weather services and television reporting of barometric pressure
use a normalized barometric pressure at sea level, so your readings may differ slightly.
• Pressure Altimeter. The pressure altimeter displays your altitude as computed by the
sensors built in to your eXplorist. The pressure altimeter requires that you calibrate the
altitude every 2-3 hours to help compensate for changes in weather and other factors
that can influence pressure altimeter readings. Please note that elevation readings on
the Nav screens use GPS information to compute your elevation, only the weather
screen displays your elevation using the pressure altimeter readings.
Weather Screen
Accessing the Weather Screen
1.
Press MENU.
2.
Use the Arrow joystick to highlight Weather.
3.
Press ENTER.
When you are finished, press ESC to return to the
Main Menu or NAV to go to the last navigation screen
displayed.
Weather
73°F Falling
Pressure Altimeter
1025 FT
Weather
61
Calibrating the Pressure Altimeter
To maintain the accuracy of the pressure altimeter you should calibrate it every 2 -3 hours
using known elevation markers.
1.
Press MENU.
2.
Use the Arrow joystick to highlight Weather.
3.
Press ENTER.
4.
Press MENU.
5.
Use the Arrow joystick to highlight Set Altimeter.
6.
Press ENTER.
7.
Press ENTER.
8.
Use the Arrow joystick to input the known elevation setting.
9.
Press ENTER.
10. Press ESC to return to the Weather screen.
Electronic Compass
62
The eXplorist 300 has a built-in electronic compass that provides you with heading
information even when standing still. Heading information that is computed solely by GPS
signals requires that you be moving before it can be computed.
Notes about the electronic compass that you should be aware of:
• Recalibrate the compass every time you change batteries.
• Do not use the compass near large metallic objects. An example would be inside a
vehicle where the engine will interfere with the compass readings.
• The compass must be held relatively level to
operate correctly.
Note: When the eXplorist is held at an angle
that is too great for the electronic compass to
be accurate, a ‘Hold Level’ warning will be
displayed.
• If the ‘Hold Level’ warning is displayed even while the eXplorist is being held level or
you feel that it is too sensitive to minor tilting changes, try recalibrating the compass
• Compass Screen. With the electronic compass turned on, the needle displayed within
the compass will point to the North indicator on the compass when there is no active
route. The needle points to your destination when there is an active route.
Electronic Compass
63
Calibrating the Compass
The electronic compass requires that it is recalibrated every time you change the batteries.
Failure to calibrate the compass could result in errors of 20° or more to the displayed
head-ing. Calibration is very simple and won’t take more than a few minutes.
It is very important that there are no metallic objects near the eXplorist 300 during this
calibration.
1.
Remove the eXplorist 300 from any cradle it may be in.
2.
Press MENU.
3.
Use the Arrow joystick to highlight Preferences.
4.
Press ENTER.
5.
Use the Arrow joystick to highlight Compass Calibrate.
6.
Press ENTER.
7.
Read the Attention message and press ENTER.
8.
Lay the eXplorist on its back on a flat, horizontal surface and press ENTER.
Be sure to keep the eXplorist away from any metallic objects while performing
this step. Avoid placing it on a desk over a drawer that might be or contain
metallic objects.
9.
Follow the displayed instructions and rotate the eXplorist in a clockwise manner,
keeping the displayed arrow pointing towards you.
10. If the calibration is successful, CALIBRATION COMPLETE is displayed.
11. Press ESC.
Electronic Compass
64
Turning the Compass Off/On
The electronic compass does cause a minor drain on the batteries and you have to option of
turning it off to conserve battery life. This battery drain is very minor so it is unlikely that
you will need to shut the compass off for this. Another reason you may want to turn the
compass off is if you are in an area where you cannot avoid large, metallic obects, such as in
a vehicle.
1.
Press MENU.
2.
Use the Arrow joystick to highlight Preferences.
3.
Press ENTER.
4.
Use the Arrow joystick to highlight Pwr Management.
5.
Press ENTER.
6.
Use the Arrow joystick to highlight the Electronic Compass field.
3.
Press ENTER.
4.
Use the Arrow joystick to select Off or On.
6.
Press ENTER.
Preferences
65
The Preferences portion of the eXplorist provides the tools to
personalize the eXplorist to your usage and needs. There are
tools that are designed to give you full flexibility over its use,
as well as to perform maintanence on the internal memory
should the need arise.
Features found in Preferences:
• Restarting the GPS (Initializing) to give the eXplorist its
approximate location if it has been moved a large
distance while turned off.
• Access to setting the units of measure for information
displayed.
• A means to set the north reference to be either
magnetic north or True North.
• The coordinate system for position information and the map datum used to compute
the coordinate information can be chosen.
• Full control over the built-in power-management tools to assist in prolonging battery
life.
• Personalize your eXplorist.
• Choose from ten different languages that can be used to display information.
• Access to tools that will provide you with the means to clear all or part of the internal
memory.
Preferences
66
Restarting the GPS
Restarting the GPS provides a means of giving the eXplorist information about its
approximate position. Longtime GPS receiver users will know this option as initializing. To
understand when you would use this option, a brief explanation of how the eXplorist works
will be helpful.
The GPS constellation consists of 24 satellites and three spares that orbit the earth. At any
given time of the day a different collection of satellites will be overhead. To keep track of
which satellites are in view, the eXplorist has a built-in almanac that uses the present date
and time, along with its approximate position, to “look-up” which satellites should be in view.
Every time you turn your eXplorist off, it records, in a special place in its memory, the last
position fix computed Then, when it is turned back on, it assumes that it is still in the same
approximate location and uses this last position fix when doing its “look up” in the almanac.
Now, if you turn your eXplorist off and fly across the country, the next time you turn it back
on it will think it is still at the location where it was turned off and will begin looking for the
satellites that it thinks are overhead. If the satellites are not there, the eXplorist begins
“polling” the skies, trying to determine which satellites are in view. This process can take
time and can appear as if the GPS portion of the eXplorist is not working. Under normal
conditions, the eXplorist will still be able to compute your position, but this can take longer
than normal.
Restart GPS gives you the ability to give the eXplorist its approximate location, hence
speeding up the time to acquire its first fix. Many eXplorist users will never need to use the
Restart GPS option, but it is available should the need arise.
When to use Restart GPS:
• When the eXplorist has been moved more than 500 miles (804.67 km) while turned off.
• When the eXplorist is sluggish and takes more then a few minutes to compute its first
position fix when turned on. (This really isn’t an option that you need to be concerned
about. Thanks to a built-in feature, the eXplorist, when it has trouble computing its
first position fix, automatically asks you to supply the approximate position.)
Restarting the GPS:
1.
Press MENU.
2.
Use the Arrow joystick to highlight Preferences.
3.
Press ENTER.
4.
Use the Arrow joystick to highlight Restart GPS.
5.
Press ENTER.
Preferences
Restart GPS
Map Units
Pwr Management
Personalize
Language
Clear Memory
Preferences
6.
Region. Use the Arrow joystick to highlight the region of the
world for your present location.
You can also enter the coordinates for your present position,
if you know them, by highlighting Enter Coord. This is
rarely used and is not described in this manual.
7.
Press ENTER.
8.
Area. Use the Arrow joystick to highlight the area of your
location. The list of areas is different for each region
selected in step 6.
9.
Press ENTER.
67
Region
Enter Coord
USA
Americas
Europe
Asia East
Asia West
Area
Alabama
Alaska
Arizona
Arkansas
California
Colorado
10. Time. Use the Arrow joystick to enter the current time. Push the Arrow joystick up
or down to change the value and left or right to move the cursor.
Note: Time is one of the first pieces of information transmitted by the satellites.
Even without enough satellite information to compute a position fix, the time
displayed may have already been corrected.
11. Press ENTER.
12. Date. Use the Arrow joystick to enter the present date. Push the Arrow joystick up
or down to change the value and left or right to move the cursor.
Note: Date is also sent by the satellites and may already be correct, as well.
13. Press ENTER.
14. Use the Arrow joystick to highlight Done.
15. Press ENTER.
16. The last viewed navigation screen is displayed, and the
eXplorist will begin tracking satellites.
Date
37° 00.000N
119° 00.000W
0FT
10:16AM
21 MAY 04
Done
Preferences
68
Setting the Map Units
In the Map Units option of Preferences you can select which units of measure for navigation
data, the north reference, the coordinate system and the map datum that will be used by the
eXplorist.
Selecting Navigational Units of Measure
The eXplorist can be set to display navigation data in Miles/Yd/MPH, Miles/Ft/MPH,
NM/Ft/Knots, NM/M/Knots or KM/KPH.
1.
Press MENU.
2.
Use the Arrow joystick to highlight Preferences.
3.
Press ENTER.
Nav Units
Miles/Ft/MPH
4.
Use the Arrow joystick to highlight Map Units.
North Reference
Magnetic
5.
Press ENTER.
6.
Use the Arrow joystick to highlight the data field for Nav
Units.
Coord System
Lat/Lon
7.
Press ENTER.
8.
Use the Arrow joystick to highlight the desired navigational units of measure.
9.
Press ENTER.
Map Units
Map Datum
WGS84
The Map Units screen is displayed with the new Nav Units shown. You can change other
settings or press ESC to return to the Preferences menu.
Preferences
69
Selecting the North Reference
You can set the north reference used by the eXplorist to be either magnetic north or True
North.
1.
Press MENU.
2.
Use the Arrow joystick to highlight Preferences.
3.
Press ENTER.
4.
Use the Arrow joystick to highlight Map Units.
5.
Press ENTER.
6.
Use the Arrow joystick to highlight the data field for North
Reference.
7.
Press ENTER.
Coord System
Lat/Lon
8.
Use the Arrow joystick to highlight Magnetic or TRUE.
Map Datum
WGS84
9.
Press ENTER.
Map Units
Nav Units
Miles/Ft/MPH
North Reference
Magnetic
The Map Units screen is displayed with the new North Reference shown. You can change
other settings or press ESC to return to the Preferences menu.
Preferences
70
Selecting the Coordinate System
Position data will be displayed in the coordinate system chosen in Map Units. The default
system is latitude/longitude (Lat/Lon) and should be fine for most users. Experienced
navigators will want to select a coordinate system that matches the maps or charts they are
using. Coordinate systems that can be selected are:
• Lat/Lon
• Finnish
• UTM
• German
• OSGB
• French
• Irish
• USNG
• Swiss
• MGRS
• Swedish
• User Grid
1.
Press MENU.
2.
Use the Arrow joystick to highlight Preferences.
3.
Press ENTER.
4.
Use the Arrow joystick to highlight Map Units.
5.
Press ENTER.
6.
Use the Arrow joystick to highlight the data field for Coord
System.
7.
Press ENTER.
8.
Use the Arrow joystick to highlight the desired coordinate
system.
If User Grid is selected, additional information is required.
This option will be used only by experienced users and is
not described in this manual.
9.
Map Units
Nav Units
Miles/Ft/MPH
North Reference
Magnetic
Coord System
Lat/Lon
Map Datum
WGS84
Press ENTER.
The Map Units screen is displayed with the new Coord System shown. You can change
other settings or press ESC to return to the Preferences menu.
Preferences
71
Selecting the Map Datum
When using the eXplorist in conjunction with a map or chart, you should make sure that the
map datum in the eXplorist matches the map datum that the map or chart uses. This can
usually be found in the legend block on the map or chart. The default map datum for the
eXplorist is WGS84 and should be used when in doubt.
1.
Press MENU.
2.
Use the Arrow joystick to highlight Preferences.
3.
Press ENTER.
4.
Use the Arrow joystick to highlight Map Units.
5.
Press ENTER.
6.
Use the Arrow joystick to highlight the data field for Map
Datum.
7.
Press ENTER.
8.
Use the Arrow joystick to highlight the desired map datum.
9.
Press ENTER.
Map Units
Nav Units
Miles/Ft/MPH
North Reference
Magnetic
Coord System
Lat/Lon
Map Datum
WGS84
The Map Units screen is displayed with the new Map Datum shown. You can change other
settings or press ESC to return to the Preferences menu.
Preferences
72
Using the Power-Management Tool
When you are out in the field or on the water, extending the life of the batteries in your
eXplorist should be something that you are mindful of. Three areas that you can control to
extend the battery life are: (1) turning the eXplorist off when not in use, (2) setting how long
the display backlight will be on and (3) turning the electronic compass off. (Please see the
chapter on the Electronic Compass for detailed instructions on turning the compass off.)
Setting the Power-Off Timer
The eXplorist has a power-off timer that will turn the eXplorist off after a defined time period
if no buttons have been pressed or if you are not moving. This will prevent the batteries from
running out if you accidentally leave the eXplorist on.
1.
Press MENU.
2.
Use the Arrow joystick to highlight Preferences.
3.
Press ENTER.
Pwr Management
4.
Use the Arrow joystick to highlight Pwr Management.
Power Off Timer
5.
Press ENTER.
Light Timer
6.
Use the Arrow joystick to highlight the data field for Power
Off Timer.
Electronic Compass
7.
Press ENTER.
8.
Use the Arrow joystick to highlight the desired time interval
or set to Off.
9.
Press ENTER.
Off
4 Minutes
On
Note: When using a GOTO route you should note that if the eXplorist turns off, the GOTO
route is erased. If you have a GOTO route activated and you think that the power timer may
elapse and turn the eXplorist off, you might want to set the Power-Off Timer to Off. This
does not apply to multi-leg routes and BackTrack routes.
Preferences
73
Setting the Light Timer
As has been mentioned before, the display backlight makes the display easier to read in lowlight situations but it also is the largest drain on the batteries. The Light Timer function
provides you with the selection of how long you want the backlight to remain on while no
buttons have been pressed.
1.
Press MENU.
2.
Use the Arrow joystick to highlight Preferences.
3.
Press ENTER.
4.
Use the Arrow joystick to highlight Pwr Management.
5.
Press ENTER.
6.
Use the Arrow joystick to highlight the data field for Light
Timer.
7.
Press ENTER.
8.
Use the Arrow joystick to highlight the desired time interval
or set to Timer Off.
9.
Press ENTER.
Light Timer
30 Seconds
1 Minute
2 Minutes
4 Minutes
10 Minutes
Timer Off
Preferences
74
Personalizing the eXplorist
This function provides a way to input information about yourself that could be used to return
your eXplorist should you happen to lose it. The name you enter in the Name field will be
displayed on the About screen.
Steps to Personalize your eXplorist
1.
Press MENU.
2.
Use the Arrow joystick to highlight Preferences.
3.
Press ENTER.
4.
Use the Arrow joystick to highlight Personalize.
5.
Press ENTER.
6.
Use the Arrow joystick to highlight the data field for Name.
7.
Press ENTER.
8.
Use the Arrow joystick and ENTER button to input your
name.
9.
Use the Arrow joystick to highlight OK when the name is
entered.
10. Press ENTER.
11. [Optional] Use the Arrow joystick to highlight the data field
for Address. Repeat steps 7 through 10 for your address.
Personalize
Name
[Enter Name]
Address
[Enter Address]
City, State, Zip
[Enter Address]
Telephone #
[Enter Telephone #]
12. [Optional] Use the Arrow joystick to highlight the data field
for City, State, Zip. Repeat steps 7 through 10 for your city, state and zip code.
13. [Optional] Use the Arrow joystick to highlight the data field for Telephone #.
Repeat steps 7 through 10 for your telephone number.
14. Press ESC to exit the Personalize function.
Preferences
75
Selecting Languages
The eXplorist can be set to display information from any one of ten different languages. You
can select from English, Français (French), Deutsch (German), Nederlands (Dutch), Suomi
(Finnish), Español (Spanish), Italiano (Italian), Português (Portuguese), Svenska (Swedish)
and Norsk (Norwegian).
Selecting the Language for Your eXplorist
1.
Press MENU.
2.
Use the Arrow joystick to highlight Preferences.
3.
Press ENTER.
4.
Use the Arrow joystick to highlight Language.
5.
Press ENTER.
6.
Use the Arrow joystick to selecte the language desired.
7.
Press ENTER.
Language
English
Français
Deutsch
Nederlands
Suomi
Español
Italiano
Português
Svenska
Norsk
Preferences
76
Clearing Memory
The Clear Memory function of Preferences gives you a tool that you can use to globally clear:
• all track logs [All Track Log],
• all user-entered POI’s and routes [POIs/Routes],
• all multi-leg routes [Routes], or
• all track logs, user-entered POI’s, and routes [All].
Using Clear Memory, you can also set all of the defaults in the eXplorist to the factory
defaults.
Clearing All Track Logs
1.
Press MENU.
2.
Use the Arrow joystick to highlight Preferences.
3.
Press ENTER.
4.
Use the Arrow joystick to highlight Clear Memory.
5.
Press ENTER.
6.
Use the Arrow joystick to highlight All Track Log.
7.
Confirm. Use the Arrow joystick to highlight Yes to confirm or No to cancel.
8.
Press ENTER.
Clear Memory
All Track Log
POIs/Routes
Routes
Reset default
All
Preferences
Clearing All User-Entered POIs and Routes
1.
Press MENU.
2.
Use the Arrow joystick to highlight Preferences.
3.
Press ENTER.
4.
Use the Arrow joystick to highlight Clear Memory.
5.
Press ENTER.
6.
Use the Arrow joystick to highlight POIs/Routes.
7.
Confirm. Use the Arrow joystick to highlight Yes to confirm or No to cancel.
8.
Press ENTER.
Clearing All Routes
1.
Press MENU.
2.
Use the Arrow joystick to highlight Preferences.
3.
Press ENTER.
4.
Use the Arrow joystick to highlight Clear Memory.
5.
Press ENTER.
6.
Use the Arrow joystick to highlight Routes.
7.
Confirm. Use the Arrow joystick to highlight Yes to confirm or No to cancel.
8.
Press ENTER.
Clearing All Track Logs, User-Entered POIs and Routes
1.
Press MENU.
2.
Use the Arrow joystick to highlight Preferences.
3.
Press ENTER.
4.
Use the Arrow joystick to highlight Clear Memory.
5.
Press ENTER.
6.
Use the Arrow joystick to highlight All.
7.
Confirm. Use the Arrow joystick to highlight Yes to confirm or No to cancel.
8.
Press ENTER.
9.
The eXplorist will automatically shut off.
77
Preferences
Reseting the eXplorist to Factory Defaults
1.
Press MENU.
2.
Use the Arrow joystick to highlight Preferences.
3.
Press ENTER.
4.
Use the Arrow joystick to highlight Reset Default.
5.
Press ENTER.
6.
Use the Arrow joystick to highlight All.
7.
Confirm. Use the Arrow joystick to highlight Yes to confirm or No to cancel.
8.
Press ENTER.
78
79
Specifications
Performance
Receiver
14 parallel-channel technology, tracks up to 14 satellites to compute
and update information.
Antenna
Patch
Acquisition Times (optimal conditions)
Warm
less than 1 minute
Cold
less than 2 minutes
Update Rate
1 second continuous
Position
<7 meters, 95% 2D RMS
Accuracy
w/WAAS/EGNOS <3 meters, 95% 2D RMS
Velocity
0.1 knot RMS steady-state
Speed
951 MPH (1530.5 km/h)
Altitude
60,000 ft. (18,600 meters)
Limits
Physical
Size
4.6” x 2.1” x 1.3” [h] x [w] x [d]
11.7 cm x 5.3 cm x 3.3 cm
Weight
4 ounces (110 grams) with 2 AA batteries installed
Display
1.8” x 1.4” [h] x [w]
4.6 cm x 3.6 cm
4-level grayscale, high-contrast LCD with backlit display
Housing
Weatherproof construction, wraparound rubber armor
Temp. Range
Operating: 14°F to 140°F (-10x°C to 60°C)
Source
2 AA alkaline batteries
Battery Life
Greater than 14 hours w/backlight display off
Power
Memory
8 MB background map
Specifications
80
Coordinate Systems
Available
11 plus 1 user grid.
Lat/Lon, UTM, OSGB, Irish, Swiss, Swedish, Finnish, German,
French, USNG and MGRS
Routes
Total
Up to 20 saved routes
GOTO route
BackTrack route
Name Length
10 characters (including spaces)
Track Logs
Total
Up to 5 saved track logs plus active track log
Name Length
7 characters (including spaces)
Points of Interest
User-entered
Total
Up to 500 saved points of interest
Name Length
8 characters (including spaces)
Built-in (included with background map)
Categories
Cities, highways, airports, waterways and parks
Navigation Screens
Map
Includes background map and 2 data fields (customizable)
Compass
Includes graphical compass and 2 data fields (customizable)
Position
Includes position, elevation, accuracy, date and time, trip odometer
and battery life
XTE Alarm
Alerts when more than 250 ft. left or right of computed track
Arrival Alarm
Alerts when within approximately 250 ft. of destination
Alarms
81
Accessories
Expand the use of your Magellan eXplorist with accessories from the Magellan Online Store
for all of your adventures.
Carrying Case
Specially designed for your Magellan eXplorist,
this rugged black canvas carrying case attaches
conveniently to your belt or pack strap. It
features handy pockets for carrying extra
batteries. Protect your Magellan eXplorist while
traveling or being stored.
Part number: 980773
Swivel Mount
Conveniently mount your Magellan eXplorist in
your car, truck, boat or virtually any vehicle. This
easy-to-install mounting bracket securely holds
your receiver for optimal viewing while on-road or
off-road, or on the water, wherever your adventure
takes you.
Part number: 702209
Bike Mounting
Bracket
Mount your Magellan eXplorist on your bicycle,
snowmobile or motorcycle for convenient operation
and viewing. The easy-to-install mounting bracket
securely holds your receiver at just the right angle
while on the trails, back roads, city street or
anywhere your adventure takes you.
Part number: 702211
Vehicle Mount
Strong suction cups conveniently secure your
Magellan eXplorist to the windshield of your car,
truck or RV. Full-tilt and swivel positioning
enables optimal viewing of your receiver wherever
your adventure takes you.
Part number: 702210
To order accessories, you can go to the Magellan Online Store at:
www.magellangps.com/en/store/
for a complete listing of these and any additional accessories that are available for your
Magellan eXplorist.
Contacting Magellan Support
The following information is provided so that if you need support for your Magellan
eXplorist in North America, you can direct your questions/comments to the proper
person at Thales Navigation.
Customers in North America, Central America, South America, Asia, and South
Pacific regions.
Technical Support
If you need technical assistance, "how-to" help, or an answer to a technical question
about the functionality of your Magellan product, please contact us on the Internet at
www.magellangps.com or you may reach technical support by fax or phone.
Our technical support phone representatives are available Monday through Friday,
6:00 a.m. to 5:00 p.m. P.S.T/P.D.T.
Telephone: 800-707-9971 or +1 909-394-5000 (Outside North America).
You may also reach technical support by fax: +1 909-394-7050 [Attn: Tech.
Support].
E-mail: [email protected]
Warranty Service
To obtain warranty service on your eXplorist, you must contact us for a return
authorization prior to shipment of product. Packages arriving at our dock without an
RMA (Return Merchandise Authorization) may be refused. To obtain an RMA, simply
contact our technical support group at:
Tel: 800-707-9971 or 909-394-5000
Fax: 909-394-7050
[Attn: Tech. Support]
E-mail: [email protected]
82
Contacting Magellan Support
83
Customers in Europe, Middle East, or Africa regions
Contacting Magellan in Europe
Technical support and warranty service
For Magellan product support and warranty service information in English, French, German,
Spanish, Portuguese, Dutch, Norwegian, Finnish and Danish please dial FREE PHONE:
00800MAGELLAN* ( 00800 62435526)
from 9 AM to 6 PM GMT & GMT+1 or send an e-mail in English, French, German,
Spanish, Portuguese, Dutch, Norwegian, Finnish and Danish to:
[email protected]
*free of charge phone access available from Eire, UK, Portugal, Spain, France, Belgium,
The Netherlands, Germany, Austria, Switzerland, Norway, Sweden, Denmark and Finland
For Magellan product phone support in English, French or German from other Europe,
Middle East or African locations please dial:
+33 2 28 09 38 00*
or send an e-mail to: [email protected]
* international communication charge according to operator.
For Magellan product phone support in other European, Middle East or African Languages
please contact our distributors listed on www.magellangps.com in our dealer locator or send
an e-mail to: [email protected]