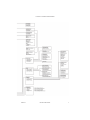
1
MoD BoX
User Manual
FOR TECHNICAL ASSISTANCE:
CONTACT YOUR LOCAL DISTRIBUTOR
For a list of distributors, visit the Merit Entertainment Web site
www.meritgames.com
PM0600-04
Table of Contents
Introduction ........................................... 1
2.9.2 Music Loader Advanced .......................... 21
Operating the Jukebox ......................... 2
2.9.3 Software Loader Basic ................................ 22
SECTION 1 - Using the Jukebox
Attract Loop .................................... 2
Getting Started ................................ 2
Paying to Use the System .............. 2
Using the System .................................. 2
AMI Entertainment
Network Connection ....................... 2
Making a Selection ......................... 3
Search Music .................................. 5
SECTION 2 - Operator Screens
Introduction ........................................... 7
Operator Screens Flowchart ............... 8
1.0 Service Mode - Main Screen ....... 10
1.1 Location/System Setup ........... 10
1.2 Pricing/Queue Options ............ 11
1.3 Play Options ............................ 11
2.9.4 Software Loader Advanced ......................... 22
2.9.5 Automatic Update
Configuration .................... 23
2.9.6 Server Configuration Broadband ........................ 23
2.9.7 Server Configuration Dial-Up ............................ 24
3.0 Pricing/Queue Options ................ 25
3.1 Credit/Feature Pricing Premium Pricing Schedule ..... 25
3.2 Credit/Feature Pricing Premium Pricing Schedule ..... 25
3.3 Credit Management ................. 26
3.4 Free Play ................................. 26
3.5 Free Play - Schedule ............... 27
3.6 Queue Management ................ 28
1.4 Hardware Setup - Standard ..... 12
4.0 Play Options .................................. 28
1.5 Reports .................................... 12
4.1 Song Settings View By Option ........................ 28
1.6 Diagnostics .............................. 13
1.7 Quick Schedules ..................... 13
4.2 Song Settings View By Song .......................... 29
1.8 Money Collection ..................... 14
4.3 Song Settings - Schedule ....... 30
2.0 Location/System Setup ................. 14
4.4 Playback Options .................... 31
2.1 Basic Setup ............................. 14
4.5 Category Management ............ 32
2.2 Locale/Languages ................... 15
4.6 Category Management Schedule ................................. 33
2.3 Skin Configuration ................... 16
2.3.1 Refresh Timers ................. 16
2.4 Message Center Schedule View ......................... 17
2.5 Message Center Message View ......................... 18
4.7 Autoplay ................................... 33
4.8 Autoplay - Schedule ................ 34
4.9 Background Music ................... 35
4.10 Background Music Schedule ............................... 35
2.6 Attract Mode ............................ 19
4.11 Explicit Lyrics ......................... 36
2.7 Security Configuration ............. 19
4.12 Explicit Lyrics - Schedule ...... 37
2.8 Enable/Extend Feature ........... 20
4.13 Playlist Management ............. 37
2.9 Advanced Administration ......... 20
4.14 Export Playlists ...................... 38
2.9.1 Music Loader - Basic ........ 21
5.0 Hardware Setup ............................ 39
7.0 Diagnostics .................................... 44
5.1 Touch Screen Setup ................ 39
7.1 System Information ................. 44
5.2 Screen Refresh ....................... 39
7.2 Hardware Information .............. 44
5.3 Money Meter ............................ 53
7.3 Event Logs .............................. 45
5.4 IR Remote Setup Standard .................................. 40
7.4 Error Log .................................. 45
5.5 Router Configuration ............... 41
7.6 Credit Device Test ................... 46
6.0 Reports ........................................... 42
7.7 Audio/Video Tests .................... 47
6.1 Cash & Usage Report ............. 42
7.8 Input/Output Tests ................... 47
6.2 Popularity Report - Songs ....... 42
7.9 Health Status ........................... 46
6.3 Collection Report ..................... 43
6.4 Music Loader Report ............... 43
7.5 Network Information ................ 46
Software License Agreements
English ............................................ 47
French ............................................. 49
German ........................................... 50
COPYRIGHT © 2006 MERIT ENTERTAINMENT
Section 1 : Using the Jukebox
INTRODUCTION
The following is a reference guide for the Operator to navigate the user
interface (UI) on the Jukebox. There are a couple reasons why it is
important that the Operator feels comfortable with all of the UI features.
First, the Operator needs to know how to answer questions on how to
use the jukebox for employees and customers at the location. Second,
the Operator needs to know what a normal UI looks like in order to
troubleshoot the UI and understand when specific features are available or not.
PM0600-04
MOD BOX USER MANUAL
1
COPYRIGHT © 2006 MERIT ENTERTAINMENT
Operating the Jukebox
Using the System
Use this reference guide to navigate the
AMI
Entertainment
Connection
jukebox.
Attract Loop
This moving image file may consist of advertisements, promotions and graphic images
and appears when no one has touched the
touch screen for a few minutes. Simply touch
the screen to begin using the system. The
attract loop will automatically disappear.
Getting Started
Touch any part of the screen to begin viewing
album covers.
Network
There will be periods of time where the jukebox cannot connect to the AMI Entertainment
Network. This may be due to outages of the
location broadband connection, maintenance
outages of the AMI Entertainment servers or
some other reason. Even though the jukebox
is not connected to the AMI Entertainment
network, local music can still be selected and
played.
Connection to the AMI Entertainment Network can be confirmed by two visual indicators on the User Interface. First, while looking
at the ALBUM tab, one of the 10 album
images will be replaced by the download
image. The album title will display “Music on
Demand”. This image is a clear indication
that the jukebox is communicating with the
AMI Entertainment Network. When a customer touches this image, the SEARCH
screen will appear.
Paying to Use the System
The Price of Credit appears on the screen.
Insert bills into the bill acceptor or coins into
the coin slot to receive credits. Total credits
are based on money inserted. Credits will
appear in the upper right-hand corner of the
screen. Credits will not accumulate until the
amount of money inserted reaches one of
the pricing levels displayed in the Price of
Credit list.
2
The second way to confirm a jukebox is
connected is to look at the album images
displayed on the SEARCH screen. If the
jukebox is not connected, the only albums
that will be displayed will be local albums. In
this case album images will be displayed.
When the jukebox is connected to the AMI
Entertainment Network, download images
will be displayed in place of album images for
each selection that is not stored locally on the
jukebox hard drive.
MOD BOX USER MANUAL
PM0600-04
COPYRIGHT © 2006 MERIT ENTERTAINMENT
Making a Selection
The jukebox software supports multiple templates and skins. A template is the actual
layout of the images and control buttons on
the User Interface (UI). A skin is a variation
in color and control shape for a specific
template.
From time to time, a software update will
contain a new template and/or skin. The new
template may provide new features, changed
or enhanced features, and may add or remove some control buttons.
Post Classic Template
The first screen that is displayed after leaving
the attract mode will be the Album Select
screen. This is indicated by the lighted ALBUM button on the middle tab just under the
screen banner at the top of the screen. The
banner will indicate that All Music is being
displayed.
Note the Touch to Download button displayed in the top center position, and also the
phrase “Touch Search to Download” above
the SEARCH radio button. These items will
appear on every album screen whenever the
computer is connected to the server. Should
these items not appear on the album screen
it indicates that a connection problem exists
or the AMI network is unavailable.
The song selection process is the same for
local music and download music. The jukebox will indicate a local selection by displaying the graphic image of an album cover. To
select and play a local song, at least one
credit must present. Music that is not stored
locally on the hard drive will have a download
image displayed in place of the album cover.
To select and play a download song will
require at least two credits be present on the
jukebox. A download confirmation screen
will display the number of credits required to
play the song and ask you to confirm your
selection. Press YES to confirm and play the
song, press NO to cancel your selection and
continue browsing the music library.
Browse through album covers on the local
jukebox by pressing the red arrow keys on
either side of the album panel. The screen
will show 10 album covers per page. When
you reach the last page, the arrow on the right
will disappear. When you reach the first
page, the arrow on the left will disappear.
To view the songs on an album, touch the
album and a song list will appear replacing
the album panel. Scroll down or up with the
double arrows to view all songs on the album.
Make a song selection by touching the title. A
confirmation screen will ask if you are sure
you want to play the song. Touch YES to
select the song or NO to cancel the selection.
After touching YES, the song will be selected
as long as there is at least 1 credit.
PM0600-04
MOD BOX USER MANUAL
3
COPYRIGHT © 2006 MERIT ENTERTAINMENT
Lava Lamp Template
This template is a simplified UI. The process
of selecting a song is the same as the Post
Classic template. However, there are only
two buttons on the top of the screen, Kwik
Pick and Search. Search works the same as
the Post Classic template and is explained
later in this section.
To make it even easier, Kwik Pick provides a
button called “Play All Credit.” Touch that
button and Kwik Pick will automatically pick
songs one at a time, starting at the top of the
displayed list, until all credit is used up. In
many locations, a customer will give a waiter
or waitress a few dollars and ask them to play
some music on the jukebox. Now all they
need to do is deposit the bills and touch one
or two buttons. Kwik Pick will choose the
most popular music using the credits on the
machine. And since the program redistributes the list’s songs each time it’s played,
Kwik Pick can be used over and over again
without bar patrons hearing the same music.
Kwik Pick is a new feature that replaces the
Popular button in previous software versions.
The Kwik Pick feature makes choosing good
music quick and easy. The jukebox’s software calculates daily, based on selections
made over the past two weeks or longer, the
most popular 50 songs played on the system. This song list is then loaded into the
Kwik Pick list. Each time a patron chooses
Kwik Pick, a random list of songs is displayed. The list contains both local and
Music On Demand songs. The patron can
view the list using up and down arrow buttons. To play a specific song in the list, the
patron simply touches the song title. Credit
is deducted and the song is queued up.
4
MOD BOX USER MANUAL
PM0600-04
COPYRIGHT © 2006 MERIT ENTERTAINMENT
Search Music
Press the SEARCH button that appears to
the right of the panel tabs or the “Touch to
Download” icon in the album screen. Album
covers will appear to the left of the artist’s
names and their available albums along with
a keyboard. Browse through the list by
touching the double up and down arrows.
Your search can be narrowed by touching
the music category at the top of the screen.
A list of categories will drop down so you can
choose one specific category to search. Only
music in your selected category will be displayed. The default category, “All Music”
will show all available music.
When searching by album or artist, the list
displays albums. Touch the album name in
the list to display a list of songs on that album.
Browse the song list by touching the up and
down double arrows. Touch a song to select
it. A confirmation screen will ask “Play This
Song?”
Touch YES to play it or NO to continue
searching. When searching by song, simply
touch the song to bring up the song confirmation screen.
From here you can search by song, artist, or
album by touching the corresponding box at
the front of the text bar and type in one or
more letters using the keyboard. As soon as
one letter has been typed into the keyboard,
the search will jump through the albums or
artists to narrow the search. Browse through
the list by touching the double up and down
arrows.
PM0600-04
MOD BOX USER MANUAL
5
COPYRIGHT © 2006 MERIT ENTERTAINMENT
This page intentionally left blank
6
MOD BOX USER MANUAL
PM0600-04
COPYRIGHT © 2006 MERIT ENTERTAINMENT
Section 2 : Operator Screens
INTRODUCTION
The service mode consists of over 40 operator screens. Pressing
the SERVICE switch on the Communication Controller displays the
Service Mode Main Menu Screen. Touch the screen to navigate between screens, choose programming options, and enter data. All
settings are set at the factory. Once you make a change and touch
the “Back” button, your change has been saved.
PM0600-04
MOD BOX USER MANUAL
7
COPYRIGHT © 2006 MERIT ENTERTAINMENT
8
MOD BOX USER MANUAL
PM0600-04
COPYRIGHT © 2006 MERIT ENTERTAINMENT
PM0600-04
MOD BOX USER MANUAL
9
COPYRIGHT © 2006 MERIT ENTERTAINMENT
1.0 Service Mode - Main Screen
1.1 Location/System Setup
This is the Service Mode - Main Menu
screen. There are 6 general categories of
service mode functions and a quick link to
all the schedules that can be set up in other
service mode screens. Touch any of the 6
general category buttons and a list of options appears in the options box. An arrow
on the right end of the general category
name indicates which options are displayed
in the options box. Touch any option in the
options box to go to that screen.
The Location/System Setup general category provides access to pages that allow
set up of basic jukebox settings.
Touch Language to display and choose one
of the available language translations for the
service mode.
Touch Money Collection to go directly to
the Money Collection screen. Touching Exit
Service Mode will return to the User Mode.
Touching Shutdown Jukebox will shutdown
the software, computer operating system,
and the core computer.
Touch Music Loader to go directly to the
Music Loader screen. This option will only
appear on jukeboxes fitted with a modem
and configured to connect using a dial-up
telephone number.
A pop-up confirmation box is displayed when
either Exit Service Mode or Shutdown
Jukebox is selected to avoid inadvertent
exits.
10
Basic Setup – Provides settings for Jukebox Name, Time Zone and collection parameters.
Locale/Languages – Sets the country of
operation and language used on the user
Interface.
Skins – Presents several user Interface
templates and color choices.
Messages – Allows programming and
scheduling of marquee messages.
Attract Mode – Offers several types of attract modes to display on the selection
screen.
Security – Sets security passwords and
enables/disables security access for the
jukebox.
Enable/Extend Features – Provides a
method to add /delete or extend special features.
Advance Administration – Provides access to Software and Music loading, as well
as server and software update configuration.
MOD BOX USER MANUAL
PM0600-04
COPYRIGHT © 2006 MERIT ENTERTAINMENT
1.2 Pricing/Queue Options
1.3 Play Options
The Pricing/Queue Options general category provides access to pages for set up
of pricing, credits, and queue management.
The Play Options general category provides access to pages for set up of Song
options, and management of all category
and explicit lyrics schedules and filters. You
can also set up Background Music and
Autoplay and manage play lists.
Credit/Feature Pricing – Provides set up
of coin and bill values, as well as the price
of credit.
Credit Management – For adding/deleting
credits manually, and setting the Daily Credit
Pool.
Free Play – Turns Free Play Mode on/off
and sets the Free Play Schedule.
Queue Management – Configures play
queue settings and the ability to clear the
play queue.
Song Settings – View, set, and clear song
options (i.e. premium play) and lockout
schedules.
Playback Options – Accesses various playback options like Random Play and Play
Limits.
Category Management – Locks out specific music categories either overall or by
schedule.
Autoplay – Sets Autoplay mode on/off or
set a custom Autoplay schedule.
Background Music – Enables Background
Music play during a specific schedule.
Explicit Lyrics – Locks out songs with explicit lyrics either overall or they can be allowed by schedule.
Playlist Management – Allows creation and
editing of custom song play lists.
PM0600-04
MOD BOX USER MANUAL
11
COPYRIGHT © 2006 MERIT ENTERTAINMENT
1.4 Hardware Setup - Standard
1.5 Reports
The Hardware Setup general category provides access to pages for set up of various
internal hardware (i.e. remote controls,
router).
The Reports general category provides access to pages that display various reports.
Cash & Usage Report – Displays summary
of coins, bills, and play information.
Touch Screen Setup – Sets the section
screen refresh rate and touch screen calibration.
Music Popularity Report – View both album and song popularity information.
Money Meter – Sets the Money Meter divisor.
Collections Report – Displays collection
summary information for selected time periods.
IR Remote Setup – Enables IR remote control functions.
Music Loader Report – View result logs for
recently added music.
Router Setup –Accesses the router configuration screens.
12
MOD BOX USER MANUAL
PM0600-04
COPYRIGHT © 2006 MERIT ENTERTAINMENT
1.6 Diagnostics
1.7 Quick Schedules
The Diagnostics general category provides
access to pages with useful information
about internal devices and the status of the
jukebox.
The Quick Schedules general category
provides a short cut to schedules that appear in other areas of the Service Mode.
System Information – Shows hard drive,
software, and server setup information.
Hardware Information – Displays the MAC
address and information on the devices connected via the Communication Controller’s
RS485 bus.
Event/Error Logs – View a software activity Event log, and view/clear the hardware
Error log.
Network Information – Displays IP configuration data and tests gateway and server
route network connections.
Messages – Displays the schedule for programming marquee messages.
Music Lockouts – Displays the schedule
for programming song, video, and image
lockouts.
Free Play – Displays the schedule for programming Free Play.
Autoplay – Displays the schedule for programming Autoplay.
Background Music – Displays the schedule for programming Background Music.
Credit Device Tests – Allows you to test
the credit devices without adding credits or
adding money to the revenue screens.
Audio/Video Tests – Allows you to display
test patterns on the display to aid in CRT
adjustment and also to play autio tones to
aid in sound configuration.
Input/Output Tests – Allows you to test the
pushbuttons on the Communications Controller.
Health Status – Allows a technician to view
motherboard voltages, temperatures, CPU
fan speed and cabinet temperature.
PM0600-04
MOD BOX USER MANUAL
13
COPYRIGHT © 2006 MERIT ENTERTAINMENT
1.8 Money Collection
2.0 Location/System Setup
2.1 Basic Setup
The Money Collection screen shows the
amount of money from the current period,
the last collection period and the cumulative total for the year for this hard drive. The
“Total this Year” column can be disabled so
it will not be displayed (see Basic Setup
screen).
Touch the text box under Jukebox Name to
display a keyboard to change the jukebox
name. Touch Enter on the keyboard to set
the new name. Touch Exit to close the keyboard without changing the jukebox name.
Collections work in the following manner:
1. The AMI Entertainment share is
automatically deducted.
2. Any Off-the-Top amount is deducted
after the AMI share is taken.
3. The Operator Share and Location Share
are calculated on the remaining Net
Collections.
The AMI Entertainment share cannot be set
locally. It is sent to the jukebox from the
AMI servers. Off-the-Top and Operator
share amounts may be programmed by the
Operator. See the next section for information on how to change these settings.
Touch Collect Money to perform a collection. The numbers in the Current Period
column are copied to the Last Period column and added to the Total this Year column. The Current Period column is then
cleared out.
To return to the Service Mode - Main Menu,
touch the Main Menu button.
14
Touch the arrow button at the end of the
Time Zone setting to choose your time zone.
Use the arrows in the drop down list to scroll
the list. Touch the proper time zone to set
it. Touch the Daylight Saving Time box to
turn Daylight Savings Time on or off. (“On”
is represented by a check mark in the box.)
Collection Percentage Settings
Set the Operator Percent of the cash box
collection by touching the text box. A numeric keypad appears, touch [C] to clear the
current value, then enter a new value and
touch [OK].
In the separate Collection Report screen, the
Operator gets this share, and the Location
receives the remaining share after all other
charges. (See the previous section for a
description of how the money collection
event is handled and how these settings
affect that collection.)
For those who have connected Merit
countertop games to the jukebox, you can
see the countertop revenue that was used
for music on the jukebox. In doing so, the
AMI sweep percentage will be automatically
deducted, making location cash settlement
easier for your collectors.
MOD BOX USER MANUAL
PM0600-04
COPYRIGHT © 2006 MERIT ENTERTAINMENT
The Off-the-Top amount can be set to either a fixed amount or a percentage of the
collection. Touching the text box will provide
a numeric keypad to set the desired value.
Checking the Hide Cumulative Totals Column check box will cause the third column
on the Money Collection screen to be hidden.
To save your changes and return to the Service Mode - Main Menu, touch the Main
Menu button. To restore the original settings on this page, touch the Undo button.
2.2 Locale/Languages
To set the System Locale and User Interface Language, touch the arrow button at
the end of either text box. Use the arrows
in the drop down list to scroll the list. Touch
the name of the locale or language to select it. The System Locale determines the
default currency and date formats. The jukebox will automatically reboot after changing
the System Locale setting.
The Default Screen Language determines
the language used for the User Interface
upon jukebox start up. If a customer
changes the language while using the UI,
this selected language will be automatically
returned after a period of no UI interaction.
Touch the check box to turn the On-Screen
Language feature on/off in the User Interface. A check mark in the box indicates this
feature is ON. When turned off, the Language Icon does not appear on the User Interface.
To save your changes and return to the Service Mode - Main Menu, touch the Main
Menu button. To restore the settings on this
page before exiting the page, touch the
Undo button.
PM0600-04
MOD BOX USER MANUAL
15
COPYRIGHT © 2006 MERIT ENTERTAINMENT
2.3 Skin Configuration
2.3.1 Refresh Timers
The Skin Configuration page is used to
change the look of the User Interface (also
referred to as the Selection Screen.) There
are multiple templates to choose from, and
optional skins for each template. The template changes the layout of the User Interface, while the skin changes the color
scheme. The currently selected template/
skin combination appears in the Skin Preview window.
The Refresh Timers page is used to change
the default times used by the jukebox to rest
the User Interface.
The Display Song/Album Counts option
displays both the number of songs per album and the number of songs or albums
per category on the User Interface. A check
mark in the box indicates this option is
turned ON. (Counts are available on Modern templates only).
This screen allows you to change the Default Search Library. The factory default is
to search the full music library. You can
change that to search the Hot Music (cache)
library if you wish.
To save your changes and return to the Service Mode - Main Menu, touch the Main
Menu button. To restore the settings on this
page before exiting the page, touch the
Undo button.
16
Users of the jukebox will most likely walk
away leaving the selection screen, user interface (UI) in some intermediate state. This
can be confusing to the next customer. The
jukebox will automatically restore the UI to
a known default state after a period of inactivity.
The Refresh with Credit option displays the
number of seconds the screen will remain
before being switched back to the default
UI when there are credits on the jukebox.
Touch the box with the number to open a
numeric keypad to make your changes.
The Refresh without Credit option displays
the number of seconds the screen will remain before being switched back to the default UI when there are no credits on the
jukebox. Touch the box with the number to
open a numeric keypad to make your
changes.
The Exit Service Mode Delay option displays the number of minutes the jukebox will
remain in the Service Mode, since the last
screen touch, before automatically switching back to the selection screen (UI).
MOD BOX USER MANUAL
PM0600-04
COPYRIGHT © 2006 MERIT ENTERTAINMENT
To save your changes and return to the Service Mode - Main Menu, touch the Main
Menu button. To restore the settings on this
page before exiting the page, touch the
Undo button.
Touch the MsgID box for a pop-up selection of choices, then touch any message to
select it, and OK to return to the schedule
screen.
2.4 Message Center - Schedule View
Touch the Start Time or Stop Time text box
to pop up a time setting tool. Set times during the day to display the message. The
Start Time must always be earlier than the
Stop Time.
The Message Center offers a scrolling message, which periodically runs across the top
of the User Interface (Selection Screen). It
has two parts. In the View - Schedule
screen, the Schedule sets the message
choices, and the times to display them. The
View- Messages button provides a separate screen to create messages, and set the
dates to display them (see next section).
Touch the [+] button to copy one line into a
new line, then edit the new line as required.
Touch the [–] button to delete a single line
in the schedule. Use Copy All to copy one
day’s entire schedule into a buffer. Then
select a different day, and use Paste All to
paste the copied schedule into the new day.
The Message Enable box must be checked
to activate the scheduled messages. In
addition, the Thank You Enable check box
also activates a “Thank You” message to
appear after confirming a selection.
Touch any Day of the week button to view
and/or change that day’s schedule. The
Schedule box displays a line for each time
period a message is displayed. Touch the
Add button to add a new line in the schedule.
PM0600-04
To save your changes and return to the Service Mode - Main Menu, touch the Main
Menu button. To restore the settings on this
page before exiting the page, touch the
Undo button.
MOD BOX USER MANUAL
17
COPYRIGHT © 2006 MERIT ENTERTAINMENT
2.5 Message Center - Message View
The Message Center offers a scrolling message, which periodically runs across the top
of the User Interface (Selection Screen). It
has two parts. In the View - Messages
screen, the Schedule lists the actual message, and dates to display it. A MsgID number is assigned for each message created.
The View-Schedule button provides a separate page to set day, time and message
choice (see previous section). The Message Enable box must be checked to activate the scheduled messages.
The Thank You Enable box activates a
‘Thank You” message to appear after making a selection.
Touch the text box under Message to pop
up a keyboard to enter/edit a message.
Press Enter on the keyboard to save the
message. Touch Exit to leave the keyboard
without saving/changing the text.
Use Copy All to copy one day’s entire
schedule into a buffer, then press Paste All
to paste a copied schedule to the bottom of
the message list.
To save your changes and return to the Service Mode - Main Menu, touch the Main
Menu button. Restoring the settings on this
page can be done before leaving the page
by touching the Undo button.
The Schedule box shows a list of dates and
messages. Touch the Add button to add a
new line in the list.
Touch the [+] button to copy one line into a
new line, then edit the new line as required.
Touch the [–] button to delete a message
line in the list.
Touch the Start Date or Stop Date text
boxes to pop up a calendar to set dates to
display the messages. Touch a day on the
calendar to select it. The Start Date must
always be earlier than the Stop Date.
18
MOD BOX USER MANUAL
PM0600-04
COPYRIGHT © 2006 MERIT ENTERTAINMENT
2.6 Attract Mode
To save your changes and return to the Service Mode - Main Menu, touch the Main
Menu button. To restore the settings on this
page before leaving the page, touch the
Undo button.
2.7 Security Configuration
The Attract Mode offers a choice of images
to display on the jukebox selection screen
after a period of no user activity. Use the
arrow buttons on the right of the options box
to scroll the list. Touch any option in the list
to select it.
Touch the Delay Time text box for a pop-up
numeric keypad to change the value, and
touch [OK] to set the value. Delay time can
be set from 1 to 999 minutes.
Video Loop – this colorful and original video
is the default choice for this option.
Marquee Screensaver – this option provides the ability to enter custom text to scroll
across the screen during inactivity. When
selected, a text box appears. Touch the text
box for a pop-up keyboard to enter the desired message, and touch Enter to save it.
To return to the screensaver screen without
making text changes press Exit.
(NOTE: Marquee Screensaver is different
from the Message Center scrolling message, which appears only when the Selection Screen is displayed. The Marquee
Screensaver blacks out the Screen Selection display, and displays nothing except the
custom text message.)
PM0600-04
Use this screen to turn security on or off.
When the Security Enabled check box
shows a check mark, security is turned “on”
and code words are required to access service screens.
There are three levels of security available
for the Service Mode. Level 3 is the lowest
level of security and allows read and write
access to all service mode screens. The
security level must be set to level 3 to
change any of the security level code words.
Touch the text box next to the Level 1, 2 or
3 Codeword box to alter the code word.
Use the keyboard pop-up to edit the code
word. Touch Enter on the keyboard to save
the new code word into the text box. Selecting Exit will close the keyboard without
changing the code word.
Level 3: Complete read and write access to
all service mode screens
Level 2: Complete read access and limited
write access to some service mode functions
MOD BOX USER MANUAL
19
COPYRIGHT © 2006 MERIT ENTERTAINMENT
Level 1: Complete read access and no write
access to all but a few service mode screens
2.9 Advanced Administration
The message READ ONLY is displayed at
the top left of each screen when security is
below a level to allow changes to be saved.
Even though the screen may appear to allow changes, if the READ ONLY message
appears no changes will be saved.
To save your changes and return to the Service Mode - Main Menu, touch the Main
Menu button. Restore the settings on this
page before leaving the page by touching
the Undo button.
2.8 Enable/Extend Feature
Advanced Administration is a sub-menu
page with access to Music and Software
loading functions as well as Server Configuration and software update settings. Touch
any one of the four choices to go to that Service Mode page.
Load Music – Allows an operator to load
music updates via a portable USB device
(modem equipped, dial-up connected jukeboxes only).
Load Software – Allows an operator to load
software updates via portable USB device.
Automatic Updates – Sets a specific time
when a software update may be installed
on the jukebox.
The Enable/Extend Feature screen is used
to enter AMI Entertainment-provided codes,
to change, enable, and extend special features available for the jukebox. This
screen’s primary use is to extend the time a
jukebox can be operated without connection to AMI Entertainment Servers. Contact
an AMI Entertainment Customer Service
representative for appropriate feature codes.
NOTE: a feature code is only valid on the
day it is generated.
To save your changes and return to the Service Mode - Main Menu, touch the Main
Menu button.
20
Configure Software – Provides ability to
configure the jukebox to connect to a music
server. Sets the default destination for saving statistics and music loader reports to a
portable device (i.e. USB connection).
Configure Server – Provides ability to configure the jukebox to connect to a music
server. Also allows selection of a local dialup phone number for jukeboxes equipped
with a modem and configured for dial-up
connections.
MOD BOX USER MANUAL
PM0600-04
COPYRIGHT © 2006 MERIT ENTERTAINMENT
Touch Restore Factory defaults to revert
all jukebox settings to their factory default
state.
Touch the Advanced button to access the
advanced Software Loader screen (see next
section).
To save your changes and return to the Service Mode - Main Menu, touch the Main
Menu button.
To save your changes and return to the Service Mode - Main Menu, touch the Main
Menu button.
2.9.1 Music Loader - Basic
2.9.2 Music Loader - Advanced
The Music Loader - Basic screen provides
access to load new music from a USB device. First, plug the USB device into the
USB port on the front of the core computer.
Then, enter the Service Mode - Main screen
and navigate to this screen. Next, press the
Load Music Now button.
The Music Loader - Advanced screen has
the same functionality as the Basic Music
Loader screen but includes the ability to
select specific music CAB or TAR files.
As the music loads from the USB device,
the status line below the button displays different states of the music loading process.
Additionally, the Load Music Now button
begins to fill with color. The level of the color
fill indicates the progress of the music loader
operation. When the button is completely
filled, the new music has been fully loaded.
A USB device may be damaged if removed
improperly. When finished loading music
from the USB device, touch Remove USB.
The jukebox will display messages as
shown. Do not remove the USB device until the message appears indicating you may
safely remove the USB device.
PM0600-04
Touch the Music File text box to bring up a
keyboard to enter a path to the music CAB/
TAR files. Next, touch the arrow button at
the end of the text box to display a list of
music CAB/TAR files found using the destination entered. Then, touch the desired
CAB/TAR file in the list to select it. Finally,
press the Load Music Now button.
As the music loads, the Load Music Now
button begins to fill with color. The level of
the color fill indicates the progress of the
music loader operation. When the button
is completely filled, the new music has been
fully loaded. See the previous section for
information about removing USB devices.
The Status text box also displays the progressive status of the process.
MOD BOX USER MANUAL
21
COPYRIGHT © 2006 MERIT ENTERTAINMENT
The Activity log displays the results of the
song loading process. Use the up and down
arrows on the right to scroll through the log.
Touch the Basic button to return to the Basic Music Loader screen (see previous section).
To save your changes and return to the Service Mode - Main Menu, touch the Main
Menu button.
NOTE: See Music Loader - Basic for information about removing the USB device.
Touch the Advanced button to access the
advanced Software Loader screen (see next
section).
To save your changes and return to the Service Mode - Main Menu, touch the Main
Menu button.
2.9.3 Software Loader - Basic
2.9.4 Software Loader - Advanced
The Software Loader - Basic screen provides access to load new version of software from a USB device. First, load the USB
device into the USB port. Then enter the
Service Mode – Main Screen and navigate
to this screen. Next, press the Load Software Now button.
The Software Loader - Advanced screen
has the same functionality as the Basic Software Loader screen but includes the ability
to select specific software CAB files.
As the software loads from the USB device,
the status line below the button displays different states of the software loading process.
Additionally, the Load Software Now button begins to fill with color. The level of the
color fill indicates the progress of the software loader operation. When the button is
completely filled, the new software version
has been fully loaded, and the jukebox will
automatically begin to install the new version.
22
Touch the Software File text box to bring
up a keyboard to enter a path to the software CAB files. Next, touch the arrow button at the end of the text box to display a list
of software CAB files found using the destination entered. Then touch the appropriate
CAB file in the list to select it. Finally, press
the Load Software Now button.
MOD BOX USER MANUAL
PM0600-04
COPYRIGHT © 2006 MERIT ENTERTAINMENT
As the software loads from the USB device,
the Load Software Now button begins to
fill with color. The level of the color fill indicates the progress of the software loader
operation. When the button is completely
filled, the new software version has been
fully loaded, and the jukebox will automatically begin to install the new version.
Touch the down arrow to make a choice of
any specific day of the week or choose Every Day.
NOTE: See Music Loader - Basic for information about removing the USB device.
To save your changes and return to the Service Mode - Main Menu, touch the Main
Menu button.
The Status text box also displays the progressive status of the software loading process.
Touch the time box to bring up a tool to allow you to set the time of the day you would
like the jukebox to install a new available
software.
2.9.6
Touch the Basic button to access the Basic
Software Loader screen (see previous section).
Server Configuration Broadband
To save your changes and return to the Service Mode - Main Menu, touch the Main
Menu button.
2.9.5 Automatic Update
Configuration
The Server Configuration - Broadband
page provides settings for server connection parameters for broadband-connected
jukeboxes.
The Automatic Update Configuration
screen sets the time when the jukebox will
load any waiting software updates.
Software updates are downloaded in the
background. The specific time a jukebox
will update its software can be selected using this screen. There must be at least one
time period chosen.
PM0600-04
If the jukebox has a modem installed, a
choice of either Broadband or Dial Up
Server Connection type is displayed. If a
modem is not installed, the Dial-Up button
will not be displayed. See the next section
for a description of dial-up configuration
options.
Enter server configuration by touching the
text box for Server URL and Agent Name
separately. A keyboard pops up to enter the
proper data for each field as it is selected.
MOD BOX USER MANUAL
23
COPYRIGHT © 2006 MERIT ENTERTAINMENT
Touch the Test Connection button to perform a quick test confirming that the jukebox is connected to the server. If the connection fails, check settings in the IP Configuration and Network Information screens
found under the Service Mode - Diagnostics section.
To save your changes and return to the Service Mode - Main Menu, touch the Main
Menu button.
Enter server configuration by touching the
text box for Server URL and Agent Name
separately. A keyboard pops up to enter the
proper data for each field as it is selected.
Touch the text box below Start Time or Stop
Time for a pop-up “clock” keypad to set
those desired times. NOTE: The start time
must always be earlier than the stop time.
(For instance, setting Start to 10 p.m. and
Stop to 3 a.m. is an invalid entry.)
Check each Day(s) of Week that you would
2.9.7
Server Configuration Dial-Up
The Server Configuration - Dial-Up page
provides settings for server connection parameters for dial-up-connected jukeboxes.
Remember that a dial-up jukebox is not “always on line” like a broadband connected
jukebox is. Therefore it must sometimes
share a telephone line with the location. A
schedule is provided to help eliminate conflicts between jukebox and location use of
the same phone line.
If the jukebox has a modem installed, a
choice of either Broadband or Dial-Up
Server Connection type is displayed. If a
modem is not installed, the Dial-Up button
will not be displayed. See the previous section for a description of dial-up configuration options.
24
like the jukebox to dial-up and connect to
the server. If no days are checked, the jukebox will eventually go Out Of Service for failure to contact the server. Be sure at least
one day is checked.
Touch the Prefix box to open a touch pad
with characters that may be used to enter
any local telephone access codes or to disable call waiting signals. Touch the Phone
Number box to select from a list of local
telephone numbers that can be used to connect to the server. If a local number is not
available on the list, call AMI Entertainment
Customer Service for assistance.
The Number to dial box will display the actual number that will be dialed. This number can be modified by using the Include 1
and Omit Area Code check boxes.
Touch the Connect button to have the jukebox dial up and connect to the server immediately without waiting for the next scheduled connect day and time. Dialing and connection progress will be shown in a status
window.
To save your changes and return to the Service Mode - Main Menu, touch the Main
Menu button.
MOD BOX USER MANUAL
PM0600-04
COPYRIGHT © 2006 MERIT ENTERTAINMENT
3.0
3.1
Pricing/Queue Options
Credit/Feature Pricing
My Song First has two settings to address
- activation and cost. Press the Enabled
box to add/remove the check mark for “on/
off”, and touch the Additional Credits box
for the pop-up numeric keypad to set the
number of additional credits required for this
feature.
Credit Card Values are preset by AMI Entertainment and may not be changed. These
are the options presented to a customer
when a credit card is swiped through the
credit card reader.
Credit/Feature Pricing provides settings for
coin and bill values, pricing/credits per level,
and access to Music On Demand, My Song
First, and Premium feature pricing.
Touch the arrow button to the left of Pricing
to display a drop down box, which allows
selection of specific pricing options. Touch
any one of the listed options to select.
The Coin/Cash Values table sets the number of coin and bill denominations the jukebox accepts. Touch either text box for Coin
Count or Bill Count and enter the number
using the pop-up numeric keypad. Then fill
in each non-grayed out text box using the
same method. Enter the necessary values
for each coin and bill starting with the lowest value in position #1.
Keep Money on Power Up is enabled by
default and shows a check mark in the text
box. To disable the function simply touch
the box to remove the check mark.
Music On Demand sets the additional credits required for downloaded music from the
server. Touch the text box for the pop-up
numeric keypad to change the value.
PM0600-04
Premium Pricing requires both credit and
schedule settings. Touch the Credits box
for the pop-up numeric keypad to clear or
edit the value. Touch the Schedule button
to the right for a pop-up schedule, which
offers customized start/stop times for this
option only (see the next section).
3.2 Credit/Feature Pricing - Premium
Pricing Schedule
The Premium Pricing Schedule service
screen allows customized start and stop
times for songs earmarked for premium pricing.
Touch the text box below either Start Time
or Stop Time for a pop-up numeric touch
pad to set the desired beginning and ending times to enable “premium pricing”.
MOD BOX USER MANUAL
25
COPYRIGHT © 2006 MERIT ENTERTAINMENT
NOTE:
1) The start time must be earlier than the
stop time.
2) The times entered apply for every day of
the week.
3) Time settings cannot run from one day to
the next – the feature will NOT activate.
(For instance, setting Start to 10 p.m. and
Stop to 3 a.m. is an invalid entry.)
The Credits value can be changed two different ways – touch the Credits text box for
a pop-up numeric keypad to set the value
from 0 to 999, or press the [–] button to set
the value to “0” or touch the [+] button to
increase the value by single digits.
Keep Credits on Power Up is enabled by
default and shows a check mark in the box.
Touch the box to remove the check mark
and turn this option “off”.
The Daily Credit Pool sets the number of
credits available for the Location to access
via the VCU and/or the IR Remote Control
per day. Touch the text box for the pop-up
numeric keypad to set the maximum daily
value. Unused daily credits are not carried
over to the next day.
Touch the Back button to return to the
Credit/Feature Pricing selection page. To
restore settings before leaving the page
touch the Undo button.
To save your changes and return to the Service Mode - Main Menu, touch the Main
Menu button. To restore the settings on this
page before leaving the page, touch the
Undo button.
3.3 Credit Management
3.4 Free Play
The Credit Management service screen
provides access to clear or add credits to
the jukebox User Interface (Selection
Screen) and set the Daily Credit Pool
amount.
The Free Play service mode page provides
the option to turn free play on or off, and
gives access to a schedule for setting when
it’s offered on the User Interface (Selection
Screen).
26
MOD BOX USER MANUAL
PM0600-04
COPYRIGHT © 2006 MERIT ENTERTAINMENT
To turn Free Play “off”, press the button to
the left of this option (it turns blue.)
To turn Free Play “on”, press the button to
the left of it, then touch Schedule for a popup schedule to set specific days and times
for this feature to appear (see the next section).
Total Scheduled Free Play Hours is automatically calculated based on the schedule
entered.
To save your changes and return to the Service Mode – Main Menu, touch the Main
Menu button. Restoring the settings on this
page can be done before leaving the page
by touching the Undo button
day. Touch the [+] button to copy any line
into a new line, then edit the new line as
required. Touch the [–] button to delete any
schedule line in the list.
Use Copy All to copy a day’s entire schedule into a buffer. Then select a different day
of the week and press Paste All to enter
the copied schedule into the new day Touch
the Add button to add a new line to the list.
Touch the text box below either the Start
Time or Stop Time for a pop-up “clock” keypad to set those desired times.
NOTE: The start time must always be earlier than the stop time, and schedule times
may not overlap one another. In addition,
times entered cannot begin on one day and
end on another. (For instance, setting Start
to 10 p.m. and Stop to 3 a.m. is an invalid
entry).
3.5 Free Play - Schedule
The Free Play-Schedule service mode
page sets the desired days and times to offer this feature on the User Interface (Selection Screen).
Touch any Day button to view scheduled
Free Play for that day of the week. Any number of days can have scheduled times entered at once.
To save your changes and return to the Service Mode - Main Menu, touch the Main
Menu button. Restoring the settings on this
page can be done before leaving the page
by touching the Undo button.
The Schedule box shows the list of start/
stop times for the selected Day. Multiple
start/stop times can be entered for any given
PM0600-04
MOD BOX USER MANUAL
27
COPYRIGHT © 2006 MERIT ENTERTAINMENT
3.6 Queue Management
4.0 Play Options
4.1 Song Settings - View By Option
The Queue Management service mode
page provides options for saving songs in
the queue, and clearing the play queue as
well.
The Song Settings - By Option service
mode page provides access to view, clear,
and edit individual songs for featured options such as Premium Pricing, Priority Play
and Lockout.
Clear Play Queue - Touch the button to remove all current songs waiting for playback
in the song queue. This does not delete
any music, just removes it from the jukebox
play queue.
Keep Play Queue on Power Up - A check
mark in the box means all songs in the play
queue are saved during any type of power
interruption. When power is returned,
queued songs will start to play and in the
correct order. However, the song currently
playing when power was interrupted will be
cancelled.
Keep Play Queue for “#” Hours - Touch
the text box for a pop-up numeric keypad to
set the number of hours the jukebox maintains the play queue in the event of a power
disruption.
To save your changes and return to the Service Mode - Main Menu, touch the Main
Menu button. Restoring the settings on this
page can be done before leaving the page
by touching the Undo button.
28
A list of song options is displayed down the
middle of the screen. Touch any one of
these options and the button will light up.
Additionally, any song with this option turned
on will be displayed in the All Songs by
Option list box on the right.
Songs may be added to the list by touching
the [+] next to each song title in the list on
the left. Three ways to help find songs to
add to the option list are provided.
1) Touch the arrows just to the right of the
song list to browse the list up and down.
2) Touch the arrow at the end of Music
Sorted by Category to display a list of categories to choose from. The song list on
the left will only show songs in the selected
category after choosing a category.
3) Touch the Search button to bring up a
keyboard to find specific music by song title.
Type in the desired song title or portion of a
song title, then touch Enter on the keypad.
The screen returns to the Song Settings
page, and displays the closest match.
MOD BOX USER MANUAL
PM0600-04
COPYRIGHT © 2006 MERIT ENTERTAINMENT
To remove a song from the list (turn off the
specific option for this song), touch the [–]
next to the song.
Image Lockout prevents the User Interface
(Selection Screen) from showing the album
image (usually the picture on the album
cover). Instead, it inserts a default image.
Playback Lockout prevents a song from
playing at all during the scheduled time.
Video Lockout suppresses the video portion of a song, but still allows the audio to
play. These three options require the Schedule to be set for day(s) and time(s) the designated song/video images are not to be
seen or heard. Touch the Schedule button
for a pop-up screen for setting the desired
lockout times and days.
Premium Pricing designates chosen songs
that require additional credits for play.
the song from the list to allow it to be selected again. These particular songs should
be reviewed to determine whether the song
files are indeed bad.
Remove All easily removes all songs listed
for a particular option. The song(s) are removed from the All Songs by Option box and
return to [+] status on the ALL Music list.
Remove a single entry by touching the [–]
next to it.
Similar access for many of the options above
is also available in a different format. Touch
View by Song for a separate screen showing an overall summary of option(s) selected
for any given song (see next section).
4.2 Song Settings - View By Song
NOTE: the number of credits and schedule
for premium play are selected on the Credits/Feature Pricing page.
Priority Play designates songs to automatically move to the top of the play queue when
selected.
NOTE: Priority Play must also be turned “on”
to enable this option – setting is found on
Playback Options page.
Autoplay Only designates songs which only
play during pre-set AutoPlay scheduled
times. Songs marked for Autoplay only cannot be seen or selected from the User Interface (Selection Screen).
NOTE: Autoplay scheduling is found under
Pricing and Play general category.
Bad Media lists songs which have encountered any error during selection or playback.
Any song in this list has been removed from
the User Interface (Selection Screen) and
cannot be chosen for play. Simply remove
PM0600-04
The Song Settings – By Song service
mode page provides access to view, clear,
and edit individual songs for most featured
options such as Premium Pricing, Priority
Play and Lockout.
The All Music box lists all of the jukebox’s
local music (i.e. songs on the hard drive).
Arrows on the far right side provide scrolling of the list. A check mark indicates the
Option in the column heading has been
turned “on” for that song. Simply touch the
MOD BOX USER MANUAL
29
COPYRIGHT © 2006 MERIT ENTERTAINMENT
box to remove the check mark and turn the
option “off”. (All options are initially “off” by
default.)
Touch the arrow at the end of Music Sorted
by Category to display a list of categories
to choose from. The song list will only show
songs in the selected category.
Press the Search button to bring up a keypad to find specific music by song title. Type
in the desired music information then touch
Enter on the keypad. The screen returns
to the Song Settings main page and displays
the closest match at the top of the list. Use
the arrow(s) to the right to scroll through the
list.
Image Lockout prevents the User Interface
(Selection Screen) from showing the album
image (the picture on the album cover). Instead, it inserts a replacement image.
cannot be seen or selected from the User
Interface (Selection Screen).
NOTE: Autoplay scheduling is found under
Pricing and Play general category.
Bad Media lists songs which have encountered any error during selection or playback.
Any song in this list has been removed from
the User Interface (Selection Screen) and
cannot be chosen for play. Simply remove
the song from the list to allow it to be selected again. These particular songs should
be reviewed to determine whether the song
files are indeed bad.
Similar access for many of the options above
is also available in a different format. Touch
View by Option for a separate screen showing every option, and displaying a list of all
songs designated for individual options (see
previous sections).
Playback Lockout prevents a song from
playing at all during the scheduled time.
Video Lockout suppresses the video portion of a song, but still allows the audio to
play. These three options require the
Schedule to be set for day(s) and time(s)
the designated song/video images are not
to be seen or heard. The Schedule button
is available on the View By Option page.
4.3 Song Settings - Schedule
Premium Pricing designates chosen songs
that require additional credits for play.
NOTE: the number of credits and schedule
for premium play are selected on the Credits/Feature Pricing page.
Priority Play designates songs to automatically move to the top of the play queue when
selected. NOTE: Priority Play must also be
turned “on” to enable this option – setting is
found on Playback Options page.
Autoplay Only designates songs which only
play during pre-set AutoPlay scheduled
times. Songs marked for Autoplay only,
30
The Song Settings-Lockout Schedule
sets the day(s) and time(s) when designated
lockout songs/videos are suppressed on the
User Interface (Selection Screen).
MOD BOX USER MANUAL
PM0600-04
COPYRIGHT © 2006 MERIT ENTERTAINMENT
Press any Day button to view the Schedule
for that day of the week. To enable the lockout options selected on the Song Settings
screen, complete the Schedule box with
desired time entries for each day. If the
Schedule box is empty, lockout options for
all songs are turned “off” for that day.
4.4 Playback Options
The Schedule box shows a list of start/stop
times. Multiple start/stop times can be entered for any given day. Press the Add button to add a new line to the list. Touch the
text box below Start Time or Stop Time for
a pop-up “clock” keypad to set those desired
times.
NOTE: The start time must always be earlier than the stop time, and schedule line
entries cannot overlap one another. In addition, settings may not begin on one day
and end in another. (For instance, setting
Start to 10 p.m. and Stop to 3 a.m. is an
invalid entry.)
Touch the [+] button to copy any line into a
new line, then edit the new line as required.
Touch the [–] button to delete any line in
the schedule list. Use Copy All to copy a
single day’s entire schedule into a buffer.
Then select a different day of the week and
press Paste All to enter the copied schedule into the new day.
To save your changes touch the Back button to return to the Song Settings page, or
to return to the Service Mode - Main Menu,
touch the Main Menu button. Restoring the
settings on this page can be done before
leaving the page by touching the Undo button
PM0600-04
The Playback Options service mode page
provides options to set the song selection
play order. In addition, access to restrictive
options like artist tracks limit, and maximum
play limit are provided. A check mark in the
box means that option is turned “on”.
Random Play – this option enables all Paid
selections to play back in random sequence.
When not checked, playback of songs is first
selected – first played.
Random Free Play – this option enables
all Free Play selections to play back in random sequence. When not checked, playback of songs is first selected – first played.
Priority Play - this option enables songs
with the “Priority Play” option set to move to
the top of the play queue when selected.
(See Song Settings – By Option screen to
set up Priority songs.)
Artist Tracks Limit - This option restricts
how many of one artist’s songs can be
played back-to-back. After the specified
number of songs from an artist are played
back to back, another song from a different
artist is chosen from the song queue and
played.
MOD BOX USER MANUAL
31
COPYRIGHT © 2006 MERIT ENTERTAINMENT
Play Delay - The number of seconds delay
between the end of one song and the start
of the next song.
Play Limit - The maximum length of time a
song is allowed to play. After this time, the
song will fade out and cancel.
Overplay Enabled - When checked Overplay is allowed and selected songs already
in the play queue will not be added to the
play queue (selected many times, played
once).
Block Categories - This button activates
overall blocking of music categories. Touch
the text box for a pop-up list of categories to
choose from. Touch any category name
shown to select it (selected categories will
be highlighted). Touch additional categories to be blocked. Touching a highlighted
category name will deselect it (highlighting
will turn off). Then, touch OK to save the
category list.
To save your changes and return to the Service Mode - Main Menu, touch the Main
Menu button. To restore the settings on this
page before leaving the page, touch the
Undo button.
4.5 Category Management
Schedules Blocking On - Touch this button to activate a Schedule button. Touch
the Schedule button to access a separate
screen to set up customized category blocking schedules (see next section).
The Category Management service mode
screen blocks playing selected music categories (genres).
Category Blocking Off - This button disables category blocking. When the button
is selected (filled with blue color) all music
categories are available.
32
The Do not block local categories check
box is used to control blocking local jukebox music stored on the hard drive. With
this check box unchecked, all Music On
Demand and local songs in all blocked categories will not be available on the selection screen. Checking this box will make all
local songs on the hard drive available for
selection while all Music On Demand songs
in the blocked categories will remain
blocked.
To save your changes and return to the Service Mode - Main Menu, touch the Main
Menu button. Restoring the settings on this
page can be done before leaving the page
by touching the Undo button.
MOD BOX USER MANUAL
PM0600-04
COPYRIGHT © 2006 MERIT ENTERTAINMENT
4.6 Category Management Schedule
Next, touch the Category text box to view a
list of available categories to choose. Select any category by touching the name, then
touch OK to return to the Autoplay Schedule main screen.
Touch the [+] button to copy any line into a
new line, then edit the new line as required.
Touch the [–] button to delete any line in
the schedule list.
The Category Management - Schedule
service mode page provides options to set
specific day(s) of the week, and multiple
start/stop times per day. A choice of music
categories and delay time for activating
autoplay are also available.
Press any Day button to view that day’s
schedule. To enable the Autoplay feature,
the Schedule box must have time entries
for the days desired. If the Schedule box is
empty, Autoplay is turned “off” for that day.
The Schedule box shows a list of start/stop
times. Multiple start/stop times can be entered for any given day. Press the Add button to add a new line to the schedule. Then
touch either the Start Time or Stop Time
text boxes for a pop-up “clock” keypad to
set those desired times.
NOTE: The start time must always be earlier than the stop time, and schedule times
cannot overlap one another. In addition,
time entries may not begin in one day and
end in another. (For instance, setting Start
to 10 p.m. and Stop to 3 a.m. is an invalid
entry–Autoplay won’t engage.)
Use Copy All to copy one day’s entire
schedule into a buffer. Then select a different day of the week and press Paste All to
enter the copied schedule into the new day.
To save your changes and return to the Service Mode - Main Menu, touch the Main
Menu button. Restoring the settings on this
page can be done before leaving the page
by touching the Undo button.
4.7 Autoplay
The Autoplay service mode page provides
options to turn autoplay on/off, set up a custom schedule, and play special advertising
songs. NOTE: Only one option is enabled
at any given time.
Autoplay Off - This button disables the
autoplay feature. When the button is selected (filled with blue color) autoplay is
turned “off”.
PM0600-04
MOD BOX USER MANUAL
33
COPYRIGHT © 2006 MERIT ENTERTAINMENT
Autoplay from Category - This button activates Standard Autoplay. Touch the text box
for drop down list of categories to choose
from. Touch any category name shown to
select it, then OK to save the chosen category. Touch the Every __ Minutes box for
a pop-up numeric keypad. Set the number
of minutes of inactivity that must occur before Autoplay is activated. This delay time
has a minimum setting of 15 minutes.
Enable Advertising - When this box is
checked, the delay time for Autoplay is fixed
and not dependent on jukebox activity. If
the time is set to 20 minutes, then every 20
minutes a song from the Autoplay category
is selected and played.
Schedule Autoplay On - Touch this button
to activate a Schedule button. Touch this
Schedule button to access a separate
screen to set up a customized Autoplay
schedule.
To save your changes and return to the Service Mode - Main Menu, touch the Main
Menu button. Restoring the settings on this
page can be done before leaving the page
by touching the Undo button.
4.8 Autoplay - Schedule
The Autoplay - Schedule service mode
page provides options to set specific day(s)
of the week, and multiple start/stop times
per day. A choice of music categories and
delay time for activating autoplay are also
available.
Press any Day button to view that day’s
schedule. To enable the Autoplay feature,
the Schedule box must have time entries
for the days desired. If the Schedule box is
empty, Autoplay is turned “off” for that day.
The Schedule box shows a list of start/stop
times. Multiple start/stop times can be entered for any given day. Press the Add button to add a new line to the schedule. Then
touch either the Start Time or Stop Time
text boxes for a pop-up “clock” keypad to
set those desired times.
NOTE: The start time must always be earlier than the stop time, and schedule times
cannot overlap one another. In addition, time
entries may not begin in one day and end in
another. (For instance, setting Start to 10
p.m. and Stop to 3 a.m. is an invalid entry–
Autoplay won’t engage.)
Next, touch the Category text box to view a
list of available categories to choose. Select any category by touching the name, then
touch OK to return to the Autoplay Schedule main screen.
34
MOD BOX USER MANUAL
PM0600-04
COPYRIGHT © 2006 MERIT ENTERTAINMENT
Finally, touch the Delay text button for a popup keypad to increase this value. The delay
time is the number of minutes of inactivity
before Autoplay is activated and has a minimum 15-minute setting.
Touch the [+] button to copy any line into a
new line, then edit the new line as required.
Touch the [–] button to delete any line in
the schedule list.
Use Copy All to copy one day’s entire
schedule into a buffer. Then select a different day of the week and press Paste All to
enter the copied schedule into the new day.
To save your changes and return to the Service Mode - Main Menu, touch the Main
Menu button. Restoring the settings on this
page can be done before leaving the page
by touching the Undo button.
To turn Background Music “off” touch the
button to the left of this option and it turns
blue. To turn Background Music “on”, touch
its button, then touch Edit for a pop- up
schedule to set the desired days and times
for background music to play (see next section for details if needed).
The Total Scheduled Background Music
Hours is automatically calculated based on
the schedule set above.
To save your changes and return to the Service Mode - Main Menu, touch the Main
Menu button. Restoring the settings on this
page can be done before leaving the page
by touching the Undo button
4.10 Background Music - Schedule
4.9 Background Music
The Background Music service mode
screen provides the option to turn on/off the
background music option and set a custom
schedule for play. Background music is
similar to Autoplay, except it engages based
on scheduled times and plays songs continuously until a paid selection is made.
Autoplay engages based on non-activity of
the User Interface, and only plays a song
after a specified delay time.
PM0600-04
The Background Music –Schedule service
mode screen provides access to set a custom schedule of playtime for day(s) of the
week, multiple start/stop times per day, and
a category of music.
Background Music is similar to Autoplay,
except it engages based on scheduled
times, and plays songs continuously until a
paid selection is made. Autoplay engages
based on inactivity of the User Interface, and
only plays a single song after a specified
delay time.
MOD BOX USER MANUAL
35
COPYRIGHT © 2006 MERIT ENTERTAINMENT
Press any Day button to view the schedule
for that day. To enable the Background Music feature, the Schedule box must have
time and category entries for the days desired. If the Schedule box is empty, Background Music does NOT engage during that
day.
The Schedule box shows a list of start/stop
times. Multiple start/stop times can be set
for any given day. First, press the Add button to add a new line to the list. Next, touch
the text box below the Start Time or Stop
Time for a pop-up “clock” keypad to set
those desired times.
NOTE: The start time must always be earlier than the stop time, and schedule times
may not overlap one another. In addition,
set times may not begin in one day and end
in another. (For instance, setting Start to
10 p.m. and Stop to 3 a.m. is an invalid entry.)
Finally, touch the Category text box for a
pop-up list of available categories to choose
from. Select any category by touching the
name, then touch OK to return to the Background Music schedule screen.
Touch the [+] button to copy any line into a
new line, then edit the new line as required.
Touch the [–] button to delete any line in
the schedule list.
Use Copy All to copy one day’s entire
schedule into a buffer. Then select a different day of the week and press Paste All to
enter the copied schedule into the new day.
4.11 Explicit Lyrics
The Explicit Lyrics service mode screen
blocks or allows playing selected music that
contains explicit or objectionable lyrics.
Explicit Lyrics Off - This button blocks
songs with explicit lyrics. When the button
is selected (filled with blue color) all explicit
lyrics songs are unavailable.
Explicit Lyrics On - This button allows
songs with explicit lyrics. When the button
is selected (filled with blue color) all explicit
lyrics songs are available.
Scheduled Explicit Lyrics On - Touch this
button to activate a Schedule button. Touch
the Schedule button to access a separate
screen to set up customized explicit lyrics
schedules (see next section).
To save your changes and return to the Service Mode - Main Menu, touch the Main
Menu button. Restoring the settings on this
page can be done before leaving the page
by touching the Undo button
To save your changes and return to the Service Mode - Main Menu, touch the Main
Menu button. Restoring the settings on
36
MOD BOX USER MANUAL
PM0600-04
COPYRIGHT © 2006 MERIT ENTERTAINMENT
4.12 Explicit Lyrics - Schedule
Touch the [+] button to copy any line into a
new line, then edit the new line as required.
Touch the [–] button to delete any line in
the schedule list.
Use Copy All to copy one day’s entire
schedule into a buffer. Then select a different day of the week and press Paste All to
enter the copied schedule into the new day.
To save your changes and return to the Service Mode - Main Menu, touch the Main
Menu button. Restoring the settings on this
The Explicit Lyrics - Schedule service
mode screen provides options to set specific day(s) of the week, and multiple start/
stop times per day. During each of the time
periods on the schedule, songs with explicit
lyrics will be allowed. All other times, songs
with explicit lyrics will be blocked.
page can be done before leaving the page
by touching the Undo button.
4.13 Playlist Management
Press any Day button to view that day’s
schedule. To enable songs with explicit lyrics, the Schedule box must have time entries for the days desired. If the Schedule
box is empty, explicit lyrics songs will remain
blocked for that day.
The Schedule box shows a list of start/stop
times. Multiple start/stop times can be entered for any given day. Press the Add button to add a new line to the schedule. Then
touch either the Start Time of Stop Time text
boxes for a pop-up “clock” keypad to set
those desired times.
NOTE: The start time must always be earlier than the stop time, and schedule times
may not overlap one another. In addition,
set times may not begin in one day and end
in another. (For instance, setting Start to
10 p.m. and Stop to 3 a.m. is an invalid entry - explicit lyrics won’t engage.)
PM0600-04
Playlist Management allows you to create
and save custom Playlists that can be used
by Autoplay and Background Music modes.
The left side of the screen is the song list
portion. Local songs on the jukebox are displayed in the window alphabetically by song
title. The list of songs can be filtered by
choosing a specific category.
Touch the down arrow at the end of the
music category name to display a list of categories. Touch the category desired.
MOD BOX USER MANUAL
37
COPYRIGHT © 2006 MERIT ENTERTAINMENT
The Search function will index into the list
of songs to find the closest match to the
search text. Touch the Search button to pop
open a keyboard. Touch the letters that
make up the start of the song title then touch
Enter. The song list will display songs starting with the letters in the search.
4.14 Export Playlists
To create a song list touch the button with
the plus [+] sign. The jukebox will automatically assign an ID number and title the list
“New List”. Touch the List Name box to pop
up a keyboard. Change the list name then
touch Enter to save it.
Add songs to the list by touching the plus
[+] button next to the song on the left side of
the display. Remove songs from a Playlist
by touching the minus [-] button next to the
song in the Playlist. Touch the Remove All
button to remove all songs from a Playlist.
View other Playlists by touching the next or
previous buttons.
Touch the minus [-] button to delete the current Playlist.
To save your changes and return to the Service Mode - Main Menu, touch the Main
Menu button.
Export Playlist allows you to save custom
Playlists to a locally connected USB storage device. These playlists can then be
loaded into other jukeboxes using the Music Loader screen.
Touch the text box under Export Location
to pop open a keyboard. Using the keyboard, enter a path to your USB device. The
default path is D:\ which should normally
work.
Each playlist programmed into the jukebox
will be written to the USB device in a separate CAB file. Each file name will include a
date stamp with the date and time it was
created. Example: Playlists 2005-0610_14-54-29.cab
NOTE: See Music Loader - Basic for information about removing the USB device.
Exporting Playlist notes:
- Playlists are used to create lists of local
songs only. Music on Demand songs cannot be included in a playlist.
- Playlists saved on USB devices can be
loaded in another jukebox using the Music
Loader screen.
- The jukebox receiving the playlist must
have the same local songs loaded on the
jukebox or the playlist will remove the missing songs from the playlist.
38
MOD BOX USER MANUAL
PM0600-04
COPYRIGHT © 2006 MERIT ENTERTAINMENT
- The playlist is encrypted when written to
the USB device.
To return to the Service Mode - Main Menu,
touch the Main Menu button. Touch the
Manage Playlists button to return to the
Playlist screen.
5.0 Hardware Setup
5.1 Touch Screen Setup
To return to the Service Mode - Main Menu,
touch the Main Menu button.
5.2 Screen Refresh
The Touch Screen Setup service mode
screen provides access to set the refresh
rate on the jukebox display and start the
touch screen calibrate function.
Touch the Calibrate Touch screen button
to launch the touch screen calibration tool.
A series of four screens will be presented.
On the first three screens there will be a target in one of the corners. Touch the center
of the target. When your finger is removed
from the touch screen another target will
show up in a different corner. Touch each
target as they are presented. After touching all three targets a confirmation screen
will appear. Touch the screen in various
places to be sure the calibration is good.
Touch the check box to accept and save the
new calibration.
PM0600-04
The Screen Refresh Rate for the jukebox
monitor may need to be changed due to
various external conditions that may affect
the operation and look of the video image
on the monitor. If the image exhibits video
noise or a jittery picture, changing the refresh rate may improve the image.
Touch the down arrow at the end of the
Screen Refresh Rate text box to display a
list of available settings. Touch one of the
settings to change the refresh rate. The
screen will immediately change to the selected setting and a pop-up box will appear
asking if you would like to keep the settings.
Touch Yes to keep them or No to revert back
to the previous setting.
MOD BOX USER MANUAL
39
COPYRIGHT © 2006 MERIT ENTERTAINMENT
Example: The smallest monetary unit may
be a penny, if the divisor is set to 1, the
money meter will advance one hundred
times for each dollar deposited. If the divisor is set to 100, the money meter will advance one time for each dollar deposited.
NOTE: Some settings may not look any better and some settings will not work very well
at all. If the screen starts to tear and you
cannot see what is there, just leave it alone
for 10 seconds and the screen will automatically return to the previous setting.
To return to the Service Mode - Main Menu,
touch the Main Menu button.
To save your changes and return to the Service Mode - Main Menu, touch the Main
Menu button. To restore the settings on this
page before leaving the page, touch the
Undo button.
5.4 IR Remote Setup - Standard
5.3 Money Meter
The IR Remote Setup service mode screen
enables options on the IR Remote to control jukebox functions including Autoplay
override to song reject (cancel).
The Money Meter service mode screen provides access to set a divisor for the optional
mechanical money counter installed in the
jukebox.
Touch the text box for the Money Counter
Divisor to pop up a numeric keypad. Select the desired divisor and touch OK to save
the number. The divisor is used to determine when the mechanical money meter is
advanced and is based on the smallest
monetary unit.
40
Remote Credit provides the location with
the ability to add credits at any time to the
jukebox by remote control. Choosing the
Link to Credit Pool option limits a location
to the credits per day value set in the Credit
Management screen. Touch the box to the
left of either option above until a check mark
appears which confirms the option is turned
“on”.
MOD BOX USER MANUAL
PM0600-04
COPYRIGHT © 2006 MERIT ENTERTAINMENT
IR Features – any of the following features
are enabled from the remote control if the
check box next to the feature is checked.
When unchecked, the feature cannot be
accessed using a remote.
5.5 Router Configuration
Autoplay Override – allows the location to
turn any programmed Autoplay mode on/off.
Pause – allows the location to pause song
playback on the jukebox. Touch the Minutes
text box for a pop-up numeric keypad to set
the maximum number of minutes the jukebox will stay in pause mode. After this time,
the jukebox will automatically resume play
mode.
Reject – allows the location to reject (cancel) the current song playing using the remote control.
Reject All – allows the location to reject
(cancel) both the current song and all songs
waiting in the current play queue by holding
the REJECT button for five seconds.
To save your changes and return to the Service Mode - Main Menu, touch the Main
Menu button. To restore the settings on this
page before leaving the page, touch the
Undo button.
PM0600-04
The Router Configuration screen allows
set up of the router. See section 6 for detailed router set up instructions.
NOTE: Many of the router configuration
functions have been disabled for security
reasons including the Wizard and any built
in links to external sites.
If any router other than the supplied D-Link
DI-604 is used, this configuration screen will
no longer work. Additionally, if either the
User Name or Password for the router is
changed, this configuration screen will no
longer work.
MOD BOX USER MANUAL
41
COPYRIGHT © 2006 MERIT ENTERTAINMENT
6.0 Reports
6.1 Cash & Usage Report
6.2 Popularity Report - Songs
The Cash & Usage Report service mode
page shows the deposits, plays, and feature minutes for weekly, monthly and year
to date periods.
The Music Popularity Report service mode
page provides a choice of detailed play
count information for both songs and albums
on a weekly, monthly and yearly basis.
Deposits – View bills, coins and credit card
collections and the operator’s share.
Report – view song title and artist, number
of plays, and the “last played” date of the
song. Arrows to the right of the report window allow scrolling through the list of songs.
Plays – View free songs, paid songs and
total songs played, with local music and
downloaded music noted individually.
Features – View feature play minutes for
Free Play, Background Music and Special
Events. (The Special Events feature lets the
Location put the jukebox on standby and use
it as an audio source for an external device
(i.e. provides audio for TV’s showing sporting events).
Period – Provides the choice to view report
information for any of the following time periods: this week/month, last week/month and
month/year to date. Simply touch the text
box for the drop down table listing the period options, then press the desired period
to update the report.
To return to the Service Mode - Main Menu,
touch the Main Menu button.
42
Period – provides a choice of time period
for report information from the following options:
This week/month, Last week/month or
month/year To Date. Touch the text box
below Period for a drop down list of choices,
then press the desired time period to update the report.
Album Popularity – Touch this button to
view similar information for albums instead
of songs.
NOTE: to confirm song vs. album information is displayed, note the title at the top of
the page.
To return to the Service Mode - Main Menu,
touch the Main Menu button.
MOD BOX USER MANUAL
PM0600-04
COPYRIGHT © 2006 MERIT ENTERTAINMENT
6.3 Collection Report
6.4 Music Loader Report
The Collection Report service mode page
provides a break down of collections by bills,
coins and credit cards for each collection
date, and offers a choice of summaries for
weekly, monthly and yearly information.
The Music Loader Report service mode
page provides detailed information about
recently loaded music on the jukebox, with
the ability to select the data by a specific
date.
Report – View collections by separate
dates, with a break down by bills, coins and
credit cards. Totals reflect the sum of all
dates listed in the report.
Choose a Date – Provides a drop down list
of dates when music was loaded on the jukebox. Touch the date desired, and the Music
File list and Music Loader Log update automatically.
Period – Provides an optional time period
of report information from the following
choices:
This week/month, Last week/month or
month/year To Date. Touch the text box
below Period for a drop down list of choices,
then press the time period desired to update the report.
To return to the Service Mode - Main Menu,
touch the Main Menu button.
Choose a Music File – Shows a list of all
music files loaded on the date selected. The
list shows successes, warnings, and errors
for each file loaded. Arrows to the right of
the window provide scrolling of the list. To
view more detailed information of a single
file, simply touch the file name and the data
appears in the Music Loader Log window.
Music Loader Log – Provides a break down
of the music file information by genre (category), album, and song, and notes both an
ID# and a name for each item. In addition,
each individual item shows a successful/
unsuccessful update confirmation. Arrows
to the right of the window provide scrolling
of the list.
To return to the Service Mode - Main Menu,
touch the Main Menu button.
PM0600-04
MOD BOX USER MANUAL
43
COPYRIGHT © 2006 MERIT ENTERTAINMENT
7.0 Diagnostics
7.1 System Information
Local Time – established in Basic Setup
service mode screen under Time Zone.
Server URL// Agent Name – established in
the System Configuration service mode
screen.
To return to the Service Mode - Main Menu,
touch the Main Menu button.
7.2
Hardware Information
The System Information service mode
screen summarizes important system information including date/time, software version,
and jukebox/server connection names. All
of these fields are filled in by default after
the initial Operator set up of the jukebox.
Jukebox Name – established in Basic
Setup service mode screen
Harddrive ID – automatically detected by
the Software Operating System of the jukebox.
Drive Space (MB) – automatically detected
by the Software Operating System of the
jukebox.
Software Version – automatically detected
based on current software loaded in jukebox.
MAC Address – shows the MAC address
of the Ethernet adaptor included on the main
computer board in the core computer.
Track Catalog Version – current version of
the song catalog downloaded from the
server
Group – the name of the group the jukebox
belongs to (used by AMI for software updates)
The Hardware Info service mode page
shows the status of internal hardware in the
jukebox such as VCU (Volume Control
Units) and amplifier, as well as KID (Keyboard, IR, Display), and Credit Module. The
MAC address of the core computer is also
shown.
Credit Module Status – shows the status
of the credit module (included as part of the
Communication Controller)
KID Status – shows the status of the parts
of the Communication Controller.
To return to the Service Mode - Main Menu,
touch the Main Menu button.
Local Date – automatically determined in
Basic Setup service mode screen.
44
MOD BOX USER MANUAL
PM0600-04
COPYRIGHT © 2006 MERIT ENTERTAINMENT
7.3
Event Logs
7.4 Error Log
The Event/Error Logs service mode page
provides separate reports noting all software
activity (events) as well as any hardware
failures (errors).
The Event Log has two sections, one window provides the date selection, and the
other window shows the event information.
The items are listed in sequential order of
time beginning at 12 a.m. (midnight) and
running through 11:59 p.m. The arrows to
the right of the window provide scrolling access to the list.
To select a date, press the arrow button to
the right of the text box for a drop down table
listing choices of available day/dates. Touch
the day/date desired and the log updates
automatically.
Error Log – touch this button for the hardware failures (errors) log. (See next section for details).
The Error Log service mode page shows
current hardware failure activity.
The Error Log provides date and time of
the failure, and the specific jukebox
component(s) affected. Items are listed in
chronological order, with the most recent
occurrence listed first. Errors listed in this
log are errors that will generally put the jukebox Out of Order. These errors must be
cleared before the jukebox can return to
service.
The Clear button is provided to remove
items which are no longer active. However,
if the information reappears after pressing
the Clear button for a particular line item,
the noted error is still occurring.
Press Show Even+t Log to return to the
Event Log (software activity list). To return
to the Service Mode - Main Menu, touch the
Main Menu button.
To return to the Service Mode - Main Menu,
touch the Main Menu button
PM0600-04
MOD BOX USER MANUAL
45
COPYRIGHT © 2006 MERIT ENTERTAINMENT
7.5 Network Information
7.6 Credit Device Test
The Network Information screens are used
to help troubleshoot and verify connection
to a server.
The Credit Device Test screens allow you
to test the credit devices without adding
credits, and without adding money to the revenue screens. You can now go to this
screen, put in any amount of money for testing, and no record is made of those monies, and no fee calculated for AMI. Figure
7.6 above shows a coin input signal was received from channel 2 with a value of 25
cents. On peripherals that are capable,
clearing the enabled box will disable the
device while you are in this screen. This feature will work on a Mars 2611 Bill Acceptor,
but not on a coin acceptor as it does not
have the capability to be disabled.
Touch the Gateway (LAN) button to start a
connection test to the local router. The results of the “ping” test to the router are displayed in the text box. Use the arrows to
the right of the text box to view the test results.
Touch the Server (WAN) button to start a
connection test to the Internet. The results
of the “ping” test to the Internet are displayed
in the text box. Use the arrows to the right
of the text box to view the test results.
Touch the IP Configuration button to display a summary of IP configuration information. Use this information to help troubleshoot connections to the local router and
the Internet.
To return to the Service Mode - Main Menu,
touch the Main Menu button.
Touch Network Status to display a page that
will allow “ping” testing of both the local network (LAN) and Internet connection (WAN).
To return to the Service Mode - Main Menu,
touch the Main Menu button.
46
MOD BOX USER MANUAL
PM0600-04
COPYRIGHT © 2006 MERIT ENTERTAINMENT
7.7 Audio/Video Tests
7.8 Health Status
The Audio/Video Tests screen allows you to
display test patterns on the display to aid in
CRT adjustment, and also to play audio
tones through the sound system to aid in
speaker and sound system configuration.
This screen will allow a technician to view
the following:
To return to the Service Mode - Main Menu,
touch the Main Menu button.
1. Voltages present on the motherboard.
2. The temperatures being reported
from the motherboard.
3. The internal cabinet temperature
reported on some models of AMI
Powered Jukeboxes.
4. The speed of the CPU Fan on the
motherboard.
7.8 Input/Output Tests
Further enhancements are planned for
this feature after statistics are gathered
and “Normal” parameters are established.
To return to the Service Mode - Main Menu,
touch the Main Menu button.
This screen allows you to test the
pushbuttons on the Communications Controller. When you push the Calibrate button
the screen changes to “On”. If you point the
I/R Remote at the jukebox and press a button, the screen shows you what button was
pushed. Test Meter causes an optional hard
meter to pulse, and Test Router Reset
causes the Router Power to be cycled off.
To return to the Service Mode - Main Menu,
touch the Main Menu button.
PM0600-04
MOD BOX USER MANUAL
47
COPYRIGHT © 2006 MERIT ENTERTAINMENT
Merit Industries, Inc. Software License Agreement
Merit Industries, Inc. (“Licensor”) is willing to license the enclosed software to you only if
you accept all of the terms in this license agreement (“Agreement”).
Ownership of the Software
1.
The enclosed Merit® product, which may include but is not limited to the Megatouch®
software program (“Software”) and the accompanying written materials are owned by
Licensor and are protected by United States copyright laws, patent laws and other
intellectual property laws, by laws of other nations, and by international treaties.
Restrictions on Use and Transfer
2.
If this Software package contains multiple media types (such as CD’s, flash cards,
hard drives, etc), then you may use only the type of media appropriate for your Machine.
You may not use the other media types on another Machine, or transfer, or assign
them to another user except as part of the permanent transfer of the Software and all
written materials (as provided for below in paragraph 4).
3.
You may make one copy of the software for backup purposes only. You may not copy
or make backup copies of any software security key or software security device under
any circumstances.
4.
You may permanently transfer the right to use the Software and accompanying written
materials (including the most recent update and all prior versions) if you retain no
copies and the transferee agrees in writing to be bound by the terms of this Agreement.
Such a transfer of this license to another party immediately terminates your license.
You may not otherwise transfer or assign the right to use the Software, except as
stated in this paragraph.
5.
You may not operate or allow the operation of the Software at locations where the
operation of such Software does not comply with all local, state, and other governmental
body laws and regulations. You agree to not use or permit the use of the Software in
violation of any U.S. Federal, state, or local laws or regulations or any foreign law or
regulation, including laws regarding gaming, gambling or intellectual property rights in
or concerning the Software.
6.
You may not modify, adapt, translate, reverse engineer, decompile, disassemble the
Software or create derivative works from the Software or any component thereof; nor
may you remove, modify or hide or otherwise make unreadable or non-viewable any
notice, legend, advice, watermark or other designation contained on the Software,
component thereof, or output therefrom.
7.
You agree that the Software and the authorship, systems, ideas, inventions methods
of operation, documentation and other information contained therein, and all versions,
modifications and adaptations thereto are proprietary intellectual properties of Licensor
and are protected by civil and criminal law, and by copyright, trade secret, trademark
and the patent laws of the United States and other countries.
Limited Warranty
8.
Licensor warrants, solely for your benefit, that the Software will function in material
conformity, with its accompanying documentation for a period outlined in Licensor’s
standard product warranty period after your receipt of the Software.
Licensor’s Obligations Under Warranty
9.
48
Licensor’s sole obligation under the aforesaid warranty shall be to utilize commercially
reasonable efforts to correct or modify such portion of the Software as to make it
materially conform with the applicable documentation.
MOD BOX USER MANUAL
PM0600-04
COPYRIGHT © 2006 MERIT ENTERTAINMENT
Grant Of License
10. Licensor grants to you a limited, non-exclusive license to distribute and/or use one
copy of the Software on a single Merit (“Machine”) accompanied by a single licensor
factory authorized security key. Licensor reserves the right to update versions of the
software and the content to the Machine as deemed appropriate by the Licensor. You
are entrusted to maintain and protect your single licensor factory authorized security
key, password, or other identification from being utilized by any third party, and you
agree to be responsible for any use of the Software provided herein by a third party
utilizing your identification. Licensor maintains the right to immediately terminate your
License for reasons related to misuse or other non-conformity with the rules expressed
herein. While Licensor does not routinely inspect Machines, Licensor also reserves
the right to inspect or audit the Software from time to time in Licensor’s sole discretion.
To the extent that Licensor’s access to the Software requires that Licensor also gain
access to a Machine in which the Software is installed, you agree to promptly provide
Licensor, when requested, with permission and aid in Licensor gaining access to the
Machine.
Disclaimers
11. EXCEPT AS PROVIDED IN THE SECTION ENTITLED “LIMITED WARRANTY”,
LICENSOR MAKES NO OTHER PROMISES, REPRESENTATIONS OR
WARRANTIES, WHETHER EXPRESSED OR IMPLIED, REGARDING OR RELATING
TO THE SOFTWARE OR CONTENT THEREIN OR TO ANY OTHER MATERIAL
FURNISHED OR PROVIDED TO YOU PURSUANT TO THIS AGREEMENT OR
OTHERWISE AND LICENSOR SPECIFICALLY DISCLAIMS ALL IMPLIED
WARRANTIES OF MERCHANTABILITY AND FITNESS FOR A PARTICULAR
PURPOSE WITH RESPECT TO SAID MATERIALS OR THE USE THEREOF. TO
THE MAXIMUM EXTENT ALLOWABLE BY LAW THE UNIFORM COMMERCIAL CODE
OR OTHER UNIFORM LAWS SHALL NOT APPLY TO THIS AGREEMENT.
Limitation on Liability
12. IN NO EVENT SHALL LICENSOR BE LIABLE UNDER ANY CLAIM, DEMAND OR
ACTION ARISING OUT OF OR RELATING TO THE SOFTWARE, ITS USE,
INSTALLATION OR LICENSOR’S PERFORMANCE OR LACK THEREOF UNDER
THIS AGREEMENT FOR ANY SPECIAL, INDIRECT, INCIDENTAL, EXEMPLARY OR
CONSEQUENTIAL DAMAGES, WHETHER OR NOT LICENSOR HAS BEEN
ADVISED OF THE POSSIBILITY OF SUCH CLAIM, DEMAND OR ACTION. IN
ADDITION, WITHOUT LIMITING THE FOREGOING, IN ALL EVENTS THE REMEDIES
AVAILABLE TO YOU SHALL BE LIMITED TO THE AMOUNT PAID BY YOU TO
LICENSOR FOR THE SOFTWARE.
13. IN NO EVENT WILL LICENSOR BE LIABLE TO YOU FOR DAMAGES, INCLUDING
ANY LOSS OF PROFITS, LOST SAVINGS, OR OTHER INCIDENTAL OR
CONSEQUENTIAL DAMAGES ARISING OUT OF YOUR USE, MISUSE, BREACH
OF THIS AGREEMENT OR INABILITY TO USE THE SOFTWARE.
General
14. The validity and construction of this Agreement and of the rights and obligations herein
shall be determined and governed by the laws of the State of New York. By accepting
the terms of this Agreement, you acknowledge and accept that the courts of New York,
New York shall have exclusive jurisdiction and venue regarding any disputes arising
with regard to this Agreement or arising out of activity or misuse of the Software.
15. Merit, in its sole discretion, may assign this agreement or any of its rights and obligations
hereunder.
16. If you have any questions concerning this Agreement or wish to contact Licensor for
any reason, please write: Merit Industries, Inc., 2525 State Road, Bensalem, PA 19020,
USA.
PM0600-04
MOD BOX USER MANUAL
49
COPYRIGHT © 2006 MERIT ENTERTAINMENT
Contrat de licence de logiciel de Merit Industries, Inc.
Merit Industries, Inc. (ci-après le "Concédant") est disposé à vous accorder la licence d'utilisation du
logiciel ci-inclus, à condition que vous vous engagiez à respecter tous les termes, clauses et conditions du présent contrat de licence (Contrat).
Droit de Propriété
1. Le produit Merit ci-joint contenant, mais ne s'y limitant pas, le logiciel Megatouch™ (ci-après le
"logiciel") et toute la documentation écrite, restent la propriété du Concédant et sont protégés
par : les lois de droits d'auteur des Etats-Unis, les lois s'appliquant aux brevets déposés et à la
propriété intellectuelle, ainsi que par celles des autres pays et les traités internationaux.
Restriction d'Utilisation et Transfert
2. Si le présent logiciel comprend plusieurs types de composants (tels que CD-ROM, cartes
flash, disques durs, etc), vous ne pouvez utilisez que ceux qui conviennent à votre appareil. Il
est strictement interdit de les utiliser sur un autre appareil, les transférer -ou les céder à un
autre utilisateur, sauf en cas de transfert permanent du logiciel et de toute la documentation
écrite (comme indiqué ci-dessous au paragraphe 4).
3.
Il est interdit de copier le logiciel, à l'exception d'une copie de sauvegarde. Il est aussi interdit
de reproduire -ou faire des copies de sauvegarde des programmes de clé de sécurité ou
autres fichiers de sécurité, quelles que soient les circonstances.
4.
Vous pouvez céder en permanence à un tiers -le droit d'utiliser le LOGICIEL et toute la documentation écrite l'accompagnant, (ainsi que la plus récente mise à jour et toutes autres anciennes
versions) seulement si vous n'en gardez aucune copie, et si le cessionnaire s'engage, par
écrit, à respecter les termes, clauses et conditions du présent Contrat. Cette cession à un tiers
met fin à votre licence immédiatement. Autrement, vous n'avez pas la permission de transférer
ou d'accorder à un tiers le droit d'utiliser le présent logiciel, excepté que tel que décrit dans le
présent paragraphe.
5.
Il est interdit d'utiliser le présent logiciel ou de permettre son utilisation dans des emplacements où l'utilisation du présent logiciel n'est pas conforme aux lois et réglementations locales,
nationales ou réglementations d'autres organismes gouvernementaux. Vous acceptez de ne
pas utiliser ou d'autoriser l'utilisation du logiciel d'une manière enfreignant les lois ou regulations s'appliquant à la propriété intellectuelle et au jeu, en vigueur aux Etats-Unis ou dans les
autres pays du monde, y compris les lois de l'ensemble du logiciel.
6.
Il est interdit de modifier, adapter, traduire, démonter, décompiler, désassembler le logiciel ou
créer du matériel dérivé du logiciel ou de tout composant de celui-ci ; vous ne pouvez pas
enlever, modifier ou cacher ou rendre illisible ou non-visible toute instruction, légende, information ou filigrane ou autre désignation qui apparaît dans le logiciel, composant dudit logiciel
ou résultant dudit logiciel.
7.
Vous convenez que le logiciel et les droits d'auteur, les systèmes, les idées, les inventions, les
méthodes d'utilisation, la documentation et autre information incluse, ainsi que toutes les
versions, modifications et adaptations qui s'y rattachent sont les propriétés intellectuelles du
Concédant et sont protégées par le droit civil et pénal et par le droit d'auteur, le secret commercial, la marque déposée et le brevet aux Etats-Unis et dans les autres pays du monde.
Limite de Garantie
8. Le Concédant garantit seulement à votre intention, que le logiciel permettra une utilisation
conforme, avec la documentation l'accompagnant, pendant la période de temps indiquée
dans la période de garantie du produit standard du Concédant, à compter de la date de
livraison du logiciel.
Responsabilité du Concédant aux termes de la Garantie
9. La seule obligation du Concédant aux termes de la garantie susmentionnée sera de faire tous
les efforts commercialement raisonnables pour corriger ou modifier la partie du logiciel pour le
rendre matériellement conforme aux spécifications de la documentation.
50
MOD BOX USER MANUAL
PM0600-04
COPYRIGHT © 2006 MERIT ENTERTAINMENT
Concession de Licence
10. Le Concédant vous accorde le droit d'utiliser une seule copie par appareil Merit (ci-après
"Appareil") accompagné d'une seule clé de sécurité autorisée en usine et fournie par le
Concédant. Le Concédant se réserve le droit de mise à jour des versions du logiciel et du
contenu de l'Appareil, quand il juge nécessaire de le faire. Il vous appartient également
d'empêcher que les mots de passe ou autres codes et la clé de sécurité soient utilisés par un
tiers. Vous acceptez d'assumer la responsabilité dans le cas de l'utilisation du logiciel par un
tiers. Le Concédant se réserve le droit de résilier votre contrat de licence à tout moment dans
l'éventualité d'une utilisation non-conforme aux clauses stipulées. Bien que le Concédant ne
contrôle pas les appareils périodiquement, il se réserve toutefois le droit de contrôler le logiciel
à tout moment et sans préavis de sa part. De surcroît, dans l'éventualité où le logiciel n'est
accessible qu'à travers la machine dans laquelle il est installé, le licencié s'engage à donner
libre accès au Concédant, ou ses représentants, à la machine et dans les plus brefs délais.
Exclusion de toute autre garantie
11. EXCEPTE COMME PREVU DANS LA SECTION INTITULEE "LIMITE DE GARANTIE", LE
CONCEDANT N'ASSURE AUCUNE AUTRE GARANTIE DE QUELQUE NATURE ET A
QUELQUE TITRE QUE CE SOIT, EXPLICITE OU IMPLICITE, EN RAPPORT AVEC LE
LOGICIEL ET LES COMPOSANTS QUI L'ACCOMPAGNENT OU, LE CAS ECHEANT, TOUT
SUPPORT OU MATERIEL FOURNI CONFORMEMENT AU PRESENT CONTRATEN
PARTICULIER, LE CONCEDANT NE PEUT DONNER AUCUNE GARANTIE, DE QUELQUE
NATURE QUE CE SOIT, POUR LA COMMERCIALISATION DE TOUS LES PRODUITS EN
RAPPORT AVEC LE LOGICIEL OU AVEC L'UTILISATION DE CELUI-CI. DANS LA MESURE
OU CELA EST PERMIS PAR LA LOI, LE CODE UNIFORME COMMERCIAL OU AUTRE LOI
UNIFORME NE S'APPLIQUE PAS AU PRESENT CONTRAT.
Limite de Responsabilité
12. LE CONCEDANT NE SERA EN AUCUN CAS RESPONSABLE DE TOUTE RECLAMATION, DEMANDE OU ACTION RESULTANT DE OU EN RAPPORT AVEC LE LOGICIEL,
SON UTILISATION OU SON INSTALLATION, OU LA PERFORMANCE OU MANQUE DE
PERFORMANCE DU CONCEDANT EN VERTU DU PRESENT CONTRAT POUR TOUS
DOMMAGES D'UNE NATURE QUI N'EST PAS PRESUMEE PAR LA LOI ET QUI DOIVENT
ETRE EXPRESSEMENT PROUVES, DOMMAGE INDIRECTS, DOMMAGES-INTERETS
POUR PREJUDICE MORAL, QUE LE CONCEDANT AIT ETE AVISE OU NON DE LA
POSSIBILITE D'UNE TELLE RECLAMATION, DEMANDE OU ACTION. DE PLUS, SANS
LIMITER CE QUI PRECEDE, LES DEDOMMAGEMENTS A VOTRE DISPOSITION SERONT
LIMITES AU MONTANT QUE VOUS AUREZ PAYE AU CONCEDANT POUR LE LOGICIEL.
13. LE CONCEDANT NE SERA EN AUCUN CAS RESPONSIBLE : D'UNE RUPTURE DE
CONTRAT, DES DOMMAGES, Y COMPRIS TOUTE PERTE DE PROFIT, PERTES
D'ECONOMIE OU TOUS AUTRES DOMMAGES INDIRECTS OU DOMMAGES-INTERETS
ACCESSOIRES DECOULANT DE LA MAUVAISE UTILISATION OU DE L'IMPOSSIBILITE
D'UTILISATION DU LOGICIEL.
Dispositions Générales
14. La validité et la construction du présent Contrat et les droits et obligations ci-inclus seront
déterminés et régis par les lois de l'état de New York aux États-Unis. En acceptant les dispositions du présent contrat, vous acceptez également que tous litiges ou revendications relatives seront réglés par voie d'arbitrage par un tribunal de l'état de New York, aux Etats-Unis.
15. Merit Industries se réserve le droit de transférer le présent Contrat à un tiers ainsi que ses
droits et obligations ci-après.
16. Pour toutes questions concernant le présent Contrat -ou si vous désirez contacter le Concédant
pour une raison quelconque, veuillez écrire à : Merit Industries, Inc., 2525 State Road, Bensalem,
PA 19020, Etats-Unis.
PM0600-04
MOD BOX USER MANUAL
51
COPYRIGHT © 2006 MERIT ENTERTAINMENT
Merit Industries, Inc. Softwarelizenzabkommen
Merit Industries, Inc. („Lizenzgeber”) ist nur dann bereit Ihnen eine Lizenz für die beiliegende
Software zu erteilen, wenn Sie alle Bestimmungen dieses Lizenzabkommens (“Abkommen”)
akzeptieren.
Eigentumsvorbehalt der Software
1. Das beiliegende Merit®-Produkt, welches das Megatouch® Softwareprogramm („Software”) beinhalten kann, aber nicht darauf beschränkt ist, und die schriftlichen Unterlagen
sind Eigentum des Lizenzgebers und sind durch die Gesetze der Vereinigten Staaten
und anderer Länder und durch internationale Verträge urheberrechtlich geschützt.
Beschränkungen im Gebrauch und Transfer
2. Sollte diese Softwarelieferung mehrere Medien enthalten (z.B. CD, Karten, Festplatten usw.),
dürfen Sie nur die für Ihre Maschine angebrachte Medienart verwenden. Die anderen
Medienarten dürfen nicht auf anderen Maschinen verwendet werden oder an Dritte übergeben
werden, abgesehen von einem endgültigen Transfer der Software und aller schriftlichen
Unterlagen (wie im untenstehenden Paragraphen 4 beschrieben).
3.
Sie dürfen nur eine Sicherungskopie der Software herstellen. Unter keinen Umständen dürfen
Sie einen Softwaresicherungsschlüssel oder Sicherungsmaßnahmen kopieren oder davon
Sicherungskopien herstellen.
4.
Sie dürfen das Nutzungsrecht für die Software und die schriftlichen Unterlagen (einschließlich
der aktuellen Version und aller vorhergehenden Versionen) an Dritte übertragen, wenn Sie
keine Kopie behalten und wenn der Empfänger die Bestimmungen dieses Abkommens in
schriftlicher Form akzeptiert. Bei einem solchen Transfer der Lizenz an Dritte erlischt Ihre
Lizenz umgehend. Abgesehen von den Bestimmungen dieses Paragraphen sind alle anderen
Transfers oder Übertragungen der Nutzungsrechte für diese Software unerlaubt.
5.
Sie dürfen die Software nicht benutzen oder eine Nutzung gestatten, wenn eine solche
Nutzung der Software irgendwelche Gesetze und Verordnungen der kommunalen oder
staatlichen Behörden verletzen würde. Sie verpflichten sich die Software nicht so zu
nutzen oder nutzen zu lassen, dass sie damit gegen staatliche, Bundes- oder
Lokalgesetze oder Bestimmungen der USA oder gegen ausländische Gesetze oder
Bestimmungen, einschliesslich aller Gesetze bezüglich Glücksspiels, Spielens oder
geistigen Eigentumrechts der Software, verstossen.
6.
Es ist Ihnen nicht gestattet, die Software abzuändern, zu verändern, zu übersetzen,
rückumzuwandeln, zu dekompilieren oder zu zerlegen, oder aus der Software oder eines
Teils davon andere Werke abzuleiten. Sie dürfen auch aus der Software, einem Bestandteil
der Software oder aus den Datenausgaben der Software keine Hinweise, Bemerkungen,
Ratschläge, Wasserzeichen oder andere Markierungen entfernen, verändern, verbergen oder
auf andere Art unlesbar machen.
7.
Sie akzeptieren, dass die Software und die Urheberschaft, die Systeme, die Ideen, Erfindungen,
die Arbeitsweisen, die Dokumentation und alle anderen darin enthaltenen Informationen und
alle Versionen, Veränderungen, und Bearbeitungen davon das geistige Eigentum des
Lizenzgebers sind, und dass sie durch Straf- und Zivilgesetzgebung und durch die Copyright, Geschäftsgeheimnis-, Warenzeichen- und die Patentgesetze der Vereinigten Staaten und
anderer Länder geschützt sind.
Beschränkte Garantie
8. Der Lizenzgeber garantiert zu Ihren Gunsten, dass die Software für die angegebene normale
Garantiezeit des Lizenzgebers nach Ihrer Annahme der Software in erheblicher
Übereinstimmung mit der beiliegenden Dokumentation laufen wird.
Verpflichtung des Lizenzgebers im Rahmen der Garantie
9. Die ausschließliche Pflicht des Lizenzgebers im Rahmen der vorstehenden Garantie besteht
darin, alle geschäftlich vertretbaren Schritte zu unternehmen, um Teile der Software zu
berichtigen oder abzuändern, bis sie mit der beiliegenden Dokumentation erheblich
übereinstimmen.
52
MOD BOX USER MANUAL
PM0600-04
COPYRIGHT © 2006 MERIT ENTERTAINMENT
Übertragung der Lizenz
10. Der Lizenzgeber gewährt Ihnen eine beschränkte, nicht-ausschliessbare Lizenz zur Vertreibung
und/oder Benutzung einer Kopie der Software auf einem einzelnen Merit™ („Gerät”) mit einem
einzelnen werksmäßig gestatteten Sicherungsschlüssel. Der Lizenzgeber behält sich das Recht
vor, nach eigenem Ermessen die Software und den Inhalt der Maschine zu verbessern. Sie
sind dafür verantwortlich ihren individuellen, vom Lizenzgeber werksmäßig gestatteten
Sicherheitsschlüssel, ihr Passwort oder anderweitigen Identifikationsmechanismus
instandzuhalten und abzusichern gegen die Nutzung durch eine dritte Partei, und sie akzeptieren
die Verantwortung für jegliche Nutzung der besagten Software durch eine dritte Partei mithilfe
ihresIdentifikationsmechanismus . Obwohl der Lizenzgeber nicht regelmässig Maschinen
inspiziert, behält sich der Lizenzgeber das Recht vor, ihre Lizenz umgehend zu kündigen aus
Gründen des Missbrauchs oder bei Nichtbefolgung der Bestimmungen in diesem Vertrag. Der
Lizenzgeber behält sich ebenfalls das Recht vor, die Software von Zeit zu Zeit nach eigenem
Ermessen zu inspizieren oder zu überprüfen. Im Falle, dass der Lizenzgeber Zugang zu dem
Gerät wünscht, in dem besagte Software installiert ist, erklären Sie sich bereit, dass sie dem
Lizenzgeber, wenn nötig, Erlaubnis und Hilfe beim Zugang zum Gerät verschaffen.
Beschränkungen
11. ABGESEHEN VON DEN BESTIMMUNGEN DES PARAGRAPHEN „BESCHRÄNKTE
GARANTIE" GIBT DER LIZENZGEBER KEINE SONSTIGEN VERSPRECHEN,
VERPFLICHTUNGEN ODER GARANTIEN, OB AUSDRÜCKLICH ODER
STILLSCHWEIGEND, FÜR DIE SOFTWARE ODER IHRE BESTANDTEILE ODER FÜR ALLE
ANDEREN MATERIALIEN, DIE IHNEN IM RAHMEN DIESES ABKOMMENS ZUR
VERFÜGUNG GESTELLT ODER ÜBERLASSEN WERDEN, UND DER LIZENZGEBER
LEHNT AUSDRÜCKLICH ALLE ANSPRÜCHE AUF MARKTFÄHIGKEIT UND EIGNUNG DER
BESAGTEN MATERIALIEN FÜR DEN GEWÖHNLICHEN GEBRAUCH AB. SOWEIT
GESETZESMÄSSIG ZUGELASSEN, SOLLEN DIE HANDELSRECHTLICHE
GESETZGEBUNG AUS DEM UNIFORM COMMERCIAL CODE ODER ANDERE GESETZE
AUF DIESES ABKOMMEN NICHT ANWENDBAR SEIN.
Haftungsbeschränkung
12. DER LIZENZGEBER HAT KEINERLEI HAFTUNG BEI EINEM ANSPRUCH, EINER
FORDERUNG ODER EINER KLAGE, DIE AUF NUTZUNG DER SOFTWARE, DEREN
INSTALLIERUNG, DER LEISTUNG DES LIZENZGEBERS ODER DESSEN VERSAGEN IM
RAHMEN DIESES ABKOMMENS FÜR JEGLICHE FOLGE-, INDIREKTE, SONDER- ODER
NEBENSCHÄDEN BERUHEN, SELBST WENN DER LIZENZGEBER AUF DIE
MÖGLICHKEIT EINES SOLCHEN ANSPRUCHES, EINER FORDERUNG ODER EINER
KLAGE HINGEWIESEN WURDE. WEITERHIN UND OHNE BESCHRÄNKUNG DES
LETZTEN SATZES, DÜRFEN IN ALLEN FÄLLEN DIE IHNEN ZUR VERFÜGUNG
STEHENDEN ABHILFEN DIE VON IHNEN FÜR DIE SOFTWARE AN DEN LIZENZGEBER
GEZAHLTE SUMME NICHT ÜBERSCHREITEN.
13. DER LIZENZGEBER HAT IN KEINEM FALL EINE HAFTUNG IHNEN GEGENÜBER FÜR
SCHÄDEN, EINSCHLIESSLICH ETWAIGER GEWINNVERLUSTE, NICHT REALISIERTER
EINSPARUNGEN ODER ANDERER NEBEN- ODER FOLGESCHÄDEN, DIE AUS IHRER
VERWENDUNG, MISSBRAUCH, VERLETZUNG DIESES ABKOMMENS ODER
GEBRAUCHSUNFÄHIGKEIT DER SOFTWARE ENTSTEHEN.
Allgemein
14. Die Rechtsgültigkeit und Provisionen dieses Abkommens und der darin enthaltenen Rechte und
Pflichten werden durch die Gesetze des Staates von New York bestimmt. Sollten sie diese
Vereinbarungen annehmen, dann akzeptieren Sie, dass der ausschliessliche Erfüllungsort und
Gerichtsstand bei den Gerichten von New York im Staat New York liegen hinsichtlich aller
Streitigkeiten, die diesen Vertrag betreffen, oder die durch Leistung oder Missbrauch der besagten
Software entstehen.
15. Merit kann nach eigenem Ermessen dieses Abkommen oder jedes der darin enthaltenen Rechte
und Pflichten an Dritte abtreten.
16. Bei Rückfragen über dieses Abkommen oder wenn Sie den Lizenzgeber aus einem anderen
Grund kontaktieren wollen, bitte schreiben an: Merit Industries, Inc., 2525 State Road, Bensalem,
PA 19020, USA.
PM0600-04
MOD BOX USER MANUAL
53
NOTES:
__________________________________________________________________
_______________________________________________________________
________________________________________________________________
___________________________________________________________________
_______________________________________________________________
________________________________________________________________
__________________________________________________________________
_________________________________________________________________
______________________________________________________________
________________________________________________________________
___________________________________________________________________
__________________________________________________________________
_________________________________________________________________
_____________________________________________________________________
___________________________________________________________________
___________________________________________________________________
__________________________________________________________________
___________________________________________________________________
__________________________________________________________________
________________________________________________________________
_________________________________________________________________
_________________________________________________________________
Please read the enclosed license agreement. Operation of this game
constitutes acceptance of the Merit Software License Agreement.
Veuillez lire le contrat de licence d’utilisation ci-inclus. Si vous utilisez
ce jeu, vous vous engagez à respecter les termes et conditions du
contrat de licence d’utilisation du logiciel de Merit.
Bitte beiliegendes Lizenzabkommen durchlesen. Das Merit Software
Lizenzabkommen tritt in Kraft, sobald dieses Spiel verwendet wird.
MOD BOX USER MANUAL
PM0600-04