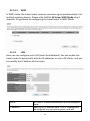
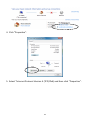
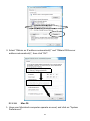
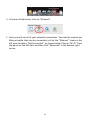
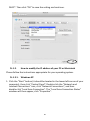
1
BR-6258nL User Manual 08-2012 / v1.0 1 COPYRIGHT Copyright Edimax Technology Co., Ltd. all rights reserved. No part of this publication may be reproduced, transmitted, transcribed, stored in a retrieval system, or translated into any language or computer language, in any form or by any means, electronic, mechanical, magnetic, optical, chemical, manual or otherwise, without the prior written permission from Edimax Technology Co., Ltd. Edimax Technology Co., Ltd. makes no representations or warranties, either expressed or implied, with respect to the contents hereof and specifically disclaims any warranties, merchantability, or fitness for any particular purpose. Any software described in this manual is sold or licensed as is. Should the programs prove defective following their purchase, the buyer (and not this company, its distributor, or its dealer) assumes the entire cost of all necessary servicing, repair, and any incidental or consequential damages resulting from any defect in the software. Edimax Technology Co., Ltd. reserves the right to revise this publication and to make changes from time to time in the contents hereof without the obligation to notify any person of such revision or changes. The product you have purchased and the setup screen may appear slightly different from those shown in this QIG. For more information about this product, please refer to the user manual on the CD-ROM. The software and specifications are subject to change without notice. Please visit our website www.edimax.com for updates. All brand and product names mentioned in this manual are trademarks and/or registered trademarks of their respective holders. Edimax Technology Co., Ltd. Add: No. 3, Wu-Chuan 3rd Rd., Wu-Ku Industrial Park, New Taipei City, Taiwan Tel: +886-2-77396888 Email: [email protected] Notice According to GNU General Public License Version 2 This product includes software that is subject to the GNU General Public License version 2. The program is free software and distributed without any warranty of the author. We offer, valid for at least three years, to give you, for a charge no more than the costs of physically performing source distribution, a complete machine-readable copy of the corresponding source code. 2 Contents I. II. 3. Product Information .................................................................................................................... 5 I-1. Package Contents .................................................................................................................5 I-2. Physical Description .............................................................................................................5 I-3. LED Status ............................................................................................................................6 I-4. Safety Information ...............................................................................................................7 I-5. System Requirements ............................................................................................................8 Quick Installation: iQ Setup ....................................................................................................... 9 II-2. iQ Setup: Wired Connection Mode .....................................................................................14 II-3. iQ Setup: WISP Mode ..........................................................................................................16 II-4. Connecting to the Travel Router ..........................................................................................20 II-5. Resetting the Travel Router..................................................................................................22 III. Browser Based Configuration Interface ................................................................................. 23 III-1. Home....................................................................................................................................26 III-2. Quick Setup ..........................................................................................................................26 III-3. General Setup ......................................................................................................................28 III-3-1. System ........................................................................................................................28 III-3-1-1. Time Zone................................................................................................................29 III-3-1-2. Password Settings ....................................................................................................30 III-3-2. WAN ...........................................................................................................................31 III-3-2-1. Dynamic IP ...............................................................................................................31 III-3-2-2. Static IP ....................................................................................................................33 III-3-2-3. PPPoE.......................................................................................................................34 III-3-2-4. PPTP .........................................................................................................................35 III-3-2-5. DNS ..........................................................................................................................37 III-3-2-6. DDNS .......................................................................................................................38 III-3-2-7. WISP ........................................................................................................................39 III-3-3. LAN.............................................................................................................................39 III-3-4. Wireless .....................................................................................................................42 III-3-4-1. Basic Settings ...........................................................................................................42 III-3-4-2. Advanced Settings ...................................................................................................45 III-3-4-3. Security Settings ......................................................................................................47 III-3-4-4. Access Control .........................................................................................................51 III-3-4-5. WPS .........................................................................................................................52 III-3-5. QoS .............................................................................................................................54 III-3-6. NAT .............................................................................................................................57 III-3-6-1. Special Applications.................................................................................................58 III-3-6-2. UPnP Settings ..........................................................................................................59 III-3-7. Firewall.......................................................................................................................60 III-3-7-1. Access Control .........................................................................................................61 III-3-7-2. URL Blocking ............................................................................................................65 3 III-3-7-3. DoS ..........................................................................................................................66 III-3-7-4. DMZ .........................................................................................................................68 III-4. Status ...................................................................................................................................70 III-4-1. Internet Connection ...................................................................................................70 III-4-2. Device Status..............................................................................................................70 III-4-3. System Log ................................................................................................................ 71 III-4-4. Security Log................................................................................................................72 III-4-5. Active DHCP Client .....................................................................................................72 III-4-6. Statistics .....................................................................................................................73 III-5. Tools .....................................................................................................................................73 III-5-1. Configuration Tools ....................................................................................................73 III-5-2. Firmware Upgrade .....................................................................................................74 IV. III-5-3. Reboot........................................................................................................................76 III-5-4. Internet Access Keeper ..............................................................................................77 APPENDIX ............................................................................................................................... 79 IV-1. Configuring your IP address .................................................................................................79 IV-1-1. How to configure your computer to use a dynamic IP address .............................................79 IV-1-1-1. Windows XP .......................................................................................................................79 IV-1-1-2. Windows Vista ...................................................................................................................81 IV-1-1-3. Windows 7 .........................................................................................................................83 IV-1-1-4. Mac OS .....................................................................................................................85 IV-1-2. How to modify the IP address of your PC or Macintosh........................................................88 IV-1-2-1. Windows XP .................................................................................................................88 IV-1-2-2. Windows Vista .........................................................................................................90 IV-1-2-3. Windows 7 ...............................................................................................................92 IV-1-2-4. Mac OS .....................................................................................................................96 IV-2. Troubleshooting ...................................................................................................................99 IV-3. Glossary ...............................................................................................................................102 IV-4. Technical Support...............................................................................................................105 4 I. Product Information Thank you for purchasing the Edimax BR-6258nL Wireless Personal Hotspot and Travel Router! For someone constantly on the move, this tiny router is an essential companion. Its quick and easy installation process ensures that anybody can set up a network environment and share an Internet connection in a matter of minutes. I-1. Package Contents Before you start using this router, please check if there is anything missing from the package, and contact your dealer to claim the missing item(s): I-2. Travel Router Quick installation guide CD with multi-language QIG and user manual Access Key Card Physical Description d. a. c. b. a. USB connector and cable: This connector can be plugged into a computer’s USB port, or into a USB power adapter. Note: The USB connector on this device transmits electrical power only, it does not transmit data. This device can only be configured by connecting to it wirelessly. Note: To prevent damage to the device, when plugging and unplugging the USB connector, please hold the connector itself. Do not pull on the body of the travel router. 5 b. Ethernet port: This port is used to connect to a wired Internet connection. Note: Please do not connect this Ethernet port to your computer’s Ethernet port, it will not work. This port should be connected to an access point or xDSL/cable modem. c. WPS/Reset button: Press this button for 2 seconds to activate WPS mode, or 10 seconds to reset the device. d. LED indicator: There are two visible LEDs underneath the device’s casing, one blue and one green. I-3. LED Status LED Color Power Blue LED Status Description Rapid: Device is initializing Blinking Slow: Device is resetting Device is powered normally Steady On Device is not powered Off Steady ON WPS Green Blinking When a WPS connection has been established, the LED will activate for 5 minutes WPS is in progress No power or no WPS in progress Off Note: When the WPS LED is blinking, that means WPS is in progress. Please do not press the WPS button again until the light stops blinking. 6 I-4. Safety Information In order to ensure the safe operation of the travel router and its users, please read and act in accordance with the following safety instructions. 1. The travel router is designed for indoor use only; do not place the travel router outdoors. 2. Do not place the travel router in or near hot/humid places, such as a kitchen or bathroom. 3. Do not pull any connected cable with force; carefully disconnect it from the travel router. 4. Take care when moving and handling the travel router; accidental damage is not covered by the travel router’s warranty. 5. The device contains small parts which are a danger to small children under 3 years old. Please keep the travel router out of reach of children. 6. Do not place the travel router on paper, cloth, or other flammable materials. The travel router will become hot during use. 7. There are no user-serviceable parts inside the travel router. If you experience problems with the travel router, please contact your dealer of purchase and ask for help. 8. The travel router is an electrical device and as such, if it becomes wet for any reason, do not attempt to touch it without switching the power supply off. Contact an experienced electrical technician for further help. 9. If you smell burning or see smoke coming from the travel router, then disconnect the travel router immediately, as far as it is safely possible to do so. Call your dealer of purchase for help. 7 I-5. System Requirements - Wireless network card compatible with 802.11b/g/n wireless network standard. - Web Browser for software configuration (Internet Explorer 7 or above, Google Chrome, Firefox, Safari). - 1 available USB Type A port capable of supplying 500mA. - Existing network with Internet connection. 8 II. Quick Installation: iQ Setup Your travel router can be up and running in a matter of minutes. Just follow these instructions to run the travel router’s built-in quick installation program, known as “iQ Setup”. If you need to make more detailed configurations, you can refer to III. Browser Based Configuration Interface. Note: Before you use this travel router, please make sure your computer is set to use a dynamic IP address. This is a simple procedure, and step by step instructions for how to do this, can be found in IV-1. Appendix: Configuring your IP address. 1. Remove the clear plastic wrapping from the device. 2. Insert the USB connector of the travel router into a USB port on your computer, or into a USB power adapter. Computer or a USB power adapter The blue power LED will light up for 10 to 15 seconds. The LED will then begin to flash rapidly for an additional 10 to 15 seconds, as the device initializes. When the blue LED remains lit without flashing, the device has completed its initialization. 3. Search nearby wireless connections for a network with an ID similar to Edimax5fb728, as in the figure below. The last six characters will be different for every individual travel router device, and will be based on the MAC address of your router. 9 Windows: Mac: You may also find your device ID on the included Access Key card, or on the label on the travel router itself. Connect to this wireless network. Note: If you are using Windows Vista or Windows 7 and the following appears, please click “Connect the network without setting it up”. Please do not click “OK”. 10 If you have accidentally clicked “OK”, you will see the following. Please click “Cancel” and try the previous step again. 4. Windows users, open the Internet Explorer web browser. You will be prompted to enter a user name and password. Mac users will be prompted for a username and password automatically. The default user name is admin, and the default password is 1234. Windows: Mac: 11 Mac users then need to open a web browser, and enter the access key http://edimax.go or the default IP address 192.168.8.1 into the URL bar. Mac: 5. Windows users will now arrive at the first iQ setup page. Mac users need to select “Quick Setup” from the menu on the left side, as shown below. Mac: 12 From this point, both Windows and Mac users continue iQ Setup in the same manner. The first step of the setup process is to name the router, and to give it a security key. The default name of the device is the device ID, while the security key must be between 8 and 32 characters. After both have been set, click ‘NEXT’ to continue. 6. The travel router will save settings and reboot. The device will automatically disconnect from your computer while it reboots. 7. When the following screen appears, the device has completed its reboot. Reconnect to the travel router by searching available wireless networks for the device name you set in step 5. The device name and security key will also be displayed on screen, as shown below. Enter the 8 to 32 character security key you set. When your computer has successfully reconnected to the device, click “NEXT”. 13 Note: Please enter the security key you set in step 5. The security key in the screenshot is an example. 8. You will be prompted to choose between “Wired Mode” and “WISP Mode”. II-2. iQ Setup: Wired Connection Mode Wired connection mode allows the travel router to receive a wired Internet connection via its Ethernet port, and broadcast that connection wirelessly. 1. Insert the Internet-connected LAN cable into the travel router’s Ethernet port, then select the Wired Mode option on the setup screen. 14 2. The travel router will detect your WAN (Wide Area Network) type and test the Internet connection. 3. If the WAN connection uses a dynamic IP and the connection is successful, you will see a final congratulation screen. If you see the following screen (shown below) “Please select and configure your Internet connect type”, then please follow the on-screen prompts and select your connection type. Enter your ISP information, user name, password, or DNS information as required. Note: Please refer to III-3-2. WAN for more guidance on these parameters. After the connection is successfully established, you may choose to start using the Internet immediately, or perform more advanced configuration. On this screen, you have the option of setting a bookmark to http://edimax.go, which will lead you directly to the travel router’s browser-based setup screen. 15 II-3. iQ Setup: WISP Mode In WISP mode, the travel router receives a wireless signal and broadcasts it to multiple wireless devices. 1. Select WISP mode on the setup screen. 2. The travel router will automatically scan for available Wi-Fi networks. Select the network you wish to connect to. If the network requires a security key, enter it here. Please be careful when entering the security key, as an incorrect key will result in the travel router being unable to connect to the Wi-Fi network. If the network you wish to connect to does not appear, please try clicking on the “Refresh” button, or move the travel router closer to the root wireless access point. 16 You may choose to Hide the SSID of the router’s wireless network by checking the “Hide SSID” box. If the wireless network you wish to connect to is not broadcasting its SSID (i.e. it has chosen to hide its ID), you may connect to it manually if you know its SSID. To do so, please check the “Setup manually” box and input the SSID, channel number, and encryption information into the appropriate fields, as shown below. Please refer to III-3-4-3. Security Settings for more detailed information about encryption. 3. Press “NEXT” to continue, or press “BACK” to return to the previous step. 4. The travel router will save the changed settings and may reboot. If it does, reconnect to the travel router by searching available wireless networks for the device name you set in step 5 of the Quick Installation section. Enter the 8 to 32 character security key you set. 17 5. After reconnecting, the travel router will verify the connection. If the connection is successful, the setup screen will tell you the ID of the wireless network it has connected to, as well as the security key. You will then be prompted to choose whether to “Setup Internet Automatically”, or to “Setup Internet Manually”. Selecting “Setup Internet Automatically” will work in most cases, and is recommended. If the router is unable to “Setup Internet Automatically”, it will prompt you to “Setup Internet Manually”. For details on how to set up the connection manually, please see III-2. Quick Setup. 6. After Internet settings are set up, you will see a final congratulation screen. On this screen, you have the option of setting a bookmark to http://edimax.go, which will lead you directly to the travel router’s browser-based configuration interface (see III. Browser Based Configuration Interface). You will also see final confirmation of the travel router’s name and security key. You may now start surfing the Internet immediately, or you may choose to perform more advanced configuration via the browser based configuration interface. 18 19 II-4. Connecting to the Travel Router Once connected to the Internet, whether through a wired connection or through WISP mode, other wireless devices can connect to this travel router and access the Internet through it. 1. Search for available Wi-Fi networks on your other device, and select the ID of the travel router, such as in the example screenshot below. This simple procedure will vary slightly depending on your device. Windows PC: Android Smartphone: 2. Enter the wireless security key you set previously. 20 Android Smartphone: 3. Repeat for as many wireless devices as you wish to connect to the Internet. The travel router will broadcast the wireless Internet signal, making it a personal hotspot for you and your wireless devices. 21 II-5. Resetting the Travel Router In the event the travel router is not properly functioning, or you wish to reset and remove all settings, you can reset the travel router to its factory default.. 1. Make sure the device is powered (by plugging the USB connector to a computer or a USB power adapter). 2. Hold the body of the device with your hand, then press and hold the WPS/Reset button with the end of a paper clip or a pen nub for approximately 10 seconds, until the blue LED indicator begins to flash. When the LED begins to flash, you may release the button, and the device will begin to reset to factory default settings. 3. The LED will first stay steadily lit for approximately 10 to 15 seconds. The LED will then begin to flash rapidly for an additional 10 to 15 seconds, as the device reinitializes. When the blue LED remains lit without flashing, the device has completed its reset process, and is ready for further configuration. 22 III. Browser Based Configuration Interface Once you have set the travel router to its operating mode as detailed in II. Quick Setup: iQ Setup, you can further configure the settings of the travel router anytime using the browser based configuration interface. Note: Before you use this travel router, please make sure your computer is set to use a dynamic IP address. This is a simple procedure, and step by step instructions for how to do this, can be found in Appendix. To access the browser based configuration interface, ensure that your travel router is still connected to your computer or power source via USB, and that you are connected to its wireless network, as detailed in II. Quick Setup steps 2 and 3. You can access the browser based configuration interface by entering “http://edimax.go” into the URL bar of a web browser. As an alternative, you can also enter the travel router’s default IP http://192.168.8.1 into the URL bar of a web browser. This information, along with other useful factory default values, is displayed on the access key card which is included in the box with your travel router: 23 Web browser access Wi-Fi Client access This is information necessary for you to login to the browser-based configuration interface. This is information necessary for your wireless client device (such as computer, smart phone or tablet) to connect to this device. This information can also be found on the label of the device itself. You will then be prompted to enter the device’s username and password. The default username is admin and the default password is 1234. Windows: Mac: 24 From here, you will see the browser based configuration interface home screen. 25 III-1. Home The Home page shows the four main menus into which you can navigate, and provides a brief description of each, those being: - III-2. III-3. III-4. III-5. Quick Setup General Setup Status Tools In the top right corner, there is a drop down menu to change the language of the browser based configuration interface, and shortcuts to each of the four main menus. III-2. Quick Setup If you wish to perform the initial setup process again, for example to change the operation mode of the device, select “Quick Setup” to restart the iQ Setup process. You will be prompted to choose between “Wired Mode” and “WISP mode”. For guidance on iQ Setup, please refer back to II-1. iQ Setup: Wired Connection Mode and II-2. iQ Setup: WISP Mode. Note: During iQ Setup for WISP Mode, if you chose to setup your Internet connection manually, then please follow the instructions below. When running iQ Setup for WISP mode, after you have established a connection with your wireless network, you can choose between “Setup Internet Automatically” and “Setup Internet Manually”. It is recommended that you choose “Setup Internet Automatically”, as detailed 26 in II-2. iQ Setup: WISP Mode. If you wish to “Setup Internet Manually”, or if the router is unable to “Setup Internet Automatically”, you will then be asked to select your connection type. Note: If you are not sure which connection type you should use, please contact your Internet Service Provider for help. After you choose your connection type, please refer to the appropriate section of the user manual for more information, as detailed below: - III-3-2-1. III-3-2-2. III-3-2-3. III-3-2-4. Dynamic IP Static IP PPPoE PPTP 27 III-3. General Setup Various advanced functions can be configured under General Setup. It is highly recommended that you keep the default settings. If you wish to proceed with configurations, use the menu displayed on the left side of the screen. III-3-1. System Under “System” you can modify basic parameters of the router, such as “Time Zone” and “Password Settings”. 28 III-3-1-1. Time Zone You can configure the time zone settings of your travel router here. The date and time of the device can be configured manually or can be synchronized with a time server. Time Zone Select the time zone of your country/ region. If your country/region is not listed, please select another country/region whose time zone is the same as yours. Time Server The travel router supports NTP (Network Address Time Protocol) for automatic time and date setup. Input the host name or IP address of the IP server manually. Daylight Savings If your country/region uses daylight saving time, please check the “Enable Function” box and select the start and end date. Click “APPLY” to make the changes take effect. The following message will appear: Click “CONTINUE” to save the changes but not apply them yet. This allows you to make further changes in the browser-based configuration interface, before applying them all at once. 29 Click “APPLY” to restart the device and implement any changes. The device will restart itself. III-3-1-2. Password Settings You can change the password used to login to the browser-based configuration interface here. It is advised to do so for security purposes. Current Password New Password Re-Enter Password Enter your current password. The default password is 1234. Enter your desired new password here. You can use any combination of letters, numbers and symbols up to 20 characters. Confirm your new password. Click “APPLY” to make the changes take effect. The following message will appear: Click “CONTINUE” to save the changes but not apply them yet. This allows you to make further changes in the browser-based configuration interface, before applying them all at once. Click “APPLY” to restart the device and implement any changes. The device will restart itself. 30 III-3-2. WAN Note: You will also arrive at this screen if you chose to setup your Internet connection manually, during iQ Setup for WISP Mode. You can set up your Internet connection or WAN (Wide Area Network) under “WAN”. Select a connection type from the list. Note: If you are not sure which connection type you should use, please contact your Internet Service Provider for help. III-3-2-1. Dynamic IP If your Internet service provider assigns IP addresses to you automatically through DHCP (Dynamic Host Configuration Protocol), select “Dynamic IP”. 31 Host Name MAC Address DNS Address DNS Address 1 and 2 TTL Input the host name of your computer here. This is optional and only required if your ISP asks you to do so. If your ISP only permits computers with certain MAC addresses to access the Internet, input your computer’s MAC address here. Press “Clone Mac address” to fill the MAC address field with your computer’s MAC address automatically. Select “Use the following IP address” if your ISP requires that you do so. Enter the primary and secondary DNS addresses assigned by your ISP here. Enable the “TTL” function if your ISP requires you to do so. Click “APPLY” to make the changes take effect. The following message will appear: Click “CONTINUE” to save the changes but not apply them yet. This allows you to make further changes in the browser-based configuration interface, before applying them all at once. Click “APPLY” to restart the device and implement any changes. The device will restart itself. 32 III-3-2-2. Static IP If your ISP is providing you Internet access via a fixed IP address, select “Static IP”. Generally, your ISP will provide you with such information as IP address, subnet mask, gateway address, and DNS address. IP Address Subnet Mask Default Gateway Mac Address DNS Address 1 and 2 TTL Input the IP address assigned by your ISP here. Input the subnet mask assigned by your ISP here. Input the default gateway assigned by your ISP here. Some ISPs may call this “Default Route”. If your ISP only permits computers with certain MAC addresses to access the Internet, input your computer’s MAC address here. Press “Clone Mac address” to fill the MAC address field with your computer’s MAC address automatically. Enter the primary and secondary DNS addresses assigned by your ISP here. Enable the “TTL” function if your ISP requires you to do so. Click “APPLY” to make the changes take effect. The following message will appear: Click “CONTINUE” to save the changes but not apply them yet. This allows you 33 to make further changes in the browser-based configuration interface, before applying them all at once. Click “APPLY” to restart the device and implement any changes. The device will restart itself. III-3-2-3. PPPoE If your ISP is providing you Internet access via PPPoE (Point-to-Point Protocol over Ethernet), select “PPPoE”. User Name Password MAC Address DNS Address DNS Address 1 and 2 TTL Input the user name assigned by your ISP here. Input the password assigned by your ISP here. If your ISP only permits computers with certain MAC addresses to access the Internet, input your computer’s MAC address here. Press “Clone Mac address” to fill the MAC address field with your computer’s MAC address automatically. Select “Use the following IP address” if your ISP requires that you do so. Enter the primary and secondary DNS addresses assigned by your ISP here. Enable the “TTL” function if your ISP requires you to do so. Click “APPLY” to make the changes take effect. The following message will appear: 34 Click “CONTINUE” to save the changes but not apply them yet. This allows you to make further changes in the browser-based configuration interface, before applying them all at once. Click “APPLY” to restart the device and implement any changes. The device will restart itself. III-3-2-4. PPTP Select “PPTP” if your ISP is providing you Internet access via PPTP (Point-to-Point Tunneling Protocol). If your ISP is providing you dynamic IP addresses, select “Obtain an IP address automatically”. If your ISP is providing you a static IP address, select “Use the following IP address”. 35 Host Name MAC Address IP Address Subnet Mask Default Gateway User Name Password PPTP Gateway Connection ID MTU Input the host name of your computer here. This is optional and only required if your ISP asks you to do so. If your ISP only permits computers with certain MAC addresses to access the Internet, input your computer’s MAC address here. Press “Clone Mac address” to fill the MAC address field with your computer’s MAC address automatically. Input the IP address assigned by your ISP here. Input the subnet mask assigned by your ISP here. Input the default gateway assigned by your ISP here. Some ISPs may call this “Default Route”. Input the user name assigned by your ISP here. Input the password assigned by your ISP here. Input the PPTP gateway assigned by your ISP here. Give this connection a name (optional). Input the MTU value of your network connection here. If you do not know, use the default value. Click “APPLY” to make the changes take effect. The following message will appear: Click “CONTINUE” to save the changes but not apply them yet. This allows you to make further changes in the browser-based configuration interface, before applying them all at once. Click “APPLY” to restart the device and implement any changes. The device will restart itself. 36 III-3-2-5. DNS You can specify the IP address of a primary and secondary DNS server. Note: In most cases, a DNS server IP address is provided dynamically by your ISP, and it is not necessary to enter a DNS server here. Primary DNS Secondary DNS Input the primary DNS server IP address here. Input the secondary DNS server IP address here. Click “APPLY” to make the changes take effect. The following message will appear: Click “CONTINUE” to save the changes but not apply them yet. This allows you to make further changes in the browser-based configuration interface, before applying them all at once. Click “APPLY” to restart the device and implement any changes. The device will restart itself. 37 III-3-2-6. DDNS Dynamic DNS (DDNS) is a service which provides a hostname-to-IP service for dynamic IP users. The changing nature of dynamic IPs means that it can be difficult to access a service provided by a dynamic IP user; a DDNS service though can map such dynamic IP addresses to a fixed hostname, for easier access. The travel router supports several DDNS service providers, please go to their website(s) and register for a DDNS account. Note: Dynamic IP users are those who will automatically be assigned a different IP address each time he or she connects to the Internet. Dynamic DNS Provider Domain Name Account Password / Key Select “Enable” or “Disable” to enable or disable DDNS function accordingly. Select your DDNS service provider from the drop down menu. Input the domain name you applied for or registered from a DDNS service provider (in the format xxx.xxx.xxx e.g. myrouter.homeip.net). Input the account (username or email address) that you used for DDNS registration. Input DDNS service password or key. Click “Save” to save the changes. 38 III-3-2-7. WISP In WISP mode, the travel router receives a wireless signal and broadcasts it to multiple wireless devices. Please refer to III-3. iQ Setup: WISP Mode step 3 onwards, for guidance on configuring the travel router in WISP Mode. III-3-3. LAN Here you can configure your LAN (Local Area Network). You can enable the travel router to dynamically allocate IP addresses to your LAN clients, and you can modify the IP address of the router. LAN IP IP Address All LAN IP related information will be displayed here. Specify an IP address here. This IP address will be assigned to your access point, and will 39 Subnet Mask 802.1d Spanning Tree DHCP Server Lease Time DHCP Client Start IP DHCP Client End IP Domain Name replace the default IP address 192.168.2.2. Please input a subnet mask value for this network. If you wish to activate the 802.1d spanning tree function, select “Enabled”. The device is active as a DHCP server for wireless devices to connect to. All DHCP Server related information will be displayed here. Select a lease time for the DHCP leases here. The DHCP client will be forced to obtain a new IP address after the period expires. You can select “Forever” if you are using this broadband router with less than 30 computers. Enter the start IP address for the DHCP server’s IP assignment. Enter the end IP address for the DHCP server’s IP assignment. You can input a domain name for your network (optional). Note: If you assigned a new IP address to the router, please make a note and remember it. If you forget this IP address, you may not be able to connect to the browser-based configuration interface in the future. If so, try using the default access key http://edimax.go. Note: To reset the IP address back to its default value of 192.168.8.1, press and hold the Reset/WPS button on the router for 10 seconds. Be aware that doing so restores all settings and passwords back to factory defaults. You can also set the router to assign a static IP address to specified computers or devices. 40 Enable Static DHCP Leases MAC Address IP Address Add Clear Check this box to enable the function. Input the specified computer’s MAC address here. Assign a fixed IP address for the specified computer here. After you have entered the MAC address and the IP address, click “Add” to add the information to the “Static DHCP Leases Table”. Click “Clear” to clear the MAC address and IP address fields. Check the box labeled “Enable Static DHCP Leases” to enable this function and then input the required values. Assigned entries will be listed in the table “Static DHCP Lease Table”. Up to 16 static DHCP leases can be assigned this way. Click “APPLY” to make the changes take effect. The following message will appear: Click “CONTINUE” to save the changes but not apply them yet. This allows you to make further changes in the browser-based configuration interface, before applying them all at once. Click “APPLY” to restart the device and implement any changes. The device will 41 restart itself. III-3-4. Wireless You can configure wireless network settings using the sub menu under “Wireless” on the left side of the screen, as shown below. III-3-4-1. Basic Settings You can configure basic wireless settings here. Mode The default mode of the router is “Access 42 Band Point” and cannot be modified. Access Point mode means the device bridges an existing wired or wireless network with a wireless client. Select from one of the following options: 2.4GHz (B): Allows 802.11b wireless network clients to connect to this router (maximum transfer rate 11Mbps). 2.4GHz (N): Allows 802.11n wireless network clients to connect to this router (maximum transfer rate 450Mbps). 2.4GHz (B+G): Allows 802.11b and 802.11g wireless network clients to connect to this router (maximum transfer rate 11Mbps for 802.11b clients and 54Mbps for 802.11g clients). 2.4GHz (G): Allows 802.11g wireless network clients to connect to this router (maximum transfer rate 54Mbps). SSID Channel Number Associated Clients 2.4GHz (B+G+N): Allows 802.11b, 802.11g, and 802.11n wireless clients to connect to this router (recommended). This is the name of your router. You can type any alphanumerical character here (maximum 32 characters). Select a channel from the dropdown menu. You can select the channel of your preference (from 1 to 13, subject to local regulations). Click “Show Active Clients” for the list of all connected wireless clients. Click “Refresh” in the new window to renew the list, and click “Close” to close the window. Note: If you have a pop-up blocker installed, you may have to disable it, or set it to allow the pop-up window to show up. 43 Click “APPLY” to make the changes take effect. The following message will appear: Click “CONTINUE” to save the changes but not apply them yet. This allows you to make further changes in the browser-based configuration interface, before applying them all at once. Click “APPLY” to restart the device and implement any changes. The device will restart itself. 44 III-3-4-2. Advanced Settings You can configure advanced wireless settings here. Note: Advanced settings are for experienced users only. Please do not change any of the values on this page unless you are already familiar with these functions. Fragment Threshold RTS Threshold Beacon Interval Set the Fragment threshold of the wireless radio. Please do not modify the default value if you don’t know what this does, the default value is 2346 Set the RTS threshold of the wireless radio. Please do not modify the default value if you don’t know what this does, the default value is 2347 Set the beacon interval of the wireless 45 radio. Please do not modify the default value if you don’t know what this does, the default value is 100 DTIM Period Set the DTIM period of wireless radio. Please do not modify default value if you don’t know what it is, the default value is 3 Data Rate Set the wireless data transfer rate. Since most wireless devices will negotiate with each other and pick a proper data transfer rate automatically, it’s not necessary to change this value unless you know what will happen after modification. N Data Rate Set the data rate of 802.11n clients, available options are MCS 0 to MCS 15. It’s safe to set this option to “Auto” and it’s not necessary to change this value unless you know what will happen after modification. Channel Width Select wireless channel width (bandwidth used by wireless signals from the travel router). It’s suggested you select “Auto 20/40MHz”. Do not change to “20 MHz” unless you know what that does. Preamble Type Set the wireless radio preamble type. Please do not modify the default value if you don’t know what this does, the default value is “Short Preamble”. Broadcast ESSID Decide if the device will broadcast its own ESSID. You can hide the ESSID of your travel router (set the option to “Disable”), so only people who know the ESSID of your travel router can connect to it. CTS Protect Enabling this setting will reduce the chance of radio signal collisions between 802.11b and 802.11g wireless access points. It’s recommended to set this option to “Auto”. TX Power You can set the output power of the wireless radio. Unless you’re using the travel router in a very large space, you may not require 100% output power. This will enhance security (malicious/unknown users in distant areas will not be able to 46 WMM reach your router). WMM (Wi-Fi Multimedia) technology can improve the performance of certain network applications, such as audio/video streaming, network telephony (VoIP), and others. When you enable WMM, the travel router will define the priority of different kinds of data, to give higher priority to applications which require instant responses. This improves the performance of such network applications. Click “APPLY” to make the changes take effect. The following message will appear: Click “CONTINUE” to save the changes but not apply them yet. This allows you to make further changes in the browser-based configuration interface, before applying them all at once. Click “APPLY” to restart the device and implement any changes. The device will restart itself. III-3-4-3. Security Settings The travel router provides a variety of wireless security options (wireless data encryption). When the data is encrypted, information transmitted wirelessly cannot be read by anyone who does not know the correct encryption key. Note: It is highly recommended that you set up wireless security. Without security enabled, intruders could gain access to your local network and cause damage to your computers and servers. 47 Security Tips: - Use complicated, hard-to-guess phrases as your security password. Include random combinations of letters, numbers and symbols. - Use WPA encryption if possible. It’s more secure than WEP. WPA2(AES) is recommended. - Change your security password regularly. Select the type of encryption you wish to use from the drop down menu labeled “Encryption”. Disable When you select “Disable”, wireless encryption for the network is disabled. This means anyone who knows the device’s SSID can connect to it, and is not recommended. WEP WEP (Wired Equivalent Privacy) is a simple encryption type. For a higher level of security, please consider using WPA encryption if possible. Note: Most wireless devices support WPA encryption, though some legacy wireless devices only support WEP encryption. WEP only supports up to 54Mbps transmission data rate. 48 Key Length Key Format Default Tx Key Encryption Key 1 There are two types of WEP key length: 64-bit and 128-bit. Using “128-bit” is safer than “64-bit”, but will reduce some data transfer performance. There are two types of key format: ASCII and Hex. When you select a key format, the number of characters of the key will be displayed. For example, if you select a “64-bit” key length, and “Hex” as the key format, you’ll see the message “Hex (10 characters)” to the right, which means the length of the WEP key is 10 characters. You can set up to four sets of WEP keys, and you can decide which key is used the default. If you don’t know which one you should use, select “Key 1”. Input WEP key characters here, the number of characters must be the same as the number displayed in the “Key Format” field. If you select the “ASCII” key format, you can use any alphanumerical characters (0-9, a-z, and A-Z). If you select “Hex” as the key format, you can use the characters 0-9, a-f, and A-F. You must enter at least one encryption key here, and if you entered multiple WEP keys, they should not be same as each other. WPA pre-shared key WPA pre-shared key is the safest encryption method, and it is recommended 49 that you use this type of encryption. WPA Unicast Cipher Suite Available options are: WPA (TKIP), WPA2 (AES), and WPA2 Mixed. AES is safer than TKIP, but not every wireless client supports it. Please make sure your wireless client supports the cipher you selected. Our default is WPA2(AES), if your wireless device can not support AES, you can change to WPA2 Mixed. Pre-shared Key Please select the format of the pre-shared Format key here, available options are “Passphrase” (8 to 63 alphanumerical characters) and “Hex (64 characters)” – 0 to 9 and a to f. Root AP Security Please enter the key according to the key Key format you selected above. For security reasons, it’s best to use a complex, hard-to-guess key. Note: TKIP only supports up to 54Mbps transmission data rate. Click “APPLY” to make the changes take effect. The following message will appear: Click “CONTINUE” to save the changes but not apply them yet. This allows you to make further changes in the browser-based configuration interface, before 50 applying them all at once. Click “APPLY” to restart the device and implement any changes. The device will restart itself. III-3-4-4. Access Control Access Control is a security feature that can help to prevent unauthorized users from connecting to your wireless router. This function allows you to define a list of wireless devices permitted to connect to the travel router. Devices are each identified by their unique MAC address. If a device which is not on the list of permitted MAC addresses attempts to connect to the travel router, it will be denied. Up to 20 MAC addresses can be assigned. To enable this function, check the box labeled “Enable Access Control”. MAC addresses which have been added to the permitted list will be displayed in the table “MAC Address Filtering Table”. To delete one or more entries, please check the box of the corresponding entry (under “Select”), and click “Delete Selected”. If you wish to delete all the entries, click “Delete All”. In the next table, you can add MAC addresses to the list. MAC Address Comment Input the MAC address you wish to add here. You can input up to 16 alphanumerical 51 characters describing the MAC address here (optional). Click “Add” to add the MAC address and associated comment to the MAC address list. Click “Clear” to remove everything in the MAC address and comment fields. Add Clear Click “APPLY” to make the changes take effect. The following message will appear: Click “CONTINUE” to save the changes but not apply them yet. This allows you to make further changes in the browser-based configuration interface, before applying them all at once. Click “APPLY” to restart the device and implement any changes. The device will restart itself. III-3-4-5. WPS Wi-Fi Protected Setup (WPS) is a simple and convenient way to build a connection between the travel router and wireless network clients. This function eliminates the need to select an encryption mode and enter an encryption passphrase each time you want to set up a connection. You can build a connection simply by pressing a button on both the travel router and the wireless client. This router supports two types of WPS: Push-Button Configuration (PBC) and PIN code. To use PBC you will need to activate WPS by pushing the Reset/WPS button, or by clicking “Start PBC” in the “WPS” screen; and to activate WPS in the wireless client by pushing a WPS button. To use PIN code, you will need to enter the PIN code of the wireless client you wish to connect to, and then activate WPS in the wireless client. 52 Enable WPS WPS Information Check this box to enable or disable WPS All information related to WPS will be displayed here. WPS Status Displays WPS status. If data encryption settings for the router have never been set, “unConfigured” will be shown here. If data encryption settings have been set, “Configured” will be shown here. Device PIN Code This is the WPS PIN code of travel router. It’s an 8-digit number, used when you need to build a wireless connection by WPS with other WPS-enabled wireless devices. SSID Displays the SSID (ESSID) of this router. Authentication Mode Passphrase Key Device Configuration The wireless security authentication mode of this router will be shown here. If you don’t enable the security functions of the router before WPS is activated, the router will automatically set the security to WPA (AES) and generate a passphrase key for WPS connection. Shows the WPA passphrase here, though all characters will be replaced by asterisks for security reasons. If encryption is not set on the router, this field will be blank. Configuration options for the device’s WPS settings can be found here. 53 Config Mode Configure via Push Button Configure by Client PIN Code There are “Registrar” and “Enrollee” modes for the WPS connection. When “Registrar” is enabled, the wireless clients will follow the router’s wireless settings for WPS connections. When “Enrollee” mode is enabled, the router will follow the wireless settings of wireless client for WPS connections. Click “Start PBC” to start Push-Button style WPS setup. This router will wait for WPS requests from wireless clients for 2 minutes. The green WPS LED on the router will blink for 2 minutes while it waits for incoming WPS requests. Please input the PIN code of the wireless client you wish to connect, and click the “Start PIN” button. The green WPS LED on the router will blink for 2 minutes while it waits for incoming WPS requests. Note: When using PBC-type WPS setup, you must press the hardware or software WPS button on the wireless client within 120 seconds of doing so on the router. If you do not do so in time, you will need to activate WPS on the router again. III-3-5. QoS Quality of service (QoS) is a function which allows you to allocate a certain amount of bandwidth to specific computer. This can ensure that applications which require guaranteed bandwidth e.g. video conference or network telephone applications, are able to function properly and without interruption. Conversely, you can also limit the maximum bandwidth available to a specific computer or application. Check the “Enable QoS” box to enable this function and then enter the desired values. 54 Enable QoS Total Download Bandwidth Total Upload Bandwidth Check this box to enable QoS function, uncheck it to disable QoS. You can set the limit of total download bandwidth in kbits. To disable download bandwidth limitation, input ‘0’ here. You can set the limit of total upload bandwidth in kbits. To disable upload bandwidth limitation, input ‘0’ here. When you assign a particular bandwidth guarantee/limit to a specific computer, it is known as a rule. Existing rules will be listed in the table “Current QoS Table”. Add Edit Delete Selected Delete All Move Up Move Down Click “Add” to create a new QoS rule. This will open a new window, see below. To edit an existing rule, please check the “Select” box of the corresponding rule, then click “Edit”. Please do not select more than one rule to edit at a time. Delete one or more selected rules. If the QoS table is empty, this button will be grayed out. Deletes all rules currently listed in the QoS table. If the QoS table is empty, this button will be grayed out. Moves selected rule up, assigning it a higher priority. Moves selected rule down, assigning it a lower priority. 55 Rule Name Bandwidth Local IP Address Local Port Range Remote IP Address Input a unique name for this QoS rule for reference. Set the bandwidth values for this QoS rule. Select “Download” or “Upload” for traffic type, and input the bandwidth in Kbps which will be assigned to this rule. Select “Guarantee” (minimum bandwidth allocated to this rule) or “Maximum” (maximum bandwidth assigned to this rule) as the type of rule. Set the IP address range that will be affected by this QoS rule. If only one IP address is involved, input the IP address in left field only. Set the port range that will activate this QoS rule. If only one port is involved, input a single number here (1 to 65535); if multiple ports are involved, input starting / ending port number in x-y format (like 10-20). Set remote IP addresses that will trigger this QoS rule. If only one IP address is involved, input the IP address in left field only. 56 Remote Port Range Set the port range that will activate this QoS rule. If only one port is involved, input a single number here (1 to 65535); if multiple ports are involved, input starting / ending port number in x-y format (like 10-20). Traffic Type If you’re creating a QoS rule for a specific type of traffic, you can select it from this menu and you don’t have to input port range above. Protocol Select the protocol type here (TCP or UDP). Click “Save” to save the changes and return to the QoS page. Click “Reset” to clear all fields on this page. Click “APPLY” to make the changes take effect. The following message will appear: Click “CONTINUE” to save the changes but not apply them yet. This allows you to make further changes in the browser-based configuration interface, before applying them all at once. Click “APPLY” to restart the device and implement any changes. The device will restart itself. III-3-6. NAT Network Address Translation (NAT) is a function which allows multiple users in a local network to share a single or multiple IP addresses. Click “Enable” or 57 “Disable” to enable or disable the NAT module accordingly. There are two headings under the “NAT” menu which you can choose from. III-3-6-1. Special Applications Some applications, such as video conferencing or network telephone applications, require multiple connections to function and so cannot work when NAT is enabled. In this case, you can configure NAT settings under “Special Applications” to allow multiple connections for specific applications. Enable Special Applications IP Address Computer name TCP Port to Open UDP Port to Open Comment Check this box to enable NAT for special applications. Input the IP address of the computer which is going to use the special application. Open the drop down menu and select the computer to which you will assign this rule. Click “<<” to add the selected computer’s IP address to ‘IP Address’ field. Input the TCP port number to open (optional). Input the UDP port number to open (blank). Input any comments here for reference. This is optional. 58 Select Game Add Reset This router is pre-loaded with the settings for many popular network games. Select a game from the drop down menu and click “Add” to add the connection parameters to all respective fields. Adds the new rule. This will clear all text from the fields in this page. Existing rules will be listed in the table “Current Trigger-Port Table”. Select Delete Delete All Reset Check the box to select an existing rule. Delete selected rule(s). Delete all rules. Unselect selected rule(s). Click “APPLY” to make the changes take effect. The following message will appear: Click “CONTINUE” to save the changes but not apply them yet. This allows you to make further changes in the browser-based configuration interface, before applying them all at once. Click “APPLY” to restart the device and implement any changes. The device will restart itself. III-3-6-2. UPnP Settings Universal plug-and-play (UPnP) is a set of networking protocols which enables network devices to communicate and automatically establish working configurations with each other. 59 To enable or disable this function, select “Enable” or “Disable” accordingly, and then click “Save”. The following message will appear: Click “CONTINUE” to save the changes but not apply them yet. This allows you to make further changes in the browser-based configuration interface, before applying them all at once. Click “APPLY” to restart the device and implement any changes. The device will restart itself. III-3-7. Firewall The travel router supports firewall functions which can protect your network and computer from malicious intruders. Choose “Enable” or “Disable” to enable or disable the firewall module accordingly. Under the heading “Firewall” in the left menu, there are four options to choose from. 60 Click “APPLY” to make the changes take effect. The following message will appear: Click “CONTINUE” to save the changes but not apply them yet. This allows you to make further changes in the browser-based configuration interface, before applying them all at once. Click “APPLY” to restart the device and implement any changes. The device will restart itself. III-3-7-1. Access Control Access Control is a security feature that can help to prevent unauthorized users from connecting to your wireless router. This function allows you to define a list of wireless devices permitted or not permitted to connect to the travel router, identified by their unique MAC address or IP address. If a device which is not on the list of permitted MAC or IP addresses attempts to connect to the travel router, it will be denied. To enable MAC filtering, check the box labeled “Enable Mac Filtering”. To enable IP filtering, check the box labeled “Enable IP Filtering.”. 61 To add a MAC address to the list, choose “Deny” or “Allow” next to “Enable MAC Filtering”, to deny or allow a specific MAC address accordingly. Then input the information in the table below. Client PC MAC Address Input the MAC address you wish to add here. Computer Name Open the drop down menu and select the computer to which you will assign this rule. Click “<<” to add the selected computer’s MAC address to “MAC Address” field. Comment You can input up to 16 alphanumerical characters describing the MAC address here (optional). Add Click “Add” to add the MAC address and associated comment to the MAC address list. Clear Click “Clear” to remove everything in the MAC address and comment fields. MAC addresses which have been added to the permitted list will be displayed in the table “Current MAC Filtering Table”. To delete one or more entries, please check the box of the corresponding entry (under “Select”), and click “Delete Selected”. If you wish to delete all the entries, click “Delete All”. Clicking “Reset” will unselect all MAC addresses. To add an IP address to the list, choose “Deny” or “Allow” next to “Enable MAC Filtering”, to deny or allow a specific IP address accordingly. Then choose “Add PC” and you will see the following screen: 62 Client PC Description Client PC IP Address Client Service Enter a description of this computer for reference. Input the starting and ending IP address of the computers which will be subject to this rule. For a single computer, input only one IP address in the left field only. Check “Select” for any services which will be involved in this rule. 63 Protocol Port Range Add Reset Select the network protocol, “TCP”, “UDP” or “both”. Enter the port range. It can be a range such as “1-100”, specific ports such as “1,3,5,7,9” or a single port number. Click “Add” to add the IP address to the IP address list. Click “Reset” to remove everything in all fields. IP addresses which have been added to the permitted list will then be displayed on the “Access Control” page. To delete one or more entries, please check the box of the corresponding entry (labeled “Select”), and click “Delete Selected”. If you wish to delete all the entries, click “Delete All”. Click “APPLY” to make the changes take effect. The following message will appear: Click “CONTINUE” to save the changes but not apply them yet. This allows you to make further changes in the browser-based configuration interface, before applying them all at once. Click “APPLY” to restart the device and implement any changes. The device will restart itself. 64 III-3-7-2. URL Blocking URL Blocking is a function which enables access to specified websites to be blocked for users in the local network. Parents or company managers for example, may wish to utilize this function. Enable URL Blocking URL/Keyword Add Reset Check this box to enable URL Blocking, uncheck it to disable URL Blocking. Input the URL (host name or IP address) of the website to be blocked, or a keyword which is contained in URL. Click “Add” to add the URL / keyword to the “Current URL Blocking Table”. Click “Reset” to clear the URL/Keyword field. Existing URLs which have been blocked will be displayed in the “Current URL Blocking Table”. To delete a specific URL/Keyword entry, check the “Select” box of the corresponding entry (or entries) and click “Delete Selected”. If you want to delete all URL/Keywords listed here, please click “Delete All”. Clicking “Reset” will unselect all URL/Keywords. Click “APPLY” to make the changes take effect. The following message will appear: 65 Click “CONTINUE” to save the changes but not apply them yet. This allows you to make further changes in the browser-based configuration interface, before applying them all at once. Click “APPLY” to restart the device and implement any changes. The device will restart itself. III-3-7-3. DoS Denial-of-Service (DoS) is a common form of malicious attack against a network. The travel router’s firewall can protect against such attacks. When you click “DoS” in the menu on the left side, you will see the screen below. DoS Module Please check all boxes of the DoS function you wish to activate. If you don’t know which one you should use, you can select all without any problem. Clicking “Advanced Settings” will open a new screen. 66 Ping of Death Discard Ping from WAN Port Scan Sync Flood You can specify the frequency of ping of death packets which will trigger this DoS function. Check this box and this travel router will not answer ping requests from Internet. Check all types of port scan you want to prevent. Specify the frequency of sync flood packets which will trigger this DoS function. Click “APPLY” to make the changes take effect. The following message will appear: Click “CONTINUE” to save the changes but not apply them yet. This allows you to make further changes in the browser-based configuration interface, before applying them all at once. Click “APPLY” to restart the device and implement any changes. The device will restart itself. 67 III-3-7-4. DMZ Here you can define a virtual DMZ Host. This is useful if a network client PC cannot run an application properly from behind an NAT firewall, since it opens the client up to unrestricted two-way access. Enable DMZ Public IP Client PC IP Address Computer Name Add Reset Check or uncheck “Enable DMZ” to enable or disable DMZ accordingly.. Select ‘Dynamic IP’ or ‘Static IP’. If you select ‘Dynamic IP’, then select an Internet connection session from dropdown menu. If you select ‘Static IP’, please input the IP address that you want to map to a specific private IP address. Please input the private IP address that the Internet IP address will be mapped to. Open the drop down menu and select the computer name of the client PC. Click “<<” to add the selected computer’s IP address to the “Client PC IP Address” field. Click “Add” to add the client to the “Current DMZ Table”. Clicking “Reset” will clear all values. Note: All public IP addresses can be 68 mapped to a single client PC IP address only. All existing DMZ entries will be displayed in the “Current DMZ Table”. To delete a specific DMZ entry, check the “Select” box of the corresponding entry (or entries) and click “Delete Selected”. If you want to delete all DMZ entries listed here, please click “Delete All”. Clicking “Reset” will unselect all DMZ entries. Click “APPLY” to make the changes take effect. The following message will appear: Click “CONTINUE” to save the changes but not apply them yet. This allows you to make further changes in the browser-based configuration interface, before applying them all at once. Click “APPLY” to restart the device and implement any changes. The device will restart itself. 69 III-4. Status The “Status” page displays basic system information about the travel router. You can select from 6 further options listed down the left hand side under the “Status” menu. III-4-1. Internet Connection Here you can view the status of your current Internet connection and other related information. III-4-2. Device Status The statuses of the travel router’s wireless and LAN configurations are displayed here. 70 III-4-3. System Log The system log of the travel router is displayed here. All logged system information since the device was last powered on is recorded here, and may be useful in the event of a problem with your travel router. Save Clear Refresh This will save the system log as a text file in your computer. This will clear the system log and erase all information. This will refresh the system log and display the latest messages, if they are not already displayed. 71 III-4-4. Security Log The security log of the travel router is displayed here. Save Clear Refresh III-4-5. This will save the security log as a text file in your computer. This will clear the security log and erase all information. This will refresh the security log and display the latest messages, if they are not already displayed. Active DHCP Client This page lists and displays information on all active DHCP clients that connect to this travel router. Click “Refresh” to refresh the list and update the information. 72 III-4-6. Statistics This page shows statistical information for each network interface. Click “Refresh” to update the information. III-5. Tools The “Tools” menu enables you to back up the current settings of the device, restore the settings back to a saved version or to factory defaults, upgrade the firmware and to reboot the device. Choose from the 3 options in the menu under “Tools” on the left side. III-5-1. Configuration Tools Here you can back up and restore the travel router’s configuration. 73 Backup Settings Click “Save” to save the current settings on your computer as config.bin file. Restore Settings Click the browse button to find a previously saved config.bin file and then click “Upload” to replace your current settings. Restore to Click “Reset” to restore settings to the Factory Defaults factory default. A pop-up window will appear and ask you to confirm and enter your log in details. Enter your username and password and click “Ok”. See below for more information. Note: Restoring to factory defaults will restore all settings, configurations and passwords back to the factory default. Note: You can also reset the device to the factory default by pressing and holding the Reset/WPS button for 10 seconds, until the blue Power LED starts blinking slowly. See I-2. Physical Description for help finding the Reset/WPS button and II-5. Resetting the Travel Router for a description of the device’s reset process. III-5-2. Firmware Upgrade Selecting “Firmware upgrade” from the “Tools” menu allows you to update the system firmware to a more recent version. You can download the latest firmware from the Edimax website. 74 Note: Do not turn off or disconnect the access point during a firmware upgrade, as this could damage the device. Note: It is recommended that you use a wired Ethernet connection to upload the firmware file. Click on the browse button to open a new window and locate the downloaded firmware file in your computer. Confirm your selection and click “APPLY” to make changes take effect. The following message will appear: Click “CONTINUE” to save the changes but not apply them yet. This allows you to make further changes in the browser-based configuration interface, before applying them all at once. Click “APPLY” to restart the device and implement any changes. The device will restart itself. 75 III-5-3. Reboot In the event that the router malfunctions or is not responding, then it is recommended that you reboot the device. Note: If the access point is still not responding after a reboot, switch off the device by unplugging the power supply. Plug it back in after 10 seconds. Note: Rebooting the access point will not affect the current configuration of the device. To reboot the device, please click “Reboot” from the “Tools” menu in the sidebar. The following screen will be displayed: Click “Apply” to reboot the device. A pop up window will ask you to confirm, please click “Ok” to confirm or “Cancel” to abort. If you click “Ok” to continue, all connections between wireless client and access will be disconnected at this point. 76 You will see the following screen. Please wait 1-2 minutes for the reboot to complete. III-5-4. Internet Access Keeper The Internet Access Keeper stores information about the operating mode of the travel router, both currently and previously. Up to 10 records can be stored here for both wired and WISP modes. No. Mode Root AP SSID Encryption Password WAN Items are ordered by number, which is displayed here. The operating mode (wired or WISP) is displayed here. The root AP SSID of the network is displayed here. If the root AP SSID uses encryption, the encryption type will be displayed here. If the root AP SSID uses encryption, the password will be displayed here. Your WAN (Wide Area Network) type will be displayed here, “Dynamic”, “Static IP”, “PPPoE” or “PPTP”. See III-3-2. WAN for 77 Connect to Password Select more information. In the case of a PPPoE or PPTP connection type, the username provided by your ISP will be displayed here. For a static IP connection, the IP address will be displayed. For a dynamic connection type, this field will be blank. In the case of a PPPoE or PPTP connection type, the password provided by your ISP will be displayed here. For a static IP connection and dynamic connection type, this field will be blank. Check the box to select one or more items for deletion. Click “APPLY” to delete selected items. The system will restart, as shown below. Please 1-2 minutes for the restart to complete, after which you will be returned to the “Home” screen of the browser based configuration interface. 78 IV. APPENDIX IV-1. Configuring your IP address Before you use this travel router, please make sure your computer is set to use a dynamic IP address. This means your computer can obtain an IP address automatically from a DHCP server. This is a simple procedure, which is explained step by step in IV-1-1. How to configure your computer to use a dynamic IP address. Unfortunately, not all networks support DHCP capability. In this case, you need to use a static IP address for your PC or Macintosh. The router uses the default IP address 192.168.8.1, which may not be in the same IP address subnet of your network; meaning you are unable to access the browser based configuration interface. So, you need to modify the IP address of your PC or Macintosh to 192.168.8.10 in order to access the browser-based configuration interface. The procedure for doing so varies across different operating systems; please follow the guide appropriate for your operating system in IV-1-2. How to modify the IP address of your PC or Macintosh. Note: For guidance on how to assign a new IP address to the travel router, so that it is within the same IP address subnet of your network, please refer to III-3-3. LAN. In the case where you need to modify the IP of your PC or Macintosh, if the default IP of the travel router remains unchanged, you may need to repeat this process and modify the IP of your PC or Macintosh every time you wish to configure the travel router. IV-1-1. How to configure your computer to use a dynamic IP address Please follow the instructions appropriate for your operating system. IV-1-1-1. Windows XP 1. Click the “Start” button (it should be located in the lower-left corner of your computer), then click “Control Panel”. Double-click the “Network and 79 Internet Connections” icon, click “Network Connections”, and then double-click “Local Area Connection”. The “Local Area Connection Status” window will then appear, click “Properties”. 2. Select “Obtain an IP address automatically” and “Obtain DNS server address automatically”, then click “OK”. 80 IV-1-1-2. Windows Vista 1. Click the “Start” button (it should be located in the lower-left corner of your computer), then click “Control Panel”. Click “View Network Status and Tasks”, then click “Manage Network Connections”. Right-click “Local Area Network”, then select “Properties”. The “Local Area Connection Properties” window will then appear, select “Internet Protocol Version 4 (TCP / IPv4)”, and then click “Properties”. 81 2. Select “Obtain an IP address automatically” and “Obtain DNS server address automatically”, then click “OK”. 82 IV-1-1-3. Windows 7 1. Click the “Start” button (it should be located in the lower-left corner of your computer), then click “Control Panel”. 2. Under “Network and Internet” click “View network status and tasks”. 3. Click “Local Area Connection”. 83 4. Click “Properties”. 5. Select “Internet Protocol Version 4 (TCP/IPv6) and then click “Properties”. 84 3. Select “Obtain an IP address automatically” and “Obtain DNS server address automatically”, then click “OK”. IV-1-1-4. Mac OS 1. Have your Macintosh computer operate as usual, and click on “System Preferences”. 85 2. In System Preferences, click on “Network”. 1. Here you will see all of your network connections. You need to remove any Ethernet cable that may be connected, so that the “Ethernet” status in the left panel displays “Not Connected”, as shown below. Choose “Wi-Fi” from the panel on the left side, and then click “Advanced” in the bottom right corner. 86 3. Now select “TCP/IP” from the menu across the top of the screen. 4. Open the drop down menu labeled “Configure IPv4” and select “Using 87 DHCP”. Then click “OK” to save the setting and continue. IV-1-2. How to modify the IP address of your PC or Macintosh Please follow the instructions appropriate for your operating system. IV-1-2-1. Windows XP 1. Click the “Start” button (it should be located in the lower-left corner of your computer), then click “Control Panel”. Double-click the “Network and Internet Connections” icon, click “Network Connections”, and then double-click “Local Area Connection”. The “Local Area Connection Status” window will then appear, click “Properties”. 88 2. Select “Use the following IP address”, then input the following values: IP address: 192.168.8.10 Subnet Mask: 255.255.255.0 Click ‘OK’ when finished. 89 IV-1-2-2. Windows Vista 1. Click the “Start” button (it should be located in the lower-left corner of your computer), then click “Control Panel”. Click “View Network Status and Tasks”, then click “Manage Network Connections”. Right-click “Local Area Network”, then select “Properties”. The “Local Area Connection Properties” window will then appear, select “Internet Protocol Version 4 (TCP / IPv4)”, and then click “Properties”. 90 2. Select “Use the following IP address”, then input the following values: IP address: 192.168.8.10 Subnet Mask: 255.255.255.0 Click ‘OK’ when finished. 91 IV-1-2-3. Windows 7 1. Click the “Start” button (it should be located in the lower-left corner of your computer), then click “Control Panel”. 92 2. Under “Network and Internet” click “View network status and tasks”. 3. Click “Local Area Connection”. 93 4. Click “Properties”. 5. Select “Internet Protocol Version 4 (TCP/IPv6) and then click “Properties”. 94 6. Select “Use the following IP address”, then input the following values: IP address: 192.168.8.10 Subnet Mask: 255.255.255.0 Click ‘OK’ when finished. 95 IV-1-2-4. Mac OS 1. Have your Macintosh computer operate as usual, and click on “System Preferences” 2. In System Preferences, click on “Network”. 3. Here you will see all of your network connections. You need to remove any Ethernet cable that may be connected, so that the “Ethernet” status in the left panel displays “Not Connected”, as shown below. Choose “Wi-Fi” from the panel on the left side, and then click “Advanced” in the bottom right corner. 96 4. Now select “TCP/IP” from the menu across the top of the screen. 5. Open the drop down menu labeled “Configure IPv4” and select “Manually”. 97 Then input the following values: IPv4 address: 192.168.8.10 Subnet Mask: 255.255.255.0 Click “OK” to save the setting and continue. 98 IV-2. Troubleshooting If you are experiencing problems with your travel router, please refer to this troubleshooting guide before contacting your dealer of purchase for help. Scenario My travel router can’t locate a wireless access point/wireless device when using the “Site Survey” function. My travel router can’t establish a connection with a particular wireless access point. I can’t log onto the browser-based configuration interface: the access point is not responding. Solution a. Click “Rescan” several more times and see if the wireless access point/device appears. b. Adjust the position of the travel router, or move closer to a known wireless access point. c. If the SSID of the access point you wish to connect to is hidden (nothing displayed in the “SSID” field in the “Site Survey” function), then you need to input the SSID manually. Ensure that you input the correct SSID. a. Click “Connect” several more times and see if you can establish a connection. b. Ensure that you input the correct passphrase/security key if connecting to an access point with encryption. c. It is possible that the access point you wish to connect to only allows network cards with specific MAC address’s to establish connections. Request that the owner/administrator of the access point add your MAC address to the list. a. Make sure travel router is powered on. Check the LED on the front panel. If the LED is out, then check the USB connection. b. Use your wireless device connects to this travel router wirelessly. c. Make sure you are using the correct IP address. d. If you are using a MAC or IP address 99 I can’t locate the travel router with my wireless client. File transfers are slow or frequently interrupted. I can’t log onto the browser-based configuration interface: incorrect password. The travel router is extremely hot. When I launch a filter, try to connect the access point to another computer. e. Set your computer to obtain an IP address automatically (DHCP), and see if your computer can obtain an IP address. f. If you are experiencing problems after a firmware upgrade, please contact your dealer of purchase for help. a. Check if “Broadcast ESSID” (in the “Wireless Advanced” section of the browser-based configuration interface) is “Enabled” or “Disabled”. If “Disabled” you need to input the ESSID into your wireless client manually. b. Try moving closer to the travel router. a. Try to move closer to where the wireless access point is located. b. Try again later. Your local network may be experiencing technical difficulties or very high usage. c. Change channel number. a. Password is case-sensitive. Make sure the “Caps Lock” light is not illuminated. b. If you do not know your password, restore the device to factory settings. a. It is normal for the travel router to heat up during frequent use. If you can safely place your hand on the travel router, the temperature of the device is at a normal level. b. If you smell burning or see smoke coming from travel router or A/C power adapter, then disconnect the travel router and A/C power adapter immediately, as far as it is safely possible to do so. Call your dealer of purchase for help. a. Ensure that the router is powered on 100 web browser, it doesn’t automatically redirect to the browser based configuration interface. b. c. I can’t save connection information to the “Access Keeper”. “Access Keeper” has deleted my connection information. d. a. a. correctly. If you recently rebooted the device, please remember that the router will be unresponsive for up to 1.5 minutes after a reboot. Try the following URL’s: http://edimax.go http://edimax.setup http://192.168.8.1 Please remember to include http:// in the URL. Ensure that your wireless client is connected to the travel router’s SSID. Try using an alternative web browser. Connection information will only be saved to the “Access Keeper” when using iQ Setup. Manual configurations made using the browser based configuration interface will not be saved in the “Access Keeper”. “Access Keeper” can only store 10 sets of connection information. When 10 sets have been saved, any additional connections will replace the 1st, and then the 2nd (and so on) stored sets of information. If you wish keep a particular set of settings, please delete any other stored sets of information which are not used frequently, so that the “Access Keeper” has enough available space to save new connections. 101 IV-3. Glossary 1. What is the IEEE 802.11g standard? 802.11g is the new IEEE standard for high-speed wireless LAN communications that provides for up to 54 Mbps data rate in the 2.4 GHz band. 802.11g is quickly becoming the next mainstream wireless LAN technology for the home, office and public networks. 802.11g defines the use of the same OFDM modulation technique specified in IEEE 802.11a for the 5 GHz frequency band and applies it in the same 2.4 GHz frequency band as IEEE 802.11b. The 802.11g standard requires backward compatibility with 802.11b. The standard specifically calls for: A. A new physical layer for the 802.11 Medium Access Control (MAC) in the 2.4 GHz frequency band, known as the extended rate PHY (ERP). The ERP adds OFDM as a mandatory new coding scheme for 6, 12 and 24 Mbps (mandatory speeds), and 18, 36, 48 and 54 Mbps (optional speeds). The ERP includes the modulation schemes found in 802.11b including CCK for 11 and 5.5 Mbps and Barker code modulation for 2 and 1 Mbps. B. A protection mechanism called RTS/CTS that governs how 802.11g devices and 802.11b devices interoperate. 2. What is the IEEE 802.11b standard? The IEEE 802.11b Wireless LAN standard subcommittee, which formulates the standard for the industry. The objective is to enable wireless LAN hardware from different manufactures to communicate. 3. What does IEEE 802.11 feature support? The product supports the following IEEE 802.11 functions: CSMA/CA plus Acknowledge Protocol Multi-Channel Roaming Automatic Rate Selection RTS/CTS Feature Fragmentation Power Management 4. What is Ad-hoc? An Ad-hoc integrated wireless LAN is a group of computers, each has a Wireless LAN card, Connected as an independent wireless LAN. Ad hoc wireless LAN is applicable at a departmental scale for a branch or SOHO operation. 5. What is Infrastructure? An integrated wireless and wireless and wired LAN is called an Infrastructure configuration. Infrastructure is applicable to enterprise scale for wireless access to central database, or wireless application for mobile workers. 6. What is BSS ID? 102 A specific Ad hoc LAN is called a Basic Service Set (BSS). Computers in a BSS must be configured with the same BSS ID. 7. What is WEP? WEP is Wired Equivalent Privacy, a data privacy mechanism based on a 40 bit shared key algorithm, as described in the IEEE 802 .11 standard. 8. What is TKIP? TKIP is a quick-fix method to quickly overcome the inherent weaknesses in WEP security, especially the reuse of encryption keys. TKIP is involved in the IEEE 802.11i WLAN security standard, and the specification might be officially released by early 2003. 9. What is AES? AES (Advanced Encryption Standard), a chip-based security, has been developed to ensure the highest degree of security and authenticity for digital information, wherever and however communicated or stored, while making more efficient use of hardware and/or software than previous encryption standards. It is also included in IEEE 802.11i standard. Compare with AES, TKIP is a temporary protocol for replacing WEP security until manufacturers implement AES at the hardware level. 10. Can Wireless products support printer sharing? Wireless products perform the same function as LAN products. Therefore, Wireless products can work with Netware, Windows 2000, or other LAN operating systems to support printer or file sharing. 11. Would the information be intercepted while transmitting on air? WLAN features two-fold protection in security. On the hardware side, as with Direct Sequence Spread Spectrum technology, it has the inherent security feature of scrambling. On the software side, WLAN series offer the encryption function (WEP) to enhance security and Access Control. Users can set it up depending upon their needs. 12. What is DSSS? What is FHSS? And what are their differences? Frequency-hopping spread-spectrum (FHSS) uses a narrowband carrier that changes frequency in a pattern that is known to both transmitter and receiver. Properly synchronized, the net effect is to maintain a single logical channel. To an unintended receiver, FHSS appears to be short-duration impulse noise. Direct-sequence spread-spectrum (DSSS) generates a redundant bit pattern for each bit to be transmitted. This bit pattern is called a chip (or chipping code). The longer the chip is, the greater the probability that the original data can be recovered. Even if one or more bits in the chip are damaged during transmission, statistical techniques embedded in the radio can recover the original data without-the need for retransmission. To an unintended receiver, DSSS appears as low power wideband noise and is rejected (ignored) by most narrowband receivers. 13. What is Spread Spectrum? 103 Spread Spectrum technology is a wideband radio frequency technique developed by the military for use in reliable, secure, mission-critical communication systems. It is designed to trade off bandwidth efficiency for reliability, integrity, and security. In other words, more bandwidth is consumed than in the case of narrowband transmission, but the trade off produces a signal that is, in effect, louder and thus easier to detect, provided that the receiver knows the parameters of the spread-spectrum signal being broadcast. If a receiver is not tuned to the right frequency, a spread –spectrum signal looks like background noise. There are two main alternatives, Direct Sequence Spread Spectrum (DSSS) and Frequency Hopping Spread Spectrum (FHSS). 14. What is WPS? WPS stands for Wi-Fi Protected Setup. It provides a simple way to establish unencrypted or encrypted connections between wireless clients and access point automatically. User can press a software or hardware button to activate WPS function, and WPS-compatible wireless clients and access point will establish connection by themselves. There are two types of WPS: PBC (Push-Button Configuration) and PIN code. 104 IV-4. Technical Support Support documentation is available on the enclosed CD and on our global websites. Headquarters Tel: +886-2-77396888 Fax: +886-2-77396887 Support: [email protected] European Headquarters Tel: +31-499-377344 Fax: +31-499-372647 Support: [email protected] French Office Tel: +33-160535680 Fax: +33-160535689 Support: [email protected] German Office Tel: +49-215488-77334 Fax: +49-215488-77339 Support: [email protected] Poland Office Tel: +48-22-6079480 Fax: +48-22-6079481 Support: [email protected] Romania Office Tel: +40-31-4250126 Fax: +40-31-4250125 Support: [email protected] Russia Office Tel: +7-499-7266678 Email: [email protected] Support: [email protected] 105 Ukraine Office Tel: +38 (044) 4983091, +38 (044) 4983092 Fax: +38 (044) 4983093 Support: [email protected] United Kingdom Office Tel: +44-845-1238307 Fax: +44-845-1238306 Support: [email protected] USA Office Tel: +1-408-4961105 Fax: +1-408-9801530 Support: [email protected] Australia Office Tel: +61-3-95431888 Fax: +61-3-98992746 Tech Support: 1300 540 833 Email: [email protected] Support: [email protected] China Office Tel: +8610-82665815 Fax: +8610-82665795 Support: [email protected] Hong Kong Office Tel: +852-2169 6311 Fax: +852-2169 6300 Support: [email protected] India Office Technical & RMA Support: +91 9867520529 / 9888060206 Bulk & Corporate Enquiries: +91 9818029555 Working Hours: 10am ~ 7pm (IST) Monday ~ Saturday (except national holidays) Email: [email protected] MEA Office Tel: +971-4-804-1888 Support: +971 800 334629 [800-EDIMAX] Fax: +971-4-883-4079 106 Support: [email protected] South East Asia Office Singapore Authorized Service Centre Tel: +65 6334 2298 (11am ~ 8pm, Monday ~ Sunday) Technical Support Hotline: 31062273 (9am~6pm, Monday ~ Friday except national holidays) Support: [email protected] Cambodia Service Centre Sales & Technical Hotline: +855 (23) 996 638 (9am ~ 5:30pm, Monday ~ Friday except national holidays) (9am ~ 12:30pm Saturday) Support: [email protected] Malaysia - Kuala Lumpur Authorized Service Centre Technical Hotline: 03 2052 4288; 03 9130 7728 (11am ~ 8pm, Monday ~ Friday except national holidays) Email: [email protected] Support: [email protected] Indonesia - Jakarta Authorized Service Centre Sales & Technical Hotline: 021 70777 629 (9am ~ 6pm, Monday ~ Sunday except national holidays) Support: [email protected] 107 108