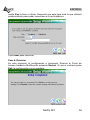
1
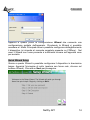
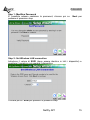
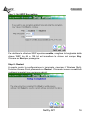
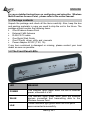
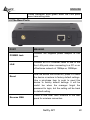
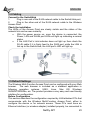
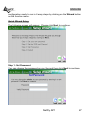
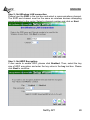
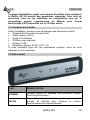
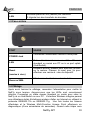
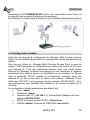
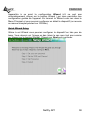
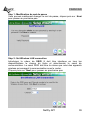
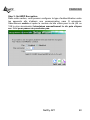
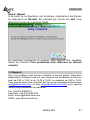
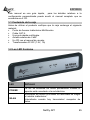
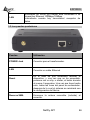
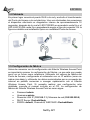
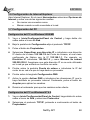
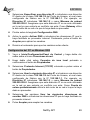
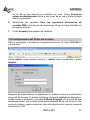
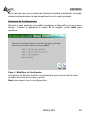
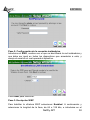
NetFly AP1 Wireless Multi-Function Access Point A02-AP1-W54 A02-AP1-W54PoE MULTILANGUAGE Quick Start Guide A02-AP1-W54(V1.1)_GX01 ISO 9001:2000 Certified Company e solutions begin r Where solutions begin ISO 9001:2000 Certified Company ITALIANO Questo prodotto è coperto da garanzia Atlantis Land Fast-Swap della durata di 3 anni. Per maggiori dettagli in merito o per accedere alla documentazione completa in Italiano fare riferimento al sito www.atlantis-land.com. ENGLISH This product is covered by Atlantis Land 3 years Fast-Swap warranty. For more detailed informations please refer to the web site www.atlantis-land.com. For more detailed instructions on configuring and using the Switch, please refer to the online manual. FRANCAIS Ce produit est couvert par une garantie Atlantis Land Fast-Swap de 3 ans. Pour des informations plus détaillées, référez-vous svp au site Web www.atlantis-land.com. DEUTSCH Dieses Produkt ist durch die Atlantis Land 3 Jahre Fast-Swap Garantie gedeckt. Für weitere Informationen, beziehen Sie sich bitte auf Web Site www.atlantis-land.com. ESPAÑOL Este producto està cubierto de garantía Atlantis Land Fast-Swap por 3 años. Para una información más detallada, se refiera por favor al Web site www.atlantis-land.com. Where solutions begin ISO 9001:2000 Certified Company The award of the information is facultative, but its lack will prevent ATLANTIS LAND® from starting the Guarantee process requested. R Reeggiisstteerr yyoouurr pprroodduucctt!! w ww ww w..aattllaannttiiss--llaanndd..ccoom m Registration on the web site www.atlantis-land.com within 15 days from the purchase of the product dismiss the customer from showing a valid proof of purchase (Sale Receipt or Invoice) in case of the request of intervention. For further information we invite you to look at our web site at the section WARRANTY. Copyright The Atlantis Land logo is a registered trademark of Atlantis Land. All other names mentioned mat be trademarks or registered trademarks of their respective owners. Subject to change without notice. No liability for technical errors and/or omissions. Where solutions begin ISO 9001:2000 Certified Company MULTILANGUAGE QUICK START GUIDE ITALIANO 1.1 Contenuto della confezione ................................................................... 8 1.2 I LED frontali ......................................................................................... 8 1.3 Le porte posteriori ................................................................................. 9 1.4 Cablaggio ............................................................................................ 10 1.5 Settaggi di Default ............................................................................... 10 1.6 Configurazione di IE ............................................................................ 11 1.7 Configurazione del PC ........................................................................ 11 Configurazione del PC in Windows 95/98/ME .......................... 11 Configurazione del PC in Windows NT4.0 ................................ 11 Configurazione del PC in Windows 2000 ................................ 12 Configurazione del PC in Windows XP.................................... 12 Configurazione del PC in Windows Vista ................................. 13 1.8 Configurazione Router ........................................................................ 13 Quick Wizard Setup .................................................................. 14 1.9 Supporto Offerto .................................................................................. 17 ENGLISH 1.1 Package contents ................................................................................ 21 1.2 The Front Panel LEDs ......................................................................... 21 1.3 The Rear Ports .................................................................................... 22 1.4 Cabling ................................................................................................ 23 1.5 Default Settings ................................................................................... 23 1.6 IE Configuration .................................................................................. 24 1.7 TCP/IP Configuration .......................................................................... 24 Configuring PC (Windows 95/98/ME) ....................................... 24 Configuring PC (Windows NT4.0)........................................... 25 Configuring PC (Windows 2000) ............................................. 25 Configuring PC (WindowsXP) ................................................ 25 Configuring PC (Windows Vista) ............................................ 26 1.8 Browser configuration.......................................................................... 26 Quick Wizard Setup .................................................................. 27 1.9 Product Support .................................................................................. 29 FRANCAIS 1.1 Contenu de la boîte ............................................................................. 32 1.2 Face avant .......................................................................................... 32 1.3 Face arrière ......................................................................................... 33 1.4 Câblage ............................................................................................... 33 NetFly AP1 4 MULTILANGUAGE QUICK START GUIDE 1.5 Configuration initiale ............................................................................ 34 1.6 Configuration du TCP/IP ..................................................................... 35 Configuration sous Windows 95/98/ME .................................... 35 Configuration sous Windows NT4.0 ......................................... 35 Configuration sous Windows 2000 ......................................... 35 Configuration sous Windows XP ............................................ 36 Configuration sous Windows Vista ......................................... 36 1.7 Vérification .......................................................................................... 37 1.8 Configuration avec le Browser ............................................................ 37 Quick Wizard Setup .................................................................. 38 1.9 Support................................................................................................ 41 ESPAÑOL 1.1 Contenido de la caja............................................................................ 45 1.2 Los LED frontales ................................................................................ 45 1.3 Los puertos posteriores ....................................................................... 46 1.4 Cableado ............................................................................................. 47 1.5 Configuración de fábrica ..................................................................... 47 1.6 Configuración de Internet Explorer ...................................................... 48 1.7 Configuración del PC .......................................................................... 48 Configuración del PC en Windows 95/98/ME ........................... 48 Configuración del PC en Windows NT 4.0 ............................... 48 Configuración del PC en Windows 2000 ................................. 49 Configuración del PC en Windows XP .................................... 50 Configuración del PC en Windows Vista ................................. 50 1.8 Configuración del Punto de Acceso .................................................... 51 Asistente de Configuración ....................................................... 52 1.9 Soporte Técnico .................................................................................. 55 APPENDIX APPENDIX A: Regulatory Domains .......................................................... 56 APPENDIX B: Technical Features ............................................................ 57 A02-AP1-W54(V1.1)_GX01(V1.00 March 2008) NetFly AP1 5 ITALIANO AVVERTENZE Abbiamo fatto di tutto al fine di evitare che nel testo, nelle immagini e nelle tabelle presenti in questo manuale, nel software e nell'hardware fossero presenti degli errori. Tuttavia, non possiamo garantire che non siano presenti errori e/o omissioni. Infine, non possiamo essere ritenuti responsabili per qualsiasi perdita, danno o incomprensione compiuti direttamente o indirettamente, come risulta dall'utilizzo del manuale, software e/o hardware. Il contenuto di questo manuale è fornito esclusivamente per uso informale, è soggetto a cambiamenti senza preavviso (a tal fine si invita a consultare il sito www.atlantisland.it o www.atlantis-land.com per reperirne gli aggiornamenti) e non deve essere interpretato come un impegno da parte di Atlantis Land che non si assume responsabilità per qualsiasi errore o inesattezza che possa apparire in questo manuale. Nessuna parte di questa pubblicazione può essere riprodotta o trasmessa in altra forma o con qualsiasi mezzo, elettronicamente o meccanicamente, comprese fotocopie, riproduzioni, o registrazioni in un sistema di salvataggio, oppure tradotti in altra lingua e in altra forma senza un espresso permesso scritto da parte di Atlantis Land. Tutti i nomi di produttori e dei prodotti e qualsiasi marchio, registrato o meno, menzionati in questo manuale sono usati al solo scopo identificativo e rimangono proprietà esclusiva dei loro rispettivi proprietari. Restrizioni di responsabilità CE/EMC Il prodotto descritto in questa guida è stato progettato, prodotto e approvato in conformità alle regole EMC ed è stato certificato per non avere limitazioni EMC. Se il prodotto fosse utilizzato con un PC non certificato, il produttore non garantisce il rispetto dei limiti EMC. Il prodotto descritto è stato costruito, prodotto e certificato in modo che i valori misurati rientrino nelle limitazioni EMC. In pratica, ed in particolari circostanze, potrebbe essere possibile che detti limiti possano essere superati se utilizzato con apparecchiature non prodotte nel rispetto della certificazione EMC. Può anche essere possibile, in alcuni casi, che i picchi di valore siano al di fuori delle tolleranze. In questo caso l’utilizzatore è responsabile della “compliance” con i limiti EMC. Il Produttore non è da ritenersi responsabile nel caso il prodotto sia utilizzato al di fuori delle limitazioni EMC. NetFly AP1 6 ITALIANO CE Mark Warning Questo dispositivo appartiene alla classe B. In un ambiente domestico il dispositivo può causare interferenze radio, in questo caso è opportuno prendere le adeguate contromisure. ATTENZIONE Lasciare almeno 30cm di distanza tra le antenne del dispositivo e l’utilizzatore. Dichiarazione di Conformità CE Sintetica Questo dispositivo è stato testato ed è risultato conforme alla direttiva 1999/5/CE del parlamento Europeo e della Commissione Europea, a proposito di apparecchiature radio e periferiche per telecomunicazioni e loro mutuo riconoscimento. Dopo l’installazione, la periferica è stata trovata conforme ai seguenti standard: EN 300.328(radio), EN 301 489-1, EN 301 489-17(compatibilità elettromagnetica), EN 60950-1 (sicurezza) e EN50385. Questa apparecchiatura può pertanto essere utilizzata in tutti i paesi della Comunità Economica Europea ed in tutti i paesi dove viene applicata la Direttiva 1999/5/CE, senza restrizioni eccezion fatta per: Francia: Se si utilizza all’aperto tale dispositivo, la potenza in uscita è limitata (potenza e frequenza) in base alla tabella allegata. Per informazioni ulteriori consultare www.art-telecom.fr. Luogo Chiuso (senza restrizioni) Aperto Banda di Frequenze(MHz) 2400-2483,5 Potenza (EIRP) 100mW(20dBm) 2400-2454 100mW(20dBm) 2454-2483,5 10mW(10dBm) Se l’uso di questa apparecchiatura in ambienti domestichi genera interferenze, è obbligo dell’utente porre rimedio a tale situazione. Italia: Questa periferica è conforme con l’Interfaccia Radio Nazionale e rispetta i requisiti sull’Assegnazione delle Frequenze. L’utilizzo di questa apparecchiatura al di fuori di ambienti in cui opera il proprietario, richiede un’autorizzazione generale. Per ulteriori informazioni si prega di consultare: www.comunicazioni.it. La dichiarazione di conformità CE può essere reperita all’indirizzo web: www.atlantis-land.com nella pagina del prodotto. NetFly AP1 7 ITALIANO Questo manuale è inteso come una guida rapida, pertanto per ulteriori dettagli sulla configurazione fare riferimento al manuale esteso o alla guida interattiva (Vera) presente sul CD. 1.1 Contenuto della confezione Prima di utilizzare il prodotto verificare che la confezione contenga: Wireless Access Point Antenna esyterna da 2 dBi Cavo RJ45 CAT 5 (in taluni modelli) Quick Start Guide CD contenente manualistica Power Adapter AC-DC (7.5V, 1A) Qualora uno di questi componenti dovesse mancare è obbligatorio contattare immediatamente il rivenditore. Si ricorda che il solo modello A02-AP1-W54PoE può essere alimentato (alternativamente al tradizionale alimentatore incluso) tramite cavo di rete utilizzando un PoE Adapter. Si raccomanda a tal fine un dispositivo compatibile con lo standard 802.3af. Atlantis land raccomanda l’uso del codice A02-POE02 (PoE Injector). Il modello A02-AP1-W54 va alimentato esclusivamente con l’alimentatore fornito a corredo. 1.2 I LED frontali NetFly AP1 8 ITALIANO LED INFORMAZIONE POWER Acceso quando connesso alla rete elettrica. WLAN LAN Acceso fisso quando il modulo wireless è correttamente caricato. Lampeggiante quando vi è trasmissione/ricezione. Acceso quando connesso ad un dispositivo Ethernet Verde= connessione a 10 o 100Mbps Lampeggiante quando vi è trasmissione/ricezione. 1.3 Le porte posteriori PORTE UTILIZZO POWER Jack Connettere l’alimentatore a questo jack. LAN Connettere con un cavo UTP. Reset Reverse SMA Dopo che il dispositivo è acceso, premere per effettuare il reset per almeno 5 secondi, rilasciare e questo punto il bottone. Tutti i LED si accenderanno e poi il sistema effettuerà un reboot caricando i parametri di default. Collegare l’antenna fornita in dotazione. NetFly AP1 9 ITALIANO 1.4 Cablaggio Anzitutto collegare la porta RJ45 alla Lan e collegare l’alimentatore all’Access Point ed alla presa elettrica. Una volta effettuati tutti i collegamenti il prodotto effettuerà una diagnostica la cui durata è di circa una decina di secondi. Terminata questa fase il Led POWER sarà acceso verde fisso ed il i Led LAN/WLAN saranno accesi (a seconda dei collegamenti fatti) o lampeggianti . In figura è possibile osservare una tipica installazione domestica in modalità Access Point. 1.5 Settaggi di Default Prima di iniziare la configurazione dell’Atlantis Wireless Multi-Function Access Point è necessario conoscere quali siano i settaggi di default. Lasciando questi settaggi e impostando sui PC un idirizzo IP statico privato (come da istruzioni seguenti) è possibile utilizzare l’Atlantis Wireless Multi-Function Access Point in pochissimo tempo. L’indirizzo IP, normalmente appartenente ad una classe privata, deve stare nella classe 192.168.1.x con Subnet 255.255.255.0. Anzitutto è necessario preparare i PC inserendovi (qualora non vi fosse già) la scheda di rete / Adattatore Wireless. E’ necessario poi installare il protocollo TCP/IP. Qualora il TCP/IP non fosse correttamente configurato, seguire gli steps successivi. Per una configurazione più dettagliata fare riferimento al manuale presente sul CD. Le configurazioni di Default dell’Atlantis Wireless Multi-Function Access Point sono: Username:admin Password: admin NetFly AP1 10 ITALIANO Indirizzo IP LAN: (192.168.1.1), Subnet Mask (255.255.255.0) DHCP Server: disabilitato SSSID= default, Channel=6, WEP/WAP=disabilitato 1.6 Configurazione di IE A questo punto è necessario lanciare IE, andare nel menù strumenti, poi scegliere la sezione Connessioni e spuntare una delle seguenti voci: Non utilizzare mai connessioni remote Usa connessione remota se non è disponibile una connessione di rete 1.7 Configurazione del PC Configurazione del PC in Windows 95/98/ME 1. Andare in Start/Settings/Control Panel. Cliccare 2 volte su Network e scegliere Configuration. 2. Selezionare TCP/IP->NIC F/E, o qualsiasi Network Interface Card (NIC) del PC. 3. Cliccare su Properties. 4. 5. 6. Selezionare l’opzione Specify an IP address (dopo aver scelto IP Address) ed introdurre un indirizzo IP del tipo 192.168.1.x (X compreso tra 2 e 254 escluso 1 che è l’IP utilizzato del Wireless MultiFunction AP) e subnet mask 255.255.255.0. Andare su DNS Configuration. Selezionare l’opzione Enable DNS ed introdurre l’indirizzo IP del server DNS. Premere su OK per terminare la configurazione. Riavviare il PC affinché i cambiamenti abbiano effetto. Configurazione del PC in Windows NT4.0 1. Andare su Start/Settings/ Control Panel. Cliccare per due volte su Network e poi cliccare su Protocols . 2. Selezionare TCP/IP Protocol e poi cliccare su Properties. NetFly AP1 11 ITALIANO 3. Selezionare l’opzione Specify an IP Address e ed introdurre un indirizzo IP del tipo 192.168.1.x (X compreso tra 2 e 254 escluso 1 che è l’IP utilizzato del Wireless Multi-Function AP)e subnet mask 255.255.255.0. Premere OK per terminare. Configurazione del PC in Windows 2000 1. Andare su Start/Settings/Control Panel. Cliccare due volte su Network and Dial-up Connections. 2. Cliccare due volte su Local Area Connection. 3. In Local Area Connection Status cliccare Properties. 4. Selezionare Internet Protocol (TCP/IP) e cliccare su Properties. 5. Selezionare l’opzione Use the Following IP address ed introdurre un indirizzo IP del tipo 192.168.1.x (X compreso tra 2 e 254 escluso 1 che è l’IP utilizzato del Wireless Multi-Function AP) e subnet mask 255.255.255.0. 6. Successivamente scegliere Use the Following DNS server address (chiedere tale informazione al proprio ISP) ed introdurre l’indirizo IP dei server DNS. 7. Premere su OK per terminare la configurazione Configurazione del PC in Windows XP 1. 2. 3. 4. 5. 6. 7. Andare su Start e poi Panello di Controllo. Cliccare due volte su Connessione di rete (se non fosse presente cliccare prima su: Passa alla Visualizzazione Classica). Cliccare due volte su Connessione alla rete locale (LAN). Nel TAB generale cliccare Proprietà. Selezionare Protocollo Internet (TCP/IP) e cliccare su Proprietà. Selezionare l’opzione utilizza il seguente indirizzo IP ed introdurre un indirizzo IP del tipo 192.168.1.x (X compreso tra 2 e 254 escluso 1 che è l’IP utilizzato del Wireless Multi-Function AP) e subnet mask 255.255.255.0. Successivamente Utilizza i seguenti server server DNS. Premere su OK per terminare la configurazione. NetFly AP1 12 ITALIANO Configurazione del PC in Windows Vista 1. 2. 3. 4. 5. 6. Andare su Start poi Pannello di Controllo (cliccare sulla voce Visualizzazione classica) e qui cliccare due volte sull’icona Centro Connessione di rete e Condivisione, poi cliccare su Gestisci connessione di rete. Cliccare 2 volte sull’icona Local Area Connection e cliccare su Proprietà poi cliccare su Continua(per continuare è necessaria l’utorizzazione dell’utente). Selezionare Protocollo Internet Versione 4 Protocol (TCP/IPv4) e cliccare su Proprietà. Selezionare l’opzione utilizza il seguente indirizzo IP ed introdurre un indirizzo IP del tipo 192.168.1.x (X compreso tra 2 e 254 escluso 1 che è l’IP utilizzato del Wireless Multi-Function AP) e subnet mask 255.255.255.0. Successivamente Utilizza i seguenti server server DNS. Premere su OK per terminare la configurazione. 1.8 Configurazione Router Digitare nel browser web il seguente indirizzo IP: http://192.168.1.1 premere il tasto invio. e Utilizzare admin (come nome utente) e admin (come password). Premere OK per continuare. NetFly AP1 13 ITALIANO Apparirà a questo punto la configurazione Wizard che consente una configurazione guidata dell’apparato. Chiudendo la Wizard è possibile accedere al Menù Principale dove è possibile configurare dettagliatamente il dispositivo (si rimanda al manuale completo presente su CDRom). Nel caso il Wizard non fosse presente è sufficiente cliccare sull’apposita voce per avviarlo. Quick Wizard Setup Grazie a questo Wizard è possibile configurare il dispositivo in brevissimo tempo. Apparirà l’immagine di sotto (qualora non fosse così, cliccare sul bottone Wizard). Cliccare su Next per proseguire. NetFly AP1 14 ITALIANO Step 1: Modifica Password E’ possibile adesso cambiare la password, cliccare poi su passare al prossimo step. Next per Step 2: Set Wireless LAN connection Introdurre il valore di SSID (deve essere identico in tutti i dispositivi) e scegliere il canale su cui opererà il dispositivo. Cliccare poi su Next per passare al prossimo step. NetFly AP1 15 ITALIANO Step 3: Set WEP Encryption Per abilitare la cifratura WEP spuntare enable, scegliere la lunghezza della chiave WEP tra 64 e 128 bit ed immettere la chiave nel campo Key. Cliccare su Next per proseguire. Step 6: Restart A questo punto la configurazione è terminata, riavviare il Wireless MultiFunction Access Point premendo su Restart. Cliccando invece su exit tutti i settaggi impostati non verranno salvati. NetFly AP1 16 ITALIANO Provare ad effettuare una prova di navigazione. In caso di problemi fare riferimento al manuale esteso presente sul CDRom allegato. 1.9 Supporto Offerto Per qualunque altro problema o dubbio è possibile contattare l’help desk telefonico (02/93907634) gratuito di Atlantis Land che fornirà assistenza da lunedì al giovedì dalle 9:00 alle 13:00 e dalle 14:00 alle 18:00. Il venerdì dalle 9:00 alle 13:00. E’ possibile anche utilizzare il fax (02/93906161) o la posta elettronica ([email protected] oppure [email protected]) per esporre eventuali domande o problemi. Atlantis Land Via Pelizza da Volpedo, 59 20092 Cinisello Balsamo (MI) Italy Fax: +39.(0)2.93906161 Help Desk :+39.(0)2.93907634 Email: [email protected] WWW: www.atlantis-land.com NetFly AP1 17 ENGLISH Copyright Statement No part of this publication may be reproduced, stored in a retrieval system, or transmitted in any form or by any means, whether electronic, mechanical, photocopying, recording or otherwise without the prior writing of the publisher. Windows™ 98SE/2000/ME/XP are trademarks of Microsoft® Corp. Pentium is trademark of Intel. All copyright reserved. The Atlantis Land logo is a registered trademark of Atlantis Land. All other names mentioned mat be trademarks or registered trademarks of their respective owners. Subject to change without notice. No liability for technical errors and/or omissions. Wireless LAN, Health and Authorization for use Radio frequency electromagnetic energy is emitted from Wireless LAN devices. The energy levels of these emissions however are far much less than the electromagnetic energy emissions from wireless devices like for example mobile phones. Wireless LAN devices are safe for use frequency safety standards and recommendations. The use of Wireless LAN devices may be restricted in some situations or environments for example: ·On board of airplanes, or ·In an explosive environment, or ·In case the interference risk to other devices or services is perceived or identified as harmful In case the policy regarding the use of Wireless LAN devices in specific organizations or environments (e.g. airports, hospitals, chemical/oil/gas industrial plants, private buildings etc.) is not clear, please ask for authorization to use these devices prior to operating the equipment. Regulatory Information/disclaimers Installation and use of this Wireless LAN device must be in strict accordance with the instructions included in the user documentation provided with the product. Any changes or modifications made to this device that are not expressly approved by the manufacturer may void the user’s authority to operate the equipment. The Manufacturer is not responsible for any radio or television interference caused by unauthorized modification of this device, of the substitution or attachment. Manufacturer and its authorized resellers or distributors will assume no liability for any damage or violation of government regulations arising from failing to comply with these guidelines. NetFly AP1 18 ENGLISH CE Mark Warning This is a Class B product. In a domestic environment, this product may cause radio interference, in which case the user may be required to take adequate measures. CE in which Countries where the product may be used freely: Germany, UK, Italy, Spain, Belgium, Netherlands, Portugal, Greece, Ireland, Denmark, Luxembourg, Austria, Finland, Sweden, Norway and Iceland. France: except the channel 10 through 13, law prohibits the use of other channels. CE/EMC Restriction of Liability The product described in this handbook was designed, produced and approved according to the EMC-regulations and is certified to be within EMC limitations. If the product is used in an uncertified PC, the manufacturer undertakes no warranty in respect to the EMC limits. The described product in this handbook was constructed, produced and certified so that the measured values are within EMC limitations. In practice and under special circumstances, it may be possible, that the product may be outside of the given limits if it is used in a PC that is not produced under EMC certification. It is also possible in certain cases and under special circumstances, which the given EMC peak values will become out of tolerance. In these cases, the user himself is responsible for compliance with the EMC limits. Declaration of Conformity This equipment has been tested and found to comply with Directive 1999/5/CE of the European Parliament and of the Council on radio equipment and telecommunications terminal equipment and the mutual recognition of their conformity. After assessment, the equipment has been found to comply with the following standards: EN 300.328 (radio), EN 301 489-1, EN 301 489-17 (electromagnetic compatibility), EN 60950-1 (safety) and EN50385.This equipment may be used in all European Union contries and in all countries applying Directive 1999/5/CE, without restriction, with the exception of the following countries: France:When this equipment is used outdoors, output power is limited to within the frequency bans listed on the chart. For more info, consult the website www.art-telecom.fr. Location Frequency Band (MHz) Power (EIRP) Indoor (no restriction) 2400-2483,5 100mW(20dBm) NetFly AP1 19 ENGLISH Outdoor 2400-2454 100mW(20dBm) 2454-2483,5 10mW(10dBm) Italy: For more info, consult the website www.comunicazioni.it NetFly AP1 20 ENGLISH For more detailed instructions on configuring and using the Wireless Multi-Function Access Point, please refer to the online manual. 1.1 Package contents Unpack the package and check all the items carefully. Also, keep the box and packing materials in case you need to ship the unit in the future. The package should contain the following items: One Wireless Access Point External 2 dBi Antenna RJ45 CAT 5 cable One Quick Start Guide One CD with driver, utility and manuals Power Adapter AC-DC (7.5V, 1A) If any item contained is damaged or missing, please contact your local dealer as soon as possible. 1.2 The Front Panel LEDs LED MEANING POWER This indicator lights green when the hub is receives power, otherwise it is off. WLAN LAN This indicator lights green when there are wireless devices connected and transmitting data to the Wireless Access Point. These indicators light green when the LAN ports were connected successfully. NetFly AP1 21 ENGLISH These indicators blink green while the LAN ports were transmitting data. 1.3 The Rear Ports PORT MEANING POWER Jack Connect the supplied power adapter to this jack. LAN Connect an UTP Ethernet cable to one of the four LAN ports when connecting to a PC or an office/home network of 10Mbps or 100Mbps. Reset Reverse SMA After the device has turned on, press it to reset the device or restore to factory default settings. Use a pin-shape item to push to reset this device to factory default settings. It will be useful too when the manager forgot the password to login, but the setting will be back to default setting. There is one 2dBi Gain Antenna in the rear panel for wireless connection. NetFly AP1 22 ENGLISH 1.4 Cabling Connect to the Switch/Hub 1. Plug in one end of the RJ45 network cable to the Switch/Hub port, 2. Plug in the other end of the RJ45 network cable to the Wireless Access Point. Check the installation The LEDs of the Access Point are clearly visible and the status of the network link can be seen instantly: With the power source on, once the device is connected, the Power, LAN and WLAN port LEDs will light up indicating a normal status. If the LAN Port’s Link indicator does not light up then check the RJ-45 cable if it is firmly feed to the RJ45 port, while the LAN is link up to the Switch/Hub, the LAN port’s LED will light up. 1.5 Default Settings The Wireless Multi-Function Access Point can be configured with your Web browser. The web browser is included as a standard application in following operation systems, UNIX, Linux, Mac OS, Windows 95/98/NT/2000/Me, etc. The product provides a very easy and user-friendly interface for configuration. Before Configuration This section describes the configuration required by LAN-attached PCs that communicate with the Wireless Multi-Function Access Point, either to configure the device or for network access. These PCs must have an Ethernet interface (or wireless adapter) installed properly, be connected to NetFly AP1 23 ENGLISH the Wireless Multi-Function Access Point either directly or through an external repeater hub or by wireless, and have TCP/IP installed and configured with a fixed IP address that must be in the same subnet of the Wireless Multi-Function Access Point. The default IP address of the Wireless Multi-Function Access Point is 192.168.1.1 and subnet mask is 255.255.255.0. For example, when the default network address of the default IP address of the AP is 192.168.1.1, then the manager PC should be set at 192.168.1.x (where x is a number between 2 and 254), and the default subnet mask is 255.255.255.0. Please follow the steps below for PC’s network environment installation. First of all, please check your PC’s network components. The TCP/IP protocol stack and Ethernet network adapter must be installed. If not, please refer to MS Windows related manuals. Before you configure this Wireless Multi-Function Access Point, you need to know the following default settings: Username:admin Password:admin IP LAN address: (192.168.1.1), Subnet Mask (255.255.255.0) DHCP Server: disable SSSID= default, Channel=6, WEP/WAP=disable 1.6 IE Configuration Now open IE, go to Instruments menu, select the Connections tab and select one of the following options: Never use remote connection Use remote connection if another network connection isn’t available 1.7 TCP/IP Configuration Configuring PC (Windows 95/98/ME) 1. Go to Start / Settings / Control Panel. In the Control Panel, double-click on Network and choose the Configuration tab. 2. Select TCP / IP -> NIC Compatible, or the name of any Network Interface Card (NIC) in your PC. 3. Click Properties. NetFly AP1 24 ENGLISH 4. 5. 6. Select the IP Address tab. In this page, click the Specify an IP address radio button (EG IP=192.168.1.2 and subnet Mask=255.255.255.0). Then select the DNS Configuration tab. Select the Enable DNS radio button and click OK to finish the configuration. Configuring PC (Windows NT4.0) 1. Go to Start / Settings / Control Panel. In the Control Panel, double-click on Network and choose the Protocols tab. 2. Select TCP/IP Protocol and click Properties. 3. Select the Obtain an IP address from a DHCP server radio button and click OK. 4. Select the IP Address tab. In this page, click the Specify an IP address radio button (EG IP=192.168.1.2 and subnet Mask=255.255.255.0). Configuring PC (Windows 2000) 1. Go to Start / Settings / Control Panel. In the Control Panel, double-click on Network and Dial-up Connections. 2. Double-click LAN Area Connection. 3. In the LAN Area Connection Status window, click Properties. 4. Select Internet Protocol (TCP/IP) and click Properties. 5. Select Use the Following IP Address (EG IP=192.168.1.2 and subnet Mask=255.255.255.0). 6. Click OK to finish the configuration. Configuring PC (WindowsXP) 1. Go to Start / Control Panel (in Classic View). In the Control Panel, double-click on Network Connections.. 2. Double-click Local Area Connection NetFly AP1 25 ENGLISH 3. In the LAN Area Connection Status window, click Properties. 4. Select Internet Protocol (TCP/IP) and click Properties. 5. Select the Use the following IP address radio buttons (EG IP=192.168.1.2 and subnet Mask=255.255.255.0). 6. Click OK to finish the configuration Configuring PC (Windows Vista) 1. 2. 3. 4. 5. 6. Go to Start / Control Panel (in Classic View). In the Control Panel, double-click on Network and Sharing Center icon. Click Manage Network connections then double-click Local Area Connection. Click Properties. Click Continue (Windows needs your permission to continue). Select Internet Protocol Version 4 (TCP/IP) and click Properties. Select the Use the following IP address radio buttons (EG IP=192.168.1.2 and subnet Mask=255.255.255.0). Click OK to finish the configuration. 1.8 Browser configuration Open the web browser, enter the local port IP address of this Wireless Multi-Function Access Point, which default at 192.168.1.1, and click Go to get the login page. The default username is admin, password admin and click OK to continue. Click on the desired item to expand the page with all settings in the main navigation panel. Following next steps you can make operating Wireless Multi-Function Access Point in short time using PCs in DHCP mode. Refer to manual on Installation CD if you need personalized configuration. Setup wizard is provided as the part of the web configuration utility. You can simply follow the step-by-step process to get your wireless router NetFly AP1 26 ENGLISH configuration ready to run in 6 easy steps by clicking on the Wizard button on the function menu. Quick Wizard Setup The following screen will appear. Please click Next to continue. Step 1: Set Password You can change the password as you like and then click Next to continue. NetFly AP1 27 ENGLISH Step 2: Set Wireless LAN connection Please type the SSID in the text box and select a communications channel. The SSID and channel must be the same as wireless devices attempting communication to the router. Select a channel number and click on Next. Step 3: Set WEP Encryption If user wants to enable WEP, please click Enabled. Then, select the key size of WEP encryption and enter the key value in the key text box. Please click Next to continue. NetFly AP1 28 ENGLISH Step 4: Restart The Setup wizard is now completed. The new settings will be effective after the Wireless Multi-Function Access Point restarted. Please click Restart to reboot the router. If you do not want to make any changes, please click exit to quit without any changes. You also can go back to modify the setting by clicking Back. Then relaunch your Web browser, to link to your favorite Web site to test your Internet connection. 1.9 Product Support If you have any problems with theNetFly AP1, please contact the dealer where you bought this product. If you have any other questions you can contact the Atlantis Land company directly at the following address: Atlantis Land Via Pelizza da Volpedo, 59 20092 Cinisello Balsamo (MI) Italy Fax: +39.(0)2.93906161 Help Desk :+39.(0)2.93907634 Email: [email protected] WWW: www.atlantis-land.com NetFly AP1 29 FRANCAIS Copyright Copyright. 2002 est la propriété de cette société. Tout droits réservés. Sont interdites, la reproduction, la transmission, la transcription, la mémorisation dans un système de sauvegarde où la traduction dans une autre langue ou en langage informatique quels qu’ils soient, de la présente publication, sous quelque forme que ce soit ou quelque en soit le moyen, électronique, mécanique, magnétique, optique, chimique, manuel ou de tout autre genre, sans avoir obtenu préalablement l’autorisation de notre entreprise. Non-responsabilité La présente entreprise n’admet ni requêtes ni de garantie, explicites ou implicites, au sujet du contenu et de manière spécifique exclue la possibilité de garantie, communicabilité ou adaptabilité pour des finalités particulières. Le logiciel décrit dans le présent manuel est vendu ou concédé en licence “tel quel”. Si les programmes devaient présenter des problèmes après l’achat, l’acquéreur (et non pas la présente entreprise, son distributeur ou concessionnaire) est tenu de prendre en charge tous les coûts de manutention ainsi que les coûts dus à des dommages accidentels ou des conséquences dérivants d’un défaut du logiciel. La présente entreprise se réserve en outre le droit de revoir le contenu de cette publication et d’y apporter des modifications de temps en temps, sans obligation d’informer les utilisateurs de ces changements. Nous avons fait tout notre possible afin d’éviter la présence d’erreurs dans le texte, les images, les tableaux présents dans ce manuel et dans le Cd-Rom. Cependant, nous ne pouvons pas garantir l’absence totale d’erreurs et/ou d’omissions, nous vous remercions donc de nous les signaler et vous prions de nous en excuser. Enfin, nous ne pouvons être tenus pour responsables dans quelque perte que ce soit, dommage ou incompréhension à la suite directe ou indirecte de l’utilisation de notre manuel, le logiciel Cd-Rom et/ou disque dur. Toutes les marques ou noms de produits mentionnés dans le présent manuel sont des marques commerciales et/ou brevetées par leurs propriétaires respectifs. Marquage CE Cet appareil, qui appartient à la Classe B peut causer des interférences radio, dans ce cas nous vous invitons à prendre les contre-mesures appropriées. ATTENTION Laisser au moins 30 cm de distance entre les antennes du dispositif et les utilisateurs. Domaine de régulation NetFly AP1 30 FRANCAIS Chaque pays utilise des bandes de fréquences fixées par cet organisme, l’utilisateur final doit donc s’assurer du bon réglage de son AP sur un canal autorisé dans son pays. Déclaration de Conformité Cet appareil a été testé et est conforme à la Directive 1999/5/CE du Parlement européen et du Conseil concernant les équipements hertziens et les équipements de terminaux de télécommunications et la reconnaissance mutuelle de leur conformité. Après évaluation du matériel, celui-ci est conforme aux normes suivantes : EN 300.328 (radio), EN 301 489-1, EN 301 489-17(compatibilité électromagnétique), EN 60950-1 (sécurité) et EN50385. Ce matériel peut être utilisé dasn tous les pays de l’Union Européenne et dans tous les pays appliquant la Directive 1999/5/CE, sans limitations, à l’exception des pays suivants : France : En cas d’utilisation de ce matériel en extérieur, la puissance de sortie est limitée dans les plages de fréquences ci-dessous. Pour de plus amples informations, consultez le site de l’ART : www.art-telecom.fr Site Intérieur restriction) Extérieur (aucune Plage de fréquences (MHz) 2400-2483,5 Puissance (EIRP) 2400-2454 2454-2483,5 100mW(20dBm) 10mW(10dBm) 100mW(20dBm) Italie : Cet appareil est conforme à l’interface radio nationale et aux exigences de la table d’allocation des fréquences. L’utilisation de ce produit sans fil en dehors du cadre de la propriété de l’acquéreur nécessite une autorisation générale. Pour da plus amples informations, consultez le site www.comunicazioni.it NetFly AP1 31 FRANCAIS Ce guide d’installation rapide vous permet d’installer et de configurer le NetFly AP1-54 suivant des paramètres standards. Pour plus de précisions, tant sur les méthodes de configuration que sur le paramétrage avancé, reportez-vous au Manuel sous format électronique (PDF) disponible sur le CD Rom fourni. 1.1 Contenu de la boîte Avant l’installation, assurez-vous de disposer des éléments suivants: Wireless Multi-Function Access Point Câble réseau (CAT5) Guide à l'installation CD-Rom avec manuels Antenne 2 dBi Adaptateur secteur AC-DC (12V, 1A) Si vous constatez qu’un de ces composants manque, merci de vous adressez à votre revendeur. 1.2 Face avant LED SIGNIFICATION POWER Allumée quand le Wireless Multi-Function Access Point est sous tension. WLAN Clignotant vert pour indiquer la transmission des donnée et allumée pour indiquer le correct fonctionnement de module wireless. NetFly AP1 32 FRANCAIS LAN Allumée quand le LAN (réseau) est connecté Il clignote lors des transferts de données. 1.3 Face arrière PORT USAGE Connectez l’alimentation fournie à cette prise. POWER Jack LAN Reset (remise à zéro) Relier directement avec un câble Ethernet standard ou croisé aux PC ou à un port uplink (Hub/Switch). Dispositif allumé, presser pour effectuer le reset ou le restore. Pressez le reset pour 5s pour effectuer une remise à zéro du dispositif. Il faut connecter l’antenne dans la boite. Reverse SMA 1.4 Câblage Après avoir terminé le câblage, raccordez l’alimentation pour mettre le NetFly sous tension. Assurez-vous que les LEDs sont correctement allumés. Connectez un câble réseau standard ou croisé pour relier le NetFly rà un Hub/Switch ou aux PC. L’interface Wireless intégrée permet aux utilisateurs dotés d’interfaces wireless d’aller sur Internet en utilisant le protocole IEEE802.11b ou IEEE802.11g. Une fois toutes les liaisons effectuées et le Wireless Multi-Function Access Point effectuera un diagnostique (d'une soixantaine de secondes). Quand cette étape sera NetFly AP1 33 FRANCAIS terminée les LED POWER,WLAN (LAN si est connectée) seront fixes, ce qui signifie que le produit fonctionne correctement. En illustration il est possible d'observer une installation domestique typique. 1.5 Configuration initiale Avant de commencer la configuration du Wireless Multi-Function Access Point il est nécessaire de connaître la configuration initiale (paramètres par défaut). Pour pouvoir utiliser le Wireless Multi-Function Access Point en peu de temps, il suffit de garder la configuration par défaut, de mettre les PC avec une adresse IP. Tous les ordinateurs doivent avoir une carte réseau Ethernet ou Wireless installée correctement et être connectés à l’appareil directement (sur câble à travers un Hub/Switch ou en wireless). Ils doivent avoir le protocole TCP/IP installé et correctement configuré avec une adresse IP qui doit rester dans le même sous réseau. L’adresse IP par défaut est 192.168.1.1 et le masque de sous réseau 255.255.255.0. Pour une configuration plus détaillée faire référence au manuel complet sur le CD-Rom. La configuration initiale (paramètres par défaut) est: User : admin Password : admin Adresse LAN IP: (192.168.1.1), Subnet Mask (Masque de sous réseau)=255.255.255.0 DHCP (Fonction serveur DHCP) : Desactivée SSSID= default, Channel=6, WEP/WAP=non activé NetFly AP1 34 FRANCAIS 1.6 Configuration du TCP/IP Configuration sous Windows 95/98/ME 1. Allez dans Panneau de Configuration. Double-cliquez sur Réseau.et enfin affichez l’onglet Configuration. 2. Sélectionnez le protocole TCP/IP NIC carte, ou quelconque carte réseau Ethernet dans le PC. 3. Cliquez sur Propriétés 4. Dans l’onglet Adresse IP Sélectionnez l’option Specify an IP address et introduisez 192.168.1.2 (IP) et subnet 255.255.255.0 (Subnet Mask). Sélectionnez l’onglet DNS. 5. 6. -> Sélectionnez l’option Activer DNS et cliquez sur OK pour terminer la configuration. Vous devez redémarrer l’ordinateur pour que les changements prennent effet. Configuration sous Windows NT4.0 1. Allez au Panneau de Configuration. Double-cliquez sur Réseau et enfin sélectionnez l’onglet Protocole . 2. Sélectionnez TCP/IP Protocol et après cliquez sur Propriétés. 3. Sélectionnez (votre carte Réseau) l’onglet Specify an IP address et introduisez 192.168.1.2 (IP) et subnet 255.255.255.0 (Subnet Mask). Configuration sous Windows 2000 1. Allez au Panneau de Configuration. Connexions Réseau et accès à distance.. 2. Double-cliquez sur connexion au réseau local. 3. Dans Connexion au réseau local cliquez sur Propriétés. 4. Sélectionnez Internet Protocol (TCP/IP) et cliquez sur Propriétés. NetFly AP1 Double-cliquez sur 35 FRANCAIS 5. Sous l’onglet Général, sélectionnez l’onglet Use the following IP address et et introduisez 192.168.1.2 (IP) et subnet 255.255.255.0 (Subnet Mask). 6. Cliquez sur OK pour terminer la configuration. Configuration sous Windows XP 1. Allez sur Panneau de Configuration. Double-cliquez sur Accès Réseau. 2. Double-cliquez sur Connexion au Réseau local. 3. Cliquez Propriétés. 4. Sélectionnez Internet Protocol (TCP/IP) et cliquez sur Properties. 5. Sélectionnez Utiliser l’adresse IP suivante (192.168.1.2) et et 255.255.255.0 (masque de sous réseau). 6. Cliquez sur OK pour terminer la configuration. Configuration sous Windows Vista 1. 2. 3. 4. 5. 6. 7. Allez sur Panneau de Configuration (Affichage Classique). Double-cliquez sur Accès Réseau Cliquer 2 fois sur Centre Réseau et Partage, puis cliquer sur Gérer les connexions Réseau. Cliquer 2 fois sur la carte NIC LAN et cliquez sur Propriétés. Cliquez sur Continuer (Windows a besoin de votre autorisation pour continuer). Sélectionnez Internet Protocol 4 (TCP/IP) et cliquez sur Propriétés. Sélectionnez Utiliser l’adresse IP suivante (192.168.1.2) et 255.255.255.0 (masque de sous réseau). Cliquez sur OK pour terminer la configuration. NetFly AP1 36 FRANCAIS 1.7 Vérification Pour vérifier le succès de la configuration (après avoir redémarré le PC, opération nécessaire sous Win98, SE, ME) utiliser le PING. Dans la fenêtre Dos écrivez: PING 192.168.1.1. Si le message suivant apparaît: Pinging 192.168.1.1 with 32 bytes of date: Reply from 192.168.1.1: bytes=32 times <10ms TTL=64 Reply from 192.168.1.1: bytes=32 times <10ms TTL=64 Reply from 192.168.1.1: bytes=32 times <10ms TTL=64 Vous pouvez procéder en allant au point suivant. Si par contre le message suivant apparaît: Pinging 192.168.1.1 with 32 bytes of date: Request timed out. Request timed out. Request timed out. Vérifiez que le Led LAN est bien allumé. Vérifiez l'adresse de votre PC en écrivant WINIPCFG (pour, Win95,98,ME) ou IPCONFIG (pour Win2000, XP) et éventuellement réinstallez le stack TCP/IP. 1.8 Configuration avec le Browser Pour accéder à l’interface Web, lancez un navigateur Internet et tapez dans la barre adresse l’IP suivante : http://192.168.1.1 Un mot de passe vous est demandé, pour la première connexion. Nom d’Utilisateur (User) = admin et Mot de Passe (Password) = admin et appuyez sur OK pour aller dans la configuration. Il apparaîtra à ce point le Menu Principal. Dans la partie gauche on pourra accéder, à toutes les sections disponibles. En suivant les indications ci-dessous il est possible de rendre opérationnel le Wireless Multi-Function Access Point en peu de temps à condition d'utiliser les PC du réseau comme client DHCP. Pour une configuration personnalisée du réseau et du Router faire référence au manuel complet dans le CD Rom. NetFly AP1 37 FRANCAIS Apparaîtra à ce point la configuration Wizard (s'il ne part pas automatiquement cliquer sur le bouton Wizard ) qui vous permettra une configuration guidée de l’apparat. En fermant la Wizard vous irez dans le Menu Principal et vous pourrez configurer en détail le dispositif (on renvoie au manuel complet présent sur CDRom). Quick Wizard Setup Grâce à cet Wizard vous pourrez configurer le dispositif en très peu de temp. Vous devrez voir l’image en bas (dans le cas que n’est pas comme ça, cliquez sur le bouton Wizard). Cliquez sur Next pour continuer. NetFly AP1 38 FRANCAIS Step 1: Modification du mot de passe Vous pouvez maintenant changer le mot de passe, cliquez puis sur Next pour passer au prochaine pas. Step 2: Set Wireless LAN connection Introduisez la valeur de SSID (il doit être identique en tous les dispositifs)dans le champ du texte et sélectionnez le canal de communication. Le canal SSID doit être le même que celui des apparats wireless qui essayent la communication avec le router. Cliquez puis sur Next pour passer au prochaine pas. NetFly AP1 39 FRANCAIS Step 3: Set WEP Encryption Dans cette section, vous pourrez configurer le type d’authentification entre les appareils afin d’obtenir une communication sans fil sécurisée. Sélectionnez enable et après le nombre de bits utilisé pour la clé (64 ou 128 la plus sécurisante) Introduisez manuellement la clé puis cliquez sur Next pour passer au prochaine pas. NetFly AP1 40 FRANCAIS Step 4: Restart À ce point la configuration est terminée, redémarrez les Router en appuyant sur Restart. En cliquant par contre sur exit vous effacerez toutes les positions faites. En exécutant maintenant le browser vous devriez être capables d’aller sur internet. Pour problèmes faire référence au manuel complet. 1.9 Support Pour tout problème vous pouvez contacter le service gratuit: l'help desk téléphonique d'Atlantis Land qui vous fournira une assistance du lundi au jeudi de 9.00 à 13.00 et de 14.00 à 18.00. Le vendredi de 9.00 à 13.00. Vous pouvez aussi nous contacter par fax ou par messagerie électronique ([email protected] ou bien [email protected]) pour exposer d'éventuelles demandes ou problèmes : Fax: +39.(0)2.93906161 Help Desk :+39.(0)2.93907634 Email: [email protected] WWW: www.atlantis-land.com NetFly AP1 41 ESPAÑOL AVISO Hemos hecho todo lo posible para evitar que en el texto, las imágenes, tablas, software y hardware, y la información presentada en general sea carente de errores. A pesar de ello, no podemos garantizar la ausencia de estos. Atlantis Land no se hacen responsable de daños o pérdidas directas o indirectas, incluidos, pero sin limitación, los daños causados por la imposibilidad su uso, la pérdida de datos o software y/o los daños o pérdidas causados por el uso o funcionamiento incorrecto del equipo y accesorios. En ningún caso, Atlantis Land será responsable de las pérdidas financieras como pérdida de beneficios, daños por inactividad, daños a la reputación, etc. El contenido de este manual se provee a título informativo y es sujeto a cambios sin previo aviso (invitándose a los clientes a consultar nuestro sitio Web www.atlantis-land.com para mantenerse informados de estos) no haciéndose Atlantis Land responsable de cualquier error o inexactitud que pueda aparecer en esta guía. Esta publicación no puede ser traducida ni reproducida, ni en todo ni en parte, ni registrada en, o transmitida por, un sistema de recuperación de información, en ninguna forma ni por ningún medio, sea mecánico, fotoquímico, electrónico, magnético, electrónico, por fotocopia, o cualquier otro, sin permiso previo por escrito de Atlantis Land. Los nombres de los fabricantes, de sus productos, así como de cualquier marca, registradas o no, mencionadas en este manual, son usados a título de referencia, siendo propiedad exclusiva de sus respectivos dueños. Declaración de conformidad CE/EMC El producto descrito en esta guía ha sido diseñado, producido y aprobado en conformidad con las reglas EMC, siendo certificado en cumplimento de la normativa. Si el producto se usara con un ordenador no certificado, el productor no puede garantizar el respeto a los límites de compatibilidad electromagnética. En la práctica, y en circunstancias particulares, es posible que dichos límites puedan ser superados si se utilizan dispositivos que no respetan la normativa EMC y que, por tanto, no han sido certificados. Asimismo, es posible, que de forma puntual ocurran picos de valor que se encuentran por encima de las tolerancias. En este caso, el usuario es responsable que el dispositivo vuelva a ser conforme con los límites EMC. El fabricante no puede hacerse responsable en el caso de NetFly AP1 42 ESPAÑOL que el producto sea utilizado fuera de los límites dictados por la normativa EMC. ATENCIÓN Para cualquier dispositivo inalámbrico dejar al menos 30cm de distancia entre la antena del dispositivo y el usuario. Aviso sobre el distintivo CE Este es un producto de Clase B. En un entorno doméstico este producto puede provocar interferencias de radio por lo que, si fuera así, es necesario que el usuario tome las medidas adecuadas Países CE donde este producto puede ser usado libremente: España, Alemania, Reino Unido, Italia, Bélgica, Holanda, Portugal, Grecia, Irlanda, Dinamarca, Luxemburgo, Austria, Finlandia, Suecia, Noruega e Islandia. En Francia esta permitido el uso de los canales 10 y 13 excluyendo el uso de otros canales. Declaración de Conformidad Este dispositivo ha sido probado, determinándose conforme con la directiva 1999/5/CE del Parlamento Europeo y de la Comisión Europea referente a equipos de radio y periféricos de telecomunicaciones y el reconocimiento mutuo de su conformidad. Después de su valoración, se ha establecido que el dispositivo se ajusta a los siguientes estándares: EN 300.328(radio), EN 301 489-1, EN 301 489-17(compatibilidad electromagnética), EN 60950-1(seguridad) y EN50385. Este dispositivo puede ser utilizado en todos los países de la Comunidad Económica Europea sin restricción alguna y en aquellos, que aún sin permanecer a esta, aplican la Directiva 1999/5/CE, a excepción de: Francia: En el caso de utilizar el dispositivo en exteriores, la potencia de salida y la frecuencia usada deberán de ajustarse a los que se detallan en la tabla. Para mayor información consulte el sitio Web www.art-telecom.fr. Lugar Banda de Frecuencias Potencia (EIRP) (MHz) Interior (sin 2,400-2,483.5 100mW(20dBm) restricciones) Exterior 2,400-2,454 100mW(20dBm) 2,454-2,483.5 10mW(10dBm) Si el uso de este dispositivo en un ambiente domestico generara interferencias, es obligación del usuario poner remedio a la situación. NetFly AP1 43 ESPAÑOL Italia: Este dispositivo es conforme la normativa de Radio Nacional y respeta los requisitos de Asignación de las Frecuencias. El uso de este dispositivo fuera del uso doméstico necesita de una autorización general. Para más información diríjanse al sitio: www.comunicazioni.it. NetFly AP1 44 ESPAÑOL Este manual es una guía rápida, para los detalles relativos a la configuración personalizada puede acudir al manual completo que se encuentra en el CD. 1.1 Contenido de la caja Antes de utilizar el producto verifique que la caja contenga el siguiente material: Punto de Acesso Inalámbrico Multifunción Cable CAT-5 Una guía rápida multilingüe Antena externa de 2 dBi Un CD con el manual de usuario Transformador AC-DC (7.5V, 1A) 1.2 Los LED frontales LED DETALLE POWER La luz se enciende de forma permanente cuando el aparato está conectado a la red eléctrica. WLAN Encendido de forma fija cuando ha terminado de cargar el módulo inalámbrico. Intermitente cuando hay transmisión/ recepción de datos. NetFly AP1 45 ESPAÑOL LAN Encendido de forma fija cuando está conectado a un dispositivo Ethernet 100Mbps/10Mbps. Intermitente cuando hay transmisión/ recepción de datos. 1.3 Los puertos posteriores Puertas Utilizaciòn POWER Jack Conector para el transformador. LAN Conectar un cable Ethernet Reset Reverse SMA En el caso de que necesitara reiniciar el dispositivo, y una vez que se ha encendido, presione con un clip, o similar, el botón durante al menos 5 segundos. Una vez que haya hecho esto, todas las luces del panel se encenderán, después de lo cual el sistema se reiniciará con la configuración de fábrica. Enrosque la antena removible (incluida) al conector. NetFly AP1 46 ESPAÑOL 1.4 Cableado En primer lugar conecte el puerto RJ45 a la red y enchufe el transformador del Punto de Acceso a la red eléctrica. Una vez efectuadas las conexiones el dispositivo efectuará un diagnóstico interno de aproximadamente 10 segundos, después de lo cual el LED POWER se encenderá verde fijo y el LED LAN/ WLAN verde fijo o parpadeante según el tipo de conexión. En la figura se detalla una instalación típica en modalidad Punto de Acceso. 1.5 Configuración de fábrica Antes de comenzar con la configuración del Atlantis Wireless Access Point es importante conocer la configuración de fábrica, ya que esta nos puede servir en un futuro como referencia. Utilizando los valores de fábrica del Punto de Acceso, configurando el ordenador con un IP estático (como se indica más abajo) y utilizando los datos suministrados por su proveedor de internet es posible comenzar a navegar rapidamente con el Atlantis Wireless Access Point. Si necesita realizar una configuración más detallada, consulte el manual incluído en el CD. La configuración de fábrica del Atlantis Wireless Access Point es como sigue: Password:admin Userneme:admin Dirección LAN IP (192.168.1.1), Máscara de red (255.255.255.0) DHCP Server: Deshabilitado SSSID= default, Channel=6, WEP/WAP= Deshabilitado NetFly AP1 47 ESPAÑOL 1.6 Configuración de Internet Explorer Abra Internet Explorer. En el menú Herramientas seleccione Opciones de Internet y active una de las siguientes casillas: No marcar una conexión nunca Marcar cuando no esté conectado a la red. 1.7 Configuración del PC Configuración del PC en Windows 95/98/ME 1. Vaya a Inicio/Configuración/Panel de Control y haga doble clic sobre sobre el icono de Red. 2. Bajo la pestaña de Configuración elija el protocolo TCP/IP. 3. Pulse el botón de Propiedades. 4. Seleccione Especificar una dirección IP e introduzca una dirección IP dentro de la clase 192.168.1.X del Punto de Acceso, el cual viene configurado de fábrica con la IP 192.168.1.1. Por ejemplo, en Dirección IP introduzca 192.168.1.2 y como Máscara de subred 255.255.255.0. Asegúrese que esta dirección IP no se este utilizando en la red ya que entraría en conflicto con esta.. 5. Pinche sobre la pestaña Puerta de enlace e introduzca la IP del router de su red o la que le haya dado su proveedor 6. Pinche sobre la lengüeta Configuración DNS. 7. Active la opción Activar DNS e introduzca las direcciones IP que le haya facilitado su proveedor internet. Finalmente, pulse el botón de Aceptar para aplicar los cambios. 8. Reinicie el ordenador para que los cambios surtan efecto. Configuración del PC en Windows NT 4.0 1. Vaya a Inicio/Configuración/Panel de Control, haga doble clic sobre sobre el icono de Red y seleccione Protocolos. 2. Seleccione el protocolo TCP/IP, pulsando a continuación el botón de Propiedades. NetFly AP1 48 ESPAÑOL 3. Seleccione Especificar una dirección IP e introduzca una dirección IP dentro de la clase 192.168.1.X del Punto de Acceso, el cual viene configurado de fábrica con la IP 192.168.1.1. Por ejemplo, en Dirección IP introduzca 192.168.1.2 y como Máscara de subred 255.255.255.0. Asegúrese que esta dirección IP no se este utilizando en la red ya que entraría en conflicto con esta. Como Gateway utilize la del router de su red o la que le haya dado su proveedor 4. Pinche sobre la lengüeta Configuración DNS. 5. Active la opción Activar DNS e introduzca las direcciones IP que le haya facilitado su proveedor internet. Finalmente, pulse el botón de Aceptar para aplicar los cambios. 6. Reinicie el ordenador para que los cambios surtan efecto. Configuración del PC en Windows 2000 1. Vaya a Inicio/Configuración/Panel de Control y haga doble clic sobre sobre el icono Conexiones de red. 2. Haga doble click sobre Conexión de área local pulsando a continuación el botón de Propiedades. 3. Seleccione Protocolo Internet (TCP/IP) volviendo a pulsar sobre el botón de Propiedades. 4. Seleccione Usar la siguiente dirección IP e introduzca una dirección IP dentro de la clase 192.168.1.X del Punto de Acceso, el cual viene configurado de fábrica con la IP 192.168.1.1. Por ejemplo, en Dirección IP introduzca 192.168.1.2 y como Máscara de subred 255.255.255.0. Asegúrese que esta dirección IP no se este utilizando en la red ya que entraría en conflicto con esta. Como Puerta de enlace predeterminada utilize la del router de su red o la que le haya dado su proveedor. 5. Seleccione las opciónes Usar las siguientes direcciones de servidor DNS e introduzca las direcciones IP que le haya facilitado su proveedor internet. 6. Pulse Aceptar para aceptar los cambios. NetFly AP1 49 ESPAÑOL Configuración del PC en Windows XP 1. Vaya a Inicio/Configuración/Panel de Control y haga doble clic sobre sobre el icono Conexiones de red. 2. Haga doble click sobre Conexión de área local pulsando a continuación el botón de Propiedades. 3. Seleccione Protocolo Internet (TCP/IP) volviendo a pulsar sobre el botón de Propiedades. 4. Seleccione Usar la siguiente dirección IP e introduzca una dirección IP dentro de la clase 192.168.1.X del Punto de Acceso, el cual viene configurado de fábrica con la IP 192.168.1.1. Por ejemplo, en Dirección IP introduzca 192.168.1.2 y como Máscara de subred 255.255.255.0. Asegúrese que esta dirección IP no se este utilizando en la red ya que entraría en conflicto con esta. Como Puerta de enlace predeterminada utilize la del router de su red o la que le haya dado su proveedor. 5. Seleccione las opciónes Usar las siguientes direcciones de servidor DNS e introduzca las direcciones IP que le haya facilitado su proveedor internet. 6. Pulse Aceptar para aceptar los cambios. Configuración del PC en Windows Vista 1. 2. 3. 4. 5. Vaya a Inicio/Configuración/Panel de Control (Vista clásica) y haga doble clic sobre sobre el icono Conexiones de red. Haga doble click sobre Centro de redes y recursos copartidos. Pulsar sobre el botón Administrar conexiones de red y haga doble clic sobre sobre el icono Conexiones de red. Clic sobre sobre el botón de Propiedades (clic Continuar). Seleccione Protocolo de Internet versión 4 (TCP/Ipv4) volviendo a pulsar sobre el botón de Propiedades. Seleccione Usar la siguiente dirección IP e introduzca una dirección IP dentro de la clase 192.168.1.X del Punto de Acceso, el cual viene configurado de fábrica con la IP 192.168.1.1. Por ejemplo, en Dirección IP introduzca 192.168.1.2 y como Máscara de subred 255.255.255.0. Asegúrese que esta dirección IP no se este utilizando NetFly AP1 50 ESPAÑOL en la red ya que entraría en conflicto con esta. Como Puerta de enlace predeterminada utilize la del router de su red o la que le haya dado su proveedor. 6. Seleccione las opciónes Usar las siguientes direcciones de servidor DNS e introduzca las direcciones IP que le haya facilitado su proveedor internet. 7. Pulse Aceptar para aceptar los cambios. 1.8 Configuración del Punto de Acceso Abra el navegador e introduzca la siguiente dirección IP: http://192.168.1.1 y pulse intro. Utilize admin como nombre usuario y admin como contraseña y pulse Aceptar. Después de autentificarse le aparecerá un asistente para la confituración del punto de acceso. Si quiere configurar de forma detallada el dispositivo, puede cerrar el asistente y acceder al Menú Principal. En el caso de que necesitara hacer una configuración personalizada de la red interna o del punto de acceso, puede encontrar más información en el manual completo incluido en el CD. NetFly AP1 51 ESPAÑOL En el caso de que no se iniciara de forma automática el asistente, lo puede iniciar pinchando sobre la opción pertinente en el menú principal. Asistente de Configuración Gracias a este asistente es posible configurar el dispositivo en muy poco tiempo. Cuando le aparezca el menú de la imagen, pulse Next para continuar. Paso 1: Modificar la Contraseña Introduzca en las dos casillas la contraseña que quiera utilizar para acceder al punto de acceso y pulse Next para seguir con la configuración. NetFly AP1 52 ESPAÑOL Paso 2: Configuración de la conexión inalámbrica Introduzca el SSID, nombre con el que se identificará la red inalámbrica y que debe ser igual en todos los dispositivos que accederán a esta, y escoja el canal en el cual operará el dipositivo. Pulse Next para continuar. Paso 3: Encripción WEP Para habilitar la cifratura WEP seleccionar Enabled. A continuación y seleccionar la longitud de la llave, de 64 o 128 bits, e introduzca en el NetFly AP1 53 ESPAÑOL casilla Key la llave a utilizar. Recuerde que esta llave será la que utilizará posteriormente para poder conectarse a la red inalábrica. Pulse Next para continuar. Paso 4: Reiniciar En este momento la configuración a terminado. Reinicie el Punto de Acceso Inalábrico Multifunción pulsando Restart. Si, por el contrario pulsa Exit, la configuración no se guardará. NetFly AP1 54 ESPAÑOL Una vez que se haya reiniciado el punto de acceso, pruebe a ver si navega. En el caso de que no funcionara, consulte el manual incluido en formato electrónico en el CD-ROM incluido. Este manual es una guía rápida, para los detalles relativos a la configuración personalizada puede acudir al manual completo que se encuentra en el CD. 1.9 Soporte Técnico Consultar el sitio Web http://www.atlantis-land.com o contactarnos a las siguientes direcciones de correo electrónico ([email protected] o [email protected]). Atlantis Land Via Pelizza da Volpedo, 59 20092 Cinisello Balsamo (MI) Italy Fax: +39.(0)2.93906161) Help Desk :+39.(0)2.93907634 NetFly AP1 55 APPENDIX A APPENDIX A: Regulatory Domains For some European Country, it may have its own domain; users are responsible for ensuring that the channel set configuration is in compliance with the regulatory standards of these countries. Channel Regulatory Domains 1-11 USA/CANADA 1-13 ETSI(Europe) 10-11 Spain 10-13 France 14 MKK 1-14 Japan (MKKI Telecom) 3-9 Israel 5-13 Israel NetFly AP1 56 APPENDIX B APPENDIX B: Technical Features Physical Interface LAN: 1 x RJ45 10/100 Base-T Ethernet auto-crossover (MDI/MDI-X) WLAN: 1 x 2 dBi (1 external orientable detachable Antenna Reverse -SMA) 3 diagnostic LEDs Reset Button Hardware: Wireless Chipset: Realtek® 8186 Radio Specifications: Standard IEEE802.11g and IEEE802.11b DSSS(Direct Sequence Spread Spectrum) Modulation: QPSK / BPSK / CCK and OFDM RF Frequency: 2.400 GHz ~2.4835 GHz Operating Channel:13 (Europe) Data Rate (with automatic adaptation): 802.11g: Up to 54Mbps (with Automatic Fall-Back) Coverage Area: Outdoor <150* m; Indoor <40* m RF max. output power: Minimum 13 dBm @ 802.11g mode Minimum 15 dBm @ 802.11b mode Receiver Sensivity(802.11g mode): -68 dBm (typically)** Receiver Sensivity(802.11b mode): -81 dBm (typically)*** Security WPA, WPA2 (without performance degradation) and WEP 64/128 802.11x Security MAC Filtering (Access Control List) SSID Broadcats Disable function Advanced Features Access Point Wireless Bridge and Multiple Bridge (WDS) Repeat Mode (WDS) NetFly AP1 57 APPENDIX B Client Wireless Roaming 802.3 af (only for A02-AP1-W54PoE) Advanced Characteristics With WDS (Wireless Distribution System) mode, user can use wireless media to communicate two or more LANs through the AP with WDS mode, all of the LAN will be combined in the WDS group. The WDS feature makes the NetFly AP1-W54 an ideal solution for quickly creating and extending a wireless local area network (WLAN) in offices or other workplaces, or even at hotspots. When used as a repeater, the same strong signal bandwidth of 802.11g devices is repeated increasing the range of wireless coverage. Package Contents One Wireless Broadband Router 1 x 2 dBi Antenna One Quick Start Guide (English, French, Italian and Spanish) One AC/DC Adapter (7.5V, 1A) One CD with driver/utilities and user’s manual System Requirements Intel® Pentium®III 600Mhz or compatible processor with 128MB RAM Windows 98SE/ME/2000/XP or Linux operating system TCP/IP Stack Physical and Environmental: Storage Temperature: -10~65°C Operating Temperature: 0~40°C Humidity: 20% - 85% RH, no condensation Dimensions: 145 mm x 110 mm x 35 mm (without Antenna) Weight: 230 g Power Consumption / DC Inputs: [7.5 W(Max)] / [7.5V/1A] Certifications: CE (Europe) NetFly AP1 58 APPENDIX B *10% PER(Packet Error Rate, ** 8% PER(Packet Error Rate) All rights registered. Microsoft and Windows are registered trademarks of Microsoft Corporation All trade names and marks are registered trademarks of respective companies Specifications are subjected to change without prior notice. No liability for technical errors and/or omissions Performance and Throughput are influenced by many factors (interference, noise, environments) NetFly AP1 59 Atlantis Land Via Pelizza da Volpedo, 59 20092 Cinisello Balsamo – MI – Italy [email protected] Where solutions begin ISO 9001:2000 Certified Company