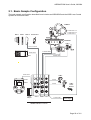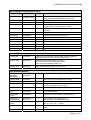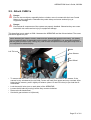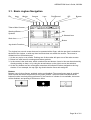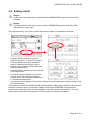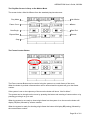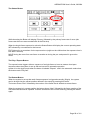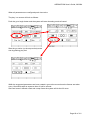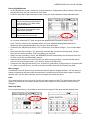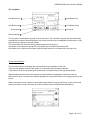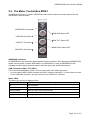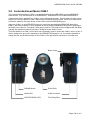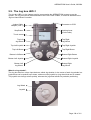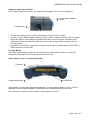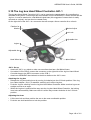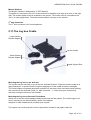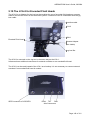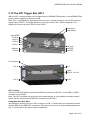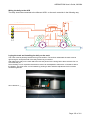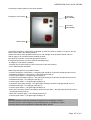
1
ARRIMOTION
User’s Guide
Software Version 2
See page 11 for information on the new features
03/2004
ARRIMOTION User’s Guide, 09/2004
This page has been intentionally left blank
Page 2 of 161
ARRIMOTION User’s Guide, 09/2004
Contents
1. Introduction........................................................... 11
1.1.
1.2.
1.3.
1.4.
1.5.
Simple Motion Control ............................................................... 12
System Components Overview.................................................. 13
Who Does What?....................................................................... 15
Definitions .................................................................................. 16
System Components List ........................................................... 18
2. Setup...................................................................... 21
2.1.
2.2.
2.3.
2.4.
2.5.
2.6.
2.7.
2.8.
2.9.
2.10.
2.11.
Basic Sample Configuration ...................................................... 22
Prerequisites .............................................................................. 25
Prep Check ................................................................................ 25
Attach the Main Controller ......................................................... 26
Attach CHM-1s .......................................................................... 27
Attach Cables & CLM-2s ........................................................... 29
Emergency Stop ........................................................................ 31
Power Up ................................................................................... 31
Defining Axes, Assigning Mimics ............................................... 32
Home Axes ................................................................................ 33
Power Down .............................................................................. 35
3. Operation............................................................... 37
3.1. Basic Jogbox Navigation ........................................................... 38
Recording a Basic Move ..................................................................... 41
3.2. Saving, Loading, Erasing and Renaming Moves ....................... 43
3.3. Setting Gear Ratios ................................................................... 45
3.4. Setting Limits ............................................................................. 46
3.5. More on Recording and Playing Back Moves ............................ 48
3.6. Stop- and Go- Motion Playback ................................................. 52
3.7. Multitrack Recording .................................................................. 61
3.8. Reassigning Mimics ................................................................... 63
3.9. Rejecting Revolutions ................................................................ 64
3.10. Jogging / Browsing .................................................................... 65
3.11. GPI Outputs ............................................................................... 67
3.12. The Bloop Light Setup ............................................................... 69
3.13. GPI Triggers .............................................................................. 71
3.14. Timecode In/Out ........................................................................ 73
3.15. VTR Control ............................................................................... 74
3.16. Operating the Panther dolly ....................................................... 75
3.17. FAQ / Troubleshooting............................................................... 77
4. Software Reference .............................................. 79
4.1.
4.2.
4.3.
4.4.
4.5.
4.6.
4.7.
4.8.
The File Menu ............................................................................ 80
The Axis Menu ........................................................................... 86
The Mimic Menu ........................................................................ 93
The Camera Menu ..................................................................... 96
The Lens Menu ........................................................................ 103
The Rec/Play Menu ................................................................. 106
The Trigger and Synchronization Menu................................... 111
The Browse / Jog Menu ........................................................... 117
5. Hardware Reference ........................................... 119
Page 3 of 161
ARRIMOTION User’s Guide, 09/2004
5.1.
5.2.
5.3.
5.4.
5.5.
5.6.
5.7.
5.8.
5.9.
5.10.
5.11.
5.12.
5.13.
5.14.
5.15.
5.16.
5.17.
ARRIHEADs ............................................................................ 120
The Head Adapter Mounting Bracket....................................... 122
Configuring the Main Controller ............................................... 123
The Camera Control Box CCB-1 ............................................. 127
The Motor Control Box MCB-1................................................. 131
Lens Control Box LCB-1 .......................................................... 132
Auxiliary Motor Control Box ACB-1.......................................... 133
Controlled Head Motor CHM-1 ................................................ 136
The Jog box JBO-1 .................................................................. 138
The Jog box Hand Wheel Controller JHC-1............................. 140
The Jog box Cradle ................................................................. 141
The JCA-2 for Encoded Fluid Heads ....................................... 142
The GPI Trigger Box GPI-1...................................................... 143
The Blooplight BLT-1 ............................................................... 146
CLM-2 Cable Swap.................................................................. 147
The Panther Evolution ............................................................. 149
Compatibility ............................................................................ 160
Page 4 of 161
ARRIMOTION User’s Guide, 09/2004
Disclaimer
No part of this document may be copied or reproduced in any form or
by any means without prior written consent of ARRI. ARRI assumes no
responsibility for any errors that may appear in this document. The
information is subject to change without notice. For actual design-in,
refer to the latest publications of ARRI Motion data sheets or data
books, etc., for the most up-to-date specifications of ARRI Motion
products. Not all products and/or types are available in every country.
Please check with an ARRI sales representative for availability and
additional information.
While ARRI endeavours to enhance the quality, reliability and safety of
the ARRI Motion products, customers agree and acknowledge that the
possibility of defects thereof cannot be eliminated entirely. To minimize
risks of damage to property or injury (including death) to persons
arising from defects in the ARRI Motion products, customers must
incorporate sufficient safety measures in their work with the system.
ARRI or its subsidiaries does not assume any liability for infringement
of patents, copyrights or other intellectual property rights of third parties
by or arising from the use of ARRI Motion products or any other liability
arising from the use of such products. No license, express, implied or
otherwise, is granted under any patents, copyrights or other intellectual
property rights of ARRI or others.
ARRI or its subsidiaries expressly excludes any liability, warranty,
demand or other obligation for any claim, representation, or cause, or
action, or whatsoever, express or implied, whether in contract or tort,
including negligence, or incorporated in terms and conditions, whether
by statue, law or otherwise. In no event shall ARRI or its subsidiaries be
liable for or you have a remedy for recovery of any special, direct,
indirect, incidental, or consequential damages, including but not limited
to lost profits, lost savings, lost revenues or economic loss of any kind
or for any claim by third party, downtime, good-will, damage to or
replacement of equipment or property, any costs or recovering of any
material or goods associated with the assembly or use of our products,
or any other damages or injury of persons and so on or under any other
legal theory.
All trademarks are courtesy of their respective owners.
Page 5 of 161
ARRIMOTION User’s Guide, 09/2004
Safety Instructions
Please always follow these instructions
to prevent injury to yourself and damage to the system!
These safety instructions are given in addition to the product-specific operating instructions and
must be strictly observed. However, they are no substitute for taking your own safety measures
when operating the equipment.
Warning Symbols
This symbol indicates that an improper operation of the equipment is possible, which could result in
injury or equipment damage.
This symbol indicates the risk of electric shock or fire danger, which could result in injury or
equipment damage.
General Safety Instructions
Read and Understand all safety and operating instructions before you operate or install the
ARRIMOTION System.
Retain all safety and operating instructions for future reference.
Heed all warnings on the ARRIMOTION system and in the safety and operating instructions before
you operate or install the ARRIMOTION System.
Follow all installation and operating instructions.
Do not use accessories or attachments not recommended by ARRI, as they may cause hazards
and void the warranty.
Do not repair any part of the system. Repairs must only be carried out by authorized ARRI repair
shops.
Do not remove any safety measure of the System.
Do not operate the system in high humidity areas or expose it to water or moisture.
Do not place the system on an unstable cart, stand, tripod, bracket, table or other surface. The
System may fall, causing serious personal injury and damage to the System.
Operate the ARRIMOTION system using only the type of power source indicated on the marking
label. Unplug the power cord by gripping the power plug, not the cord.
Never insert objects of any kind into the any part of the system, as the objects may touch
dangerous voltage points or short out parts. This could cause fire or electrical shock.
Page 6 of 161
ARRIMOTION User’s Guide, 09/2004
Unplug the system from the AC power outlet before opening any part of the system or before
making any changes to the systems, especially when attaching or removing cables.
Be sure that all electric cables are intact and install properly before you running the system
Additional Safety Instructions for the Dolly System
Read and Understand the Panther instruction manual before operating the dolly
Read and Understand all dolly related sections of the operating manual
Check the function of the safety bumpers and the emergency cutout switch before lacing the timing
belt through the drive system
Do Not permit anybody to stand in the track or close to the track. If anybody is standing in the track
hit the emergency stop immediately even if the dolly is at standstill
Do Not permit anybody to ride the panther while the drive or lift motors are switched off. Use the
Handwheel or Fluid head remote controllers instead
Check the clearance of the drive System, the Bumpers and the limit switches of the drive system as
described in the manual before lacing the belt
Do not leave the dolly system unobserved when it is under power
Do not bend over the lift column
Prevent all cabling to the panther from getting close to the track or under the wheels of the dolly
Do not mount a jib or crane arm to the dolly
Important Note
When operating the equipment in humid conditions to prevent fire or electric shock, take appropriate
precautions to protect the electrical equipment.
Important Note
When shooting double exposure with the 435 Advanced in CAN mode always check the camera
frame counter before exposing a pass to avoid misalignment.
Page 7 of 161
ARRIMOTION User’s Guide, 09/2004
Safety Features
The ARRIMOTION System can be stopped by the following means:
• The STOP button in the Play/Record screen of the Jogbox stops the system’s movement.
• The silver button above the screen on the Jogbox stops the system’s movement. It may take a
moment till the motors come to a standstill. This is not an emergency stop button.
•The EMERGENCY STOP button on the Camera Control Box (CCB) cuts the power supply to the
motors and thus the motors stop instantly.
• Removing power from the system will stop the system.
Page 8 of 161
ARRIMOTION User’s Guide, 09/2004
Software Version
This User’s Guide is for the ARRIMOTION system as of software version 1.8. To check the software
version, look at the Jog box display while the ARRIMOTION system powers up. In addition, the
software packet version can be seen in the System Settings screen that is accessible via the File
screen.
Software Features
Software version 1.0 had the following features:
• Support of 435 ES, 535B, 16SR 3, 435 Advanced (435 ES Modus), ARRICAM (LT und ST with
software packet 03 or higher)
• Supports WHA-2, WZU, WFU, ZMU 1&2, FIU
• Supports CLM-2 und CHM-1
• Supports the Encoded ARRIHEAD
• Supports the basic functions of the Bloop Light (BLT-1)
• Recording and playback of moves at variable speeds
• Multitrack recording, including the option to record individual tracks at differing speeds
• Creating, editing, managing and interpolating lens tables
• Remote control of the supported cameras
• Filing system
• Update system
Software version 1.8 added the following features:
• Part Move
• Stop Motion (Single Frame)
• Go Motion
• Support of 435 Advanced for stop and go-motion (use the K-CAM-CCB-2 for stop and go-motion
and the K-CAM-CCB-1 for live action and part move) including capping shutter control.
• Support of up to four GPI trigger boxes
• Support of different bloop events on any frame
• Support of Sony® Control 1 compatible VTR/ATR for playback
• Support of external triggers (Time code, GPI)
• Browsing
• Jogging
• Running the camera at an integer multiple of the move frame rate
• Support of the ACB-1
• Support of the Panther Evolution dolly with lift and track
• Support of the Panther lift mimic and the force sensitive pushbar
• Refined status and warning icons
• Time code output
Software 2.0 adds the following features (435 Advanced SW package 02D or higher required)
• Shutter compensated speed ramping with the 435 Advanced
• Live Action mode over K-CAM-CCB2 (CAN mode) with 435 Advanced
• Frame accurate control of the 435 Advanced in CAN mode
•
Page 9 of 161
ARRIMOTION User’s Guide, 09/2004
This page has been intentionally left blank
Page 10 of 161
ARRIMOTION User’s Guide, 09/2004
1. Introduction
Page 11 of 161
ARRIMOTION User’s Guide, 09/2004
1.1. Simple Motion Control
The ARRIMOTION system gives productions a simple and user friendly alternative to complex and
expensive motion control rigs. Just add a couple of small, lightweight components to an ARRIHEAD,
and suddenly camera moves, lens operations, fps changes and shutter changes can be recorded
and played back without any loss of production time.
The basic ARRIMOTION system is small and portable and can be operated by the camera
assistant, especially since it seamlessly integrates with most modern ARRI cameras and uses other
familiar components, like the ARRIHEAD and the ARRI Lens Control System. Moves can be
created by operating the camera, ARRIHEAD and Lens Control System in the normal fashion, while
the ARRIMOTION system records all actions. Playing moves back is as easy as pushing the PLAY
button on a video recorder. Because standard ARRI components are used, the producer will be
pleased since fewer specialty items have to be rented.
Page 12 of 161
ARRIMOTION User’s Guide, 09/2004
1.2. System Components Overview
The Main Controller
The main controller is attached to the ARRIHEAD‘s right side. It is the brain of the ARRIMOTION
system and all cables connect here. The main controller consists of at least one module, the
Camera Control Box (CCB-1). Its functions can be expanded by adding other modules which control
head motors, lens motors and other equipment. A typical main controller would include:
• The Camera Control Box (CCB-1) controls the camera and has the processor and data storage.
• The Motor Control Box (MCB-1) controls the ARRIHEAD motors.
• The Lens Control Box (LSB-1 controls the lens motors.
Camera Control Box
Motor Control Box
Lens Control Box
The Controlled Head Motors
The Controlled Head Motors (CHM-1) are attached between the ARRIHEAD and the ARRIHEAD
hand wheels. The ARRIHEAD can still be operated normally when the CHM-1 motors are attached.
While the ARRIHEAD is operated, the sensors inside the CHM-1 motors record all pan and tilt
movements. When the move is played back, these motors will precisely repeat the pan and tilt
movements of the operator.
Page 13 of 161
ARRIMOTION User’s Guide, 09/2004
The Jogbox
The Jogbox is used to setup the ARRIMOTION system and to record and playback moves.
Other Components
Here is a list of other components that can be used to complete the picture:
• ARRI Lens Control System
In order to control a lens from the main controller, CLM-2 lens motors are used. The hand control
units of the wired or wireless ARRI Lens Control System allow the operator to change focus, iris
and zoom. Note that the hand control units of the wireless Lens Control System must be used
with the WHA-2 cabled to the main controller; wireless use is not supported at this time.
• Bloop Light
the ARRIMOTION Bloop Light is used to expose a reference mark on the film.
• GPI Trigger Box
The GPI Trigger Box is used to trigger external events from the ARRIMOTION system, or to have
the ARRIMOTION system be triggered by external events.
• Encoded ARRIHEAD-2
Even though ARRIMOTION can be used with the normal ARRIHEAD-1 and ARRIHEAD-2, higher
precision and easier setup is achieved with the Encoded ARRIHEAD-2.
• Jogbox Hand Wheel Controller
This is a station that the Jogbox, two ARRIHEAD hand wheels and a video monitor can be
attached to.
• Jogbox Cable Adapter JCA-2
This is an adapter that interfaces encoded fluid heads like the Movie Engineering CAMS encoded
Fluid head to remotely control the Arrihead
• The Auxiliary Control Box (ACB-1)
The ACB-1 controls up to 3 external servo motors (model movers, dolly drives, etc.)
• The Panther Evolution with Arrimotion interface that allows to control the drive and lift axis.
Camera Compatibility
For most record/repeat moves the ARRIFLEX 16SR3, 435ES, 435 Advanced, 535B and ARRICAM
cameras can be used. Frame accurate effects such as time lapse, multiple exposure, speed ramps,
stop motion or go motion can be accomplished with the 435 Advanced.
Page 14 of 161
ARRIMOTION User’s Guide, 09/2004
1.3. Who Does What?
The graphic shows what inputs a basic ARRIMOTION configuration receives and what it controls.
Input
Main Controller
Controlled Items
Camera
Camera
Jogbox
Bloop Light
Laptop
Main Controller
GPI Trigger Box
GPI Trigger Box
Camera Control
Box
Video Deck
Timecode
Controlled Head Motors
Motor Control
Box
Lens Control
Box
Timecode Output
ARRIHEAD
Controlled Head Motors
ARRIHEAD Encoders
Lens
Controlled Lens Motors
Controlled Lens Motors
Lens Data System
Input
The Camera Control Box sees everything the camera does (start/stop, fps, shutter), receives input
from Jogbox and Laptop and can be triggered by the GPI Trigger Box or by Timecode.
The Motor Control Box receives the position of the Controlled Head Motors. If an ARRIHEAD with
encoders is connected, it uses the more precise ARRIHEAD encoders instead.
The Lens Control Box receives the position of the Controlled Lens Motors on the lens. In addition it
can record the signals from the Lens Data System, which interprets the raw position data into
human readable values (focus in meters or feet, iris in T-stops and focal length in mm).
Control
The Camera Control Box controls the camera (start/stop, fps, shutter) and makes the Blooplight
flash. It can trigger external devices with the GPI Trigger Box, and can control a video deck.
The Motor Control Box controls the Controlled Head Motors on the ARRIHEAD.
The Lens Control Box controls the Controlled Lens Motors on the lens.
Page 15 of 161
ARRIMOTION User’s Guide, 09/2004
1.4. Definitions
There are seven terms which should be understood to operate the ARRIMOTION system, since
these terms are used in this manual and in the Jogbox software.
1. What is an Encoder?
An encoder is an electrical component that translates motion into an electrical signal. Underneath
the focus knob of the ARRI Lens Control System, for instance, is an encoder that converts the
rotation of the knob into an electrical signal. This signal is then used to drive the lens motors.
2. What is a Mimic?
A Mimic is a device that is operated by a human and that translates the human’s motions into
electrical signals. It usually consists of some sort of wheel or knob or other device that a human can
manipulate, and an encoder that translates the human action into electrical pulses.
Examples of Mimics are:
A focus knob on a lens control
A hand wheel connected to a position sensor (encoder)
A panhandle on a fluid head fitted with position sensors (encoders)
In the example below, the tilt hand wheel turns an encoder inside the Controlled Head Motor (CHM–
1), which records the turning (=position information). The tilt hand wheel and the encoder together
are called a “Mimic”.
Mimic
Tilt
Hand Wheel
CHM-1
Encoder
Position
Information
Motor Control
Box
Control
Signals
CHM-1
Motor
ARRIHEAD Tilt
Mechanism
3. What is a Controller?
A controller is a box of electronics that reads the position either from a Mimic (while recording) or
from memory (while playing back) and controls a motor.
In the example below, the position information from the tilt Mimic is passed on to the main
controller,where it is used to drive the motor inside the CHM-1.
Mimic
Tilt
Hand Wheel
CHM-1
Encoder
Controller
Position
Information
Motor Control
Box
Control
Signals
CHM-1
Motor
ARRIHEAD Tilt
Mechanism
Page 16 of 161
ARRIMOTION User’s Guide, 09/2004
What is an Axis
An axis is a thing that performs a movement along a certain path. There are two types of axes
relevant to Motion Control work:
Real Axis
A real axis is a motor that is connected to some mechanics that perform a motion.
In the example below, the position information from the tilt Mimic is passed on to the main controller,
where it is used to move the real tilt axis.
Mimic
Tilt
Hand Wheel
CHM-1
Encoder
Axis
Controller
Position
Information
Motor Control
Box
Control
Signals
CHM-1
Motor
ARRIHEAD Tilt
Mechanism
Capture Axis
A capture axis is a position measurement system that reports the current position of something
moving on a path. This could be the rotational position of a lens motor, for instance.
5. What is a Setup?
A Setup is the configuration of a motion control system. It includes a list of which axis you want to
use and how these axis are controlled (which Mimics are used). This information is stored as a
Setup.
6. What is a Move?
A Move describes the changing of all axes that have been defined. If you push the record button on
the ARRIMOTION system, than pan and tilt around wildly and then push Stop, you have recorded a
Move. This Move can now be played back, at full or some partial speed.
Each recorded ARRIMOTION Move also contains the Setup data for the system.
7. Homing
Homing is a way to establish accurately the position of each motor, and of the motors to each other.
This is necessary to find accurately the same positions when the system is switched of and on, or
when the system was moved to another place. There are several different methods of homing:
- going to both end stops (the method used in the ARRI Lens Control System)
- special reference sensors (the method used in the Encoded ARRIHEAD-2)
- manual reference marks on the system.
Page 17 of 161
ARRIMOTION User’s Guide, 09/2004
1.5. System Components List
Code
Ident#
Name
Description
CCB-1
K2.52103.0
(HDD)
K2.52231.0
(SSD)
Camera Control
Box
The main module that contains move
storage and camera control (requires a
camera cable).
HDD: Harddisk SSD:Solid State Disk
MCB-1
K2.52107.0
Motor Control
Box
Controller for the CHM-1 motors.
LCB-1
K2.52104.0
Lens Control Box Controller for 3 CLM-2 motors.
Accessory
Bracket
K2.52227.0
Accessory
Bracket
Head Adapter
K2.52206.0
Mounting Bracket Mounts CCB-1 to ARRIHEAD-2
(Accessory Bracket required). Not
compatible with ARRIHEAD-1.
Battery Holder 1
K2.34340.0
Mounting Bracket Battery bracket holds CCB-1 on
ARRIHEAD-1.
Adapter Plate 2
K2.47000.0
Mounting Bracket A plate for the ARRIHEAD-2 for less play
in camera mounting and better nodal
mounting.
ACB-1
K2.52108.0
Auxiliary Control
Box
Controller for external servo motors or
dolly.
CHM-1
K2.52134.0
Controlled Head
Motor
Motor to drive pan or tilt of an
ARRIHEAD.
K-MCB-CHM
K2.52098.0
Cable, 0.6m/2
feet
Cable from CHM-1 motors to MCB-1.
Encoded
ARRIHEAD-2
K2.52090.0
ARRIHEAD-2
ARRIHEAD-2 with integrated encoders
and brake detection.
ARRIHEAD-2
K2.43670.0
K2.43670.0
K2.43670.0
ARRIHEAD-2
ARRIHEAD-2 prepared for encoders, but
encoders not installed.
K-ARRIH-MCB
K2.52216.0
Cable, 0.8 m/2.6
feet
Cable from Encoded ARRIHEAD to CCB.
CC-M2
K2.52224.0
Cable, 0.8 m/2.6
feet
Longer replacement cable for CLM-2
cable (necessary for ARRIMOTION).
JBO-1
K2.52102.0
Jogbox
Handheld Controller with touchscreen.
JCA-1
K2.52135.0
Jogbox Cable
Adapter
Adapter necessary when connecting
Jogbox with a cable to CCB.
JHC-1
K2.52136.0
Jogbox Hand
Wheel Controller
Remote control station with 2 arms for the
hand wheels, monitor platform and
Jogbox holder.
This bracket mounts to the ARRIHEAD-2.
The Head Adapter slides into it and holds
the CCB-1.
Page 18 of 161
ARRIMOTION User’s Guide, 09/2004
K-JCA-CCB
K2.52152.0
Cable, 10 m/33
feet
K-JCA-CCB 2m
K2.52252.0
Cable,
2m/6.5feet
Cable to connect JCA-1, JHC-1,
Blooplight and/or GPI-1 to the CCB
(10m/33 feet long).
K-JCA-CCB 25m K2.52253.0
25m Cable,
25m/82 feet
K-CAM-CCB-1
K2.52219.0
Cable, 1 m/3.2
feet
Cable to connect 435 Advanced, 435ES,
535B, 16SR3, 16SR3 HS, 16SR 3
Advanced or 16SR3 HS Advanced to the
CCB. Note: when used with the 435
Advanced, no special motion control
features are accessible. For those
features, use cable K-CAM-CCB-2
instead.
K-CAM-CCB-2
K2.52220.0
Cable, 1 m/3.2
feet
Cable to connect 435 Advanced/MCI-1 to
the CCB.
K-CAM-CCB-3
K2.52221.0
Cable, 1 m/3.2
feet
Cable to connect ARRICAM Studio or
Lite to the CCB.
K-LDD-LDS
K2.52215.0
Cable, 1 m/3.2
feet
Cable that connects LDD connector on
ARRICAM or FEM-2 to LCB-1 LENS
DATA connector.
GPI-1
K2.52223.0
General Purpose GPI Trigger Box to trigger external events
Interface
by the ARRIMOTION or vice versa.
BLT-1
K2.52222.0
Blooplight
Blooplight to record sync marks.
LSW-1
K2.52137.0
Laptop Software
Software for Windows PC (Laptop).
NG12/26R
K2.47351.0
Power Supply
Mains Power Supply
Jogbox Cradle
K2.52259.0
Jogbox Cradle for mounting the Jogbox on
various heads
JCA-2
K2.52260.0
for interfacing encoded fluid heads
K-Update-LP
K2.52230.0
Update Cable for direct Laptop / PC
connection
SER-DISTR
K2.52261.0
Splits SER2 into BLT and VTR connector
K-SER-VTR
K2.52250.0
Connects CCB to Sony Control 1 interface of
VTRs
PANTHER MOD
K2.52249.0
Modification for Panther Evolution for
Arrimotion
K-ACB-LIFT
K4.52802.0
Cable, 2m/6.5 feet Connects ACB-AUX-2 to the Panther
Electronics
K-ACB-CAN
K4.52801.0
Cable, 2m/6.5 feet Connects ACB-AUX-CAN to the Panther
Electronics
K-ACB-DMA
K4.52800.0
Cable,
3.5m/11.5feet
Connects ACB-AUX-1 to the Panther drive
motor
Page 19 of 161
ARRIMOTION User’s Guide, 09/2004
This page has been intentionally left blank
Page 20 of 161
ARRIMOTION User’s Guide, 09/2004
2. Setup
Page 21 of 161
ARRIMOTION User’s Guide, 09/2004
2.1. Basic Sample Configuration
The basic sample configuration described here includes an ARRIHEAD and the ARRI Lens Control
System for focus and zoom.
CAMERA
WFU-1
WZU-1
K-CAM-CCB-1 or
K-CAM-CCB-2 or
K-CAM-CCB-3
Rod Bracket
WHA-2
ARRIHEAD
CHM-1
LC-Z1 or LC-Z2
K-JBO-CCB
K-ARRIH-MCB
CHM-1
K-MCB-CHM
K-MCB-CHM
BLT-1
K-JBO-CCB
CLM-2
CC-M2
JCA-1
JBO-1
CC-M2
Head
Adapter
CCB-1
MCB-1 LCB-1
Power Cable
CLM-2
CLM-2 Offset Bracket
Battery or
Power Supply
ARRIMOTION Main Controller
Page 22 of 161
ARRIMOTION User’s Guide, 09/2004
Basic ARRIMOTION System (6 axes)
Code
Ident#
Amount
CCB-1
K2.52103.0 (HDD)
K2.52231.0 (SSD)
Name/Description
1
Camera Control Box (requires camera cable)
HDD=Harddisk, SSD=Flashdisk (more robust)
MCB-1
K2.52107.0
1
Controller for the CHM-1 motors
LCB-1
K2.52104.0
1
Controller for 3 CLM-2 motors
Accessory Bracket K2.52270.0
1
This bracket mounts to the ARRIHEAD-2. The Head
Adapter slides into it and holds the CCB-1.
Head Adapter
K2.52206.0
1
Mounts CCB-1 to ARRIHEAD-2 (Accessory Bracket
required)
CHM-1
K2.52134.0
2
Controlled Head Motor
K-MCB-CHM
K2.52098.0
2
Cable from CHM-1 motors to MCB-1.
JBO-1
K2.52102.0
1
Jogbox
JCA-1
K2.52135.0
1
Jogbox Cable Adapter
BLT-1
K2.52222.0
1
Blooplight
K-JCA-CCB
K2.52152.0
2
Cable from Jogbox or Blooplight to CCB.
CLM-2
K2.52036.0
2
Controlled Lens Motors
CC-M2
K2.52224.0
2
Long cable for CLM-2 (required for ARRIMOTION)
Camera Cables
K-CAM-CCB-1
K2.52219.0
Cable from 435 Advanced, 435ES, 535B, 16SR3, 16SR3 HS,
16SR 3Advanced or 16SR3 Advanced HS to CCB.
K-CAM-CCB-2
K2.52220.0
Cable from 435 Advanced/MCI-1 to CCB.
This cable supports only stop and go motion
in the Arrimotion software release 1.8
K-CAM-CCB-3
K2.52221.0
Cable from ARRICAM Studio or Lite to CCB.
Also Needed/Optional
ARRIHEAD-2,
or Encoded
ARRIHEAD-2
K2.43670.0, or
K2.52090.0
1
K-ARRIH-MCB
K2.52216.0
1
Cable from Encoded ARRIHEAD to CCB-1
Battery Holder 1
K2.34340.0
1
Battery bracket, can hold CCB-1 on ARRIHEAD-1.
Adapter Plate 2
K2.47000.0
1
A plate for the ARRIHEAD-2 for less play in camera
mounting and better nodal mounting.
NG12/26 R
K2.47351.0
1
Power Supply (or battery)
KC20, or
KC29
K2.41966.0, or
K2.44693.0
1
Power cable (straight), or
Power cable (coiled)
CLM-2 Offset
Bracket
K2.52035.0
1
“Dogbone” to mount CLM-2 in tricky situations.
Rod Bracket, or
Rosette Bracket
K2.52150.0, or
K2.52153.0
1
Attaches WHA-2 to support rods, or
attaches WHA-2 to ARRIHEAD rosette.
Lens Control
System
Either WHA-2 + WZU-1 + WFU-1 + cable, or
ZMU (1 or 2) + FIU-1 + cables
Jogbox Cradle
K2.52259.0
1
Jogbox Cradle for mounting the Jogbox on various
heads
JCA-2
K2.52260.0
1
for interfacing encoded fluid heads
Page 23 of 161
ARRIMOTION User’s Guide, 09/2004
K-Update-LP
K2.52230.0
1
Update Cable for direct Laptop / PC connection
SER-DISTR
K2.52261.0
1
Splits SER2 into BLT and VTR connector
K-SER-VTR
K2.52250.0
1
Connects CCB to Sony Control 1 interface of VTRs
PANTHER MOD
K2.52249.0
1
Modification for Panther Evolution for Arrimotion
Page 24 of 161
ARRIMOTION User’s Guide, 09/2004
2.2. Prerequisites
Danger
No Persons or other items should ever be in the pan range of the ARRIHEAD, otherwise
personal injury or equipment damage can result
Danger
If the weight on the ARRIHEAD is not properly balanced, the motors can get very hot.
Be sure that all electric cables are intact and install properly before you running the system.
Use only ARRI batteries and power supplies.
This setup guide assumes that you have a camera on an ARRIHEAD with a lens and CLM-2 motors
attached. It describes the setup for the basic configuration, where you can control camera start/stop,
camera fps and shutter, lens zoom, iris and focus and ARRIHEAD pan and tilt.
For more detailed information check the Hardware Reference part.
2.3. Prep Check
Before setting up the ARRIMOTION system, check the following items:
• A separate battery or power supply for camera and ARRIMOTION are available.
• The main controller has been assembled containing one CCB-1, one MCB-1, one LCB-1 (details
are in the Hardware Reference part).
• If you have an ARRIHEAD-2, the main controller should have a Head Adapter, and the
ARRIHEAD should have an Accessory Bracket attached. If you have an ARRIHEAD-1, it should
have been equipped with a Battery Bracket.
• On all ARRIHEAD pan and tilt gear boxes one screw has been exchanged for a special pin with a
hex driver head. If a pin with a slotted head is already there, it must also be replaced with the pin
with the hex driver head. These special pins come with the CHM-1 motors. Details are in the
ARRIHEAD chapter of Hardware Reference.
• The CLM-2 motors have their normal cables replaced with the longer CC-M2 cables (details are
in the Hardware Reference part).
• You have a long 3 mm hex driver.
• Rotate the EMERGENCY button on the main controller clockwise to make sure it is disengaged.
Page 25 of 161
ARRIMOTION User’s Guide, 09/2004
2.4. Attach the Main Controller
• ARRIHEAD-2: Slide the main controller’s Head Adapter into the ARRIHEAD Accessory Bracket.
Main Controller
ARRIHEAD-2
Accessory Bracket
Head Adapter
• ARRIHEAD-1: Place the main controller on the Battery Bracket and secure it.
Battery Bracket
Page 26 of 161
ARRIMOTION User’s Guide, 09/2004
2.5. Attach CHM-1s
Danger
Ensure, that no objects, especially hairs or clothes, come in contact with the Lens Control
Motors or the cogwheels. Otherwise they could clamp and cause serious injury or
equipment damage.
Danger
Ensure that all components of the system are properly installed. Otherwise they can cause
heat which can cause serious injury or equipment damage.
This describes how to attach a CHM-1 between the ARRIHEAD and the tilt hand wheel. The same
procedure applies for pan.
Before attaching the CHM-1 motors, make sure the ARRIHEAD gears moves freely. The quality
of the complete system is dependant on the quality of the ARRIHEAD. It is especially important
that the gears are free of play. During very cold or warm temperatures the pan gears may have to
be re-adjusted for minimum play.
Brake
Left Tilt Lock
Gear Selector
Pin
Hand Wheel
• To ensure that the CHM-1 on the tilt axis performs optimally, first balance the camera. If the
camera is very unbalanced, the tilt CHM-1 motor will need more power and may overload. After
balancing the camera, push it slightly off balance (about 15 mm/0.5 inches) to pre-load the tilt
mechanism.
• Lock the two tilt locks (one on each side) of the ARRIHEAD.
• Loosen the tilt brake by turning it all the way counter-clockwise.
• Remove the tilt hand wheel.
• Set the tilt gear selector to N (Neutral).
Page 27 of 161
ARRIMOTION User’s Guide, 09/2004
• Look at the back of the CHM-1 motor and note in which position the drive shaft’s key slot is. Turn
the drive shaft on the ARRIHEAD so it matches the key slot on the CHM-1.
CHM-1 Drive Shaft
Key Slot
• Switch the ARRIHEAD tilt gear selector to 1.
The ARRIHEAD gear selectors for pan and tilt should always be set to 1 when using
CHM-1 motors. Using gear position 2 or 3 can lead to equipment damage. The gear ratio
can still be adjusted with the Jogbox.
• Place the CHM-1 motor on the ARRIHEAD tilt drive shaft. First rotate the brake collar so it
engages the ARRIHEAD hand wheel brake. Then push the motor towards the ARRIHEAD while
slightly rotating it, so the CHM-1 key slot engages the ARRIHEAD drive shaft key.
Hand Wheel Brake
Brake Collar
CHM-1 Drive
Shaft
Fluid Drag
Ring
• Once the CHM-1 key slot has engaged the ARRIHEAD drive shaft key, the CHM-1 can be
rotated to be mounted in 8 positions, every 45°. It is preferable to mount the CHM-1 so the
BRAKE button is easily accessible.
• Use a 3 mm hex driver to tighten the screw inside the CHM-1 drive shaft.
• Turn the fluid drag ring clockwise to tighten. This makes attaching the hand wheel easier.
• Place the hand wheel onto the CHM-1 drive shaft and tighten the locking screw.
• Adjust the fluid drag to your personal preference.
• Unlock the two tilt locks (one on each side) of the ARRIHEAD.
Note: if you need to pan or tilt while the system is off, you can always switch the gear selector to N
(Neutral). Careful, though: if the system is unbalanced, the camera may tilt with surprising speed
and equipment could be damaged! Make sure to move the gear selector back to 1 once you are
done. Switching the gear selector to neutral while the system is on is not recommended, since you
will loose your homing reference.
Page 28 of 161
ARRIMOTION User’s Guide, 09/2004
2.6. Attach Cables & CLM-2s
Danger
Always make sure the cables are routed so they do not catch on anything, as the system
could be seriously damaged!
We recommend the long CLM-2 Motor Cables (CC-M2) for the Lens Control Motors.
Danger
Ensure, that no objects, especially hairs or clothes, come in contact with the Lens Control
Motors or the cogwheels. Otherwise they could clamp and cause serious injury or
equipment damage.
Danger
Ensure that all components of the system are properly installed. Otherwise they can cause
heat which can cause serious injury or equipment damage.
Danger
Don’t operate camera and ARRIMOTION from one battery or power supply!
Use a separate ARRI battery or a ARRI power supply for the ARRIMOTION System (e.g.
the NG 12/26R)
Be sure that all electric cables are intact and install properly before you running the system.
Use only ARRI batteries and power supplies.
• Connect a battery or power supply to the 2 pin connector on the backside of the main controller.
Connect another battery or power supply to the camera’s BAT connector.
• Connect the camera to the CAM connector on the CCB-1 according to this chart:
Camera
Connector on
camera
Cable
435 Advanced, 435ES, 535B,
16SR3, 16SR3 HS, 16SR 3
Advanced or 16SR3 HS Advanced
CCU & ACC
connectors
K CAM-CCB-1
Note: when used with the 435
Advanced, no special motion
control features are
accessible. For those features,
use cable K-CAM-CCB-2
instead.
435 Advanced (Motion Control
Mode)
MC connector
on MCI-1
K CAM-CCB-2
ARRICAM Studio, ARRICAM Lite
CAC connector
K CAM-CCB-3
Note that some of those cables have two connectors on the camera side: an 8 pin connector that
goes in the CCU receptacle on the camera and a 9 pin connector that goes into the ACC (or
MCL/ESU) connector on the camera. It is easy to distinguish between the two: the 8 pin
connector has no center pin, the 9 pin one does.
• Connect the Jogbox or Jogbox Hand Wheel Controller to the SER1 connector on the CCB-1
using cable K-JCA-CCB.
• Attach the WHA-2 (with WFU-1 and/or WZU-1) or the ZMU (with or without the FIU) to the LCS
connector on the CCB-1.
Page 29 of 161
ARRIMOTION User’s Guide, 09/2004
• Connect the connectors on the bottom of the CHM-1 motors to the respective connectors on the
MCB-1 with cables K MCB-CHM. The side with the angled connector goes into the CHM-1. If you
have more than one MCB-1, use the one closest to the CCB-1.
• Attach the CLM-2 motors to the rods and plug their cables into the respective connectors on the
LCB-1. Cables for motors that are attached to the camera left rod should be fed between the lens
and the rod, not underneath the rod.
• If you have an Encoded ARRIHEAD-2, use cable K-ARRIH-MCB to connect the connector on
the Encoded ARRIHEAD-2 to the ARRIHEAD connector on the MCB-1 closest to the CCB-1.
• If you have a 435 Advanced with an FEM-2 or an ARRICAM, and you are using LDS lenses, you
can connect their LDD connector with the LENS DATA connector on the LCB-1 using cable KLDD-LDS.
The ARRIMOTION system all cabled up!
Page 30 of 161
ARRIMOTION User’s Guide, 09/2004
2.7. Emergency Stop
In an emergency the ARRIMOTION system can be stopped by pushing the big red EMERGENCY
button on the Camera Control Box (CCB-1). All motors will be deactivated and all brakes will be
applied. The ON/OFF LED will blink red.
To Reset After an Emergency Stop:
• Remove the reason for the emergency.
• Rotate the EMERGENCY button in the direction of the arrows to release it. The ON/OFF LED
blinks red and green.
• Push the ON/OFF button to turn the system back on.
• Go into the Axes screen and turn all axes back on.
Pushing the EMERGENCY button will immediately stop all motors, which can lead to extreme
stress on all mechanical components. It is therefore recommended to use this feature only in
case of a real emergency.
2.8. Power Up
Danger
Always make sure the cables are routed so they do not catch on anything, as the system
could be seriously damaged!
We recommend to use the long CLM-2 Motor Cables (CC-M2) for the Lens Control Motors.
Danger
Ensure, that no objects, especially hairs or clothes, come in contact with the Lens Control
Motors or the cogwheels. Otherwise they could clamp and cause serious injury or
equipment damage.
Danger
Ensure that all components of the system are properly installed. Otherwise they can cause
heat which can cause serious injury or equipment damage.
Danger
Don’t operate camera and ARRIMOTION from one battery or power supply!
Use a separate ARRI battery or a ARRI power supply for the ARRIMOTION System (e.g.
the NG 12/26R)
Be sure that all electric cables are intact and install properly before you running the system.
Use only ARRI batteries and power supplys.
• Now is an excellent time to double check that the two tilt locks and the one pan lock on the
ARRIHEAD are loose, and that pan and tilt are set to the first gear.
• Turn camera power on.
• Push the ON/OFF button on the CCB-1.
The LEDs on the main controller will light up while a system check is being performed. If the CCB
finds any ARRIMOTION components attached with incompatible software versions, it
automatically updates those components.
Page 31 of 161
ARRIMOTION User’s Guide, 09/2004
• If you use the ZMU, turn its POWER button on now (the CCB can only supply power to the ZMU
once the CCB is powered up).
The Quick Start Screen
• If you were working on a move before the
system was powered off, push Load Last
Move and the last move plus its setup will be
loaded.
• If your setup has not changed, but you do not
want to continue to work with the last move,
push Load Last Setup.
• In all other cases, push the Load Other /
Create New button.
2.9. Defining Axes, Assigning Mimics
In the basic configuration, the ARRIMOTION system will automatically recognize the axes and
Mimics connected. It will automatically define the axes and assign the Mimics to their default axes,
i.e. the pan hand wheel to the pan axes, the focus knob to the focus lens motor, etc.
If components are used that are not part of the basic configuration, axes and Mimics have to be
configured manually.
Page 32 of 161
ARRIMOTION User’s Guide, 09/2004
2.10.Home Axes
Danger
The system moves on its own when homing. Make sure that nothing obstructs the system
and all cables are neatly tucked away so they do not catch on anything!
Every time the ARRIMOTION system is powered up, all existing axes must be homed. Homing is a
way to accurately establish the position of each motor.
Axes Tab
Axes Screen
On/Home Button
• Push the Axes tab to open the Axes screen. Select the first axis in the list, which should be PAN.
• Push the On/Home button once to turn the axis on. The axis State will change to ?. Push
On/Home again to start homing. While homing the respective LED on the main controller will
blink red/green.
• Now select the next item in the list, and again push On/Home twice. Go through the whole list
using the same method. Tip: when homing the lens axes, you do not need to wait for one to finish
before you start homing the next. They can home simultaneously.
Note: if you have trouble with an axis, unplug its cable from the main controller and then
plug it back in. Then turn the axes back on in the Axes screen.
Homing PAN with a Non-encoded ARRIHEAD-1 or ARRIHEAD-2
The procedure described above is slightly different for the non-encoded ARRIHEADs.
• Place a piece of tape on the rotating part of the head and another one close-by on a non-rotating
part. Draw a line through both pieces of tape. This is your home mark.
• Push the Axes tab to open the Axes screen. Select the first axis in the list, which should be PAN.
• Push the On/Home button once to turn the pan axis on. The axis State will change to ?. Push
On/Home again. The current position will become the homing position.
Page 33 of 161
ARRIMOTION User’s Guide, 09/2004
• The next time you home the system, push the On/Home button twice to turn the pan axis on and
to home it. Go to the Play/Record screen and turn Connect on. Now you can move the pan with
the hand wheel so the marks on the two pieces of tape line up. Go back to the Axes screen and
push On/Home a second time to home the pan axis.
• If a more precise referencing is needed on a non encoded Arrihead select “search index” as a
homing method. The motor will then move the output shaft of the motor in increments of exactly
180°. This will result in about 130 different positions on the pan axis. Mark one of them and it will
be exactly found again within the next homing.
This method will only work under the following circumstances
- leave the CHM-1 motor of the Pan axis mounted to the Arrihead
- never switch the gear to a other position than 1
- Do not change the motors position
- Do not exchange the CHM-1 motor
- Stay within +/- 180° on the PAN since the gear ratio of the gearbox is not an integer
number
Explanation of this method for techies:
The servomotor inside the CHM has an incremental encoder with an index pulse. This pulse always
appears on the same position. Since there is a 2:1 gear in the CHM-1 motor this would result in half
a revolution of the CHM-1s output shaft per servomotor revolution.
Page 34 of 161
ARRIMOTION User’s Guide, 09/2004
2.11.Power Down
Regular Power Down
The ARRIMOTION system is properly powered
down with the Jogbox, not with the ON/OFF
button on the Camera Control Box (CCB-1).
• Push the File tab to open the File screen.
Then push the Power Off button.
Hard Power Down
In case the regular power down does not work, you can perform a hard power down by pushing the
ON/OFF button on the Camera Control Box for 3 seconds. The system will power down within the
next 10 seconds. During this time the power LED will blink green. During a hard power down, all
data that has not been saved can be lost.
Note: a hard power down is not possible while an emergency stop is still in place.
Page 35 of 161
ARRIMOTION User’s Guide, 09/2004
This page has been intentionally left blank
Page 36 of 161
ARRIMOTION User’s Guide, 09/2004
3. Operation
Page 37 of 161
ARRIMOTION User’s Guide, 09/2004
3.1. Basic Jogbox Navigation
File
Axes
Mimics
Camera
Lens
Play/Record
GPI
Browse
Tabs to Main Screens
Warnings/Status
Symbols
List
A Selected Item
Work Area
Button
Jog-shuttle Functions
The Jogbox has a touch screen that can be operated with a finger, with the pen that is tucked into
the back of the Jogbox, or with any blunt item that does not scratch the screen. The screen is
divided into four horizontal areas:
1. At the very top is a row of tabs. Pushing one of those tabs will open one of the main screens.
2. Below is a small area for warnings and status symbols.
3. In the center is the work area, which contains lists and buttons. Items in lists can be selected by
directly pushing on them, or by using the arrow buttons on the right to move the selection.
4. At the very bottom are four rectangular areas that will indicate functions assigned to the Jogshuttles. In our example, the top right Jog-shuttle has the focus axis assigned.
Buttons
Buttons come in three flavors: enabled, active and disabled. The normal button state is enabled,
which means the button will perform its duty when pushed. The active state indicates that the
buttons function is actively being performed. If the function of a button is not available, the button
will be disabled, and pushing it will have no effect.
Button Enabled
Button Active
Button Disabled
Page 38 of 161
ARRIMOTION User’s Guide, 09/2004
Status and Warning Symbols
Low Battery Warning
This symbol will blink when the incoming voltage is too low. What the exact level is
depends on which Battery Type is set in the System Settings (File screen)
Encoded ARRIHEAD-2 OK
This symbol indicates that an Encoded ARRIHEAD-2 has been connected and is
communicating properly with the ARRIMOTION system.
Encoded ARRIHEAD-2 Brakes
This symbol indicates that at least one of the two ARRIHEAD brakes is applied.
Encoded ARRIHEAD-2 Error
This symbol indicates that an error in the communication to the encoded Arrihead
occured.
Camera OK
This symbol indicates that the ARRIMOTION system has detected and identified a
camera, and the camera is OK.
Camera Not Ready
This symbol indicates that the ARRIMOTION system has detected and identified a
camera, and there is a problem with the camera.
Camera Roll Off
This symbol indicates that the Roll Camera is switched off in the camera menu.
The camera will not be synchronized and/or rolling during record and playback.
Camera Sync
This symbol indicates that the camera has not synchronized properly. The takes
might not match. Do not use any pass with such a fault.
Camera not present
This symbol indicates that a camera was selected and configured to run but is not
detected on the camera interface.
Camera Running
This symbol indicates that the camera connected to the ARRIMOTION system has
is running and everything is OK.
Emergency Stop
This symbol indicates that the EMERGENCY button has been pushed.
GPI BOX active
This symbol indicates that a GPI box is connected and working.
GPI BOX active but all Outputs disabled
This symbol indicates that a GPI box is connected and working but the outputs are
globally disabled in the GPI Outputs menu.
Page 39 of 161
ARRIMOTION User’s Guide, 09/2004
GPI BOX events defined but box missing
This symbol indicates that GPI events have been defined but there is no GPI Box
found or GPI events are defined on a box that is not present (2nd, 3rd or 4th GPI
box).
Bloop Light active
This symbol indicates that a Bloop Light is connected and working.
Bloop Light active
This symbol indicates that a Bloop Light events are programmed but the bloop
light was not found.
Laptop Connected
This symbol indicates that a Laptop connection is active.
Panther Dolly Connected
This symbol indicates that a Panther Evolution dolly was detected.
Panther Dolly and Pushbar Connected
This symbol indicates that a Panther Evolution dolly with an electronic pushbar
was detected.
VTR found
This symbol indicates that a VTR or ATR was found on the serial interface and is
ready for operation.
VTR disabled
This symbol indicates that a VTR or ATR sync is programmed in the move but the
Sync VTR is set to off in the playback menu.
VTR not found
This symbol indicates that a VTR or ATR should be synchronized in the current
move but was not found on the serial interface or is not ready for operation.
LDS OK
This symbol indicates that a LDS connection to the camera was established and
working.
LDS not OK
This symbol indicates that there is a LDS problem on the camera. Please check
the camera.
Page 40 of 161
ARRIMOTION User’s Guide, 09/2004
Recording a Basic Move
Danger
The system moves on its own when moving to begin, moving to end or playing back a
move. Make sure that no humans or any other items obstruct the system and that all
cables are neatly tucked away so they do not catch on anything!
Danger
Playback of a move should be tested first at slow speeds.
Danger
During playback the system can move with high speeds.
Moving the System
• Push the Play/Record tab in the top part of the display to open the Play/Record screen. This is
the screen that is used most when recording and playing back moves.
Play/Record Tab
Play Mode
Status
Play Speed
Move to Begin
Move to End
Stop
Connect (off)
Play
Record
Play/Record Screen
• For safety reasons, the Mimics (the wheels and knobs you fiddle with) are disconnected by
default from their assigned axes (the motors and mechanical parts that move the camera). In
order to connect them, push the Connect button. You should be able to move the ARRIHEAD
now with the pan and tilt hand wheels. If not, look at the troubleshooting chapter at the end of the
Operation part.
Connect Off
Connect On
Page 41 of 161
ARRIMOTION User’s Guide, 09/2004
Recording a Move
• Make sure the Connect button is on.
• Push the Record button. In the top left corner of the Play/Record screen the move duration will
be displayed. The ARRIMOTION system will now precisely record every change you make to
camera, lens and head.
• Push the Stop button to stop recording.
• The system will now ask you if you want to save this move. In the Save Move screen, push the
big empty button to name the move, and the Version button to differentiate between different
versions (takes) of the same move.
Playing Back a Move
• Push the Connect button to disconnect the Mimics from the axes. This is necessary because you
will not be controlling the motors during playback, but the ARRIMOTION system will.
• Push the Move to Begin button to move all motors to the beginning position.
• Push the Play button to play back the move.
Page 42 of 161
ARRIMOTION User’s Guide, 09/2004
3.2. Saving, Loading, Erasing and Renaming Moves
Saving a Move
If you have not saved the move, you can save it after the fact to the digital storage media that is built
into the CCB-1 (either a hard disk or a flash card).
• Push the File tab to open the File screen.
Push the Save Move button.
• In the Save Move screen, push the big empty
button to name the move.
• In the Move Name screen, use the letter
buttons to enter a move name. If you need
numbers or special symbols, push the button
under the Clr button.
• Push OK when you are done. Back in the
Save Move screen, you can also enter a
version number for this move by pushing the
button to the right of the word Version:.
• Push the Save button.
Loading a Move
• Push the File tab to open the File screen. Push the Load Move button.
• In the Load Move screen the list shows the names and version numbers of all stored moves.
Select the move to load, and push the Load button.
Page 43 of 161
ARRIMOTION User’s Guide, 09/2004
Erasing a Move
• Push the File tab to open the File screen.
Push the System button.
• In the System screen, push the File Utils
button.
• In the Delete File screen, push the Move
button.
• In the Delete Move screen, select a move to
delete, and push the Delete button.
Renaming a Move
To rename a move, you should save the move under a different name (see saving a move), and
then erase the original move.
Page 44 of 161
ARRIMOTION User’s Guide, 09/2004
3.3. Setting Gear Ratios
Danger
When very high gear ratios are set, the system can move very fast.
Danger
Very high gear ratios and an inappropriate acceleration or dampening setting can lead to
vibrations (for instance: ARRIHEAD pan).
A higher gear ratio allows for faster response when shooting fast moving objects, and a lower gear
ratio allows for more precision, useful for instance when shooting miniatures. 100% gear ratio for
pan and tilt is the gear ratio an ARRIHEAD-2 would have with its mechanical gear set to 1. 100%
gear ratio for the lens hand units approximates what they normally have.
• Push the Mimics tab to open the Mimics screen. Select an axis and push the Gear Ratio button.
• Change the gear ratio by touching the slider where you want the new ratio to be, or by pushing
the button with the gear ratio percentage and entering a new percentage. You can also reverse
the turning direction by moving the slider left past the 0% point.
Note: It is OK to change the gear ratio while Connect is turned on in the Play/Record screen. In fact,
it is convenient to do so since you can see the effect of the new gear ratio immediately.
Note: When a gear ratio higher than 100% is set a warning symbol with an exclamation mark will
show up.
Page 45 of 161
ARRIMOTION User’s Guide, 09/2004
3.4. Setting Limits
Danger
Under some circumstances it is possible that the ARRIMOTION system will override the
set limits.
Danger
The limits should not be used to ensure that the ARRIMOTION system does not collide
with humans or other items.
If an axis should only move up to a certain point and no further, it is possible to set limits.
• Push the Play/Record tab to open the
Play/Record screen. Connect should be on.
• Push the Mimics tab to open the Mimics
screen. Select the axis that you want to
change (in our example the PAN axis) and
push the Modify button.
• In the Edit Mimic: HW PAN screen, push the
Axis Range button.
• Look at the number labeled Current Value,
and pan to the limit that has the smaller
number (note: -10 is a smaller number than 5). Push the Set Min button.
• Look at the number labeled Current Value, and pan to the limit that has the higher number. Push
the Set Max button.
The two buttons above the Set/Release Min and Set/Release Max buttons show the minimum and
maximum encoder values you have set. Instead of moving the ARRIHEAD to the respective
positions and setting the limits, it is also possible to enter the encoder values directly. To do so,
push on the buttons above the Set Min or Set Max buttons and enter the numbers.
Page 46 of 161
ARRIMOTION User’s Guide, 09/2004
Erasing Limits
• Push the Mimics tab to open the Mimics
screen. Select the axis that you want to
change (in our example the PAN axis) and
push the Modify button.
• In the Edit Mimic: HW PAN screen, push the
Default button.
Soft Stops
The ARRIMOTION System will stop at the limits as fast as it can. Smoother stopping can be set in
the Axes screen.
• Push the Axis tab to open the Axis screen.
Select the axis that you want to change (in our
example the PAN axis) and push the Conf
button.
• In the Params for Axis (PAN) screen, push the
Param button.
• Scroll down the list until UserAcc is selected
and push the Modify button.
• The default value for user acceleration is
100%. Stops will be smoother if you set it to a
value less than 100%. Set the new value and
push OK.
• In the Axis Params: PAN screen push the
Close button. In the Params for Axis (PAN)
screen, push the Close button.
Smoothing
The same parameter that sets soft stops (UserAcc, see Soft Stops above) also will smooth out any
irregularities, and make a pan or tilt smoother.
Page 47 of 161
ARRIMOTION User’s Guide, 09/2004
3.5. More on Recording and Playing Back Moves
Danger
The system moves on its own when moving to begin, moving to end or playing back a
move. Make sure that no humans or any other items obstruct the system and that all
cables are neatly tucked away so they do not catch on anything!
Danger
Playback of a move should be tested first at slow speeds.
Danger
During playback the system can move with high speeds.
The Counter/Status Field
During record and play back the Status Field in the top left corner of the Play/Record screen will
display a running counter. This counter is also a button: pushing it will switch from a time counter to
a frames counter. During standby the move status will be displayed in this space:
No Move
Move Begin
Move End
Not on Move
No move data is stored in memory.
The system is at the beginning of the move.
The system is at the end of the move.
After a move is loaded, or if a move is stopped in mid move, the system will not be
on the exact path of the move.
Page 48 of 161
ARRIMOTION User’s Guide, 09/2004
Camera Roll
There are various ways to fine tune who starts the camera and how. The master switch that
overrides all other settings is the Roll button in the Camera screen.
• Push the Camera tab to open the Camera screen. Push the Roll button.
• If the camera will not run at all, disregarding who turns it on or off, this setting should be NO. The
ARRIMOTION system will then ignore the camera. Even if the camera is turned on manually
while a move is recorded or plays back, the ARRIMOTION system will make no attempt to
synchronize itself to the camera. The NO setting is recommended for rehearsals.
• If the camera will run during record or play back, started by the ARRIMOTION system or
manually, this setting should be YES. In that case the ARRIMOTION system will synchronize
itself to the camera. Detail options can be set via the Setup button in the Camera screen.
• To access the detail options, push the Setup button in the Camera screen.
• Scroll down the list until you see the following three items:
Run While Record
When On, the camera will start running each time a move is recorded or
played back.
When Off, the camera will not run when a move is recorded, but it will
run each time a move is played back.
Start Camera
When On, the camera will start running each time a move is recorded or
played back.
When Off, the camera will not start running when a move is recorded or
played back. Instead, the ARRIMOTION system will expect you to start
the camera before the move. This is useful when the action begins
before the move.
Stop Camera
When On, the ARRIMOTION system will stop the camera each time a
move recording or play back is stopped.
Page 49 of 161
ARRIMOTION User’s Guide, 09/2004
When Off, the ARRIMOTION system will not stop the camera on its
own. This is useful when the action is longer than the move.
Rehearsing Without a Camera (Camera Setup)
If the ARRIMOTION system is used for rehearsals without a camera, it should know which camera it
will ultimately accommodate.
• Push the Camera tab to open the Camera screen.
• Push the Camera button. From the list choose the camera you will use.
• Push the Select button.
Page 50 of 161
ARRIMOTION User’s Guide, 09/2004
Running the camera with a different frame rate than the move
It is quite often required that the camera runs a different frame rate than the Arrimotion system when
doing CGI Effects in the Post.
Usually the frame rate is an integer factor of the Arrimotion frame rate.
The result will be that the camera records one, two, three,… and up to seven frames per frame of
the Arrimotion move.
You have to be very carefull when combining takes which where shot with different camera frame
rates since the motion blur and the exposure time will be different.
To modify the so called speed multiplier hit Setup in the camera menu, scroll down to speed
multiplier and push modifiy to change.
The camera speed will be:
camerafps = movefps × multiplier
movefps: record and/or playbackspeed of the move
Please note that the resulting value must be within the cameras limit and that the maximum move
fps will be limited to
movespeed max = cameratopfps / multiplier
cameratopfps: maximum possible frame rate of the camera
movespeedmax: maximum possible record/playback speed (will be limit during playback to the
record fps if no replay speed multiplier has been selected in the live action mode menu.
If non integer multiples are required the camera can not be synchronized anymore and has to be
run wild (without connection to Arrimotion). Be very careful when doing so since a lot of problems
can occur in the postproduction then.
Page 51 of 161
ARRIMOTION User’s Guide, 09/2004
3.6. Stop- and Go- Motion Playback
Danger
The system moves on its own when moving to begin, moving to end or playing back a
move. Make sure that no humans or any other items obstruct the system and that all
cables are neatly tucked away so they do not catch on anything!
Danger
Playback of a move should be tested first at slow speeds.
Danger
During playback the system can move with high speeds.
Basics
Stop- and Go-Motion modes work with the 435 Advanced in the CAN-Bus Mode using the
K-CAM-CCB 2 Cable (connects the camera socket on the CCB with the 435 Advanced 11 pin
Fischer Socket on the camera body.
A integrated capping shutter ICS should be used on the camera.
The single frame hand controller SFHC must not be used.
The difference between Stop- and Go-Motion
Stop Motion works like a stills camera that takes a picture on the mid shutter open position of each
frame on the move. All objects that are not moving will have no motion blur since the camera is also
not moving.
The exposure time could be as short as 1/128 of a second in Stop Motion.
Go Motion moves the camera the same amount of motion like on a live action move during the
exposure and create the same amount of motion blur like on a live action move. The moving speed
is dependent on the exposure time and the virtual shutter angle (future option) set in the go motion
options.
The minimum exposure time in Go-Motion is 1/8 of a second.
Page 52 of 161
ARRIMOTION User’s Guide, 09/2004
Setting up and Selecting Stop- or Go-Motion Mode
In the play mode list select either Stop- or Go-Motion by moving the cursor with the two arrows over
the desired play mode and push the select button
Page 53 of 161
ARRIMOTION User’s Guide, 09/2004
Modifying the Parameters of Stop and Go-Motion
To modify the parameters of the play mode push the Modify button. A list box with all parameters of
the Stop or Go-Motion mode will appear.
Start Frame
The start frame is the frame that is defined as the first frame of the sequence. This is the frame
where the system will go to when go to begin is pressed.
This is also the first frame that will be shot in a sequence.
To delete a start frame simply enter Zero.
Stop Frame
The stop frame is the frame that is defined as the first frame of the sequence. This is the frame
where the system will go to when go to end is pressed.
This is the last frame that will be shot in a sequence.
To delete a start frame simply enter Zero.
Exposure Time
The exposure time can be entered in seconds.
Fractionals
Time
½ sec
0.500s
¼sec
0.250s
1/8sec
0.125s
1/16sec
0.063s
1/32sec
0.031s
1/64sec
0.016s
1/128sec
0.008s
Minimum exposure time is 1/8 sec in Go Motion and 1/128sec in Stop Motion.
The shortest Exposure time in Go-Motion is also limited by the recording speed of the move.
The exposure time of the live action move is another limit for the minimum exposure time in GoMotion. E.g. if the live action move was recorded at 2fps the minimum exposure time will be 1/4th of
a second which is the same as the exposure time at 2fps.
Page 54 of 161
ARRIMOTION User’s Guide, 09/2004
Burst
This is the number of frames that will be shot on one position.
Interval
The interval is the time between two consecutive exposures.
If the Interval time is set to zero the system will do consecutive exposures as fast as possible.
The Interval must be larger than the time the camera needs for the exposure of a frame times the
burst number plus the time needed for the capping shutter to open and close.
Cont / Single
In continuous Mode the system will shoot the frames of the move in a continuous process with the
interval that was defined.
The process starts with the frame defined as start frame and ends at frame defined as the stop
frame.
This is very useful for time lapse operation.
In Single Mode the system will wait for a trigger for each frame. This trigger could either be a GPI
event or the EXP button in the rec/play menu.
This mode is typically used in animation.
Retreat Frame
The retreat frame can be defined as one frame of the move. It is used to give a better access to the
set e.g. for animating characters. The Arrimotion system will go to this frame on the predefined
move and return also exactly on the move.
Page 55 of 161
ARRIMOTION User’s Guide, 09/2004
The Play/Rec Screen in Stop- or Go-Motion Mode
The screen looks a little bit different from the standard play/record screen.
Play Mode
Frame Count
Goto Begin
Expose/Start
Link Mimics
Status
Goto End
Retreat
Stop
The Frame Counter Button
The Frame counter Button can be used to bring the system to a certain frame of the move.
When the button is pushed a framenumber can be entered and the system will go to that frame
number.
If the system is not on the trajectory of the move the button will show “Not On Move” .
The system can be brought on the move by pressing the button and entering a frame number or by
pressing go to begin or go to end.
When the system is not ready to shoot single frame but the system is on the move the button will
display FR(ame) followed by a frame number.
When the system is ready for shooting single frame the button will display BR(owsing) followed by
the current frame number.
Page 56 of 161
ARRIMOTION User’s Guide, 09/2004
Page 57 of 161
ARRIMOTION User’s Guide, 09/2004
The Status Button
While browsing the Button will display P(rimary) followed by the primary frame rate of move (the
frame rate the move was recorded with at the first time)
When the single frame exposure is active the Status Button will display the current operating state:
INT followed by a countdown for the interval
EXP followed by a countdown for the exposure time (might not be visible when the exposure time is
less than a second)
MOVE during the move from one frame to another or during the pre- and postroll in go-motion
mode.
The Play / Expose Button
The expose button triggers either a exposure of a single frame or burst or starts a time lapse
sequence when the system is set up with an interval for automatic operation
system is in the single mode when the button is labeled “Expose” and in the automatic mode when
the button reads “Play fwd”.
The Retreat Button
When the system is set up that each frames exposure is triggered manually (Single) the system
can be brought into the retreat position defined in the setup by pressing this button.
The button shows “Retr” followed by the number of the frame that is defined as retreat frame.
When the system is in retreat position the button shows “Next” followed by the frame number of the
next frame that should be exposed. it can be sent back to the current frame by pressing the button
again.
Page 58 of 161
ARRIMOTION User’s Guide, 09/2004
Browsing during Single Frame
When the system is ready for single frame mode it is possible to browse through the move with the
primary jog/shuttle. The bottom line indicates which jog shuttle is attached to the Timeline.
Quick Setup for Go- and Stop Motion
It is assumed that a move is loaded in the systems and all needed axes and accessories are
connected and ready and the system is in live action mode.
Push the play mode button and select either stop or go-motion by moving the cursor to the desired
mode and pushing select:
Push modify and configure the parameters:
e.g.
Expos time
Burst
Intervall
Cont/Single
0.5s
1
10sec
continuous
Page 59 of 161
ARRIMOTION User’s Guide, 09/2004
When all parameters are configured push close twice
The play / rec screen will look as follows:
Push the go to begin button and the system will enter browsing mode at frame 1
Start the go motion (or the stop motion) mode
now by pushing play fwd
Whith the suggested parameters we have created a go motion move where the frames are taken
every 10 seconds with an exposure time of half an second.
Since we haven’t defined a start and a stop frame the system will do the full move.
Page 60 of 161
ARRIMOTION User’s Guide, 09/2004
3.7. Multitrack Recording
Danger
During Multitrack recording, one or more axis can move on their own. Before starting a
Multitrack recording, make sure that no humans or any other items obstruct the system
and that all cables are neatly tucked away so they do not catch on anything!
Danger
During Multitrack recording the system can move with high speeds.
When you record a new move, the ARRIMOTION system will by default erase the move data for all
axes in memory and write the new move. This is called the Normal record behavior. In some
situations, though, it is advantageous to build a move one axis at a time. This can be done with
Multitrack recording, where you can record one axis, and then play this axis back while recording
the next one, building the move axis by axis.
Enabling Multitrack Recording
• Push the Play/Record tab to open the
Play/Record screen. Connect should be off.
• Push the Play Mode button (probably labeled
Live) to open the Play Mode screen.
• Select Live Action, and push Modify.
• In the Config Live Action Parameter screen,
select Record Behaviour. Push the Modify
button to switch to Multitrack.
• Now close the screens until you are back in
the Play/Record screen.
The Record button in the Play/Record screen will change its look when Multitrack is enabled.
Multitrack Off
Multitrack On
Page 61 of 161
ARRIMOTION User’s Guide, 09/2004
Recording Multitracks
• In the Play/Record screen, switch the Connect button on, and push the Record button. Move only
the pan this time, and not tilt or focus. Push Stop.
• Push the Axes tab to open the Axes screen. Here you set the behavior of the individual axes.
Auto
If move data for this axis exists,
the axis will play back during the
next recording. If no data exists,
the axis will record.
Rec
Any previously recorded data for
this axis will be discarded. New
data will be recorded.
Hold
Move data will be retained, and
the axis will not move at all.
In our case, select the TILT axis and push the Mode button to switch its mode to Rec.
•
•
•
•
•
Note: The Rec option is only available when you have switched the playback behavior to
Multitrack. During Normal playback, all you get is Auto and Hold.
Go back to the Play/Record screen. Turn Connect off. Push Move to Begin. Turn Connect back
on.
Now push the Record button. The previously recorded pan movement will play back, but any
tilting you do will be recorded. Push Stop when you are done.
When you stop recording a move, the ARRIMOTION will automatically set the tilt axis from Rec
to Auto, so you do not accidentally erase it.
Open the Axes screen to set the next axis you want to record to Rec. If you did not like the tilt,
set it to Rec and record it again. If you liked it, set the FOCUS to Rec.
Go back to the Play/Record screen, turn Connect off, push Move to Begin and turn Connect back
on. When you push Record, you will record the new axis while the old ones all play back.
Move Length
A multitrack move will be as long in duration as the axis with the longest duration. If a new axis you
record is longer than the previously recorded axes, the whole move will be made longer to include
the new axis. If a new axis is shorter, the move length will remain the same.
Hold
If you want an axis to not move at all, set it in the Axes screen to Hold. The Hold mode will not be
reset to Auto each time a record is made (like the Rec mode), but it will remain in Hold until you
change it.
Slow Play Back
For increased accuracy, it is possible to slow down the speed of the axes that are playing back.
Page 62 of 161
ARRIMOTION User’s Guide, 09/2004
• Push the Play/Record tab to open the Play/Record screen.
• Push the Play Speed button (it has some fps number on it). In the following screen enter a slower
fps, in our example 6 fps. Push the OK button.
• Now when you record a new axis, all previously recorded axis will play back much slower.
3.8. Reassigning Mimics
When the basic ARRIMOTION system is turned on, it will scan all available axes and Mimics, and
assign by default the hand wheels as Mimics for the CHM-1 motors, and the Lens Control System
hand units as Mimics for the CLM-2 motors:
Axis
Default Mimic
Mimic Name
PAN
Hand Wheel Pan
HW PAN
TILT
Hand Wheel Tilt
HW TILT
ZOOM
WHA-2 (with WZU) or ZMU
WHA2 ZOOM or ZMU ZOOM
FOCUS
WHA-2 (with WFU) or ZMU (with FIU)
WHA2 FOCUS or ZMU FOCUS
IRIS
WHA-2 (with WFU) or ZMU (with FIU)
WHA2 IRIS or ZMU IRIS
Note that if you have multiple MCBs or LCBs in a main controller, the ARRIMOTION system will
automatically assign the CHM-1 or CLM-2 motors plugged into the MCB or LCB that is closest to
the CCB. All other axes have to be configured manually.
It is, of course, also possible to assign the axes to other Mimics.
• Push the Play/Record tab to open the Play/Record screen and turn Connect on. This will allow
you to test your new Mimic assignment quickly.
• Push the Mimics tab to open the Mimics screen. Select the axis to re-assign in the list. In our
example we chose FOCUS.
• Push the Assign button.
• You will be presented with a list of all available Mimics. Select one (we chose the top right Jogshuttle of the Jogbox) and push Select.
• Now operate the Jogbox top right Job-shuttle to see how it moves the focus.
Page 63 of 161
ARRIMOTION User’s Guide, 09/2004
3.9. Rejecting Revolutions
When an axis reaches either the natural end
point or a limit set in software, the assigned
Mimic will still turn, but the motor will not move.
For example, if the ARRIHEAD is tilted all the
way down, the tilt axis cannot go any further, but
the tilt hand wheel will still rotate past that point.
The ARRIMOTION system can either remember
how many revolutions past that point a Mimic
was wound, or it can reject the extra revolutions
of the Mimic.
• Push the Mimics tab to open the Mimics
screen. Select the axis that you want to
change (in our example the PAN axis) and
push the Modify button.
• In the Edit Mimic: HW PAN screen, push the Reject Rev button.
• If you want the extra revolutions rejected, push Yes.
Page 64 of 161
ARRIMOTION User’s Guide, 09/2004
3.10.Jogging / Browsing
The rightmost Tab in the Jogboxscreen is assigned to the jog/browse menu.
The browsing enables the system to move through the timeline of the move, the jog function
enables the system to move the axes with the jog/shuttles of the jogbox.
Browsing is very usefull for the careful examination of the programmed move while jogging will be
used for keyframing in combination with the laptop software.
Browse/Jog menu
The Browsing Menu
Stop
Previous Frame
Goto Begin
Framecounter
Next Frame
Goto End
Close
When the system is not on move the browsing, the jog shuttle for the timeline, the goto previous and the
goto next frame buttons are disabled.
The system can be brought onto the move by either pressing goto begin, goto end or entering a frame
number in the framecounter.
The Framecounter Button
The Framecounter Button shows either "Not on Move" when the system is not on the waypath of the
move or the current frame number of the move. By pressing the button a frame number can be entered
and the system will move to that frame after entering the number.
Frame numbers without fractionals are the accurate mid shutter open position of the camera.
Page 65 of 161
ARRIMOTION User’s Guide, 09/2004
The goto previous / goto next Frame buttons
By these buttons the system can be brought accurately to the next or previous frame.
Page 66 of 161
ARRIMOTION User’s Guide, 09/2004
3.11.GPI Outputs
Danger
The GPI outputs must not be connected with voltages / currents higher than rated.
Danger
Every device connected to these GPI outputs must be secured by an external safety
device according to the regulations that apply in your country.
GPI (General Purpose Interface) Outputs are simple relay contacts that can be triggered to close or
open on certain frame numbers. These contacts can be used to control a plethora of things like
lamps in miniatures, igniters, magnetic valves,
The GPI Channels will change its state always in the mid shutter closed position (the position which
is exactly between two frames).
Defining an GPI Output Event
Select the GPI Menu and select Outputs
Now select add
Open relay
Close relay
Now enter a frame number and an output channel and select whether the relay contact should close
or open at that frame. If this has been done confirm the data by pressing set. With the test function it
is possible to check the relay output.
Page 67 of 161
ARRIMOTION User’s Guide, 09/2004
Modifying or Deleting
Select the GPI Menu and select Outputs
The event can be deleted by pressing Del.
It is possible to modify the frame number of the GPI output by changing the frame number and the
confirming the frame number with set. The range in that the frame number can be changed is limited
by the frame number of the previous and the next GPI output event on that channel.
Enabling and Disabling GPI Outputs
All GPI outputs can be globally enabled or disabled. The default setting after power on or loading a
move is disabled.
Important Note on GPI Outputs
IfEvents
GPI events are defined in a move the GPI Box has to be present to enable the system to play the move
back. If a GPI Box is not present all outputs have to be disabled to enable the system to play back the
move.
Page 68 of 161
ARRIMOTION User’s Guide, 09/2004
3.12.The Bloop Light Setup
One of the advantages of the Arrimotion system is that it supports a multi colored bloop light and a
bloop light event list.
To setup the bloop light go to the GPI menu and push the Bloop button
Push add to add a bloop light event
Enter a frame number, a brightness and pattern.
A typical setting is Frame 1, 100% brightness and all red/green.
Here we have defined a second event on frame 122.
This feature is particular useful when doing part moves (The second event is defined on the start
frame of the part move).
The test button can be used to check the selected pattern and brightness of the BLT-1.
After pushing close the events list will look as following:
Page 69 of 161
ARRIMOTION User’s Guide, 09/2004
Modifying or Deleting a BLT-1 Event
Select the desired event and push modify
It is now possible to change the pattern intensity or the frame number of the event.
When pushing Del the event will be deleted.
Important Notes on Bloop Events
If Bloop events are defined in a move the bloop light has to be present to enable the system to play
the move back. If a bloop light is not available all events that are defined in a move have to be
deleted to enable the system to play back the move.
When the system is playing back a move on very low fps the system can not be stoped during the
time the bloop light flashes.
Page 70 of 161
ARRIMOTION User’s Guide, 09/2004
3.13.GPI Triggers
The system can be started or stopped with external triggers.
To select external trigger modes push the Trigger button in the GPI menu.
A trigger source can be selected by pushing
the start or stop button, selecting a source
with the up/down keys and confirming the
source by pushing select.
When using a start trigger other than
Jogbox/Laptop the system has to be armed by
pushing the play button in the respective
menu and then it will wait for a certain
period (30 sec) for the trigger. If the
trigger doesn’t occur within that time the system disarms for safety reasons and has to be rearmed
by pushing play again.
The following sources are available:
Jogbox/Laptop
The move can be started / stoped by the corresponding buttons on the laptop or the jogbox
(default).
GPI Channels
The move can be started or stopped by applying a signal to the respective GPI input.
Camera
Not yet implemented
Page 71 of 161
ARRIMOTION User’s Guide, 09/2004
Timecode
The system will wait for a timecode value defined in the timecode window under the start trigger
source button to appear on the timecode input.
Push the button near TC Type to select the timecode type (either based on 24, 25, or 30fps).
The TC Start Value is the timecode value is sent for frame 1.
Use the following format for entering the timecode: hh:mm:ss:ff Us a colon for separation.
Leading zeroes are not required.
Page 72 of 161
ARRIMOTION User’s Guide, 09/2004
3.14.Timecode In/Out
Arrimotion generates a timecode that is synchronized to the move.
The timecode is based either on 24, 25 or 30 frames (non drop).
The timecode will be sent out in real time when playing back or recording at 24, 25 or 30fps.
When the system is playing at a non timecode speed the timecode will be sent out based on the
selected TC rate (24, 25 or 30 fps).
When the playback is done with low frame rates some timecode values will be sent out several
times per frame.
When the playback is done with very high frame rates timecode will be sent out whenever a new
timecode value can be sent but the system might drop certain values.
E.g. when shooting at 150fps with a timecode base speed of 30 fps only every 5th timecode value
will be sent out.
Timecode setup
Select timecode in the GPI menu
Push the button near TC Type to select the
timecode type (either based on 24, 25, or 30fps).
The TC Start Value is the timecode value that
is sent out for frame 1.
Use the following format for entering the timecode:
hh:mm:ss:ff Us a colon for separation.
Leading zeroes are not required.
Page 73 of 161
ARRIMOTION User’s Guide, 09/2004
3.15.VTR Control
The Arrimotion system can control any VTR that is compatible to the Sony™ RS 422 Control 1™
protocol. This is particular useful when shooting music videos to synchronize the actors or for
synchronizing actors on multiple passes.
The VTR has to be connected to the SER-2 output.
To select the VTR control push Playback in the GPI menu
The following parameters can be set in the playback menu:
Run Playback
The control of the VTR can be switched on and off. When off the VTR is not controlled by
Arrimotion, when set to on Arrimotion controls the VTR.
Preroll time
This is the duration in seconds where the VTR is started before the timecode for frame 1.
Take care that there is sufficient preroll on the tape with uninterrupted timecode.
The minimum value is five seconds.
Postroll time
This is the duration in seconds how long the VTR continues to roll after the end of the move.
Timecode Fr#1
This is the timecode value that is synchronized to frame one of the move.
Rewind
When rewind is selected then the VTR is automatically winded to the cue-in after the end of the
move. Cue in is the value of timecode fr#1 minus the preroll time.
When rewind is not selected the VTR will be cued up when the move is started (this can result in a
delay).
Page 74 of 161
ARRIMOTION User’s Guide, 09/2004
3.16.Operating the Panther dolly
Prereqisites
Prior to operating the dolly the setup and tests described in the hardware section of this manual
have to be carried out.
Special operation mode of the ACB-1
The ACB-1 will automatically assign the AUX-1 Axis to the drive and the AUX-2 axis to the lift axis.
Since the panther axes are not automatically detected the ACB-AUX1 and ACB-AUX2 axes have to
be added manually.
Before adding the axes make sure that the Panther dolly is connected and switched on.
Due to variations of motors used by Panther for the dolly there are several different sets of control
parameters that can only be assigned when the Panther dolly is switched on before adding the lift
axis.
When adding the axes the control loop parameters of AUX1 and AUX2 will automatically be set to
the parameters required for the Panther drive and lift axes.
ATTENTION: Do not alter any of the control loop parameters in the axis configuration menu since
this can lead to destruction / oscillation of the system.
Referencing methods
The panther dolly uses special referencing methods for its axes:
The track (drive) will first move towards the amplifiers side until the proximity switch that is mounted
close to the timing belt wheel of the gearbox detects the track end. Then a search sequence for the
precision detection of the position of the limit switch is carried out. Afterwards the dolly will run to the
drive motor sides direction until the other limit switch detects the opposite track end. Again a search
sequence is carried out and after completion the dolly will return to the middle of the track.
The lift axis will move down (or when lower than 12cm upwards) to find the limit switch that is
integrated in the panther. Then a precision search for the edge of the switch is carried out and the
lift column will afterwards position herself to the lowest position.
Switching between normal panther mode and motion control mode
The panther dolly is switched to Arrimotion mode as soon as the ACB-1 detects it.
When the dolly is in Arrimotion mode it will display some Error messages on its display that can be
ignored except the following:
- Amplifier overload: switch the dolly off and on again to recover. The lift axis has to be homed
again after doing so.
- Low Battery: switch off the dolly and replace the batteries.
To bring the dolly back to normal operation switch off the dolly, disconnect the Arrimotion cables
and switch it on again.
Page 75 of 161
ARRIMOTION User’s Guide, 09/2004
Pushbar tricks
Since the pushbars power is supplied from the Panther dolly it is notoperational when the Panther is
switched off.
Saving dolly battery life
The lift column of the panther draws quite a high current from the batteries when switched on (even
when not moving!). To save battery lifetime we recommend the following:
- Switch off the lift axis in the axis dialogue on the jogbox whenever possible. The system will
give a warning message prior to any play and record cycle when axes are switched off.
Switch on again then when required. The position will not be lost if the axis is switched to off
in the axis dialogue so no new homing cycle will be required when switching on again.
- Charge the dolly permanently with the panther charger when in motion control mode by
using the long charge cable that attaches directly to the panther.
- Have a set of spare batteries available.
- If the dolly is used for motion control only the internal gas springs can be exchanged to
weaker ones or two of them can be removed (diagonal). If there are weaker springs in the
dolly no one must ride it anymore.
Page 76 of 161
ARRIMOTION User’s Guide, 09/2004
3.17.FAQ / Troubleshooting
I Cannot Move an Axis
• Are all cables connected properly? Is the system turned on?
• Look in the Play/Record screen. The Connect button should be on, that is it should have
white circles on a black background.
• Look in the Axes screen. Unless the axis state is Ready, it will not move. If the axes states
are Off, maybe you forgot to home the system or those axes.
• Look in the Axes screen, at the Mode column: if the Axis is set to Hold, it will not move.
• Look in the Mimic screen. Is the Mimic you are moving really assigned to the axis you
thought it was?
Camera doesn’t start
• Are the settings for roll camera in the camera menu correct? Is start camera set to yes? Is
roll camera in the main camera menu set to yes?
Camera starts but Arrimotion doesn’t start the move
A typical indication is that after pushing play the system displays a negative framecount (preroll) for
some seconds and the stops automatically.
• Is the camera connected to the system?
• If there is a little R/S Distributor box on the right side of the 435 Advanced remove it. These
units often cause trouble.
• Is there anything elese connected to the R/S socket of the camera? Pull the cable.
• Check camera fps
• Change camera cable
Camera doesn’t accept fps / fps entry not possible
• Is the camera set to PS/CCU?
• Is the camera connected and does the camera displayed in the camera menu match with the
camera that is connected?
• Does the Arricam show CCB? Check cabling, remove any other speed controlling accessory
• Change camera cable
Couldn’t set a speed higher than the recording speed
• The play speed scaling factor has not been set to a value >1. Store your move, clear the
data out of memory (file/system menu) and record again after setting the playback speed
scaling factor. The factor reduces the top speed and accelerations of all motors to ensure
that a faster playback is definitely possible.
• Is the desired speed possible with the connected and/or selected camera?
The system will not move in GoMotion or Stop Motion in the Play Menu
• Press the Frame Counter Button to bring the system on the move. This will enable the
browsing, Goto start, Goto stop and Play button
Page 77 of 161
ARRIMOTION User’s Guide, 09/2004
I can not replay a move that was created with an older software version
• Go to the trigger menu and select a valid start trigger like Jogbox/Laptop. The old file format
doesn’t support triggers, so no valid setting for the start trigger will be in the system after
loading an old move.
I have a 435A camera connected with a K-CAM-CCB2 and it does not work in Live Action
• The K-CAM-CCB2 currently supports only stop and go motion operation in software versions
below V2.0
I can not get Ethernet connection to my CCB
• Please check all the required settings with your system administrator as described in the
network setup document that is included in the update file package.
I have selected a certain Frame for the begin (end) of a part move but when I select
go to start (end) in the play menu it doesn’t hit this frame
• The system will need a certain time to come up to speed so it goes to a position that is
somewhere before this frame to pick up the speed. This is called a preroll (postroll) and is
not a malfunction of the system. The length depends on the allowed accelerations of the
axes and the speed of the start frame.
We need to synchronize an actor (event) to the Arrimotion system
• The best method is to record the action with the actor so the camera reacts to the actor and
not vice versa. If this is not possible there are several other methods
• Use a GPI box to switch lights, buzzers,…. or any other device suitable for Your application.
The events can be programmed frame accurate.
• Use more than one bloop light events. For example set a all red/green event on frame one
as a reference for the post and then program different colours/patterns to trigger actors,…
• Connect a buzzer or a LED lamp to the connector on top fo the bloop light for marking
frames / triggering events. This is very suitable if an actor can not look at anything since it
might be in frame
• If an actor has to interact with himself in multiple passes (“multiplicity”) You can record the
first pass with the actor. While recording thhe first pass You can record the Audio of the
actor and the video assist image of the camera on a VTR that has a RS422 control input. For
the second pass synchronize the VTR to arrimotion. You will find out the correct timecode
value for frame one by searching the bloop light on the video image. From now on provide
him the Audio as a playback.
• Use the timecode output of the system and feed it into a timecode display or slate, this will
give a nice countdown for the actors
• If You need to synchronize lighting use the timecode out of arrimotion and feed it into the
lighting control desk
• When shooting a music video use either a VTR with the soundtrack that is controlled from
arrimotion as a playback or trigger arrimotion from the playback timecode.
Page 78 of 161
ARRIMOTION User’s Guide, 09/2004
4. Software
Reference
Page 79 of 161
ARRIMOTION User’s Guide, 09/2004
4.1. The File Menu
The file menu offers the options of loading moves and setups, saving them, changing system
settings and powering off the systems.
System Setups contain the following data
- axis configuration and their parameters
- mimics connections and settings
- camera settings
- play mode settings
- bloop light events
- trigger events
- output settings
Moves contain the same data as a setup but additional the motion data for each axis.
Move and Setup file do not contain system specific information like the IP-address of the CCB or
their name.
The Load Move Menu
In this menu a move can be selected by the up and down keys and loaded by pushing load.
With the information button information on the selected move like the date it was recorded can be
displayed. The menu can be exited without loading a move by pushing cancel.
Page 80 of 161
ARRIMOTION User’s Guide, 09/2004
The Save Move Menu
To save a move push the large move name button and enter a move name. The move name must
consist of at least one character. A whole group of moves can be saved under the same name with
different version (take) numbers.
The Load Setup Menu
A setup can be loaded by selecting it with the up/down keys and then pushing load. Information on
the setup can be displayed by pushing the info button. Due to the unified data structure a setup can
be extracted of each stored move.
The Save Setup Menu
A system setup can be saved in this menu. The name of the setup has to contain at least one
character. Due to the unified data structure of the system a setup with the same name as a move
will overwrite the move (the system will give you a warning). This function is particular useful when
the system has to be pre configured on a prep day to decrease setup time on the shooting day.
Page 81 of 161
ARRIMOTION User’s Guide, 09/2004
The System menu
The system menu is for customizing the system for different needs and/or operators.
System settings could be saved, loaded and changed.
The Load Settings Menu
This menu will display a list of stored settings.
The Save Settings Menu
A setup can be stored in this menu. The name of the setup has to contain at least one character.
Page 82 of 161
ARRIMOTION User’s Guide, 09/2004
The Clear Data Menu
This function will clear all move data in the RAM of the CCB and set the mode to live action /
normal.
This function can be used to enable the play back speed scaling functionality when a new move
should be crated but there is old data in the RAM.
The File Utils Menu
All user data like moves, setups, axis config, lens config and system settings can be deleted in this
menu.
WARNING: There is no undo function after a file has been deleted.
Backup your files on a PC before deleting them.
The Info menu
The info menu will display the amount of installed and available hard disk space.
Page 83 of 161
ARRIMOTION User’s Guide, 09/2004
The Settings menu
The following system parameters can be changed here:
- Warning dialogs will present a list of all warnings that can be displayed by the
system. Each dialog can be switched on or off.
- Browsing speed will set the maximum speed in percent of the move speed for
browsing.
- Primary wheel sets which of the four jog/shuttles will be used as primary. The primary
jog shuttle will have the following functions in the user interface
• Browsing in the browse menu and the single frame player
• Lens calibration in the Lens Menu
- Secondary Wheel sets which of the four jog/shuttles will be used as secondary. The
secondary jog shuttle will have the following functions in the user interface
• Not supported in V1.8
- IP-adress sets the IP address of the CCB. The new address will become valid after
the next power up of the system. The IP address is related to the CCB and can not
be stored in or recalled from a system setup file.
- CCB name will set the CCB Name for the Network. The CCB name is related to the
CCB and can not be stored in or recalled from a system setup file.
- Supply allows to set different thresholds depending on the battery type the system is
powered from for the low battery warning. The supply setting is related to the CCB
and can not be stored in or recalled from a system setup file.
- Contrast adjusts the display contrast. The contrast setting is related to the CCB and
can not be stored in or recalled from a system setup file.
- Backlight selects whether the Jogbox Backlight should be on or off
- HW Version info will display a list of all hardware versions of the connected
components
- SW Packet Version will display the version of the SW in the CCB
- System Time sets the Time. The System Time is related to the CCB and can not be
stored in or recalled from a system setup file.
- System Date sets the Date. The system date is related to the CCB and can not be
stored in or recalled from a system setup file.
Page 84 of 161
ARRIMOTION User’s Guide, 09/2004
The Warnings menu
The warnings menu will display a list with detailed information on current warnings.
The warnings menu is not implemented yet.
Power Off
Power Off will switch of the system. Take care that all relevant data has been saved before
powering off the system.
Attention:
Switch off al axes connected to an ACB-1 prior to switching of the Arrimotion system to avoid
unintended movement.
Page 85 of 161
ARRIMOTION User’s Guide, 09/2004
4.2. The Axis Menu
All axis relevant data and states can be configured in the axis menu. It represents a list of axes that
a re configured.
The list starts with real (physical) axes and is followed by all capture axes.
Real axes are all basically the electrical motors and gears that drive a function in the system.
Examples for real axes are PAN, TILT, FOCUS,…
A physical axis can produce motion.
Capture axes are axes that can only report their positional information but do not have the possibility
to reproduce motion by them self.
Examples for capture axes are the LDS System, the Encoded Arrihead,…
The On/Home Button
An axis physical axis has to be switched on to enable its motor. This can be done by selecting the
desired axis with the up/down keys and then pushing on/home.
If an axis does not know its absolute position, the “off” indicator right to the axis name will change to
“?”. The question mark represents that the axis is operational but needs to be referenced. As long
as an axis is not referenced it can not be moved by any mimic.
Push the On/Home button again to start referencing the axis.
The axis will then perform the homing sequence that has been set in the axis parameters.
While axes connected to a MCB or ACB are homed a warning dialogue with the option to abort
homing will be displayed. When axes connected to an LCB are homed no such dialogue will be
displayed to speed up homing of the LCB axes.
Page 86 of 161
ARRIMOTION User’s Guide, 09/2004
The Conf menu
The Conf menu offers all the tools reqired to setup an axis and its controller.
There are some restrictions to the axis configuration:
The ZOOM, FOCUS and IRIS motors have to be connected to the leftmost LCB and the axes must
be named ZOOM, FOCUS and IRIS to operate as the lens axes in the lens and camera menu.
When using an Encoded Arrihead the following restrictions apply:
The encoded Arrihead and the two CHM motors driving the Arrihead must be connected to the
same MCB.
The Arrihead PAN motor must be connected to the PAN socket of the MCB.
The Arrihead TILT motor must be connected to the TILT socket of the MCB.
When using an Panther Evolution Dolly System the following restrictions apply:
The Panther CAN-Bus cable, the drive and the lift axis must be connected to the same ACB.
The drive amplifier box must be connected to the AUX-1 socket.
The lift collum cable must be connected to the AUX-2 socket.
Page 87 of 161
ARRIMOTION User’s Guide, 09/2004
The Param(eter) Menu
Be careful when changing parameters in the conf menu since alteration of parameters can lead to
unintended movement, oscillation, instability or damage of an axis.
The following parameters of the selected axis can be configured here
-
-
-
-
-
-
Homing Method selects the method which is used to figure out the absolute position.
Be careful to select a homing method that works with the selected axis.
User Vel sets the velocity that can be governed by a mimic in percent of the
maximum axis velocity.
User Acc sets the acceleration that can be governed by a mimic in percent of the
maximum axis acceleration.
UPreRollAcc sets the maximum acceleration for the preroll. Do not set the preroll
acceleration to a smaller value than the user acceleration.
UPostRollAcc sets the maximum acceleration for the postroll. Do not set the postroll
acceleration to a smaller value than the user acceleration.
MaxCurrent sets the maximum current for the LCB motors. 50% is a comparable
setting to the Lens Control System. This value will also be used as the trip level for
the homing by end stop.
FWD Limit is the maximum position of an axis measured in encoder counts. Some
home methods set these limit during homing (all methods that are based on finding
two endstops and the panther lift axis)
REV Limit is the minimum position of an axis measured in encoder counts. Some
home methods set these limit during homing (all methods that are based on finding
two endstops and the panther lift axis)
Limit Tolerance in encoder ticks that a motor can overshoot the set limit. This
parameter is needed in the case that the detected travel of axis varies after a further
homing attempt.
Error Limit is the maximum allowed Magnitude of the difference between
commanded and actual position in ticks that is tolerated by the system without
warning.
Shut off Limit is the Magnitude of the difference between commanded and actual
position where a emergency shutoff is done by the axis controller
KP Proportional term of the control loop (only on ACB-axes)
KD Derivate term of the control loop (only on ACB-axes)
KI Integral term of the control loop (only on ACB-axes)
I Limit maximum magnitude of the integrator component in the summation term of the
control loop
Vel FFWD Velocity feed forward term of the control loop (only on ACB-axes)
Page 88 of 161
ARRIMOTION User’s Guide, 09/2004
-
Acc FFWD Acceleration feed forward term of the control loop (only on ACB-axes)
DAV Range Number of sampling intervals for the derivate term
The Name Menu
This Menu sets the name that is displayed in the axis menu.
The Cntrl Menu
Select the controller that the axis is connected to when the axis is switched to a other controller.
Page 89 of 161
ARRIMOTION User’s Guide, 09/2004
The Load Menu
A pre configured axis can be loaded by selecting it from the list box and pushing load.
The Save Menu
The configuration of a single axis can be saved. The name must contain at least one character.
The Del(ete) Button
An axis can be deleted from the axis listing by pushing delete.
Page 90 of 161
ARRIMOTION User’s Guide, 09/2004
The Off Button
An axis can be switched off by pushing off.
If the axis is fitted with a safety brake the brake will be engaged.
As long as the system is under power and the axis is not disconnected the axis will memorize its
position.
The Free Button
Free releases the control loop on an axis. The axis can be moved manually after switching it to free.
Axes that are fitted with safety brakes can not be switched to free.
Axes with safety brakes are for example
- CHM motors on pan and tilt
- Panther lift
- Panther drive
The Mode Button
The mode button toggles the axis states
- AUTO: axis is in record if there is no data for that axis and in play as soon as data
has been recorded
- REC: axis is set to record new data (in multitrack mode only).
- HOLD: axis holds its current position but will not move during record or playback.
Page 91 of 161
ARRIMOTION User’s Guide, 09/2004
The Add Menu
An axis can be added here. All axes connected to an ACB have to be added manually since there is
no auto detection method implemented in the ACB.
Axes connected to a second MCB or LCB attached to a CCB will not be auto detected.
Note: The Panther Evolution has to be switched on before entering the add menu when the correct
axis parameters for the drive and lift should be loaded to the ACB on which the Panther CAN bus is
connected.
Page 92 of 161
ARRIMOTION User’s Guide, 09/2004
4.3. The Mimic Menu
The mimics menu presents a list of axes-mimic relationships. All mimic related parameters can be
changed in this menu.
The Assign Menu
Each axis will require a mimic assigned to it when it should be moved during recording a move.
There is a wizard that automatically assigns mimic to some axes upon power up of the system
based on the following rules:
- Each CHM motor will get its own handwheel as a mimic
- The Focus motor will get the WHA-2 WFU Focus mimic or the ZMU-Focus mimic if
no WHA-2 was detected.
- The Iris motor will get the WHA-2/WFU Iris mimic or the ZMU-Focus Iris if no WHA-2
was detected.
- The Zoom motor will get the WHA-2/WZU Zoom mimic or the ZMU-Zoom mimic if no
WHA-2 was detected.
- The 1st axis on the ACB which detects a panther dolly will get the Panther drive axis
and will be linked to the force sensitive pushbar if detected.
- The 2nd axis on the ACB which detects a panther dolly will get the Panther lift axis
and will be linked to the panther lift controller.
If a move is loaded from the hard disk no auto assignment of mimics will take place to avoid
unintentional behavior.
Note: The ZMU has to be switched on before entering the assign menu.
Note: The Panther Evolution has to be switched on before entering the assign menu. Otherwise the
push bar and panther lift mimic wouldn’t be visible.
Page 93 of 161
ARRIMOTION User’s Guide, 09/2004
The Modify Menu
The modify menu offers the following functions:
- Changing the range of an axis (soft stops)
- Resetting the range of an axis to its maximum travel set in the axis configuration
menu
- Rejection revolutions
The Axis Range
If the range of a axis should be limited (e.g. to hit a certain endpoint) this can be done by setting
minimum and / or maximum limits for an axis.
Set limits as following:
Figure out if it’s the maximum or the minimum limit by moving the axis towards the limit from the
desired side and observing the Current Value display.
If the numbers decrease push the Set Min button on the desired position.
If the numbers increase push the Set Max button on the desired position.
The dampening with which the limits will be hit can be altered by changing the user acceleration
parameter in the axis configuration on the corresponding axis.
When a limit is active the corresponding button will toggle to Rel Limit (release limit).
Attention: The limits set in the mimics menu will apply to the mimic only; it is called a relative limit.
The absolute limits are a different set of limits that limit the total possible travel to the maximum
possible of an axis. Do not use the relative mimics as safety limits as they will not apply to loaded
moves. If you want to change the axis limits find out the values of these limits by jogging the axis to
these positions and set these limits in the axis menu.
Page 94 of 161
ARRIMOTION User’s Guide, 09/2004
The Default Button
Default resets the limits that were set in the mimics menu to the maximum allowed travel of the axis.
The Reject Revolution Menu
Rejection revolutions is a eat feature of the Arrimotion system: It will take care if You crank a axis
into its limits that the mimic will pick up moving the axis accurately on the same position of the
mimics wheel where it hit the axis limits. By using this function the system will memorize the pins
position (e.g. on the Arrihead) without the need to wind back several turns on the mimic.
The Gear Ratio Menu
The gear ratio of a mimic can be changed by pushing the arrow on the screen or by pushing the
gear ratio button and entering a gear ratio.
Negative numbers or moving the arrow to the left half of the gear ratio indicator will reverse the
direction of the mimic.
Page 95 of 161
ARRIMOTION User’s Guide, 09/2004
4.4. The Camera Menu
The camera menu allows setting all camera related functions of the Arrimotion system.
The fps Buttom
The camera fps is the camera speed that is used to shoot the move. It must be within the limits of
the selected camera.
The Camera Menu
The camera menu displays a list of all cameras that can be used with Arrimotion.
Select the camera that is connected to the Arrimotion system.
Arrimotion will synchronize to all cameras except the “435Advanced CAN” and the “Unknown
Camera”
Page 96 of 161
ARRIMOTION User’s Guide, 09/2004
The “435 Advanced CAN” is the only camera that is slaved to Arrimotion and allows complete
control of all camera functions. This camera is the only camera that can be used for stop motion, go
motion and repeatable speed ramping (implemented from V2.0 on)
The “Unknown Camera” is a special camera that can be used when there is no connection to the
camera available that sits on the system. It offers the following limits and constraints
- 0.001 to 150fps
- no pre or post roll
- the camera is not synced to the system
- the camera is not started or stopped by the system
This camera type can be used when there is the need of shooting with a camera that can not be
connected to the Arrimotion system.
WARNING: It might cause problems in post production when the camera is not synchronized to the
Arrimotion system.
The Base Exp(osure) Button
The Base Exposure function is not yet implemented.
The Shutter Angle Button
This button allows setting the shutter angle on all cameras with an electronic shutter.
Page 97 of 161
ARRIMOTION User’s Guide, 09/2004
The Setup Menu
The setup menu displays all important limits of the selected camera and allows controlling certain
functions of the camera.
Min FPS Fwd
This indicates the minimum camera speed that the selected camera can run forward.
Max FPS Fwd
Indicates the maximum camera speed the camera can run forward. This speed can be limited to a
lower value by a magazine, the supply voltage or some other parameters. See the corresponding
camera manual for further information.
Min FPS Bwd
This indicates the minimum camera speed that the selected camera can run in reverse.
Max FPS Bwd
Indicates the maximum camera speed the camera can run in reverse. This speed can be limited to a
lower value by a magazine, the supply voltage or some other parameters (some magazines can not
run in reverse). See the corresponding camera manual for further information.
Ramp acceleration (435 Advanced CAN only)
This indicates the maximum ramping acceleration of the camera movement.
Electronic Shutter
Indicates that an electronic shutter is available and enabled in the camera.
Min Shutter
Indicates the minimum shutter angle of the camera
Max Shutter
This indicates the maximum shutter angle of the camera.
Shutter Speed
This indicates the maximum angular speed of the shutter.
Shutter pulse phase
Indicates the phase angle of the shutter pulse for synchronization
Page 98 of 161
ARRIMOTION User’s Guide, 09/2004
ICS Status (435 Advanced CAN only)
Indicates the capping shutter status
SFHC
This selects if the external camera has a single frame controller connected (and is not a 435
Advanced over CAN). If this is selected a relay of the GPI Trigger Box with the address 0 is
triggered on each exposure.
This option will only work in stop and go motion (trigger position in go-motion might need external
post-processing).
Capping while wind (435 Advanced CAN only)
Selects if the capping shutter should be closed while the camera is winding
Wind camera (435 Advanced CAN only)
Wind camera allows winding a camera a defined number of frames forward or backward. This
function is only supported on the 435 Advanced connected with a K-CAM-CCB 2.
Wind speed (435 Advanced CAN only)
This indicates the winding speed. The winding speed is set to 5fps.
Run while Record
This selects if the camera should run during record or not. This control can be overrided by the roll
camera button in the camera menu.
Start camera (not available with 435 Advanced CAN)
This selects if Arrimotion starts the camera or if this is done manually. If its set to no the camera has
to be started manually before playing or recording a move.
Stop camera (not available with 435 Advanced CAN)
This selects if the camera is stopped by Arrimotion after recording / playing a move.
Preroll (not available with 435 Advanced CAN)
This selects the number of preroll frames. The number of preroll frames will be accurate on the 435
Advanced CAN, on all other cameras a slight deviation of the number of frames can occur.
In the 435 Advanced CAN Mode these frames will not be exposed automatically but there is a
separate trigger button for them in the camera remote menu.
Postroll (not available with 435 Advanced CAN)
This selects the number of post roll frames. The number of post roll frames will be accurate on the
435 Advanced CAN, on all other cameras a slight deviation of the number of frames can occur.
In the 435 Advanced CAN mode these frames will not be exposed automatically but there is a
separate trigger button for them in the camera remote menu.
Direction
Selects the camera shooting direction (forward or reverse)
Page 99 of 161
ARRIMOTION User’s Guide, 09/2004
Speed multiplier
This control allows to select multiple camera speeds. The camera will run the move fps times the
speed multiplier. This function will not work when the camera is speed ramping.
Run in Reverse Move
This selects if the camera should also run when the move is played in reverse. This function will not
work when the camera is speed ramping.
Page 100 of 161
ARRIMOTION User’s Guide, 09/2004
The Ramp Menu (435 Advanced CAN only)
The ramp menu offers all controls for shutter compensated speed ramps with the 435 Advanced
CAN camera.
Ramp
Selects ramping mode is switched on.
Compensation
This selects if Shutter compensation is desired. If off no exposure compensation is performed or a
ICU can be used to compensate exposure.
Ramp mode
This selects if the camera ramp is being recorded or played back. Play can only be selected after
ramp data has been recorded.
Ramp mimic
If this control is set to manual the camera speed can be controlled by the mimic that is linked to the
camera speed in the mimic menu. If automatic mode is selected the ramp can be started with the
corresponding control button of the jog box mimic that is connected to the camera.
Please note that the camera speed can only be controlled with one of the four jog box mimics.
Top fps
Sets the upper speed limit of the ramping mode
Bottom fps
Sets the lower limit of th ramping mode
Duration
This sets the minimum speed to get from bottom to top fps or vice versa.
Page 101 of 161
ARRIMOTION User’s Guide, 09/2004
The Footage Counter
The footage counter represents the footage counter of the camera. When a 435 Advanced CAN
camera is connected to the system the footage counter will switch to a frame counter.
The Roll Button
The roll button selects if the camer shall be synchronized / run during record and playback or if the
camera should stay in standby (e.g. for rehearsals)
When roll camera is activated with a 435 Advanced CAN camera the camera will enter motion
control mode.
The Remote Menu
The remote menu allows the remote control of the camera like WRC in CAM mode. The screen
represents the cameras display and control buttons.
When a 435 Advanced CAN is selected this menu will be limited to a RUN button to shoot slates.
Page 102 of 161
ARRIMOTION User’s Guide, 09/2004
4.5. The Lens Menu
The purpose of the lens menu is the indication of focus, iris and zoom settings in their
corresponding measurement units. The conversion from encoder counts is based on conversion
tables. These tables can be created, modified, stored and retrieved manually or they will be
automatically created based on the LDS system in later software versions.
The Focus, Iris and Zoom Display
These will indicate the current position of the corresponding lens axis. If they indicate “CAL” the
corresponding axis is not yet calibrated or no conversion table is available.
If they indicate “n.a.” the axis is not available or no motor is connected to this axis.
The Config Menu
The Config menu gives access to the Lens calibration file system and the lens calibration tables.
Page 103 of 161
ARRIMOTION User’s Guide, 09/2004
The Focus, Iris and Zoom Table Buttons
The correction tables consist of several records of data that contain a pair of encoder ticks to
absolute value entries.
Adding values should be carried out by pushing the Add button.
Move the lens now to the desired position using the primary wheel (as defined in the system menu)
and enter the corresponding value by pushing the value button followed by pushing set.
Several entries can be created now. We suggest entering all marked positions of the corresponding
lens barrel.
By pushing add new entries can be added, by selecting one of the data with the up/down arrows
pairs and pressing delete this data pair could be removed.
The Load Button
The load buttons allows loading calibration tables from the hard disk.
Please not that Arri lenses come in eight different metric and eight different imperial calibrations.
We suggest using exactly the same lens since calibration may vary from lens to lens of the same
type. Other manufacturers have individually calibrated lenses so it might be necessary to create a
Page 104 of 161
ARRIMOTION User’s Guide, 09/2004
table for each single lens. The calibration can be done during checkout and the tables can be saved
to the internal hard disk. The tables can then be retrieved from the hard disk during shooting to
speed up the lens calibration process.
The Save Button
The save button allows to save lens calibration tables to the hard disk.
The New Button
The new button will delete all calibration information stored in the system (not on the hard disk, so
no files will be deleted).
The Param Menu
Focus Scaling
Selects either metric or imperial scaling units
Zoom selected
Selects if a zoom lens is used or not
Focus direction, Zoom Direction, Iris Direction
Selects the direction of the focus motor (depending on which side of the lens the motor is mounted)
Lens principal point
This defines the distance of the principal (nodal) point of the lens to the film plane.
Page 105 of 161
ARRIMOTION User’s Guide, 09/2004
4.6. The Rec/Play Menu
Play mode
Status Indicator
Frame Counter
Time code Display
Frame Rate
Single Frame Status
Link mimics
Goto end
Goto begin
Stop
Play/Expose
Record
Retreat
This menu is the most important of the system since it enables the user to create, modify and replay
moves.
The Position / Frame counter / Time code Button
The position counter indicates the current position of the system on the move.
It can be switched from time code to frame count by pushing it.
It will display the following messages
Not on move
The system is not positioned on the move. One or more axes are not
positioned on a point of the move. Use the go to start, go to end
or the browsing menu to get the system on the move.
No move
No move data is stored in the system. Record a move or load a move
from the file menu.
Page 106 of 161
ARRIMOTION User’s Guide, 09/2004
The Play Mode Menu
The play mode menu allows the selection of the following play modes
Live Action
This is the only mode which allows recording of motion. The recording or
the playback can be done at various camera speeds.
Part Move
This mode allows playing back a part of the move.
Stop Motion
This mode will play the move in a frame by frame manner. The camera
will not move during exposure. Exposure time could be as small as
1/128s.
Go Motion
Go Motion mode is similar to stop motion but the camera is moving the
same amount as she would do in live action. The advantage of go motion
is that the recorded images have the similar motion blur as in live action
mode. Exposure time could be as small as 1/8 of a second but we
suggest to use exposure times well above one second to reduce shake.
The Select Button
By pushing select one of the above play modes can be selected.
Disable multitrack mode in live action if it was activated before selecting any other play mode.
Page 107 of 161
ARRIMOTION User’s Guide, 09/2004
The Modify Button (Live Action)
The modify button will give access to the parameters of the selected play mode.
In live action mode the following items can be varied:
Play speed scaling
If playback at a higher frame rate than the move will be recorded at is
required then this multiplier has to be set to the appropriate factor. The
maximum possible playback speed is given by the following formula
MaxPlayfps = Re cfps × Multiplier
Record Behaviour
Normal will record all axes simultaneously.
Multitrack will enable multitracking -> one or more axes can be
re-recorded.
Select the axes that should be re-recorded in the axis menu
The Modify Button (Part Move)
Start Frame
Start Frame will define the frame where playback will start.
If no number is entered the system will start playback at frame one.
Please not that if some axes are already at speed during frame one a pre
roll will be required that can move axes well before their respective
positions in the selected start frame.
Stop Frame
Stop Frame will define the frame number where playback stops. All axes
that are still at speed in that frame will do a post roll. The axes can have a
certain amount of “overtravel” past the end frame.
Page 108 of 161
ARRIMOTION User’s Guide, 09/2004
The Modify Button (Go- and Stop Motion)
The following parameters can be modified in stop and go motion mode:
Start Frame
First frame of playback (similar to part move)
Stop Frame
Last Frame of playback
Exposure time
Exposure time in seconds. The minimum time is limited to 1/8 of a second
in go motion and to 1/128s in stop motion
Burst
Number of exposures in a certain position
Interval
Interval between consecutive exposures. If zero is entered the minimum
possible delay will be used.
Cont/Single
Continouos will automatically expose a sequence of frames from the start
to the stop frame, Single waits for a trigger on each exposure.
Retreat Frame
For animation work a retreat frame can be defined to give the crew better
access (to move the camera and rig out of their way)
Page 109 of 161
ARRIMOTION User’s Guide, 09/2004
The fps Button
This button sets the frame rate in live action and part move mode. During stop and go motion it will
give information on the current status of the exposure.
The Lock Mimics Button
Locking mimics will enable the mimics and the axes will exactly follow the positions commanded by
the mimics. If the button is not selected the system can e.g. play back moves.
The Goto Start Button
Pushing this button will move the system to the start position. The start position is the begin of the
preroll (or frame one in stop motion mode).
The Goto End Button
Pushing this button will move the system to the end position. The start position is the begin of the
preroll (or the last frame one in stop motion mode).
The Play Button (available in Live Action, Part Move, and in Stop- and Go Motion Mode in
continuous mode)
Pushing play will start the replay of the move. If the system is not on the start or the stop position of
the move this button is inactive.
The Expose Button (available in Stop- and Go Motion mode with manual exposure instead of
the play button)
Pushing expose will trigger the exposure of a single frame.
The Stop Button
Pushing the stop button will decelerate the system smoothly to standstill.
The stop button is not an emergency cutout button since axes will not stop immediately.
The Record Button (available Live Action Mode)
The record button will trigger the recording of a move. In multitrack mode the button will show a
combined play/rec icon.
The Retreat Button (available in Stop- and Go Motion mode)
Pushing retreat will move the system on the move to the selected frame.
The Timeline Wheel (available in Stop- and Go Motion mode)
The system will browse through the move when rotating the primary mimic.
Page 110 of 161
ARRIMOTION User’s Guide, 09/2004
4.7. The Trigger and Synchronization Menu
The trigger and sync menu will give access to all functions that are required to either synchronize
the arrimotion system to any other device or to control or synchronize any other device from
Arrimotion.
The Outputs Menu
The outputs are Form C relay contacts housed in the GPI trigger box. Each GPI trigger box has
eight output channels that can be opened or closed in any frame of the move.
The Enable Button
The Enable button will globally enable or disable all output relays. This is particularly useful when no
action of the relays is required during rehearsals.
Page 111 of 161
ARRIMOTION User’s Guide, 09/2004
The Modify Button
The modify button will give access to the parameters of a GPI event. The frame number of the event
can be edited by pushing the frame button.
The Add Button
By pushing the add button a new GPI event can be added. Select the frame number, the channel of
the GPI event and the event type (open or close relay). By pushing test the corresponding channel
will be activated, by pushing Set the event will be added to the event list. Leave the menu by
pushing close.
The Trigger Menu
The trigger menu will define the events upon which Arrimotion will start or stop the playback or
expose a single frame during the manually triggered stop and go motion mode.
Page 112 of 161
ARRIMOTION User’s Guide, 09/2004
The Start Trigger Field
The start trigger field defines the type of the event Arrimotion is starting the playback.
If any other event than Jogbox/Laptop has been selected the system has to be armed by pushing
the play button in the play menu and then the system waits that the trigger occurs. For safety
reasons there is a timeout. If the timeout period is over the system will not accept the trigger
anymore and will go back to the play menu.
The Stop Trigger Field
The stop trigger is the event upon arrimotion stops the playback of a move.
The external trigger input must not be used for safety cutout switches since it does not fulfill the
safety regulations for cutout switches.
The Bloop Menu
The bloop menu controls the function of the bloop light. It presents a list of bloop events that can be
edited.
Page 113 of 161
ARRIMOTION User’s Guide, 09/2004
The Modify Button
By selecting a bloop event from the events list and pushing modifiy the position, intensity and
pattern can be edited or the event can be deleted.
By pushing frame a frame number for the bloop event can be entered, by pushing intensity the
intensity of the event can be modified and by pushing the event type the pattern can be modified.
To see a preview of the pattern push the test button.
The Add Button
The add function will create new events. Push set to add the event to the list after all settings for the
event are made.
Page 114 of 161
ARRIMOTION User’s Guide, 09/2004
The Timecode Menu
The timecode menu will control the mode of timecode that is being read and sent out by the system.
The timecode will be sent out frame rate independent.
Attention:
If the frame rate of the record/playback is lower than the timecode frame rate of the selected
timecode system some values will be sent out more than once, if the frame rate of the
record/playback is higher some timecode values will be skipped.
The TC Type Button
Select the type of time code that is being used. Drop Frame time code is not supported
The TC Start Button
The time code start button will define the time code number that is sent out on frame one of the
move. The time code will be incremented on each frame.
Page 115 of 161
ARRIMOTION User’s Guide, 09/2004
The Playback Menu
The playback menu offers all controls needed to run a external VTR or ATR in sync with the
Arrimotion system.
Since Arrimotion is continuously syncing on the camera the timebase of the VTR or ATR should be
at least as precise as the cameras timebase to reduce drift.
Please allow a tolerance of up to three frames when a camera is synchronized to Arrimotion.
For maximum precision use a 435 Advanced over CAN bus since Arrimotion will have full control
over this camera and no camera sync phase is needed.
The control is carried out over RS422 using the Sony® Control 1™protocol.
The following controls are available in the playback menu
Run VTR
Enables or disables the VTR control
Preroll time
This is the time in seconds that the VTR is cued up to prior to the time
code for Frame one. Do not use values less than five seconds.
Postroll time
this is the time in seconds that the VTR continues to play after the
playback of the move is finished.
Timecode Fr#1
Defines the time code value that the VTR will be at on frame one of the
move.
Rewind
If selected Arrimotion will automatically rewind the VTR to the cue in time
code after playback is stopped.
Page 116 of 161
ARRIMOTION User’s Guide, 09/2004
4.8. The Browse / Jog Menu
The Browse / Jog menu can be used to move axes independent of their mimics or to examine a
move.
Browsing will always move all axes according to their stored motion path (a.k.a. move) and van be
used for a precise analyses of the recorded move.
Jogging will move any axis within their limits and can be used e.g. for manual homing or for
wrapping the equipment (e.g. retracting the Panther lift column).
The Browse Menu
Stop
Previous Frame
Goto Start
Next Frame
Goto End
Framecounter
Before Browsing can be done the system has to be on any point of the move. This can be
accomplished either by pushing go to start, go to stop or by pushing the frame counter button and
entering a frame number to which the system should go.
When in browse modus the system can be moved by the four go to buttons (start, stop, previous,
next) or the jog shuttle that is assigned to the primary wheel in the system menu.
Pushing stop will exit browse mode.
Page 117 of 161
ARRIMOTION User’s Guide, 09/2004
The Jog Menu
Axis Button one
Axis Button four
Axis Button two
Axis Button three
Group down
Group up
Group indicator
The Jog menu is arranged in groups of up to four axes. The axis within a group can be selected by
pushing the axis button and selecting an axis. Each axis can only be assigned to one button in a jog
group but it can appear in several groups.
The axis buttons are linked to the jog shuttle wheels on the jog box.
Axis button one is linked to the top left, Axis button two is linked to the bottom left,
Axis button four is linked to the bottom right and Axis button four is linked to the top right one.
The four Axis Buttons
The four axis buttons will display the name and the current position of the axis.
They will also display the key frame status in conjunction with the laptop software.
A key frame can be set by pushing the button that is corresponding to the jog shuttle wheel.
When pushing the axis button the desired axis that should be displayed on the button can be
selected from a list. Axes that are already assigned to a other axis button in the jog group will not be
shown.
When you want to move a axis to a other axis button within the jog group first go to the current axis
button and select <none> and then go to the new axis button and select the desired axis.
Page 118 of 161
ARRIMOTION User’s Guide, 09/2004
5. Hardware
Reference
Page 119 of 161
ARRIMOTION User’s Guide, 09/2004
5.1. ARRIHEADs
Danger
Whichever ARRIHEAD is used, it should NEVER be operated upside down, as that would
damage the head.
Danger
Disconnect the System from the power supply or battery when assembling, disassembling
or servicing the equipment.
The ARRIMOTION system can work with a regular ARRIHEAD-1, a regular ARRIHEAD-2 or with an
Encoded ARRIHEAD-2.
Exchanging the Position Pin
On the pan and tilt gear boxes of all ARRIHEADs, one screw must be exchanged for a special pin
with a hex driver head (use a 2.5 mm hex driver). These special pins come with the CHM-1 motors.
Some ARRIHEADs already have pins with slotted heads; those must also be replaced with the pins
with the hex driver heads.
Position Pin with
Hex Driver Head
Position Pin with
Slotted Head (replace)
Position Pin
on Tilt Gear Box
Encoded ARRIHEAD-2
The Encoded ARRIHEAD-2 is equipped with position sensors on the main pan gear and on the left
rail of the tilt mechanism and there are three sensors for the three locks.
• Encoders in the pan and tilt mechanisms provide higher precision in position detection (=easier
and more accurate homing).
• Automatic lock detection
Page 120 of 161
ARRIMOTION User’s Guide, 09/2004
• Automatic gear check during homing
• Automatic detection of CHM-1 motors
• Automatic identification of the ARRIHEAD-2
Identifying an Encoded ARRIHEAD-2
An Encoded ARRIHEAD-2 has a connector on the base housing. An ARRIHEAD-2 prepared for
encoders has a connector on the base housing that is covered by a plug. A plain old ARRIHEAD-2
has no connector on the base housing.
Connector for ARRIMOTION on ARRIHEAD-2 with Encoders
Connecting an ARRIHEAD-2 with Encoders to the ARRIMOTION system
• Use cable K-ARRIH-MCB to connect the connector on the Encoded ARRIHEAD-2 to the
ARRIHEAD connector on the MCB-1 closest to the CCB-1.
• The head will be automatically identified when the ARRIMOTION system is turned on, and during
homing the other features will be activated (automatic lock detection, home marking and
automatic gear check).
Adapter Plate-2 for ARRIHEAD-2
The Adapter Plate-2 slides onto the ARRIHEAD-2 instead of the usual balancing sled. Since there
are fewer components then between camera and ARRIHEAD, the whole structure is more stable. In
addition, the camera sits lower, which makes nodal positioning of the camera possible.
The Adapter Plate-2 mounted on the ARRIHEAD-2
Page 121 of 161
ARRIMOTION User’s Guide, 09/2004
5.2. The Head Adapter Mounting Bracket
The Head Adapter is used to attach the main controller to an ARRIHEAD-2. It can be attached to
the left or right side cover of the main controller. The ARRIHEAD-2 must be equipped with the
Accessory Bracket, which was previously used to attach a battery holder.
When attached to the ARRIHEAD with the Head Adapter, the main controller can contain up to a
CCB-1 and five other modules. Otherwise the weight is too much for the Head Adapter.
Attaching the Head Adapter
• Use a 2.5 mm hex driver to remove the 3 screws that hold the upper bar in place.
3 Screws holding upper bar in place
2 bottom screws
• Loosen the two bottom screws, but don’t remove.
• Place the upper bar into the top dovetail groove on the side cover as shown in the picture.
Top Dovetail Groove
Upper Bar
Bottom Dovetail
Groove
• Hook the lower portion of the Head Adapter into the bottom dovetail groove.
• Put the 3 screws back into the Head Adapter and upper bar.
• Move the Head Adapter into the desired position and then tighten the 3 upper and two lower
screws. It is best on an ARRIHEAD-2 to position the Head Adapter in the middle. Move to
another position only if the main controller interferes with your other camera equipment.
Removing the Head Adapter
• Use a 2.5 mm hex driver to remove the 3 screws that hold the upper bar.
• Partially loosen the bottom two screws.
• Remove the Head Adapter and the upper bar from the main controller.
• Put the 3 screws back into the Head Adapter and upper bar so you don’t loose them.
Page 122 of 161
ARRIMOTION User’s Guide, 09/2004
5.3. Configuring the Main Controller
The main controller is the brain of the ARRIMOTION system. It consists of at least the CCB-1. Its
features can be expanded by attaching various other modules. Here are all the items that the main
controller can consist of:
• Camera Control Box (CCB-1)
• Motor Control Box (MCB-1)
• Lens Control Box (LCB-1)
• Auxiliary Control Box (ACB-1)
• Side Covers (included in CCB-1)
• Head Adapter (to mount main controller to the ARRIHEAD)
A typical main controller configuration
(from left to right: left side cover, CCB-1, MCB-1, LCB-1, right side cover)
Working on the Main Controller
• Make sure no power is applied to the CCB-1, and disconnect all cables from all modules before
assembly or disassembly of the main controller.
• Assembling or disassembling a module while it is still powered up will lead to the destruction of
the module and possibly all other connected modules.
• Assembly or disassembly of the main controller should only be carried out in an ESD safe
workplace. Such a workplace should consist at least of:
- a grounded work matte,
- a grounded wrist band,
- a grounded matte on the floor,
- a conductive seat,
- proper grounding of all components.
- It is absolutely necessary to wear antistatic clothing and shoes.
• Do not touch the electronic boards and the contacts of the connectors.
• The main controller should only be operated when:
- both side covers have been installed,
- and all modules have been safely attached to each other.
Page 123 of 161
ARRIMOTION User’s Guide, 09/2004
Tools
For basic assembly and disassembly of the ARRIMOTION main controller, the following tools are
needed. These tools can be found, for instance, at www.wiha.de.
• 3mm hex driver, for instance WIHA Type 353, order number 01227
• 2,5mm hex driver, for instance WIHA Type 353, order number 01226
• 7x1, 05mm straight slot screwdriver (7mm wide, 1,05mm thick blade), for instance WIHA Type
148, order number 00101
Adding and Removing Modules
The order in which expansion modules are attached to the CCB-1 is irrelevant, although we suggest
the following order: CCB - MCB (s) - LCB (s) - ACB (s). This is so the modules consuming higher
current are closer to the CCB.
A maximum of 16 modules can be attached to the CCB-1, limited by the total current draw. Here
some theoretical maximum configurations:
• 2 MCBs, 1 LCB, 14 ACBs, or
• 1 MCB, 3 LCBs, 12 ACBs, or
• no MCB, 5 LCBs, 11 ACBs.
When attached to the ARRIHEAD with the Head Adapter, the main controller can contain up to a
CCB-1 and five other modules. Otherwise the weight is too much for the Head Adapter.
1. Remove the Head Adapter
It is more comfortable to work on the main controller without the Head Adapter attached. A detailed
description of the removal process can be found in the chapter “The Head Adapter Mounting
Bracket”.
2. Remove the Right Side Cover
The left side cover should only be removed by a service technician!
Place the main controller on its left side.
Four screws
• Remove the four screws on the right side of the main controller with a 3 mm hex driver.
On each module and the side cover, always carefully check the condition of the gasket. These
gaskets not only function as gaskets, but also ensure conductivity between the modules to reduce
electromagnetic interference. In case a gasket is damaged, replace it only with original ARRI spare
Page 124 of 161
ARRIMOTION User’s Guide, 09/2004
parts! These gaskets are made from a special, highly conductive material, and their replacement
with a rubber or silicone substance would lead to problems in operating the ARRIMOTION system.
3a. Attaching Modules
• Slide the first expansion module onto the side of the CCB 1. Make sure that the module slides on
straight.
Never touch the contacts of the connectors between the modules.
Contacts
Four screws to attach expansion modules
• Tighten the four screws on the new module with a straight slow screwdriver 7x1,05mm until you
feel the end stop, then rotate counter-clockwise until the white alignment dot on each screw lines
up with the white dots on the module.
White alignment dots
• Slide the next module onto the first module and attach in the same manner.
• Repeat until all modules are attached.
Page 125 of 161
ARRIMOTION User’s Guide, 09/2004
3b. Removing Modules
• Loosen the four screws on the top module with a straight slot screwdriver 7x1, 05mm.
• With one hand grab the center of the detent on the top and bottom of the module (see picture).
With the other hand pull the release lever up.
• Carefully pull the module off. Make sure to pull the module up straight and not at an angle, since
it could bind. Never touch the contacts of the connectors between the modules.
• If a module is to be stored on its own, it should be placed into its original packaging (conductive
plastic bag, conductive packaging).
4. Re-attach the Right Side Cover
• When all modules are attached, place the right side cover back on and tighten with the four
screws.
5. Re-attach the Head Adapter
A detailed description of the removal process can be found in the chapter “The Head Adapter
Mounting Bracket”.
Page 126 of 161
ARRIMOTION User’s Guide, 09/2004
5.4. The Camera Control Box CCB-1
The CCB is the basic module of the main controller. The CCB contains the central processor, the
power supply, data storage and connectors for controllers.
On/Off button
EMERGENCY button
Status LED
Timecode connector
LCS connector
Serial connector 1
Serial connector 2
Camera Status LED
Camera connector
ON/OFF Button
Power On
Push the ON/OFF button to turn the ARRIMOTION system on.
Power Down
The ARRIMOTION system is properly powered down through the Jog box or Laptop software.
Hard Power Down
In case the regular power down does not work, you can perform a hard power down by pushing the
ON/OFF button on the Camera Control Box for 3 seconds. The system will power down within the
next 10 seconds. During this time the power LED will blink green. During a hard power down, all
data that has not been saved can be lost.
Note: A hard power down is not possible while an emergency stop is still active.
Electromagnetic Brakes
When the ARRIMOTION system is powered down, or during an emergency stop, a special
electromagnetic safety brake will be applied to the CHM-1 motors. These safety brakes open and
close with an audible “clack” sound. This sound will only occur during system initialization, power off
and emergency stop.
The electromagnetic safety brakes are not the same as the electronic brakes that are activated with
the blue BRAKE button on the CHM-1.
Page 127 of 161
ARRIMOTION User’s Guide, 09/2004
Status LED
The status LED provides information about system and emergency stop status.
LED
Meaning
Off
System is turned off.
Green
System is on and ready
Red
Incoming voltage to high or low or current too high.
Red blinking
Emergency stop has been activated, and the emergency stop button
has not been released yet.
Red/green alternating
The emergency stop is not active anymore, and the system can be
turned on again.
EMERGENCY Button
In an emergency the ARRIMOTION system can be stopped by pushing the big red EMERGENCY
button on the Camera Control Box (CCB-1). All motors will be deactivated and all brakes will be
applied. The ON/OFF LED will blink red.
To Reset After an Emergency Stop:
• Remove the reason for the emergency.
• Rotate the EMERGENCY button in the direction of the arrows to release it. The ON/OFF LED
blinks red and green.
• Push the ON/OFF button to turn the system back on.
• Go into the Axes screen and turn all axes back on.
Pushing the EMERGENCY button will immediately stop all motors, which can lead to extreme
stress on all mechanical components. It is therefore recommended to use this feature only in
case of a real emergency.
TC Connector
The TC (Time code) connector provides longitudinal Time code (LTC) in and outputs. The Time
code output is synchronous with the move. The Time code format (24/25/30fps, drop/non drop) can
be set by the Jog box or Laptop software.
The matching cable connector is: LEMO FGG0B-305
Pin
Signal
Description
1
GND
signal ground
2
TC-IN
LTC in
3
not used, reserved for future features
4
not used, reserved for future features
5
TC-OUT
LTC out
LCS Connector
The following hand controllers of the ARRI Lens Control System can be attached to the LCS
connector:
• Zoom Main Unit (ZMU-1 or ZMU-2)
The Focus/Iris Unit (FIU-1) can then be attached to the ZMU-1 or ZMU-2.
• Wireless Handgrip Attachment (WHA-2)
The Wireless Focus/Iris Unit (WFU-1) and/or the Wireless Zoom Unit (WZU-1) can be attached to
the WHA-2. Please note that the WHA-2 attaches with a cable to the ARRIMOTION CCB-1.
Wireless operation is not possible at this point in time.
Page 128 of 161
ARRIMOTION User’s Guide, 09/2004
All other Lens Control System Components (CLM-1 motors, FIU) should not be connected to the
LCS connector since they can damage the system if connected here.
SER1 and SER2 Connectors
The following ARRIMOTION controllers and accessories connect to the two serial connectors
(SER1 and SER2):
• Jog box (JBO-1) with cable adapter (JCA-1)
• Jog box (JBO-1) with Jog box Hand Wheel Controller (JHC-1)
• Bloop light (BLT-1)
• GPI Trigger Box (GPI-1)
• Betacam Playback deck (RS422)
Camera Status LED
The LED shows camera status:
LED
Meaning
Off
Camera is in standby
Green
Camera runs
Red
Camera not ready or no camera present.
Red blinking
Communications Error between camera and ARRIMOTION
CAM Connector
Attach one of the following cables between the camera and the CAM connector on the CCB-1:
Camera
Connector on camera
Cable
435 Advanced, 435ES, 535B, 16SR3,
16SR3 HS, 16SR 3 Advanced or
16SR3 HS Advanced to the CCB.
Note: when used with the 435
Advanced, no special motion control
features are accessible. For those
features, use cable K-CAM-CCB-2
instead.
CCU & ACC connectors
K-CAM-CCB-1
435 Advanced (Motion Control Mode)
MC connector on the MCI-1
K-CAM-CCB-2
ARRICAM Studio, ARRICAM Lite
CAC connector
K-CAM-CCB-3
Power Connector
An ARRI 2 pin power connector is located on the backside of the CCB-1. The ARRIMOTION system
needs its own power supply. Do not use a “Y” cable to power the ARRIMOTION system and
something else simultaneously.
We recommend the use of the ARRI power supply NG12/26 for ARRIMOTION configurations with
up to 10A current draw.
The amount of power needed depends on the ARRIMOTION system configuration. Always ensure
that the power supply or battery you are using can provide enough power to the ARRIMOTION
configuration in question.
Page 129 of 161
ARRIMOTION User’s Guide, 09/2004
Power Connector
CCB-1 Back with door closed
Ethernet Connector
CCB-1 Back with door open
Ethernet 100/10Mbit with SYNC Connector
On the CCB backside is a RJ45 network connector labeled “Ethernet 100/10Mbit with SYNC”. The
Laptop connects here, and this connector can also be used to network multiple main controllers for
further system expansion.
1
1 TX+
2
2 TX-
3
3 RX+
6
6 RXARRIMOTION Ethernet Cable for Laptop
When connecting the CCB-1 to a Laptop, make sure to use only Ethernet cables that have just the 4
conductors necessary for 100 Mbit Ethernet.
Do not use the number 4, 5, 7 and 8 pins.
These pins are used for special signals to synchronize more than one CCB.
Using other Ethernet cables than the cables supplied by Arri can damage the CCB.
Page 130 of 161
ARRIMOTION User’s Guide, 09/2004
5.5. The Motor Control Box MCB-1
The MCB controls up to 3 CHM-1 ARRIHEAD motors and it reads the encoder signals from the
ARRIHEAD-2 with encoders.
ARRIHEAD Connector
CHM-PAN Status LED
CHM-PAN Connector
CHM-TILT Status LED
CHM-TILT Connector
CHM-ROLL Status LED
CHM-ROLL Connector
ARRIHEAD Connector
An ARRIHEAD-2 with encoders can be attached to this connector. Even though the ARRIMOTION
system can work with a regular ARRIHEAD-1 or ARRIHEAD-2, using an ARRIHEAD-2 with
encoders provides higher precision position detection plus other automated features.
CHM Connectors (PAN, TILT, ROLL)
The Controlled Head Motors (CHM-1) can be connected to the CHM connectors:
• Use the cable K-MCB-CHM to connect the CHM-1 motors to the MCB-1. Connect the pan motor
to the CHM-PAN connector, and the tilt motor to the CHM-TILT connector.
Status LEDs
The status of each axis is displayed here.
LED
Meaning
Off
Axis turned off
Green
Motor is ready
Green blinking
Motor is ready, but at the end stop
Red blinking
Error. Detailed information is displayed on the Jogbox.
Red/green alternating
Homing in process
Page 131 of 161
ARRIMOTION User’s Guide, 09/2004
5.6. Lens Control Box LCB-1
The LCB is used to control up to 3 CLM-2 lens motors, and to process the information from the Lens
Data System, if a Lens data System (LDS) capable camera and lens are used.
Note: CLM-1 motors are not compatible with the ARRIMOTION system.
LENS DATA Connector
CLM-ZOOM Status LED
CLM-ZOOM Connector
CLM-FOC Status LED
CLM-FOC Connector
CLM-IRIS Status LED
CLM-IRIS Connector
LENS DATA Connector
Use cable K-LDD-LDS to connect the LENS DATA connector on the LCB-1 to the LDD connector
on the ARRICAM or FEM-2.
CLM Connectors (ZOOM, FOC, IRIS)
Connect CLM-2 lens motors here.
Connect the zoom lens motor to the CLM-ZOOM connector, the focus lens motor to the CLM-FOC
connector and the iris lens motor to the CLM-IRIS connector.
When CLM-2 motors are used with the ARRIMOTION system, it is best to replace the cable on the
CLM-2 motors with the longer version cable
Status LEDs
The status of each axis is displayed here.
LED
Meaning
Off
Axis turned off
Green
Motor is ready
Green blinking
Motor is ready, but at the end stop
Red blinking
Error. Detailed information is displayed on the Jogbox.
Red/green alternating
Homing in process
Page 132 of 161
ARRIMOTION User’s Guide, 09/2004
5.7. Auxiliary Motor Control Box ACB-1
The ACB is used to control up to 3 external servo motors with external servo amplifiers. It is also
possible to control other equipment (like a dolly, for instance) equipped with a CAN bus interface.
The ACB can control a total of three axes. If one axis is controlled over the CAN bus, only two of the
AUX connectors can be used.
CAN-AUX Connector
AUX1 Connector
Status LED
AUX2 Connector
Status LED
AUX3 Connector
Status LED
CAN-AUX Connector
Any ARRIMOTION compatible equipment using the CAN bus can be connected to the CAN-AUX
connector.
Status LEDs
The status of each axis is displayed here.
LED
Meaning
Off
Axis turned off
Green
Motor is ready
Green blinking
Motor is ready, but at the end stop
Red blinking
Error. Detailed information is displayed on the Jogbox.
Red/green alternating
Homing in process
Page 133 of 161
ARRIMOTION User’s Guide, 09/2004
AUX Connectors (1, 2, 3)
An external servo amplifier with encoder feedback according to the RS-422 standard can be
connected to each of the AUX connectors.
Pin
Signal
Description
1
MOT A+
Encoder RS422 Input Track A+
2
MOT A-
Encoder RS422 Input Track A-
3
MOT B+
Encoder RS422 Input Track B+
4
MOT B-
Encoder RS422 Input Track B-
5
MOT I+
Encoder RS422 Input Track Index+
6
MOT I-
Encoder RS422 Input Track Index-
7
GND1
GND for Encoder Signals
8
BRAKE
Enable (open collector, active low) for a safety brake that is
attached to the drive.
The Enable input should have a pull up on the servo
amplifier to prevent malfunction due to broken wiring and to
activate the brake when ARRIMOTION is not switched on.
not used, reserved for future features
9
MCOMMAND +/- 10V Motor Command to Amplifier
10
GND-CMND
11
GND for Motor Command
not used, reserved for future features
12
HOME
Home (Reference) Switch Input (active high)
The switch is normally open and should be closed when it
is activated. This is a safety precaution that protects against
broken wiring.
13
nFWD_LIMIT Forward Limit Switch Input (active low)
The switch is normally closed and should open when it is
activated. This is a safety precaution that protects against
broken wiring.
14
nREV_LIMIT
Reverse Limit Switch Input (active low)
The switch is normally closed and should open when it is
activated. This is a safety precaution that protects against
broken wiring. Enable (open collector, active low) for an
external servo amplifier.
15
GND1
GND for Control Signals
16
not used, reserved for future features
17
not used, reserved for future features
18
19
EN/nDIS
The Enable input should have a pull up on the servo
amplifier to prevent malfunction due to broken wiring and
disable the drive when ARRIMOTION is switched off.
not used, reserved for future features
Page 134 of 161
ARRIMOTION User’s Guide, 09/2004
AUX Connector Cable Diagram
The connector on the AC1 is a W.W.Fischer DGP104Z092-230.
The matching cable connector is:
• W.W.Fischer S104Z092-230 (with solder contacts)
• W.W.Fischer S104Z092-250 (with crimp contacts)
Note: Some other connector parts and tools have to be ordered based on the cable diameter used.
The friendly folk at W.W. Fischer can help.
A+
AB+
BI+
I-
1
2
3
4
5
6
ENC
M
Brake
GND 7
Motor Amplifier
CMD 9
GND 10
EN/DIS 14
GND 16
CMD +
CMD EN/DIS
GND
Motor wiring as specified
by motor / amplifier manufacturer
Brake Driver (if brake is installed)
GND
BRAKE 15
FLS 11
RLS 12
HOME 13
Forward Limit (normally closed)
Reverse Limit (normally closed)
Home Switch (normally open)
+5V
GND
Page 135 of 161
ARRIMOTION User’s Guide, 09/2004
5.8. Controlled Head Motor CHM-1
The Controlled Head Motors CHM-1 are attached between the ARRIHEAD and the ARRIHEAD
hand wheels. They can be used on an ARRIHEAD-1, ARRIHEAD-2 or Encoded ARRIHEAD-2.
A hand wheel that is attached to a CHM-1 motor will turn an encoder. This encoder provides control
signals for a motor inside the CHM-1 that turns the ARRIHEAD drive shaft. There is no mechanical
connection between the hand wheel on the CHM-1 and the ARRIHEAD gears.
Using the CHM-1 on an ARRIHEAD feels very much like operating the ARRIHEAD without the
CHM-1, with one exception: it is not possible to stop a panning ARRIHEAD anymore by pushing on
the head or the camera. This takes a little getting used to. The head must be stopped with the Mimic
(usually the respective hand wheel) that is assigned to the CHM-1 motor.
The hand wheel on a CHM-1 motor does not necessarily have to control the CHM-1 motor. In fact, it
can be assigned to any motor attached to the ARRIMOTION system. It is, for instance possible to
assign the pan and tilt hand wheels of the CHM-1 to the pan and tilt functions of a snorkel lens.
Brake Collar
BRAKE Button
Drive Shaft
Brake LED
CHM Connector
MOTOR READY LED
Fluid Drag Ring
Page 136 of 161
ARRIMOTION User’s Guide, 09/2004
Brake Collar
The ARRIHEAD pan and tilt brakes have to be loose when the CHM-1 is attached, otherwise the
CHM-1 motors could overload. To ensure that they are loose, a collar fixes the brakes in the loose
position when the CHM-1 is attached.
BRAKE Button and LED
The Brake button will disconnect the hand wheel from whichever motor it is assigned to. Thus the
motor will not receive a signal anymore, and hold its current position. When the brake is applied, the
BRAKE LED will glow red.
MOTOR READY LEDs
The status of each axis is displayed here.
LED
Meaning
Off
Axis turned off
Green
Motor is ready
Green blinking
Motor is ready, but at the end stop
Red
No Mimic has been assigned
Red blinking
Error. Detailed information is displayed on the Jogbox.
Red/green alternating
Homing in process
Fluid Drag Ring
With the fluid drag ring the friction on the hand wheel can be adjusted. This allows the operator to
set the friction until the hand wheels feel just like they do without a CHM-1. Clockwise rotation
increases friction, counter-clockwise rotation decreases friction.
CHM Connector
Use cable K-MCB-CHM to connect the CHM connector on the CHM-1 to the CHM-PAN, CHM-TILT
or CHM-ROLL connector on the MCB-1.
Page 137 of 161
ARRIMOTION User’s Guide, 09/2004
5.9. The Jog box JBO-1
The Jog box JBO-1 or the Laptop must be connected to the ARRIMOTION system to use the
system. The Jog box can be either attached to the CCB-1 with a cable, or it can be attached to the
Jog box Hand Wheel Controller.
Jogbox Cable
Adapter (JCA-1)
Stop Button
Connector to CCB
Locking Lever
(On the side)
Touch screen
Top Left
Jog Wheel
Top Left Joystick
Top Left Button
Bottom Left Button
Bottom Left Joystick
Bottom Left
Jog Wheel
Top Right
Jog Wheel
Top Right Joystick
Top Right Button
Bottom Right Button
Bottom Right Joystick
Bottom Right
Jog Wheel
What is a Jog-shuttle?
The Jog box has four unique input devices, called Jog-shuttles. In the center of each Jog-shuttle is a
joystick that can be pushed up or down, and around the joystick is a jog wheel that can be rotated.
The joystick can change values quickly, whereas the jog wheel allows for precision positioning.
Jog Wheel
Joystick
Page 138 of 161
ARRIMOTION User’s Guide, 09/2004
Using the Jogbox with a Cable
If the Jogbox is used with a cable, the Jogbox Cable Adapter (JCA-1) must be attached.
Jog box Cable Adapter
(JCA-1)
Locking Lever
• Tension the locking lever by moving it clockwise into the 8 O’clock position.
• Push the Jog box Cable Adapter carefully onto the Jog box. Make sure that it goes on straight.
• When the Jog box Cable Adapter is pushed all the way onto the Jog box, the locking lever
releases and locks automatically. Make sure that it is all the way counter-clockwise in the 6
O’clock position.
• Use cable K-JCA-CCB to connect the connector on the Jog box Cable Adapter to the SER1 or
SER2 connector on the CCB-1.
The Stop Button
This button has the same function as the Stop button in the Play/Record menu. It is NOT an
emergency stop all button like the big red button on the CCB.
If the Locking Lever is Locked Accidentally
Connector
Locking Mechanism
Lock Release
If the locking lever has been released accidentally (6 o’clock position) without a JCA-1 or JHC-1
attached, it can be tensioned again by pushing the lock release down with a small tool.
Do not touch the contacts of the connector on the Jog box or JCA-1!
Page 139 of 161
ARRIMOTION User’s Guide, 09/2004
5.10.The Jog box Hand Wheel Controller JHC-1
The Jog box Hand Wheel Controller JHC-1 can be used as the central station for controlling the
ARRIMOTION system. It can accept two hand wheels from the ARRIHEAD, a video monitor and the
Jog box. It must be attached to a flat Mitchell tripod base (this suggests of course that it is easily
mounted on a tripod), and can then be rotated freely.
On the right side of the JHC-1 is a connector that can accept a future controller for a roll axis.
Platform for
Monitor
Monitor Adjust
Arm Lock
Adjustable Arm
Jogbox
Adjustable Arm
Hand Wheel
Hand Wheel
JHC-1 Set up
• Attach the JHC-1 to a tripod or other secure surface that has a flat Mitchell base.
• Use cable K-JCA-CCB to connect the connector on the right side of the Jog box Hand Wheel
Controller base to the SER1 connector on the CCB-1.
• Attach two ARRIHEAD hand wheels to the drive shafts on the JHC-1 arms.
Attaching the Jog box
• Release the Jog box locking lever by moving it clockwise into the 8 O’clock position. If the Jog
box Cable Adapter (JCA-1) is attached, carefully pull it off the Jog box.
• Push the Jog box carefully onto the Jog box Hand Wheel Controller. Make sure that it goes on
straight and not at an angle.
• When the Jog box is pushed all the way onto the Jog box Hand Wheel Controller, the locking
lever locks automatically. Make sure that it is all the way counter-clockwise in the 6 O’clock
position.
Adjusting the Arms
• Lift the arm lock and then position the arm to the most comfortable position.
• Push the arm lock back down to lock the position.
Page 140 of 161
ARRIMOTION User’s Guide, 09/2004
Monitor Platform
The Monitor Platform is designed for 9” CRT Monitors.
The platform is mounted by two 3/8” screws and can be adjusted in its angle by a lever on the right
side. The monitor platform can be screwed on the monitor. The monitor can be used without the
JHC-1 for other applications. The black monitor platform can stay on the monitor.
3rd Axis Connector
The 3rd Axis connector is for future expansion.
5.11.The Jog box Cradle
Large Sachtler
Rosette Adapter
Jog box Cradle
Small Sachtler
Rosette Adapter
Cradle Support Rod
Mounting the Jog box on the Arrihead
The Jog box can be mounted on any of the four Arrihead Rosettes. Take care that the cradle is at
approximately 45° to prevent that the Jog box dropping out of the cradle at extreme tilt angles.
The Cradle support rod bracket should be mounted in a way that it does not interfere with anything
else mounted on the Arrihead (CHM-1´s, Main Controller,…). Check for proper clearance by
manually moving the tilt sled of the Arrihead.
Mounting the Jog box to Encoded Fluid Heads
Attach one of the two rosette adapters between the head and the panbar. The cradle support rod
can be mounted on the small Sachtler rosette of the adapter.
Adapters for other heads can be provided upon request.
The Jogbox can be secured with a Velcro strap that is included in the jogbox cradle kit.
Page 141 of 161
ARRIMOTION User’s Guide, 09/2004
5.12.The JCA-2 for Encoded Fluid Heads
The JCA-2 is an Adapter for the Jog box that enables the use of encoded fluid heads as a master
head for the remote control of the Arrimotion system. It should be used in combination with the jog
box cradle.
Interface cable
JCA-2
JBO-1
Encoded Fluid Head
Rosette Adapter
(not visible)
Jog box Bar
The JCA-2 is mounted on the Jog box in the same way as the JCA-1.
It features three additional connectors for external encoders on an encoded fluid head.
The JCA-2 can be used instead of the JCA-1 as a backup. It is not necessary to connect external
encoders if no encoded fluid head is needed.
SER Connector to CCB SER1
ROLL TILT
PAN
Axis Connectors
Page 142 of 161
ARRIMOTION User’s Guide, 09/2004
5.13.The GPI Trigger Box GPI-1
With the GPI-1 external events can be triggered by the ARRIMOTION system, or the ARRIMOTION
system can be triggered by external events.
Each GPI-1 is equipped with eight relays with one form C contact (maximum 1A 42V DC) and four
trigger inputs (5V DC). The trigger inputs are only active on the GPI-1 with the address 0. It is
possible to connect up to four GPI-1s to the CCB-1.
Serial Input
Serial Output
Input LEDS:
LED I-4
LED I-3
LED I-2
LED I-1
Address
Switch
Led Term
Led ERR
Led RDY
IO Connector
Pin 19
Pin 1
Output
LEDs O-1 to O-8
Pin 37
Pin 20
GPI-1 Cabling
Use the K-JCA-CCB cable to connect the SER IN connector on the GPI-1 to the SER1 or SER2
connector on the CCB-1.
Note: The GPI-1 provides a loop trough for the serial signals, so it is possible to connect another
device (like the Jog box) to the SER OUT connector on the GPI-1.
Using More than One GPI-1
It is possible to connect up to four GPI-1 boxes to a CCB-1. These boxes are connected in series
with the SER IN and SER OUT connectors. Each box must be given a unique address between 0
and 7. The first box in line has to be set to address 0.
Page 143 of 161
ARRIMOTION User’s Guide, 09/2004
to CCB-1
K-JBO-CCB
K-JBO-CCB
K-JBO-CCB
K-JBO-CCB
Four GPI-1 boxes in Series
Note: Make sure that the last GPI-1 in the chain either has no cable attached to its SER OUT
connector, or that a Jog box, Jog box Hand Wheel Controller or Blooplight is attached to the cable.
If no further device is attached to the last GPI-1 in the chain, its TERM LED should be illuminated,
showing that the chain is properly terminated here.
ADDR Rotary Switch
Each GPI-1 must be given a unique address with a rotary switch. This address is set by turning the
ADDR rotary switch to any position from 0 to 3. The first box in line has to be set to address 0. The
other three boxes can have any address between 1 and 3. Addresses have to be set before the
system is turned on. If a wrong address is set, the ERR LED will blink.
Note: It is possible to connect up to four GPI-1 Boxes to a CCB-1, but no more.
Never set more than one GPI-1 to the same address.
The addresses 8 and 9 will put the GPI-1 into a test mode. When in the test mode, the GPI-1 cannot
communicate with the CCB-1.
SER IN Connector
The SER IN (Serial In) connector can be connected to the SER 1 or SER2 connector on the CCB-1,
or to the SER OUT connector on another GPI-1.
SER OUT Connector
The SER OUT connector can be connected to either a Bloop Light, a Jogbox, a Jogbox Hand Wheel
Controller, or another GPI-1.
Input LEDs (I-1 to I-4)
These LEDs show the status of the respective trigger inputs.
LED off
0 Volts
LED on
5 Volts
TERM LED
When the TERM LED illuminates, the serial connection has been automatically terminated. This
happens when no other device is connected to the GPI-1.
Do not connect a cable without another device at the other end to the SER OUT connector, since
this can lead to errors in data communications.
If the TERM LED is illuminated even though another device has been connected with a cable to the
SER OUT connector, either a cable or a GPI-1 box is faulty. Determine which one is faulty and
exchange it.
ERR LED
The ERR LED will blink if an invalid address has been set, if two boxes have the same address, if
an internal error has occurred or if the address switch has been changed while powered.
RDY LED
The RDY LED illuminates when the GPI-1 is ready.
Page 144 of 161
ARRIMOTION User’s Guide, 09/2004
Output LEDs (O-1 to O-8)
These LEDs show the status of the eight relay outputs. If an LED is illuminated, the respective
channel is active.
I/O Connector
The contacts of the eight relays as well as the four trigger inputs are available on the 37pin d-sub
connector. There is also an isolated +5V output that can be loaded with up to 50mA. A trigger input
can either be activated by connecting an external switch between the +5V-ISO and the trigger input
or to a voltage source that feeds in 5V to the trigger input (connect ground of the external voltage
source to GND-ISO).
Pin
Signal
Description
1
O1-NC
GPI Output 1 normally closed
2
O1-NO
GPI Output 1 normally open
3
O2-AC
GPI Output 2 Alternating (center) contact
4
O3-AC
GPI Output 3 normally closed
5
O3-NO
GPI Output 3 normally open
6
O4-NC
GPI Output 4 Alternating (center) contact
7
O5-NC
GPI Output 5 normally closed
8
O5-NO
GPI Output 5 normally open
9
O6-AC
GPI Output 6 Alternating (center) contact
10
O7-NC
GPI Output 7 normally closed
11
O7-NO
GPI Output 7 normally open
12
O8-AC
GPI Output 8 Alternating (center) contact
13
not connected
14
+5V-ISO
Isolated +5V Supply for GPI Inputs
15
I1
Isolated GPI input 1
16
I2
Isolated GPI input 2
17
GND-ISO
Isolated GND for GPI inputs
18
not used / reserved for future expansions
19
not used / reserved for future expansions
20
O1-AC
GPI Output 1 Alternating (center) contact
21
O2-NC
GPI Output 2 normally closed
22
O2-NO
GPI Output 2 normally open
23
O3-AC
GPI Output 3 Alternating (center) contact
24
O4-NC
GPI Output 4 normally closed
25
O4-NO
GPI Output 4 normally open
26
O5-AC
GPI Output 5 Alternating (center) contact
27
O6-NC
GPI Output 6 normally closed
28
O6-NO
GPI Output 6 normally open
29
O7-AC
GPI Output 7 Alternating (center) contact
30
O8-NC
GPI Output 8 normally closed
31
O8-NO
32
GPI Output 8 normally open
not used / reserved for future expansions
33
+5V-ISO
Isolated +5V Supply for GPI Inputs
34
I3
Isolated GPI input 3
35
I4
Isolated GPI input 4
36
GND-ISO
Isolated GND for GPI inputs
37
not used / reserved for future expansions
Page 145 of 161
ARRIMOTION User’s Guide, 09/2004
5.14.The Blooplight BLT-1
The Blooplight is used to expose sync marks onto film. Various different patterns can be displayed
by the 64 LEDs on the front. To allow for a smaller light source when filming a small area, an
external LED can also be connected.
EXT LED
Connector
(On top)
LED Field
3/8“ UNC Hole
SER IN Connector
SER IN Connector
Use cable K-JCA-CCB to connect the SER IN connector on the Blooplight to the SER1 or SER2
connectors on the CCB-1.
LED Field
64 dual color (red/green) LEDs are arranged in a 4 x 4 matrix. With the Jogbox or Laptop software it
is possible to define different patterns for sync marks, as well as to adjust the LED brightness.
EXT LED Connector
To allow for a smaller sized light source when filming a small area, an external LED can be
connected to the Blooplight. The connector is a W.W.Fischer Type DG102A051. The matching
cable connector is a W.W. Fischer S102A051-120.
EXT LED connector pin out:
Pin
Signal
Description
1
GND-SW
GND
2
+9V-SW
9V (max 150mA)
It is not allowed to switch loads with an external power supply with the signals on the EXT LED
connector. The power for the external LED must be supplied by the Blooplight.
3/8” Threaded Hole
The Blooplight can be attached with a 3/8” bolt. The bolt should not be screwed in any deeper than
6,35mm/0.14 inches.
Page 146 of 161
ARRIMOTION User’s Guide, 09/2004
5.15.CLM-2 Cable Swap
The regular cables of the CLM-2s should be exchanged for the longer cables CC-M2.
• Remove the seven straight slotted screws that hold the cover, then remove the cover.
Screws
Screws
• Use a screwdriver with a thin blade to carefully remove the cable connector from the CLM-2.
Cable Connector
• Lift the cable out of the CLM-2 motor. Remove the silver strain relief from the cable.
Strain Relief
• Flip the motor over and loosen the strain relief screw with a 2 mm hex driver.
Strain Relief Screw
Page 147 of 161
ARRIMOTION User’s Guide, 09/2004
• Fold the shield of cable CC-M2 over and place the strain relief on the cable so the shield is
between the cable and the strain relief. Place the cable in the cable channel, making sure the
strain relief goes in its proper place.
• Attach the cable connector to the CLM-2.
• Make sure the individual cable strands coming from the cable connector are tucked under the
edge of the CLM-2 motor housing, so they do not get pinched when the cover is replaced.
• Place the cover back on the CLM-2 and put the seven screws back in.
• Now tighten the strain relief screw on the other side of the CLM-2.
Page 148 of 161
ARRIMOTION User’s Guide, 09/2004
5.16.The Panther Evolution
Overview
The Arrimotion can control the track and lift of a modified Panther Evolution Dolly.
The following items are needed for the dolly system
- one ACB-1
- a modified Panther Evolution
- The dolly driver kit
The dolly driver kit contains the following items
- Hardware for the modification of the Panther. This modification has to be made at
Arri Austria. Field modification is not possible.
- Drive Motor Assembly for the track
- Servo Amplifier box
- Two safety bumpers
- Force Sensitive Pushbar
- Track Endpieces for Panther precision track MK2 and the timing belt for the drive
- Cabling
Page 149 of 161
ARRIMOTION User’s Guide, 09/2004
The lift axis is driven by the internal motor of the panther and can be controlled by the panther
handcontroller that is fully implemented in the mimics system of arrimotion. For the necessary
precision the lift axis drive of the panther is modified to a timing belt instead of a multi-V belt which
will result in increased noise.
Attention: Motion Control Mode must not be operated with the multi-V belt.
The lift axis is powered from the panther batteries. In motion control mode a set of full charged
batteries will last for about one hour. It is recommended that the panther charger is permanently
connected to the grey connector on the bottom of the panther to recharge the batteries. See the
manual of the panther for the installation and operation of the charger. Whenever possible switch
the lift axis to off in the axis menu to save power.
The Panther is driven along the track by a brushless servo motor with a high precision planetary
gearbox and a timing belt that is in the center of the track. There are safety bumpers installed on
both sides of the dolly.
The drive axis is operated with a force sensitive pushbar that allows the Arrimotion to mimic the
behavior of a normal dolly.
Page 150 of 161
ARRIMOTION User’s Guide, 09/2004
Setting up the Panther drive system
Attention:
Read the panther operating manual before using the panther
The first step is to mount the motor on the mounting bridge that is attached to the dolly.
Tighten the wheel brakes of the panther. The panther should be preset to 620mm track width (all
wheel arms at 45°)
Loosen the four M8 screws with a 6mm Allen key on the bolts on the mounting plate. Do not use the
ferrules on the bolts.
Attach the motor to the panther and take care that the gas spring is not torn and the cables for the
limit switches are not clamped anywhere. First insert the two M8 screws with their ferrules on top
and then the bottom ones. Do not tighten them.
Now attach the safety bumper without amplifier platform on the drive motor side and the other
bumper with the platform on the opposite side.
ATTENTION: The top surface of the bumper mounts must be about 5mm above the pushbar
mounts to clear the timing belt clamping elements!
Now the drive motor amplifier can be placed on its platform and the force sensitive pushbar can be
placed in one of the four wheel arms.
Page 151 of 161
ARRIMOTION User’s Guide, 09/2004
Wiring the Drive Motor
ATTENTION: The servo amplifier must not be connected to mains unless wiring ang setup is
completed.
Connectors on the rear side of the amplifier box
Cable from ACB-AUX1
Emergency cutout
connector with
shorting plug
Safety bumpers
Limit switches
Motor power
Motor resolver
Mains cord
The two bumper cables have to be attached to the safety bumper sockets on the rear of the drive
amplifier.
The limit switches (the two proximity switches on the drive assembly) have to be connected to the
socket marked limit switches
The emergency cutout socket should have a shorting plug on it. If an external emergency cutout
button should be used it can be connected to this socket (it has to be looped into the emergency
loop which is available on pins 1 and 2 with its NC contact).
The orange motor power and resolver (A special version of a position sensor on the motor shaft)
cables should be connected to the corresponding sockets.
Attention: The drive motor is running on 560V DC. Do not pull any of the cables while the
system is connected to mains.
Page 152 of 161
ARRIMOTION User’s Guide, 09/2004
Wiring the dolly to the ACB
The dolly should be connected to the leftmost ACB-1 on the main controller in the following way.
K-PB-POT
K-ACB-LIFT
K-ACBCAN-PANTHER
K-ACB-DRIVE
K-PANTHER-PB
Laying the track and installing the dolly on the track
The Track must be perfectly leveled and in good condition. The surface underneath the track must be
rigid enough to accept the load of the dolly without any movement.
After placing the dolly on the track attach the two end pieces for the timing belt to the track ends. Do not
mount the belt yet.
Place the dolly in such a position that the drive motor can be adjusted to about 2mm of clearance above
the sleeper. The drive motor can be lowered by pushing it down and after adjustment the four screws
should be tightened.
2mm clearance
Page 153 of 161
ARRIMOTION User’s Guide, 09/2004
Tighten the screws
after adjusting clearance
After the clearance has been adjusted and the track end pieces including the timing belt clamping
elements have been mounted move the dolly manually from one end to the other end of the track
and check if the clearance is sufficient at all sleepers and that the bumpers have enough clearance
over the track end pieces and the timing belt clamping elements.
The bumpers should be at least 12 mm above the track end pieces to have enough clearance for
the timing belt clamping elements.
Check that the both proximity switches are not closer than two and not further away than 6mm form
the blades on the track end pieces.
Limit switches
Page 154 of 161
ARRIMOTION User’s Guide, 09/2004
End piece with long limit switch blade on amplifier side
(Will fit on a 2 meter track section of
Panther precision track MK2)
End piece with short blade on motor side
After all clearances /sleepers, end pieces) have been successfully checked loop the timing belt in an
omega shape through the drive motor assembly. The dolly should be somewhere in the middle of
the track or at least more than half a meter away from the track end.
Page 155 of 161
ARRIMOTION User’s Guide, 09/2004
The timing belt clamping element on the amplifier side end piece should now be loosened to the
maximum and the timing belt should be clamped on the motor sides end piece as strong as
manually possible.
The unused end of the timing belt must be run underneath the end piece otherwise it might be
damaged by the bumper.
run timing belt underneath
the end piece to avoid damage
Now tighten the timing belt with a long 13mm nut on the amplifier end piece side quite strong (the timing
belts tension is sufficient when it is in an upright position over the entire length of the track.
13mm hex nut for tightening the
timing belt with a nut
Page 156 of 161
ARRIMOTION User’s Guide, 09/2004
Checking the safety systems on the drive amplifier
Emergency cutout switch
Off button
(illuminated)
On button
(illuminated)
Mains switch
Check if the emergency cutout switch is released (a yellow ring must be visible), if not pull on the red
button until it locks in the released position.
Switch on the drive motor amplifiers main switch. The red light on the off button should come on.
Wait for approx. ten seconds until the amplifier is ready.
Now push the on button. The green light should come on.
If the green light doesn’t come on check the following things:
- Emergency cutout switch activated?
- Shorting plug on the emergency cutout connector on the rear missing?
- one or both bumpers activated?
When the green light is on proceed as follows:
- Push the emergency cutout switch -> the green light should go off and the red light should come on
- Release the emergency cutout switch -> the red light must stay on
- Push the green button -> the green light should go on
- Activate one of the safety bumpers -> the green light should go off and the red light should come on
- Release the Bumper -> the red light must stay on
- Push the green button -> the green light should go on
- Activate the other safety bumper -> the green light should go off and the red light should come on
- Release the Bumper -> the red light must stay on
- Push the green button -> the green light should go on
- Remove the connector from the emergency loop on the rear side -> the green light should go off and
the red light should come on
- Attach the connector again -> the red light must stay on
- Push the green button -> the green light should go on
Attention:
Check the operation of the two emergency bumpers prior to operating the system.
Check the function of the emergency cutout switch(es) prior to operating the system.
The timing belt must not be greased or treated with talkum powder.
Page 157 of 161
ARRIMOTION User’s Guide, 09/2004
Interaction of the drive motor amplifier and the emergency cutout system on the CCB-1
When the drive motor amplifier is wired to the ACB-1 on a CCB-1 the CCB-1 will go Into the emergency
cutout state as long as the green light of the on button is not lit. You can only release the emergency
cutout state of the CCB after switching on the drive motor amplifier.
If both limit switches of the drive axis are activated simultaneously (e.g. due to excessive overtravel on
the track) the emergency system will also be activated and could only be reset after at least one of the
limit switches is de-activated.
If the green light of the drive amplifier is on but it is not possible to recover from the emergency cutout
on the CCB-1 then power cycle the drive amplifier by using its main switch. In rare cases the amplifier
will have an internal error after an emergency stop that can only be recovered by power cycling it.
The force sensitive pushbar
As a user interface for the dolly drive Arri designed a force sensitive pushbar that allows the dolly grip to
push the dolly as he is used to do.
The pushbar can be mounted in any of the 4 wheel arms.
The sensitivity of the pushbar can be adjusted with a little knob on top of the pushbar in the range of
10% to 100%.
Adjustment pot
Height adjustment
The orientation of the pushbar is critical, if reversed the dolly will move in the wrong direction.
Either reverse the gear ratio setting on the CCB or simply turn the pushbar base by 180° so that it
matches the direction of the dolly.
If the pushbar is located on the side of the dolly where the connectors for the Arrimotion operation
are (the left side of the track in positive counting direction of the drive) the grey electronics box of
the pushbar should look to the center, if the pushbar is mounted on the other (right side) the
electronics box should be on the outer side.
For best performance grip the pushbar firmly with both hands and set the gear ration in a way that
the force that is needed matches the force on an unmotorised dolly.
Attention: Do not use the pushbar for steering the dolly when not on track
Page 158 of 161
ARRIMOTION User’s Guide, 09/2004
Replacement Cables for the dolly drive system
Code
Ident#
Description
K-ACB-CAN
K4.52801.0
Connects the CAN socket of the ACB to the Panther dolly
K-ACB-LIFT
K4.52802.0
Connects the AUX-2 Socket of the ACB to the Panther dolly
K-ACB-DRIVE
K4.52800.0
Connects the AUX-1 socket of the ACB to the drive amplifier
K-PB-POT
K4.52809.0
Connects the electronics box of the pushbar to the handgrip
of the pushbar
K-PANTHER-PB
K4.52805.0
connects the pushbar electronics box to the panther
Resolver cable
Orange resolver cable for the drive motor
Motor cable
Orange motor cable for the drive motor
Page 159 of 161
ARRIMOTION User’s Guide, 09/2004
5.17.Compatibility
Camera Support
Cameras:
Lens Motors:
Lens Controls:
Temperature Range
All units except CCB and JBO:
Jogbox (JBO):
CCB with Hard disk:
CCB with Flash disk:
Transport:
Power
Input Voltage:
Power Draw:
Dolly drive
Other
Humidity:
Elevation above sea level
Environmental protection:
Vibration:
ARRIHEAD-1, ARRIHEAD-2, Encoded ARRIHEAD-2
ARRICAM Studio, Lite
ARRIFLEX 435ES, 435 Advanced
ARRIFLEX 535B
ARRIFLEX 16SR 3, 16SR3 HS, 16SR3 Advanced,
16SR3 HS Advanced
CLM-2
WHA-2, WFU-1, WZU-1
ZMU-1, ZMU-2, FIU-1
-20°C to +50°C (-4°F to +122°F)
-10°C to +50°C (+14°F to +122°F)
+5°C to +50°C (+41°F to +122°F)
-20°C to +50°C (-4°F to +122°F)
-20°C to +60°C (-4°F to 140°F)
22 to 35 V DC
6 axes system (1 MCB, 1 LCB, 2 CHM, 2 CLM2, WHA-2):
in standby: 2,2A
maximum: 14A
complete system maximum: 25A
3Phase 400V AC including neutral and earth
Fused to 16A
5-95% (none-condensing)
0 to 3000m (0 to 9800 feet)
IP 42 (particle >1mm, drip water)
Operating: Random (RMS) 0.67G (5-500Hz)
Swept Sine 1G peak (5-500Hz)
Page 160 of 161
ARRIMOTION User’s Guide, 09/2004
Corrections
20.3.2003
HA
Pinout of the ACB axis connectors corrected
K-number of Accessory Bracket corrected
25.3.2003
HA
Definition of new status / warning symbols added
Stop / go motion instructions added
Browsing instructions added
27.3.2003
HA
Playback / VTR control instructions added
27.8.2003
HA
Ident numbers for CCB versions changed/added
Ident number and items added in optional equipment list
JCA-2, Jogbox Cradle added in HW Reference
Troubleshooting questions added
JHC-1 reference improved
8.9.2003
HA
Maximum number of GPI Boxes and address range changed
16.10.2003
HA
Added first parts of the dolly drive hardware reference
20-21.10.2003
HA
Added further details to the dolly hardware reference and
safety instructions for the dolly drive
22-23.10.2003
HA
corrected Head Adapter ident-number, added
emergency cutout procedures on the dolly drive
7-12.11.2003
HA
Reformatted, added Software Reference for Lens, Camera
and Play/Rec menu, added warnings in Panther HW
Reference
14.11.2003
HA
Added Browse Jog Software Reference / minor other
corrections
29.3.2004
HA
Added some FAQ items
17.5.2004
HA
Added detailed description to sync symbol
14.9.2004
HA
Minor corrections
22.2.2005
HA
Added various cables to the partlist on pages 19-20
Page 161 of 161