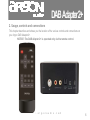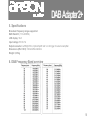
1
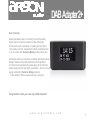
DAB Adapter2+
Dear Customer,
Quality has always been our driving force and founding
Argon Audio is a natural extension of this philosophy.
We have 20 years' experience in creating and specifying
high quality products, manufacturing them and selling them
on to end users with Value-for-Money as the primary aim.
And Argon Audio is a brand fully compliant with these values.
Design, features and quality standards are all specified
in Denmark and manufacturing takes place in the Far East,
where quality vendors are highly competitive - and as a result
supply outstanding Value-for-Money products
– to the delight of both ourselves and our customers!
Congratulations with your new Argon DAB Adapter2+
w w w . a r g o n a u d i o . c o m
1
DAB Adapter2+
Content
1 Introduction
1.1
1.2
Safety
Contents of the box
2 Usage, controls and connections
3 Using Your Argon DAB Adapter2+
3.1
3.2
Quick Start
DAB mode
4 Using Basic Functions
4.1
4.2
4.3
4.4
4.5
Storing and recalling your stations
Setting/checking the sleep timer
Setting the alarm
Using of the Snooze function
<System> settings/info
5 Specifications
6 DAB Frequency Band overview
w w w . a r g o n a u d i o . c o m
page
page
page
page
3
3-5
5
6-7
page
page
page
8
8
9-11
page
page
page
page
page
page
page
page
12
12
12
13
14
14-15
16
16
2
DAB Adapter2+
1. Introduction
1.1 Safety
Safety instructions
WARNING
To reduce the risk of fire or electric shock, do not
expose this unit to rain or moisture.
Read Instructions
Read all safety and operating instructions before
operating the product.
CAUTION
Use of controls or adjustments or performance of
procedures other than those specified may result
in hazardous radiation exposure.
The lighting flash with arrowhead symbol, within
an equilateral triangle, is intended to alert user of
the presence of un-insulated dangerous voltage
within the products enclosure that may be of
sufficient magnitude to constitute risk of electric
Shock to a person.
The exclamation point within an equilateral
triangle is intended to alert user to the presence of
important operating and maintenance (servicing)
instruction in the literature accompanying the
appliance.
Retain Instructions
Keep all safety and operating instructions for
future reference.
Heed Warnings
Take note of all warnings on the product and in
the operating instructions.
Follow Instructions
Follow all operating and usage instructions.
Cleaning
Unplug this product from the power source before
cleaning. Do not use liquid or aerosol cleaners.
Use a damp cloth for cleaning.
w w w . a r g o n a u d i o . c o m
3
DAB Adapter2+
Attachments.
Do not use attachments of accessories not
recommended by us as they may cause hazards.
.
Water and Moisture
Do not use this product near any water source or
water hazard.
Placement
Place the product on a stable surface or
recommended stand, otherwise the product may
fall and cause injury to a person, and damage to
the product.
Follow the manufacturer’s instructions for
mounting the product.
Ventilation
To ensure reliable operation and to prevent
overheating, do not block or cover ventilation
openings and slots with fabrics or impermeable
material Do not place in a built-in
installation such as a bookcase or rack unless
there is proper ventilation or our instructions
have been adhered to.
Heat
Do not place this product anywhere near heat
sources such as radiators, stoves, and other
products (including amplifiers) that produce heat.
Power Sources
This Adapter is specifically designed for operation
within the electrical range(s) specified on the
provided power adapter and use outside of this
range shall be at your own risk. Please contact
your local electric utility company if you have any
questions about the electrical voltage at your
intended location of use
Power-cord Protection
Arrange the power-cord to minimize the risk of
damage from traffic or other hazards. Pay
particular attention to the area near the plug head,
the power source outlet and the connection from
the product.
Lightning
Unplug the product from the power source during
lightning storms of if unused for long periods of
time. This will prevent lightning and power-line
surge damage to the product.
w w w . a r g o n a u d i o . c o m
4
DAB Adapter2+
Overloading
Do not overload wall outlets, extension cords, or
integral power circuits as this can result in a risk
of fire or electric shock.
Object and Liquid Entry
Never push any object through the product
openings, as this can result in a fire, electric
shock or damage. Do not spill liquids on the
product.
Servicing
Do not attempt to service the product yourself.
Refer all servicing to qualified service personnel.
Damage Requiring Service
Call for servicing when:
a) the power-supply cord or plug is damaged.
b) objects have fallen through or liquids have
been spilled into the product openings.
c) the product does not operate normally when
following the operating instructions.
d) the product has been dropped or damaged in
any way.
1.2 Contents of the box;
• ARGON DAB Adapter2+
• DC5V 1A Power adapter
• RCA to RCA cable
• Antenna cable
• Remote control
• Quick Start Guide - English.
We recommend that you keep the original box
and packing material for future transportation.
We also recommend that you keep this User
Manual.
w w w . a r g o n a u d i o . c o m
5
DAB Adapter2+
2. Usage, controls and connections
This chapter describes and shows you the location of the various controls and connections on
your Argon DAB Adapter2+.
NOTICE: The DAB Adapter 2+ is operated only via the remote control.
w w w . a r g o n a u d i o . c o m
6
DAB Adapter2+
Usage and controls
Function
1. Preset buttons (1-6)
2.Auto Scan button
3.Tune buttons
4.Sleep button
Press to recall a stored Adapter station.
Press to perform quick scan or full scan in DAB mode.
Press to select options, scan or switch stations.
Press to activate and set your sleep delay timer. This function turns off your
Adapter after a preset period of time.
5.Info button
6.Snooze button
7.Alarm button
8.Volume arrow buttons
9. Power button
10. Back button
11. Menu button
Press this button to change the display information on your LCD display
Press to temporarily turn off your alarm. Press to mute a broadcast
Press to activate and set your alarm.
Press to adjust the volume of your Adapter.
Press to switch between Stand By and Playing Mode.
Press to go one step back in the Menu.
Press to activate and use the Menu function.
Connections
1. Power button
2. Antenna plug
3. Left/right RCA output
4. Optical output
5. 12 volt trigger output
6. Power supply connection
Press to turn the Adapter On or Off.
Connect the antenna to this plug.
Analogue output to amplifier.
Digital output to amplifier.
Use this plug to turn on your amplifier automatically, when the Adapter is
turned on. Requires that your amplifier supports this function.
Connect the included power supply to this plug.
w w w . a r g o n a u d i o . c o m
7
DAB Adapter2+
3. Using Your Argon DAB Adapter2+
3.1 Quick start
3.1.1 Start up
1.
Mount the antenna in the antenna plug. If you use the included antenna, remember to split the
antenna into a “T”.
2.
Plug the Power supply into an electric outlet and into the back of the Adapter.
3.
Press “power” On
4.
The Adapter will start searching for DAB stations automatically. This may take a few minutes and
the progress will be shown in the display.
5.
Once finished searching, the Adapter will start playing the first found station.
3.1.2 Basic Operating
1.
Stations can be chosen by pressing the “arrows” on the remote.
2.
Once the prefer station is found press the “Select” knob and the chosen station will start playing.
3.
To store a station on one of the 1-6 preset buttons, press and hold the wished preset button for 3
sec., while playing the station that you want to store.
4.
When stored, the display will show “Preset X saved”
w w w . a r g o n a u d i o . c o m
8
DAB Adapter2+
3.2 DAB mode
The Adapter displays the correct time after a full scan has been preformed for the first time.
(Normally done automatically at first time installation). Your Adapter retrieves the time information
from a DAB station.
3.2.1 Scanning stations
There are two ways to scan for stations:
•
Automatic full scan (autotune )
•
Manual scan
To do an automatic full scan:
1.
Press Auto scan button <Full scan> will show in the display.
This may take a few minutes. When there scan is finished the first found station, starts to play
immediately.
2.
To preview another station, press Arrow buttons until the name of another station appears.
3.
Press the Select button to select and listen to the new station.
4.
You can also to a Full scan from the Menu. Press Menu button and use the Arrow to scroll to Full
Scan. Press Select.
To do a manual scan
1.
Press and hold the Menu button.
2.
Turn the Arrow button until the display shows <Manual Tune>.
3.
Press the Select button to activate manual tune.
4.
To choose a frequency manual press the Arrow button.
5.
Confirm by pressing the Select button.
w w w . a r g o n a u d i o . c o m
9
DAB Adapter2+
3.2.2 Viewing additional Information (Display Information)
Display information containing useful ones such as; time, date, station name, signal strength, program type,
frequency, signal error, kbps quality, including Adapter services, song titles, and special announcements sent
by your DAB provider.
1.
While playing a station in DAB mode, press the Info button. Additional information appears at the
bottom row of the display.
2.
Each time you press the Info button, new Display information will appear.
There are nine different types of Display information available for DAB mode:.
•
Station information with text messages such as song title, artiste name etc, are displayed.
•
Station category
•
Programs being played.
•
Stations broadcast frequency.
•
Signal error
•
Signal strength
•
Time obtained automatically from a DAB transmission in your country or region.
•
Date obtained automatically from a DAB transmission in your country or region.
•
Kbps quality
3.2.3 Additional Menu functions
1.
Pressing the Menu button, will bring you into the Menu.
2.
In the Menu you will find these options, by pressing the Arrow buttons up (or down):
<Full scan>
see point 3.2.1 page 9
w w w . a r g o n a u d i o . c o m
10
DAB Adapter2+
<Manual tune>
see point 3.2.1 page 9
<DRC> Dynamic range compression
This function reduces the difference between the loudest and quietest audio being broadcast. Effectively, this
makes quiet sounds comparatively louder and loud sounds comparatively quieter.
Note: DRC only works if it is enabled by the broadcaster for a specific station.
There are three settings High, Low and Off.
1.
Chose your preference by pressing the Arrow buttons, confirm your choice by pressing the
Select button.
<Prune>
This removes all invalid stations, indicated in the station list with a ‘?’ in front of the station name.
1.
Choose “Yes” or “No” using the Arrow buttons
2.
Confirm your choice by pressing the Select button.
<System>
See point 4.5 page 14 for System menu.
To enter the System settings:
1.
Press and holding the Menu button.
2.
Press the Arrow buttons until you see <System> in the display.
3.
Confirm your choice by pressing the Select button.
w w w . a r g o n a u d i o . c o m
11
DAB Adapter2+
4. Using Basic Functions
4.1 Storing and recalling your stations
Your Adapter can store up to 6 DAB and 6 FM Adapter stations as presets.
1.
To store a station you are listening to, press and hold any one of buttons 1~6 number you want to
store the station in.
2.
Hold until Preset x stored (Where x is anyone of the 1~6 number selected) appears in the Display.
A new preset overrides an existing one when you store a new station over it.
3.
To recall a station you press any one of the 1~6 number buttons, you will hear the corresponding
station that you stored with the corresponding number buttons.
4.2 Setting and checking the sleep timer
This option turns the Adapter off automatically after a specified period.
1.
Press Sleep button and it will show “Sleep off” in the display.
2.
Keep pressing the Sleep button and for each press it will increase the sleep intervals of 15
minutes, up to a maximum of 90 minutes.
3.
Confirm your wished choice by pressing the Select button.
Your sleep function is now activated and an “S” will appear in the top right corner of the display.
4.
To deactivate the sleep function follow the steps above, but confirm “Sleep off” instead of a Sleep
time.
4.2.1 Checking the sleep timer setting
1.
Press the Sleep button. The amount of time left is displayed on the bottom of the display.
2.
To deactivate the sleep function follow the steps as in point 4.2, but confirm “Sleep off” instead of
a Sleep time. Notice: When you press the Power button, the sleep delay mode is deactivated.
w w w . a r g o n a u d i o . c o m
12
DAB Adapter2+
4.3 Setting the alarm
The Adapter has two Alarm presets
1.
When your Adapter is in ON mode (playing), press the Alarm button. The display will show “Alarm
1 setup”. If you press one more time it will show “Alarm 2 setup”.
Press the Select buttons on either “Alarm 1 setup” or “Alarm 2 setup” depending on which Alarm
you want to activate and the Alarm Wizard will start up.
2.
Hours will start blinking in the display. Adjust time (hours) by pressing the Arrow buttons until you
reach the hour you want the alarm to start. Confirm by pressing the Select button.
3.
Next “minutes will start blinking. Adjust time (minutes) by pressing the Arrow buttons until you
reach the minutes you want the alarm to start. Confirm by pressing the Select button.
4.
Next Source will start blinking showing “Buzzer”. Press the Arrow buttons and scroll between
Alarm start on “Buzzer” or “DAB” and confirm your choice by pressing the Select button.
5.
Next choose “Last listened” on DAB pressing the Select button.
Next by pressing the Arrow buttons you can choose if the alarm has to be activated: Once, Daily,
Weekdays or Weekend. Confirm you choice by pressing the Select button.
6.
Next Date will start blinking, choose the date by pressing the Arrow buttons and after you choose
day, month and year remember to press the Select button to confirm each step.
7.
Next the volume scale will show in the display. Choose you’re wished Alarm sound level by
pressing the Arrow buttons until you reach the volume level you want.
8.
Finally a screen appears that shows “Alarm 1 ON” where the “ON” is blinking. Press the Select
button to confirm the whole alarm setup. When the Adapter is turned off a Bell (alarm sign) is
shown in the top right corner of the display. And you are ready.
4.3.1 To deactivate the alarm
1.
Press Snooze button to temporary stop the alarm.
w w w . a r g o n a u d i o . c o m
13
DAB Adapter2+
2.
To totally stop the alarm in Adapter standby mode press the Alarm button continuously until both
Alarm 1 and Alarm 2 shows OFF.
4.4 Use of the Snooze function
1.
2.
3.
When the Adapter is playing, you can press the Snooze button to mute the Adapter.
To turn off the mute function, press the Snooze button again.
In alarm mode the Snooze function will, when pressing the button, mute the alarm for 5 minutes.
After 5 minutes the alarm will sound again.
4.5 <System> settings and information
The Adapter has a system menu with various functions and information.
1.
To enter the system settings press the Menu button.
2.
Press the Arrow buttons until it shows <System> in the display.
3.
Activate the System menu by pressing the Select button.
4.
Once in the system menu you can scroll through all the options by pressing the Arrow buttons.
There are five different system menu functions: Time, Backlight, Language, Factory Reset, SW
version.
4.5.1 Time
1.
Access Time settings by pressing the Select button when <Time> is shown in the display.
2.
In the Time menu you can choose either to <Set Time/Date> manually or to <Auto update>
3.
Choose which one you want and confirm by pressing Tuning/select (3) button/knob.
It’s recommended to have the setting on <Auto update>. This way the time and date will be
updated automatically from either FM or DAB broadcasts.
w w w . a r g o n a u d i o . c o m
14
DAB Adapter2+
4.5.2 Backlight
1.
Access Backlight settings by pressing the Select button when <Backlight> is shown in the display.
2.
Backlight can be “OK” or set at eight different timeout levels. Press the Arrow buttons until you
reach your desired setting.
3.
Press the Select button/knob to confirm your choice.
4.5.3 Language
1.
Access Language settings by pressing the Select button when <Language> is shown in the
display.
2.
Scroll through the language options by pressing the Arrow buttons.
3.
Press the Select button/knob to confirm your choice.
4.5.4 Factory reset
1.
Access Factory reset settings by pressing the Select button when <Factory reset> is shown in the
display. You may want to erase your settings on your Adapter, including your presets and alarm
and sleep delay settings.
2. Press the Select button/knob to confirm. The Adapter is now reset.
4.5.5 Software version (SW version)
1.
Access Software version information by pressing the Select button when <SW version> is shown
in the display.
2.
Press the Select button to confirm.
The display now shows the software version of your Adapter.
w w w . a r g o n a u d i o . c o m
15
DAB Adapter2+
5. Specifications
Broadcast Frequency ranges supported:
DAB: Band III: (174~240MHz).
LCD display: 16x3
Input voltage: 5V DC/1A
Output connector: Left/Right RCA, Optical Spdiff and 12 volt trigger for external amplifier
Dimensions (W x H X D): 129mmx55mmx80mm
Weight: 0,35 kg
6. DAB Frequency Band overview
w w w . a r g o n a u d i o . c o m
16