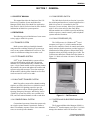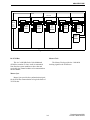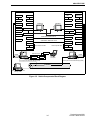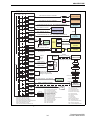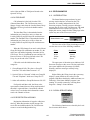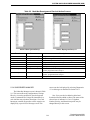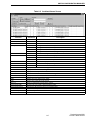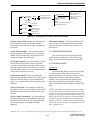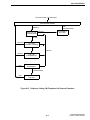
1
3000 Series OPERATING MANUAL SYSTEM AND SUBSCRIBER MANAGER Multi-Net® 3000 Series Switch System and Subscriber Manager Part Number 002-3139-078CD August 2001 Supercedes 002-3139-077 MULTI-NET® II 3000 SERIES SWITCH SYSTEM AND SUBSCRIBER MANAGER OPERATOR'S MANUAL LAND MOBILE PRODUCT WARRANTY The manufacturer's warranty statement for this product is available from your product supplier or from the E.F. Johnson Company, 299 Johnson Avenue, Box 1249, Waseca, MN 56093-0514. Phone (507) 835-6222. Copyright© 2001 by the E.F. Johnson Company The E.F. Johnson Company, which was founded in 1923, provides wireless communication systems solutions for public safety, government, and commercial customers. The company designs, manufactures, and markets conventional and trunked radio systems, mobile and portable subscriber radios, repeaters, and Project 25 digital radio products. Viking Head/EFJohnson logo, LTR®, LTR-Net™, and Multi-Net® are trademarks of the E.F. Johnson Company. All other company and/or product names used in this manual are trademarks and/or registered trademarks of their respective manufacturer. Information in this manual is subject to change without notice. E.F. Johnson will not be liable for any misunderstanding due to misinformation or errors found in this document. This device complies with Part 15 of the FCC rules. Operation is subject to the condition that this device does not cause harmful interference. In addition, changes or modification to this equipment not expressly approved by the E.F. Johnson Company could void the user's authority to operate this equipment (FCC rules, 47CFR Part 15.19). TABLE OF CONTENTS TABLE OF CONTENTS 1 GENERAL 4 1.1 1.2 SCOPE OF MANUAL . . . . . . . . . . . . . . . . . . . . 1-1 DEFINITIONS . . . . . . . . . . . . . . . . . . . . . . . . . . . 1-1 Trunked System . . . . . . . . . . . . . . . . . . . . . . . . . 1-1 LTR Trunked System . . . . . . . . . . . . . . . . . . . . . 1-1 Multi-Net Trunked System. . . . . . . . . . . . . . . . . 1-1 Conventional System . . . . . . . . . . . . . . . . . . . . . 1-1 3000-Series Switch . . . . . . . . . . . . . . . . . . . . . . . 1-1 Call Processor (CP) . . . . . . . . . . . . . . . . . . . . . . 1-1 System and Subscriber Manager (SSM). . . . . . . 1-1 Locality. . . . . . . . . . . . . . . . . . . . . . . . . . . . . . . . 1-2 Home Repeater Channel. . . . . . . . . . . . . . . . . . . 1-2 Status Repeater . . . . . . . . . . . . . . . . . . . . . . . . . . 1-2 Monitor Repeater Channel . . . . . . . . . . . . . . . . . 1-2 Device Address. . . . . . . . . . . . . . . . . . . . . . . . . . 1-2 Unique Identification (UID) . . . . . . . . . . . . . . . . 1-2 Group Identification Number . . . . . . . . . . . . . . . 1-2 Dynamic Reassignment . . . . . . . . . . . . . . . . . . . 1-3 Pulse Code Modulation (PCM) . . . . . . . . . . . . . 1-3 Access Priority . . . . . . . . . . . . . . . . . . . . . . . . . . 1-3 Remote Access Service . . . . . . . . . . . . . . . . . . . 1-3 WIDE AREA CALL INFORMATION . . . . . . . 1-3 Wide Area Module (WAM) . . . . . . . . . . . . . . . . 1-3 Wide Area Call (WAC) . . . . . . . . . . . . . . . . . . . 1-3 Resource Allocation . . . . . . . . . . . . . . . . . . . . . . 1-3 WAC Alarm Messages . . . . . . . . . . . . . . . . . . . . 1-3 SYSTEM MANAGEMENT . . . . . . . . . . . . . . . . 1-4 System Administrator . . . . . . . . . . . . . . . . . . . . . 1-4 System Operators . . . . . . . . . . . . . . . . . . . . . . . . 1-4 CP AND SSM OPTIONAL FEATURES. . . . . 1-5 General . . . . . . . . . . . . . . . . . . . . . . . . . . . . . . . . 1-5 Call Processor Options . . . . . . . . . . . . . . . . . . . . 1-5 SSM Options . . . . . . . . . . . . . . . . . . . . . . . . . . . 1-5 4.1 4.2 4.3 4.4 4.5 4.6 4.7 4.8 4.9 4.10 1.3 1.4 1.5 2 3000-SERIES SWITCH 2.1 2.2 INTRODUCTION . . . . . . . . . . . . . . . . . . . . . . . . 2-1 SWITCH MODULES . . . . . . . . . . . . . . . . . . . . . 2-2 3 ARCHITECTURE 3.1 3.2 3.3 INTRODUCTION . . . . . . . . . . . . . . . . . . . . . . . . 3-1 SWITCH INTERFACES . . . . . . . . . . . . . . . . . . 3-1 BUS STRUCTURE . . . . . . . . . . . . . . . . . . . . . .3-1 Introduction . . . . . . . . . . . . . . . . . . . . . . . . . . . . 3-1 Data Buses . . . . . . . . . . . . . . . . . . . . . . . . . . . . . 3-1 Control Bus. . . . . . . . . . . . . . . . . . . . . . . . . . . . . 3-3 Voice Bus . . . . . . . . . . . . . . . . . . . . . . . . . . . . . . 3-3 CALL PROCESSOR (CP) INTRODUCTION . . . . . . . . . . . . . . . . . . . . . . . .4-1 DATA BUSES. . . . . . . . . . . . . . . . . . . . . . . . . . .4-1 SYSTEM CONFIGURATION . . . . . . . . . . . . . .4-1 STANDARD GROUP CALL. . . . . . . . . . . . . . .4-1 WIDE AREA CALL . . . . . . . . . . . . . . . . . . . . . .4-1 REGISTRATION . . . . . . . . . . . . . . . . . . . . . . . .4-2 INTERROGATE . . . . . . . . . . . . . . . . . . . . . . . . .4-3 DYNAMIC REASSIGNMENT. . . . . . . . . . . . . .4-4 REASSIGNMENT PLAN EXECUTION . . . . .4-4 USAGE ACCOUNTING . . . . . . . . . . . . . . . . . .4-5 General . . . . . . . . . . . . . . . . . . . . . . . . . . . . . . . . 4-5 Error Messages and Internal Errors . . . . . . . . . . 4-5 Call Usage Logging . . . . . . . . . . . . . . . . . . . . . . 4-5 CSB Usage . . . . . . . . . . . . . . . . . . . . . . . . . . . . . 4-6 Registration Logging . . . . . . . . . . . . . . . . . . . . . 4-6 4.11 STATUS MONITOR. . . . . . . . . . . . . . . . . . . . . .4-6 Introduction. . . . . . . . . . . . . . . . . . . . . . . . . . . . . 4-6 Local Service Menu . . . . . . . . . . . . . . . . . . . . . . 4-6 Messages Menu. . . . . . . . . . . . . . . . . . . . . . . . . . 4-7 Display Menu . . . . . . . . . . . . . . . . . . . . . . . . . . . 4-8 About Menu . . . . . . . . . . . . . . . . . . . . . . . . . . . . 4-8 5 SYSTEM AND SUBSCRIBER MANAGER (SSM) 5.1 GENERAL . . . . . . . . . . . . . . . . . . . . . . . . . . . . . .5-1 Introduction. . . . . . . . . . . . . . . . . . . . . . . . . . . . . 5-1 Setting Up New Systems . . . . . . . . . . . . . . . . . . 5-3 FILE MENU . . . . . . . . . . . . . . . . . . . . . . . . . . . . .5-3 Select Network . . . . . . . . . . . . . . . . . . . . . . . . . . 5-3 Reload Distributed Tables. . . . . . . . . . . . . . . . . . 5-3 Properties . . . . . . . . . . . . . . . . . . . . . . . . . . . . . . 5-3 Enter New Key . . . . . . . . . . . . . . . . . . . . . . . . . . 5-3 Import From File. . . . . . . . . . . . . . . . . . . . . . . . . 5-4 Export To File . . . . . . . . . . . . . . . . . . . . . . . . . . . 5-4 Print. . . . . . . . . . . . . . . . . . . . . . . . . . . . . . . . . . . 5-4 Exit . . . . . . . . . . . . . . . . . . . . . . . . . . . . . . . . . . . 5-4 TOOLS MENU . . . . . . . . . . . . . . . . . . . . . . . . . .5-4 Group Manager . . . . . . . . . . . . . . . . . . . . . . . . . . 5-4 Permissions Profile Manager . . . . . . . . . . . . . . . 5-6 Reassignment Plan Manager. . . . . . . . . . . . . . . . 5-7 Subscriber Manager . . . . . . . . . . . . . . . . . . . . . . 5-9 System Locality Manager . . . . . . . . . . . . . . . . . 5-11 Wide Area Call Manager . . . . . . . . . . . . . . . . . 5-12 Switch Configuration Manager. . . . . . . . . . . . . 5-14 User Privilege Manager . . . . . . . . . . . . . . . . . . 5-15 Network Names Manager . . . . . . . . . . . . . . . . . 5-17 DIAGNOSTICS MENU . . . . . . . . . . . . . . . . . .5-17 Call Processor List . . . . . . . . . . . . . . . . . . . . . . 5-17 5.2 5.3 5.4 i Revised August 2001 Part No. 002-3139-078 TABLE OF CONTENTS (CONT’D) 5.5 5.6 6 6.1 6.2 6.3 6.4 DIM (Dispatch Interface Module). . . . . . . . . . . IDM (Intelligent Dispatch Module) . . . . . . . . . LEM (Logging Encoder Module) . . . . . . . . . . . MAM (Multi-Net Acquisition Module) . . . . . . MCM (Multi-Net Console Module) . . . . . . . . . SNM (System Network Module) . . . . . . . . . . . TIM (Telephone Interface Module) . . . . . . . . . VDM (Voter Diagnostic Module) . . . . . . . . . . . WAM (Wide Area Module) . . . . . . . . . . . . . . . Receiver Buffer. . . . . . . . . . . . . . . . . . . . . . . . . 5-17 Send Who’s There . . . . . . . . . . . . . . . . . . . . . . 5-17 User Messages . . . . . . . . . . . . . . . . . . . . . . . . . 5-17 WINDOWS MENU . . . . . . . . . . . . . . . . . . . . . . 5-18 Tile . . . . . . . . . . . . . . . . . . . . . . . . . . . . . . . . . . 5-18 Cascade. . . . . . . . . . . . . . . . . . . . . . . . . . . . . . . 5-18 Set Title . . . . . . . . . . . . . . . . . . . . . . . . . . . . . . 5-18 HELP MENU . . . . . . . . . . . . . . . . . . . . . . . . . . .5-18 General . . . . . . . . . . . . . . . . . . . . . . . . . . . . . . . 5-18 Contents . . . . . . . . . . . . . . . . . . . . . . . . . . . . . . 5-18 Change History . . . . . . . . . . . . . . . . . . . . . . . . . 5-18 About . . . . . . . . . . . . . . . . . . . . . . . . . . . . . . . . 5-18 SWITCH CONFIGURATION MANAGER SCREENS A ALARM LISTS A.1 A.2 ALL ALARMS LISTED BY NUMBER . . . . . A-1 INTRA-TERMINAL ALARMS LISTED BY SEVERITY . . . . . . . . . . . . . . . . . . . . . . . . . . . A-6 CALL PROCESSOR ALARMS LISTED BY SEVERITY . . . . . . . . . . . . . . . . . . . . . . . . . . . A-9 A.3 INTRODUCTION . . . . . . . . . . . . . . . . . . . . . . . . 6-1 General . . . . . . . . . . . . . . . . . . . . . . . . . . . . . . . . 6-1 Displaying Installed Cards . . . . . . . . . . . . . . . . . 6-1 Selecting Card to Configure . . . . . . . . . . . . . . . . 6-1 Selecting Activity Monitor, Logs, and Properties 6-2 Selecting Other Installation . . . . . . . . . . . . . . . . 6-2 ALARMS . . . . . . . . . . . . . . . . . . . . . . . . . . . . . . .6-2 General . . . . . . . . . . . . . . . . . . . . . . . . . . . . . . . . 6-2 Displaying Active and Archived Alarms . . . . . . 6-3 Repeater Alarms . . . . . . . . . . . . . . . . . . . . . . . . . 6-3 PROGRAMMING COMMON SWITCH PROPERTIES . . . . . . . . . . . . . . . . . . . . . . . . 6-6 Activity Monitor . . . . . . . . . . . . . . . . . . . . . . . . . 6-6 Activity Log . . . . . . . . . . . . . . . . . . . . . . . . . . . . 6-6 Call Log . . . . . . . . . . . . . . . . . . . . . . . . . . . . . . . 6-6 Emergency Traffic Activity Log . . . . . . . . . . . . 6-7 Queued Call Log. . . . . . . . . . . . . . . . . . . . . . . . . 6-8 Reassignment Plan Log . . . . . . . . . . . . . . . . . . . 6-8 Registration Log . . . . . . . . . . . . . . . . . . . . . . . . . 6-9 Usage Accounting Log . . . . . . . . . . . . . . . . . . . . 6-9 Remove Installation . . . . . . . . . . . . . . . . . . . . . 6-10 Dialing Rules . . . . . . . . . . . . . . . . . . . . . . . . . . 6-10 Copy Settings To Defaults . . . . . . . . . . . . . . . . 6-20 Pack Tables. . . . . . . . . . . . . . . . . . . . . . . . . . . . 6-20 Call Processor Properties . . . . . . . . . . . . . . . . . 6-20 Log Properties . . . . . . . . . . . . . . . . . . . . . . . . . 6-20 Switch Properties . . . . . . . . . . . . . . . . . . . . . . . 6-20 CARD PROPERTIES . . . . . . . . . . . . . . . . . . . 6-25 Global Card Properties . . . . . . . . . . . . . . . . . . . 6-25 CCM (Conventional Channel Module) . . . . . . 6-25 CIM (Channel Interface Module) . . . . . . . . . . . 6-26 DCM (Dispatch Channel Module) . . . . . . . . . . 6-28 6-29 6-30 6-31 6-31 6-32 6-33 6-34 6-41 6-42 B CALL SEQUENCES B.1 GROUP CALL. . . . . . . . . . . . . . . . . . . . . . . . . . B-1 Mobile-to-Mobile On Same Locality . . . . . . . . B-1 Mobile-to-Mobile with DIM Monitoring . . . . . B-1 WIDE AREA GROUP CALL. . . . . . . . . . . . . . B-1 Mobile to Group of Mobiles on Multiple Localities . . . . . . . . . . . . . . . . . . . . . . . . . . . B-1 DISPATCH CONSOLE (DC) TO MOBILE GROUP CALL. . . . . . . . . . . . . . . . . . . . . . . . B-1 MOBILE GROUP CALL TO DISPATCH CONSOLE . . . . . . . . . . . . . . . . . . . . . . . . . . . B-2 MOBILE TO UNIQUE ID . . . . . . . . . . . . . . . . . B-2 MOBILE TO UNIQUE ID FOR A MOBILE OUTSIDE SWITCH . . . . . . . . . . . . . . . . . . . B-3 MOBILE TO DIRECTED GROUP CALL (DTMF ENTRY WITHIN SWITCH) . . . . . . B-4 MOBILE TO DIRECTED GROUP CALL (DTMF ENTRY OUTSIDE THE SWITCH)B-5 MOBILE ORIGINATED TELEPHONE CALL . . . . . . . . . . . . . . . . . . . . . . . . . . . . . . . B-6 LANDSIDE (TIM) ORIGINATE TO MOBILE WITHIN SWITCH USING A DID LINE . . . B-6 LANDSIDE (TIM) ORIGINATE TO MOBILE WITHIN SWITCH USING A 2WY LINE . . B-7 TIM ORIGINATE TO MOBILE OUTSIDE SWITCH USING A DID LINE . . . . . . . . . . . B-7 LANDSIDE ORIGINATE TO MOBILE OUTSIDE SWITCH USING A 2WY LINE. B-8 B.2 B.3 B.4 B.5 B.6 B.7 B.8 B.9 B.10 B.11 B.12 B.13 INDEX ii Revised August 2001 Part No. 002-3139-078 TABLE OF CONTENTS (CONT’D) LIST OF TABLES 5-1 5-2 5-3 5-4 5-5 5-6 5-7 5-8 5-9 5-10 5-11 6-1 6-2 6-3 6-4 6-5 6-6 6-7 6-8 6-9 6-10 6-11 6-12 6-13 6-14 6-15 6-16 6-17 6-18 6-19 6-20 6-21 6-22 6-23 6-24 6-25 A-1 A-2 A-3 LIST OF FIGURES Main Menu Functions . . . . . . . . . . . . . . . . . . . . . 5-2 Group Manager Screen . . . . . . . . . . . . . . . . . . . . 5-5 Permission Profile Manager Screen . . . . . . . . . . 5-6 Reassignment Plan Manager Screen . . . . . . . . . . 5-8 Multi-Net Reassignment Plan Add Action Screens . . . . . . . . . . . . . . . . . . . . . . . . . . . . . . . . 5-9 Subscriber Manager Screen . . . . . . . . . . . . . . . . 5-10 Add Multi-Net Users Screen . . . . . . . . . . . . . . . 5-11 System Locality Manager Screen . . . . . . . . . . . 5-12 Wide Area Call Screen . . . . . . . . . . . . . . . . . . . 5-15 Assignable Privileges . . . . . . . . . . . . . . . . . . . . 5-16 Network Names Screen . . . . . . . . . . . . . . . . . . . 5-17 Active Alarm Screen . . . . . . . . . . . . . . . . . . . . . . 6-4 Archived Alarms Screen . . . . . . . . . . . . . . . . . . .6-5 Rules Screen . . . . . . . . . . . . . . . . . . . . . . . . . . . 6-11 Rules Screen Add/Edit Actions Screens . . . . . . 6-12 Digit Patterns Screen . . . . . . . . . . . . . . . . . . . . . 6-13 Trunk Groups Screen . . . . . . . . . . . . . . . . . . . . . 6-14 Call Processor Properties Screen . . . . . . . . . . . . 6-21 Log Properties Screen . . . . . . . . . . . . . . . . . . . . 6-23 Switch Properties Screen . . . . . . . . . . . . . . . . . . 6-24 Global Card Properties . . . . . . . . . . . . . . . . . . . 6-25 Conventional Channel Module Screen . . . . . . .6-26 Channel Interface Module Screen . . . . . . . . . . . 6-27 Dispatch Channel Module Screen . . . . . . . . . . . 6-28 Dispatch Interface Module Screen . . . . . . . . . . 6-29 Intelligent Dispatch Module Screen . . . . . . . . . 6-30 Logging Encoder Module Screen . . . . . . . . . . . 6-31 Multi-Net Console Module Screen . . . . . . . . . . 6-32 System Network Module Screen . . . . . . . . . . . . 6-33 TIM 2-Wire DID Screen . . . . . . . . . . . . . . . . . .6-36 TIM 2-Wire Loop Ground Screen . . . . . . . . . . . 6-37 TIM 4-Wire DID Screen . . . . . . . . . . . . . . . . . .6-38 TIM 4-Wire Loop Ground Screen . . . . . . . . . . . 6-39 TIM 4-Wire Screen Properties . . . . . . . . . . . . . 6-40 Voter Diagnostic Module Screen . . . . . . . . . . . 6-41 Wide Area Module Screen . . . . . . . . . . . . . . . . 6-43 All Alarms (Listed By Number) . . . . . . . . . . . . A-1 Intra-Terminal Data Bus Alarms . . . . . . . . . . . . A-6 Call Processor Alarms Listed By Severity . . . . A-9 1-1 1-2 2-1 2-2 2-3 2-4 2-5 2-6 2-7 3-1 3-2 3-3 3-4 3-5 3-6 4-1 5-1 6-1 6-2 6-3 6-4 6-5 6-6 6-7 6-8 B-1 B-2 B-3 B-4 B-5 B-6 B-7 iii Call Processor . . . . . . . . . . . . . . . . . . . . . . . . . . 1-1 System and Subscriber Manager (SSM) . . . . . . 1-2 3000 Series Switch (8-Shelf). . . . . . . . . . . . . . . 2-1 Two-Shelf Switch With CP/SSM . . . . . . . . . . . 2-3 Four-Shelf Switch With CP/SSM . . . . . . . . . . . 2-3 Sample 2-Shelf Switch Rack Setup. . . . . . . . . . 2-3 Sample 4-Shelf Switch Rack Setup. . . . . . . . . . 2-3 Sample 6-Shelf Switch Rack Setup. . . . . . . . . . 2-4 Sample 8-Shelf Switch Rack Setup. . . . . . . . . . 2-4 Multi-Net System Diagram . . . . . . . . . . . . . . . . 3-1 Data Buses. . . . . . . . . . . . . . . . . . . . . . . . . . . . . 3-2 Control Buses . . . . . . . . . . . . . . . . . . . . . . . . . . 3-3 Voice Buses. . . . . . . . . . . . . . . . . . . . . . . . . . . . 3-4 Switch Components Block Diagram . . . . . . . . . 3-5 Switch Audio and Data Links . . . . . . . . . . . . . . 3-6 Call Processor Status Monitor Main Screen . . . 4-7 Main Screen Menu Structure. . . . . . . . . . . . . . . 5-1 Switch Configuration Manager Screens . . . . . . 6-1 Activity Monitor Screens . . . . . . . . . . . . . . . . . 6-6 Call Log Screens . . . . . . . . . . . . . . . . . . . . . . . . 6-7 Queued Call Log Screens . . . . . . . . . . . . . . . . . 6-8 Reassignment Plan Log . . . . . . . . . . . . . . . . . . . 6-8 Registration Plan Log Screen . . . . . . . . . . . . . . 6-9 Usage Accounting Log Screen . . . . . . . . . . . . . 6-9 Dialing Rules Screen Command Structure . . . 6-10 SNM Unique ID Request Flowchart . . . . . . . . . B-9 DIM Unique ID Request Flowchart . . . . . . . . B-10 CIM DTMF Auxiliary Call Flowchart . . . . . . B-11 Telephone Incoming TIM Incoming Flowchart B-12 Telephone Calling CIM Telephone Call Request Flowchart . . . . . . . . . . . . . . . . . . . . . B-13 Dynamic Reassignment User Interface Request Flowchart . . . . . . . . . . . . . . . . . . . . . B-14 Selective Unit Disable User Interface Request Flowchart . . . . . . . . . . . . . . . . . . . . . B-14 Revised August 2001 Part No. 002-3139-078 GENERAL SECTION 1 GENERAL 1.1 SCOPE OF MANUAL 1.2.5 3000-SERIES SWITCH This manual describes the functions of the Call Processor (CP) and the System and Subscriber Manager (SSM). Refer to the Multi-Net Application Note, Part No. 009-3039-004 or later for more detailed information on Multi-Net system operation. The 3000-Series Switch (see Section 2) provides the switching and interface to external equipment for a Multi-Net system. It is controlled by the Call Processor (see next section). It has up to eight shelves with 12 device slots each (96 slots total). Many different modules are available to provide interfacing with the repeaters, control consoles, public telephone systems and other functions. 1.2 DEFINITIONS The following are brief definitions of some terms as they apply to Multi-Net systems. 1.2.6 CALL PROCESSOR (CP) The Call Processor is a Windows NT® based computer (see Figure 1-1) which contains the database used to control the Switch. It controls and continuously monitors Switch operation, provides logging of information for billing purposes, and performs other functions such as processing certain types of calls. The Call Processor interfaces with the Switch as shown in Figure 3-1. Refer to Section 4 for more Call Processor information. 1.2.1 TRUNKED SYSTEM Radio systems which pool multiple channels using automatic switching allowing all system users access to any repeater channel that is not in use. This results in a minimum waiting time to make a call. 1.2.2 LTR TRUNKED SYSTEM LTR (Logic Trunked Radio) systems utilize a concept called trunking which makes all repeater channels of a system automatically available to the users. A logic control module in each repeater continually monitors the system and updates the mobiles and repeaters using data messages. These data messages tell the mobiles which repeater channels are free and can be accessed if a call is to be made. 1.2.3 MULTI-NET TRUNKED SYSTEM Multi-Net radio systems utilize channel trunking similar to an LTR system. However, Multi-Net uses a different Multi-Net signaling protocol to provide enhanced features such as Auto-Registration, Busy Queuing, Emergency Messages, and Priority Access. A Multi-Net system also allows users on Multi-Net, LTR, and Conventional channels to talk to each other. Figure 1-1 Call Processor 1.2.7 SYSTEM AND SUBSCRIBER MANAGER (SSM) 1.2.4 CONVENTIONAL SYSTEM Conventional systems are licensed to operate only on a single repeater channel. Operation is similar to that of a community repeater as there is no automatic access to several repeater channels. The System and Subscriber Manager (SSM) is a Windows NT® based computer (see Figure 1-2) which manages the database in the Call Processor. It also 1-1 Revised August 2001 Part No. 002-3139-078 GENERAL 1.2.10 STATUS REPEATER generates reports from the information logged by the CP and sets up and initiates activities such as Dynamic Reprogramming of certain transceiver parameters (Group 11), disabling (Kill) of lost or stolen transceivers. A Multi-Net repeater at a locality is designated to transmit update information for all calls occurring at that locality. This repeater is also available for voice traffic, but is not assigned as a home repeater for any transceivers because none of its transceivers would have home channel backup. Multiple status repeaters may be assigned in large localities. The local SSM and the CP functions can run on the same computer if desired. The SSM interfaces with the Call Processor via an Ethernet link as shown in Figure 3-1. Refer to Section 5 for more SSM information. 1.2.11 MONITOR REPEATER CHANNEL This is the repeater that a transceiver is currently monitoring for update messages. With Multi-Net signaling, it is usually the Status repeater but may also be the home repeater. When a transceiver is not receiving a call, it continually monitors update messages from this repeater for incoming call and free repeater information. When making a call, the transceiver may be trunked to any of the locality repeaters that are not busy. 1.2.12 DEVICE ADDRESS Each Switch has a a variable number of shelves, each of which hold up to 12 modules. The addressing of the shelves starts with zero on the lower left of the first Switch rack (reserved for the NetNIM Network Interface Modules). Each succeeding shelf above the first starts with a number 16 higher. The next Switch rack (if applicable) continues this consecutive sequence. This device address is part of the identification used in the protocols (referred to as “Card Address”). Figure 1-2 System and Subscriber Manager (SSM) 1.2.8 LOCALITY 1.2.13 UNIQUE IDENTIFICATION (UID) A Locality refers to repeaters that are physically located together and connected by the same High Speed Data Bus. Multi-Net localities can have a maximum of 30 repeaters. The terms “Locality” and “Site” are sometimes used interchangeably. The Unique ID number (1-8163) is assigned on a locality-wide basis to each transceiver. Each selectable system of a transceiver is programmed with a UID code in addition to the Group ID codes. UIDs 81648191 are reserved and should not be used. 1.2.9 HOME REPEATER CHANNEL 1.2.14 GROUP IDENTIFICATION NUMBER Each Multi-Net selectable system is programmed with a “home” repeater number. When standard (dispatch) calls are placed and received, the home repeater and group ID code identify the transceiver or group of transceivers that receive the call. Multiple “homes” can be assigned in large localities. Group IDs 1-255 are assignable on each MultiNet Home Repeater. A “standard” Group call uses ID codes 1-225, and the call is received by a mobile if it is programmed to receive calls on the Home Repeater/ ID code of a call. “Special” Calls use Group ID codes 1-2 Revised August 2001 Part No. 002-3139-078 GENERAL 1.3 WIDE AREA CALL INFORMATION 226-255. These calls are telephone Interconnect (Group ID = 237), Auxiliary (Group ID = 236), and others. Interconnect and Auxiliary Unique ID calls require System and Subscriber Manager/Call Processor authorization. 1.3.1 WIDE AREA MODULE (WAM) A Wide Area Module (WAM) is used in a Switch to activate Group Dispatch Calls on multiple sites, either internal (same Switch) or external (between Switches). The Call Processor in a system activates a WAM by sending it a Wide Area Call (WAC) configuration that contains Site/Home/Group combinations to be activated as a Wide Area Call. 1.2.15 DYNAMIC REASSIGNMENT Dynamic Reassignment feature of Multi-Net systems allows the reprogramming of Group 11 of the specified system of a particular mobile over the air. In addition, another Multi-Net feature allows the selected system/group of a particular mobile to be changed over the air, for example, to receive an important message. 1.3.2 WIDE AREA CALL (WAC) A Wide Area Call (WAC) consists of a combination of participants that are brought together as a Wide Area Dispatch Call. Once activated in a WAM, the call remains in the WAM until taken over by another WAC. 1.2.16 PULSE CODE MODULATION (PCM) PCM is used on the Switch voice buses to send voice signals between modules. These buses operate at 2.048 MHz and have 32 Time Slots. 1.3.3 RESOURCE ALLOCATION Wide Area Calls are activated by Group Dispatch Calls. When a Call Processor identifies a call on the Switch as being a Wide Area Call, it attempts to allocate a resource for that call if necessary. After validating the Group and User to see if it is permitted on the Switch, the call is identified as either Internal or External. If there are Groups on other Switches that need to be included in the call, it is marked as External. If the converse is true, the call is marked as Internal. 1.2.17 ACCESS PRIORITY Access Priority determines which mobiles have access to a busy system. The method used by MultiNet systems is to transmit the system Priority Level in the data stream to the mobiles. The only mobiles which are allowed to access the system are those programmed with an access priority that is equal to or higher than the currently transmitted system priority. Mobiles with a lower priority do not even attempt to access the system. This prevents lower priority mobiles from loading the system when it is the most crucial, such as during busy periods. The Call Processor then determines if there is a resource available to handle that call. If there is a WAM available that matches the type (Internal or External) and also matches the Routing Group number, the call is assigned to the WAM and configured appropriately. 1.2.18 REMOTE ACCESS SERVICE Remote Access Service is not being used on the Call Processor for remote access and should not be installed in the computer. If it is in the computer, it can be removed in the Services tab by selecting Remote Access Services and click “Remove”. 1.3.4 WAC ALARM MESSAGES LapLink should be used to answer the modem. Ensure that LapLink is setup to start before the NT Logon, not a default. Alarm 46 Not All Channels Active In WAM - This indicates a WAM was unable to acquire channels for all the Groups (participants) that were programmed. There are two alarm messages that appear in the Alarm Log that are helpful in solving fleet mapping issues with Wide Area Calls: 1-3 Revised August 2001 Part No. 002-3139-078 GENERAL Possible Causes: 1.4 SYSTEM MANAGEMENT • Channels are all busy at the Site and the WAM could not activate its Group. 1.4.1 SYSTEM ADMINISTRATOR • More participants were programmed for a Site than the number of available channels. • Channels at a Site were not functional. The System Administrator configures the System and Subscriber Managers to allow selection of Networks and User Privileges for the System Operators. The System Administrator also performs the following required administrative procedures: Possible Solutions: Periodic Reboot • • • Mark participants as temporary. This allows only the necessary participants in all calls to be using channels. Permanent participants will always be brought up on channels where available. A feature of the Call Processor application is the automatic creation and maintenance of a backup set of tables. This action is performed at start-up. To ensure that this backup is usable, the system needs to be rebooted after major configuration changes occur. Reduce the number of participants in a Wide Area Call that use the same Site. For instance, after the cards are initially configured, reboot to allow this information to be copied to the backup set of tables. Also, the resource management of Windows NT® may cause the slow loss of available resources. To recover them, it is necessary to reboot. The frequency of service depends on the type and amount of activity on the system. Increase the number of channels at a Site or fix any channels that are malfunctioning. Alarm 268 No Available WAMs - This indicates that the criteria for WAM take over was not met and therefore a call that needed a WAM could not get one. Possible Causes: Database Backup • • All WAMs have been in use within the Maximum Inactive Time window. This essentially means that all WAMs are being used simultaneously. Since the operational characteristics of the system depend on the information in the configuration tables, it is recommended that a backup copy be kept of the current information on a separate medium (tape, CDRW, multiple floppies, a different hard drive, etc.). When the Call Processor is not operating, copy the entire contents of the RunTimeModel directory. Regular backup of the full drive contents is the preferred course of action. All WACs have a higher priority than the one attempting to come active and the Maximum Inactive Time has not expired on any WAMs. Possible Solutions: • • Decrease the Maximum Inactive Time. Keep in mind that the lower the number, the higher the probability of interrupting conversations. It is recommended that no less than 5 seconds be used. 1.4.2 SYSTEM OPERATORS System Operators are assigned User Privileges by the System Administrator. These privileges determine what the operator is allowed to do using the System and Subscriber Manager. For more important WACs, increase the WAC priority to allow the higher priority WACs to ignore the Maximum Inactive Time. 1-4 Revised August 2001 Part No. 002-3139-078 GENERAL 1.5 CP AND SSM OPTIONAL FEATURES Repeater Alarms - If this option is enabled, repeater alarms are logged by the Call Processor and reported to the SSM. Refer to Section 6.2 for more alarm information. 1.5.1 GENERAL Various Call Processor and System and Subscriber Manager features are optional and available only if unlocked by a special encryption key available from the E.F. Johnson Company. 1.5.3 SSM OPTIONS The latest software includes all of the following optional features. They can be selectively unlocked by an encryption key which activates them for use. A key consists of a string of letters and numbers that are unique to a specific serial number of CP/SSM software. Demo Mode - Restricts the SSM to a Demonstration Mode only. In this mode, sample tables are used to display and change the various parameters which can be programmed by the SSM. Actual data in a Call Processor cannot be viewed or edited in this mode. The SSM encryption key is entered using the File > Enter New Key menu function of the SSM (see Section 5.2.4). Likewise, the Call Processor key is entered by clicking the “Enter Key” button in the Switch Configuration Manager Switch Properties screen (see Section 6.3.15). When installing the SSM to operate in this mode, be sure the Call Processor Tables are installed. To do this, select “Custom Installation” and make sure that “Call Processor Tables” is checked. Wide Area Calling - Allows the wide area group calls described in Section 1.3. 1.5.2 CALL PROCESSOR OPTIONS 3rd Level WAM Routing - Allows routing groups to be set up so that certain wide area calls can be routed to specific localities. Without this option, routing groups are not available and wide area calls are always routed to the same localities. The Call Processor can support the following modes. This determines the types of subscribers that can be programmed by the SSM. • • • Multi-Net LTR-Net Wide Area LTR Priority 1 Emergency - Allows emergency calls to be routed as wide area calls. 1-5 Revised August 2001 Part No. 002-3139-078 3000-SERIES SWITCH SECTION 2 3000-SERIES SWITCH Multi-Net system as building blocks, a system can be designed to meet the communication needs of almost any type of user. The basic elements of a Multi-Net system are as follows: Backbone - This consists of repeater Locality equipment including the links to the Switch. Control Consoles - Used for dispatch operators. Switch - Provides the interface between the Backbone and Control Consoles. RF Equipment - Consists of mobile, control station, and portable transceivers. Each Multi-Net Locality is an independent trunking system that processes calls between RF units, maintains fleet partitioning, and provides priority access control. The backbone elements are interconnected by either microwave, fiber optics, RF links, or private telephone lines equivalent to a 4-Wire voice grade phone circuit. A Switch contains a Channel Interface Module (CIM) for each repeater it controls, a Telephone Interconnect Module (TIM) for each telephone line used for interconnect calls, an Intelligent Dispatch Module (IDM) or Multi-Net Console Module (MCM) for each dispatch console and others described in this section. A single Switch can control up to 30 repeater channels all at one Locality or divided among a combination of Localities. The Switch provides interface between the Locality equipment and the control consoles and directs all activity in Multi-Net Locality applications. RF units in the coverage area of one repeater Locality can communicate with RF units in the coverage area of other repeater Localities through the Switch. Where more than 30 channels are required, multiple Switches can be used with communication between them to direct calls. Wide area radio coverage is provided to allow a mobile to talk to another mobile using a repeater hundreds of miles away. That repeater may be part of the same Multi-Net system or another Multi-Net system with phone lines or some other type of link that provides the communication path. Figure 2-1 3000 Series Switch (8-Shelf) 2.1 INTRODUCTION A Multi-Net radio system is a combination of several key elements that together make up a communication system. By using the basic elements of a 2-1 Revised August 2001 Part No. 002-3139-078 3000-SERIES SWITCH It connects to a 4-Wire interface or to an external 4-Wire E&M interface. An associated MCM is required. One or more dispatch consoles can be connected to the Switch using direct connection, phone lines, or some other type of link. Depending on the capabilities of the particular console, the dispatcher can perform functions such as place calls to specific mobiles, place calls to other dispatchers, and make a patch between two mobiles. DCM (Dispatch Channel Module) - A Terminal shelf module that controls a Conventional repeater. DIM (Dispatch Interface Module) - Interface from the Switch to the Dispatch Consoles. 2.2 SWITCH MODULES IDM (Intelligent Dispatch Module) - Controls the Multi-Net Dispatch Console. The Switch contains various modules that provide the interface between the Switch and external devices. The exact modules used depend on the application. The available modules are as follows. LEM (Logging Encoder Module) - Provides system usage information to a logging recorder. Shelves in the Switch are designated as Channel or Terminal shelves. A Channel shelf can contain only CIM and CCM modules, and a Terminal shelf can contain any of the other modules. This is necessary for proper routing of the audio signals on the PCM bus. MAM (Multi-Net Acquisition Module) - Interface from the Switch to the ORBACOM Dispatch Consoles for Tone Paging. MCM (Multi-Net Console Module) - Interfaces the Switch to a computer controlled (VRCM-50 Series) Dispatch Console. CCM - Conventional Channel Module CIM - Channel Interface Module CPM - Conventional Patch Module DCM - Dispatch Channel Module DIM - Dispatch Interface Module IDM - Intelligent Dispatch Module LEM - Logging Encoder Module MAM - Multi-Net Acquisition Module MCM - Multi-Net Console Module NetNIM - Network Interface Module PTM - Power Termination Module SNM - System Network Module TIM - Telephone Interface Module VDM - Voter Diagnostics Module VTM - Voice Tone Module WAM - Wide Area Module NetNIM (Network Interface Module) - Primary Switch interface to the Call Processor. The NetIDB and NetCSB interface the Call Processor to this card in the Switch. PTM (Power Termination Module) - Provides fusing of power and termination for a shelf. SNM (System Network Module) - Controls other SNMs and Switches. This allows Unique ID calls by mobiles. TIM (Telephone Interface Module) - Connects the Switch to telephone lines and handles telephone line protocol to the PSTN or a PABX. Call Processor - The computer which contains the data base used by the Switch. This data base is programmed by the System and Subscriber Manager. VTM (Voice Tone Module) - Provides voice and tone messages to the System. CCM (Conventional Channel Module) - A Channel shelf module that controls a Conventional repeater. VDM (Voter Diagnostics Module) - Interfaces the Switch to the Voter system. CIM (Channel Interface Module) - A Channel shelf module that controls a Multi-Net or LTR repeater. WAM (Wide Area Module) - Used to make wide area calls to multiple Localities within a System or across multiple Switches. CPM (Conventional Patch Module) - Patches a single Conventional channel to a single trunked Group. 2-2 Revised August 2001 Part No. 002-3139-078 3000-SERIES SWITCH P C C C C C C T I I I I C C M M M M M M M P T M SHELF 2 20 21 22 23 24 25 26 27 16 17 18 19 N e t N I M N e t N I M V T M 1 V S S T T D L W D T N N I I C E A I M M M M M M M M M 2 0 1 2 3 SHELF 1 4 5 6 7 8 9 10 11 POWER SUPPLY Figure 2-4 Sample 2-Shelf Switch Rack Setup P W W W W W W T A A A A A A M M M M M M M Figure 2-2 Two-Shelf Switch With CP/SSM SHELF 4 48 49 50 51 52 53 54 55 56 57 58 59 P D D L L T C C E E M M M M M SHELF 3 32 33 34 35 36 37 38 39 40 41 42 43 P C C C C C C C C C C C C T I I I I I I I I I I C C M M M M M M M M M M M M M 16 17 18 SHELF 2 19 20 21 22 23 24 25 26 27 N P N e e V T t t T M N N M I I 1 V S S T T T T D D T N N I I I I I I M M M M M M M M M 2 M M 0 1 “A” Figure 2-3 Four-Shelf Switch With CP/SSM 2 3 4 SHELF 1 5 6 7 POWER SUPPLY 8 9 10 11 “B” Figure 2-5 Sample 4-Shelf Switch Rack Setup 2-3 Revised August 2001 Part No. 002-3139-078 3000-SERIES SWITCH P T M P T M 80 81 82 SHELF 6 83 84 85 86 87 88 89 90 91 SHELF 8 112 113 114 115 116 117 118 119 120 121 122 123 P T M P T M 64 65 66 67 SHELF 5 68 69 70 71 72 73 74 75 SHELF 7 96 97 98 99 100 101 102 103 104 105 106 107 P T M SHELF 6 80 81 82 83 84 85 86 87 88 89 90 91 P W W W W W W T A A A A A A M M M M M M M P T M SHELF 4 48 49 50 51 52 53 54 55 56 57 58 SHELF 5 64 65 66 67 68 69 70 71 59 M C C C P P M M M 1 2 P D D L L T C C E E M M M M M SHELF 3 32 33 34 35 36 37 38 39 40 41 72 73 74 75 P W W W W W W T A A A A A A M M M M M M M SHELF 4 48 49 50 51 52 53 54 55 42 43 P D D L L T C C E E M M M M M 56 57 58 59 M C C C P P M M M 1 2 SHELF 3 32 33 34 35 36 37 38 39 40 41 42 43 P C C C C C C C C C C C C T I I I I I I I I I I C C M M M M M M M M M M M M M P C C C C C C C C C C C C T I I I I I I I I I I C C M M M M M M M M M M M M M 27 16 17 18 SHELF 2 19 20 21 22 23 24 25 26 27 P N N V V S S T T T T D D T e e T T N N I I I I I I t t M N N M M M M M M M M M M I I 1 2 SHELF 1 M M P N N V T et et T M N N M I I 1 V S S T T T T D D T N N I I I I I I M M M M M M M M M 2 SHELF 2 16 17 18 19 20 21 22 23 24 25 26 0 1 “A” 2 3 4 5 6 7 POWER SUPPLY 8 9 M M 10 11 0 “B” 1 “A” Figure 2-6 Sample 6-Shelf Switch Rack Setup 2 3 SHELF 1 4 5 6 7 POWER SUPPLY 8 9 10 11 “B” Figure 2-7 Sample 8-Shelf Switch Rack Setup 2-4 Revised August 2001 Part No. 002-3139-078 ARCHITECTURE SECTION 3 ARCHITECTURE Switch MULTI-NET REPEATERS a IDM CIM MCM LTR REPEATERS d e VR SERIES DISPATCH CONSOLE f PSTN (Telephone Sys) b CIM TIM CONVENTIONAL REPEATERS c MULTI-NET DISPATCH CONSOLE WAM g SNM NetNIM CCM OTHER SWITCHES h CALL PROCESSOR (CP) Figure 3-1 Multi-Net System Diagram 3.1 INTRODUCTION g. Interface to other Switches The architecture of the Switch refers to the modules or elements that make up the physical portions of the Switch and the buses that carry data, control, and voice information. h. Interface to the Call Processor and System and Subscriber Manager 3.2 SWITCH INTERFACES 3.3.1 INTRODUCTION The main Switch interfaces are as follows (see Figures 3-1, 3-5, and 3-6). The modules in the Switch are connected by Data, Control, and Voice buses. Refer to the sections which follow for more information. 3.3 BUS STRUCTURE a. Interface to Multi-Net repeaters 3.3.2 DATA BUSES b. Interface to LTR repeaters c. Interface to Conventional repeaters The following are descriptions of the data buses shown in Figure 3-2. d. Interface to Multi-Net Dispatch Consoles Ethernet e. Interface with VR-series Dispatch Consoles Ethernet is a LAN (Local Area Network) protocol that is used to pass information between multiple Call Processors and System and Subscriber Managers using TCP/IP communication. Several different physical f. Interface with the Public Switched Telephone Network 3-1 Revised August 2001 Part No. 002-3139-078 ARCHITECTURE INTRA-TERMINAL DATA BUS (IDB) CHANNEL INTERFACE BUS (CIB) CHANNEL INTERFACE BUS (CIB) DISPATCH INTERFACE BUS (DIB) PSTN OR PABX NETWORK INTRA-TERMINAL DATA BUS (NetIDB) NetNIM CALL PROCESSOR NETWORK CHANNEL STATUS BUS (NetCSB) NETWORK INTERFACE MODULE CHANNEL INTERFACE MODULE CONVENTIONAL CHANNEL MODULE MODULE DISPATCH CHANNEL MODULE CIMs CCMs WAMs DCMs WIDE AREA SYSTEM AND SUBSCRIBER MANAGER TELEPHONE INTERFACE MODULE TIMs SYSTEM NETWORK MODULE SNMs CHANNEL STATUS BUS (CSB) ETHERNET BUS SYSTEM NETWORK BUS (SNB) Figure 3-2 Data Buses media may be used including twisted-pair cable and coaxial cable. The Ethernet link is used to pass information between the SSM and CP even if they are located on the same computer. information to each other using high speed CSMA (Carrier Sense Multiple Access). TCP/IP is the abbreviation for Transmission Control Protocol/Internet Protocol which is a suite of communication protocols used to connect hosts on the Internet. It is the de facto standard for transmitting data over networks. The CSB is a 19,200 baud sync-escape protocol bus that passes channel status from channel modules to other system modules using high speed CSMA. Network Intra-Terminal Data Bus (NetIDB) The CIB is a 1200 or 9600 baud sync-escape protocol bus that passes system channel control and status to and from the CIMs, CCMs, and repeaters. Channel Status Bus (CSB) Channel Interface Bus (CIB) The NetIDB is 19,200 baud sync-escape protocol bus that passes information from the Call Processor to and from other modules via the NetNIM. Dispatch Interface Bus (DIB) Network Channel Status Bus (NETCSB) The DIB is a 1200 or 9600 baud sync-escape protocol bus that passes DIM control and status to and from the Dispatch consoles. The NetCSB is a 19,200 baud Sync-escape protocol bus that passes the CSB (Channel Status Bus) data to the Call Processor or external peripheral equipment via the NetNIM. Dispatch Tone Protocol (DTP) Intra-Terminal Data Bus (IDB) The DTP passes industry standard tone remote push-to-talk tone and DTMF for DIM control and status to and from the dispatch consoles. The IDB is a 19,200 baud sync-escape protocol bus that modules communicate on to pass control 3-2 Revised August 2001 Part No. 002-3139-078 ARCHITECTURE INTRA-TERMINAL DATA BUS (IDB) IDLE / COLLISION NetNIM NETWORK INTERFACE MODULE CHANNEL INTERFACE MODULE CONVENTIONAL CHANNEL MODULE WIDE AREA MODULE DISPATCH CHANNEL MODULE CIMs CCMs WAMs DCMs TELEPHONE INTERFACE MODULE TIMs SYSTEM NETWORK MODULE SNMs CHANNEL STATUS BUS (CSB) IDLE / COLLISION Figure 3-3 Control Buses System Network Bus (SNB) CSB Idle/Collision Line The SNB is a 1200 baud sync-escape protocol bus that passes control and status between SNMs. This is a three level line that indicates if the line is idle or busy or a collision occurred for the CSB communication process. This provides high speed CSMA of the CSB. PSTN or PABX 3.3.4 VOICE BUS This connects to a PSTN (Public Switch Telephone Network) or a PABX (Private Automatic Branch Exchange) for outgoing and incoming telephone calls. The following are descriptions of voice buses. shown in Figure 3-4. VTM Bus The VTM Bus is a 2.048 MHz Pulse Code Modulated (PCM) bus containing 32 slots of tones or voice the modules use to indicate call progress to an end user by means of audio information. 3.3.3 CONTROL BUS The following are descriptions of the control buses shown in Figure 3-3. Tx PCM Bus IDB Idle/Collision Line This is a 2.048 MHz Pulse Code Modulated (PCM) bus containing 32 slots. Audio received from the RF channel is transmitted on these slots by the channel modules and received by the other system modules. This is a three level line that indicates if the line is idle or busy or a collision occurred for the IDB communication process. This provides for high speed CSMA of the IDB. 3-3 Revised August 2001 Part No. 002-3139-078 ARCHITECTURE VOICE TONE MODULE BUS TX/RX PCM VTM VOICE TONE MODULE CHANNEL INTERFACE MODULE CONVENTIONAL CHANNEL MODULE WIDE AREA MODULE DISPATCH CHANNEL MODULE CIMs CCMs WAMs DCMs TELEPHONE INTERFACE MODULE TIMs SYSTEM NETWORK MODULE SNMs MASTER SYNC / MASTER CLOCK Figure 3-4 Voice Buses Rx PCM Bus Master Clock This is a 2.048 MHz Pulse Code Modulated (PCM) bus contains 32 slots. Audio is transmitted from the other system modules to these slots and received by the channel modules to be transmitted on the RF channel. The Master Clock provides the 2.048 MHz clocking signal for the PCM buses. Master Sync Master Sync provides the synchronization signal for the PCM bus communication to begin the frame of 32 PCM slots. 3-4 Revised August 2001 Part No. 002-3139-078 ARCHITECTURE SWITCH CIM/CCM 1 SWITCH TIM 1 TIM 1 CIM/CCM 30 TIM n TIM n NetNIM-pri CIM/CCM 1 CONSOLE DCM CONSOLE CIM/CCM 30 NetNIM-pri DCM NetNIM-sec VTM 1 NetNIM-sec IDM/DIM/MCM 1 IDM/DIM/MCM 1 VTM 2 VTM 1 VTM 2 IDM/DIM/MCM n IDM/DIM/MCM n VDM WIDE AREA GROUP CALLS WAM n WAM n VDM LEM WIDE AREA UNIQUE ID CALLS SNM 1 SNM 1 SNM 2 LEM SNM 2 Local Unique ID Calls Local Unique ID Calls SNM n SNM n Modem Remote Access NetIDB Modem NetCSB NetIDB Remote Computer Telco NetCSB Call Processor (CP) and Local System and Subscriber Manager (SSM) Call Processor (CP) and Local System and Subscriber Manager (SSM) ETHERNET Remote System and Subscriber Manager (SSM) Figure 3-5 Switch Components Block Diagram 3-5 Revised August 2001 Part No. 002-3139-078 ARCHITECTURE ID B C SB C IB VT M PC M 3000 Series Switch EFJ 4-wire, Balanced, 600 ohm, AFSK B&B CRM Conventional Repeater SCRM CRM Conventional Repeater CCM 4-wire, Balanced, 600 ohm, AFSK B&B CCM Non-EFJ 4-wire, Balanced, 600 ohm, PCM, AFSK-Data/AFSK-B&B/RS-232 CIM IDM IDIB 4-wire, Balanced, 600 ohm Multi-Net Console 4-wire, Balanced, 600 ohm Multi-Net Console IDM Summit QX Repeater HSDB 4-wire, Balanced, 600 ohm, PCM, AFSK-Data/AFSK-B&B/RS-232 Summit QX Repeater CIM LEM 1 per 5 channels AFSK 1200 baud Data Only CPM (1or 2 per console) MCM C o m p. Logging Recorder CPP TIC PIC Non-EFJ Conventional Repeater 14 pin connector PIC (Audio directly from CIM punch blocks). 4-wire, Balanced, 600 ohm (1 per console) CPM 4-wire, E&M LIC RIA VR-CM50 Console VR-CM50 Console RIA 9600 bps, Full Duplex, RS-232 Data Line (1 or 2 per console) WAM WAM NetIDB 19,200bps - Full Duplex Internal Group Calls NetNIM 56 kbit channel for Wide Area Calls WAM SNB SNM 56 kbit channel for UID Calls SNM SNM Remote 3000 Switch WAM NetCSB 19,200bps - Full Duplex SSM and Call Processor Hub Router CSU/DSU 256k or T1 Link Internal UID calls: 4-wire, Balanced, 600 ohm voice, with type-II or type-IV E&M 256k or T1 Link CSU/DSU SNM RS-449 or RS-530 cable Router DIM VF 4-wire, 600 ohm, 1 per talk group (1 per talk grp) Logging Recorder VDM CIB = Channel Interface Bus 1200 bps CSB = Channel Status Bus 19,200 bps IDB = Intra-Terminal Data Bus 19,200 bps IDIB = Intelligent Dispatch Interface Bus 9600 bps RS-232 PCM = Pulse Code Modulation 2.048 MHz SNB = System Network Bus 1200 bps VTM= Voice Tone Module Bus 2.048 MHz (PCM) 2-wire, DID/DOD/2-way LS/2-way GS// 4 Wire Voter Shelf ... CDM CDM VTM SSM and Call Processor NetCSB- 19,200bps - Full Duplex Buffer RVM RVM TIM Hub Straight RG-45 cable NetIDB - 19,200bps - Full Duplex NetNIM Straight RG-45 cable Telco/ PABX CCM = Conventional Channel Module CIM = Channel Interface Module CPM = Conventional Patch Module CRM = Conventional Repeater Module DIM = Dispatch Interface Module LEM = Logging Encoder Module MCM = Multi-Net Console Module NIM = Network Interface Module RNT = Radio Network Terminal SCRM = Secondary Conventional Repeater Module SNM = System Network Module TIM = Telephone Interface Module VDM = Voter Diagnostic Module VTM = Voice Tone Module WAM = Wide Area Module CPP = Central Processing Package LIC = Line Interface Card TIC = Terminal Interface Card PIC = Position Interface Card RIA = Remote Interface Adapter DID = Direct Inward Dial DOD = Direct Outward Dial LS = Loop Start GS = Ground Start VF = Voice Frequency HSDB = High Speed Data Bus MPC = Main Processor Card SSM = System & Subscriber Manager RVM = Receiver Voter Module CDM = Central De-Multiplexer Module Figure 3-6 Switch Audio and Data Links 3-6 Revised August 2001 Part No. 002-3139-078 CALL PROCESSOR (CP) SECTION 4 CALL PROCESSOR (CP) 4.1 INTRODUCTION Processor. The Call Processor communicates with the rest of the Switch modules on the CSB via the NetNIM. The Call Processor (CP) controls the Multi-Net System. These components interface with the Switch as shown in Figure 3-5. 4.3 SYSTEM CONFIGURATION The Call Processor controls and continuously monitors Switch operation, provides logging of information for billing purposes, and performs other functions such as processing certain types of calls. The Call Processor program runs on a computer that has a Windows NT® 4.0 operating system and a Pentium® 233 or better microprocessor. System configuration provides initialization of modules and database management. When a module sends an initialization request to the Call Processor, the Call Processor searches the configuration database and sends initialization information to the module. If the module number is not found, the Call Processor creates an alarm and places the module in standby mode. One Call Processor is required for each Switch, and it must be co-located with the Switch. The Call Processor program must be running for the Switch to function. If desired, the local Call Processor and Subscriber Management Module can run on the same computer. The following information describes the data buses utilized by the Call Processor and some of the main functions the Call Processor performs. 4.4 STANDARD GROUP CALL A Standard Group Call is a call originated by a mobile which is destined for a Group of mobiles in a given Locality. If the Group Call does not exist in a WAC (Wide Area Call) configuration, the call processing is handled by modules external to the Call Processor/Switch. If the Group Call does exist in a WAC configuration, the Call Processor initiates Wide Area Call Processing. 4.2 DATA BUSES The NetIDB and NetCSB connect the Call Processor to the Switch via the NetNIM (Network Interface Module). The Ethernet port connects the Call Processor to other Call Processors and System and Subscriber Managers. Refer to Section 3 for more information. The Call Processor creates a Usage Accounting record containing the Initiation Time/Ending Time of the Standard Group Call. 4.5 WIDE AREA CALL NetIDB (Net Intra-Terminal Data Bus) NOTE: Refer to Section 1.3 for more information on wide area calls. The NetIDB is a 19,200 baud full duplex port connected to the NetNIM (Network Interface Module). The NetNIM buffers the Call Processor data to the IDB (Intra-Terminal Data Bus). The Call Processor communicates with the rest of the Switch modules on the IDB via the NetNIM. The Call Processor looks at each CSB (Channel Status Bus) message and determines if Group Call data is contained in a WAC (Wide Area Call) configuration. If the Group Call Data does exist in a WAC configuration, the Call Processor determines if there is an existing WAM (Wide Area Module) configuration containing the Group Call Data. If there is, the Call Processor updates the Last Used Time in the WAM configuration. If there is not an existing WAM configuration, the Call Processor creates a new WAM configuration based on the Registration Database and NetCSB (Net Channel Status Bus) The NetCSB is a 19,200 baud full duplex port connected to the NetNIM. The NetNIM buffers the data from the CSB (Channel Status Bus) to the Call 4-1 Revised August 2001 Part No. 002-3139-078 CALL PROCESSOR (CP) the one sent to a previously configured WAM, the Call Processor sends a WAC UID Update Order to an active WAM. There are response time-out periods, expected acknowledges, and retries on the orders and messages to an active WAM. acquires a free internal and/or external WAM resource and sends a WAM Configuration Order to the WAM resource. If the WAC required an external (to the Switch) WAM resource, the Call Processor sends a WAC Active Message to other Call Processors over the network connection. After sending the WAC Active Message to the other Call Processors, the originating Call Processor waits for positive WAM Active Ack Messages from each Call Processor. Once the Call Processor has received each of the acknowledges, the originating Call Processor sends an Active E&M Lead Order to the WAM resource with the E-Lead and MLead bits set. The Call Processor creates a Usage Accounting record for the initiation and completion of a Wide Area Call. 4.6 REGISTRATION If the Call Processor is configured for PTT Registration or auto-registration, it monitors the CSB for Registration of Unique IDs. The Call Processor updates the Locality information for the Unique ID in the Registration Database. The Call Processor sends a Registration Message to the other Call Processors over the network connection (Ethernet). If the Call Processor receives a “nak” from any of the other Call Processors, it does not send the Activate E&M Lead Order. If the Call Processor receives a WAC Active Message from another Call Processor and the message contains any of the following, the Call Processor sends a WAM Active Ack Message with an “acknowledge” to the other Call Processors. • An active WAM Port Number and the message has a Higher Priority • An equal priority and lower WAC ID • The WAC active timers are within 5 seconds of expiring When a Registration Request message on the IDB is received from a CIM (Channel Interface Module) the Call Processor formats and sends a Registration Acknowledge Order back to the CIM with the appropriate acknowledge information. The Call Processor updates the Registered Locality, Home, and User Status of the Unique ID. The Call Processor sends a Registration Request message to the other Call Processors within the system network via the Ethernet. These messages are acknowledged using the low level network communication with a response time out period. If there is no acknowledgment from a given Call Processor, an error record is written to the alarm log containing the Unique ID, “no ack on network registration” indication, Originating Call Processor, Destination Call Processor that did not respond, and a Date/Time Stamp. It also sends a WAM Configuration Order to the associated WAM with that WAM Port Number. It then sends an Activate E&M Lead Order with the E-Lead bit set. Any other condition, the Call Processor sends a WAM Active Ack Message with a “no acknowledge”. If the Call Processor receives a WAC Active Message from another Call Processor and the WAM Port Number is not active, the Call Processor sends a WAM Active Ack Message with an acknowledge to the other Call Processors. It also sends a WAM Configuration Order to the associated WAM with that WAM Port Number. It then sends an Activate E&M Lead Order with the E-Lead bit set. When a Registration Request message is received from another Call Processor, it is acknowledged via a Registration Ack Message back to the Originating Call Processor. The received Registration Request message is then processed by the Call Processor. If the message contains Non-Zero Home/Locality information, the Call Processor updates the registered Locality/Home and User Status for the given Unique ID associated with the message. If the WAC Active Message from another Call processor contains a Unique ID that is different than 4-2 Revised August 2001 Part No. 002-3139-078 CALL PROCESSOR (CP) there is no response in 10 seconds, the System and Subscriber Manager displays “no mobile response”. If the message contains Zero or Non-Zero Home/ Locality information, the Call Processor uses the information for Wide Area Call Management. If the message contains Zero for Locality/Home it is used to de-register the unit from a Wide Area Call Configuration. If the information changes the Wide Area Call to add or delete a Locality/Home/Group combination for any or all Wide Area Calls the Call processor updates the associated Wide Area Calls accordingly. This includes Wide Area Calls that are presently configured in a WAM within the Switch and re-configuring the associated WAMs. If the CIM responds, the System and Subscriber Manager displays the information from the CIM Interrogate Response. The System Operator is able to exit the interrogate unit function, otherwise the System and Subscriber Manager remains in the function. The interrogate is used by the Call Processor for de-registration of subscriber units that are being tracked for Wide Area Calls. If the Unique ID last registration timer expires, then the Call Processor determines if the unit is still active. 4.7 INTERROGATE The Call Processor performs an interrogation on the unit if the last Registered Locality is within the given Call Processor/Switch. If the unit is last registered on a Locality outside of the given Call Processor/Switch then the Call Processor does not perform the interrogation. The Call Processor selects a free channel on the last Registered Locality, if within the Call Processor/Switch, to interrogate the unit. If there are no free channels or all channels deny the request, then the Call Processor queues the unit to be de-registered. Interrogation is determining the Registered Locality/Home and last User Status of a Unique ID. There are two forms of interrogation: Static Request from a console position, and Dynamic Function in which the Call Processor tries to communicate with the given subscriber unit (a ping). When a console position requests an interrogate, the Call Processor sends a response back to the console position with the Registered Locality/Home and Last User Status. The console then uses the information to request a CIM (Channel Interface Module) in the Registered Locality (if it is within the Call Processor/Switch combination) to interrogate the unit if it is a mobile. If a CIM accepts the Interrogate Request and the CIM responds with an Interrogate Response, then the Call Processor updates the last registered time of the Unique ID and continues to the next task. If there is no response from the CIM in 3 seconds, the Call Processor assumes the mobile unit is no longer active in the Locality and sends a registration order with Locality 0 (zero), Home 0 (zero) on the Registration Bus (Ethernet). This does not update the Registered Locality to zero but must be used by Wide Area Calls to update the mobile information and which Localities to use in the Wide Area Calls. The Call Processor continues after the Interrogate Response or the time out. To interrogate a mobile the System Operator enters the desired Locality and Home repeater numbers to use. All Call Processors receive the interrogate request message, but only the one with the requested mobile responds. Otherwise, the Call Processor selects a free channel from the desired Locality and sends an Interrogate Request to a free CIM. If the CIM accepts the request, the Call Processor waits for a response. If the request is denied, the Call Processor selects a new free channel on the desired Locality and tries again. If there are no free channels or all channels have been requested with no positive acknowledge, the System and Subscriber Manager displays “All Channels Busy” or times out to the requesting function. The Call Processor waits for a response from the acknowledged requested CIM. If The Call Processor searches the CSB information and determines if the Unique ID to be interrogated is active on a channel. If the unit is active on a channel and is in the Locality/Home it is registered on, the Call Processor may not send an interrogate request to a free CIM. 4-3 Revised August 2001 Part No. 002-3139-078 CALL PROCESSOR (CP) 4.8 DYNAMIC REASSIGNMENT The Call Processor attempts the Dynamic Selection on the desired Locality/Home. The Call Processor attempts to find a free channel on the desired Locality, starting with the Home channel. If the Dynamic Reassignment Order is sent to the free CIM and the order is not acknowledged by a Module Response Message from the CIM, the CIM is marked as busy and another attempt is made to find a new free channel. Dynamic Reassignment sends a command to a subscriber unit to reprogram the transmit/receive Group ID and user priority level of Group 11 of the desired selectable system. It is also used to automatically switch a transceiver to a specific system/group selection. This function is also used in the execution of a Reassignment Plan. If a time out of 2 seconds is reached the Dynamic Reassignment Order is tried once more to find a free channel. If a free channel is not available, a “no channel available” status is indicated to the requesting function and the dynamic Reassignment Order is exited. When a system operator is permitted to initiate a Dynamic Reassignment, the following information can be entered: OTAR (Over-The-Air Reprogramming) of Group 11 • • • • • • If the Dynamic Reassignment Order is acknowledged, a delay of 5 minutes is allowed for an Execute Dynamic Reassignment Message. If no message is received from the CIM in the time out period there is a “request not performed” indication. When the Execute Dynamic Reassignment Message is received, it is acknowledged by a Call Processor Response Order and waits for 3 seconds for a Dynamic Reassignment Response Message from the CIM. Unique ID of the subscriber unit to be reassigned The locality/home on which the reassignment is to be attempted (the last known registered locality/ home is the default) System position to program Priority level Receive Group ID (GID) Transmit Group ID (GID) Move To New System/Group • • • If there is no response in the time out period from the CIM a “no performed status to the requesting function” is displayed. If the CIM responds with a Dynamic Reassignment Response Message, the response is indicated to the requesting function when: Unique ID of the subscriber unit to be moved The locality/home on which the move is to be attempted (the last known registered locality/home is the default) System and Group to select • • The System and Subscriber Manager asks for verification (Yes or Cancel). Once verification is confirmed, the System and Subscriber Manager/Call Processor perform the Dynamic Reassignment. The System and Subscriber Manager then displays the following information: • • • • Successful No Acknowledge, then times out (No RF Response, Mobile No Acknowledge then Subscriber No Acknowledge). This execution is the same as for a Dynamic Reassignment. Request completed successfully Not acknowledged by the subscriber unit No response (time out) No channels were available, try again 4.9 REASSIGNMENT PLAN EXECUTION A Reassignment Plan is initiated for execution by a System Operator using the System and Subscriber Manager. The chosen Reassignment Plan to execute is configured again by a System Operator using the System and Subscriber Manager. When a Reassignment Plan is executing, it uses the Dynamic Reassignment and Dynamic Selection functions. Dynamic Selection is also used by the Call Processor when executing Reassignment Plans. The Call Processor attempts the Dynamic Selection and responds back to the Reassignment Plan indicating the status of the Dynamic Selection for a given Unique ID. 4-4 Revised August 2001 Part No. 002-3139-078 CALL PROCESSOR (CP) 4.10 USAGE ACCOUNTING A Reassignment Plan is a Dynamic Reassignment or a Dynamic Selection for a given subscriber unit Unique ID. When a Reassignment Plan is initiated, a Reassignment Plan Log is opened and a Log Record indicating which Reassignment Plan is initiated and the Date/Time. A retry indicator is cleared. The Reassignment Plan executes by looking at the Unique ID of a transaction and the information in a transaction. The information indicates a Dynamic Reassignment or a Dynamic Selection must be performed. The Reassignment Plan uses the Registered Locality and Home of the Unique ID to perform the transaction. 4.10.1 GENERAL The Usage Accounting process is impacted by the following log database tables or files: • • • • The Call Processor uses only the allowed number of channels in the given Reassignment Plan Configuration for simultaneous transactions. If there are multiple transactions for a given Unique ID, these are performed second after there is a response to the first. Other simultaneous transactions are performed on other Unique IDs while the first transaction is being executed. If a transaction is responded to with a “no RF response” (mobile time out) or not performed (no available channels), then an indication for a retry is set. Call Usage Reassignment Messages Auxiliary Calls Telco Calls Queued Calls CSB Usage (all PTTs) Reassignment Plan Logging Registration Logging 4.10.2 ERROR MESSAGES AND INTERNAL ERRORS The Call Processor receives error messages from modules and also failures during other processes. The Call Processor generates an Error Record written to the Alarm Log that contains a Running Alarm Sequence Number (see Appendix A for a list of error numbers and definitions). 4.10.3 CALL USAGE LOGGING When all transactions of a plan are attempted, the Call Processor determines if the retry indication was set. If the retry indication is active, the Call Processor determines if the Reassignment Plan has retries and if the number of retries was met. If the number of retries was not met, the Reassignment Plan is executed for those transactions not marked for successful or no acknowledge from the mobile. Once all retries have been attempted, the Reassignment Plan is complete. A log record is written indicating the plan is complete with the associated Date/Time. Call Processing generates certain types of records and writes them to the Activity Log or Call Usage Log. Types of Usage Records are as follows: Reassignment Messages - Whenever a Reassignment Rx Message, Reassignment Tx Message or Reassignment Clear Message is received from a module the Call Processor writes a Reassignment record to the Call Usage Log. Directed Call (UID Call) - A Directed type (using special Group ID 236) Call Record is generated by the Call Processor and written to the Call Usage Log. The response to a transaction is written to a History Log for the given executing Reassignment Plan. The log record includes the Unique ID, Transaction Data, Response and Time. The response is: • • • • Telco Call - A Telco type (using special Group ID 237) Call Record generated by the Call Processor and written to the Call Usage Log. Successful No RF response (mobile time out) No acknowledge from the mobile Not performed (no available channels). Queued Call - Certain mobile originated Directed or telco calls may be Queued Calls. The Call Processor 4-5 Revised August 2001 Part No. 002-3139-078 CALL PROCESSOR (CP) 4.11 STATUS MONITOR writes either an SNM or TIM Queue Record to the Queued Call Log. 4.11.1 INTRODUCTION 4.10.4 CSB USAGE The Status Monitor program shows log and message entries that have occurred on the Call Processor. It is totally independent of the Call Processor program. Clearing a status or deleting a message has no affect on the Call Processor. The main Status Monitor screen is shown in Figure 4-1. To display this screen, simply click the Viking logo in the system tray area of the screen (see below). Call information is derived from the CSB (Channel Status Bus). The Call Processor notes a change of usage state when the Locality/Home/Group ID/Unique ID for a given Switch channel number changes. The Start Date/Time is determined when the information goes from idle to active or from one Locality/Home/Group ID/Unique ID combination to another. The End Date/Time is determined when the information goes from active to idle or from one Locality/Home/Group ID/Unique ID combination to another. Status Monitor Icon The face color of the Viking icon changes to indicate the most severe of the following conditions: When the CSB changes from one Locality/Home/ Group ID/Unique ID combination to another, it is the end of one call and the beginning of another call for CSB Usage. This is a birth/death process and the Call Processor writes a CSB Usage Record to the CSB Usage Log at the end of the CSB call. Color White Yellow Red CSB calls can be divided into these three categories: Condition Normal Warning Errors The upper pane of the main screen indicates Call Processor messages as they occur. The bar graph in the lower pane indicates the percentage of Normal, Warning, and Error messages currently being displayed. 1. Group Dispatch Calls. They have a Group ID between 1-225 and a Home between 1-30 2. Special Calls are “Directed” which uses Group ID 236 and “Telephone” which uses Group ID 237. Right clicking the Viking icon in the system tray displays a menu which can be used to Exit the program, Hide/Show the display, and Reset Status (see following). If the Status Monitor program is not running, it is usually restarted by selecting Start > Programs > Startup > Status Monitor. 3. Other calls which use Group IDs between 226-255. For Special and Other calls, the Home value represents the channel that was being used instead of the radio’s registered Home. Occasionally a Home value of zero is used when the infrastructure cannot resolve the Channel or Home. 4.11.2 LOCAL SERVICE MENU 4.10.5 REGISTRATION LOGGING Registration information is logged to a Registration Log. When Registration request messages are received from channel modules, the Call Processor creates a record in the Registration Log. The following functions are selected by the Local Service menu shown above: 4-6 Revised August 2001 Part No. 002-3139-078 CALL PROCESSOR (CP) Figure 4-1 Call Processor Status Monitor Main Screen Shutdown - Stops the Call Processor program. The following functions are selected by the Messages menu shown above: Restart - Restarts the Call Processor program. Reset Status - Clears only the status entries and the Viking head changes to white. Show Console/Hide Console - Shows or Hides the following DOS window that also indicates Call Processor messages. Clear All - Erases all messages, clears all the Status entries, clears the graph, and the Viking head changes to white. CAUTION Selecting the close icon (X) in the Console window shown below Shuts Down the Call Processor program (a confirmation window is not displayed). Therefore, DO NOT close this window unless this is what you want to do. 4.11.3 MESSAGES MENU Call Processor DOS Window 4-7 Revised August 2001 Part No. 002-3139-078 CALL PROCESSOR (CP) Status - Displays the following screen which is used to program the messages that are displayed when various events occur. Save To Disk - Saves the Status messages to a file in an RTF format. Limit . . . - Sets the maximum number of entries in the log. When the number of entries reaches this set number, a new entry is entered at the top of the log and the last entry drops off from the log. 4.11.4 DISPLAY MENU Sounds - Displays the following screen which is used to program the sounds that occur when various events take place. 4.11.5 ABOUT MENU About - Displays the following screen containing information about the Status Monitor program. 4-8 Revised August 2001 Part No. 002-3139-078 SYSTEM AND SUBSCRIBER MANAGER (SSM) SECTION 5 SYSTEM AND SUBSCRIBER MANAGER (SSM) SSM Main Screen Menu Bar FILE (Section 5.2) Group Manager (Section 5.3.1) Permissions Profile Manager (Section 5.3.2) Reassignment Plan Manager (Section 5.3.3) Subscriber Manager (Section 5.3.4) System Locality Manager (Section 5.3.5) Wide Area Call Manager (Section 5.3.6) Switch Configuration Manager (Section 6) User Privilege Manger (Section 5.3.8) Network Names Manager (Section 5.3.9) TOOLS (Section 5.3) MAIN MENU DIAGNOSTICS (Section 5.4) WINDOWS (Section 5.5) HELP (Section 5.6) Figure 5-1 Main Screen Menu Structure 5.1 GENERAL • Generate reports from the information logged by the Call Processor. • Disable, reprogram, interrogate, and reassign individual subscriber units. • Enable and disable the modules of any Switch in the network. 5.1.1 INTRODUCTION The System and Subscriber Manager (SSM) administers the Multi-Net System. The Call Processor (CP) and SSM connect to the Switch as shown in Figure 3-5. The CP is described in Section 4. Some of the functions the SSM performs are as follows: • Manage the database used by the Call Processor. This includes viewing, setting, or modifying the Locality/Home/Group ID and the Unique ID permissions. • Monitor Switch operation and provide logging of information for billing purposes. The SSM program runs on the desktop (work station) of a personal computer that is equipped with the Windows NT® 4.0 operating system and a Pentium® 233 or better microprocessor. The CP and local SSM functions may run on the same computer if desired. The SSM program does not need to be continuously running for the Switches to operate, unlike the Call Processor program. • Display alarm and current system configuration via a menu-driven display format. The information which follows describes the parameters that are programmed in the various SSM 5-1 Revised August 2001 Part No. 002-3139-078 SYSTEM AND SUBSCRIBER MANAGER (SSM) screens. The main SSM menu and a flowchart of the menu structure are shown in Figure 5-1. Also shown is the section of this manual in which each function is described. The various SSM program functions are also summarized in Table 5-1. Table 5-1 Main Menu Functions Menu Sub-Menu Description NOTE: The Window Title is user configurable using the Windows Menu described in Section 5.5. File Select Network Network Numbers refer to the network of Call Processors to which the SSM is linked. Network Names can be used along with numbers to make identification and selection easier. Reload Distributed Tables Retrieves the latest table settings shared by all Switches. Properties Selects the sounds from a Sounds file that play when an alarm is activated. Enter New Key Enters a new encryption key when required for such things as enabling updated software or converting demonstration software to a fully operational program. Import From File This allows previously exported text (.txt) files to be updated after external modification. Export To File This function allows the current data to be written to a text file as tab Delimited Text (for importing to a spreadsheet program, for example) or in Formatted Text (for importing into a word processor program). Print This function displays the current data on pages which can then be printed if desired. Exit Closes the System and Subscriber Manager program. Tools Group Manager Creates and maintains a Group ID list. Permissions Profile Manager Configures Unique ID and telephone permission for Subscribers and Dispatcher Consoles. Reassignment Plan Manager Allows Dynamic Reassignments (Reprogram) or Dynamic Selections (Move) to be entered and saved in a plan that can be executed at any time. Subscriber Manager Allows the Unique IDs to be viewed and modified and subscriber units to be interrogated, disabled, etc. System Locality Manager Programs the Switch ID number and the associated Locality IDs. Wide Area Call Manager Configures Wide Area Calls using Home/Group ID/Locality data. Switch Configuration Manager Global Switch Locality configuration of shelves, modules and Telco call logs and System monitor functions (see Section 6). User Privilege Manager Used by the System Administrator to set which SSM functions are available to Subscriber Managers. Network Names User defined name assigned to system components on a Logical Network to aid in the identification of other components on the Logical Network. There may be multiple Logical Networks on a single Physical Network. Diagnostics Call Processor List Shows all active Call Processors on the current Logical Network . Receiver Buffer Shows Switch specific Network traffic. Send Who’s There Issues a broadcast message to all Call Processors on the Network. Responses to the broadcast can be viewed using the preceding Receiver Buffer window. Windows Cascade or Tile Arranges all open windows in either a “block” or “overlay” format. Set Title Allows the System Administrator to change the name of the main window. Current See Section 5.3.8 on page 5-15 Network name of the user logged in to the computer running the SSM. User Current Name of the Network in which the SSM is operating (see Section 5.3.9 on page Network 5-17). 5-2 Revised August 2001 Part No. 002-3139-078 SYSTEM AND SUBSCRIBER MANAGER (SSM) 5.1.2 SETTING UP NEW SYSTEMS 5.2.1 SELECT NETWORK When setting up a new Multi-Net system, certain parameters must be programmed before others. Therefore, it is recommended that the following programming order be followed: Local Switch 1. Installation Properties (Section 6.3) 2. Configure Switch Cards (Sections 6.1.3 and 6.4) Distributed Tables 3. System Locality Manager (Section 5.3.5) 4. Permissions Profile Manager (Section 5.3.2) 5. Group Manager (Section 5.3.1) 6. Subscriber Manager (Section 5.3.4) 7. Wide Area Call Manager (Section 5.3.6) 8. Reassignment Plan Manager (Section 5.3.3) Local PC 9. User Privilege Manager (Section 5.3.8) 10.Network Names Manager (Section 5.3.9) The File Menu “Select Network” parameter selects the Network of Call Processors to which the System and Subscriber Manager is attached.The Network(s) in which a particular System and Subscriber Manager can operate is determined by the System Administrator. The Networks can be given names to make identification and selection easier. Network names are entered using the Tools > Network Names menu described in Section 5.3.9. Some of the information required to program a system is as follows: • • • • • • • • 5.2.2 RELOAD DISTRIBUTED TABLES Name of switch Number of localities Name of each locality Number of repeaters at each locality Conventional repeaters (if any) Number of CIMs required in switch (one per rptr) What talk groups will be set up and which locality will be the home of each. What unique IDs will be assigned to each home repeater The File Menu “Reload Distributed Tables” parameter reloads distributed tables by retrieving the latest table settings shared by all Switches. 5.2.3 PROPERTIES The Files > Properties screen which follows selects the sound that plays when specific alarms are activated. 5.2 FILE MENU 5.2.4 ENTER NEW KEY This screen is used to enter a new encryption key when required for such things as enabling updated software or converting demonstration software to a fully operational program. 5-3 Revised August 2001 Part No. 002-3139-078 SYSTEM AND SUBSCRIBER MANAGER (SSM) 5.2.5 IMPORT FROM FILE 5.2.8 EXIT Exits the System and Subscriber Manager program. 5.3 TOOLS MENU This function allows previously exported text (.txt) files to be read back in. Do not attempt any external modification of a text file that is to be imported because improper operation may result. 5.2.6 EXPORT TO FILE The preceding tools menu is used to select the screens for the program functions that are common to all Switches on the network. Parameters unique to individual Switches are programmed by the Switch Configuration Manager described in Section 6. The Tools screens and the section of this manual in which they are described are as follows: Group Manager Permissions Profile Manager Reassignment Plan Manager Subscriber Manager System Manager Wide Area Call Manager Switch Configuration Mngr User Privileges Manager Network Names This function writes the current table to a text file. The Delimited Text function formats the text in tab delimited columns for spreadsheet programs, and the Formatted Text Report function formats the text for viewing using word processor programs. Section 5.3.1 (pg 5-4) Section 5.3.2 (pg 5-6) Section 5.3.3 (pg 5-7) Section 5.3.4 (pg 5-9) Section 5.3.5 (pg 5-11) Section 5.3.6 (pg 5-12) Section 6 Section 5.3.8 (pg 5-15) Section 5.3.9 (pg 5-17) 5.3.1 GROUP MANAGER 5.2.7 PRINT The Group Manager screen shown in Table 5-2 creates and maintains the Group ID list. The Permission of Group IDs is set on a Locality/Home/Group basis. Up to 30 Home channels can be declared per Locality, and deletions and allocations are done per Locality/Home/Group. This function displays the current log, table, or data as it will look when printed. The displayed pages can then be printed if desired by clicking the printer icon on the top. The report can also be viewed, saved to a file, or another loaded by clicking other icons on top. The Locality/Home/Group combination to be programmed is selected in the right pane and then the applicable button (Enable/Disable/Delete) is clicked. The status of all groups in the network is indicated in the left pane. A name and description can be entered for each group to help identify it. The print choices that are available depend on what table or log is currently being displayed. For example, if the Usage Log described in Section 6.3.8 is displayed, there are several different reports that can be selected. 5-4 Revised August 2001 Part No. 002-3139-078 SYSTEM AND SUBSCRIBER MANAGER (SSM) Table 5-2 Group Manager Screen Function Locality Set Home Set Group Enable Disabled OK Apply Cancel Delete Parameter 1-255 1-30 1-225 - Description Selects the Locality number. Selects the home repeater number. Selects the ID code of the group. Activates Locality/Home/Group selection. Deactivates Locality/Home/Group selection. Saves the current data and closes screen. Saves the current data without closing the screen. Closes the screen without saving the current data. Deletes the selected Locality/Home/Group. 5-5 Revised August 2001 Part No. 002-3139-078 SYSTEM AND SUBSCRIBER MANAGER (SSM) 5.3.2 PERMISSIONS PROFILE MANAGER sion profiles that are assigned to subscriber units and dispatch consoles. The assigned profile determines the unique ID and Telephone call rights of the unit. The Permission Profile Manager screen is shown in Table 5-3. This screen is used to set up the permis- Table 5-3 Permission Profile Manager Screen Permission Profile Screen Add Dialing Rule Group Screen Add Profile Screen Function Permission Profile Time Out Dispatcher Directed Out Blocked Inbound Telco Blocked Outbound Telco Blocked Message Telco Dialing Rule Group Add Dialing Rule Group Delete Dialing Rule Group Save Cancel Add Delete Description Selects the Profile name to edit or click the “Add” button to create a new Permission Profile. The above Add Profile screen is displayed to enter the name of the new profile. The new name then appears in the Permission Profile drop down list. Registration Time-Out in hours. If a subscriber unit has not registered for this amount of time, an interrogate message is sent and de-registration occurs if no response is received. This is selected for consoles and not selected for mobiles/portables. When checked, directed out (directed group/unique ID) calls are not permitted by the selected UID. When checked, incoming Telco calls are not allowed. When checked, outgoing Telco calls are not allowed. A note for the System Operator that provides more information about the Profile. Selects the desired Dialing Rule from a list. Refer to the Switch Configuration Manager description in Section 6 for more information. Adds a new Dialing Rule Group to the existing list. The new group must then be set up as described in 6.3.10. Deletes the selected Dialing Rule Group from the existing list. Causes Permission Profile data to be immediately stored and used by the Call Processor. Unsaved changes to the Permission Profile are disregarded and the screen is closed. Adds a new Profile Name. Deletes the selected Profile from the Profile List. 5-6 Revised August 2001 Part No. 002-3139-078 SYSTEM AND SUBSCRIBER MANAGER (SSM) 5.3.3 REASSIGNMENT PLAN MANAGER If no plan is active, the System Manager has the ability to select a plan from a list and initiate the execution of the selected plan. Once a plan is initiated for execution, the Call Processor maintains a history of the successes and failures of the Reassignment Plan’s transactions. Each success or failure records the transaction, and a time stamp. When a plan is complete or is aborted (stopped) the history is written to non-volatile storage on the Call Processor at the time of each transaction. A System Manager (verified with an abort Yes/No question that must be explicitly answered) can abort an executing plan. NOTE: Refer to Sections 4.8 and 4.9 for more information on this feature. The Reassignment Plan Manager screen is shown in Table 5-4. This screen allows Dynamic Reassignments and Selections to be entered and saved in a plan that can be executed at any time. Dynamic Reassignments reprogram Group 11 of the specified selectable system in specified subscriber units with new encode and decode IDs and access priority. Dynamic Selections automatically move the specified subscriber units to another selected system/group (for example, to receive an important message). The System and Subscriber Manager can display a selected plan history to view from a list of Reassignment Plans executed. Once a plan is initiated for execution the Call Processor writes a log record indicating a Reassignment Plan execution was initiated, which plan was initiated, the System Manager ID logged in at the initiation and a time stamp. The System and Subscriber Manager displays a Reassignment Plan is executing and which plan is active. The System and Subscriber Manager configures and manages the operation of Reassignment Plans and displays which Reassignment Plan is active. Only one plan in the entire system (including all System and Subscriber Managers) can be active at any one time. 5-7 Revised August 2001 Part No. 002-3139-078 SYSTEM AND SUBSCRIBER MANAGER (SSM) Table 5-4 Reassignment Plan Manager Screen Function Parameter Description Plan Number Plan Name Retries A unique number assigned to a Reassignment Plan. Reference name assigned to the plan number. Maximum number of times an attempt should be made to reach a mobile upon initialization of a Reassignment Plan. Maximum Channels The maximum number of channels this Plan is allowed. Plan Status In Progress, Complete, Idle The result of attempts made to contact the mobiles. Execute Starts implementing the selected plan. New Sets up the screen to create a new Reassignment Plan. OK Saves current data shown and closes dialog. Abort Halts the currently executing Reassignment Plan. Delete Deletes the selected Reassignment Plan. Apply Saves the current configuration and leaves dialog open. Retrieve Current Status Displays the current Reassignment Plan information. Cancel Deletes data entered for a new Reassignment Plan. Execute Selected Action Executes only the individual action selected by the cursor. Delete Action Deletes only the individual action selected by the cursor. Add Action Includes a new individual action to the plan. Action Move, Reprogram, Group Move mobile to a different System/Group, Reprogram mobile to Tag Group 11 or Reassign a new Group Tag. Decode Group 0-225 Group ID programmed into Group 11 associated with the Home repeater to identify the Group to receive from. Encode Group 0-225 Group ID programmed into Group 11 associated with the Home repeater to identify the Group to transmit with. Group Selection 0-99 Group to use to move to in the selected System. UID 1-8163 (8164-8191 reserved) Unique ID assigned the mobile unit. Priority 1=highest, 5=lowest Priority Access number. Select System 1-16 Select new system number for Dynamic Reassignment/Selection. Times Retried The number of times attempted to contact an individual mobile. Status Result of the attempts made for the individual mobile. Plan List executed by This is the Computer name and User’s NT login name. NOTE: To print a Reassignment Plan report, select File > Print from the main menu bar. 5-8 Revised August 2001 Part No. 002-3139-078 SYSTEM AND SUBSCRIBER MANAGER (SSM) Table 5-5 Multi-Net Reassignment Plan Add Action Screens Action: Move System/Group Function Action: Reprogram Group 11 Parameter Description Action Unique ID Selected System Group Selection Move System/Group 1-8163 (8164-8191 reserved) 1-16 0-225 Assigns different System/Group Numbers. Unique ID assigned the Mobile unit. Select a new System number for Dynamic Reassignment. Group ID to send Dynamic Reassignment to. Action Encode Group Reprogram Group 11 0-225 Decode Group 0-225 Priority 1=highest, 5=lowest A Unique ID is reprogrammed over-the-air with a new System/Group. This is a "Transmit To" Group ID that is associated with the Home repeater programmed into Group 11. This is a "Receive From" Group ID that is associated with the Home repeater, programmed into Group 11. Priority Access number. 5.3.4 SUBSCRIBER MANAGER screen can also be displayed by selecting Diagnostics > User Messages as described in Section 5.4.4. The Subscriber Manager screen is shown in Table 5-6. This screen allows the configuration of Unique IDs to be viewed or modified. It can also Suspend Audio, Terminate/Kill a Unique ID (immediately or wait until the next activation), Reassign a User, and Interrogate a mobile. Responses to these requests are displayed by a special User Message screen. This New Users can also be added or edited and Permission Profiles added or edited. The status of the selected user is indicated. A User’s Telephone Number, Priority, and Permission profile may be changed directly in this screen. 5-9 Revised August 2001 Part No. 002-3139-078 SYSTEM AND SUBSCRIBER MANAGER (SSM) Table 5-6 Subscriber Manager Screen Function UID Locality Home Phone Number Priority Current Status Selected Status Permission Profile Name Description Registered OK Apply Cancel Reload Find User Add Users Parameter Description 1-8163 (8164-8191 reserved) Unique ID assigned to a subscriber mobile unit. Select a UID and update the telephone number and priority. 1-255 Locality the UID is currently registered in. 1-30 UID’s Home repeater with in the registered Locality. 10-numerical digits Unique 10-digit number associated with the UID. 1-5 There are 5 levels of access priority ranging from priority 5 as the lowest to priority 1 as the highest. Information Only The System Level status of the user (Active, Idle, Timed Out, Marked For Kill, Killed, Audio Disabled). Information Only Last reported status of the selected user. See Section 5.3.2 Dialing permissions of the selected user. Text Field A text string to identify the user. Text Field A text string to define the user. Indicates the current registration on the System. Saves the current configuration shown and closes dialog. Loads the Subscriber Manager data for immediate storage and use by the Call Processor. Disregards unsaved changes to the Subscriber Manager list. Reloads data from the Call Processor. Enter the Unique ID of the User. See Table 5-7 Adds Users to the Management List. 5-10 Revised August 2001 Part No. 002-3139-078 SYSTEM AND SUBSCRIBER MANAGER (SSM) Table 5-6 Subscriber Manager Screen (Continued) Function Edit User Delete Users Kill Now Mark for Kill Reset Reassign User Interrogate Parameter Brings up dialog box Brings up dialog box Disable Audio Description Select a User and make required changes. Eliminates the selected UID from the list. Disables the mobile with which the UID is associated. Disables the mobile upon incoming request to use the system. Reactivates a UID killed or enables audio. Programs Group 11 Group ID or Moves to a different System/Group. A special interrogate message is sent that contains the UID code of the affected mobile. Disables the receive audio to a mobile selected by its UID. Table 5-7 Add Multi-Net Users Screen Function UID Start/End Locality Home Phone Number Priority Permissions Profile Add/Edit Permission Profile Parameter Description 1-8163 (8164-8191 reserved) Start and Ending Unique ID for this block of UIDs. 1-255 Locality the repeater is in. 1-30 Relates to Home repeater number for this block of IDs. 10-numerical digits Used when adding only one user. Unique number associated with UID. 1-5 There are 5 levels of access priority ranging from priority 5 as the lowest to priority 1 as the highest. List of selected Permission Profiles for this User. See Section 5.3.2 Select a Permission Profile (created in Section 5.3.2) from the list to include or change. 5.3.5 SYSTEM LOCALITY MANAGER the Locality IDs associated with that Switch. It also sets the maximum number of active calls permitted by the Switch, and wide area call group time-out per Locality. The System Locality Manager screen is shown in Table 5-8. This screen sets the Switch ID number and 5-11 Revised August 2001 Part No. 002-3139-078 SYSTEM AND SUBSCRIBER MANAGER (SSM) Table 5-8 System Locality Manager Screen Function Switch ID Locality ID Maximum Active Calls WAC Group Time-Out Add Switch Delete Switch Add Locality Delete Locality Ok Parameter Description 1-255 1-255 0-16 0-65,535 minutes The Switch number used in this Locality. The Locality number associated with the Switch. The limit set for simultaneous active special calls (both UID and Telco). Group Time-Out for Wide Area Group tracking (see page 5-13). Includes an entry to the Switch list. Removes a Switch from the list. Includes a Locality ID to the Locality Manager list. Eliminates a Locality ID from the Locality Manager list. Accepts the data entered and programs the changes into the Call Processor memory. Disregards unsaved changes to the Locality Manager List. 5.3.6 WIDE AREA CALL MANAGER The Wide Area Call configuration contains multiple sets of single Home/Group ID/Locality data and multiple Home/Group ID/UID List/Locality List data sets. The Call Processor sends only the necessary Home/Group ID/Locality data to the WAM within the Call Processor’s Switch. Cancel NOTE: Refer to Sections 1.3 and 4.5 for more information on wide area calls. The Wide Area Call Manager screen is shown in Table 5-9. A Wide Area Call is a combination of Participants (Locality/Home/Group ID) that are brought together as a Wide Area Dispatch Call. Once activated in a WAM, it remains in the WAM until it is taken over by another Wide Area Call. A WAM can be given a maximum of 30 Home/ Group ID/Locality data sets. A Switch can handle a maximum of 30 channels. If each channel was a single channel Locality, the maximum configuration becomes 30 data sets. The Default Tx UID is the only UID information given to a WAM. A Wide Area Call configuration contains a Wide Area Call Unique Identification number (WAC ID) that identifies the configuration to all Call Processors in the system. A Wide Area Call can track units by their Unique ID across multiple Localities, or by their Locality/Home/Group ID combination. The following is additional information on the parameter programmed in the Wide Area Call Manager screen. 5-12 Revised August 2001 Part No. 002-3139-078 SYSTEM AND SUBSCRIBER MANAGER (SSM) However, there can be no active call (PTT) on the WAM. Default priority is 5, with 1 being the highest. Priority level 1 is reserved for emergency use only and can be used to take over WACs regardless of whether or not someone is talking on the WAM. Use of priority level 1 as the default is not recommended and should be reserved for emergency use only. Participant - Locality/Home/Group entry in a Wide Area Call. Time-Out Behavior Temporary - When a participant is marked “temporary”, it is not loaded into a WAM until an actual radio has transmitted on that Locality/Home/ Group. The participant then remains active for the WAC Group Time-Out duration (in minutes). This time-out timer is reset with each PTT on that Locality/Home/Group. The timer value can be changed for each Locality (default is 60 minutes) and is located in the System Manager under the Tools menu in the SSM (see Section 5.3.5). Hang Time - This is a time in seconds that the channels can be ordered to hang for a Group in the Wide Area Call. This can be set from 0 - 7 seconds with the default set to 0. WAC Group Time-Out - This parameter is programmed in the System Locality Manager screen described in Section 5.3.5. It is a value in minutes that a Temporary WAC participant remains active on a Locality between PTTs. The Temporary participant is not activated until a PTT is seen from that Group on that Locality. The default is 60 minutes. Permanent - When a participant is marked “permanent”, it is loaded into a WAM regardless of whether or not traffic has been seen for that particular Locality/Home/Group. When the WAC is loaded into a WAM, all participants that are marked as permanent are loaded into the WAM and channels are brought up accordingly. Routing Group - The Routing Group number corresponds to the number assigned to WAMs (see Routing Group in Section 6.4.13). NOTE: Do not use Routing Group 0 because it is reserved for internal WAM use. When configuring Wide Area Calls, it is important to understand that by assigning a Routing Group to the call, the scope of the call may be limited. By Unique ID (pull-down) - The time-out is from the Permission Profile of the Unique ID. Permission Profiles are described in Section 5.3.2, and they are assigned to Unique IDs as described in Section 5.3.4. For example: In a four-switch system, if a call is configured to use Routing Group 1 and the WAMs for this Group only connect Switches 1 and 2, then the call can never be activated in Switches 3 and 4 without reconfiguration of the Routing Group. Default Transmit UID - In the event that the WAM does not have a UID available, the Default Unique ID (loaded in the WAM) is used. The default is 8180 and it is not recommended that it be changed as it ensures that a UID is in the data base. Examples: Default Priority - This is a take-over priority that is used for allocating WAMs. When a call attempt is made and the WAC has not yet been programmed into a WAM, the Call Processor uses this priority to determine if a WAM is available. If the priority of the WAC being taken over is equal or greater, then the Maximum Inactive Time must have expired. WAC with Permanent Participants WAC ID 1 is set up with 3 participants. All default values are chosen for WAC parameters. Participant Locality Maximum Inactive Time - The time (in seconds, default is 10 seconds) that a Wide Area Call remains reserved after a PTT and cannot be taken over by a WAC of equal or lesser priority. 1 2 3 If the priority of the WAC being taken over is less, then the Maximum Inactive Time does not matter. 1 2 3 Home Group 1 1 1 1 1 1 Time-Out Behavior Permanent Permanent Permanent When activated in a WAM, this call brings up all three Localities if channels are available. 5-13 Revised August 2001 Part No. 002-3139-078 SYSTEM AND SUBSCRIBER MANAGER (SSM) expired (default is 60 minutes). The timer is reset each time there is a PTT for the participant. Participant 1 is always activated regardless of PTTs seen on that Locality. WAC with Temporary Participants WAC ID 2 is set up with 3 participants. All default values are chosen for WAC parameters. Participant Locality 1 2 3 1 2 3 Home Group 1 1 1 2 2 2 Takeovers Time-Out Behavior • • Temporary Temporary Temporary • When activated in a WAM, this call brings up only the Localities that have had Group traffic. System with one WAM Current WAC in WAM is WAC ID 1 with Default Priority set to 5 Maximum Inactive Time set to 10 seconds Default Priority = 5 • • • Example: If participant 1 keys up the radio, the WAC is loaded into a WAM. If there has been no traffic seen from participants 2 and 3, then only Locality 1 comes up. Once a user keys up on participant 2, then that Locality is added into the call. Each participant is active as long as the WAC Group Time-out has not expired (default is 60 minutes). The timer is reset each time there is a PTT for the participant. • • • The WAC ID 1 User has just ended a conversation. The Maximum Inactive Timer is reset to 10 seconds. A User from WAC ID 2 with Default Priority 5 and Maximum Inactive Time set to 10 seconds keys up. The timer for WAC ID 1 has not expired, therefore, WAC ID 2 does not get the WAM. The User keys up a second time and the 10 second timer for WAC ID 1 has expired and WAC ID 2 gets the WAM. The WAM is now active for WAC ID 2. Default Priority = 4 WAC with Mixed Participants • WAC ID 3 is set up with 3 participants. All default values are chosen for WAC parameters. Participant Locality 1 2 3 1 2 3 Home Group 1 1 1 3 3 3 • Time-Out Behavior Permanent Temporary Temporary The User for WAC ID 3 with Default Priority set to 4 and Maximum Inactive Time set to 10 seconds keys up just as WAC ID 2 is finished with a conversation. Even though the 10 second timer is active for WAC ID 2, WAC ID 3 has higher priority and therefore takes over the WAM card. As demonstrated, by changing the values for Default Priority and Maximum Inactive Time, the utilization of the System can be changed. For more important WACs it may be necessary to increase the priority and also lengthen the Maximum inactive Time. This allows them to remain programmed into a WAM for a greater length of time between PTTs. If the system utilization is high, it may be necessary to reduce the Maximum Inactive Time on all WACs to allow more takeovers by all WACs. When activated in a WAM, this call always brings up Locality 1 for participant 1. The other Localities come up if they have had Group traffic. Example: If participant 1 keys up the radio, the WAC is loaded into a WAM. If there has been no traffic seen from participants 2 and 3, then only Locality 1 comes up. Once a user keys up on participant 2, then that Locality is added into the call. Each participant is active as long as the WAC Group Time-out has not 5.3.7 SWITCH CONFIGURATION MANAGER Refer to Section 6 for information on the Switch Configuration Manager. 5-14 Revised August 2001 Part No. 002-3139-078 SYSTEM AND SUBSCRIBER MANAGER (SSM) Table 5-9 Wide Area Call Screen Wide Area Call Manager Screen Function Wide Area Call Add Participant Screen Parameter Description Wide Area Call ID Identification number for this Wide Area Call configuration. Wide Area Call Name Name assigned as a reference to the Wide Area Call ID. Add WAC Creates a new WAC configuration. Delete WAC Removes the selected WAC configuration. Find WAC Quickly displays the desired WAC by simply entering its number. NOTE: For additional information on the following parameters, refer to Section 5.3.6. Default Transmit UID 8180 If an ID is not specified, this ensures that one is provided. Default Priority 5 If a Priority Level is not specified this ensures that one is provided. Maximum Inactive Time 1-255 sec The time (in seconds) that a WAC remains reserved after a PTT and (default = 10 sec) cannot be taken over by a WAC of equal or less priority. Hang Time 0-7 sec. The length of time (in seconds) that the channels can be ordered to (default = 0) Hang for a Group in the WAC. Hang is when a repeater delays after a transmission until the repeater stops transmitting. For hang time to be active, it must also be enabled in the repeater by repeater programming. Routing Group (Do not use “0”) Assigns a routing group to the WAC (see Section 6.4.13). Locality 1-255, 0=all 30 entries maximum, 2 entries minimum. Home 1-30 Home repeater numbers of the units in the call list. Group 1-225 Group ID numbers of the units in the call list. UID 1-8163, 0=don’t track Unique IDs of the units in the call list. (UIDs 8164-8191 are reserved) Add Entry Allows adding a Locality/Home/Group/UID to the WAC list. Delete Entry Removes a selected Locality/Home/Group/UID from the WAC list. 5.3.8 USER PRIVILEGE MANAGER SSM program will be available to each Subscriber Manager. The four different User Privilege screens that can be displayed by clicking the tab at the top are as follows: The User Privilege Manager is used by the System Administrator to assign what portions of the 5-15 Revised August 2001 Part No. 002-3139-078 SYSTEM AND SUBSCRIBER MANAGER (SSM) User Privilege Screen Privilege category. Privilege categories are added and deleted by the Privileges screen described next. Programming privilege categories makes assigning privileges more convenient when several users are assigned the same group of privileges. Table 5-10 lists the privileges that are assignable and the section of this manual in which it is described. Privileges Screen The User Privileges screen shown above is used to assign which user privileges are available to the user name selected by the drop down list. Users Screen The Users screen shown above is used to create and maintain the list of users. These are the NT login names used by Subscriber Managers. The Privileges screen shown above is used to add and delete Privilege categories that are programmed in the preceding Privilege Content screen. Table 5-10 Assignable Privileges Privilege Sect. No. Alarms Add Comments to Archive Delete Tools Menu Diagnostics Menu Delete Log Entries Change or View Dialing Rules Change or View Groups Change or View Permission Profiles Change or View Reassignment Plans Change or View Subscribers Change or View Systems Change or View Wide Area Calls Change or View Switch Configuration Change or View User Privileges Change or View Network Names Privileges Content Screen The Privilege Content screen shown above is used to program which privileges are included in each 5-16 6.2 6.2 6.2 6.2 5.3 5.4 6 6.3.10 5.3.1 5.3.2 5.3.3 5.3.4 5.3.5 5.3.6 6 5.3.8 5.3.9 Revised August 2001 Part No. 002-3139-078 SYSTEM AND SUBSCRIBER MANAGER (SSM) 5.3.9 NETWORK NAMES MANAGER A Network Name is a user defined name assigned to system components on a Logical Network used to aid in the identification of other components on the Logical Network. There may be multiple Logical networks on a single Physical Network. The Network Names Manager screen is shown in Table 5-11. This screen assigns names to the various Networks (Switches) that are controlled by the SSM. Table 5-11 Network Names Screen Function Network Number Network Name Apply Cancel Add Delete Description A unique number used to identify a Logical Network. A “human friendly” reference name associated with a specific Network Number. Saves the current data without exiting the window. Exits the Network Name window without changing the Network Name data. Creates a new network number and name. Removes the selected Network Number and Network Name from the list. 5.4 DIAGNOSTICS MENU broadcast can be viewed using the Receiver Buffer window. 5.4.4 USER MESSAGES 5.4.1 CALL PROCESSOR LIST This command displays a screen similar to the following which indicates responses to requests initiated from the Subscriber Manager screen such as Kill and Interrogate (see Section 5.3.4). Old messages continue to be displayed until the Clear button is clicked. Clicking the Close button simply closes the screen. This window displays all Call Processors that are active on the current Logical Network. 5.4.2 RECEIVER BUFFER This window displays the Switch specific Network traffic. 5.4.3 SEND WHO’S THERE This command issues a broadcast message to all Call Processors on the Network. Responses to the 5-17 Revised August 2001 Part No. 002-3139-078 SYSTEM AND SUBSCRIBER MANAGER (SSM) 5.5 WINDOWS MENU 5.6.2 CONTENTS This menu selection displays the Help Table of Contents window. 5.6.3 CHANGE HISTORY This displays a text file describing the various changes that have occurred to the SSM software. The date and reason for each change are listed with the most recent change first. 5.5.1 TILE Displays all open windows in a “block” format. 5.5.2 CASCADE 5.6.4 ABOUT Displays all open windows overlayed, one on top of another. 5.5.3 SET TITLE This screen follows, and it allows the System Administrator to change the name of the main window. 5.6 HELP MENU Displays the screen shown above which indicates the version number of the software and other information. 5.6.1 GENERAL This menu selection displays the Help window. 5-18 Revised August 2001 Part No. 002-3139-078 SWITCH CONFIGURATION MANAGER SECTION 6 SWITCH CONFIGURATION MANAGER “By Shelf” Screen (Right Click in Left Pane) “By Card Type” Screen Figure 6-1 Switch Configuration Manager Screens 6.1 INTRODUCTION 6.1.2 DISPLAYING INSTALLED CARDS 6.1.1 GENERAL The main Switch Configuration Manager screen is shown in Figure 6-1. Clicking the “By Shelf” tab displays what cards are in each shelf and what slots are empty. Then clicking the “By Card Type” tab displays a listing of the available cards. Then clicking a particular card displays the slot and shelf in which those cards are installed (if applicable). The Switch Configuration Manager described in the following information is selected by the Tools > Switch Configuration Manager screen of the SSM as described in Section 5.3. The Switch Configuration Manager programs individual Switch parameters such as Switch number, number of shelves, and the configuration of individual cards. It also displays various logs and other information for a switch. The other Tools menu functions program parameters common to all Switches in the Network. 6.1.3 SELECTING CARD TO CONFIGURE To select a card to configure, double click the address of the card or right click the mouse in the right pane and select “Properties” in the pop up screen that is displayed (see Figure 6-1). The card configuration 6-1 Revised August 2001 Part No. 002-3139-078 SWITCH CONFIGURATION MANAGER Function screen is then displayed which defines the attributes of the particular card that was selected. Refer to the following sections for more information on card programming: Card Global Card Properties CCM CIM DCM DIM IDM LEM MAM MCM SNM TIM VDM WAM Activity Monitor Activity Log Call Log Emergency Traffic Log Queued Call Log Reassignment Plan Log Registration Log Usage Accounting Log Remove Installation Dialing Rules Copy Settings To Defaults Pack Tables Call Processor Properties Log Properties Switch Properties Section 6.4.1 6.4.2 6.4.3 6.4.4 6.4.5 6.4.6 6.4.7 6.4.8 6.4.9 6.4.10 6.4.11 6.4.12 6.4.13 Section 6.3.1 6.3.2 6.3.3 6.3.4 6.3.5 6.3.6 6.3.7 6.3.8 6.3.9 6.3.10 6.3.11 6.3.12 6.3.13 6.3.14 6.3.15 NOTE: Displayed windows can be resized by dragging an edge or corner, a table column can be temporarily resized by dragging it in the heading, and columns can be sorted by clicking the column heading. 6.1.5 SELECTING OTHER INSTALLATION 6.1.4 SELECTING ACTIVITY MONITOR, LOGS, AND PROPERTIES To display a Call Processor that is not running or is being added to the Network, right click on the network name in the Switch Configuration Manager main screen. Then click the “Other Installation” popup screen that is displayed. The following dialog box is then displayed to enter the name of the desired Call Processor. To display the submenu used to display switch activity monitors, logs, and properties, select the desired Switch if applicable and then right click the mouse in the left pane of the main screen shown in Figure 6-1. The pop-up menu shown below is then displayed. 6.2 ALARMS 6.2.1 GENERAL NOTE: An alarm listing is located in Table A-1 in Appendix A in the back of this manual. When errors occur on either the Intra-Terminal Data Bus (IDB) or the Call Processor they are displayed by the Switch Manager in one of the five The functions in this menu are described in following sections: 6-2 Revised August 2001 Part No. 002-3139-078 SWITCH CONFIGURATION MANAGER Alarm categories listed below. Note that the Critical, Major, and Minor alarms report a failure that requires action to fix it. However, Informational Alarms do not indicate a failure. They are intended only as a tool to provide the system operator with information on system performance. The severity assigned to alarms can be changed in the Log Properties screen described in Section 6.3.14. Simply click the Alarm Severity button and then click the right side of the severity box of the alarm to be changed. This displays a drop-down list which is used to select the desired severity. Informational messages indicate such normal occurrences as the successful completion of a task, not enough channels to include everyone in a wide area call, and no free WAMs available at the time a call was placed. These messages are one information source that a system administrator can use to determine when additional channels or switch modules may be needed. If desired, these messages can be suppressed by entering “0” for the Information Alarm Limit on the Log Properties screen. However, it is recommended that these messages not be suppressed. 6.2.2 DISPLAYING ACTIVE AND ARCHIVED ALARMS To display the alarms which have been detected on a Switch, click on the switch and then click the applicable button at the top. For example, to display any Major alarms on Switch1, click Switch1 and then the Major button on the top. To display all alarms on a Switch, click the All Alarms button instead. The Active/Archive Alarm screen described in Tables 6-1 and 6-2 is then displayed. An alarm condition is cleared by moving all Active Alarms in a category to the Archived Alarms table. The alarms in a screen can be sorted by Date, Number, Card, or Severity. Alarms can be archived individually by selecting the alarm and clicking the Archive button or all alarms in the screen can be archived by clicking the Archive All button. Alarms can also be displayed by date. Appendix A lists the various alarm conditions that may be displayed. Critical: The device is unavailable and it may have stopped operating. Major: A problem has been reported that is causing some degradation in operation. Minor: A condition has been reported that may be causing some degradation in operation. Informational: A condition has been reported that may be normal or undesirable. 6.2.3 REPEATER ALARMS Unknown: The event that caused this alarm is not known to the System, so no severity can be assigned. Repeater alarm reporting is optional (see Section 1.5.2). The repeater alarms are numbers 324-358 and 402 shown in Appendix A. The external repeater alarms are 327-330 (IAC 1-IAC 4). These alarms can be given a unique description which identifies the repeater and the actual alarm that is occurring. These descriptions are programmed by the Log Properties screen described in Section 6.3.14. Click the Alarm Severity button and then in the screen that is displayed, click the Define IAC button (see Table 6-8). If an alarm condition exists on a Network or Switch, a colored dot is displayed to the left of the Network or Switch on the main Switch Configuration Manager screen (see Figure 6-1). This dot indicates the most important alarm that has been detected. For example, if a red dot is indicated to the left of Switch1, a critical alarm has been detected on that Switch. 6-3 Revised August 2001 Part No. 002-3139-078 SWITCH CONFIGURATION MANAGER Table 6-1 Active Alarm Screen Function Parameter Description Archive Archive All Sort By Stores the selected alarm in the archive file. Stores all alarms in the archive file. Date Lists alarms by Date/Time. Error Lists alarms by severity. Device Lists alarms created by individual module, data bus, etc. Severity Lists alarms by degree of importance. Add Comment Reference to the operator about the alarm. Show Dates From - To The Start-End date limits to display. Apply Uses the entered date/time to retrieve data. Clear Ignores entered dates and empties the field. Refresh Updates the displayed data with the most current entries. Print Sends the data displayed to a printer. Close Exits the window. Alarm Number Displays the Alarm Number (see Appendix A). Alarm Displays the Alarm Name (see Appendix A). Severity Displays the severity of the alarm (see Section 6.2.1). Switch ID The number of the Switch where this alarm is registered. Card Address (1-288) Displays the card (Module) slot number in the Switch. Switch Channel Number Displays the channel number (1-30) for this Switch. Time Displays the time stamp for the Alarm. UID Displays the Unique ID of the Switch. Data 1-3 These are parameters assigned to the Alarms. Comments Reference to the operator about the alarm. Comments By Identifies the person that entered the comment. Comments Time Indicates the time the comment was entered. 6-4 Revised August 2001 Part No. 002-3139-078 SWITCH CONFIGURATION MANAGER Table 6-2 Archived Alarms Screen Function Parameter Description Delete Delete Visible Delete All Sort By Erases the selected alarm. Erases all alarms visible on the screen. Erases all archived alarms. Date Arranges the order of alarms by Date/Time. Error Arranges the order of alarms by error name. Device Arranges the order of alarms by individual module, data bus, etc. Severity Arranges the order of alarms by degree of importance. Add Comment Reference to the operator about the alarm. Show Dates From - To The start-end date limits to display. Apply Uses the entered dates to retrieve data. Clear Ignores entered dates and empties the field. Refresh Updates the displayed data with the most current entries. Print Sends the data displayed to a printer. Close Exits the window. Alarm Number Displays the Alarm Number (see Appendix A). Alarm Displays the Alarm Name (see Appendix A). Severity Displays the severity of the alarm (see Section 6.2.1). Switch ID The number of the Switch where this alarm is registered. Card Address (1-288) Displays the card (Module) slot number in the Switch. Switch Channel Number Displays the channel number (1-30) for this Switch. Time Displays the time stamp for the Alarm. UID Displays the Unique ID of the Switch. Data 1-3 These are parameters assigned to the Alarms. Acknowledged By Identifies the person that acknowledged the alarm. Acknowledged Time Indicates the date/time the alarm was acknowledged. Comments Reference to the operator about the alarm. Comments By Identifies the person that entered the comment. Comments Time Indicates the date/time the comment was entered. 6-5 Revised August 2001 Part No. 002-3139-078 SWITCH CONFIGURATION MANAGER Channel Status Screen WAM Configuration Status Screen Figure 6-2 Activity Monitor Screens 6.3 PROGRAMMING COMMON SWITCH PROPERTIES A freeze display is provided to view the display without updates changing the data on the screen.The refresh rate may be from 1-10 seconds on Periodic updates. A refresh rate of 0 enables a Manual Refresh button which can be used to view information On Demand. NOTE: The menu which selects the screens described in the section is displayed by right clicking the mouse in the left pane of the main Switch Configuration screen (see Section 6.1.4). 6.3.2 ACTIVITY LOG 6.3.1 ACTIVITY MONITOR Channel Status Screen The Channel Status screen shown in Figure 6-2 provides either a Periodical or On Demand update of the System. The user selects how often the display is refreshed and can choose to include all Localities or select a specific Locality with the filter. A freeze display is provided to view the display without updates changing the data on the screen. The refresh rate may be from 1-10 seconds on Periodic updates. A refresh rate of 0 enables a Manual Refresh button which can be used to view information On Demand. The Activity Log screen is shown above. Whenever a Reassignment Plan is started or completed, it is recorded in the Activity Log. The Activity Log contains the activity name, a time stamp, the Switch ID, Data, and the User name. To print this log select File > Print. WAM Configuration Status Screen 6.3.3 CALL LOG The WAM Configuration Status screen shown in Figure 6-2 is a Periodical or On Demand update of Wide Area Modules. The user selects how often the display is refreshed and can choose to include all Localities or select a specific Locality with the filter. Telco Calls Log The Telco Calls screen shown in Figure 6-3 displays a Telco Call record. When a Telco call request is received, the Call Processor begins the 6-6 Revised August 2001 Part No. 002-3139-078 SWITCH CONFIGURATION MANAGER Telco Call Log Directed Calls Log Figure 6-3 Call Log Screens This type of call typically uses a destination module (i.e. CIM/SNM/IDM etc.). The Call Processor is informed if the destination module answers and this is noted. The originating unit notifies the Call Processor when the call is terminated and the End Date/Time is noted. To print this log select File > Print. Telco Call Record. This record includes the Start Date/ Time, Originating Unique ID (if generated from a mobile), Dialed Digits, and Locality/Home used in the call. This type of call is typically a full-duplex call and uses a destination module (i.e. CIM/SNM/IDM/TIM etc.). The Call Processor is informed if the destination answers and the Date/Time it occurred. The originating unit notifies the Call Processor when the call is terminated and the End Date/Time is noted. To print this log, select File > Print. 6.3.4 EMERGENCY TRAFFIC ACTIVITY LOG Directed Calls Log The Directed Calls Log screen shown in Figure 6-3 displays Directed Group and Unique ID Calls. When a Directed Call request is received, the Call Processor begins the Directed Call record. The Log displays the Start Date/Time, Originating Unique ID, Dialed Digits (if generated from a mobile), Destination Unique ID requested (if trunk side generated), and the Locality/Home used in the call. The Call Processor writes an Emergency record to Emergency Traffic Activity Log screen shown above whenever an Emergency Rx Message, Emergency Tx Message, or an Emergency Clear Message is received from a module. To print this log, select File > Print. NOTE: The above screens are displayed by right clicking the mouse in the left pane of the main Switch Configuration Manager screen. 6-7 Revised August 2001 Part No. 002-3139-078 SWITCH CONFIGURATION MANAGER Queued Telco Call Log Screen Queued Directed Call Log Screen Figure 6-4 Queued Call Log Screens Figure 6-5 Reassignment Plan Log 6.3.5 QUEUED CALL LOG 6.3.6 REASSIGNMENT PLAN LOG Queued Telco Calls Reassignment Plan information is logged to the Reassignment Plan Log screen shown in Figure 6-5. This log displays when a Reassignment Plan is started and ended, and the associated transactions. The Queued Telco Call Log screen shown in Figure 6-4 indicates all Telco Calls that are waiting to be completed. Once a call is completed, it is displayed in the Call Log described in Section 6.3.3. To print the Telco Call log, select File > Print. The Call Processor begins the record with the Reassignment Call Name, Start Date/Time, Locality/ Home for Dynamic Reassignment/Selection, Unique ID number of the originating caller, and Type (Reprogram, Move). The Log also displays the number of attempts made (Times Retried) to activate the plan and the results (Status) of the attempts that were made. To print this log, select File > Print. Queued Directed Calls The Queued Directed Call Log screen shown in Figure 6-4 displays the Directed Calls waiting to be completed. Once a call is completed, it is displayed in the Call Log described in Section 6.3.3. To print the Directed Call log, select File > Print. NOTE: The above screens are displayed by right clicking the mouse in the left pane of the main Switch Configuration Manager screen. 6-8 Revised August 2001 Part No. 002-3139-078 SWITCH CONFIGURATION MANAGER Figure 6-6 Registration Plan Log Screen Figure 6-7 Usage Accounting Log Screen 6.3.7 REGISTRATION LOG Delete Visible - Permanently deletes all records in the current screen (even those that have scrolled out of the screen). Registration information is logged to the Registration Log screen shown in Figure 6-6. When registration request messages are received from channel modules, the Call Processor creates a record in the Registration Log. To print this log, select File > Print. Empty Log - Permanently deletes all records in the log. Close - Exits the screen and returns to the main screen. 6.3.8 USAGE ACCOUNTING LOG Printing Reports General Several different reports can be printed from the currently displayed usage log information. To display the following menu which selects the report to be printed, select File > Print. The Usage Accounting Log screen shown in Figure 6-7 displays the various usage information that is generated and stored as calls are processed. The following functions can be selected in this screen: Show Dates/UIDs/Groups - If information is entered in these boxes, only records in the selected range are displayed. For example, if a beginning and ending date is entered, only calls made on those dates are displayed. If a Show box is left blank, no Date/UID/ Group restriction occurs (for example, leaving all Show boxes blank displays all records in the log). Run Query - Updates the log with the records in the ranges selected in the Show boxes (if applicable). Only information contained in a displayed log can be printed. Some report menus allow further restrictions to be added to records displayed in a report. The reports that can be selected are as follows: Delete - Permanently deletes the currently selected record. NOTE: The above screens are displayed by right clicking the mouse in the left pane of the main Switch Configuration Manager screen. 6-9 Revised August 2001 Part No. 002-3139-078 SWITCH CONFIGURATION MANAGER Rules Telco Dialing Rule Group 1 Step 1 Include These Patterns Exclude These Patterns Then Do These Actions Step x Telco Dialing Rule Group x Digit Patterns New Pattern Insert (Digit String) Strip Prepend (Digit String) Append (Digit String) Queue Block Allow (on which Trunk Groups) Remove Queued Calls After Pattern After Including Pattern Before Pattern Before Including Pattern Pattern Only Excluding Pattern Delete Pattern Trunk Group Add Trunk Group Delete Trunk Group Rule Groups Add Rule Group Delete Rule Group Figure 6-8 Dialing Rules Screen Command Structure Channel Usage Graph - Displays in graph form, the percentage utilization of each channel (repeater) connected to the Switch. Various types of graphs can be selected. UID Traffic Summary - This report summarizes for each UID, the total times push-to-talk was initiated, the total call length, and the average length of each transmission. Group Traffic Summary - This summary includes the total number of times push-to-talk was initiated and the total call length and average length of each transmission for the specified Group. 6.3.9 REMOVE INSTALLATION This menu selection removes a non-operating switch from the configuration. If the switch is operating, the connection is automatically re-established. System Busy Statistics - This report indicates, for the date specified, the percentage of time all repeaters were busy, the percentage of possible airtime that was used, the actual time that all repeaters were busy, the total time that the repeaters were used, and the number of times that all repeaters were busy. 6.3.10 DIALING RULES Introduction The main Dialing Rules screen is shown in Table 6-3. The structure of the various screens that are selected from this screen is shown in Figure 6-8 above. Dialing rules determine what telephone number patterns a user is permitted to dial and also which patterns are not permitted (if applicable). Dialing Rules also establish a link to telephone company trunk lines. System Traffic Listing - This report displays the binary data from the System Status Bus. A time period and Unique ID code range is specified and then the time of every transmission for each Unique ID code is indicated. Total System Traffic - This summary includes the total number of times a push-to-talk was initiated and the total call length and average length of each transmission. NOTE: If telephone toll charges are passed to customers in an area regulated by a local Public Service Commission, or like entity, it is important that the exact toll charges be closely approximated when developing call dialing rules. Be sure to charge the customer an amount equal to or less than the amount charged by the long distance carrier. E.F. Johnson has no responsibility for any penalty or fine levied for overcharging toll rates in those regulated areas. UID to Group Contributions - This report indicates, for the specified time period and Home/Group range, the calls made to each Group. The total number and time of calls made by each Unique ID code is displayed. NOTE: The above screens are displayed by right clicking the mouse in the left pane of the main Switch Configuration Manager screen. 6-10 Revised August 2001 Part No. 002-3139-078 SWITCH CONFIGURATION MANAGER Table 6-3 Rules Screen Function Telco Dialing Rule Group Step Add Step Remove Step Move Up Move Down Available Patterns Include These Patterns Exclude These Patterns Then Do These Actions Add Action Remove Action Edit Action Move Up Move Down OK Apply Cancel Description Name representing the complete set of patterns and actions. Number representing one set of patterns under the Telco Dialing Rule Group name. Creates a new Step for additional patterns under the Telco Dialing Rule Group name. Removes the selected Step under the Telco Dialing Rule Group name. Moves a pattern up a Step in the selected pane (to execute earlier). Moves a pattern down a Step in the selected pane (to execute later). The patterns created in the Digit Patterns screen. Patterns that must be met for the call to be accepted. Patterns are dragged between panes using the mouse. Patterns to be excluded from an Included pattern. Patterns are dragged between panes using the mouse. If the call has met the criteria in the Include pane and does not meet the criteria in the exclude pane, then these actions determine the call routing to a Trunk Group. Adds an action to the actions pane. These screens are shown in Table 6-4. Removes the selected action from the actions pane. Allows the selected action in the action pane to be changed. Moves up the list of actions in the action pane. Moves down the list of actions in the action pane. Saves the current Dialing Rules shown and closes dialog. Saves the current Dialing Rules shown. Disregards unsaved changes to the Dialing Rules. NOTE: The above screens are displayed by right clicking the mouse in the left pane of the main Switch Configuration Manager screen. 6-11 Revised August 2001 Part No. 002-3139-078 SWITCH CONFIGURATION MANAGER Table 6-4 Rules Screen Add/Edit Actions Screens Strip Insert Prepend/Append Allow Action Description Insert The insert pattern includes numbers that are needed to complete a call but do not have to be dialed by the user. The “at” string is where the insert pattern is to be placed in the original pattern. Strip The strip action removes part of a pattern and a replacement can be inserted. For example if 1-507-555-1212 was dialed for directory assistance, the 555-1212 could be stripped and the number of another service could be inserted. Prepend/Append This allows digits to be placed at the beginning or the end of the digit string. Queue Allows calls to be stored until a trunk is available. Block Does not allow this type of call to be placed. Allow A trunk group from the Available Trunks is dragged to the On These Trunks to allow calls on that trunk. Remove Queued Calls Empties the stored calls waiting for an available trunk. Trunk Group Screen - The Trunk Rule Group screen shown in Table 6-6 adds and deletes the Trunk Groups that are associated with each TIM (Telephone Interface Module) in the Switch (see Section xx). A Trunk Group is a logical subgroup of the different types of telephone lines that are available. Dialing Rules Programming Screens Rules Screen - The Rules screen shown in Table 6-4 sets up the dial patterns in each Telco Dialing Rule Group. Rule Groups are added and deleted by the Rule Group screen (see description which follows). Rule Group Screen - This following Rule Group screen adds and deletes Telco Dialing Rule Groups that are programmed by the Rules screen in Table 6-3. NOTE: Additional information on setting up Dialing Rules is located on the pages which follow. Digit Patterns Screen - The Digit Patterns screen shown in Table 6-5 sets up the digit patterns that are Included or Excluded in the preceding Rules screen. Dialing patterns consist of numbers and symbols. 6-12 Revised August 2001 Part No. 002-3139-078 SWITCH CONFIGURATION MANAGER Table 6-5 Digit Patterns Screen Pattern Description New Pattern Current Patterns Add Pattern Delete Pattern OK Apply Cancel Create a dialing pattern to be added to the Current Patterns. A list of dialing patterns already created. Adds the New Pattern to the Current Pattern list. Deletes the selected pattern from the Current Pattern list. Saves the current patterns shown and closes dialog. Saves the current patterns shown. Disregards unsaved changes to the current patterns. Digit Pattern Symbols (see “Patterns” description on page 6-14) ^ . $ * + ? [] - Signifies the pattern must be at the beginning. If inside the string in [ ] brackets, it means “not”. Allows any single digit dialed to be accepted (wild card). Signifies the pattern must be at the end. Matches zero or more digits that are dialed before this symbol. Example: ^1800.*, any 1-800 numbers are allowed. Matches 1 or more digits that are dialed before this symbol. The digit preceding the + must be dialed to be accepted. Example: 1+, the 1 must be dialed first. Signifies the digit immediately following the ? is an optional digit. Example: ?1507, either 1-507 or 507 can be dialed, the 1 is optional Binds acceptable matches for this digit. Examples: 1[135]6 matches 116, 136 and 156 1[1-4]6 matches 116, 126, 136 and 146 1[^2-8]6 matches 106, 116 and 196 (not 2-8) Specifies a range (used in conjunction with brackets). of dialing rules to determine which rule (and therefore which calling resource) applies to this call, and also if the call is allowed. This function is performed automatically when Dialing Rules and associated Trunk Groups have been set up. What Call Routing Does Call Routing routes all outbound interconnect calls through particular calling resources such as an SLIC (Subscriber Line Interface Circuit) line, DID (Direct Inward Dialing) device, FX (Foreign Exchange) line, or OPX (Off Premises Exchange) line. Call Routing only deals with interconnect calls. Call Routing selectively routes calls by checking the area codes and any other considerations that are in the Dialing Rules. This permits the System Operator to disallow certain types of calls or intercept calls and route them to another trunk or line. The Call Processor routes calls by matching the number dialed and the service of a call against a table 6-13 Revised August 2001 Part No. 002-3139-078 SWITCH CONFIGURATION MANAGER Table 6-6 Trunk Groups Screen Function Add Trunk Group Delete Trunk Group OK Apply Cancel Description Creates a trunk group by name associated with a TIM. Removes the selected Trunk Group from the Trunk Group list. Saves the current Trunk Groups shown and closes dialog. Saves the current Trunk Groups shown. Disregards unsaved changes to the Trunk Groups. If the digits dialed by the radio do not start with this pattern, then this pattern does not match. The Dialing Rules can block certain calls altogether such as “976-xxxx” numbers. Call Routing allows variable routing based on exchanges or area codes. It can also allow certain users to access certain resources while not allowing others to use them. The ^ signifies the beginning of a pattern or line. Example: ^1 indicates all phone numbers beginning with the number 1. If it is inside the string in brackets [ ^ ], it means “not”. Example: ^1507[^8][^3][^5]$ indicates 1-507 is acceptable but “not” with the 835 exchange. Call Routing also lets the System Operator define numbers for special uses, such as “611” to get the service number (rather than telephone repair) or “1” to get time and temperature service. It can also redirect numbers like “411” to free commercial directory assistance services, if available. When a rule matches a call, the resources (repeaters, phone lines) assigned to the rule are made available to that call. The $ causes a pattern to match only if it is at the end of a line. Example: 5000$ matches any pattern ending in 5000. A single digit may be replaced by a ( . ) period to show that any digit in that position is an acceptable match. Example: If the rule is to match all directdialed calls to long distance information, the pattern is ^1...5551212$ for this rule. Users are assigned a Permission Profile and Permission Profiles are assigned a Dialing Rule Group that is a collection of Dialing Rules. The phone number the User dialed must meet the Dialing Rules in the Dialing Rule Group specified by the Permission Profile. Many users may have the same Permission Profile and several Permission Profiles may use the same Dialing Rule Group. A pattern must contain at least one digit or a period. Any sequence of one or more periods at the end of a pattern can be replaced with one period and an asterisk ( .* ) The asterisk matches zero or more of any preceding digits. A plus sign ( + ) signifies that whatever digit precedes it, may be duplicated. Example: ^1507+.+ matches 1-507 followed by any number of the numeral seven and one or more additional digits. Patterns The user must dial a call that matches the pattern exactly. In most cases, the pattern is shorter than the phone number. A matching call is the same length as the pattern, and matches as many digits as are defined in the pattern. These are the first digits that must have been dialed by the radio if this pattern is to be selected. A ? signifies the number that follows is optional. Example: ^?1507 indicates the 1 is optional and either 1-507 or 507 are acceptable. 6-14 Revised August 2001 Part No. 002-3139-078 SWITCH CONFIGURATION MANAGER Types Of Rules Numerals in brackets [ ] indicates these numbers must be matched. [135] matches a 1, 3, or 5, while [1-5] matches numbers 1, 2, 3, 4, 5. The Dialing Rules in a Call Processor either permit a call to be completed (Include), or prevent a call from being completed (Exclude). How Call Routing Works There are two ways to block a call in a Call Processor. The first way to block a call is not to describe the call in any of the rules. When the call is placed, it fails to match any of the rules, and so is not made. Use this method when a potentially large group of calls is to be blocked, such as all 1-digit calls only, or all 8-digit calls. Define rules and assign trunks to calls to allow any of the remaining calls to be made. Call Routing works by matching the number dialed by a radio and the Dialing Rules. The Dialing Rules should be in descending sequence order, i.e. from the most restrictive to the least restrictive. When a call is made, the number dialed is matched against the patterns of the first Dialing Rule. If the number dialed matches an “include pattern” and does not match an “exclude pattern”, then the actions associated with that Step are applied. If the patterns do not match, then the next Dialing Rule is applied. This continues until a terminating action is encountered or all of the Dialing Rules have been tested. Terminating actions are those which make a determination as to whether or not to allow the call to complete. These actions are Allow (where a trunk is available), Block and Queue. If a call is allowed on a Trunk Group with no available lines, the rule processing will continue to see if the call can be completed in accordance with another Dialing Rule Step. The second way to block a call is to describe the call so that it matches a pattern and use the Block for the action. Entering and Changing Rules Before entering or changing a rule, make a plan. New rules have call canceling implications. • Decide if this dialing rule is to apply to all radios or to radios that use a particular permission table. Planning The Pattern List • Because of the complexity of setting up a good Pattern list, planning a list of Digit Patterns, Trunk Groups, and Rules is suggested. Decide if the set of numbers this new or revised rule covers is also covered by other dialing rules already in the table, for the same radios. • If both new and existing rules cover the same set of numbers, decide if the existing rules should have priority over the new rule, or vice versa. • Decide if this new rule interferes with dialing rules for radios other than those to be affected. • Begin by listing all the calls to be Included and then list the calls to be Excluded. • Arrange the Include list in order from the most restrictive to the least restrictive. • Plan a Pattern that accomplishes what is required for each type of call. • Put these Patterns in order so they do not cancel each other out. • Plan the Action Form of any calls to allow. • Finally, enter the Digit Patterns into the Dialing Rules Form. Remember that when the system searches for a match, it starts at the first rule in the sequence and goes through them to find a match. Once it finds a match, it stops looking. Because the system tries to find a match in this order, it is important to place rules in an order that makes sense. For example, suppose that a certain area code has thirty exchanges. All calls to that area are to be allowed, but use a different Trunk Group for ten of the exchanges. 6-15 Revised August 2001 Part No. 002-3139-078 SWITCH CONFIGURATION MANAGER ^[1-8]11$ This is used to restrict the 3 digit dialing other than “911”. The other service numbers of 411 or 611 are typically not usable by the end subscriber units. If the first rule accepts a match with any number in that area code, and the second through ninth rules define the exchanges, any calls to the selected exchanges are allowed on the same Trunk Groups for the rest of that area code. When the area code matched, the system stopped looking at the rules. To set this up, enter the detailed rules “first”, so that if a call matches one of those exchanges two through nine, the system stops looking and uses its Trunk Group. Then add the general rule for the rest of the area code. ^1900 To be used to restrict any number of digits with “1-900” dialing, typically disallowed since calling party is billed at typically significant charges. ^1976 To be used to restrict any number of digits with “1-976” dialing, typically disallowed since calling party is billed at typically significant charges. Add in any other 1-9xx calls you wish to disallow. There are 9xx area codes that have to be allowed. North American Number Plan Example The dialing rules for the North American Numbering Plan can be fully implemented. The complexity of the dialing rules depends upon the amount of restriction the system operator wishes to implement. ^001……… To be used to allow “001” dialing for international operator assisted calling. This is used if one allows international calls that are billed to the called party. This is to allow any operator assisted international calls if 12 or more total digits are dialed; notice there are 9 periods. If one wishes to allow less digits, then reduce the number of periods. The following is an example of the North American Numbering Plan. The example assumes that a single type of telephone line or trunk is available. The trunk type is a standard two-way telephone line that can handle the North American Numbering Plan. The telephone line is assumed not to be a PBX or PABX line. The assumed area code is 507 with two local exchanges of 835 and 837. ^011……… To be used to allow “011” direct dialed international calling. This is to allow any international calls if 12 or more total digits are dialed (notice there are 9 periods). The following is the list of possible digit patterns for dialing rule usage. ^911$ This is to be used to allow the 3 digit dialing of the public safety emergency number. ^0$ To be used to restrict single digit dialing of “0”. Typically disallowed since international direct and international operator assisted cannot be distinguished, the full number is unknown. ^18 To be used for all 1-8xx-xxxx calls. This is typically allowed for all toll free 1-8xx type calls and for direct long distance calls to area codes beginning with 8. If the toll free 1-8xx numbers are to be restricted then those patterns should be placed before the allowed pattern set. ^1$ To be used to restrict single digit dialing of “1”, any long distance call would be allowed to pass through since the subscriber unit could then dial any digits after the initial dialing. ^1507835….$ This pattern is used to allow the stripping of the 1507 since the 835 is a local exchange. ^011$ To be used to restrict 3 digit dialing of “011” direct dialed international calling. Any international calls would be allowed to pass through since the subscriber unit could then dial any digits after the initial dialing. This is typically disallowed since the full number that is dialed is unknown. ^1507837….$ This pattern is used to allow the stripping of the 1507 since the 837 is a local exchange. 6-16 Revised August 2001 Part No. 002-3139-078 SWITCH CONFIGURATION MANAGER ^1……….$ This pattern is used to allow any 11 digit direct long distance dialing. Since the ^1507835….$ and the ^1507837….$ patterns come before this pattern, they are used to intercept and perform the stripping of the digits. Previous patterns are used to restrict the long distance dialing. 3. Establish all of the above digit patterns by the “Digit Patterns/Add Pattern” function. ^1800The 18xx toll free call patterns are included here to be allowed. Select the DRG_Local_LD_Intl group in the “Telco Dialing Rule Group” selection box under the “Rules” tab. NOTE: It is advisable to keep the patterns in the desired order when configuring the dialing rules. DRG_Local_LD_Intl ^1888 ^1877 ^1866 Step 1 1. Under the “Include these patterns” box, place the following patterns: ^835….$This pattern is used to allow 7 digit dialing of the 835 local exchange (notice the 4 periods). ^0$ ^1$ ^011$ ^[1-8]11$ ^1900 ^1976 ^837….$This pattern is used to allow 7 digit dialing of the 837 local exchange. Any other 7 digit dialing will be disallowed since there is no other pattern match. ^$ This is the no digits dialed pattern match that is used to remove a subscriber from the queue. 2. Under the “Then do these actions” box, select the “Block” function. The following procedure would be used to set up the proper trunk group, digit patterns, and dialing rules for the above North American Dialing Plan usage. 3. Select the “Add Step” function to add Step 2. Step 2 1. Establish a trunk group by “Trunk Groups/Add Trunk Group” function with the name Default_2Way. 1. Under the “Include these patterns” box, place the following patterns: 2. Establish the “Telco Dialing Rule Groups” under the Permission Profiles form or the Dialing Rules Form. Set up three telco dialing rule groups. ^1507835….$ ^1507837….$ 2. Under the “Then do these actions” box, select the “Strip” function. a.Name a group DRG_Local that will be used for users that will have local only dialing, it will also allow 1-800 number dialing but restrict direct long distance to 8xx area codes. 3. Under the “Strip” function, insert the “1507” for the pattern and select the “Pattern Only” radio button. b.Name a group DRG_Local_LD that will be used for users that will have local and direct long distance dialing. 4. Under the “Then do these actions” box, select the “Allow” function as the next function. 5. Under the “Allow” function, select the Default_2Way trunk group name under the “Available Trunks” and place it in the “On these trunks” box. c.Name a group DRG_Local_LD_Intl that will be used for users that will have local, direct long distance, and international dialing. 6-17 Revised August 2001 Part No. 002-3139-078 SWITCH CONFIGURATION MANAGER DRG_Local_LD: 6. Under the “Then do these actions” box, select the “Queue” action. This will queue the call if there are no lines available for the given trunk group name. Select the DRG_Local_LD_Intl group in the “Telco Dialing Rule Group” selection box under the “Rules” tab. 7. Select the “Add Step” function to add Step 3. Step 1 Step 3 1. Under the “Include these patterns” box, place the following patterns: 1. Under the “Include these patterns” box, place the following patterns: ^0$ ^1$ ^011$ ^[1-8]11$ ^1900 ^1976 ^001……… ^011……… ^001……… ^011……… ^911$ ^1……….$This will allow direct long distance dialing when the previous steps blocked the long distance calls that are not allowed. ^835….$ ^837….$ 2. Under the “Then do these actions” box, select the “Block” function. 2. Under the “Then do these actions” box, select the “Allow” function. 3. Select the “Add Step” function to add Step 2. Step 2 3. Under the “Allow” function, select the Default_2Way trunk group name under the “Available Trunks” and place it in the “On these trunks” box. 1. Under the “Include these patterns” box, place the following patterns: ^1507835….$ ^1507837….$ 4. Under the “Then do these actions” box, select the “Queue” action. This will queue the call if there are no lines available for the given trunk group name. 2. Under the “Then do these actions” box, select the “Strip” function. 5. Select the “Add Step” function to add Step 4. 3. Under the “Strip” function, insert the “1507” for the pattern and select the “Pattern Only” radio button. Step 4 4. Under the “Then do these actions” box, select the “Allow” function as the next function. 1. Under the “Include these patterns” box, place the following patterns: 5. Under the “Allow” function, select the Default_2Way trunk group name under the “Available Trunks” and place it in the “On these trunks” box. ^$ 2. Under the “Then do these actions” box, select the “Remove Queued Calls” function. This is the pattern for no dialed digits. If a user starts a call but does not enter any digits they will be removed from the queue if they were previously queued. 6. Under the “Then do these actions” box, select the “Queue” action. This will queue the call if there are no lines available for the given trunk group name. 6-18 Revised August 2001 Part No. 002-3139-078 SWITCH CONFIGURATION MANAGER 7. Select the “Add Step” function to add Step 3. Step 1 Step 3 ^911$ ^1……….$This will allow direct long distance dialing when the previous steps blocked the long distance calls that are not allowed. ^835….$ ^837….$ 1. Under the “Include these patterns” box, place the following patterns: ^0$ ^1$ ^011$ ^[1-8]11$ ^1900 ^1976 ^001……… ^011……… ^1………$This is used to block long distance calls except for the exclude patterns. 2. Under the “Then do these actions” box, select the “Allow” function. 2. Under the “Exclude these patterns” box, place the following patterns: 3. Under the “Allow” function, select the Default_2Way trunk group name under the “Available Trunks” and place it in the “On these trunks” box. ^1800 These patterns will be excluded from being blocked under the ^1……….$ pattern to be allowed in step 4. ^1888 ^1877 ^1866 1. Under the “Include these patterns” box place the following patterns: 4. Under the “Then do these actions” box, select the “Queue” action. This will queue the call if there are no lines available for the given trunk group name. 3. Under the “Then do these actions” box, select the “Block” function. 5. Select the “Add Step” function to add Step 4. 4. Select the “Add Step” function to add Step 2. Step 4 1. Under the “Include these patterns” box place the following patterns: Step 2 1. Under the “Include these patterns” box, place the following patterns: ^$ 2. Under the “Then do these actions” box select the “Remove Queued Calls” function. This is the pattern for no dialed digits. If a user starts a call but does not enter any digits they will be removed from the queue if they were previously queued. ^1507835….$ ^1507837….$ 2. Under the “Then do these actions” box, select the “Strip” function. 3. Under the “Strip” function, insert the “1507” for the pattern and select the “Pattern Only” radio button. DRG_Local: Select the DRG_Local group in the “Telco Dialing Rule Group” selection box under the “Rules” tab. 4. Under the “Then do these actions” box, select the “Allow” function as the next function. 6-19 Revised August 2001 Part No. 002-3139-078 SWITCH CONFIGURATION MANAGER pattern for no dialed digits. If a user starts a call but does not enter any digits, they will be removed from the queue if they were previously queued. 5. Under the “Allow” function, select the Default_2Way trunk group name under the “Available Trunks” and place it in the “On these trunks” box. 6.3.11 COPY SETTINGS TO DEFAULTS 6. Under the “Then do these actions” box, select the “Queue” action. This will queue the call if there are no lines available for the given trunk group name. This function copies the data entered for the Switch Configuration as defaults in the Call Processor so they are used on startup by the Call Processor. 7. Select the “Add Step” function to add Step 3. The Call Processor maintains separate Default settings which are loaded when the Call Processor is restarted. Switch Configuration Manager changes affect current Switch operation, but are not automatically made to the Call Processor default settings. Therefore, any changes made by the Switch Configuration Manager are lost when the Call Processor is restarted if they have not been saved to the defaults. Step 3 1. Under the “Include these patterns” box place the following patterns: ^835….$ ^837….$ ^911$ ^1800 The 18xx toll-free call patterns are included here to be allowed. ^1888 ^1877 ^1866 6.3.12 PACK TABLES When records are deleted, they are only marked as deleted and continue to occupy space on the hard drive. This function completely removes deleted records from a table so that hard disk space is recovered. Use the Pack Tables command only when absolutely necessary to recover disk space because this function significantly slows down program execution. It should be used only if a very large number of records are to be deleted from a table. 2. Under the “Then do these actions” box, select the “Allow” function. 3. Under the “Allow” function, select the Default 2Way trunk group name under the “Available Trunks” and place it in the “On these trunks” box. 6.3.13 CALL PROCESSOR PROPERTIES 4. Under the “Then do these actions” box, select the “Queue” action. This will queue the call if there are no lines available for the given trunk group name. The Call Processor Properties screen and descriptions are shown in Table 6-7. 5. Select the “Add Step” function to add Step 4. 6.3.14 LOG PROPERTIES Step 4 The Log Properties screen and descriptions are shown in Table 6-8. 1. Under the “Include these patterns” box, place the following patterns: 6.3.15 SWITCH PROPERTIES ^$ 2. Under the “Then do these actions” box, select the “Remove Queued Calls” function. This is the The Switch Properties screen and descriptions are shown in Table 6-9. NOTE: The above screens are displayed by right clicking the mouse in the left pane of the main Switch Configuration Manager screen. 6-20 Revised August 2001 Part No. 002-3139-078 SWITCH CONFIGURATION MANAGER Table 6-7 Call Processor Properties Screen WINDOWS PRIORITIES Main Process Call Processor application Priority. Normal = default, Idle = Used only if nothing else is operating, High = Runs before anything else. Timer Thread Priority of the clock that determines when things happen in the program. Scan Thread Priority of data retrieval from the Data Base. Write Thread Priority of the writing to the data base. LOGGING CONTROL Log Errors Includes program errors in the NT (Administrative Tools) Event Viewer and console window (if displayed). Log Warnings Includes program warnings in the NT Event Viewer and console window (if displayed). Log Status Includes program status in the NT Event Viewer and console window (if displayed). Console Window Displays log messages in a window as they occur. Record Session Copies the logging record to a text file. COMMAND OPTION Run Keeps the program running. Restart Shuts down the Call Processor program (not the computer) and restarts it from the beginning when the window is closed. Shutdown Stops the Call Processor program. It must then be manually restarted or the computer rebooted. Can’t Happen Is Fatal If an event in the application occurs in a state marked as “cannot happen”, it is treated as a critical error that causes the Call Processor to restart. Reboot Computer Shuts down the Call Processor computer and restarts it from the beginning. Exit Closes the window and applies the settings to the Call Processor. 6-21 Revised August 2001 Part No. 002-3139-078 SWITCH CONFIGURATION MANAGER Table 6-7 Call Processor Properties Screen (Continued) RUNTIME DEBUGGING (Direction required from support personnel to use these functions) Constructors/Destructors These functions send debugging information to a text file. All these settings are normally OFF. Synchronous Events Asynchronous Events State Tracing Process Tracing Timers Read Database Activity Write Database Activity CALL PROCESSOR SOUND FILES Save Old Sound Files On Saves the old sound file when replacing it with another file. Replace Call Processor Event Selects the event for which the sound is being programmed. Call Processor events which can be programmed to play a sound include Crash, Initialize, Shutdown, and Startup. Plays the selected sound. Button Replace Displays a window which allows a new sound to be selected to replace the current sound. 6-22 Revised August 2001 Part No. 002-3139-078 SWITCH CONFIGURATION MANAGER Table 6-8 Log Properties Screen Function Log Limits Alarm Limits Alarm Mail E-mail Host Name OK Cancel Alarm Severity Description The number entered is the maximum number of entries allowed in the log. Any further entries will cause the oldest entry to be deleted. The number entered is the maximum number of alarms allowed in the active alarm file. Any further entries will go into the alarm archive (see Section 6.2.2). Archived This is the maximum number of alarms allowed in the archive, any further entries will cause the oldest entry to be deleted. Checked boxes enable that severity to be sent via E-mail. E-mail Log Enabled When checked, enables the entire E-mail option. Recipient Name This is the name of the E-mail recipient. This can be used to send E-mail if the server knows the recipient by this name. Recipient Address This is the E-mail address of the recipient. This address always works for sending Email, but is not needed if the server knows the recipient by name. Name of the E-mail server (typically POP3). Saves the current data shown and closes dialog. Disregards unsaved changes to the current patterns. This is a scroll list of all Alarm Numbers, Severity, and Description that allows the user to customize the severity assigned to an alarm for the system. To change the severity of an alarm, simply click the right side of the applicable Severity box to display a drop-down list. Then select the desired severity from this list. Define IAC Alarm Input (Defines specific external repeater alarms) IAC Number This is the number of the Alarm Input (1-4) of the repeater Interface Alarm Card. CIM Card Address This is the address of the CIM card in the Switch (defines which repeater it is from). Severity The degree of severity of the alarm (see Section 6.2). Alarm Text This is the description that is displayed when the alarm occurs. 6-23 Revised August 2001 Part No. 002-3139-078 SWITCH CONFIGURATION MANAGER Table 6-9 Switch Properties Screen Function Parameter Switch ID Number of Shelves UID Call Time Out Network Number Slots per Shelf Directed Call Queue Limit Serial Number Group Patch Limit 1-255 1-18 0-255 sec 1-255 12 or 16 0-16 Telco Call Queue Limit Primary NIM COM Ports 0-16 IDB 1-256 CSB 1-256 IDB 1-256 CSB 1-256 Secondary NIM COM Ports Comments Multi-Net/Wide Area LTR/LTR-Net/ Repeater Alarm Reporting Wide Bus Call Queuing WAM Insufficient Resource Warning Tone Create Database Backup During Startup Auto Registration PTT Registration OK Apply Cancel Enter Key Redundant Operation 0-16 Description ID number assigned to this Switch. Total number of shelves in this Switch at this Locality. Maximum UID Call time limit. Network number to which this Switch is attached. There are 11 slots for modules and one slot for the PTM. Maximum number of Auxiliary calls to hold in queue. Unique alphanumeric string (verified and enforced by the CP). Controls the maximum number of Console-configured Group Patches in the Switch at any one time. Maximum number of Telco calls to hold in queue for a line. This is the COM port used for the master clock on the bus serial cable to the Switch (defaults are 5-6). This is the redundant COM port used for the master clock on the bus serial cable to the Switch (defaults are 7-8). Short note pad to help in the identification of the Switch. Displays only the type of System in which this Switch is operating. For Repeater Alarms reported see Log Properties screen, Table 6-8. Sets the protocol words for running an LTR-Net Switch. Allows calls to be placed in queue until a line becomes available. Sounds an warning tone if a WAC was initiated and there are not enough WAMs or channels available. This copies the database tables to the runtime directory. Should be checked if changes have been made to ensure a good backup copy. Automatically registers mobile when it becomes a roamer. Enables registration to occur on PTT if the mobile is a roamer. The parameters are acceptable, save the settings. Saves the current Switch Properties shown. Ignores entries and exits the Switch Properties screen. To change Switch type (i.e. Multi-Net to LTR-Net), a serial number is required from Customer Service and must be entered here. This is the ID number of a Hot Standby Switch. 6-24 Revised August 2001 Part No. 002-3139-078 SWITCH CONFIGURATION MANAGER 6.4 CARD PROPERTIES of the cards in the Switch. The CPM (Conventional Patch Module), NetNIM (Network Interface Module), and VTM (Voice Tone Module) have no attributes. These cards are required to be a place holder for the Call Processor to know and display the actual configuration of the Switch and the modules that are defined. This screen also shows the slots available to be used by other modules. NOTE: The procedure for selecting the card to configure is described in Section 6.1.3. 6.4.1 GLOBAL CARD PROPERTIES The properties in Table 6-10 are common to all card types. The following sections define the attributes Table 6-10 Global Card Properties Function Card Address Auto Enable* Enable Card Disable Card Restart Card Parameters 1-288 False, True OK Cancel Button Save Settings as Default for Current Card Description Card slot number. Automatically initiates the operation of the card on restart. Manually initiates the operation of the card. Renders the card inoperable and denies access by the Call Processor. Manually returns the card to operation and re-initiates the card with the Call Processor. Saves current settings and closes form. Ignores entries and exits the card properties screen. Allows a group of cards to be updated. A window is displayed to enter the start and end address of cards to Enable, Disable, or Restart. Saves current card configuration as start up default values (see Section 6.3.11). * WARNING - See CIM Card Properties, Section 6.4.3. 6.4.2 CCM (CONVENTIONAL CHANNEL MODULE) receives confirmation on all requests made to the repeater and sends information the repeater received. The CCM (Conventional Channel Module) screen is shown in Table 6-11. This module connects the Switch to a Conventional Repeater. Each repeater has a CCM that controls the repeater through logic signaling. The CCM exchanges control information with the Conventional Repeater Module (CRM) via AFSK (Audio Frequency Shift Keying) data in a Blank-Burst (B&B) mode on the Voice Audio Path. The CCM monitors and controls the repeater transmit, The CCM provides a 4-Wire 600 ohm balanced voice connection to the repeater, converts audio to and from PCM (Pulse Code Modulation), transmits and receives on the PCM bus, and controls voice audio gating to and from the repeater. The CCM uses the IDB (Intra-Terminal Data Bus) to communicate with other modules, and send messages to and receives messages from the Call Processor via the NetNIM that controls its actions. 6-25 Revised August 2001 Part No. 002-3139-078 SWITCH CONFIGURATION MANAGER The other modules determine the status of the CCM/CRM/Repeater combination by what the CCM transmits on the CSB (Channel Status Bus). The other modules monitor the CSB and determine if a CCM has the appropriate Group and Status for the type of communication the module requires. Table 6-11 Conventional Channel Module Screen Function Parameters Description NOTE: Global Card Properties are described in Table 6-10. Switched Channel Number 1-30 A unique CCM number (a PCM time slot number). Repeater Number 1-30 The Home Repeater channel used for calls. Locality Number 1-255 The Locality Number that the repeater is in. Each conventional channel must be in a unique Locality. Group Number 1-225 The Group ID used with the Home Repeater channel. Repeater Type Simplex, Duplex Selects the type of repeater used. 6.4.3 CIM (CHANNEL INTERFACE MODULE) the repeater’s memory, and tells the repeater transmit code to Hang or Send Turn-Off. The CIM receives confirmation of all requests made to the repeater and sends information the repeater receives. IMPORTANT If more than one CIM is used as a Floating Channel, DO NOT have more than one channel with Auto Enable selected as TRUE (see Table 6-10). The CIM provides 4-Wire 600 ohm balanced voice connection to the repeater, converts audio to and from PCM (Pulse Code Modulation), transmits and receives on the PCM buses, and controls voice audio gating to and from the repeater. The CIM uses the IDB (Intra-Terminal Data Bus) to communicate with other modules, and send messages to and receives messages from the Call Processor that controls its actions via the NetNIM. The other modules determine the status of the CIM/Repeater combination by what the CIM transmits on the CSB (Channel Status Bus). The other modules monitor the CSB and determine if a CIM has the appropriate Group and Status for the type of communication the module requires. The CIM (Channel Interface Module) screen is shown in Table 6-12. This module connects the Switch to the Multi-Net and LTR Repeaters. Each repeater has a CIM that monitors and controls the repeater through logic signaling. The CIM uses one of three methods to exchange control information with its repeater: RS232 lines, AFSK (Audio Frequency Shift Keying) data on a Separate Audio Path, or by AFSK data in a Blank-Burst (B&B) mode on the Voice Audio Path. The CIM controls the repeater with RestartEnable-Disable, executes requests to Read-Write to 6-26 Revised August 2001 Part No. 002-3139-078 SWITCH CONFIGURATION MANAGER Table 6-12 Channel Interface Module Screen Function Parameters Description NOTE: Global Card Properties are described in Table 6-10. Switch Channel Number 1-30 A unique CIM number (a PCM time slot number). Repeater Number 1-30 The Home Repeater channel used for calls. Locality Number 1-255 The Locality Number of the repeater. LTR Starting GID 1-255 LTR Telco starting Group ID of the block. LTR Ending GID Start to 255 LTR Telco ending Group ID of the block. Star Pound Disconnect Yes, No Both * and # must be used to disconnect a Telco/Aux call. Status Channel Yes, No Marked for documentation. Indicates that this card is connected to the Locality Status Channel. NOTE: Do not program hang time of any type in the CIM if wide area calls are used because improper operation will result. However, hang time works properly if it is set as a wide area call parameter and not in the CIM card properties. Unconditional Hang Yes, No Conditional is selected to hang when there is a Busy System condition. Unconditional selects hang for all calls. Hang Time 0=None The length of time a repeater delays after a transmission until the 1-15 sec. repeater stops transmitting. For hang time to be active, it must also be enabled in the repeater by repeater programming. CIM Type LTR, Multi-Net Communication channel if Multi-Net or LTR compatible. Repeater Connection Type FSK Burst Communication Data signaling type for CIM-to-repeater logic. Communication uses Blank-and-Burst mode when FSK is to be used on FSK Continuous Digital 1200/9600 the main audio line. 6-27 Revised August 2001 Part No. 002-3139-078 SWITCH CONFIGURATION MANAGER 6.4.4 DCM (DISPATCH CHANNEL MODULE) received. The DCM provides a 4-Wire 600 ohm balanced voice connection to the repeater, converts audio to and from PCM (Pulse Code Modulation), transmits and receives on the PCM buses, and controls voice audio gating to and from the repeater. The DCM (Dispatch Channel Module) screen is shown in Table 6-13. This module connects the Switch to a Conventional Repeater. Each repeater has a DCM that controls the repeater through logic signaling. The DCM exchanges control information with the CRM via AFSK (Audio Frequency Shift Keying) data in a Blank-Burst mode on the voice audio path. The DCM uses the IDB (Intra-Terminal Data Bus) to communicate to other modules and send messages to and receive messages from the Call Processor that controls its actions via the NetNIM. The DCM monitors the CSB to determine if a DCM is active with the appropriate Group. The DCM monitors and controls the repeater transmit, receives confirmation of all requests made to the repeater, and sends information the repeater Table 6-13 Dispatch Channel Module Screen Function Unique ID Home Number Group ID Locality Number Repeater Number Priority Parameters Description NOTE: Global Card Properties are described in Table 6-10. 1-8163 (8164-8191 reserved) Unique Identification (UID) number. 1-30 Home Repeater channel. 1-225 Group ID used for calls. 1-255 Locality number of the repeater. 1-30 Home channel number used for calls. 1-5 Access Priority level. 1 is highest, 5 is lowest. 6-28 Revised August 2001 Part No. 002-3139-078 SWITCH CONFIGURATION MANAGER 6.4.5 DIM (DISPATCH INTERFACE MODULE) (Dual Tone Multi-Frequency) to select from one-of-ten Group Codes. A control sequence uses the DTMF to place the DIM in scan mode or to stop and use a specific Group Code. The Tone Remote feature requires the use of a plug-in personality card. The DIM connects the 4Wire 600 ohm balanced audio with the PCM (Pulse Code Modulation) data paths and communicates to other modules via the IDB (Intra-Terminal Data Bus). The DIM also monitors the CIM (Channel Interface Module) via the CSB (Channel Status Bus) to determine if a CIM is active with a DIM Group. The DIM (Dispatch Interface Module) screen is shown in Table 6-14. This module uses either Direct Connection or Tone Remote to interface to the dispatch equipment. A DIM with direct connection is associated with only one Group Code and uses a form of Type II E&M lead input similar to the mobile PTT. A DIM with Tone Remote connection decodes Guard Tone for the PTT indication and decodes DTMF Table 6-14 Dispatch Interface Module Screen Function Parameters Description NOTE: Global Card Properties are described in Table 6-10. Number of Extended Group personalities available to dispatcher with tone remote capability. Unique ID 1-8163 Dispatcher Unique ID (UIDs 8164-8191 are reserved) Home Channel 1-30 Home Repeater channel used for calls. Beginning Block ID 1-225 Lowest number in a block of Group IDs. Ending Block ID 1-225 Highest number in a block of Group IDs. Encrypted LIC Yes, No If selected, M-Lead is used to mute audio on the LIC for UIDs 8000 and above. Enable Patch Mode Yes, No If selected, this DIM is connected to a group of DIMs. Patch Time-Out 0-255 minutes Automatically disconnects the patch after time selected. Enable Proceed Tone Yes, No If selected, a tone sounds indicating ready to talk. Enable DTMF Yes, No DTMF used by Tone Remote to indicate extended group. Allow Enable By DTMF Yes, No If selected, DTMF tones enable a patch. Receive Control Tones Yes, No Tone Remote interface tones, input. Send Control Tone None to 2050 Hz Tone Remote Function Tone. Uses selected standard frequency. in 100 Hz steps Home 1-30 List for each Extended Group: Home Repeater Channel. Default Tx Locality 1-255 List for each Extended Group: Default Transmit Locality. Hang Time 1-255 seconds List for each Extended Group: Repeater Hang Time. Time a repeater transmits data but no audio and hold the channel for the call. Priority 1 highest - 5 lowest List for each Extended Group: Access Priority Level. Rx ID 1-225 or 255 List for each Extended Group: Receive Group ID. Tx ID 1-225 or 255 List for each Extended Group: Transmit Group ID. Add Includes DIM properties to the list. Delete Removes selected DIM properties from the list. Current Group 0-9 6-29 Revised August 2001 Part No. 002-3139-078 SWITCH CONFIGURATION MANAGER 6.4.6 IDM (INTELLIGENT DISPATCH MODULE) with voice communication on another Group. The information exchanged between the IDM and the consoles controls what the IDM receives and transmits for voice communication. The IDM (Intelligent Dispatch Module) screen is shown in Table 6-15. This module interfaces the Switch to a computer controlled dispatch Multi-Net II console. The IDM has a digital data connection that requires a separate full-duplex 9600 baud RS-232 interface called the IDIB (Intelligent Dispatch Interface Bus). The separate data path is required to allow the computer controlled dispatch consoles to monitor and display the status of other Groups. This status and display update can take place while the console is busy The IDM connects the 4-Wire 600 ohm balanced audio with the PCM (Pulse Code Modulation) data paths and communicates to other modules via the IDB (Intra-Terminal Data Bus). The IDM also monitors the CSB (Channel Status Bus) to send update changes to the IDM via the IDIB. Table 6-15 Intelligent Dispatch Module Screen Function Unique ID Enable Proceed Tone Parameters Description NOTE: Global Card Properties are described in Table 6-10. 1-8163 Dispatcher Unique ID (UIDs 8164-8191 are reserved) Yes, No When selected, sounds a Proceed Tone indicating Ready-To-Talk. 6-30 Revised August 2001 Part No. 002-3139-078 SWITCH CONFIGURATION MANAGER 6.4.7 LEM (LOGGING ENCODER MODULE) The LEM is configured to monitor up to five channels for information. The LEM converts the CSB information for the five channels and outputs 1200 baud AFSK (Audio Frequency Shift Keying) to a logging recorder. There may be up to six LEMs in a Switch to cover up to thirty channels The LEM (Logging Encoder Module) screen is shown in Table 6-16. This module is the interface that performs the data collection and outputs of information for recording voice traffic. The LEM communicates with the other modules via the IDB (IntraTerminal Data Bus) and monitors the CSB (Channel Status Bus) for the Groups set up to use the LEM. . Table 6-16 Logging Encoder Module Screen Function Channel 1- Channel 5 Parameters Description NOTE: Global Card Properties are described in Table 6-10. 1-30 Array with 5 Switch Channel Numbers. These are PCM time slot positions. 6.4.8 MAM (MULTI-NET ACQUISITION MODULE) The MAM also monitors the CIM (Channel Interface Module) via the CSB (see Section 3.3.2) to determine if a CIM is active with a MAM Group. The CIM notifies the MAM when a channel has been acquired and an alarm relay on the MAM closes the connection between the VRCM-50 console and the MAM. When the console detects the connection to the MAM, paging tones are sent. The MAM (Multi-Net Acquisition Module) screen is the same as the DIM screen shown in Table 6-14. This module uses either Direct Connection or Tone Remote to interface to the VRCM-50 (Orbacom) dispatch equipment for tone paging. A MAM with direct connection is associated with only one Group Code and uses a form of Type II E&M lead input similar to the mobile PTT. 6-31 Revised August 2001 Part No. 002-3139-078 SWITCH CONFIGURATION MANAGER 6.4.9 MCM (MULTI-NET CONSOLE MODULE) tion) data paths and communicates to other modules via the IDB (Intra-Terminal Data Bus). The MCM also monitors the CSB (Channel Status Bus) to send update changes to the console via the IDIB (Intelligent Dispatch Interface Bus). The MCM (Multi-Net Console Module) screen is shown in Table 6-17. This module interfaces to a computer controlled VRCM-50 Series dispatch console. The MCM has a digital data connection that requires a separate full-duplex 9600 baud RS-232 interface called the IDIB (Intelligent Dispatch Interface Bus). The separate data path is required to allow computer controlled dispatch consoles to monitor and display the status of other Groups. This status and display update can take place while the console is busy with voice communication on another Group. The information exchanged between the MCM and the console controls what the MCM receives and transmits for voice communication. The MCM is similar to an IDM except it also has the capability of summing Multiple Group Audio into the Select Audio. It can also change the audio level of each Group in the Select Audio. A Conventional Patch Module (CPM) can only exist with an MCM. There may be two CPMs per MCM and they must be installed in the two address slots above the MCM. Example: MCM card address 40, CPM1 address would be 41 and CPM2 address would be 42. The functions of the CPM are controlled by the MCM. The MCM connects the 4-Wire 600-ohm balanced audio with the PCM (Pulse Code Modula- Table 6-17 Multi-Net Console Module Screen Function Unique ID Enable Proceed Tone Parameters Description NOTE: Global Card Properties are described in Table 6-10. 1-8163 Dispatcher Unique ID (UIDs 8164-8191 are reserved) Yes, No When selected, sounds a Proceed Tone indicating ready to talk. 6-32 Revised August 2001 Part No. 002-3139-078 SWITCH CONFIGURATION MANAGER 6.4.10 SNM (SYSTEM NETWORK MODULE) The SNM communicates with other modules via the IDB (Intra-Terminal Data Bus) and monitors the CSB (Channel Status Bus) for a Group set up to use the SNM. SNMs use AFSK (Audio Frequency Shift Keying) data in a Blank-Burst mode to pass information on the interface relative to the type of call desired and connection status of the end device. This form of data passing allows a standard 4-Wire interface connection and does not require a specialized system switching node. The SNM (System Network Module) screen is shown in Table 6-18. This module is the interface that allows Unique ID calling from RF units and multiple Switches to be connected to a total system network. The SNM uses a 4-Wire 600-ohm balanced audio on the interface and connects audio to the PCM (Pulse Code Modulation) data paths. The SNM also uses a Type II E&M lead connection set for connection initiation and supervision. Table 6-18 System Network Module Screen Function Parameters Description NOTE: Global Card Properties are described in Table 6-10. SNM Connection Type Internal, External Is this SNM External to this Switch? Paired SNM Card Address Paired SNM’s Address. Switch Connected To 0 = Node Switch Associated Switch. Provides reference as to when to select SNM when routing a call. 255 is for incoming SNM. 6-33 Revised August 2001 Part No. 002-3139-078 SWITCH CONFIGURATION MANAGER 6.4.11 TIM (TELEPHONE INTERFACE MODULE) Signaling General Once connection supervision has occurred, the digit signaling occurs. There are two ways to send and receive digits: Dial Pulse or DTMF. The TIM sends or receives the appropriate signaling depending on the direction of the call. The TIM is capable of sending and receiving “end-to-end” signaling where the call is completed and normal voice communication takes place, or numeric information can be sent or received via DTMF. Dial Pulse information cannot pass through the telephone company’s CO (Central Office) to make it back and forth to the units. The TIM (Telephone Interface Module) connects the Switch to the telephone lines and handles telephone line protocols. The TIM logic unit is microprocessor-controlled, and communicates to the Call Processor via the NetNIM and the IDB (Intra-Terminal Data Bus). A Switch may have multiple TIMs with varying styles of telephone lines attached. The telephone line audio is processed to interface with the PCM (Pulse Code Modulation) voice path. The basic TIM operation functions are Supervision, Signaling, Call Supervision, and Intra-Terminal Communication (see Multi-Net 3000 Series Switch Setup and Alignment Manual, Part No. 001-3139-003 or later for more detailed information). Call Supervision Once the signaling of the digits has occurred, call status is determined for Answer and Disconnect. Answer Supervision is an indication of when the called party answers the telephone. The preferred method is by Reverse Battery Answer, where the CO reverses the battery connection. Therefore, current flow reverses when the called party answers. The other method is Mobile Speech Activity which detects the presence of mobile speech for a certain length of time. If the telephone line cannot recognize Reverse Battery Answer, none is sent toward the CO, and no real answer supervision exits. However, the mobile speech activity can be used for answer detection. The TIM screens vary depending on the type of telephone line being used. The TIM Card Type parameter selects one of the following types of phone lines. Refer to the indicated table for information on the screen, and to following descriptions for more information on TIM card programming. 2-Wire DID - Table 6-19 2-Wire Loop Ground - Table 6-20 4-Wire DID - Tables 6-21 and 6-23 4-Wire Loop Ground - Tables 6-22 and 6-23 Disconnect Supervision Disconnect Supervision detects when the called party hangs-up (disconnects) and a message is then sent to the TIM to disconnect from the telephone line. The preferred method is Reverse Battery Answer where the battery returns to normal when the called party disconnects. The next method is to wait for the Mobile Disconnect Message. If the mobile does not hang up properly, the message is not sent and the call continues. Fail-safe alternatives watch for loss of mobile speech or detect the return of dial tone. This ensures call disconnect and allows another call to be placed. The TIM then informs the Call Processor that it has disconnected from the telephone line. Supervision The TIM can be seized from either landside or internal. Landside seizure occurs by DID (Direct Inward Dialing) or 2-Way Start. Internal seizure comes from the IDB as a request for outgoing service on the telephone line. Once seizure has occurred, connection supervision takes place. Incoming calls are connected by Immediate Start or Wink Start. Immediate Start requires the ability to accept digits in less than 70 ms before digits are sent. Wink Start sends digits after a short battery reversal and back to normal battery before digits are received. Two-Way Incoming indicates readiness to accept “end-to-end” DTMF digits by outputting a Proceed Tone. The TIM communicates to the Call Processor through the Intra-Terminal Data Bus (IDB) and sends activity information to the Call Processor. The Call 6-34 Revised August 2001 Part No. 002-3139-078 SWITCH CONFIGURATION MANAGER Receive Audio Processor sends messages to the TIM to request service, informs the TIM to disconnect, and any other necessary control information. The receive audio is from the telephone line and processed for the intra-terminal Pulse Code Modulation (PCM) channel stream. The received audio has three paths: Telephone Line Styles There are several different styles of telephone lines the TIM controls. The following styles of lines and their basic connection are supported: Voice Audio - The receive audio from the telephone line comes from the unbalanced receive side of the hybrid. The audio is level adjusted through an amplifier to give a correct line level adjustment and passes through minimal filtering to eliminate the possibility of unwanted frequencies. A transmission gate turns the audio on and off toward the terminal. The gate is followed by a level adjustment amplifier/buffer before the audio enters the intra-terminal voice processing. The intra-terminal voice processing is a PCM CODEC with a time slot determination circuit. The CODEC digitizes the analog voice and outputs it on the PCM transmit channel stream in the appropriate time slot. The master clock and master frame sync are inputs to the TIM. These inputs provide timing for the CODEC and timing determination circuit. Direct Inward Dialing (DID) - The DID offers direct inward dialing of the telephone number and supplies the –48V DC battery voltage to the incoming lines. The Central Office (CO) contacts the DID by closing the loop and sends the number to the DID by dial pulse or DTMF. The DID can handle 2, 3 or 4 digits being spilled forward by the CO. 4-Wire E&M - This is primarily used with electronic switches, public leased lines or microwave equipment to provide complete separation of transmit and receive audio lines. The signaling unit provides the -48V DC battery to the M-Lead, while the trunk unit provides ground to the M-Lead. The signaling is reversed for the E-Lead. Dial Tone Detection - The receive audio from the telephone line is taken from the line level adjust amplifier buffer and passes into a bandpass filter centered on the frequencies used for dial tone. The bandpass filter is adjusted for detection of the dial tone sent by the CO. The output of the bandpass filter passes to a rectification and detection circuit. The output of the detection circuit indicates the presence of dial tone to the logic unit. Dial Pulse - Dial pulsing is the “break and make” of the loop path current to cause no flow and flow. The number of breaks, when no current flows, is the number of the desired digit, with 10 pulses equaling 0. Dual Tone Multi-Frequency (DTMF) - DTMF tone signaling is used on almost all push button telephones. DTMF is where the desired digit is composed of a combination of two tones. A tone pair consists of one tone from the low band group (697, 770, 852 or 941 Hz), and the high band group (1209, 1336, 1447 or 1633 Hz). DTMF Detection - The receive audio from the telephone line is taken from the line level adjust amplifier buffer. The audio passes into the DTMF detection circuitry and outputs the tone pair received and the valid tone pair signal to the logic unit. Audio Processing Transmit Audio The audio processing converts intra-terminal voice path audio to be placed on the telephone lines. The telephone line interface contains a hybrid that transmits and receives audio from the telephone line and keeps the transmitted audio out of the received audio to eliminate side-tone and echoing. The hybrid also converts the balanced telephone line to unbalanced connections. The transmit audio from the PCM channel stream is processed to analog and sent to the telephone line. The functional paths of the transmit audio are as follows: Voice Path - The transmit voice is processed from the PCM channel stream by the same CODEC and time slot determination circuitry as in the receive audio 6-35 Revised August 2001 Part No. 002-3139-078 SWITCH CONFIGURATION MANAGER frequency recognized for voice peaks. The filtered audio is rectified and detected for the presence of voice. The output of the detector is an input to the logic unit. voice path section above. The digitized voice is converted to analog and filtered by the CODEC to a high pass filter to eliminate low frequency audio. The audio is level adjusted by an amplifier buffer and gated into a summing amplifier buffer. The audio gating provides on/off control of the voice audio to the telephone line. The summing buffer has a level adjustment to set the outgoing line level and drives the unbalanced side of the telephone line hybrid. DTMF Generation - The DTMF signaling is generated on the TIM and transmitted toward the telephone line. The logic unit provides the inputs to the DTMF generation circuit. The generator outputs the desired tones and is adjusted to the proper level with respect to the voice path by an amplifier. The tones pass through a logic unit controlled audio transmission gate, summing amplifier buffer, to the telephone line. Mobile Speech Detection - The audio for mobile speech detection comes from the CODEC amplifier buffer. The bandpass filter is centered at the audio Table 6-19 TIM 2-Wire DID Screen Function TIM Card Type Disconnect Method Priority Default Locality Call Time Out DTMF Dialing Home Digits Number of Digits Wink Start Fast Pulse Parameters Description NOTE: Global Card Properties are described in Table 6-10. 2-Wire DID DID (Direct Inward Dialing) of the telephone number. Cannot dial out to the CO. Two-Wire uses a pair of lines for short distances. Total Time Call disconnect by Dial Tone or by a Total Call Time. Dial Tone 1=highest, 5=lowest Access Priority Level 1-30 Default Locality for a Group Call when dialing only Home/ Group. 1-255 Time between PTTs in seconds for Dial Tone disconnect. Total call time in 10s of seconds for total time disconnect. Used on almost all push-button phones. Tone pairs are used to represent a digit. 10 numerical digits PSTN number. 1-9 The number of digits to receive (digits spilled forward). Yes, No Waits for battery reversal and back to normal to send digits. Yes, No Controls dialing rate for Pulse Dial, 20 PPS/10 PPS. 6-36 Revised August 2001 Part No. 002-3139-078 SWITCH CONFIGURATION MANAGER Table 6-20 TIM 2-Wire Loop Ground Screen Function Disconnect Method Priority Default Locality Call Time Out DTMF Dialing Trunk Group Telephone Number Proceed Tone Wait For Dial Tone Ground Start Fast Pulse Reverse Battery Parameters Description NOTE: Global Card Properties are described in Table 6-10. Total Time Call disconnect by Dial Tone or Total Call Time. Dial Tone 1=highest, 5=lowest Access Priority Level 1-30 Default Locality for a Group Call when dialing only Home/ Group. 1-255 Time between PTTs in seconds for Dial Tone disconnect. Total call time in 10s of seconds for total time disconnect. Used on almost all push button phones. Tone pairs are used to represent a digit. 0-9 Used for trunk selection (see Section 6.3.10). Corresponds to the trunk number assigned to the device connected to the PBX. 10-digits PSTN number (xxx-xxx-xxxx) Yes, No Outgoing tone when ready for digits. Yes, No Wait for a Dial Tone before sending digits. Yes - Ground Ground Start recognizes ground on Inward/Outward calls. No - Loop Loop Start establishes load current on Inward/Outward calls. Yes, No Controls dialing rate for Pulse Dial, 20 PPS/10 PPS. Yes - Reverse Battery Call answering scheme. No - Mobile Speech 6-37 Revised August 2001 Part No. 002-3139-078 SWITCH CONFIGURATION MANAGER Table 6-21 TIM 4-Wire DID Screen Function Parameters Description NOTE: Global Card Properties are described in Table 6-10. Disconnect Method Total Time Call disconnect by Dial Tone or by a Total Call Time. Dial Tone Priority 1=highest, 5=lowest Access Priority Level Default Locality 1-30 Default Locality for a Group Call when dialing only Home/ Group. Call Time Out 1-255 Time between PTTs in seconds for Dial Tone disconnect. Total call time in 10s of seconds for total time disconnect. DTMF Dialing Used on almost all push-button phones. Tone pairs are used to represent a digit. Home Digits 10 numerical digits PSTN number. Number of Digits 1-9 The number of digits to receive (digits spilled forward). Wink Start Yes, No Waits for battery reversal and back to normal to send digits. Wink Delay Time 0-255 ms Amount of delay between an E-Lead state change and a wink on the M-Lead is asserted. Wink Pulse Length 0-255 ms Length of a Wink Pulse. NOTE: Setting both Wink Delay Time and Wink Pulse Length to zero indicates Immediate Start. NOTE: Refer to Table 6-23 for information on the 4-Wire Properties on the right side of the screen. 6-38 Revised August 2001 Part No. 002-3139-078 SWITCH CONFIGURATION MANAGER Table 6-22 TIM 4-Wire Loop Ground Screen Function Parameters Description NOTE: Global Card Properties are described in Table 6-10. Disconnect Method Total Time Call disconnect by Dial Tone or by a Total Call Time. Dial Tone Priority 1=highest, 5=lowest Access Priority Level Default Locality 1-30 Default Locality for a Group Call when dialing only Home/ Group. Call Time Out 1-255 Time between PTTs in seconds for Dial Tone disconnect. Total call time in 10s of seconds for total time disconnect. DTMF Dialing Used on almost all push-button phones. Tone pairs are used to represent a digit. Trunk Group 0-9 Used for trunk selection (see Section 6.3.10). Corresponds to the trunk number assigned to the device connected to the PBX. Telephone Number 10-digits PSTN number (xxx-xxx-xxxx) Proceed Tone Yes, No Incoming tone when ready for digits. Wait For Dial Tone Yes, No Wait for a Dial Tone before sending digits. E-Lead Time-Out 0-9950 ms If E-Lead Detection is on, the amount of time (in 50 ms steps) to look for an E-Lead reversal before determining the line is out-of-order. NOTE: Refer to Table 6-23 for information on the 4-Wire Properties located on the right side of the screen. 6-39 Revised August 2001 Part No. 002-3139-078 SWITCH CONFIGURATION MANAGER Table 6-23 TIM 4-Wire Screen Properties Function Parameters Ignore Pulse Time Out Detect E-Lead CO Settle Yes, No Yes, No 0-2550 Dial Tone 0-9950 Hang-Up Delay 0-9950 Inter-Digit 0-9950 Maximum Ring Pulse Minimum E-Lead 0-255 0-255 Minimum Dial Tone 0-255 Minimum Pulse Break 0-255 Minimum Pulse Make 0-255 Minimum Pulse Pause 0-9950 Minimum Pulses/Ring 0-255 Minimum Ring Pulse 0-255 Minimum Tone Off Minimum Tone On Pulse Dial Break Pulse Dial Make 0-2500 0-2500 0-255 0-255 Description Accept valid Pulse Dial digits. Turns E-Lead detection on or off. The amount of time to delay after line supervision has taken place before dialing digits. If Dial Tone detection is on, the amount of time to look for a Dial Tone before determining the line is out-of-order. The amount of time after going off-hook before an E-Lead reversal is accepted as a valid hang-up. Time-Out Timer that sets the maximum time allowed between digits when overdialing a radio or (in the case of DID) the amount of time to collect a Pulse Dialed digit. In either case when a digit is detected the timer is reset. When the timer expires, the call progresses with no more digits being accepted. The maximum length of a pulse for ring detection. The minimum length of a pulse for ring detection. Along with Maximum Ring Pulse Length creates a valid frequency envelope for ring detection. The minimum amount of time a Dial Tone is detected contiguously before it is considered valid. The minimum amount of time to idle the M-Lead while dialing Pulse Dial digits for out-bound calls. The minimum amount of time to reverse the M-Lead while dialing Pulse Dial digits for out-bound calls. The minimum amount of time to pause between Pulse Dial Digits when making an out-bound call. The minimum number of ring pulses that must be gathered before the ring tone is considered valid. The minimum length of a pulse for ring detection. Along with Maximum Ring Pulse length creates a valid frequency envelope for ring detection. The off time between DTMF digits while making an out-bound call. How long to generate a DTMF digit while making an out-bound call. How long to idle the M-Lead while dialing Pulse Dial digits for out-bound calls. How long to reverse the M-Lead while dialing Pulse Dial digits for out-bound calls. 6-40 Revised August 2001 Part No. 002-3139-078 SWITCH CONFIGURATION MANAGER Table 6-23 TIM 4-Wire Screen Properties (Continued) Function Parameters Pulse Dial Pause 0-9950 Ring Time Out Tone Off Tone On 200-50,000 0-2500 0-2500 Description The amount of time to pause between Pulse Dial digits when making an out-bound call. The amount of time to wait for an answer (from a mobile or landside) when ringing. The off time between DTMF digits while making an out-bound call. How long to generate a DTMF digit while making an out-bound call. 6.4.12 VDM (VOTER DIAGNOSTIC MODULE) the Call Processor. The type of data exchanges between the Voting System and the VDM pertains to memory read of the Voters, Receiver Locality Enable/ Disable, and Alarm/Control information. The Call Processor supports the manual control of the Receiver Voter Module (RVM) in the Voter Shelf through the VDM and the VDM is configured accordingly. The VDM (Voter Diagnostic Module) screen is shown in Table 6-24. This module in the Switch is the data communication buffer module between the Call Processor and the Voting System. The VDM polls the Voter Shelf for alarms and passes the information to Table 6-24 Voter Diagnostic Module Screen Function Active Channels Channel RVM Number RVM Memory Management Address Data Read Write Local Channels Send Parameters Description NOTE: Global Card Properties are described in Table 6-10. Array with identifiers of 1-30, each identifying if the channel is active. 1-30 An active channel number indicated. Relates to the Receiver number. 0=current, 1-7 external Select an RVM number in conjunction with a Channel number to communicate with a specific RVM via the VDM screen. The user, via the VDM, uses the number as a temporary selection. External, Internal, Code, Memory location to store data. External memory, Internal memory, EEPROM Code ROM or the EEPROM. Number in Hex Hex RAM address to read (memory location on selected RVM). Number in Hex Data to write to EEPROM. Reads from the EEPROM at Address/Data location. Writes to EEPROM at Address/Data location. 1-4 These represent the four possible Localities a given RVM can be connected to for a given channel. Sends the data to the selected channel in the Voter shelf. 6-41 Revised August 2001 Part No. 002-3139-078 SWITCH CONFIGURATION MANAGER 6.4.13 WAM (WIDE AREA MODULE) number can be assigned that identifies they are tied together. If there are more than two switches in the system, all the WAMs in the group that are tied together get the same port number. The WAM (Wide Area Module) screen is shown in Table 6-25. This module communicates with the other modules via the IDB (Intra-Terminal Data Bus) and monitors the CSB (Channel Status Bus) for the Groups that are set up to use the WAM. The Wide Area Call configuration sent by the Call Processor determines when the Wide Area Call should be activated. Call Router - The Call Router option can either be set for Present or Not Used. When multiple Switches are connected together, the transmit and receive audio paths are connected together. This in effect wraps the audio from the transmit to the receive audio path. When this type of configuration is used, the Call Router option needs to be set to Present. When only one Switch is used, this option needs to be set to Not Used. This option tells the WAM whether the audio is wrapped internally or externally. The Wide Area Call configuration contains a unique identification number (WAC ID) that identifies the configuration to all Call Processors on a Network. If a user at one Call Processor creates or modifies a WAC ID configuration, it propagates to all the other Call Processors on the Network. Type - A WAM can be either an Internal or External type. An Internal WAM is only used for calls occurring on that Switch with no external connections to other switches. An External WAM is used for calls to other switches designated by a Routing Group Number. A Wide Area Call can be configured to look like an STM* (Site Tracking Module) call or a GPM* (Group Patch Module) call. The STM call uses only one Home/Group ID and tracks units by their UID (Unique ID) across multiple Localities. The GPM call contains Locality/Home/Group ID combinations and does not care about Unique IDs. Routing Group - The Routing Group identifies which Switches are included in a WAM Group. When WAMs are wired externally, they may be connected to any or all of the other Switches in the system. Wide Area Calls are allocated to a WAM through the use of the Routing Group number. WAMs with software version 2.17 or later allow consoles to patch together multiple wide area group calls. Each WAC is configured with a Routing Group number that identifies the type of resource needed to setup the Call. If more than one set of WAMs are connected to wire the same group of Switches together, they are assigned the same Routing Group number. * These modules were used in previous Multi-Net Systems with an RNT. The WAM obsoleted these modules. Additional information on Wide Area Module programming follows: NOTE: Do not use Routing Group 0 because it is reserved for internal WAMs. Card Address - This is the slot number in the Switch. Port - This is the logical port number assigned to a WAM in a switch. The port numbers must be unique and are used to identify which external WAMs are physically tied together. Allow Emergency Wide Area Calls - Turns on or off the WAM’s ability to activate WACs for priority 1 calls. This is a serial number key dependent field. Therefore, it is displayed only if the SSM encryption key contains this feature. This key is entered using the File > Enter Key function described in Section 5.2.4. Example: If a WAM located in Switch 1, Slot 32 is connected to a WAM in Switch 2, Slot 38, a port 6-42 Revised August 2001 Part No. 002-3139-078 SWITCH CONFIGURATION MANAGER Table 6-25 Wide Area Module Screen External Connection Type Internal Connection Type Function Parameters Description NOTE: Global Card Properties are described in Table 6-10, and additional information on the following parameters is located on page 6-42. Connection Type External, Internal Is this an external stand-alone WAM or is it externally connected to WAMs in other Switches? Call Router Not Used, Present Indicate if a Call Router is used. In a multiple-switch environment where the switches may not be co-located, Present is selected to prevent multiple audio paths in Wide Area Calls. NOTE: The Tx and Rx audio between WAM cards needs to be bridged together at one point in all multiple-switch systems. Allow Emergency Wide Enable/Disable Enables or disables the ability to activate WACs for priority 1 calls. Area Calls This is an optional feature that is displayed only if the SSM encryption key contains this feature. Port Number 16 bits (0-65535) External Only. When there is no Call Router present, the WAM Port Number represents a set of interconnected WAMs. If there is a Call Router, the port number represents only one external WAM. Routing Group (Do not use “0”) Identifies which Switches are included in a WAM group. 6-43 Revised August 2001 Part No. 002-3139-078 ALARM LIST APPENDIX A ALARM LIST Table A-1 All Alarms (Listed By Number) Alarm No. Severity Description INTRA-TERMINAL DATA BUS ALARMS 1 2 3 4 5 6 7 8 9 10 11 12 Major CIM:Repeater Assignment Error from the RIM. The CIM is reporting a mismatch between the repeater number assigned to it and the repeater number reported by the repeater. Data 1 Value and Description: This is the repeater number that is programmed into the CIM and is what the CIM is expecting from the repeater. Data 2 Value and Description: This is the actual repeater number reported by the repeater to the CIM. Major CIM:Link Setup time-out on the CIB. The CIM tries for 30 seconds to establish a link with the repeater and if it fails, it generates this alarm. Once this alarm is generated for the first time, the CIM continues to look for the repeater and if it continues to see nothing, it proceeds to report this alarm every 5 minutes until it either sees a repeater or detects that it has been set to disable. Informational CIM:Repeater restarted unexpected from RIM. The CIM generates this alarm if the CIM receives a repeater restart message at a time it does not expect it. This alarm will be generated anytime the repeater is manually restarted after the link had been established. Minor CIM:Enable Repeater Order No Response Message from the RIM. Not used. Alarm #18 used in its place. Minor CIM:Disable Repeater Order No Response Message from the RIM. This alarm is generated if the CIM does not get a response back from the repeater indicating that the repeater has disabled as a result of a disable order sent from the CIM. A disable order is nothing more than a bit state inside of a “repeater authorization request order”. The repeater must acknowledge this order with the proper repeater number and a proper enable/disable state. If either of these two parameters are wrong or no acknowledge is received at all, this alarm is generated. Informational CIM:Received Wrong Message from the RIM. Not Used. Minor CIM:Transmit Call Request No Response Message from the RIM. Not used. Alarm #9 used in its place. Minor CIM:No Channel Acknowledge from the RIM. Not used. Alarm #18 used in its place. Minor CIM:No Transmit Call Ack Message from the RIM. If a CIM does not get a reply back from a repeater for a “transmit call request order” within 300 ms, it will send the order again. If it does not receive a response 300 ms after the third try, the CIM will send this alarm to the CP and send a NACK back to whatever device that had sent it the simulselect or channel request order in the first place. Minor CIM:No Transmit Hang Ack Message from the RIM. If a CIM does not get a reply back from a repeater for a “transmit hang request order” within 300 ms, it will send the order again. If it does not get a response within an additional 300 ms, it will send this alarm to the CP. Minor CIM:No Transmit Clear Ack Message. If a CIM does not get a reply back from a repeater for a “transmit clear request order” within 300 ms, it will send the order again. If it does not get a response within an additional 300 ms, it will send this alarm to the CP. Minor CIM:No Receive Update from the RIM. Once a CIM is in a receive state of some form as the result of receiving a “receive call request” message from its repeater at some point, the CIM expects additional messages periodically from the repeater to keep the call up. If the CIM does not receive another receive “call request message” from its repeater for a period of three minutes and if the CIM is not in duplex task, it drops the call and sends this alarm to the CP. If it does not receive another “call request message”' while it is in duplex task, it closes its audio gates routing the received audio and returns to transmit task. A-1 Revised August 2001 Part No. 002-3139-078 ALARM LIST Table A-1 All Alarms (Listed By Number) (Continued) Alarm No. 13 14 15 16 17 18 19 20 21 22 23 24 25 26 27 28 29 30 31 32 33 34 35 36 Severity Description Unknown External error. If the DIM or MAM initialization order from the Call Processor indicates there are extended groups but then no DIM extended initialization order is received by the card, the card will send this alarm message to the CP and then go back to the initialization task. Informational Group Number Error. If a DIM or MAM receives a “DIM Extended Initialization Order” from the Call Processor with a record number that is out of order, it will send this error to the CP and return to Idle Task. This may occur if for some reason the card missed one in a series of DIM Extended Initialization Orders resulting in the extended group record number not matching what it expects. Informational Idle busy conflict. If the home, group, or UID of the channel the card has selected or requested, changes to something other than what the card started with, or if the channel unexpectedly goes idle, this alarm message is sent to the CP. This alarm is produced whenever a switch side card (WAM, MCM, SNM, DIM, TIM, MAM, IDM, etc.) attempts to take control of an idle channel and gets a negative response. This could be caused by such things as two cards requesting a channel at the same time (collisions), a radio getting a channel just prior to an attempt by a card, a console taking over control of a channel, or the channel going down for some reason. A few of these alarms a day are normal but hundreds may indicate a very busy system in need of reconfiguration. Note that this alarm does not indicate lost calls because a retry is immediately made on another channel. Informational Transmit time-out error Informational Hang error Minor CIM:No Repeater Authorization Ack Message Major TIM:No Trunk Error Minor SNM:Connection Failure Minor CIM:Link Established Message No Response Order Minor CIM:Repeater Enabled Message No Response Order Minor CIM:Repeater Disabled Message No Response Order Minor Loss of E-lead on the PCM Minor No response from the SMM Minor No response from the module Minor No Trunk Response Order Minor No disconnect response Minor No DIM Response Minor SNM:No SNB Response Major TIM:2-WAY not able to get service Minor TIM:No dial tone received Minor TIM:No wink received Major TIM:No trunk connected to 2-way Informational Lost a Registration Request Message Minor CIM:RIM Link Lost A-2 Revised August 2001 Part No. 002-3139-078 ALARM LIST Table A-1 All Alarms (Listed By Number) (Continued) Alarm No. 37 38 39 40 41 42 46 72 73 74 100 101 102 103 104 105 106 107 108 109 110 111 112 113 114 115 116 117 118 119 Severity Description Major No RVM Response. The VDM polls each RVM it believes exists sequentially every two seconds. If it does not get a response back from one, it sends an error message on the IDB informing the CP of which RVM it has lost communication with. Data 1 Value and Description: Range of the value is 8 to 255. This is an 8-bit number binaurally representing the RVM and channel number of the reportedly missing RVM. Bits 0-2 represent the RVM number. A zero in these three bits means the cRVM is missing. Anything in the range of 1 to 7 means a specific slave RVM is missing. The upper 5 bits (3-7) represent the repeater number (or cRVM number) of the missing RVM. These 5 bits can range in value from 1 and 30. Data 2 Value and Description: Range of the value if 0 to 1. If this field is a zero then this alarm is “set”' meaning the RVM in Data 1 is currently missing. If this field is a one, then this alarm is “cleared” meaning the RVM in Data 1 has had communication restored. Informational CIM:Went to standby Informational SNM:SNB link restored Minor IDM:Link was lost between IDM and console Informational IDM:Link was restored between IDM and console Minor IDM:Repeater Alarm/IDM Link Error Informational Not all channels active in WAM. The WAM did not get all the channels needed to fully service the wide area call, usually because not enough were available. It indicates that one or more of the participants did not participate. A few if these messages are normal during busy periods, but hundreds per day may indicate a need for additional channels. Data 1 Value and Description: Indicates that task the WAM was in where the alarm was generated. They can be as follows: 3 - Rx Only; 4 - Rx of Other Tx; 5 - Tx Only; 8 - Duplex. Data 2 Value and Description: Indicates the site number of the site that was unable to bring up all needed channels. Note that this only displays the first site the WAM sees that did not bring up all channels. There may have been others. Major NIM:IDB lock up Major NIM:CSB lock up Major NIM:NIM Card Lock up Critical Out of Memory Minor Received Card Address out of range Informational Clock Status Major NIM:Clock Takeover Informational Unexpected DIM Ack Informational DIM Initialization Complete Informational Device Enabled Informational CIM Initialization Complete Informational STM Initialization Informational CCM Initialized Informational SNM Initialized Minor Device Not Defined at Initialization Informational CIM:Repeater Enabled Informational CIM:Repeater Disabled Informational UID Terminated Minor Unexpected UID Termination Informational UID Reassigned Minor Failed Terminate Set up Minor Failed Interrogate Setup Minor Selective Unit Disable Time-out A-3 Revised August 2001 Part No. 002-3139-078 ALARM LIST Table A-1 All Alarms (Listed By Number) (Continued) Alarm No. 120 121 122 123 124 125 126 127 128 129 130 131 132 133 134 135 136 137 138 139 140 141 142 143 144 145 146 147 148 149 150 151 152 153 154 155 156 157 Severity Description Minor No Response Suspend Audio Order Minor Failed Dynamic Reassignment Setup Minor Dynamic Reassignment Response Time-out Minor NAK to Selective Unit Disable Order Minor Execute Selective Unit Disable Failure Minor Fail Execute of Dynamic Reassignment Minor Unexpected Dynamic Reassignment Informational System Boot Complete Minor Call Failure Prior to SUD Informational RNT Registration out to others failure Minor No Response for DIM to accept a UID call Minor No Response for SNM to accept a UID call Minor Exceeded number of tries to disconnect Unknown Pointer indicate idle and still on timed list Informational SNM Idle Time-out Error Informational TIM Initialization Minor No TIM Response to Trunk Request Informational TIM Idle Time-out Error Informational NAK to a TIM Outgoing Request Minor No TIM Response to Call Destination Order Minor No DIM Response to Call Destination Order Minor No SNM Response to Call Destination Order Minor NACK Execute of Dynamic Reassignment by Mobile Informational Failure to complete enable of card Unknown Reserved Unknown Reserved Unknown Reserved Unknown Reserved Unknown Reserved Unknown Reserved Unknown Reserved Informational DCM Initialization Minor SUD Kill Not Allowed by Radio Unknown Reserved Unknown Reserved Informational VDM Initialization Informational Group Patch Initialization Minor GPM Configure Setup Failure A-4 Revised August 2001 Part No. 002-3139-078 ALARM LIST Table A-1 All Alarms (Listed By Number) (Continued) Alarm No. Severity Description 158 159 160 161 162 163 164 165 Minor GPM Tear Down Failure Minor No Queue setup completion message Informational IDM Initialization Informational LEM Initialization Minor Dynamic Freq. No CIM Response Minor IDM fail to ack patch setup Minor GPM fail to ack patch add order Minor GPM fail to ack reconfiguration order 240 256 257 258 259 260 261 262 263 264 265 266 267 268 Unknown Keith Barnes Personal TIM debug message (call for details) Informational Selection Complete Informational No channels available for interrogate Informational Interrogate succeeded Informational Interrogate failed Minor Selective Unit Disable setup failed Informational User Kill completed Major Network time-out Minor User suspend audio failed Minor WAM abort failed Major Card failed Minor EM activate failed Minor No available channels Informational No available WAMs. At the instant the Call Processor needed a WAM to configure a wide area call, all were busy or were in the 10-second dwell time after a call. A few of these messages a day is considered normal, but hundreds may indicate a need for additional WAMs. Informational Net WAM nak. The Call Processor receives a NACK when a wide area call configuration order is sent to a WAM and fails. This could occur if the WAM went busy with another call at the same time this order was sent. The CP then reattempts on a different WAM. As with alarm 268, hundreds of these alarms a day may indicate a need for additional WAMs. Informational Channel was busy Informational “Kill user failed, no available channels” Minor TIM request failed Minor EM enable failed Informational Emergency plan aborted Informational NIM:CSB OK Critical NIM:CSB failed CALL PROCESSOR ALARMS 269 270 271 272 273 274 275 276 A-5 Revised August 2001 Part No. 002-3139-078 ALARM LIST Table A-1 All Alarms (Listed By Number) (Continued) Alarm No. 277 278 Severity Description Informational VDM memory log. The VDM receives a memory message from an RVM as a result of it initially sending a memory order to it. The memory order includes the memory location and the type of memory being read from the card. The order sent from the VDM to the RVM is itself the result of a VDM order sent to the VDM from the CP. The memory order from the CP is itself originated from a user requesting the memory read from the VDM card property of the SSM. The result is a VDM Memory Message being sent to the CP from the VDM containing the contents of the memory message it received from the RVM. The CP then generates the informational VDM Memory Log alarm (277) and logs it to the alarm log with the following data fields set as follows: Data 1 Value and Description: Range of the value is 1 to 65535. This 16-bit number represents the RVM number and the channel number that had its memory read. The RVM number is located in the top 8 bits of the field value and the channel number is in the lower 8 bits of the field. The RVM number ranges from 0 to 7 with 0 being the cRVM and 1 to 7 being the possible slave RVMs. Example, if memory read occurred on the cRVM of channel one the 16-bit binary representation would be 0000000000000001 or 1 in decimal. If the memory read occurred on slave RVM number 1 of channel 2, the binary representation would be 0000000100000010 or 258 in decimal (12h in hex). Data 2 Value and Description: Range of the value is 1 to 65535. This 16-bit number represents the memory location (in decimal) read from the respective RVM. Data 3 Value and Description: Range of the value is 1 to 65535. This 16-bit number represents the value returned by the RVM as a result of reading the location displayed in Data2. The lower 8 bits of this 16-bit number is the value returned for the actual memory location displayed in Data2. The upper 8 bits are from the location directly above the memory location displayed in Data 2. In other words, every memory read returns the contents of two locations. The one requested and the one above it. Informational RVM message log. The cRVM sets a bit in its RVM error bit map when it does not get a response back from a slave RVM. The bitmap is seven bits long with the least significant bit representing RVM 1 and the most significant bit representing RVM 7. Example: If the cRVM lost contact with RVM 3, the RVM error bit map would be set to 0000100 (or decimal 4). If it lost contact with RVMs one, two, and six it would set it to 0100011 (decimal 35). This bit map is supplied in every RVM status message to the VDM. If the VDM detects a change to the bit map for the given RVM, it writes an “RVM Message” to the CP via the IDB informing the CP of the new bit map state. The CP will write this out as an informational alarm (278) with the data fields set as described below. See also alarm 37. Data 1 Value and Description: Range of the value is 1 to 30. This is the repeater number of the cRVM that originated the data to the VDM. Data 2 Value and Description: Range of the value is 0 to 128. This is the 7-bit bitmap representing the failed RVMs the cRVM is reporting on. If this value is 0, then all previously reported RVM failures have cleared. Data 3 Value and Description: Range of the value is 1 to 128. This is the 7-bit bitmap representing the RVMs that are expected to be present and communicating with the cRVM. The source of this setting is a dip switch setting on the cRVM. A-6 Revised August 2001 Part No. 002-3139-078 ALARM LIST Table A-1 All Alarms (Listed By Number) (Continued) Alarm No. 279 280 281 282 283 284 285 286 287 288 289 Severity Description Informational CDM message log. RVMs send their status to the VDM when polled. Included in this status is the status of the CDM bus (bus that transfers RSSI information to the RVM). If an RVM detects a bad CDM bus on one or more of its sites, it sets that site’s respective number in a 4-bit bitmap. Example: If the RVM lost the CDM bus on the third site, the CDM Error bit map would be set to 0100 (or decimal 4). If it lost sites one and two it would set it to 0011 (decimal 3). This bit map is supplied in every RVM status message to the VDM. If the VDM detects a change to the bit map for the given RVM, it writes a “CDM Message” to the CP via the IDB informing the CP of the new bit map state. The CP then writes this out as an informational alarm (279) with the data fields set as described follows: Data 1 Value and Description: Range of the value is 1 to 65535. This 16-bit number represents the RVM number and the channel number. The RVM number is located in the top 8 bits of the field value and the channel number is in the lower 8 bits of the field. The RVM number itself ranges from 0 to 7 with 0 being the cRVM and 1 to 7 being the possible slave RVMs. Example: If the CDM error occurred on the cRVM of channel one the 16-bit binary representation would be 0000000000000001 or 1 in decimal. If the error occurred on slave RVM number 1 of channel 2, the binary representation would be 0000000100000010 or 258 in decimal (102h in hex). Data 2 Value and Description: Range of the value is 0 to 15. This is the CDM error bit map value. If the value is 0, then the last change to the bit map resulted in any previous CDM errors being cleared. A number from 1 to 15 binaurally describes which of the 4 CDM busses for that given RVM is in an error state. Example: If sites one and three are in an error state, the bit map would be 0101 or 5 in decimal. Informational RDM message log. RVMs send their status to the VDM when polled. Included in this status is the status of the RDM bus (bus that transfers RSSI information to the RVM). If an RVM detects a bad RDM bus on one or more of its sites, it sets that site's respective number in a 4-bit bitmap. Example: If the RVM lost the RDM bus on the third site, the RDM Error bit map would be set to 0100 (or decimal 4). If it lost sites one and two it would set it to 0011 (decimal 3). This bit map is supplied in every RVM status message to the VDM. If the VDM detects a change to the bit map for the given RVM, it writes a “RDM Message” to the CP via the IDB informing the CP of the new bit map state. The CP writes this out as an informational alarm (279) with the data fields set as follows: Data 1 Value and Description: Range of the value is 1 to 65535. This 16-bit number represents the RVM number and the channel number. The RVM number is located in the top 8 bits of the field value and the channel number is in the lower 8 bits of the field. The RVM number itself ranges from 0 to 7 with 0 being the cRVM and 1 to 7 being the possible slave RVMs. Example: If the RDM error occurred on the cRVM of channel one, the 16-bit binary representation would be 0000000000000001 or 1 in decimal. If the error occurred on slave RVM number 1 of channel 2, the binary representation would be 0000000100000010 or 258 in decimal (12h in hex). Data 2 Value and Description: Range of the value is 0 to 15. This is the RDM error bit map value. If the value is 0, then the last change to the bit map resulted in any and all previous RDM errors being cleared. A number from 1 to 15 binaurally describes which of the 4 RDM busses for that given RVM is in an error state. Example: If sites one and three are in an error state, the bit map would be 0101 or 5 in decimal. Minor TIM:Bad TIM type Minor Dispatch card initialize failed Informational Card restart log entry Minor Bad card address detected Informational Memory log error Informational Log standby Informational Card initialized Minor Card Initialize failure Minor Card restart failure A-7 Revised August 2001 Part No. 002-3139-078 ALARM LIST Table A-1 All Alarms (Listed By Number) (Continued) Alarm No. 290 291 292 293 294 295 296 297 298 299 300 301 302 303 304 305 306 307 308 309 310 311 312 313 314 315 316 317 318 319 320 321 322 323 324 325 326 327 328 329 330 331 Severity Description Informational Bad opcode detected. The Call Processor received a IDB message addressed to it with an opcode it does not handle. This could be caused by improper programming of a CIM or other card. Minor UID not in database Minor Group or home not in database Informational CIM Initialized Critical NIM:IDB Tx Bus Failure Critical NIM:IDB General Bus Failure Informational Emergency plan execution started Informational Emergency plan completed Minor Sleep call setup failed Minor Sleep call failed Minor Sleep call timed out waiting for a response Minor Sleep execute failed Minor “Sleep call failed, no available channels” Informational Sleep Completed successfully Informational Group Alpha Tag completed successfully Minor Group Alpha Tag Failed Minor “Group Alpha Tag failed, no available channels” Minor “Group Alpha Tag Failed, no response from CIM” Informational Wide Area Call aborted due to glare on specified port number Informational Alpha Numeric Message sent successfully Informational Alpha Numeric Message failed. Minor “Alpha Numeric Message failed, No available channels” Minor “Alpha Numeric Message failed, no response received.” Minor ESN by UID call failed Minor “ESN by UID call failed, No available channels” Minor “ESN by UID call failed, No response from subscriber unit” Informational ESN successfully retrieved from UID Minor UID by ESN call failed Minor “UID by ESN call failed, No available channels” Minor “UID by ESN call failed, No response from subscriber unit” Informational UID successfully retrieved from ESN Informational ESN Authentication Done Informational ESN Authentication Started Minor WAM Configuration Failed Unknown RPTR:SMC Unknown RPTR:VNC Unknown RPTR:AC Fail Unknown RPTR:IAC 1 Unknown RPTR:IAC 2 Unknown RPTR:IAC 3 Unknown RPTR:IAC 4 Unknown RPTR:MAC A-8 Revised August 2001 Part No. 002-3139-078 ALARM LIST Table A-1 All Alarms (Listed By Number) (Continued) Alarm No. 332 333 334 335 336 337 338 339 340 341 342 343 344 345 346 347 348 349 350 351 352 353 354 355 356 357 358 359 360 361 362 363 400 401 402 100000 Severity Description Unknown RPTR:HSDB Unknown RPTR:IRDB Unknown RPTR:CIM Unknown RPTR:TIC Unknown RPTR:Battery Fail Unknown RPTR:PS Thermal Unknown RPTR:FAN 1 Unknown RPTR:FAN 2 Unknown RPTR:GPS 1PPS Unknown RPTR:IAC Mismatch Unknown RPTR:SMC Link Unknown RPTR:No A/D Unknown RPTR:GPS 10 MHZ Unknown RPTR:Setup Unknown RPTR:RF Shutdown Unknown RPTR:RF Half Power Unknown RPTR:RF Thermal Unknown RPTR:RF 1 & 2 Unknown RPTR:RF 3 & 4 Unknown RPTR:RF VSWR Unknown RPTR:Tx Synth Lock Unknown RPTR:Rx Synth Lock Unknown RPTR:HSS Rx Lock Unknown RPTR:HSS Tx Lock Unknown RPTR:RF 1/4 Power Unknown RPTR:Disabled Unknown RPTR:Test Mode Informational Alpha Group Page failed - No channels available Informational Alpha Group Page failed - No response from unit Informational Alpha group Page Completed Successfully Informational Alpha Group Page failed Informational TIM went idle unexpectedly Informational CIM:Repeater Link Established Informational NIM:IDB OK Unknown RPTR: Undefined Forwarded Repeater Alarm Minor Bogus Alarm A-9 Revised August 2001 Part No. 002-3139-078 CALL SEQUENCES APPENDIX B CALL SEQUENCES B.1 GROUP CALL B.2 WIDE AREA GROUP CALL B.1.1 MOBILE-TO-MOBILE ON SAME LOCALITY B.2.1 MOBILE TO GROUP OF MOBILES ON MULTIPLE LOCALITIES Use two mobiles with the same Home and list of Group IDs. Select the same Group on the mobiles. 1. Press the PTT on Mobile-1. Use a mobile with a Home/Group that exists in a Wide Area Call Configuration on the Call Processor. The Wide Area Call Configuration can contain entries for multiple Localities, Homes and Groups. • 1. Press the PTT on Mobile-1. • • The CIM associated with the active repeater changes from Idle Task “2” to Receive Task “4”. Mobile-2 receives the voice communication from Mobile-1. No DIMs receive voice communication. • • 2. Release the PTT on Mobile-1. • • • The active CIM returns to the Idle Task “2”. Mobile-2 returns to Idle and is silent. • The CIM associated with the active repeater changes from Idle Task “2" to Receive Task “4”. The WAM card picks up the call from the Channel Status Bus and acquires channel resources based on the Wide Area Call Configuration. The acquired CIM cards change from Idle Task “2” to Transmit Task “3”. The other mobiles receive the audio for Mobile-1. 3. Repeat these steps using Mobile-2 as PTT Mobile. 2. Release the PTT on Mobile-1. B.1.2 MOBILE-TO-MOBILE WITH DIM MONITORING • • Use two mobiles with the same Home and list of Group IDs. On the Dispatch Console (DC) select a DIM and mobiles with a group that is common to both. • 3. Repeat these steps from any Mobile in the Wide Area Call Configuration. 1. Press the PTT on Mobile-1. • • • • The active CIM in Receive Task “4” returns to Idle Task “2”. The associated WAM returns to Idle Task and releases the acquired channels. The acquired CIMs return from Transmit Task to Idle Task. The CIM associated with the active repeater changes from Idle Task “2” to Receive Task “4”. The associated DIM changes from Idle Task “2” to Receive Task “4”. The DIM receives the voice communication. Mobile-2 receives the voice communication from Mobile-1. B.3 DISPATCH CONSOLE (DC) TO MOBILE GROUP CALL Use two mobiles with the same Home and list of Group IDs. Select the DIM with this Group ID. 2. Release the PTT on Mobile-1. 1. Press the PTT function on the DC. • • • The CIM returns to Idle Task “2”. Mobile-2 returns to Idle and is silent. The DIM returns to Idle Task “2” and no voice communication is heard at the DC. • • • 3. Repeat these steps using Mobile-2 as PTT Mobile. B-1 The associated DIM changes from the Idle Task “2” to the Transmit Task “3”. The Associated CIM is selected and changes from the Idle Task “2” to Transmit Task “3”. The mobiles receive the voice communication. Revised August 2001 Part No. 002-3139-078 CALL SEQUENCES When the Hang Time has expired the associated CIM returns to Idle Task “2”. 2. Release the PTT on the DC. • • The associated DIM returns to Idle Task “2”. The associated CIM returns to Idle Task “2”. • B.5 MOBILE TO UNIQUE ID If the associated DIM has Hang Time defined, the associated CIM enters Hang Task “7” for the defined time. Use two mobiles defined to different Home and Group ID. When the Hang Time has expired the associated CIM returns to Idle Task “2”. • The mobiles return to idle and are silent. NOTE: Some of these tasks change rapidly. 1. Mobile-1, the originating mobile, selects the Auxiliary Call group code. The mobiles return to idle and stop receiving. 2. Press the PTT of Mobile-1 to access the system. B.4 MOBILE GROUP CALL TO DISPATCH CONSOLE • Use two mobiles with the same Home and list of Group IDs. On the Dispatch Console (DC) select a DIM and mobiles with a group that is common to both. 3. Release the PTT of Mobile-1. • 1. Press the PTT on Mobile-1. • • • • Originating CIM (O-CIM), changes from Idle Task “2” to Dial Tone Task “C”. Mobile-1 hears “Dial Tone” from O-CIM. 4. Press the PTT of Mobile-1. The CIM associated with the active repeater changes from Idle Task “2” to Receive Task “4”. The associated DIM changes from Idle Task “2” to Receive Task “4”. The DIM receives the voice communication. Mobile-2 receives the voice communication. 5. When Mobile-1's transmit light is lit, enter 4-digits of DTMF for the Unique ID of Mobile-2 (terminating mobile). 6. Release the PTT of Mobile-1. 2. On the DC press the PTT of the DIM. • • • • The associated DIM changes to Transmit Task “3”. The associated DIM changes to Duplex Task “6”. Mobile-2 receives voice communication from both the DC and Mobile-1. • • • 3. Release the PTT of Mobile-1. • • • • The associated CIM changes to Transmit Task “3”. Both mobiles now receive the DIM voice communication. • • • If the associated DIM has Hang Time defined, the associated CIM enters Hang Task “7” for the defined time. • B-2 Mobile-1 hears the “Confirmation Tone” from the O-CIM confirming the acceptance of the digits. O-CIM changes to the Ringing Task “D”. Mobile-1 hears “Ringing Tone” from the O-CIM. Originating SNM (O-SNM) changes from Idle Task “2” to SNM Outgoing Task “8”. Destination SNM (D-SNM) changes from Idle Task “2” to incoming Seize Task “3”. D-SNM changes from Incoming Seize Task “3” to SNM Incoming Task “4”. D-SNM changes to Incoming Channel Task “5”. O-SNM changes to Outgoing Channel Task “9”. Destination CIM (D-CIM) changes from Idle Task “2” to Transmit Task “3”. Mobile-2 hears “Ringing Tone”. Revised August 2001 Part No. 002-3139-078 CALL SEQUENCES 7. Press the PTT on Mobile-2. 3. Release the PTT of Mobile-1. • • • • D-CIM changes to Duplex Task “6”. O-CIM changes to Transmit Task “3”. Mobile-1 hears the voice of Mobile-2. 4. Press the PTT of Mobile-1. 5. When Mobile-1's transmit light is lit, Enter 7DTMF digits, 3 for Locality outside the Switch and 4 for the Unique ID of Mobile-2 (terminating mobile). 8. Release the PTT on Mobile-2. • • Mobile-1 hears “Dial Tone” from O-CIM. D-CIM changes to Transmit Task “3”. Mobile-1 is silent. 9. Press the PTT on Mobile-1. 6. Release the PTT of Mobile-1. • • • O-CIM changes to Duplex Task “6”. Mobile-2 hears the voice of Mobile-1. • • • 10.Release the PTT on Mobile-1. • • O-CIM changes to transmit Task “3”. Mobile-2 is silent. • 11. Press the PTT on Mobile-1. • 12.Press DTMF “#” key for longer than 1 second. • • • • • • • • • • • • O-CIM changes to the End Call Task “E”. Mobile-1 hears the “End Call Tone”. O-CIM changes to Idle Task “2”. O-SNM changes to the Idle Task “2”. D-SNM changes to the End Call Task “C”. D-CIM changes to the End Call Task “E”. Mobile-2 hears the “End Call Tone”. D-CIM changes to the Idle Task “2”. D-SNM changes to the Idle Task “2”. • Mobile-1 hears the “Confirmation Tone” from the O-CIM confirming the acceptance of the digits. O-CIM changes to the Ringing Task “D”. Mobile-1 hears “Ringing Tone” from the O-CIM. Originating SNM (O-SNM) changes from Idle Task “2” to SNM Outgoing Task “8”. Destination SNM (D-SNM) changes from Idle Task “2” to incoming Seize Task “3”. D-SNM changes from Incoming Seize Task “3” to SNM Incoming Task “4”. D-SNM changes to Incoming Channel Task “5”. O-SNM changes to Outgoing Channel Task “9”. Destination CIM (D-CIM) changes from Idle Task “2” to Transmit Task “3”. Mobile-2 hears “Ringing Tone”. 7. Press the PTT on Mobile-2. • • • D-CIM changes to Duplex Task “6”. O-CIM changes to Transmit Task “3”. Mobile-1 hears the voice of Mobile-2. B.6 MOBILE TO UNIQUE ID FOR A MOBILE OUTSIDE SWITCH 8. Release the PTT on Mobile-2. Use two mobiles defined to different Home and Group ID. • • NOTE: Some of these tasks change rapidly. 9. Press the PTT on Mobile-1. 1. Mobile-1, the originating mobile, selects the Auxiliary Call group code. • • 2. Press the PTT of Mobile-1 to access the system. 10.Release the PTT on Mobile-1. • • • The originating CIM (O-CIM), changes from Idle Task “2” to Dial Tone Task “C”. B-3 D-CIM changes to Transmit Task “3”. Mobile-1 is silent. O-CIM changes to Duplex Task “6”. Mobile-2 hears the voice of Mobile-1. O-CIM changes to transmit Task “3”. Mobile-2 is silent. Revised August 2001 Part No. 002-3139-078 CALL SEQUENCES 6. Release the PTT of Mobile-1 to indicate completion of dialing. 11. Press the PTT on Mobile-1. 12.Press DTMF “#” key for longer than 1 second. • • • • • • • • • • • O-CIM changes to the End Call Task “E”. Mobile-1 hears the “End Call Tone”. O-CIM changes to Idle Task “2”. O-SNM changes to the Idle Task “2”. D-SNM changes to the End Call Task “C”. D-CIM changes to the End Call Task “E”. Mobile-2 hears the “End Call Tone”. D-CIM changes to the Idle Task “2”. D-SNM changes to the Idle Task “2”. • • • • • • • B.7 MOBILE TO DIRECTED GROUP CALL (DTMF ENTRY WITHIN SWITCH) 7. Press the PTT on Mobile-1. • • • Use two mobiles defined to different Home and Group ID. NOTE: Some of these tasks change rapidly. 1. Mobile-1, the originating mobile, selects the Auxiliary Call group code. O-CIM changes to Receive Task “4”. D-CIM changes to Transmit Task “3”. Mobile-2, destination mobile, hears Mobile-1 voice communication. 8. Release the PTT on Mobile-1. • • • 2. Press the PTT of Mobile-1 to access the system. • O-CIM hears the “Confirmation Tone”. Originating SNM (O-SNM) changes to SNM Outgoing Task “8”. Destination SNM (D-SNM) changes to Incoming Seize Task “3”. D-SNM changes to Incoming Task “4”. Destination CIM (D-CIM) changes to Transmit Task “3”. D-SNM changes to Incoming Channel Task “5”. O-SNM changes to Outgoing Channel Task “9”. O-CIM changes to Ringing Task “D”. Mobile-1 hears the “Call Proceed Tone”. O-CIM changes to Hang Task “7”. D-CIM changes to Hang Task “7”. Mobile-2 is silent. The originating CIM (O-CIM), changes from Idle Task “2” to Dial Tone Task “C”. 9. Press the PTT on Mobile-2. • • • 3. Release the PTT of Mobile-1. • Mobile-1 hears “Dial Tone” from O-CIM. D-CIM changes to Receive Task “4”. O-CIM changes to Transmit Task “3”. Mobile-1 hears the voice of Mobile-2. 4. Press the PTT of Mobile-1. 10.Release the PTT on Mobile-2. 5. When Mobile-1's transmit light is lit, enter DTMF digits: • • • • 11. Press the PTT on Mobile-1. • Enter 5-DTMF digits, 2 for Home channel and 3 for the Group ID desired. Enter 8-DTMF digits, 3 for different Localities within Switch, 2 for Home channels and 3 for Group IDs desired. • • • B-4 D-CIM changes to Hang Task “7”. O-CIM changes to Hang Task “7”. Mobile-1 is silent. O-CIM changes to Receive Task “4”. D-CIM changes to Transmit Task “3”. Mobile-2 hears the voice of Mobile-1. Revised August 2001 Part No. 002-3139-078 CALL SEQUENCES 12.Press DTMF “#” key for longer than 1 second. • • • • • • • • • • O-CIM changes to the End Call Task “E”. Mobile-1 hears the “End Call Tone”. O-CIM changes to Idle Task “2”. Both SNMs change to the End Call Task “C”. D-CIM changes to the End Call Task “E”. Mobile-2 hears the “End Call Tone”. D-CIM and both SNMs change to the Idle Task “2”. • • • • Destination SNM (D-SNM) changes to Incoming Seize Task “3”. D-SNM changes to Incoming Task “4”. Destination CIM (D-CIM) changes to Transmit Task “3”. D-SNM changes to Incoming Channel Task “5”. O-SNM changes to Outgoing Channel Task “9”. O-CIM changes to Ringing Task “D”. Mobile-1 hears the “Call Proceed Tone”. 7. Press the PTT on Mobile-1. B.8 MOBILE TO DIRECTED GROUP CALL (DTMF ENTRY OUTSIDE THE SWITCH) • • • Use two mobiles defined to different Home and Group ID. O-CIM changes to Receive Task “4”. D-CIM changes to Transmit Task “3”. Mobile-2, destination mobile, hears Mobile-1 voice communication. NOTE: Some of these tasks change rapidly. 8. Release the PTT on Mobile-1. 1. Mobile-1, the originating mobile, selects the Auxiliary Call group code. • • • O-CIM changes to Hang Task “7”. D-CIM changes to Hang Task “7”. Mobile-2 is silent. 2. Press the PTT of Mobile-1 to access the system. 9. Press the PTT on Mobile-2. • Originating CIM (O-CIM), changes from Idle Task “2” to Dial Tone Task “C”. 3. Release the PTT of Mobile-1. • • • • 10.Release the PTT on Mobile-2. Mobile-1 hears “Dial Tone” from the O-CIM. • • • 4. Press the PTT of Mobile-1. 5. When Mobile-1's transmit light is lit, enter DTMF digits: • • D-CIM changes to Hang Task “7”. O-CIM changes to Hand Task “7”. Mobile-1 is silent. 11. Press the PTT on Mobile-1. • • • Enter 5-DTMF digits, 2 for Home channel and 3 for the Group ID desired. Enter 8-DTMF digits, 3 for different Localities within Switch, 2 for Home channel and 3 for Group ID desired. O-CIM changes to Receive Task “4”. D-CIM changes to Transmit Task “3”. Mobile-2 hears the voice of Mobile-1. 12.Press DTMF “#” key for longer than 1 second. • • • • • • • 6. Release the PTT of Mobile-1 to indicate completion of dialing. • • D-CIM changes to Receive Task “4”. O-CIM changes to Transmit Task “3”. Mobile-1 hears the voice of Mobile-2. O-CIM hears the “Confirmation Tone”. Originating SNM (O-SNM) changes to SNM Outgoing Task “8”. B-5 O-CIM changes to End Call Task “E”. Mobile-1 hears the “End Call Tone”. O-CIM changes to Idle Task “2”. Both SNMs change to End Call Task “C”. D-CIM changes to End Call Task “E”. Mobile-2 hears “End Call Tone”. D-CIM and both SNMs change to Idle Task “2”. Revised August 2001 Part No. 002-3139-078 CALL SEQUENCES B.9 MOBILE ORIGINATED TELEPHONE CALL 10.Press the DTMF “#” key for longer than 1 second and release the PTT. 1. Mobile selects the Telephone Call group code. • • • • • • • 2. Press the mobile’s PTT to access the system. • The associated CIM changes from Idle Task “2” to Dial Tone Task “C”. 3. Release the PTT of the mobile. • CIM changes to End Call Task “E”. Mobile hears the “End Call Tone”. CIM changes to Idle Task “2”. Mobile returns to idle and is silent. TIM changes to End Call Task “C”. TIM disconnects the telephone line. TIM changes to Idle Task “2”. B.10 LANDSIDE (TIM) ORIGINATE TO MOBILE WITHIN SWITCH USING A DID LINE Mobile hears “Dial Tone” from the CIM. 4. Press the PTT of the mobile. 1. Dial the desired number for a mobile within the Switch. 5. When the transmit light of the mobile is lit, enter DTMF digits. • • • When the SMM is set for normal dialing translation, enter the required digits to exercise the dialing translation function. When the SMM is set for PBX operation, enter the complete set of digits, no wait for second dial tone after the access digits. • • • The associated TIM changes from Idle Task “2” to Incoming Seize Task “3”. CIM changes from Idle Task “2” to Transmit Task “3”. TIM changes to Incoming Channel Conversation Task “5”. Landside party and mobile hear “Ringing Tone”. 2. Press the PTT on the mobile. 6. Release the PTT of the mobile. • • • • • • • • CIM hears the “Confirmation Tone”. TIM changes from Idle Task “2” to TIM Outgoing Task “8”. When digit dialing is complete, the TIM changes to Channel Conversation Task “9”. CIM changes to Ringing Task “D”. Mobile hears landside progress tones, ringing, busy or called party answer. 3. Release the PTT on the mobile. • • • 7. Press the PTT on the mobile. • • “Ringing Tone” is turned off. CIM changes to Duplex Task “6”. Landside party hears the mobile voice. Landside party hears silence. CIM changes to Transmit Task “3”. Mobile hears the landside party. 4. The mobile disconnects by pressing the PTT and DTMF “#” key for 1 second. CIM changes to Duplex Task “6”. Called party hears the mobile voice. 5. The landside party disconnects by pressing the DTMF “#” key for 1 second. 8. Release the PTT on the mobile. • • • • • • • • • • CIM changes to Transmit Task “3”. Mobile hears the called party. Called party does not hear the mobile. 9. Press the PTT on the mobile. • • CIM changes to Duplex Task “6”. Called party hears the mobile voice. • B-6 CIM changes to the End Call Task “E”. Mobile hears the “End Call Tone”. CIM changes to the Idle Task “2”. Mobile is silent. TIM changes to end Call Task “C”. Landside party hears “End Call Tone”. TIM disconnects the telephone line when landside disconnects. TIM changes to Idle Task “2”. Revised August 2001 Part No. 002-3139-078 CALL SEQUENCES B.11 LANDSIDE (TIM) ORIGINATE TO MOBILE WITHIN SWITCH USING A 2WY LINE B.12 TIM ORIGINATE TO MOBILE OUTSIDE SWITCH USING A DID LINE 1. Dial the desired number for the 2WY line. NOTE: Some of these tasks change rapidly. • 1. Dial the number for a mobile within the Switch. • The associated TIM changes from Idle Task “2” to Incoming Seize Task “3”. Landside party hears the proceed tone. • • • 2. The landside party enters the 4-DTMF digits of the Unique ID of the mobile. • • • • • CIM changes from Idle Task “2” to Transmit Task “3”. TIM changes to Incoming Channel Conversation Task “5”. Landside party and the mobile hear “Ringing Tone”. • • • • 3. Press the PTT on the mobile. • • • • • “Ringing Tone” is turned off. CIM changes to Duplex Task “6”. Landside party hears the mobile voice. The associated TIM changes from Idle Task “2” to Incoming Seize Task “3”. TIM changes to TIM incoming Task “4”. Originating SNM (O-SNM) changes from Idle Task “2” to Incoming Seize Task “3”. O-SNM changes to SNM Outgoing Task “8”. Destination SNM (D-SNM) changes from Idle Task “2” to Incoming Seize Task “3”. D-SNM changes to SNM Incoming Task “4”. Destination CIM (D-CIM) changes from Idle Task “2” to Transmit Task “3”. D-SNM changes to Incoming Channel Task “5”. O-SNM changes to TIM Outgoing Conversation Task “E”. TIM changes to SNM Incoming Conversation Task “D”. Landside party and mobile hear “Ringing Tone”. 2. Press the PTT on the mobile. 4. Release the PTT on the mobile. • • • • • • 3. Release the PTT on the mobile. Landside party hears silence. CIM changes to Transmit Task “3”. Mobile hears the landside party. • • • 5. Press mobile's PTT and DTMF “#” key for 1 second or landside party presses the DTMF “#” key for 1 second. • • • • • • • “Ringing Tone” is turned off. CIM changes to Duplex Task “6”. Landside party hears the mobile voice. Landside party hears silence. CIM changes to Transmit Task “3”. Mobile hears the landside party. 4. Mobile disconnects by pressing the PTT and DTMF “#” key for 1 second. CIM changes to the End Call Task “E”. Mobile hears the “End Call Tone”. CIM changes to the Idle Task “2”. Mobile is silent. TIM changes to end Call Task “C”. TIM disconnects the telephone line. TIM changes to Idle Task “2”. 5. Landside party disconnects by pressing the DTMF “#” key for 1 second. • • • • • • • • • • B-7 CIM changes to the End Call Task “E”. Mobile hears the “End Call Tone”. CIM changes to the Idle Task “2”. Mobile is silent. Both SNMs change to End Call Task “C”. TIM changes to end Call Task “C”. Landside party hears “End Call Tone”. TIM disconnects the telephone line. TIM changes to Idle Task “2”. Both SNMs change to Idle Task “2”. Revised August 2001 Part No. 002-3139-078 CALL SEQUENCES B.13 LANDSIDE ORIGINATE TO MOBILE OUTSIDE SWITCH USING A 2WY LINE 3. Press the PTT on the mobile. • • • NOTE: Some of these tasks change rapidly. “Ringing Tone” is turned off. The CIM changes to Duplex Task “6”. Landside party hears the mobile voice. 1. Dial the desired number for the 2WY line. 4. Release the PTT on the mobile. • • • The associated TIM changes from Idle Task “2” to Incoming Seize Task “3”. TIM changes to TIM Incoming Task “4”. Landside party hears a “Proceed Dialing Tone”. • • • 2. The landside party enters the 4-DTMF digits of the Unique ID of the mobile. • • • Landside party hears silence. CIM changes to Transmit Task “3”. Mobile hears the landside party. 5. The mobile presses the PTT and DTMF “#” key for 1 second or landside party presses the DTMF “#” key for 1 second. CIM changes from Idle Task “2” to Transmit Task “3”. TIM changes to Incoming Channel Conversation Task “5”. Landside party and the mobile hear “Ringing Tone”. • • • • • • • B-8 CIM changes to the End Call Task “E”. Mobile hears the “End Call Tone”. CIM changes to the Idle Task “2”. Mobile is silent. TIM changes to end Call Task “C”. TIM disconnects the telephone line. TIM changes to Idle Task “2”. Revised August 2001 Part No. 002-3139-078 CALL SEQUENCES SNM UNIQUE ID REQUEST IDLE SERVICE PARSER DIM REQUEST NO DIM DIM REQUEST SNM IDLE WAIT DIM RESPONSE NO RESPONSE CIM / SNM CONVERSATION DIM ACKNOWLEDGE FAILURE WAIT FOR SNM ACKNOWLEDGE TO CALL DESTINATION CIM IDLE DIM IDLE ACKNOWLEDGE SNM IDLE DIM / SNM CONVERSATION DIM IDLE SNM DISCONNECT SNM IDLE SNM IDLE DIM / SNM CONVERSATION SNM ACKNOWLEDGE DISCONNECT Figure B-1 SNM Unique ID Request Flowchart B-9 Revised August 2001 Part No. 002-3139-078 CALL SEQUENCES DIM UNIQUE ID CALL REQUEST CIM / DIM CONVERSATION CIM IDLE INTERNAL CIM IDLE SERVICE PARSER SNM REQUEST NO CARDS DIM IDLE SNM REQUEST SNM ACKNOWLEDGE SNM IDLE WAIT FOR ACKNOWLEDGE TO CALL DESTINATION ORDER DIM IDLE FAILURE DIM ACKNOWLEDGE SNM IDLE DIM / SNM CONVERSATION DIM IDLE SNM DISCONNECT SNM IDLE SNM IDLE WAIT FOR SNM IDLE SNM ACKNOWLEDGE DISCONNECT Figure B-2 DIM Unique ID Request Flowchart B-10 Revised August 2001 Part No. 002-3139-078 CALL SEQUENCES CIM DTMF AUXILIARY CALL IDLE SERVICE PARSER SNM REQUEST CIM ACKNOWLEDGE WAIT SNM ACKNOWLEDGE FAILURE CIM IDLE NO DIM DISCONNECT CIM CARD NO WAIT DIM RESPONSE SNM MODULE RESPONSE CIM / SNM CONVERSATION CIM IDLE SNM IDLE WAIT DIM RESPONSE DIM ACKNOWLEDGE CIM / DIM CONVERSATION SNM DISCONNECT CIM IDLE SNM ACKNOWLEDGE DISCONNECT SNM IDLE WAIT FOR SNM IDLE Figure B-3 CIM DTMF Auxiliary Call Flowchart B-11 Revised August 2001 Part No. 002-3139-078 CALL SEQUENCES TIM INCOMING IDLE SERVICE PARSER INTERNAL CIM DIM REQUEST TIM WAIT WAIT FOR FOR IDLE SNM IDLE WAIT FOR DIM RESPONSE DIM ACK NO RESPONSE TIM / DIM CONVERSATION SNM ACK ACK NO RESPONSE TIM IDLE IDLE IDLE SNM TIM DISCONNECT DISCONNECT NO SNM ACK TIM ACKNOWLEDGE SNM REQUEST TIM DISCONNECT TO CALL DESTINATION ORDER ACKNOWLEDGE TIM RESPONSE WAIT FOR TIM ACKNOWLEDGE TIM IDLE TIM / DIM NO RESPONSE DIM IDLE TIM ACK CONVERSATION SNM IDLE TIM / SNM CONVERSATION TIM IDLE Figure B-4 Telephone Incoming TIM Incoming Flowchart B-12 Revised August 2001 Part No. 002-3139-078 CALL SEQUENCES CIM TELEPHONE CALL REQUEST IDLE SERVICE PARSER TIM OUTGOING REQUEST WAIT FOR TIM ACKNOWLEDGE CIM ACKNOWLEDGE DISCONNECT CIM CARD FAILURE TIM ACK TIME-OUT WAIT FOR LANDSIDE ANSWER CIM IDLE TIM IDLE CIM / TIM CONVERSATION IDLE TIM DISCONNECT ACKNOWLEDGE IDLE TIM WAIT FOR IDLE Figure B-5 Telephone Calling CIM Telephone Call Request Flowchart B-13 Revised August 2001 Part No. 002-3139-078 CALL SEQUENCES USER INTERFACE REQUEST FOR DYNAMIC REASSIGNMENT BIT SET SETUP DYNAMIC REASSIGNMENT MODULE RESPONSE TIME-OUT DYNAMIC REASSIGNMENT BID CLEARED IDLE FAILURE REPORT EXECUTE REQUEST SUCCESS REPORT WAIT FOR EXECUTE Figure B-6 Dynamic Reassignment User Interface Request Flowchart USER INTERFACE REQUEST FOR SELECTIVE UNIT DISABLE SETUP OF SELECTIVE UNIT DISABLE ACKNOWLEDGE REQUEST FAILURE (LEAVE BIT SET) WAIT FOR SELECTIVE UNIT DISABLE EXECUTE COMPLETE (INDICATES RESULTS) IDLE Figure B-7 Selective Unit Disable User Interface Request Flowchart B-14 Revised August 2001 Part No. 002-3139-078 INDEX INDEX 3000 Series Switch 1-1 3rd Level WAM Routing 1-5 A Access Priority 1-3 Activity Log 4-5, 6-6 Activity Log screen 6-6 Activity Monitor 6-2, 6-6 Alarm Categories 6-3 Severity 6-3 Alarm #268 1-4 Alarm #46 1-3 Alarms Displaying Active 6-3 Displaying Archived 6-3 Repeater 6-3 Wide Area Calls 1-3 Answer Supervision 6-34 Auto-Registration 1-1 Auxiliary Calls 1-3 B Backbone 2-1 Break and Make, see Dial Pulse Bus 3-1 Control Bus 3-3 Data Bus 3-1 Voice Bus 3-3 Busy Queuing 1-1 C Call Log 6-6 CCM 6-25 Directed Calls 6-7 Queued Call Log 6-7 Reassignment Plan Activity Log 6-8 Registration Log 6-8 Telco Calls 6-6 Call Processor 4-1 Call Processor Properties 6-20 Call Routing 6-13 Call Usage Log 4-5 Call Usage Logging 4-5 Card Properties 6-25 CCM 6-25 CIM 6-26 DCM 6-28 DIM 6-29 Global 6-25 IDM 6-30 LEM 6-31 MAM 6-31 MCM 6-32 SNM 6-33 TIM 6-34 VDM 6-41 WAM 6-42 Carrier Sense Multiple Access 3-2 CCM, see Conventional Channel Module Channel Interface Bus 3-2 Channel Interface Module 2-1, 2-2, 6-26 Channel Status Bus 3-2, 4-1, 4-6 Channel Status screen 6-6 Channel Usage Graph 6-10 CIB, see Channel Interface Bus CIM, see Channel Interface Module Control Bus 3-3 CSB Idle/Collision line 3-3 IDB Idle/Collision line 3-3 Control Consoles 2-1 Conventional Channel Module 2-2, 6-25 Conventional Repeater Module 2-2 Conventional System 1-1 CP see Call Processor 1-1 CRM, see Conventional Repeater Module CSB See Channel Status Bus 3-2 CSB Usage 4-6 CSB, see Channel Status Bus CSMA, see Carrier Sense Multiple Access D Data Bus 3-1 CIB 3-2 CSB 3-2 DIB 3-2 DTP 3-2 Ethernet 3-1 IDB 3-2 NetCSB 3-2 NetIDB 3-2 PABX 3-3 PSTN 3-3 SNB 3-3 Database Backup 1-4 DCM, see Dispatch Channel Module Demo Mode 1-5 Device Address 1-2 Dial Pulse 6-35 Dialing Rules 6-10 DIB, see Dispatch Interface Bus Digit Patterns Screen 6-12 DIM, see Dispatch Interface Module Direct Inward Dialing 6-35 Directed Calls Log Screen 6-7 Directed Group Call B-4 Index-1 Disconnect Supervision 6-34 Dispatch Channel Module 2-2, 6-28 Dispatch Console Call B-1 Dispatch Interface Bus 3-2 Dispatch Interface Module 2-1, 2-2, 6-29 Dispatch Tone Protocol 3-2 DTMF, see Dual Tone Multi-Frequency DTP, see Dispatch Tone Protocol Dual Tone Multi-Frequency 6-35 Dynamic Reassignment 1-3, 4-4 E Emergency Messages 1-1 Emergency Traffic Activity Log 6-7 Emergency Traffic Activity Log screen 6-7 Enter New Key 5-3 Error Messages 4-5 Ethernet 3-1 F File Menu 5-3 G GPM, see Group Patch Module GROUP CALL B-1 Group Call 4-1, B-1 Group ID 1-2 Group Patch Module 2-2 Group Traffic Summary 6-10 H High-Speed Data Bus 1-2 Home Repeater Channel 1-2 I IDB, see Intra-terminal Data Bus IDM, see Intelligent Dispatch Module Intelligent Dispatch Module 6-30 Internal Errors 4-5 Interrogate 4-3 Intra-Terminal Data Bus 3-2, 4-1 L LapLink 1-3 Locality 1-2 Log Properties 6-20 Logging Encoder Module 6-31 LTR 1-1 M Master Clock 3-4, 6-35 Master Frame Synchronization 6-35 Master Sync 3-4 Revised August 2001 Part No. 002-3139-078 MCM see Multi-Net Console Module 2-1 MLM, see Multi-Net Logic Module Modules 2-2 CCM 2-2 CIM 2-2 CPM 2-2 DIM 2-2 IDM 2-2 LEM 2-2 MAM 2-2 MCM 2-2 NetNIM 2-2 PTM 2-2 SNM 2-2 TIM 2-2 VDM 2-2 VTM 2-2 WAM 2-2 Monitor Repeater Channel 1-2 Multi-Net Acquisition Module 6-31 Multi-Net Console Module 2-1, 6-32 Multi-Net Locality 2-1 Multi-Net Trunked System 1-1 N NetCSB see Network Channel Status Bus 3-2 NetIDB see Network Intra-Terminal Data Bus 3-2 NetNIM see Network Interface Module 1-2 Network Channel Status Bus 3-2 Network Interface Module 1-2, 2-2 Network Intra-Terminal Data Bus 3-2 NIM, see Network Interface Module North American Number Plan 6-16 O Optional Features 1-5 Options 3rd Level WAM Routing 1-5 Priority 1 Emergency 1-5 Repeater Alarms 1-5 Wide Area Calling 1-5 P Pattern list 6-15 PCM see Pulse Code Modulation 1-3 PCM, see Pulse Code Modulation Periodic Reboot 1-4 Printing Reports 6-9 Priority 1 Emergency 1-5 Priority Access 1-1 Pulse Code Modulated 3-3 Pulse Code Modulation 1-3 Q Queued Call Log 6-8 Queued Directed Call Log screen 6-8 Queued Telco Call Log screen 6-8 R Reassignment Plan 4-4 Reassignment Plan Activity Log Screen 6-8 Reboot 1-4 Registration Log 4-6, 6-9 Registration of Unique IDs 4-2 Remote Access Service 1-3 Repeater Alarms 6-3 Repeater Site 1-2 Resource Allocation 1-3 RF Equipment 2-1 RNT, see Radio Network Terminal Rule Group Screen 6-12 Rx PCM Bus 3-4 S Site Tracking Module 2-2 SMB, see System Management Bus SNB, see System Network Bus SNM, see System Network Module Special Calls 1-2 SSB, see System Status Bus SSM see System and Subscriber Manager 1-1 Standard Group Call 4-1 Status Monitor 4-6 Status Repeater 1-2 STM, see Site Tracking Module Switch 2-1, 2-2 Switch Configuration Manager 6-1 Switch Interfaces 3-1 Switch Module Programming 6-1 Switch Properties 6-20 System Administrator 1-4 System and Subscriber Manager 1-1 System and Subscriber Manager (SSM) 5-1 System Busy Statistics 6-10 System Configuration 4-1 System Management Bus 4-1 System Network Bus 3-3 System Network Module 2-2, 6-33 System Operator 1-4 System Status Bus 4-1 System Switch, see Radio Network Terminal System Traffic Listing 6-10 T Telco Call Screen 6-6 Telephone Call B-6 Telephone Interface Module 2-2, 6-34 Index-2 Telephone Line Styles 6-35 TIM, see Telephone Interconnect Module TIM, see Telephone Interface Module Total System Traffic 6-10 Trunk Group Screen 6-12 Trunked System 1-1 Tx PCM Bus 3-3 U UID see Unique ID 1-2 UID to Group Contributions 6-10 UID Traffic Summary 6-10 Unique ID 1-2 Unique ID Call B-2 Usage Accounting 4-1, 4-5 Usage Accounting Log Screen 6-9 User Messages 5-9, 5-17 V VDM, see Voter Diagnostics Module Voice Bus 3-3 Master Clock 3-4 Master Sync 3-4 Tx PCM Bus 3-3 VTM Bus 3-3 Voice Tone Module 2-2 Voter Diagnostic Module 6-41 Voter Diagnostics Module 2-2 VTM Bus 3-3 VTM, see Voice Tone Module W WAC see Wide Area Call 1-3 WAM see Wide Area Module 1-3 WAM Configuration Status screen 6-6 Wide Area Call 1-3, 4-1 Call Router 6-42 Card Address 6-42 Default Priority 5-13 Default Transmit UID 5-13 Hang Time 5-13 Maximum Inactive Time 5-13 Participant 5-13 Permanent 5-13 Port 6-42 Routing Group 5-13, 6-42 Temporary 5-13 Type 6-42 WAC Group Timeout 5-13 Wide Area Dispatch Call 1-3 Wide Area Group Call B-1 Wide Area Module 1-3, 6-42 Revised August 2001 Part No. 002-3139-078 Part Number 002-3139-078CD August 2001 Printed In U.S.A.