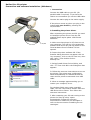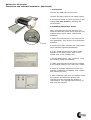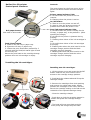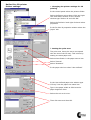
1
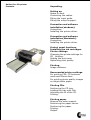
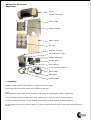
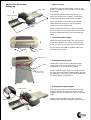
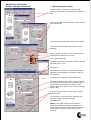
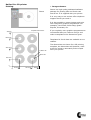
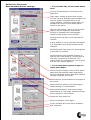
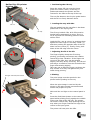
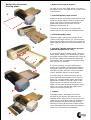
High resolution inkjet printer for CD and paper. DaVinci pro 6 photo User Guide Instructions for installing and using your new printer. DaVinci Pro CD printer. Contents. Unpacking. Setting up. Space to work. Connecting the cables. Fitting the input guide. Fitting the output support. Connection and software installation(windows). Connection. Installing the printer driver. Connection and software installation(Macintosh). Connection. Installing the printer driver. Control panel functions. Installing the ink cartridges. Printer settings. Changing the printer settings for CD printing. Setting the print area. Optimizing print quality. Printing. Image software. Recomended printer settings. For printing CDs, CD business cards and 80mm discs. For printing photo quality images on inkjet photo paper. Printing CDs. Positioning the CD tray. Loading the tray with Cds. Adjusting the fit of the CD. Printing. Printing paper. Remove the outer support. Positioning the paper carrier. Positioning the paper. Printing. Output. DaVinci Pro CD printer. Unpacking. Printer Printer cartridges Input guide Output support Paper carrier CD tray Packing checklist CD protection spray* Image software** Printer driver User manual 2 free Verbatim CDs*** Mains cable USB cable Parallel cable 1. Unpacking. Prepare a clean area of desk space to unpack the printer parts. Check that all of the parts shown are included in the box. Note. *CD protection spray may not be included, depending on shipping/air frieght regulations. **Free bundled image software may vary, depending on stock at time of order/shipping. ***Free sample discs may not be shipped, depending on stock at time of order/shipping. Do not discard the box but store it safely in case the printer should ever need to be returned for any reason. DaVinci Pro CD printer. Setting up. 1. Space to work. Input guide 1 Prepare an area of desk space to set up the printer. A space of 135cm wide x 62 cm deep is required. The desk should be stable and level, in a place free from dust, humidity, movement, vibrations and away from direct sunlight. Output support Place the printer in the centre of the desk space with the control end of the printer nearest the front of the desk. 135cm When using the printer you will be working from the side of the printer and not from the front as desktop printers are conventionally used. 2. Connecting the cables. Move the input guide aside. Do not connect the mains cable to the mains supply at this point, but plug it into the rear of the printer. 2 Parallel Plug in either the USB or parallel cable into the rear of the printer. Mains USB Locating holes 3. Fitting the input guide. Cables Locate the 2 pins on the underside of the input guide into the location holes on the metalwork on the rear of the printer. 3 Pins under input guide Ensure that the input guide is sitting level on the desk top and that the cables pass through the opening in the side of the input guide and are not trapped underneath it. 4. Fitting the output support. Location holes 4 Flex the two wings on the end of the output support enough to locate the 2 pins on the support into the 2 location holes in the printer body. Ensure that the support sits level on the desktop and nothing is trapped underneath it. Output support Pins DaVinci Pro CD printer. Connection and software installation .(Windows) 1. Connection. Connect the USB cable to your PC. (Or parallel cable if required). If you have the choice we recommend you use the USB cable. Connect the mains plug to the mains supply. If the printer comes on when you plug in the mains cable turn it OFF by pressing the on/off button. 2. Installing the printer driver. After connecting the printer and PC you need to install the printer driver from the CD marked ‘Epson stylus photo 1290 Printer Software’. On/Off A. Make sure that printer is off, then turn on your computer. Turn off any virus protection software and cancel any set-up wizard or the ‘New hardware found’ window if it has opened. B. Insert the printer software CD. If the Installer dialog box does not appear click on ‘my computer’, click on the CD rom icon, then click ‘open’. Then double-click on EPsetup.exe. C. Select Install Printer Driver/Utility, and click . Then click OK in the dialog box that appears. D. Follow the onscreen instructions to turn on the printer. The printer port configuration starts automatically for widows Me and 98 users and for printers connected via a USB cable. E. When a message appears asking you to restart your computer, do so. For windows 2000 users using a parallel cable, click the ‘stop search’ button when the USB device driver starts. Then follow the onscreen instructions. F. After restarting your PC and turning on the printer the ‘Set-up utility’ opens automatically. Follow the onscreen instructions to install the ink cartridges or refer to the next section ‘Installing the ink cartridges’. DaVinci Pro CD printer. Connection and software instalation .(Macintosh) 1. Connection. Connect the USB cable to your mac. Connect the mains plug to the mains supply. If the printer comes on when you plug in the mains cable turn it OFF by pressing the on/off button. 2. Installing the printer driver. After connecting the printer and mac you need to install the printer driver from the CD marked ‘Epson stylus photo 1290 Printer Software’. On/Off A. Make sure that printer is off, then turn on your Macintosh. Turn off any virus protection software. B. Insert the printer software CD. The printer driver software opens automatically. B. If the Install Printer Driver/Utility folder appears in the Epson folder, open it and double click on the installer icon. C. At the initial screen, click ‘continue’. Then the installer dialog box appears. D. Make sure that the correct drive is shown in the ‘Install location’ box, then click ‘install’. E. When a message appears to inform you that the installation is complete click ‘restart’ and restart your mac. F. After restarting your mac you need to open the chooser and select the printer icon ‘Sp1290’ and the port that the printer is connected to. Turn ‘background printing’ on and close the chooser. DaVinci Pro CD printer. Control panel functions. Controls. The control panel on the front corner of the printer has three buttons and two indicator lights. Printer status indicator light. A. On solid when the printer is on but inactive. B. Flashing when the printer is active. On/Off button A. Used to turn the printer on and off. B. Used to clear the printers memory if pressed twice while the printer is on. Feed/ink status indicator light. A. On solid when the printer is ready for the CD tray, or paper tray, to be pushed in. (After spooling the image). B. On solid if the printer is jammed during printing. C. Flashing when either of the ink cartridges is low. D. On solid when either of the ink cartridges are empty. E. Flashing slow when the print head is in the cartridge change position and the black cartridge requires changing. F. Flashing fast when the print head is in the cartridge change position and the colour cartridge requires changing. Roll paper button. Not used on this model. Feed/Clean button. A. Feeds in the CD tray or paper tray. B. Ejects the CD tray or paper tray. C. Cleans the print head when pressed for 3 seconds with the Feed/ink status light off and the CD tray out. Moves the print head to the cartridge change position when an ink cartridge is empty. Installing the ink cartridges . Installing new ink cartridges. 1. Lift the printer cover and press the On/Off button. Wait for the print head to move across to the cartridge change position. 1 2 2. Push back the release tabs and lift up the cartridge clamps. 3. Remove the cartridges from their packing and remove the yellow tape seals. Gently position the cartridges in the head, with the tab on the cartridge resting on the tab on the underside of the opened cartridge clamp. Ink change button 4. Close the cartridge clamps. 5. Push down to lock the cartridge clamps in position and press the cartridge change button. 6. The head will now move back and the printer pump will charge the print head. 3 4 5 DaVinci Pro CD printer. Printer settings. 1. Changing the printer settings for CD printing. In the control panel select the printers folder. Select the Epson stylus photo 1290 and right click and select rename. In the rename window type ‘DaVinci 6’ and click OK. Select the DaVinci 6 and right click and select properties In the Da Vinci 6 properties window select the ‘paper’ tab. 2. Setting the print area. The print area has to be set to correspond with the size of the CD tray. This is done by setting a custom paper size. Select sheet feeder in the paper source box. Select ‘Portrait’. Select ‘Standard’. In the paper size box select ‘User defined’. In the User defined paper size window type ‘CD tray’ into the paper size name box. Type in the paper width as 3200 and the paper height as 4200. Select the unit as 0.01cm. Then click save and then OK. DaVinci Pro CD printer. Printer settings continued. 3. Optimizing print quality. In the DaVinci 6 properties window ‘CD tray’will now show in the paper size selection box. Click on the ‘Main’ tab and then click ‘custom’ and ‘Advanced’. The Advanced properties window now opens. In the advanced properties window select 1440dpi. Select ‘photo enhance 4’ and set the tone to hard and the sharpness to high. Turn ‘high speed’ off. Click save settings and in the custom settings window type in ‘CD’. Click save. Now when the DaVinci 6 properties window appears all the settings should be ready for CD printing. CD tray should appear as the Paper size. CD should show in the mode, custom setting box and as confirmation the settings shown on the white area should be ‘Photo-1440’, Photo enhance 4, Micro weave: On, and High speed: Off. If all the settings are correct click on apply and then OK. Your printer is now set up for printing CDs and will default to these settings automatically. Note; If the page setup in the graphics application does not match the page size 320x420mm then the paper size will default to A4 and will require re-selecting when printing. DaVinci Pro CD printer. Printing. 1. Image software. Discus Discus is a high quality dedicated software package for printing CDs and Jewel case inserts etc. It is supplied with your printer. It is very easy to use and we offer telephone support should you need it. It is also possible to create images and print CDs using other graphics programmes. For example; Corel Draw, Photo shop, Quark Express, Illustrator, etc. Template dimensions 420mm If you regularly use a graphics programme we recommend that you continue using it and make a template to the dimensions given. 349.3mm Templates for Corel draw are available on our website. 219.2mm 118mm dia 38mm dia 89.1mm 0 93.7mm 0 241.2mm 320mm The dimensions are shown for a CD printing template, the dimensions will however, need to be fine tuned to accurately fit the output from your printer. DaVinci Pro CD printer. Recommended printer settings. 1. For printable CDs, CD cards and 80mm discs. ‘CD tray’ should always be selected as the paper size. ‘Plain paper’ setting gives the best results over the range of printable discs available and ensures that the template will be in the correct position. (Choosing ‘photo paper’ for example will move the print down approx 10mm on the discs). Using the CD setting, (set-up in the previous pages), will give optimum results when printing on printable CDs. Photographic images of high quality can be printed. Printing time for 6 discs is just less than 20 minutes. If print quality in not so important and speed is of importance then these settings can be changed. At 1440dpi with ‘high speed on’, printing time is less than 13 minutes. At the extreme of the possible settings, at 360 dpi with ‘high speed on’, printing time is less than 1minute and 30 seconds. This setting could only practically be used to print text and very simple graphics. 2. For printing photo quality images on inkjet photo paper. Select the type of paper to be printed, photo paper and heavyweight matte inkjet paper are recommended as they absorb ink without swelling under the print head. Select the size and orientation of the paper to be printed Select the Print quality, for a photo quality image 1440dpi is recommended. Select photo enhance, tone hard and high sharpness for a vivid image. Experiment with these settings for other effects. Switch the ‘high speed’ off Set the orientation of the paper. In the ‘Printable area’ box select ‘Standard’ and ‘Centered’. DaVinci Pro CD printer. Printing CDs. 1. Positioning the CD tray. Place the empty CD tray onto the input guide.The corner cutout, in the tray, is positioned towards the printer and the cutouts for the CDs to the top of the tray. 1 The tray fits between the 6 nylon guide blocks and should run freely between them. 2. Loading the tray with Cds. Cut out CDs are loaded into the tray after it has been positioned on the input guide. CD tray The CD tray holds 6 CDs, all 6 CDs must be loaded before attempting to print. If only 1 CD is required the remaining positions must still be filled. Load the CDs, one at a time, by pushing them against the two fingers in the tray cutout (1) and then pushing the opposite side of the CD down into the cutout (2). Finally, firmly push down all the CD edge into the cutout. 2 3. Adjusting the fit of the CD. 3 Fingers The fingers lightly clamp the CD during printing, preventing movement and rotation caused by printer vibration. If the fingers do not touch the CDs, they can be twisted slightly until they do by removing the CD and inserting a screwdriver into the slit behind the finger and twisting slightly. Take care not to bend the finger up above the tray surface as it may rub against the print head during printing. 4.Printing. Red light and feed/clean button The print image must be spooled to the printer before pushing in the tray. 4 When the print image is received by the printer it will make certain movements and noises and prepare to print. Wait until the red light on the control panel is lit. Press the feed/clean button on the control panel whilst pushing firmly against the middle of the rear edge of the CD tray. The printer will draw in the CD tray. Stop pushing the CD tray when your finger reaches the edge of the cutout in the input guide. The printer will now print the CDs. DaVinci Pro CD printer. Printing paper. 1.Remove the output support. An area of free, level desk space, the size of the paper carrier is needed on the output side of the printer. 1 2. Positioning the paper carrier. Remove the film protecting the adhesive area. Place the empty paper carrier onto the input guide. The corner cutout in the carrier is positioned towards the printer and the adhesive area facing up. 2 The carrier fits between the nylon guide blocks and should run freely between them. 3. Positioning the paper. Align the paper with the front edge of the cutout in the paper carrier (A), and then the edge marked with arrows (B). Press down the paper onto the adhesive area and smooth out (C). 3 4. Printing. (At this point there are two different techniques to use). C A B B If you are printing on photo paper, using the photo paper setting, it is necessary to insert the paper carrier before spooling the image to the printer. (Otherwise the print image will start before the top edge of the paper).Only one copy can be printed. If you are printing using the plain paper setting it is necessary to spool the image to the printer, wait for the red feed/ink status indicator to light, and then insert the paper carrier. Multiple copies can be printed. 4 5 In either case, to insert the paper carrier, press the feed/clean button on the control panel (A), whilst pushing gently but firmly against the middle of the rear edge of the paper carrier. The printer will draw in the paper carrier. Stop pushing the paper carrier when your finger reaches the edge of the cutout in the input guide (B). 5. Output. The paper carrier and paper are drawn through by the printer and exit onto the desktop at the output end of the printer. The paper carrier must drop onto the desktop to keep the paper tensioned during printing. Warning! Printing large areas of deep colour onto unsuitable paper will cause the paper to swell, rise, and touch the printhead. Problem solving. Problem. When printing deep colours, on plain paper or on heavyweight matte paper, the wet paper rises and rubs on the bottom of the head, or the paper edge is caught by the print head. (No problem on photo paper). Cause. The paper carrier supports the paper from below and the paper can only rise. Solution. Use only photo paper for printing deep colours. Problem. When printing using the ‘no margins’ setting, ink is printed onto the paper carrier. Cause. The carrier is bigger than the paper; normally there is nothing under the paper edge. Solution. Do not print using the ‘no margins’ setting. Problem. The front edge of the paper carrier catches on the output tray as it leaves the printer. Cause. The carrier is not rigid. The front edges, of the support rails, have no ramp. Solution. Do not use the output tray when printing paper. The paper carrier falls down and runs along the desktop, holding the paper taught. Problem. Printing starts 10mm earlier on photo paper setting. Cause. The paper feed winds differently when photo paper is selected. Solution. Feed the paper into the printer before spooling the image and do not print multiple copies. Problem. Ink marks on the bottom edge of the paper. Cause. The paper flips up as it leaves the top rollers. Solution. Apply low tack adhesive to the paper carrier underneath the bottom edge of the paper. Do not use ‘no margins’ printing setting. Problem. Paper sticks to the paper carrier and is damaged when removed. Cause. The adhesive is too strong on the paper carrier. Solution. Repeatedly apply and remove a piece of paper onto the adhesive to weaken it.