1
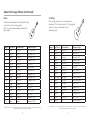
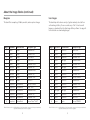
www.fishman.com
USER GUIDE
AURA® SPECTRUMDI
Welcome
Quick Start
Thank you for making Fishman a part of your acoustic experience. We are
proud to offer you the finest acoustic amplification products available;
high-quality professional-grade tools to empower you to sound your very
best. We are confident Aura Spectrum DI will both enhance and inspire
your music making.
Power – Install a fresh 9V battery (not included) or connect a Fishman
power adaptor.
Set the controls – Volume at minimum and all other controls as
shown below.
Plug in – Use standard ¼-inch and XLR shielded instrument cables.
Tune up – Step on the tuner footswitch to tune with the output muted.
Set trim – Play hard and adjust the input trim (on the right side) so the
clip/batt LED flashes only occasionally.
Select an Image – Raise the volume and audition Images with the
select knob. Move the Image Bank slider to choose the set of Images
that best match the instrument you’re playing. (see pages 6 thru 13)
Blend to taste – Turn left for more pickup and right for more Image.
Kill feedback – If feedback starts, change the position of the phase
switch. For advanced feedback handling, check out the section detailing
the automatic feedback filters on page 24.
2
3
What is Aura?
Aura Custom Shop
Aura Acoustic Imaging Technology uses digital algorithms developed in
Fishman’s audio laboratories to restore a studio-miked sound to an
acoustic instrument. To achieve this, we record instruments using worldclass microphones and techniques to capture an “Image” of the natural
sound that your acoustic instrument emits when miked in a professional
studio. This Image, when recorded direct or played through an amp,
mixer or PA, blends with your instrument’s pickup to produce an incredibly accurate recreation of the original recording.
For the ultimate in Aura Imaging, be sure to check out the Aura Custom
Shop at fishman.com. For a modest fee, you send us your instrument and
we’ll create a set of Images using our best microphones, custom
recorded for you.
Aura Acoustic Imaging processors sound best when used with Fishman
undersaddle pickups and magnetic soundhole pickups. When we record
each instrument, we use our Acoustic Matrix undersaddle pickup. So,
when you play through an Aura processor, you’ll get the best results using
our Acoustic Matrix pickup. We do not recommend soundboard-mounted
pickups, bridge-plate pickups, multi-sensor pickups or microphones for
Aura products since they include unnecessary resonances that can interfere with the Aura processing.
Aura Image Gallery
The Aura Image Gallery software manages a vast library of Images
created from an ever-expanding list of instruments, and provides tools to
search and store sets of Images. Browse the Image Library to find your
instrument, then drag and drop an Image into an Image Set for download
into Aura Spectrum.
Making Connections
Playing live
Choosing an Image
To get the most realistic tone from Aura Acoustic Imaging, you should
always match your Images with the instrument type you’re playing. For
example, choose dreadnought Images when plugging in a dreadnought
body style guitar; choose mandolin Images if you’re playing a mandolin.
Don’t hope to derive a mandolin sound from a dreadnought or try to turn
your orchestra body style guitar into a 12-string. If you are not sure which
body type your guitar falls into, we suggest you audition several Images
from each bank and let your ears decide. See the following pages to help
match your instrument with the best Aura Image.
4
For the best sound reproduction when performing live, connect your Aura
Spectrum to an acoustic instrument amp, a PA system, a powered monitor or other full-range system. The balanced XLR D.I. output eliminates
an outboard D.I. and features an automatic ground lift when you use the
1/4” output, providing a high quality, noise free signal.
Going direct
For direct recording, there is no better solution than using Aura
Spectrum’s balanced XLR D.I. or 1/4” output. In fact, an acoustic track
recorded with just a pickup can be re-recorded using Aura to restore the
miked sound.
5
About the Image Banks
Dreadnought
Jumbo
Use this bank of Images with all varieties of the
classic deep-body dreadnought.
Use these Images with large, deep-body instruments
with slim waists and wide lower bouts
(usually over 16”).
Top Wood
Back and Sides
Microphone Type
1
Cedar
Rosewood
Shure® SM57
Soundelux® E47
2
Spruce
Maple
AKG® C414
Rosewood
Soundelux® E47
3
Spruce
Maple
DPA® 4011
Spruce
Rosewood
Neumann® KM84
4
Spruce
Maple
Schoeps® CMC64
5
Spruce
Rosewood
Schoeps® CMC64
5
Spruce
Maple
Schoeps® CMC64
6
Spruce
Rosewood
Schoeps® CMC64
6
Spruce
Rosewood
DPA® 4011
7
Spruce
Rosewood
Shure® KSM141
7
Spruce
Rosewood
Neumann® U87
8
Spruce
Rosewood
Neumann® M147
8
Spruce
Rosewood
Shure® SM57
9
Spruce
Rosewood
Neumann® M147
9
Cedar
Rosewood
DPA® 4011
10
Spruce
Rosewood
Schoeps® CMC64
10
Spruce
Maple
Soundelux® E47
11
Spruce
Mahogany
AKG® C414
11
Spruce
Rosewood
Neumann® U87
12
Spruce
Rosewood
Neumann® U87
12
Spruce
Rosewood
Neumann® KM84
13
Spruce
Rosewood
Neumann® U87
13
Spruce
Maple
Shure® SM57
14
Composite
Composite
DPA® 4011
14
Cedar
Rosewood
Neumann® U87
15
Spruce
Rosewood
Neumann® M147
15
Spruce
Maple
Neumann® U87
16
Spruce
Mahogany
Shure® SM57
16
Spruce
Koa
Schoeps® CMC64
Image #
Top Wood
Back and Sides
Microphone Type
1
Spruce
Rosewood
DPA® 4011
2
Spruce
Mahogany
3
Spruce
4
Image #
Fishman Transducers, Inc. is not affiliated with any of the forementioned companies or their respective trademarks,
registered trademarks, product models or copyrights.
Fishman Transducers, Inc. is not affiliated with any of the forementioned companies or their respective trademarks,
registered trademarks, product models or copyrights.
6
7
About the Image Banks (continued)
Concert
Orchestra
Use the Concert Images with small-body, short-scale
instruments with thin waists, like 0, 00 and L-00
styles; typically finger-picking guitars as well as
parlor and travel instruments.
For guitars larger than concert but smaller than
dreadnought, the Orchestra Images work well with
OM & 000 styles as well as auditorium and other
narrow-waist mid-size, medium-depth
instruments.
Top Wood
Back and Sides
Microphone Type
Image #
Top Wood
Back and Sides
Microphone Type
1
Spruce
Rosewood
Schoeps® CMC64
1
Spruce
Rosewood
Soundelux® E47
2
Spruce
Rosewood
Schoeps® CMC64
2
Spruce
Rosewood
Neumann® M147
3
Spruce
Maple
Neumann® M147
3
Spruce
Mahogany
Schoeps® CMC64
4
Spruce
Rosewood
Shure® SM57
4
Spruce
Mahogany
Neumann® M147
5
Mahogany
Mahogany
DPA® 4011
5
Spruce
Mahogany
Soundelux® E47
6
Spruce
Rosewood
Neumann® M147
6
Spruce
Rosewood
Neumann® KM84
7
Spruce
Koa
Neumann® U87
7
Spruce
Mahogany
Soundelux® E47
8
Spruce
Rosewood
DPA® 4011
8
Spruce
Rosewood
Soundelux® E47
9
Mahogany
Mahogany
Neumann® M147
9
Spruce
Mahogany
DPA® 4011
10
Mahogany
Mahogany
Soundelux® E47
10
Spruce
Rosewood
Soundelux® E47
11
Mahogany
Mahogany
DPA® 4011
11
Spruce
Rosewood
Shure® Beta 58A®
12
Spruce
Maple
Schoeps® CMC64
12
Spruce
Rosewood
Schoeps® CMC64
13
Spruce
Rosewood
Neumann® M147
13
Spruce
Mahogany
Neumann® M147
14
Spruce
Rosewood
Neumann® M147
14
Spruce
Rosewood
Neumann® KM84
15
Spruce
Rosewood
Schoeps® CMC64
15
Spruce
Rosewood
Schoeps® CMC64
16
Spruce
Koa
Schoeps® CMC64
16
Spruce
Rosewood
Schoeps® CMC64
Image #
Fishman Transducers, Inc. is not affiliated with any of the forementioned companies or their respective trademarks,
registered trademarks, product models or copyrights.
Fishman Transducers, Inc. is not affiliated with any of the forementioned companies or their respective trademarks,
registered trademarks, product models or copyrights.
8
9
About the Image Banks (continued)
Nylon
12 String
Use with all medium-depth classical and thin-body
acoustic-electric nylon-string guitars.
Note: Use only an undersaddle pickup with the
Nylon pedal.
These are typically jumbo or dreadnought size
instruments. The heavier bracing for 12 string guitars
creates a unique sound and has its own
Aura Image bank
Top Wood
Back and Sides
Microphone Type
Image #
Top Wood
Back and Sides
Microphone Type
1
Cedar
Rosewood
Schoeps® CMC64
1
Spruce
Rosewood
Soundelux® E47
2
Spruce
Cypress
Soundelux® E47
2
Spruce
Maple
AKG® C414
3
Spruce
Rosewood
Soundelux® E47
3
Spruce
Rosewood
Soundelux® E47
4
Cedar
Rosewood
Neumann® M147
4
Spruce
Rosewood
Neumann® KM84
5
Spruce
Rosewood
DPA® 4011
5
Spruce
Rosewood
Soundelux® E47
6
Spruce
Cypress
AKG® C1000S
6
Spruce
Rosewood
DPA® 4011
7
Spruce
Rosewood
Soundelux® E47
7
Spruce
Rosewood
Shure® KSM141
8
Spruce
Mahogany
Neumann® M147
8
Spruce
Rosewood
Neumann® M147
9
Cedar
Rosewood
Soundelux® E47
9
Mahogany
Mahogany
Schoeps® CMC64
10
Spruce
Rosewood
Neumann® M147
10
Spruce
Rosewood
Schoeps® CMC64
11
Cedar
Rosewood
AKG® C414
11
Spruce
Mahogany
Shure® SM57
12
Cedar
Rosewood
DPA® 4011
12
Spruce
Mahogany
Neumann® U87
13
Cedar
Rosewood
Shure® KSM141
13
Spruce
Rosewood
Neumann® U87
14
Spruce
Cypress
DPA® 4011
14
Spruce
Maple
Soundelux® E47
15
Cedar
Rosewood
Neumann® M147
15
Spruce
Rosewood
Shure® SM57
16
Spruce
Cypress
Neumann® M147
16
Spruce
Koa
Schoeps® CMC64
Image #
Fishman Transducers, Inc. is not affiliated with any of the forementioned companies or their respective trademarks,
registered trademarks, product models or copyrights.
Fishman Transducers, Inc. is not affiliated with any of the forementioned companies or their respective trademarks,
registered trademarks, product models or copyrights.
10
11
About the Image Banks (continued)
Bluegrass
User Images
This bank offers a sampling of fiddle, mandolin, and resophonic Images.
This bank ships with a diverse variety of guitars randomly selected from
our Aura Image Gallery. You can overwrite any of the 16 locations with
Images you download from the Aura Image Gallery software. See page 26
for more details on downloading Images.
Image #
Instrument
Back and Sides
Microphone Type
®
Image #
Top Wood
Back and Sides
Microphone Type
1
Fiddle
Maple
Neumann U87
1
Spruce
Rosewood
Shure® SM57
2
Fiddle
Maple
Soundelux® E47
2
Spruce
Rosewood
Schoeps® CMC64
3
Fiddle
Maple
RCA® Ribbon
3
Composite
Composite
Soundelux® E47
4
Fiddle
Maple
Royer® R-121
4
Spruce
Mahogany
Neumann® KM84
®
5
Fiddle
Maple
Neumann KM54
5
Spruce
Rosewood
Soundelux® E47
6
Mandolin
Maple
Neumann® U87
6
Spruce
Mahogany
DPA® 4011
7
Mandolin
Maple
Neumann® KM84
7
Spruce
Rosewood
Neumann® U87
8
Mandolin
Maple
Neumann® U87
8
Spruce
Rosewood
Soundelux® E47
9
Mandolin
Maple
Neumann® M147
9
Spruce
Rosewood
Schoeps® CMC64
10
Mandolin
Maple
DPA® 4011
10
Spruce
Rosewood
Neumann® U87
11
Resophonic
Finland Birch
Schoeps® CMC64
11
Spruce
Rosewood
Neumann® M147
12
Resophonic
Finland Birch
Shure® SM57
12
Spruce
Rosewood
DPA® 4011
13
Resophonic
Finland Birch
Neumann® KM84
13
Mahogany
Mahogany
Neumann® U87
®
14
Resophonic
Finland Birch
Neumann U87
14
Spruce
Rosewood
Neumann® M147
15
Resophonic
Finland Birch
Neumann® M147
15
Spruce
Rosewood
AKG® C414
16
Resophonic
Finland Birch
Groove Tubes® Velo8®
16
Spruce
Sapele
Schoeps® CMC64
Fishman Transducers, Inc. is not affiliated with any of the forementioned companies or their respective trademarks,
registered trademarks, product models or copyrights.
Fishman Transducers, Inc. is not affiliated with any of the forementioned companies or their respective trademarks,
registered trademarks, product models or copyrights.
12
13
Left Side Panel
Right Side Panel
Output
Trim
Use a standard ¼-inch instrument cable to connect the output to your
amplifier, mixer or effects devices. You can also connect this output to
an unbalanced input on a recording system.
Raise or lower the trim to optimize the input level for your pickup. Play
hard and adjust trim so clip/batt flashes occasionally. Some pickup
systems may not cause the light to flash at all and other onboard preamps
may require you to turn their output down to achieve an optimum level.
Connecting a guitar cable here will also lift the ground on the XLR D.I.
output, preventing unwanted ground loops.
FX Loop
This tip/ring/sleeve connection allows you to insert external devices, such
as the Fishman AFX Acoustic Effects, between Aura Spectrum’s blended
signal and the main outputs. Any pedals you connect here will appear at
the 1/4” and XLR D.I. outputs. The overall output level will still be affected
by Aura Spectrum’s volume control.
9VDC
Power may be supplied by either a 9V battery (battery compartment
underneath the pedal) or the Fishman 910-R (for 110V).
Phase
Use the phase switch to improve bass response at low volume and suppress feedback at high volume. Move the phase switch and leave it in
the position most pleasing to your ear.
USB
After installing Aura Image Gallery software, connect your computer here.
Input
Plug in your guitar here with a standard ¼-inch instrument cable. If you
have a passive undersaddle pickup (no battery onboard), always plug into
the Aura Imaging Pedal first, even if you use a pedal tuner.
Insert a plug into the input jack, and the Aura Imaging Pedal powers up.
To conserve the battery, remove the plug from the input when not in use.
14
15
Top Side Panel
XLR D.I. Output
Connect a standard microphone cable here to feed recording equipment
or a sound reinforcement mixing console. When the 1/4” output is also
connected, this D.I. output’s ground is automatically lifted to prevent any
unwanted ground loops.
16
17
Front Panel Controls
Select
The select knob allows you to choose among
the 16 Images available for each of the eight
different Image Banks. Move the select slider
to choose a bank of Images that best match
the style of instrument you’re playing, then
select through the 16 Images to find the ones
that sound best. Try all 16 within each bank
and adjust the blend knob to obtain more or
less character.
Blend
Position the blend knob straight-up at 12
o’clock and you’ll hear a 50/50 mix of Image
and pickup. Turn the blend all the way right
for just Image; all the way left for just pickup.
Most performers blend in some pickup with
the Image for clarity and definition.
more
pickup
more
Image
Suggestions
Volume
The volume control affects the overall output level coming from both
the 1/4” and the XLR D.I outputs. For the cleanest signal, set the volume
as high as possible without clipping the next device in the signal chain.
If you hear distortion and the clip/batt light is not flashing, reduce the
volume.
18
• For live performance try backing off the Image by setting blend
to about 10 or 11 o’clock or about 65% pickup. You won’t need
too much Image blended in to achieve a great live sound. If
feedback occurs, flip the phase switch.
• For recording, try blending in more Image for a realistic
acoustic sound. Set the blend to taste. Again, you’ll often get
good results with a little bit of pickup blended in with the Image
for clarity and definition.
19
Front Panel Controls (cont’d)
Pickup EQ: Low, Mid, High
Global vs. Pickup EQ
As a default, the low, mid, and high tone controls affect the sound of
the pickup signal only, allowing you to further refine the sound of your
instrument without excessive alterations to the chosen Image.
When shipped from our factory, the low, mid, and high tone controls
are set to affect the sound of the pickup signal only. This is referred to
as Pickup EQ mode. However, a Global EQ mode may also be selected
which applies the same EQ settings to both the pickup and Image signals
simultaneously (or “globally”).
A Global EQ mode may also be selected, applying the same EQ settings
to both the pickup and Image path simultaneously.
When you power on Aura Spectrum, watch the tuner display for a “P” or
a “G” indicating the currently selected mode.
To select Global EQ mode:
1. Hold the tuner button while Powering on.
2. The display flashes a “P” indicating that the unit is currently in
Pickup EQ mode.
3. Press the anti-feedback button once and the display now
flashes a “G” indicating Global EQ mode is now selected.
4. Press the tuner button to select Global EQ and resume
powering on to normal playing mode.
To return to Pickup EQ mode:
Compressor
The compressor control adjusts several
settings within a sophisticated automatic
leveling circuit.
more
dynamics
less
dynamic
As you turn this knob clockwise, your overall
playing dynamics become increasingly limited, making softer notes louder and controlling loud spikes in your playing. This can be helpful in performances
where you desire a more even level to your playing. At its maximum
setting, there may be some overall increase in the output level.
20
1. Hold the tuner button while Powering on.
2. The display flashes a “G” indicating that the unit is currently in
Global EQ mode.
3. Press the anti-feedback button once and the display now
flashes a “P” indicating Pickup EQ mode is now selected.
4. Press tuner button to select Pickup EQ and resume powering
on to normal playing mode.
21
Front Panel Controls (cont’d)
an ‘E’ played very flat
an ‘A#’ played in-tune
a ‘B’ played slightly sharp
Tuner Option
Tuner Footswitch
Step on the tuner footswitch to enable the digital chromatic tuner. You’ll
know it’s active when the white Aura LED goes dark and the tuning fork in
the center display is lit red. As a default, Aura Spectrum’s output is muted
allowing you to tune silently.
To tune, play a note lightly and watch the display. The note name will be
indicated as a single letter and a small # sign will be lit whenever the displayed note is raised one half step. The note being sharp, flat, or in-tune
will be displayed using the five multi-colored LEDs in the tuner window
and below the tuning note. When there is no audio input, or you’re not
playing, a “–” will appear in the display.
This digital chromatic tuner accommodates all standard and alternate
tunings and is calibrated to A = 440.
When shipped from the factory, the audio output is muted when the tuner
is engaged.
Alternately, you have the option to use the tuner without muting your output. To choose this option, hold the footswitch down until the Aura LED
flashes. Repeat to return to the factory state.
Bypass mode
Aura Spectrum allows you completely bypass the Image, EQ, and Compressor processing. To enter bypass mode, press both the anti-feedback and tuner switches together. The white Aura LED will alternate
slowly with the tuner LED to indicate bypass mode is active. To exit
bypass mode, press both foot switches again.
With bypass active, all controls including the tuner are functional,
however you will not hear any of the changes until you exit bypass.
22
23
Front Panel Controls (cont’d)
Anti-Feedback Footswitch
About Phase and Anti-Feedback
Use this search-and-destroy anti-feedback filter in addition to the phase
switch to control feedback during a performance. Aura Spectrum’s
automatic anti-feedback filter can apply up to three separate notch
filters, which are essentially very precise tone controls that reduce only
a small piece of the audio band. When activated, the filter determines
where the offending resonances are and only reduces the frequencies on
which they are centered.
There are two features provided to help control acoustic feedback, the
phase switch and the anti-feedback control.
While the anti-feedback control is very effective, it’s best if you spend
some time while setting up before a performance and catch any issues
before you begin to play. With some practice, you’ll find you can also use
it to “fix” any resonant notes that may stand out in a particular venue.
Using the automatic anti-feedback control:
1. Press and hold anti-feedback footswitch for 2 seconds. The tuner
display will flash a “1” to indicate it is searching for the first feedback.
2. Turn up your volume, then either dampen the strings while tapping
the body or play the troublesome note until the feedback begins. The
filter will automatically identify and eliminate the feedback. The “1” in
the display will light solid as will the “A-F” indicator.
3. At this point, you may continue to turn up your volume as in step 2
to catch up to two more problematic resonances. Each is indicated via a
flashing “2” or “3” during the search, turning to solid lit numerals when
the resonance has been identified.
Feedback usually occurs in the lowest octaves of your instrument. The
natural resonances which produce an instrument’s tone also react with
amplified sound. The louder an instrument is amplified, the more it will
interact. Feedback occurs when a note on the instrument resonates in
sync with the amplified sound, reinforcing and building to a sustained
howl.
The phase switch flips the polarity of your instrument signal from
positive to negative, changing its relationship to the sound coming from
the amplifier. One phase setting usually provides better resistance to
feedback than the other and will vary depending on the instrument and
playing environment. Another approach to determining optimal phase is
the selection which sounds or feels most natural when playing.
The phase switch also affects the signal polarity to the balanced XLR
D.I. and 1/4 inch outputs, synchronizing the amplifier with other sound
systems in use.
In certain playing environments the phase switch may not have an
audible impact.
The anti-feedback control is an automatic variable frequency notch filter designed to subdue a resonant peak on the instrument which is prone
to feedback. Check out page 24 for more exact details of its operation.
4. You may tap the anti-feedback footswitch at any time to cancel the
search. The circuit will hold the offending frequenc(ies) in memory until
you repeat the process again.
You may also turn the filter on or off at any time by tapping the footswitch. When enabled, the “A-F” lights to indicate the filters are active
and the number of filters being applied will be briefly displayed.
24
25
Downloading Images
Battery Replacement
The Aura Image Gallery software manages a vast library of Images created from an ever-expanding list of instruments, and provides tools to
search and store sets of Images.
The clip/batt indicator will light steadily when it is time to change the
battery. Open the battery door underneath the pedal and install a fresh
9V alkaline or lithium battery. When the clip/batt LED comes on you
have approximately one hour of remaining battery life.
If you can’t find your exact instrument in the list, use the built-in Image
Wizard to find the closest match. For example, if one of our hundreds of
Images doesn’t match your instrument exactly, you can still find a great
sounding Image by matching similar tone woods and body styles. Experiment with these tools, and use your ears to determine what sounds best
for your playing or musical style.
To access this library of additional instrument Images, install the Aura Image Gallery on your computer. Then, gently remove the USB cover from
the right side of the unit and connect the included USB cable to the side
of the preamp and your computer. Create a new Image Set and load your
Images into Aura Spectrum
Be sure to install the Aura Image Gallery software prior to connecting
Aura Spectrum for the first time.
USB mini jack
26
27
Specifications
Signal Flow
The illustration below shows the audio signal as it flows through Aura
Spectrum. Note: When Global EQ mode is selected, the tone controls
also affect the Image signal as indicated by * (see pages 20 & 21).
input
trim
phase
clip | batt
Input impedance:
Input trim gain range:
10M Ohm
-10dB to +2dB
Nominal Output impedance:
3.5k Ohm
Maximum Output level (onset of clipping): +3dBV
Digital signal path:
A/D, D/A conversion:
Signal processing:
24-bit
32-bit
-97dBV (A-weighted)
100dB (A-weighted)
Baseline noise:
Dynamic range:
compressor
Power supply:
Typical in-use current consumption:
Typical 9V battery life:
*
9V adapter:
blend
compressor
Image select
low
mid
9V battery or 9VDC adapter
25mA
20 hours using alkaline battery
40 hours using lithium battery)
Fishman 910-R (for 110V)
or suitable filtered and regulated,
200mA type, tip = negative
high
Tone Controls:
Low (bass) control:
Midrange control:
High (treble) control:
±12dB @ 70Hz
±12dB @ 1kHz
±12dB @ 6.5kHz
Anti-Feedback Notch Filter (3 notches):
100Hz Default Frequency
50Hz to 750Hz Search Range
0.25 Octave bandwidth
13.5dB Attentuation
Phase switch:
Forward position = non-inverting
“insert style” effects loop
tip = send
XLR ground is lifted
when 1/4” output is
is connected
ring = return
All specifications subject to change without notice
fx loop
output
volume
28
29
www.fishman.com
Fishman and Fishman Transducers are trademarks or tradenames of Fishman Transducers Inc.
513-300-159 Rev A, 8-09