1
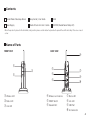
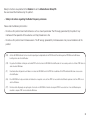
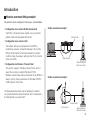
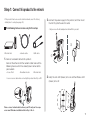
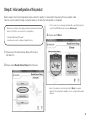
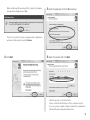
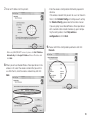
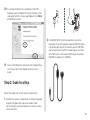
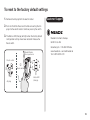
Meade Wireless Telescope Server
Setup Guide
Thank you for purchasing the USB device server Meade Wireless Telescope Server (this product).
This setup guide, “Meade Wireless Telescope Server Setup Guide“, provides information on how to configure and use this product in a network environment.
Before setup, please read carefully the “Safety instructions“ in the online manual included in the CD-ROM to properly configure this product.
English
1
Technical Data
Meade Wireless Telescope Server (WTS 1.0)
• 10/100 BASE-TX
• USB 2.0 Hi-Speed
• WEP/SSID
• WPA-PSK(TKIP/AES)
• WPA2-PSK(AES)
• Share USB Devices over an Ethernet Network
• Max. number of USB connections is 15 (including optional
USB Hub)
• IP Filtering enhanced security
• Hi Speed USB Wireless Device Server
• Supported operating systems: Windows2000/XP/Vista
(32bit)
• Supported protocols: TCP/IP
• Wi-Fi Network interface: IEEE 802.11b/g
• Configuration: Quick Setup, Web Browser, TELNET
• Security: WEP(64, 128bit), WPA-PSK, WPA2-PSK,
IP Adress Filter
• Dimensions/Weight: 36x140x143 mm 1.4x4.5x5.4 in,
172g /5.6 oz
The MEADE Wireless Telescope Server provides a brand
new and unique hardware solution to remotely connect and
control your telescope, CCD-camera, DSLR and many more
accessories with your PC in your living room. The MEADE WTS
1.0 is, as far as we know, the first product worldwide that can
be used as an astronomical device server for amateur
astronomers, universities, schools and astronomical
observatories. It supports Wireless LAN, IP-connections and
Ethernet.
This is the first step MEADE Europe is taking in terms of
development of our own products for convenient observation
in the amateur astronomical sector. Amateur astronomers can
now remotely move and focus their telescope and, further, will
now be able to take pictures with their DSLR/CCD camera
remotely from any convenient place, as if they were standing
next to their telescope. All Autostar functions and camera
functions are supported.
When using the MEADE WTS 1.0 it may be necessary
to add the following components (standard PC-Store
equipment):
- USB HUB with separate powerline connection
- WLAN Router (with Access Point functionality - if not
already present in your Network)
IDEAL FOR SHARING YOUR ASTRONOMICAL DEVICES ON
YOUR WIRELESS NETWORK.
2
This MEADE WTS 1.0 is the ideal solution for sharing your
astronomical devices in your wireless network. It supports the
remote wireless access of the following devices:
Supported Software:
MEADE DSI 1
•Stellarium
MEADE DSI 2
•Cartes du Ciel
MEADE DSI 3
•Nebulosity
MEADE LPI
•www.worldwidetelescope.org from Microsoft
MEADE LX200
• and many more; basically any Software that controls
telescopes and cameras via Microsoft Windows 2000, XP
and Vista through a USB or RS232 connection.
MEADE LX400
•Meade Autostar Suite including Envisage
•The Sky
MEADE LX90
MEADE LXD75
MEADE ETX
MEADE Autostar Suite
Canon DSLR
Nikon Olympus DSLR
Webcams
SBIG up to ST11000
DOME controls
Rainsensors, Windsensors
RS232 / USB – Focusers
Boxdörfer Telescope control
FS2 Telescope control
Supports ASCOM compliant devices and more...
3
Contents
Meade WirelessTelescope Server
Setup Guide / User Guide
Stand
Power Supply
Meade Virtual Link User‘s Guide
CD-ROM (Meade Server Setup CD)
· When the product is placed in the horizontal (side) position, please use the rubber feet provided to prevent the unit from sliding. Place one on each
corner.
Name of Parts
Front View
Back view
E
B
C
D
B Wireless LED
C Status LED
D Link LED
F
G
J
E Wireless Lan Antenna
F RESET Switch
G Network Port
H
I
1)
H Status LED
I Link LED
J USB Port
1) AC Connector
4
Safety instructions are provided in the Readme file on the Meade Server Setup CD.
Be sure to read them before using this product.
- Safety instructions regarding the Radio Frequency emissions
Please note the following instructions:
- Do not use this product near medical devices such as a heart pacemaker. The RF energy generated by this product may
interfere with the operation of these devices and may threaten one‘s life.
- Do not use this product near microwave ovens. The RF energy generated by microwave ovens may cause interference to this
product.
(DE) Auf der CD-ROM befindet sich ein deutschsprachiges Setup-Handbuch im PDF-Format. Zum Anzeigen der PDF-Datei unter Windows
benötigen Sie den Acrobat Reader.
(FR) Un guide d‘installation en français au format PDF est inclus dans le CD-ROM. Acrobat Reader est nécessaire pour lire les fichiers PDF dans un environnement Windows.
(IT)
Una Guida alla configurazione in italiano è inclusa nel CD-ROM come file PDF. Per visualizzare il file PDF ambiente Windows è necessario Acrobat Reader.
(ES)
En el CD-ROM se incluye una Guía de instalación en espanol como archivo PDF. Se necesita Acrobat Reader para ver el archivo PDF en un entorno Windows.
(PT)
Um Guia de Configuração em português é fornecido no CD-ROM no formato de arquivo PDF. É necessário ter o Acrobat Reader para
visualizar o arquivo PDF em um ambiente Windows.
5
Introduction
How to connect this product
This product can be configured in three ways, as listed below:
• Configuration via a wired LAN (Recommended)
• Cable connection example 1
The WTS is connected to your network using a standard network cable and configured from the PC.
Ethernet Hub
• Configuration via a wireless LAN
The network settings are configured on the WTS by
establishing a wireless connection between a PC and the WTS in AdHoc mode. To communicate with this product in AdHoc mode, the wireless setting on the PC must be the same as the WTS.
network cable
Meade Wireless
Telescope Server
• Configuration via Windows “Connect Now“
This product supports “Windows Connect Now“, which is one of the functions installed in Windows XP SP2.
Windows Connect Now enables connection of the WTS to a wireless LAN by utilizing a wireless PC (Windows XP SP2) a USB memory ‘Flash Drive‘.
• Cable connection example 2
This Setup Guide describes how to configure this product
using a wired Ethernet cable connection, which corresponds
to “Configuration via a wired LAN“.
network cable
Access point
Meade Wireless
Telescope Server
6
Step 1: Connect this product to the network
· If this product has been used in another network, reset it to factory
default prior to setup (See page 14).
The following items are necessary for the setup.
2.Connect the power supply to this product, and then insert the AC Plug into the electric outlet.
· Only ever use the AC adapter bundled with this product.
C
- Ethernet Hub
- network cable
- USB cable
B
1. Connect a network cable to this product.
Connect the other end of the network cable to one of the following devices which has already been connected to
your network.
- Access Point
- Broadband router
- Ethernet Hub
· Use a crossover cable when connecting this product directly to a PC.
3.Verify the Link LED (Green) turns on and the Wireless LED (Green) turns off.
B
C
Please connect networkcable between your PC and your telescope
server now! Otherwise installation fails in Step 2 No. 6.
7
Step 2: Initial configuration of this product
Step 2 explains the initial configuration process when this product is connected to the wired LAN via a network cable.
You can use this product through a wired or wireless LAN after the configuration is completed
· Before proceeding to step3, please temporarily disable the firewall
function of the PC to be used for the configuration.
- Standard Windows XP firewall
- Commercial security software‘s firewall function
· If the screen does not appear automatically, open My Computer, select the CD-ROM drive and execute Autorun.exe.
3.Please select Wired.
1. Please insert the Device Server Setup CD into your
Windows PC.
2.Please select Meade Server Setup from the menu.
· Select the network connection type. Click Wired for a wired
network. This Setup Guide explains how to configure with a wired
network.
8
· When in a Windows XP environment (SP2 or higher), the following
message will be displayed. Select Yes.
· The User Account Control screen is displayed when configuration is performed on Windows Vista. Select Continue.
4.Click Next.
5.Read the agreement and click Yes to accept.
6.Select this product and click Next.
· When this product is not found in the list...
· Please confirm that the IP address of PC is configured correctly.
· If you use security or firewall software, including those embedded in Windows XP, please temporarily disable them.
9
7. Enter an IP address for this product.
·E
nter the wireless configuration information prepared in advance.
If the wireless network that you wish to use is not shown in
the list, click Detailed Config and configure each setting. For Detailed Config, please refer to the online manual.
If you are going to use Meade Wireless Telescope Server
with a network cable instead of wirelessly, upon completing the configuration, check Skip wireless
configuration and click Next.
9.Please confirm the configuration parameters and click · When using DHCP/BOOTP server etc. please click Get IP Address Automatically. Click Assign IP Address. Enter an IP address and click Next.
Execute.
8.When you will use Meade Wireless Telescope Server in the wireless LAN, select the wireless network that you wish to use from the list, enter the wireless network key and click Next.
10
10.It is recommended that, on completion of the WTS
hardware setup, the Meade Virtual Link software is then
configured.To do this, simply select Yes and click Finish
at thefollowing screen.
C
B
2.The MEADE WTS 1.0 will be placed on or next to the
telescope. Via an active (power supplied) USB Hub (optional) all telescope specific and camera specific USB Ports
can be connected to the WTS. All telescope accessories
with RS232 ports can be connected through an optional
USB/RS232 adapter (Art. 0745830).
11. Then install USB device connection utility, Meade Virtual Link. Please refer to the “Meade Virtual Link User‘s Guide“.
Step 3: Enable the settings
Restart this product for the new settings to take effect.
1. To reflect the wireless configuration, disconnect the power plug from the outlet and unplug the network cable.
Do not unplug the network cable when using this product with a wired LAN.
11
Please note the correct usage of the correct cable per telescope type.
LX90/LXD 75/ETX (round cable Art.: 0745910; #505 serial
cable for Autostar 497)
LX400 (normal USB-cable)
Please connect all telescope components (e.g. camera,
focuser, handbox (Autostar)) with the telescope. Then continue
to do the intialisation process of your mount.
Now you can connect the serial cable with your telescope on
one end and with the USB-Hub on the other end. ATTENTION!
– Only use powered USB Hubs in order to keep the
performance characteristics of of your powered USBAppliances attached. When buying a powered USB Hub it
should have the following LOGO:
LX200 (flat cable Art.: 0745810; #507 serial cable for LX200)
Connect your USB-Hub with the free USB port of your MEADE
WTS 1.0.
B
12
2.Connect the USB devices to be shared over the network
3.Connect Meade WTS 1.0 with the powerline.
along with this product via an USB cable.
B
B
The initial configuration of this product is complete.
13
To reset to the factory default settings
1. Remove the AC plug from the electric outlet.
Customer Support
2.Push and hold the Reset switch while re-inserting the AC plug into the electric outlet. Continue pressing the switch.
3.The Status LED(Orange) will light when the factory default
configuration settings have been restored. Release the Reset switch.
Meade Wireless
Telescope Server
Meade Instruments Europe
GmbH & Co. KG
Gutenbergstr. 2 · DE-46414 Rhede
www.meade.de · [email protected]
Tel.: 02872 - 8074 - 310
Electric outlet
C
B
Reset switch
C
AC plug
D
Status LED
(Orange)
14
Warranty
The period of warranty is 2 years, beginning on the day of purchase. Please keep the cash receipt as evidence of purchase. Devices
which become defective during the warranty period can be returned to the dealer where the device was bought. The repaired device
or a new one will then be returned to you. In the case of defects which occur after the end of the warranty period, the devices can
also be returned. However, repairs which become necessary after the end of the warranty period will be subject to a service fee.
Important:
Make sure to return the device carefully packed in the original packaging in order to prevent transport damage. Please also enclose
the cash receipt (or a copy). This warranty does not imply any restriction of your statutory rights.
Your dealer:
Name:_______________________________________________________________________________________________________
Postcode / City:_ ______________________________________________________________________________________________
Street:_______________________________________________________________________________________________________
Telephone:_ __________________________________________________________________________________________________
Date of purchase:______________________________________________________________________________________________
Signature:____________________________________________________________________________________________________
15
Gutenbergstr. 2 · DE-46414 Rhede
www.meade.de
ANL0751000_02GB0708MEADE
Meade Instruments Europe
GmbH & Co. KG
16