1
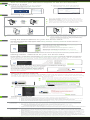
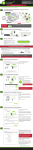
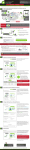
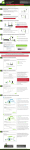
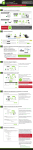
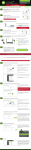
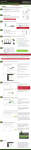
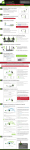
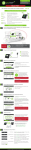
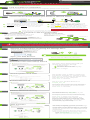
? Need Help? Give us a call.
Phone: 888-573-8820
Email: [email protected]
Web: www.ampedwireless.com/support
SETUP GUIDE
—
R E A D
F I R S T
—
AP600EX
High Power Wireless-N 600mW Pro Access Point
1
Find a location for installation
View the package insert for instructions on how to optimally position the Pro Access Point.
INDOOR SETUP
OUTDOOR SETUP
Pro Access Point
Pro Access Point
Router
(LAN Port)
Modem
Internet
Router
(LAN Port)
Indoor range will be limited.
2
Modem
Internet
See back side for mounting instructions.
Connect the Pro Access Point to your Router or Network Switch
d
PWR
AP
NETWORK
Router
(LAN Port)
Modem
Internet
Open the lid of the Pro Access Point and check
that the PoE cable is securely fastened to the
POE
port.
Locate the power adapter and connect one
end to a power outlet and the other end to
the POWER port on the PoE adapter.
Locate the PoE Adapter and connect the 30 ft
AP
PoE cable to the
port on the PoE
adapter.
Locate the shorter network cable and connect
one end to the port on the PoE adapter and
the other to your router's network (LAN) port,
or a network switch.
Note: If you plan to use your own network cable, ensure
that the cable is a Non-PoE cable to avoid power conflict issues.
Allow up to two (2) minutes for the Pro Access Point to
automatically configure itself to your network.
3
Connect your Computer to the Pro Access Point
Wireless Connections:
Wired Connections:
Scan for available wireless networks on your
PC and connect to the following network:
Attach any Wired Devices to the
Pro Access Point using an
Ethernet cable.
NETWORK ID:
PASSWORD:
or
Network Switch
Amped_Pro_AP
wireless
CONGRATULATIONS, YOU’RE DONE!
!
The instructions below are optional. You may now use your Pro Access Point without any additional
configurations. However, if you wish to change any settings (such as network ID and security) for the Pro
Access Point, follow the instructions below to access the configuration menu of the Access Point.
Note: If your network uses static IP address assignments, you will need to manually configure the settings for your
Pro Access Point. See the instructions on the back to access the configuration menu of the Access Point.
1
Optional Configurations: Accessing the Settings Menu
Scan for available wireless networks on your
PC and connect to the following network:
NETWORK ID:
PASSWORD:
Amped_Pro_AP
wireless
Amped_Pro_AP
!
2
If you do not wish to connect wirelessly, you may also use a wired
connection between the Access Point (LAN Port) and your computer to
access the Settings Menu.
Open your Web Browser
Enter the setup web address into your browser:
http://setup.ampedwireless.com
If the URL fails to open, then try: http://192.168.1.240
3
Welcome to the Smart Setup Wizard
The Smart Setup Wizard will guide you
through the following settings:
System Clock
2 Wireless Network SSID
3 Wireless Network Security Key
1
Click Start to begin.
4
Set the System Clock Time
The System Clock is used for system logs
and setting schedules for Internet access.
Click Sync to synchronize the System Clock
with the time on your computer.
Click Next to continue.
5
Wireless Network ID
The ID of your Wireless Network is:
Amped_Pro_AP
To change it, enter a new name in the SSID field.
Users connecting wirelessly to the Pro Access Point
will use this ID to identify your wireless network.
Click Next to continue.
6
Wireless Network Security
The default Security Key (WPA) of your
wireless network is: wireless
To change it, enter a new key in the Security Key
field. The key must be at least 8 characters long.
Click Next to apply your settings.
The Pro Access Point will reboot. This
process may take up to 2 minutes. The
page will automatically reload after the
countdown. If it does not, you may need
to reconnect to the Access Point and
refresh the page manually.
7
Setup Summary
The Setup Summary provides you with
information regarding your current settings.
If you have wired network devices, you may
attach them to the wired ports on the back
of the Pro Access Point for additional wired
connectivity.
If you have any questions during the setup process
please contact Amped Wireless support department:
Phone: 888-573-8820
Email: [email protected]
Web: www.ampedwireless.com/support
This is the second page of the Setup Guide. Start on the opposite side first.
How to Connect your Wireless Computer to the Pro Access Point
Windows 7 & Vista
A. Click on the Wireless icon to see available
wireless networks (For Vista, click Start >
Connect To). Select the "Amped_Pro_AP"
network and click Connect.
B. When prompted, enter the wireless
security key "wireless" and click OK.
Amped_Pro_AP
Mounting Instructions
WALL MOUNTING
a
a
Place the AP600EX against the wall, use a pencil
and mark two pilot locations through the mounting
hole on the wall.
b
Remove the AP600EX and securely drill two screws
where you have marked on the pilot location’s wall.
c
Now, mount the unit onto the secured screws.
c
b
DESKTOP MOUNTING
POLE MOUNTING
b
a
a
b
a
Place the stand in an optimum location.
a
Place the AP600EX against the pole.
b
Secure the AP600EX onto the desktop mount.
b
Use the included hose clamp or plastic tie and secure
the AP600EX to the pole by inserting one side of the
clamp through the smaller hole located on the bottom
of the mounting bracket. If using the hose clamp,
use a screw driver to fasten the clamp until the
adapter is securely mounted.
Using the Smart Features on your Pro Access Point
The Pro Access Point is equipped with many powerful security features which can be
accessed through the web menu under More Settings > Smart Features on the left side of
the web menu:
12:26
Wireless Access Scheduling
Control when your WiFi is on/off
Menu Location: More Settings > Smart Features > Access Schedule
?
User Access Control
Restrict network access to specific users
Menu Location: More Settings > Smart Features > User Access
Wireless Coverage Control
Adjust the distance of your wireless network
Menu Location: More Settings > Smart Features > Wireless Coverage
Web Menu (Left Side)
If you are unfamiliar or want more information on how to set up Smart Features, please refer
to the User’s Guide on the included CD.
Setting a Static / Manual IP for your Pro Access Point
If your network uses Static IP settings, you will need to set a static IP address for your Pro
Access Point. To do this, access the More Settings > IP Settings menu from the navigation
menu and select Disabled from the DHCP drop down menu. Next enter the IP information
as it relates to your network. Click Apply and reboot when you are done.
How to Reset the Pro Access Point to Default Settings
The Pro Access Point can be reset to default
settings by holding down the Reset button
on the Power over Ethernet (PoE) Adapter
for 5-10 seconds. To simply reboot the Pro
Access Point, press the Reset button for 1
second and release.
Reset
Note: Pro Access Point must be connected to the PoE adapter for the Reset button to function.
Using an External Antenna
For additional range and coverage, the AP600EX comes with the option of using external antennas
instead of the high power internal antenna. To use the external antenna, attach the antenna and log
on to the web menu to activate the external antenna port:
Remove the lid covering the external antenna port and
attach external antenna to the Pro Access Point.
Enter the setup web address into your web browser:
http://setup.ampedwireless.com
If the URL fails to open, then try: http://192.168.1.240
Click on More Settings,
Settings then select Wireless Settings
Settings. Select Antenna Settings from the
drop down menu. Check External Antenna to activate the external antenna and click Apply.
Apply
Troubleshooting Tips
PROBLEM:
SOLUITIONS:
PROBLEM:
SOLUITIONS:
I entered http://setup.ampedwireless.com and it failed to open the Web Menu.
a. Make sure your computer is connected to the Pro Access Point wirelessly and NOT using a network cable.
Ensure the power is plugged in and on. Try to access the setup menu again.
b. Enter the following web address into your web browser: http://setup.ampedwireless.com
c. Power off (unplug the power adapter) the Pro Access Point and power it back on. Try again.
d. Reset your Pro Access Point to default settings by holding the Reset Button (located on the back panel)
for five to ten (5-10) seconds only and try again.
The Pro Access Point is not functioning and the Power LED keeps blinking.
a. The network (Ethernet) cable you are using is not compatible with the Pro Access Point. Replace the
network cable between the PoE Adapter and your router/switch with a Non-PoE cable.
Tip: How to check whether your cable is a PoE cable or a Non-PoE cable:
Check the connector tip of the network cable to see if there are 4 wires or 8 wires.
Non-PoE cables have only 4 wires.
b. If you have a computer or network device attached to the LAN port of the Pro Access Point, check that the
cable is a Non-PoE cable. Some unsupported PoE devices may cause power conflicts with the Pro Access Point.
PROBLEM: I do not have Internet access when connecting to the Pro Access Point.
SOLUITIONS: a. Your router or original network may not have Internet access. First check to see if you are able to access
the Internet by connecting directly with your router. If you cannot, there is a problem with your router that
needs to be fixed first. If you are able to access the Internet, continue with the following troubleshooting
options below.
b. Check that the Pro Access Point is correctly connected to your router or network switch. The router should
be connected to the Network port on the PoE Adapter (not directly to the Pro Access Point). The PoE
adapter should be connected to the Pro Access Point’s PoE port. After the connection has been established,
allow up to 2 minutes for the Pro Access Point to configure itself to your router’s settings.
c. Your router may be using Static IP assignments. If so, you will need to configure a Static IP for the Pro
Access Point. Connect your PC to the Pro Access Point using an Ethernet cable. Disconnect your PC from
any wireless networks that it may be connected to. Access the web menu at setup.ampedwireless.com using
a web browser. Access the IP settings menu from the left hand navigation bar. Select ‘Disabled’ under the
DHCP dropdown menu and enter an IP address that matches your router’s IP settings.
Amped Wireless
A Division of Newo Corporation
Copyright © 2011 Amped Wireless / Newo Corporation. All rights reserved.
Amped Wireless, Newo Corporation, the Amped Wireless Logo are registered trademarks or trademarks of Newo Corporation.