1
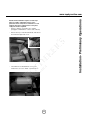
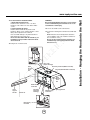
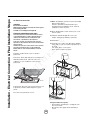
14. For internal blower installation ONLY:
a. Horizontal (Rear) discharge:
Install from the outside the 3 1/4 ” x 10” Rect.
transition on the outlet hole of the blower with 3
screws.
b. Vertical (Upper) discharge:
Install from the outside the 8" plastic round
transition, with 4 screws. Install transition so that
little position adjustment are allowed.
Note: Seal with duct tape only when transition is
firmly attached to the range hood.
Do not use duct smaller than the transition, (see
installation step 9) for further instruction about
duct to be used.
WARNING
Excessive Weight Hazard - Use three or more people
to move and install range hood. Failure to do so can
result in back or other injury.
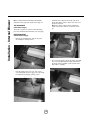
16. Secure hood with screws and washers.
17. Connect the ducting to the transition. Seal with duct
tape.
Note: If Duct has been already fixed to transition
(See installation step 15b), install the transition to
the hood with 4 screws.
Do not use duct smaller than the transition, see
installation step 9 for further instruction about
duct to be used.
15. Hang hood on lower bracket.
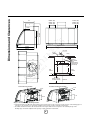
Upper outlet
(Vertical discharge)
Upper
security
screw
hole
Knock-out junction box (Mains connection)
Knock-out (External Blower connection)
Upper
security
screw
hole
Bottom security
screws hole
Lower
support
bracket
CenterLine
Rear outlet
(Horizontal
discharge)
Bottom security
screws hole
Rectangular
transition
19
Hanging bracket
Installation - Hanging the Hood onto the Wall
www.zephyronline.com