1
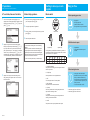
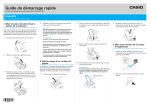
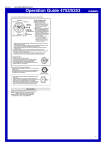
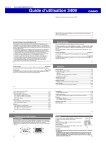
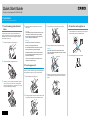
Quick Start Guide
Electronic Cash Register SE-S400/SE-C450
Preparations
Note: Please follow the steps described below.
1.To set memory protection batteries
To prevent losing all your settings and sales data, we
strongly recommend that you set the memory protection
batteries before you use the cash register and replace
them at least once a year.
printer cover.
the Mode switch and turn it to OFF position.
Warning
No battery is included in the accessories.
Do not expose batteries to direct heat, let them
become shorted or try to take them apart.
Keep batteries out of the reach of small children.
If your child should swallow a battery, consult a
physician immediately.
4. Close the platen arm slowly until it locks securely.
Warning
Never touch the printer’s thermal head and the
platen. Avoid the thermal paper from heat, humidity
or direct sunlight.
platen arm
There is a risk of explosion if the batteries are
replaced with improper type.
2.To set a paper roll
The following explains for setting roll paper used as
receipts. If you wish to use the paper roll for journal (sales
record), please see page E-11 of the owner’s manual.
1. Open the platen arm by lifting it up.
3. Note the (+) and (–) markings in the battery compart-
ment. Load a set of two new “AA” type manganese
batteries so that their plus (+) and minus (–) ends are
facing as indicated by the markings.
2. Ensuring the paper is being fed from the bottom of the
roll, lower the roll into the space behind the printer.
Q SG291*E
3.To turn the cash register on
1. Insert a Mode key that comes with the cash register in
Important
These batteries protect information stored in your
cash register’s memory when there is a power
failure or when you unplug the cash register. Be
sure to install these batteries first.
Never try to recharge the batteries.
2. Remove the battery compartment cover.
3. Put the leading end of the paper over the printer.
M
PG
1. Remove the printer cover by lifting it up.
4. Replace the battery compartment cover and the
5. Replace the printer cover, passing the leading end of
the paper through the cutter slot. Tear off the excess
paper.
2. Plug in the power cord into an AC outlet.
Preparations
Getting to know your cash
register
Note: Please follow the steps described below.
4.To set date, time and tax table
5.About help guidance
1. As soon as the power socket is plugged in, the
1. When you have any problem to operate or program
display shows the language selection display. Choose
language and country by using ? or > keys then
press F key.
Mode switch
•
•
•
•
2. The register prints items of guidances.
4. Follow the printed instruction.
PGM
OP
While the store is open
You can download “Setting tool” from the following
websites.
Deutsch http://www.casio-b2b.com/ecr/de/support/
Français http://www.casio-b2b.com/ecr/fr/support/
English http://www.casio-b2b.com/ecr/euro/support/
Nederlands http://www.casio-b2b.com/ecr/nl/support/
UK :http://www.casio-b2b.com/ecr/uk/
For other countries, please ask your Casio dealer.
Program key
Operator key
The Program key marked PGM can select any position of
the Mode switch while Operator key marked OP can select
only OFF, REG, or CAL positions.
PGM
OP key
PGM key
¡
RF
¡
OFF
¡
¡
REG
¡
¡
X
¡
Z
¡
Using ten key pad, input tax rates. You can set four
kinds of tax rates.
2 RF (Refund)
Use this position to correct registered items.
3OFF
The cash register turns off in this position.
4 REG (Register)
This position is for normal transactions.
6 X (Read)
This is the position used for issuing daily sales totals
report without clearing the data.
7 Z (Reset)
This position is for issuing reports of daily totals with
clearing the accumulated totals.
8X2/Z2
This position is used to print periodic sales reports.
MA1302-A
• Registrations
• Issuing latest total sales report if
needed.
X2/Z2
¡
1 PGM (Programming)
This position is for setting your cash register to suit the
needs of your store.
3. Display then changes to tax table setting screen.
Plugged in?
Enough paper roll?
Date and time are correct?
Enough small change in the drawer?
Mode switch
press / key.
Moving the input area (reversed area) by ? or >
keys, input date, month, year and time from ten key
pad. Input the time by 24 - hour system. For example,
1356 for 1:56 pm. After then press F key. For
Australian model, the setting is completed by this step
To set Australian GST, please see the next section.
Before opening your store
your cash register, press / key.
3. Enter the number you need help from ten key pad and
2. Display changes to date and time setting display.
Daily job flow
After closing the store
• Issuing day’s total sales report.
• Withdraw the money from the drawer.
After you withdraw all the money
from the drawer, we recommend that
you leave the drawer open when you
leave your store.
• Turn the Mode switch to OFF.
• Please see page E-22 on SE-S400.
• Please see page E-25 on SE-C450.