1
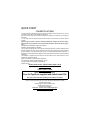
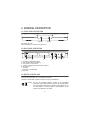
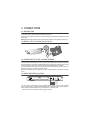
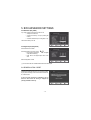
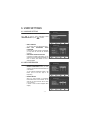
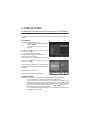
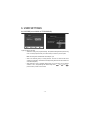
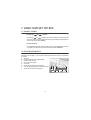
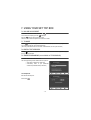
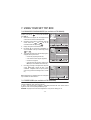
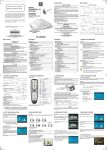
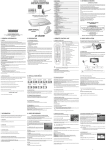
DIGITAL
TERRESTRIAL
TV RECEIVER
ITD 58 - ITD 59 - ITD 60
ITD 61 - ITD 62 - ITD 64
ITD 68* - ITD 72*
*Top Up TV compatible
USER MANUAL
ENGLISH
QUICK START
CONGRATULATIONS!
This new generation of Set Top Box gives you access to new digital services and makes it easy for you and
your family to choose the very best experiences of Digital TV.
Once you have connected your Set Top Box and adjusted it according to your preference, you can enjoy all
the services.
You can update your Set Top Box through the antenna stream as new functions and services become
available.
Sagem set top box operates a policy of continuous development. Therefore we reserve the right to
make changes and improvements to any of the products described in this manual without any prior
notice.
The EMC Directive 89/336/EEC is applied to this product.
SAGEM is a registred trademark of SAFRAN.
The CE marking certifies that the product meets the essential requirements of Directive 1999/5/CE of the
European Parliament and of the Council pertaining to microwave radio equipment and telecommunication
terminal equipment, for the safety and health of users, for electromagnetic interference. Furthermore, it
efficiently uses the frequency spectrum attributed to ground and spatial communication to prevent damaging
interference.
The declaration of compliance may be looked up on the www.sagem.com site, section "support" or can be
obtained from the following address:
Sagem Communication - Customer relations department
4 rue du Petit Albi - 95800 Cergy Saint-Christophe - France
Copyright © Sagem Communication (SAFRAN Group)
All rights reserved
ITD 58 / ITD 60 / ITD 61 / ITD 62 / ITD 64 / ITD 68 / ITD 72
Digital TV Receiver
Quick Start Guide
IMPORTANT NOTICE
Before unpacking this product further,
Your Set Top Box is supplied with default code 1234.
Have you or your local store checked your Postcode for reception?
Telephone number for your local store is on your till receipt.
Should your Store be unable to help, please check the following Website Links for Digital
Terrestrial signal coverage:
http://www.dtg.org.uk/consumer/freeview.html
htmlhttp://www.freeview.co.uk
http://www.bbc.co.uk/digital
Please note : In order to receive quality digital signal
you may need an aerial upgrade.
-I-
QUICK START
Connection diagram
ITD 60 and TV without scart
ITD 58/59/60/68 and TV with scart
On ITD 58/59, only analog channels can be recorded.
ITD 61/62/64/72
- II -
QUICK START
Installation Guide
Getting Started
Unpack your Sagem Communication digital receiver and check for the following accessories : User Manual, remote
control, batteries and power cable.
Disconnect power to all your existing equipment.
Locate product in preferred position.
Connect all equipment as shown in the diagram on the adjacent page.
Finally, once all other connections are made, connect power and switch on your television set.
Setting up your Set Top Box
Switch on your Set Top Box. Your television switches to external input. If your television does not switch automatically,
select the external input to which the Set Top Box is connected (refer to your TV handbook for details).
The Set Top Box displays a first time installation message. Press OK to continue.
Press OK to confirm menu language and user country set up.
Your Set Top Box will now search for all available channels.
Please be patient as this process takes a few minutes.
When completed, press OK to save the channel list. You should now be watching Digital Television.
Select your preferred digital channel using the Up arrow/Down arrow key button or the numbered keys on your remote
control.
Reception issues
If no reception or less than 10 channels are found, picture freezes, blanking out or blocking occurs, please re-check all
connections and repeat the automatic tuning procedure above.
Problems with setting up your Set Top Box could be caused by incorrect signal levels. Your aerial system may need
realignment or to be upgraded. Contact your retailer for details.
In case of persistant problems despite of correct signal level, contact your retailer or call Sagem Communication
helpdesk at 0905 77 48 081 (0.15 £/min, tariff cost effective form 27/06/2005).
Reasons to upgrade your aerial installation
They are 3 main reasons why you may need to upgrade your aerial :
1. your current aerial and cabling may not be able to receive all the digital channels due to its age and condition,
2. in your location the digital channels may be transmitted on a different frequency to your analog signal and you
may need a different type of aerial to receive them,
3. the new digital channels may be transmitted from a new transmetter and if this is the case, the aerial would
have to be realigned. Alternatively you could add a second aerial to your system.
For further informations, please contact your retailer.
Warnings
Interference - Do not place your Set Top Box near appliances which may cause electromagnetic interferences (i.e. hi-fi speakers). If you do, it
may adversely affect the working of the unit, causing the picture or sound to distord.
Covers - Do not remove any fixed covers as this may expose dangerous voltages.
Weather - It is advisable to unplug the aerial during a thunderstorm. Even if your Set Top Box and TV are switched off they can still be damaged
by lightning strikes.
Ventilation - The ventilation holes in the casing of your Set Top Box prevent it from over heating. Do not block or cover these holes, especially
with cloth or paper. If your Set Top Box is to be built into a compartment or similary enclosed, make sure that there is a gap of at least 10 cm on
both sides and 20 cm at the top and back of the unit.
Damage - Never use your Set Top Box if it is damaged in any way.Always place your television on a flat level surface avoiding anywhere which
may be subject to strong vibration.
Batteries - Batteries are easily swallowed by young children. Do not allow young children to play with the remote control unit.
Temperature - Avoid extreme temperature, either hot or cold. Place your Set Top Box well away from heat sources such as radiators or gas/
electric fires. Do not place candles or table lamps on or near your Set Top Box.
Moisture - Do not allow your Set Top Box to be exposed to rain, moisture or dust. Do not place a plant or flowers which may need wateringon
your TV. If any liquid is split inti your Set Top Box it can cause serious damage. If you spill any liquid into your Set Top Box switch it off at the
mains immediately and contact your retailer.
- III -
CONTENTS
QUICK START ............................................................................................... I
1. GENERAL INFORMATION ....................................................................... 1
1-1. SAFETY ........................................................................................................ 1
1-2. PACKING LIST ............................................................................................. 1
1-3. CONNECTION TO THE MAINS SUPPLY .................................................... 1
2. GENERAL DESCRIPTION ....................................................................... 2
2-1. FRONT PANEL DESCRIPTION ................................................................... 2
2-2. REAR PANEL DESCRIPTION ...................................................................... 2
2-3. REMOTE CONTROL UNIT ........................................................................... 2
2-3-1. Battery installation ........................................................................................... 2
2-3-2. RCU operation ................................................................................................. 3
3. CONNECTIONS ........................................................................................ 4
3-1. INTRODUCTION ..........................................................................................
3-2. INSTALL TOP UP TV CARD (only ITD 68/72) .............................................
3-3. CONNECTION TO TV SET, VCR AND ANTENNA ......................................
3-4. AUDIO AMPLIFIER (only ITD 64) .................................................................
4
4
4
4
4. FIRST TIME INSTALLATION ................................................................... 5
4-1. GENERAL INFORMATION ...........................................................................
4-2. FIRST TIME INSTALLATION .......................................................................
4-3. LANGUAGE ..................................................................................................
4-4. COUNTRY ....................................................................................................
4-5. CHANNEL SEARCH IN PROGRESS ...........................................................
4-6. AERIAL FAILURE .........................................................................................
5
5
5
6
6
6
5. BOX ADVANCED SETTINGS .................................................................. 7
5-1. PRELIMINARY/ INSTALLATION CODE ....................................................... 7
5-2. CHANNEL SEARCH: AUTO TUNE .............................................................. 8
5-3. AUDIO/VIDEO INSTALLATION .................................................................... 9
5-3-1.
5-3-2.
5-3-3.
5-3-4.
TV .................................................................................................................... 9
VCR (Not available on ITD58/59/60/68) .......................................................... 9
Modulator (Only ITD60) ................................................................................. 10
Digital output (Only ITD64) ............................................................................ 10
5-4. REINSTALLATION - RESET ...................................................................... 10
CONTENTS
6. USER SETTINGS .................................................................................... 11
6-1. LANGUAGE SETTING ............................................................................... 11
6-2. USER PREFERENCES .............................................................................. 11
6-3. FAVOURITE LISTS INSTALLATION (not available on ITD 58/59/60/68) .. 12
6-3-1. CREATION ..................................................................................................... 12
6-3-2. MODIFICATIONS ........................................................................................... 12
6-4. LOCKING (not available on ITD 58/59/60/68) ............................................ 13
6-5. CHANGING INSTALLATION CODE ........................................................... 14
7. USING YOUR SET TOP BOX ................................................................. 15
7-1. CHANNEL CHANGE ..................................................................................
7-2. PROGRAM INFORMATION .......................................................................
7-3. EXTENDED PROGRAM INFORMATION ...................................................
7-4. TV CHANNELS LIST ..................................................................................
7-5. AUDIO LANGUAGE AND SUBTITLE LANGUAGE SELECTION ..............
15
15
16
17
17
7-6. VOLUME ADJUSTMENT ............................................................................
7-7. TV MODE ....................................................................................................
7-8. DIGITAL TEXT SERVICES .........................................................................
7-9. TIMER PROGRAMMING (not available on ITD 58/59/60/68) ....................
18
18
18
18
7-10. ENHANCED PROGRAM GUIDE (not available on ITD 58/60/68) ...........
7-11. FREEZE VIDEO (not available on ITD 58/59/60/68) ................................
7-12. RADIO MODE ...........................................................................................
7-13. SET TOP BOX ENHANCEMENT .............................................................
7-14. TROUBLESHOOTING ..............................................................................
7-15. OUTLINE SPECIFICATIONS ...................................................................
7-16. GUARANTEE (TERMS AND CONDITIONS) ...........................................
20
20
21
21
22
23
24
7-5-1. Audio language .............................................................................................. 17
7-5-2. Subtitle language ........................................................................................... 17
7-9-1. Sleep timer ..................................................................................................... 18
7-9-2. Events timer ................................................................................................... 19
8. ENVIRONMENT ...................................................................................... 25
8-1. PACKAGING ............................................................................................... 25
8-2. BATTERIES ................................................................................................ 25
8-3. THE PRODUCT .......................................................................................... 25
1. GENERAL INFORMATION
1-1 SAFETY
Use of your Set Top Box is subject to safety measures designed to protect users and their environment.
In order to keep the high performance of your Set Top Box, it should:
• be located in an indoor place to protect it from lightning, rain and direct sunlight,
• be located in a dry and well-ventilated place,
• be protected from damp, be installed in a way to avoid violent shocks,
• be plugged directly into the mains with the cords provided with the Set Top Box. The use of an
extension cord is not recommended,
• do not place anything on top of your Set Top Box as this will restrict ventilation.
Be careful
• Contact with a liquid would lead to deterioration of your Set Top Box, which could cause failure.
Never open your Set Top Box.
• Like any electronic device, the Set Top Box contains fragile components. It should thus be
installed in a place where it is unlikely to fall and out of reach of children.
• The case of the Set Top Box can be cleaned with a soft and dry cloth. Do not use any type of
abrasive pad, scouring powder or solvents, such as alcohol or turpentine, as they could damage
the surface of the case.
• The Set Top Box must be disconnected from mains supply (from wall socket or rear panel)
before any modification of connection between TV, VCR or antenna.
• Use only the Sagem Communication power adaptator given with the Set Top Box to connect the
STB to the mains. Other practice may be dangerous.
• Do not forget to put the batteries inside the remote control unit.
1-2 PACKING LIST
Your Set Top Box is delivered with the following components:
• a remote control unit,
• 2 batteries (R6) for the remote control unit,
• a scart cord for connection to the TV set (Not available with ITD 58/59/61/68),
• AC/DC adapter,
• this user’s manual.
1-3 CONNECTION TO THE MAINS SUPPLY
The Set Top Box must be connected by the AC/DC adapter to a 220-240 V wall socket. Turn on the mains
power on the wall.
As a safety measure, you can use the power adaptors to cut off the 230V current in case of danger. They
must be located near to the device, and must be easily accessible.
Be advised to put your Set Top Box in standby when not used.
-1-
2. GENERAL DESCRIPTION
2-1 FRONT PANEL DESCRIPTION
Green/Red
IR sensor
Red LED Stand-by mode.
Green LED Reception of commands from remote control.
2-2 REAR PANEL DESCRIPTION
A
B
C
D
E
F
A – Connector for external AC/DC adapter
B – Scart socket for VCR/AUX connection (*)
C – Scart socket for TV set connection
D – mini jack 3.5 for DIGITAL audio and AUDIO L/R output (**)
E – RF output for TV
F – Aerial input
(*) Not available on ITD 58/59/60/68
(**) Only ITD64
2-3 REMOTE CONTROL UNIT
2-3-1 Battery installation
The remote control unit requires two AA or R6 batteries for operation.
The diagram inside the battery compartment will show you how to insert the batteries.
Warning:
Only use the appropriate batteries, according to the manufacturer
specifications (see “Outline specifications” page 23). The provided batteries
are not rechargeable. Bring back the defective or empty batteries to your
local waste disposal in accordance with the current regulations. Do not
dispose of used batteries in your dustbin.
-2-
2. GENERAL DESCRIPTION
2-3-2 RCU operation
KEY
0-9
Red
Green
Yellow
Blue
INFO
MENU
EXIT
BACK
FUNCTION
Standby/Switch on
Text
Subtitles
TV/VCR
Numerical keys
Audio mute
Audio track
Radio mode
Still video (*) (**)
Change favourite lists (*) (**)
Guide (*)
Function key colour
Function key colour
Function key colour
Function key colour
Information
Menu
Exit
Previous channel and Back in menus
Audio volume - and Left arrow for navigation
Audio volume + and Right arrow for navigation
Channel - and Down arrow for navigation
Channel + and Up arrow for navigation
Smart List and Confirm in setup menu
Be sure to point the remote control unit directly towards the Set Top Box.
(*) Function not available on ITD 58/60/68
(**) Function not available on ITD 59
-3-
3. CONNECTIONS
3-1 INTRODUCTION
There are several ways of connecting the Set Top Box to your audio/TV system. Some of the methods enable
you to listen to music in stereo sound of CD like quality (ITD 64 only).
Consult your local supplier for assistance in setting up an audio/video configuration best suited to your unique
requirements.
Warning: Disconnect the Set Top Box from the mains before connecting or disconnecting any device to it.
3-2 INSTALL TOP UP TV CARD (only ITD 68/72)
To access, Top Up TV channels, you may turn the receiver and place the smard card as indicated below.
3-3 CONNECTION TO TV SET, VCR AND ANTENNA
Only connect your terrestrial antenna when the Set Top Box is unplugged.
The Set Top Box connects directly to your TV by a scart connector which includes RGB signals to guarantee
optimum image quality. Connect the scart cable between the TV scart connector of the Set Top Box and the
main scart connector of the TV (the one with 3 points indicating that RGB provision is available).
Then connect the Set Top Box (AUX scart connector) to your VCR or DVD player (main scart connector on
the VCR or DVD player). See Connection diagram page II.
Note: ITD 60 is equipped with an RF modulator. You can't see digital programs via the RF lead on another
TV set.
3-4 AUDIO AMPLIFIER (only ITD 64)
Yellow
DIGITAL
Red
Analog R
White
Analog L
You can connect your Set Top Box to your Hi-Fi amplifier (standard or home cinema) by using a standard
jack 3.5 to 3 RCA cable(*) to obtain excellent listening comfort comparable to those of audio programs.
Volume adjustment is possible directly from your Set Top Box only on analog output.
(*) This kind of cable is also intended for digital and analog camcorder.
-4-
4. FIRST TIME INSTALLATION
4-1 GENERAL INFORMATION
Once you have correctly connected the Set Top Box, you also have to perform a “First time installation”.
During this procedure, helpful information is displayed at the bottom of the menus.
Please note!
The
button always confirms a selection within these menus, and pressing it will take you to the next
step in the installation process. However, and this is important, often more than one value has to be entered
in a menu. First, perform all necessary settings on the different lines. Then, confirm them all simultaneously
by pressing
.
• Use cursors
• Use cursors
and
and
to move upwards and downwards from one line to another.
to change settings.
You can also use the numerical keys on the remote control to enter numeric values.
4-2 FIRST TIME INSTALLATION
• Plug in your Set Top Box.
• The “First time installation” menu is shown.
• Press
to continue.
4-3 LANGUAGE
• Select the desired language with cursors
and .
• Press
to continue.
-5-
4. FIRST TIME INSTALLATION
4-4 COUNTRY
• Select the desired country with cursors
. This will also set the current time.
• Press
and
to continue.
4-5 CHANNEL SEARCH IN PROGRESS
This menu will be shown as the Set Top Box is searching for
TV and radio channels.
Please note that the search procedure may take a few
minutes.
You can cancel the search at any time by pressing EXIT.
When the search procedure has ended, a message will
indicate how many TV and radio channels have been found.
• Press
to finish the first time installation
and to open the door of Digital TV.
4-6 AERIAL FAILURE
If the channel search has found no channel, this screen is
displayed to help you adjust the aerial.
Enter a channel number
(refer to http//www.dtg.org.uk/retailer/tx_details/_tx_index.htm.
For example, Oxford channel numbers are 29, 34, 48,51, 52,
68. These numbers depend on broadcasters and are subject
to change.) and move the antenna until the signal and quality
bars are green.
When signal and quality are green, press BACK to launch a
new channel search.
-6-
5. BOX ADVANCED SETTINGS
Go to MENU/INSTALLATION/BOX SETTING/CHANNEL SEARCH.
5-1 PRELIMINARY/ INSTALLATION CODE
Your Set Top Box is supplied ready to use for a standard configuration.
TV : 4/3 format, RGB (Letterbox)
VCR : PAL (none on ITD 58/59/60/68)
Access to the installation screens shown below will enable you to adapt your Set Top Box to your favourite
equipment.
The access to main menu is obtained by pressing the MENU key.
You can memorise your selections by pressing the
key.
Return to the previous screen by pressing the BACK key.
Exit from all the screens by pressing the EXIT key.
Use cursor
to move down to the INSTALLATION line
and press
to confirm.
Access to the installation menus is protected by a secret
installation code to avoid any unintentional misadjustment.
Your Set Top Box is supplied with default code 1234.
Note: you will not be prompted to enter any code, if the
installation code is «0000».
Enter your code.
As soon as each value is entered, the segment is replaced by
a star.
Using cursor
of the remote control unit, you can come
back to a value that has already been entered and modify it
provided the code has not been confirmed by
.
After entering the four digits press
INSTALLATION
ENTER YOUR INSTALLATION CODE
THEN PRESS OK TO CONFIRM
----
to confirm.
An error message will be displayed if the code you have
entered is not correct.
MAIN MENU
ENTER YOUR INSTALLATION CODE
THEN PRESS OK TO CONFIRM
****
BAD CODE
PLEASE TRY AGAIN
-7-
5. BOX ADVANCED SETTINGS
5-2 CHANNEL SEARCH: AUTO TUNE
This installation will complete list "All services" with all the channels found during the scanning of all the
frequencies.
This list is a summary of all the channels and will not be modified. It will be possible to create personal lists
based on this reference list, also called list "All services" (see page 12).
It would be advisable to launch a channel search monthly in order to keep your Set Top Box up todate.
Press
to start channel tuning.
An indicator at the bottom of the screen will indicate the
percentage of the scanned frequency band.
The number of different services found is displayed in real
time.
A message at the end of the scanning process will ask you to
memorize. Press
.
You can cancel the scanning process at any time by pressing
the EXIT key.
You can memorize or not.
Note: You may observe a difference between the number of channel found and the number of channel
present in the channel list. This may happen when you are in area where you receive same channel from
different transmitters.
-8-
5. BOX ADVANCED SETTINGS
5-3 AUDIO/VIDEO INSTALLATION
Use cursor
line and press
to move down to the TV AND VCR SETTING
to confirm.
5-3-1 TV
Several choices are available.
Scroll through the choices using cursors
or
:
• TV format : 4/3 (Letterbox or Pan-scan) or 16/9.
• TV RGB Output: low,medium, high or none if you
want to have PAL video output (*).
(*) Note that if you choose low, medium or high you will not able to choose the VCR standard format.
5-3-2 VCR (Not available on ITD58/59/60/68)
Several choices are available.
Scroll through the choices using cursor
• PAL or S-Video standard.
After a final check, press
terminate.
or
:
to memorize the settings. Press BACK to continue installation or EXIT to
-9-
5. BOX ADVANCED SETTINGS
5-3-3 Modulator (Only ITD60)
If you want to adjust the channel for another TV set:
• directly access the menu,
• choose the channel (21 to 69) by entering the
number,
• choose the standard of your country (B/G, I or K).
The channel is factory set to 38.
5-3-4 Digital output (Only ITD64)
Several choices are available.
Scroll through the choices using cursors
or
:
• Home cinema: Send AC3 audio data to the digital
output when available (*).
• PCM: Send to the digital output stereo audio
data.
Default configuration is PCM.
(*) If no AC3 audio data are available default audio track will be played.
5-4 REINSTALLATION - RESET
Use this option only if you have to start the complete
installation procedure all over again. If you continue from here,
all your previous settings, access code and favourite channels,
etc. will be erased!
If you do not want to perform a reinstallation, you can
leave this menu when the warning is displayed by
pressing the BACK or EXIT key.
- 10 -
6. USER SETTINGS
6-1 LANGUAGE SETTING
Go to main MENU/INSTALLATION/USER SETTINGS
Press
for access to various configurations. Select
LANGUAGE SETTING and press
to confirm.
• MENU LANGUAGE
You may select the menu displayed languages.
• MAIN
AND
ALTERNATIVE
AUDIO
LANGUAGES
If more than one audio language is transmitted,
you may select the main and the alternative
languages.
• MAIN AND ALTERNATIVE SUBTITLES
If more than one subtitle is transmitted, you may
select the main and the alternative subtitles. To
have no subtitle, select NONE for main or
alternative subtitle.
6-2 USER PREFERENCES
(APPEARANCE PREFERENCES)
• BANNER TRANSPARENCY When you switch
channels, an information banner will be shown for
a few seconds.
You can select the transparency aspect of the
banner (none for full blue, high for full
tranparency).
• BANNER TIME OUT
When you switch channels, an information
banner will be shown for a few seconds. You can
select for how long the banner will be shown
(0 to 10 seconds).
0 second to have no banner displayed when
zapping.
- 11 -
6. USER SETTINGS
6-3 FAVOURITE LISTS INSTALLATION (not available on ITD 58/59/60/68)
To go main MENU/INSTALLATION/USER SETTINGS/FAVOURITE LISTS
This function will enable you to make up a FAVOURITE list of the TV or radio type from the reference list All
Services.
6-3-1 CREATION
Two lists are displayed simultaneously.
• The list on the left side is the reference list (issued
scanning installation).
• The list on the right side is the list under
construction.
Use cursors
and
of the remote control to select the
main of the list to be created.
Use
to validate the list to be created.
Press the green key to integrate the selected channel.
Repeat as many times as necessary.
At the end of the creation, memorise using the yellow key.
Use cursors
and
from one list to another.
of the remote control unit to move
To copy a channel from list "All services" to favourite list (A to
G), place the index on the program to be transferred and press
the green key.
Repeat as many times as necessary.
At the end of creation, memorise using the yellow key.
6-3-2 MODIFICATIONS
At any time, you can modify your favourite list (A to G). Memorize at the end using the yellow key.
• To erase, place the index on the channel to be erased and press the red key.
• To insert a new channel from main list "All services" (for example if you have forgotten to put it
in number 5). Move the index in the list "All services" (all channels), select it by pressing the
green key (the channel is added at the end of your favourite list). Move the index in your favourite
list up to the channel, press the blue key to select it, then use
or
key to move it , and
press blue key again when you are at the right place.
• To move a channel from one place to another in a favourite list, delete it and then insert it from
the main list to the place you want.
- 12 -
6. USER SETTINGS
6-4 LOCKING (not available on ITD 58/59/60/68)
To go main MENU/INSTALLATION/USER SETTINGS/LOCKING
3 types of locking are provided:
• Select Box Locked (yes/no) for general locking. This represents the highest Set Top Box locking
level. You will be prompted to enter your code each time you switch on your Set Top Box.
Note: this locking will be activated after one standby/on cycle.
• Select Lock Channels (yes/no) for locking activation. This locks or unlocks all the locked
channels in one operation. This offers the advantage of being able to lock several channels and
unlock them temporarily.
• Select Channels To Lock for individual channel locking: you can choose to lock only selected
channels. To do so, navigate through the channels using cursors
and
and
press each time you want to lock a channel.
- 13 -
6. USER SETTINGS
6-5 CHANGING INSTALLATION CODE
To go main MENU/INSTALLATION/USER SETTINGS/CHANGING INSTALLATION CODE
Enter your new code.
As soon as the value has been entered, the segment is
replaced with a star.
Use cursor
on the remote control unit to come back to a
value that has been entered and modify it.
In this case, the value becomes a blinking segment again,
indicating that entry is possible.
Enter the same new code to confirm it.
"CORRECT" appears, the code is validated automatically.
If you have not entered the right code, you will see the error
message according to appearing "BAD CODE
CONFIRMED", enter again the code.
Note: use value “0000” if you do not want to enter any protection code.
- 14 -
7. USING YOUR SET TOP BOX
7-1 CHANNEL CHANGE
• Using the keys
and
, or keys 0-9
Press the keys
and
to change channel or enter its number on numeric keypad of the
remote control unit to access the desired channel directly. It is possible to go back to the previous
channel viewed by pressing the BACK key.
• Using the channel list
Press the OK key to display the channel list, select your channel, press OK key again to validate.
It is possible to go back to the previous channel viewed by pressing the BACK key.
7-2 PROGRAM INFORMATION
Every time you change channels, you will receive program information for a few seconds (in the User
preferences menu (see page 11), you can select how long this information will be shown). The information
may include:
A - Channel list
B - Number of audio tracks and subtitles available
C - Channel number and name
D - Name of the current program
E - Current time
F - The start and end time of the current program
G - A bar, indicating the elapsed time of the current program
H - The start and end time of the next program.
- 15 -
7. USING YOUR SET TOP BOX
7-3 EXTENDED PROGRAM INFORMATION
The Set Top Box can display information about programs currently being broadcasted as well as those that
will be broadcasted next.
By pressing INFO while watching TV, you will get the “Program information” banner.
A - Program information (see page 15)
B - Short summary
C - Next program
If necessary, use
page.
D
key to continue reading on the next info
If the
icon is displayed (see D), an extended summary is
available.
Graupapageien sind zumeist sehr
konservative V gel, die sich am wohlsten
in ihrer gewohnten Umgebung f hlen.
Gew hnt man ein Graupapageienbaby von
klein an, an verschiedene rtlichkeiten,
ist eine sp tere Urlaubsunterbringung
kein Problem.
Press INFO to display it.
Use cursors
and
to switch between the current and
the next program information.
14:58 : Dr. Verena Breitenbach
A
and
?
You can see another channel information by pressing cursors
and
When there is a lot of text information, use cursors
to continue reading on the next info page.
By pressing
1
15:56
ProSieben
Die Bunte Vogelwelt
15:00
.
, you will watch the video. Press INFO or EXIT to return to TV mode.
- 16 -
i
7. USING YOUR SET TOP BOX
7-4 TV CHANNELS LIST
• When viewing TV programs, press
current channels list.
• Move with cursors
channel with
.
,
,
to display the
and
select
You can Change favourite lists with
key.
• Without displaying TV list, you can directly Change
favourite lists by pressing
key.
1
2
3
4
5
6
7
8
9
10
11
12
13
14
TWC 4 - EURO.
TWC 5 - FRANC.
MTV
N-TV
RTL
RTL2
SAT.1
BLOOMBERG TV
DTRAVELO YiH
CNN INT.
TV 5
ARTE
DW-TV
COMEDIE !
7-5 AUDIO LANGUAGE AND SUBTITLE LANGUAGE SELECTION
By pressing
or
, you open the menu that lets you
enter temporary settings. Settings made in this “options
menu” are only valid for the program you are currently
watching. If you leave the program and return to it again, the
temporary settings will be lost.
?
4 ENGLISH
2 FRENCH
7-5-1 Audio language
When available, you can choose select among the different
languages being broadcast.
ITD 64 only: If a digital audio stream is available,“DA” eg
digital audio - will be displayed on the same line than the audio language tag. This allows you to choose
between stereo or home cinema audio tracks.
Please note: when you select a digital audio, there will be no sound output from the analogue audio
connections.
7-5-2 Subtitle language
When available, you can select among different subtitle languages.
• Each time you press one of these two keys, you change language.
• A time out automatically closes this menu.
• The number on the left of each language indicates how many languages are available on this
current channel.
- 17 -
7. USING YOUR SET TOP BOX
7-6 VOLUME ADJUSTMENT
To increase or reduce the volume, use cursor
To turn off the sound quickly, press the
Press the
or
.
mute key.
mute key again to restore the sound.
The audio volume cannot be adjusted in the VCR and TV modes.
7-7 TV MODE
With the
button, you can toggle between external connected equipment, such as e.g. a digital terrestrial
TV or a video recorder (the video must be switched on).
(This is only valid when the units are connected via SCARTcables, and not by RF connection).
7-8 DIGITAL TEXT SERVICES
Pressing
key will launch digital text services when broadcast. These interactive applications give you
access to various information.
7-9 TIMER PROGRAMMING (not available on ITD 58/59/60/68)
Go to main MENU/TIMER PROGRAMMING
The Timer programming function enables the Set Top Box to:
• switch off at a selected hour (sleep timer),
• automatically switch to your preselected
channels at preselected times (events timer).
7-9-1 Sleep timer
Enter the selected sleep hour.
Confirm with
.
- 18 -
7. USING YOUR SET TOP BOX
7-9-2 Events timer
You can make the Set Top Box start and stop at a predefined
time.
The timer function is very useful when you want to record a
program and you are unable to start/stop the recording event
yourself, or when you just want to be reminded of the start of
a program you do not want to miss.
•
•
•
•
•
EVENTS TIMER
>
CHANNEL
-------------
DATE
--/--/---/--/---/--/---/--/---/--/---/--/--
START
--:---:---:---:---:---:--
END
--/---/---/---/---/---/--
Press OK to set or modify, A key to delete
Press
to set an event.
First, select Channel list with
or
key.
Set the date using the numerical keys on your remote control (dd/mm/yy).
If you enter a wrong digit, you can erase it with cursor
.
Set the start and stop time using the numerical keys on your remote control.
The different start times must not overlap each other.
• Select Confirm and press
to save.
• Select Cancel and press
to abort.
EVENTS TIMER
CHANNEL
DATE
START
END
Up to 6 different events can be predefined.
At each stop time, the box will return to standby.
>
006
22/01/03
12:52
14:52
DW-TV
CONFIRM PROGRAMMING
CANCEL PROGRAMMING
During the predefined event in process, you can stop it by
pressing the MENU key during 10 seconds.
- 19 -
7. USING YOUR SET TOP BOX
7-10 ENHANCED PROGRAM GUIDE (not available on ITD 58/60/68)
To display more detailed information about a selected
program, press the key
. To remove this information,
press EXIT key.
A - Resized video is displayed. The video displayed is the
current channel’s one before entering the EPG.
B - Channels list of the current list is displayed. Select the
chosen channel with
and
and see the
associated resized video by pressing
.
SHIN CHAN
15:45
16:00 (Total : 00:15)
Zeichentrickserie, J 1992/2002S
A
4
5
6
7
8
9
10
11
12
RTL2
SAT.1
Bloomberg TV.
dTravelo ýIHCN.
CNN Int.
TV 5
ARTE
DW-TV
COMEDIE !
15:45
16:00
17:00
18:00
18:30
20:00
20:15
22:35
00:35
B
4 - RTL2
A
31-01-03 15:47
Shin Chan
Schnulleralarm 3! - Wir...
Achtung Bausteller! Uns...
Veronica - Verliebt, verl...
King of Queens
RTL II News
The Game
Red Scorpion
C.I.A. Codename Alexa I...
Fri Sat Sun Mon Tue Wed Thu
C
C - Displays the name of the favourite list used.
D - By pressing
, the current event is highlighted. You
can see all events of the day if broadcast by pressing
and
.
E - The following information about the selected program is
displayed at the top of the screen:
• the time the program begins and ends,
ACHTUNG BAUSTELLE! UNSER TRAUM...
17:00
18:00 (Total : 01:00)
ReportageS
E
4
5
6
7
8
9
10
11
12
RTL2
SAT.1
Bloomberg TV.
dTravelo IHCN.
CNN Int.
TV 5
ARTE
DW-TV
COMEDIE !
• a bar which fills in as the program progresses,
A
• the name of the program,
D
15:45
16:00
17:00
18:00
18:30
20:00
20:15
22:35
00:35
31-01-03 15:47
Shin Chan
Schnulleralarm 3! - Wir...
Achtung Bausteller! Uns...
Veronica - Verliebt, verl...
King of Queens
RTL II News
The Game
Red Scorpion
C.I.A. Codename Alexa I...
Fri Sat Sun Mon Tue Wed Thu
i
• information about the program's contents (press
INFO key to have extended content shown by...).
F - Press red key to be able to change the date. Then press
cursors
and
to change the date (7 days
available according to the data sent by the provider)
(Only one day present and following events on ITD 62/
72).
Note: information about a selected program can be displayed
only if available from the broadcaster.
DAS NACHRICHTEN JOURNAL
00:25
01:00 (Total : 00:35)
InformagazinS
4
5
6
7
8
9
10
11
12
RTL2
SAT.1
Bloomberg TV.
dTravelo IHCN.
CNN Int.
TV 5
ARTE
DW-TV
COMEDIE !
A
15:45
16:00
17:00
18:00
18:30
20:00
20:15
22:35
00:35
31-01-03 15:47
Shin Chan
Schnulleralarm 3! - Wir...
Achtung Bausteller! Uns...
Veronica - Verliebt, verl...
King of Queens
RTL II News
The Game
Red Scorpion
C.I.A. Codename Alexa I...
Fri Sat Sun Mon Tue Wed Thu
F
7-11 FREEZE VIDEO (not available on ITD 58/59/60/68)
The current video can be frozen using the STILL key.
Pressing the STILL key again video is then released.
In order to avoid screen burning, brightness is automatically decreased after some minutes. Normal
brightness can be recovered pressing the STILL key again.
WARNING: keeping the video frozen with full brightness for a long time can damage your TV.
- 20 -
7. USING YOUR SET TOP BOX
7-12 RADIO MODE
Press the
Box.
key on the remote control unit of the Set Top
You can move through the list displayed using
.
You can adjust the volume with
and
and
.
7-13 SET TOP BOX ENHANCEMENT
The Set Top Box goes in this state when a new version of software is available on the network after startup.
• Red led flashes.
• The Welcome screen is displayed.
Then a screen for “download process” request is displayed.
You can delay the downloading process by pressing the EXIT
key. This process will be displayed again the next time you
switch on your Set Top Box. When pressing the key, the
downloading will be performed:
• Then the screen becomes black,
• Flash on led.
During this mode, no action from the user is authorized.
Once the process is completed, the receiver will switch on
automatically. After startup an information screen is displayed
on download completed. Then press
and enjoy with
your last viewed program.
Note: if the download process is not correctly performed, the
screen stays black and the green led flashes indicating the
cause of the failure (see table below).
When an error occurs, press any key on the remote to
continue. Then put the Set Top Box in standby mode and
switch it back on to perform downloading again.
If this operation does not succeed, unplug the main cord and
the antenna cord. Then plug them again to perform
downloading again.
- 21 -
DOWNLOAD PROCESS
IN ORDER TO IMPROVE THE BOX FONCTIONNALITIES
A DOWNLOAD OF SOFTWARE IS NECESSARY.
IT TAKES A FEW MINUTES.
DURING THE DOWNLOAD
YOUR SCREEN WILL BE BLACK.
DO NOT SWITCH OFF YOUR BOX
DURING THIS TIME.
TO RECEIVE THIS UPDATE
PRESS OK OTHERWISE EX TO EXIT.
DOWNLOAD PROCESS
DOWNLOAD COMPLETED
NEW S/W DOWNLOAD
IS SUCCESSFUL
TO RETURN TO YOUR PROGRAMME
PRESS OK
7. USING YOUR SET TOP BOX
7-14 TROUBLESHOOTING
Error Code
Origin of Error
User Action
1, 2 or 3 flashes
Reception error
Acknowledge the message by pressing any key on the
remote control. If necessary, repeat your request.
4, 5 or 6 flashes
Flow validity errors
Acknowledge the message by pressing any key on the
remote control. If necessary, repeat your request.
7 or 8 flashes
Local errors
Acknowledge the message by pressing any key on the
remote control. If necessary, repeat your request.
9, 10, 11 or 12
flashes
Various errors
Acknowledge the message by pressing any key on the
remote control. If necessary, repeat your request.
14, 15, 16 or 17
flashes
Defective Set Top Box Contact your retailer for replacement.
The remote control has no effect on the Set Top Box
Point the remote control towards the terminal.
Check the state and polarity of the batteries.
The red front panel LED remains on
Switch terminal from standby to on
A black screen or an error message is displayed
Perform a new auto tune.
Bad reception with a portable antenna
Move the antenna away from the Set Top Box.
- 22 -
.
7. USING YOUR SET TOP BOX
7-15 OUTLINE SPECIFICATIONS
Tranmission standards
Video Decoder
Front Panel
DVB-T, MPEG 2, COFDM
MPEG-2 (ISO/IEC 13818-2)
Profile level: MP@ ML
Input rates: 1.5 to 15 Mbit/s
Aspect Ratio: 4:3 and 16:9
Video resolution: 720x576, 704x576,
544x576, 480x576, 352x576,
352x288
Conversion: Pan and Scan, Letter
box
Resizing: Down/Up (1/4, 1/16)
1 leds
IR sensor : 38 KHz
Tuner (RF Input)
Input Connector: IEC 169-2
Female
RF input frequency range :
UHF 470-862 MHz (8 MHz BW)
RF input level: -90 to –20 dBm
RF impedance: 75 Ohm
COFDM bandwidth: 8Mhz
Tuning step: 166,66Khz
RF booster/modulator CH 21-69
(ITD 60 only)
Tv standard : B/G, K, I (selectable)
Ouput Connector: IEC 169-2 Male
Loopthrough F. Range: 47-862 MHz
Demodulator
COFDM mode : 2k / 8k supported
Support SFN
Modulation: QPSK, 16-QAM,
64-QAM
Code rate: 1/2 to 7/8
Mode: Non hierarchical
Guard interval: 1/4, 1/8, 1/16, 1/32
De-interleaver: 12x17 Forney
convolutionnal
Outer decoder: Reed Solomon
(204,188, 8)
Demultiplexing/Descrambling
CD ISO/IEC 13818-1 compliant
Rear Panel
1 x IEC female (signal input)
1 x IEC male (RF Loopthrough)
1 x TV SCART
1 x AUX SCART (ITD 62/64/72 only)
1 x 3.5 mm jack (digital and analog
audio output)
Audio Decoder
CD ISO/IEC 13818-3 compliant
MPEG layer I et II (Musicam Audio)
Mode: Mono, Stereo, Joint stereo
Sampling frequency:
32/44.1/48 KHz
A/V Data Input/Output
TV scart
RGB, CVBS, Audio stereo
AUX scart (ITD 62/64/72 only)
RVB in, CVBS, S-video out,
Audiostereo
Jack 3.5 mm (ITD 64 only)
• Audio L/R (volume and mute
control)
• Digital audio output (AC3 and
PCM)
External Power supply
AC: 220-240 V ~50 Hz
Output: 12 V DC 700 mA
Power consumption max. 11 W
(stand-by 9.5 W)
- 23 -
Physical Specifications
Size (wxdxh): 220x135x35 mm
Total weight: ~400 g
Operating temp. +5°C to +40°C
Total packing (carton box)
Total weight: ~1.0 kg
Size (wxdxh) : 247x236x80 mm
Storage temp. -25°C to +65°C
Accessories
33 keys Remote Control
NEC Code
Operating range up to 7 m
Batteries 2 x 1.5 V (type AA)
Power cord
Scart cord (ITD 60/62/64/72 only)
User manual
External AC/DC adapter
7. USING YOUR SET TOP BOX
7-16 GUARANTEE (TERMS AND CONDITIONS)
ATTENTION
In order to apply the guarantee, you should contact your dealer
or Sagem Communication helpdesk at 0905 77 48 081 (0.15 £/min, tariff cost effective form 27/06/2005).
Proof of purchase will be required. Should any malfunctioning arise,
the dealer or Sagem Communication helpdesk will advise you what to do.
If you bought your equipment from Sagem Communication directly, the following shall apply:
1) Sagem Communication undertakes to remedy by repair, free of charge for labour and replacement parts, any
defects in the equipment during a period of twelve (12) months from the date of original delineavit of the
equipment, where those defects are a result of faulty workmanship.
During this twelve-month guarantee period, the defective equipment will be repaired free of charge; the
customer must however return the defective equipment at his/her own expense, to the address given by
Sagem Communication After Sales Department, the phone number of which can be found on the delivery
slip. Unless the customer has concluded with Sagem Communication a maintenance contract for the
equipment which specifically provides for repairs to be carried out at the Customer'splace, the repairs will not
be carried out on the equipment at the Customer's place.
The following sentence applies to purchases of equipment for the customer's trade, business or profession.
Except as otherwise expressly provided in this Document and to the extent permitted by law, Sagem
Communication makes no representations or warranties, express or implied, statuette or otherwise, and to
such extent, all terms and conditions implied by law are hereby excluded.
This guarantee does not affect the Customer's statutory rights.
2) Exclusions from Guarantee
Sagem Communication shall have no liability under the guarantee in respect of:
• damage, defects breakdown or malfunction due to:
- failure to properly follow the installation process and instructions for use, or
- an external cause to the equipment (including but not limited to, lightening, fire, shockor water damage
of any nature), or
- modifications made without the written approval of Sagem Communication, or
- a failure or neglect to maintain the equipment or inappropriate maintenance, or
- unsuitable operating conditions, particularly of temperature and humidity, or
- repair or maintenance of the equipment by persons not authorised by Sagem Communication,
• wear and tear from normal daily use of the equipment and its accessories,
• damage due to insufficient or bad packaging of equipment when returned to Sagem Communication,
• supply of new versions of software,
• work on any equipment or software modified or added without the prior written consent of Sagem
Communication,
• malfunctions not resulting from the Equipment or from software installed in user workstations for the
purpose of use of the equipment,
• communication problems related to an unsuitable environment, including:
- problems related to access and/or connection to the Internet such as interruptions by access networks
or malfunction of the line used by the subscriber or his correspondent,
- transmission faults (for example poor geographical coverage by radio transmitters, interference or poor
line quality),
- the local network fault (wiring, servers, workstations) or the failure of the transmission network,
• the normal servicing (as defined in the user guide supplied with the equipment) as well as malfunctioning
due to servicing not being carried out, servicing costs are in any event always borne by the customer.
- 24 -
8. ENVIRONMENT
Preservation of the environment is an essential concern of Sagem Communication. The desire of Sagem
Communication to operate systems observing the environment and consequently it has decided to integrate
environmental performances in the life cycle of its products, from manufacturing to commissioning, use and
elimination.
8-1 PACKAGING
The presence of the logo (green dot) means that a contribution is paid to an approved national
organisation to improve packaging recovery and recycling infrastructures.
To facilitate recycling, please respect the sorting rules set up locally for this kind of waste.
8-2 BATTERIES
If your product contains batteries, they must be disposed of at appropriate collection points.
8-3 THE PRODUCT
The crossed-out waste bin stuck on the product or its accessories means that the product
belongs to the family of electrical and electronic equipments.
In this respect, the European regulations ask you to dispose of it selectively:
- At sales points in the event of the purchase of similar equipment.
- At the collection points made available to you locally (drop-off centre, selective collection, etc.).
In this way you can participate in the re-use and upgrading of Electrical and Electronic Equipment Waste,
which can have an effect on the environment and human health.
- 25 -
User Guide
Data subject to change without notice
*252220355A*
SAGEM COMMUNICATION
Société anonyme au capital de 300 272 000 € - 480 108 158 RCS PARIS
27, rue Leblanc - 75512 PARIS CEDEX 15 - FRANCE
www.sagem.com