1
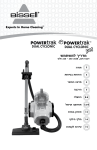
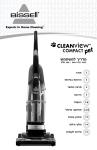
מדריך למשתמש דגם 220 – 240 44L6וולט 2 תודה 3 הוראות בטיחות 4 מראה המוצר 5 הרכבה 11-6 הפעלה 12 תחזוקה וטיפול 13 פתרון בעיות 14 חלקי חילוף 14 אביזרים 15 אחריות 16 שירות לקוחות אנו מודים לכם על שקניתם CleanView PowerBrushשל BISSELL אנו שמחים שרכשתם CleanView PowerBrushשל .BISSELLבתכנון המערכת עתירת הטכנולוגיה והמושלמת הזו לניקוי הבית כללנו את כל הידע שלנו בנושא טיפול ברצפות. מכשיר CleanView PowerBrushשל BISSELLבנוי היטב ,ואנו מגבים אותו בשנת אחריות של חברת אלקטרה מוצרי צריכה ( )1951בע"מ .,לה מחלקת שירות לקוחות ייעודית ובעלת ידע ,כך שאם אי פעם תיתקלו בבעיות ,תקבלו סיוע מהיר ומקצועי. הסבא רבא שלי המציא את מטאטא הרצפות בשנת .1876היום ,ביסל היא חברה עולמית מובילה בתכנון ,ייצור ושירות של מוצרים איכותיים לבית כמו CleanView PowerBrushשל BISSELLשלכם. מארק ג' .ביסל יו"ר ומנכ"ל www.bissell.com 2 הוראות בטיחות חשובות בעת שימוש במכשיר חשמלי ,יש להקפיד על אמצעי זהירות בסיסיים ,ובכלל זה: ■ יש לקרוא את כל ההוראות לפני תחילת השימוש במכשיר שלכם. ■ חברו תמיד לשקע הארקה תקני .נתקו את המכשיר מהחשמל אם אינו בשימוש ובבואכם לבצע בו פעולות תחזוקה או לפתור בעיה. ■ אזהרה :לצמצום סכנת שרפה ,התחשמלות או פציעה: ■ ■ ■ ■ ■ ■ ■ ■ ■ ■ ■ ■ ■ ■ ■ ■ מיועד אך ורק לשימוש ביתי. אין לטבול במים; יש להשתמש רק במשטחים שהורטבו כחלק מתהליך הניקוי אין להשאיר את המכשיר מחובר לחשמל. אין לתקן את המכשיר בעודו מחובר לחשמל. אם פתיל הזינה ניזוק ,כדי להימנע מסכנה החלפתו תיעשה ע"י היצרן ,ע"י סוכן השירות שלו או ע"י אדם מוסמך אחר. אין להשתמש במכשיר אם הופל ,ניזוק ,הושאר מחוץ לבית או נפל למים. אין למשוך את המכשיר או לשאת אותו מכבל החשמל ,אין להשתמש בכבל כידית ,אין לסגור את הדלת על הכבל או למשוך את הכבל מסביב לפינות או קצוות חדים ,אין לדרוס את הכבל בשואב או לחשוף את כבל החשמל למשטחים מחוממים אין לשאת את המכשיר בזמן השימוש אין למשוך את הכבל כדי לנתק את המכשיר מהחשמל .לניתוק המכשיר מהחשמל ,אחזו בתקע ולא בכבל ,והוציאו אותו מהשקע. אין לגעת בתקע או במכשיר בידיים רטובות אין להחדיר חפצים לפתחי המכשיר ,אין להשתמש כשפתחים חסומים ,ואין לחסום זרימת אוויר אין לחשוף שיער ,בגדים רפויים ,אצבעות או חלקי גוף לפתחים או לחלקים נעים אין להרים חפצים חמים או לוהטים אין לשאוב חומרים דליקים או בעירים (נוזל למצית, דלק ,קרוסן ,וכו') ואין להשתמש בנוכחות נוזלים או אדים נפיצים. אין להשתמש במכשיר בשטח סגור מלא באדים שמקורם בצבע שמן ,מדלל ,חומרים למניעת עש, אבק דליק ,או אדים נפיצים או רעילים אחרים. אין להפעיל את המכשיר אם דלת החגורה אינה מורכבת כראוי במיקום המתאים 3 ■ ■ ■ ■ ■ ■ ■ ■ ■ ■ יש להוציא את התקע מהשקע לפני ניקוי המכשיר ולפני שמבצעים בו פעולות תחזוקה מכשיר זה אינו מיועד לשימוש על ידי אנשים (ובכלל זה ילדים) בעלי יכולות פיזיות ,סנסוריות או מנטאליות מוגבלות ,או על ידי אנשים חסרי ניסיון וידע ,אלא אם משגיח עליהם אדם שאחראי על בטיחותם או מנחה אותם כיצד להשתמש במכשיר. יש להשגיח על ילדים על מנת לוודא שאינם משחקים עם המכשיר. אין לשאוב חומרים רעילים (מלבין ,אמוניה ,נוזל לפתיחת סתימות ,דלק וכדומה). אין לשנות את הדק ההארקה אין להשתמש במכשיר למטרה אחרת מלבד זו המתוארת במדריך למשתמש יש להשתמש רק באביזרים מומלצים על ידי היצרן למניעת נזק למרכיבים הפנימיים ,יש להשתמש אך ורק במוצרי ניקיון מתוצרת BISSELLשיועדו לשימוש במכשיר זה יש לנקות פתחים מאבק ,מוך ,שערות וכדומה. יש להחזיק את המכשיר על משטח ישר יש לכבות את כל המתגים לפני ניתוק המכשיר מהחשמל יש לפעול במשנה זהירות בעת ניקוי מדרגות בעת שימוש במכשיר בסביבת ילדים יש להקדיש תשומת לב מירבית. שמרו הוראות אלה לשימוש עתידי דגם זה מיועד לשימוש ביתי בלבד. אזהרה: חשוב מכשיר זה חייב הארקה. המכשיר נועד לשימוש במתח 220-240וולט בתדר 50/60הרץ בלבד. www.bissell.com מראה המוצר ידית ארגונומית Ergonomically Designed ™Handle אזהרה: לצמצום סכנת שרפה והתחשמלות כתוצאה מנזק במרכיבים פנימיים ,השתמשו רק בחומרי ניקוי של BISSELL שמיועדים לשימוש עם מכשיר זה .חומרי ניקוי שאינם מתוצרת BISSELLעלולים להזיק למכשיר ולגרום לביטול האחריות. מכלול ידית מכלול גוף עליון ידית לנשיאה קלה מכלול גוף תחתון חוגה ™Ready Tools פתח גישה לרצועה מברשת נשלפת מברשת ™DirtLifter PowerBrush חומר ניקוי: מברשות לטאטוא קצוות ™Edge Sweep החזיקו בהישג יד כמות גדולה של חומר ניקוי 2xשל .BISSELLכך תוכלו לנקות ולהגן בזמן המתאים לכם. השתמשו תמיד בחומרי הניקוי המקוריים של BISSELLלניקוי עמוק .חומרי ניקוי שאינם מתוצרת BISSELL עלולים להזיק למכשיר ולגרום לביטול האחריות. 651מ"ל מסיר כתמים קשים #0400-E 473מ"ל חומרי ניקוי לרצפות קשות מסדרת 2X #56L9-E 1.5ל' 2X Wash & Protect Lavender Fragrance Formula w/ ™Scotchgard Protector #33D2-E לשטיפה והגנה בניחוח לבנדר 1.5ל' 2X Wash & Protect Spring Breeze Fragrance Formula w/ ™Scotchgard Protector #12W4-E 1.5ל' 2X Wash & Protect Fresh Fragrance Formula w/ ™Scotchgard Protector #92F4-E 1.5ל' 2X Wash & Protect Pet Stain & Odour Formula w/ ™Scotchgard Protector #66W9-E 1.5ל' 2X Wash & Protect Professional Formula w/ ™Scotchgard Protector #81L5-E לשטיפה והגנה בניחוח משב אביבי לשטיפה והגנה בניחוח רענן להסרת כתמים ונטרול ריחות של חיות מחמד נוסחה מקצועית לשטיפה והגנה הערה :אפשר שתמצאו חומרי ניקוי נוספים \ אחרים של BISSELLבתחנות השירות שבאזורכם. www.bissell.com 4 הרכבה מכשיר CleanView PowerBrushמגיע מפורק לחמישה חלקים קלים להרכבה: אזהרה: • מכלול ידית • מכלול גוף עליון • מתלה עליון לצינור • מכלול גוף תחתון • מתלה תחתון לצינור באריזה כלולים שלושה ברגי פיליפס. תמצאו אותם מודבקים למכלול הידית. יש לחבר את המכשיר לחשמל רק לאחר שהשלמתם את הרכבתו לפי ההנחיות הבאות ולמדתם את ההנחיות ואת נהלי ההפעלה. 1 להרכבת מכשיר הניקוי שלכם כל הנדרש לכם הוא רק מברג פיליפס. .1 החליקו את מכלול הגוף העליון לתוך הגוף התחתון והבריגו אותו למקום עם שני ברגים. לחיבור מתלה הצינור העליון אל מכלול .2 הידית ,וודאו ש"הלשוניות" במתלה הצינור העליון מצביעות לעבר חלקה העליון של הידית .כעת ,החליקו את המתלה ככל שתוכלו לעבר חלקה העליון של הידית .סובבו את מתלה הצינור עד לשמיעת צליל נקישה. .3 החליקו את מכלול הידית כלפי מטה לתוך הגוף העליון עד הסוף וחברו עם בורג. .4 חברו את מתלה הצינור התחתון אל חלקו האחורי של הגוף העליון. לשם כך ,דחפו אותו לתוך החריצים הפתוחים והחליקו מטה עד לשמיעת צליל נקישה. 2 לשונית מתלה צינור עליון 3 4 5 .5 כרכו את הצינור הגמיש סביב מתלה הצינור והדקו אותו למקום כפי שמתואר בתמונה. .6 קבעו את הצינור הגמיש למקומו באמצעות הסגר לנעילת הצינור. חריץ 6 סגר לנעילת הצינור 5 www.bissell.com הפעלה תכונות ואביזרים מכשיר CleanView PowerBrushשל ,BISSELLמערכת לניקוי הבית שמשתמשת בשילוב של מי ברז חמימים ,חומרי ניקוי מתקדמים של ,BISSELLהנעת מברשת ושאיבה כדי לנקות בבטחה את השטיחים. מברשת ™:Dirt Lifter Powerbrush מברשת DirtLifter PowerBrushמיועדת לשיפור ביצועי הניקיון .דוגמת הזיפים מרימה בבטחה את הלכלוך העמוק ומנקה ברכות את סיבי השטיח. המתלה הצף מתאים את עצמו לגובה השטיח. כשהמכשיר מופעל ובמצב עומד ,השטיח שלכם מוגן היות שהמברשות מורמות מהשטיח. חוגה ™:ReadyTools התכונה Ready Toolsמאפשרת לכם לבחור בין ניקוי רצפות ( )FLOOR CLEANINGובין ניקוי באמצעות כלים ( )TOOLSפשוט על ידי סיבוב החוגה .מצב TOOLSמאפשר ניקוי מעל הרצפה של ריפוד ,מדרגות ,לאורך הפנלים ,ואזורים פחות נגישים אחרים .זה פשוט! בחרו את הכלי המתאים לעבודה ,חברו אותו לצינור הגמיש ואתם יכולים להתחיל לנקות. כוסית מדידה המכשיר שלכם לניקוי עמוק מצויד בכוסית מדידה להוספת הכמות המתאימה של חומר ניקוי למיכל 2ב .1-לשם נוחות ,כוסית המדידה בנויה לתוךהמכסה של מיכל 2-ב.1- מיכל מים 2-ב1- מערכת מיכל המים 2-ב 1-שלנו כוללת בתוכה מיכל עמיד שמיועד למים נקיים .בעודכם מנקים, המים הנקיים שבמיכל הפנימי יתרוקנו ויתערבבו עם חומר הניקוי .מים מלוכלכים שנשאבים מהשטיח שלכם יצטברו מסביב לדפנות החיצוניות של המיכל הפנימי .באופן זה ,המים הנקיים נשמרים תמיד בנפרד מהמים המלוכלכים .עובדה זו מאפשרת למשתמש למקסם את שטח המיכל, ועם זאת לסחוב רק מיכל אחד אל הכיור וממנו לצורך ריקון המים ומילויים. אזהרה: לצמצום סכנת שריפה ,השתמשו במכשיר הניקוי ק שלכם רק בחומר לניקוי עמוק של BISSELL המיועד למכשירים גדולים. שימוש בחומרי ניקוי שמכילים לימון או שמן אורנים עלול להזיק למכשיר זה ולגרום לביטול האחריות עליו .אין להשתמש בחומרים כימיים לניקוי כתמים או במסירי לכלוך שמכילים ממסים. מוצרים אלה עלולים ליצור ריאקציה עם חלקי הפלסטיק של המכשיר לניקוי עמוק שתגרום להיווצרות סדקים או חורים. חוגה ReadyTools כוסית מדידה ידית נשיאה זהירות: לסוגי שטיחים מסוימים נטייה להתמלא פלומה ככל שהם מתבלים .חבטות חוזרות ונשנות באותו אזור באמצעות שואב רגיל או מכשיר לניקוי לעומק עשויות להחמיר את הבעיה. www.bissell.com 6 הפעלה תכונות מיוחדות (המשך) מגן Scotchgard™ Protector שכבת ההגנה שמגיעה בדרך כלל מבית החרושת מתבלה עם הזמן כתוצאה מתנועה רבה וניקוי יומיומי ,ובכלל זה ניקוי לעומק .כדי להשיב את ההגנה החשובה הזאת BISSELL ,היא היחידה שמציעה חומרי ניקוי עם מגן .Scotchgardחומרי ניקוי אלה מעניקים הגנה נוספת מפני לכלוך וכתמים קשים ,כדי שהשטיחים שלכם ייראו טוב זמן ממושך יותר. לפני תחילת הניקוי .1 תכננו את הפעולות באופן שישאיר לשטיח זמן להתייבש. .2הזיזו את הרהיטים לאזור אחר אם אתם מנקים את כל החדר (אופציונלי). .3לפני תחילת הניקוי העמוק ,שאבו את האזור בשואב אבק. .4תכננו את מסלול הניקיון שלכם כך שיישאר לכם נתיב יציאה .מומלץ להתחיל את הניקוי מהפינה הרחוקה ביותר מהיציאה. .5טיפול מקדים (אופציונלי) מומלץ לבצע טיפול מקדים כדי לשפר את יעילות הניקיון במקרה של שטיחים מלוכלכים מאד באזורים שבהם יש תנועה רבה ,כגון מבואות או מסדרונות. 9 הטיפול המקדים: א.השתמשו בחומר הניקוי Tough Stain Precleanerשל .BISSELLרססו בנדיבות ובאופן שווה את השטח המלוכלך ,אך הקפידו לא להרטיב את האזור יתר על המידה. ב. EXIT 10 7 '3 1 T STARRE HE '4 11 6 12 5 2 3 4 המתינו 3עד 5דקות לפני הניקוי העמוק. ג.נקו כרגיל בעזרת מכשיר לניקוי עמוק של ,BISSELLעל פי ההוראות שלהלן. 7 www.bissell.com הפעלה מלאו את מיכל מים 2-ב1- 1 2 .1הרימו את הידית לנשיאת המיכל ושלפו את המיכל מבסיס המכשיר. .2נשאו אותו כמו דלי אל הכיור .סובבו את הידית קדימה ,לפתיחת המכסה .הסירו את המכסה ,הפכו את המיכל ומצאו את כוסית המדידה המובנית. .3מלאו חומר ניקוי 2Xשל BISSELLעד לקו המילוי של כוסית המדידה ומזגו לתוך פתח המיכל הפנימי. 4 3 .4מלאו את המיכל במי ברז פושרים נקיים. *אין להרתיח או לחמם מים במיקרוגל. זה יכול להרוס את המיכל הפנימי. .5החזירו למקומו את חלקו העליון של המיכל על ידי התאמת המכסה וקצוות המיכל .כדי להשיב את המכסה למקומו ,הידית צריכה להיות במצב קדימה .כדי לסגור את המכסה סובבו את הידית למצב נשיאה. הערה :לפני שאתם מרימים את המיכל, זכרו לסגור את המכסה ולבדוק שהוא סגור היטב. .6החזירו את המיכל לבסיס המכשיר .מקמו אותו היטב במקומו .סובבו את ידית המיכל בחזרה למצב נעול. 6 5 עצה: שאיבה יסודית לפני ניקוי עמוק תמנע חסימה מהירה של פילטר הסיבים. אזהרה: לצמצום סכנת שרפה והתחשמלות כתוצאה מנזק במרכיבים פנימיים, השתמשו רק בחומרי ניקוי של BISSELLשמיועדים לשימוש עם המכשיר לניקוי עמוק .חומרי ניקוי שאינם מתוצרת BISSELLעלולים להזיק למכשיר ולגרום לביטול האחריות. www.bissell.com 8 הפעלה ניקוי שטיח .1חברו את המכשיר לשקע חשמל מתאים. להפעלת המכשיר לחצו ברגלכם על מתג החשמל האדום שבגב המכשיר. .2ברגלכם ,לחצו על המנוף האפור לשחרור הידית שבגב המכשיר ,מתחת למיכל המים. .3בעת לחיצה על לחצן הריסוס ,בצעו מעבר רטוב אחד לאט ומעבר נוסף בחזרה. הניחו לחומר הניקוי ולמברשת DirtLifter PowerBrushלעשות את העבודה בשבילכם. לחצן הפעלה 1 שחרור הידית 2 זהירות :אין להרטיב יתר על המידה. .4שחררו את לחצן הריסוס ובצעו על אותו אזור מעבר רטוב אחד לאט ומעבר נוסף בחזרה כדי להסיר מים מלוכלכלים שנותרו ולעזור בייבוש האזור. .5חזרו על מעברי הניקיון עד שהתמיסה הנשאבת נראית נקייה .המשיכו לעבור על האזור מבלי ללחוץ על לחצן הריסוס ,עד שתראו שהמכשיר אינו שואב יותר מים. 3 פילטר סיבים 4 רוקנו את מיכל המים 2-ב/1- נקו את המברשת הנשלפת .1כבו את המכשיר .הוציאו את מיכל המים 2ב 1-מהבסיס תוך אחיזה בידית לנשיאתהמיכל .נישאו את המיכל כמו דלי לכיור או החוצה ,ושפכו את המים המלוכלכים .הסירו את חלקו העליון של המיכל על ידי סיבוב הידית קדימה לפתיחת המכסה והסירו את המכסה מהמיכל. .2 5 רוקנו את המים המלוכלכים מתחתית המיכל. .3בתום כל שימוש ,הסירו ושטפו את פילטר הסיבים שממוקם על מכסה המיכל. .4לניקוי המברשת ,אחזו בה בחלקה העליון ומשכו אותה קדימה כדי לשלוף אותה ממקומה .נקו את המברשת הנשלפת במי ברז זורמים. .5לסיום ,החזירו את המברשת למקומה .לשם כך ,הרימו מעט את חלקו הקדמי של המכשיר על מנת ליישר את החריצים שבתחתית עם הווים שבמברשת .תחילה חברו בבסיס ואחר כך הקליקו את המברשת למקומה. הערה :אם המברשת איה מחוברת כראוי כוח השאיבה יפחת. 9 www.bissell.com הפעלה רוקנו את מיכל המים 2-ב/1-נקו את המברשת הנשלפת (המשך) .6כדי להמשיך ולנקות את השטיח ,שובו לעיין בעמודים 8עד ,9החל מהפסקה "מלאו את מיכל המים 2-ב "1-שבעמוד .8 אם סיימתם לנקות ,נא עיינו בפסקה "תחזוקה וטיפול" שבעמוד .12 bvh g kvh gh j j h d b lg fd hn l kl sd jkn f h Ad bj jh b j cv hh gcg ™Ready Tools מכשיר CleanView PowerBrushשלכם מגיע מצויד בצינור ובאביזר אחד לפחות לניקוי מדרגות ,ריפוד ועוד. חשוב! אם אתם משתמשים במכשיר לניקוי ריפוד ,בדקו את תוויות הריפוד. .1לפני הניקוי ,בדקו תחילה את תווית היצרן. " "Wאו " "WSבתווית פירושם שאפשר להשתמש במכשיר לניקוי עמוק .אם על התווית מופיע הקוד " "Xאו "( "Sמחוקים בקו אלכסוני) ,או אם כתוב עליה "ניקוי יבש בלבד" ,אין לבצע ניקוי במכשיר .אין להשתמש במכשיר לניקוי קטיפה או משי .בהיעדר תווית היצרן או קוד ,בדקו עם חנות הרהיטים. .2 בדקו את עמידות הצבע במקום נסתר. .3במידת האפשר ,בדקו את מילוי הריפוד .מילוי צבעוני עלול לצבוע את הבד כשהוא רטוב. .4תכננו את הפעולות באופן שיאפשר לריפוד זמן להתייבש. תווית היצרן עצה: כדי לנקות באמצעות האביזר לניקוי חריצים ,החליקו את המברשות קדימה לניקוי הכתם, ואחורה לשאיבה. 7 .5שאבו ביסודיות כדי לאסוף לכלוכים ואת שיערות חיות המחמד .השתמשו במברשת ובאביזר לניקוי חריצים כדי לנקות את קפלי הבד ואת הציציות. .6כדי להתחיל לנקות באמצעות אביזרים ,עקבו אחר ההוראות בעמודים 7עד 8למילוי מיכל המים 2-ב.1- .7כוונו את החוגה ReadyToolsלמצב .TOOLS מצב זה יאפשר ריסוס ושאיבה מהצינור. .8 חברו את אביזר הניקוי לקצה הצינור. www.bissell.com 10 הפעלה ( Ready Toolsהמשך) .9 11 נקו על ידי לחיצה על לחצן הריסוס כדי לרסס תמיסה על האזור שדורש ניקוי .באיטיות ,הזיזו את האביזר אחורה וקדימה על פני האזור המלוכלך .שחררו את לחצן הריסוס כדי לשאוב מים מלוכלכים .המשיכו לנקות את האזור, קטע קטן בכל פעם ,עד להסרת הלכלוך. זהירות :אין להרטיב יתר על המידה. .10בתום הניקיון ,הסירו ושטפו את האביזר/ים במי ברז נקיים וזורמים. 12 .11מומלץ לשאוב מים נקיים מקערה כדי לנקות את הצינור. .12לפני ליפוף הצינור על מתלה האביזרים ,הרימו את קצה הצינור ומתחו אותו כדי לוודא שלא נותרו בו מים. .13כרכו את הצינור הגמיש סביב מתלה האביזרים. .14רוקנו את מיכל המים 2-ב 1-ושטפו אותו ,לפי ההוראות שבעמודים 9עד .10 15 .15אם נהיה קשה לסובב את החוגה ,ReadyToolsייתכן שצריך לנקות את מכלול המסב שמחזיק את החוגה .כדי לנקותו, הוציאו תחילה את המברשת ומצאו את הבורג שמחזיק את מכלול המסב במקומו .בעזרת מברג פיליפס ,הוציאו את הבורג והניחו אותו בצד. .16הוציאו את מכלול המסב; החזיקו אותו מתחת למים זורמים תוך שאתם מוודאים שהמים זורמים דרך החוגה ומסביבה. סובבו את החוגה כ 10-פעמים בכיוון השעון ו 10-פעמים נוספות נגד כיוון השעון .פעולה זו אמורה לשחרר לכלוכים שהצטברו סביבה. .17נגבו את מכלול המסב בעזרת מטלית עדינה והחזירו אותו בחזרה למכשיר .החזירו את המברשת למקומה. .18החזירו את החוגה ReadyToolsלמצב .FLOOR CLEANING 11 בורג הזרימו מים דרך כאן 16 www.bissell.com תחזוקה וטיפול טיפול במכשיר מספר צעדים פשוטים יסייעו לכם להבטיח תחזוקה טובה של המכשיר שלכם ,ותוצאות אופטימליות. כבו את המכשיר .נתקו את המכשיר מהחשמל .1 וכרכו את כבל החשמל. .2 לאחר ריקון מיכל המים 2-ב ,1-שטפו אותו במי ברז זורמים חמים בעודכם דואגים לנקות מתחת לתא הפנימי העמיד ומסביבו .נקו את פילטר הסיבים האדום .במידת הצורך ,אפשר לשטוף את המברשת הנשלפת .עיינו בעמוד .9 .3 החזירו את מיכל המים 2-ב 1-למקומו במכשיר. אפשר למשוך מגלגלת המברשת שיערות .4 חופשיות או לכלוכים ולזרוק אותם. לניקוי האביזרים המתחברים ,נתקו אותם .5 מהצינור ושטפו במי ברז נקיים וזורמים. יבשו אותם לפני האחסון .נקו את הצינור על ידי שאיבת מים נקיים מקערה .לפני שאתם כורכים אותו בחזרה במכשיר ,הרימו את קצה הצינור ומתחו אותו כדי לוודא שלא נותרו בו מים .עיינו בעמוד ,11בתמונות 11ו.12- .6 נגבו את חלקו החיצוני של המכשיר במטלית רכה. .7 לאחר שהשטיח התייבש ,שאבו אותו פעם נוספת להסרת שיערות ופלומה. אחסון המכשיר אחסנו את המכשיר בארון או במרתף עד לשימוש הבא .אחסנו את המכשיר באזור מוגן ויבש. מאחר שהמכשיר משתמש במים ,אין לאחסן אותו במקום שבו יש סכנת קיפאון .קיפאון יזיק למרכיבים הפנימיים ויבטל את האחריות. www.bissell.com 12 אזהרה: פתרון בעיות עוצמת ריסוס פחותה או המכשיר לא מרסס לצמצום סכנת שרפה ,התחשמלות או פציעה, נתקו את המכשיר משקע החשמל לפני טיפול. פתרונות סיבות אפשריות .1כבו את המכשיר; מלאו שנית את המיכל הפנימי במי .1ייתכן שהמיכל הפנימי ריק. ברז חמים. .2ייתכן שמיכל 2-ב 1-אינו ממוקם כראוי.2 .כבו את המכשיר; הוציאו את המיכל והחזירו אותו למקומו. .3כבו את המכשיר; כעבור דקה ,הפעילו את המכשיר ולחצו .3המשאבה התעייפה. על לחצן הריסוס. .4כבו את המכשיר ונתקו מהחשמל .כדי לבדוק אם חגורת .4ייתכן שחגורת המשאבה שבורה. המשאבה שבורה ,יידרש לכם מברג בעל ראש שטוח. א .הכניסו את להב המברג לתוך החריץ של ב. א. דלת הגישה לחגורה כדי לשחררה .בדקו סימני שבירה בחגורה .אתם אמורים לראות את חגורת המשאבה משירות הלקוחות של .BISSELLהחגורה החלופית תגיע עם הוראות התקנה מלאות. ב .כשמחליפים את דלת הגישה לחגורה, חגורת משאבה חריצים יש לוודא שמיישרים את החריצים של דלת הגישה של החגורה עם החריצים שבמכשיר, להחליק את הדלת למקומה ולסגור אותה. מברשת DirtLifter PowerBrushאינה מסתובבת פתרונות סיבות אפשריות .1רצועת המברשת או רצועת המשאבה .1עיינו בפתרון 4שלעיל או בדקו אם רצועת המברשת או רצועת המשאבה קרועות. אינן במקומן או שהן שבורות . המכשיר אינו שואב תמיסה סיבות אפשריות .1ייתכן שהחוגה ReadyToolsאינה מכוונת להגדרה הנכונה. .2מיקום האביזר לקוי( .לאביזרים מתחברים ידנית בלבד). .3ייתכן שהמברשת הנשלפת אינה מחוברת כראוי. .4מכסה המיכל 2-ב 1-אינו מותקן כראוי. .5מיכל 2-ב 1-אינו ממוקם כראוי. .6המים שנאספו במיכל 2-ב 1-הגיעו לרמה המקסימאלית. .7ייתכן שפילטר הסיבים חסום. פתרונות .1כוונו את החוגה ReadyToolsלמצב CLEANING FLOOR או TOOLSלצורך ביצוע עבודת הניקיון. .2תקנו את הזווית; הפעילו לחץ רב יותר כלפי מטה. .3וודאו שהמברשת מחוברת כראוי .לשם כך ,העלו מעט את חלקו הקדמי של המכשיר באופן שיישר את החריצים שבבסיס המכשיר עם הווים שעל גבי המברשת .תחילה חברו בבסיס ואחר כך הקליקו את המברשת למקומה. נא עיינו בתמונה 5שבעמוד .9 .4התקינו מחדש את המכסה; עיינו בתמונה שבעמוד .8 .5מיכל 2-ב 1-צריך לשבת היטב במקומו כדי לתפקד; הוציאו והחזירו למקום את מיכל 2-ב.1- .6רוקנו את מיכל 2-ב 1-ומלאו מחדש .נא עיינו בפרק הפעלה. .7נקו את פילטר הסיבים .עיינו בעמוד .9 פעולות תחזוקה או שירות אחרות שאינן נכללות במדריך זה יבוצעו על ידי אנשי שירות מוסמכים. אנו מודים לכם על בחירתכם במוצר של .BISSELL אין להחזיר מוצר זה לחנות. 13 www.bissell.com חלקי חילוף פריט 1 2 3 4 5 6 1 שם חלק מכלול מיכל מלא בסיס מיכל מברשת נשלפת רצועת משאבה חלופית (עם הנחיות) רצועת מברשת חלופית (עם הנחיות) פילטר סיבים מק"ט 2 03-0104 203-0102 203-8114 215-0628 015-0621 203-0105 3 2 5 4 6 אביזרים וחומרי ניקוי אף כי ייתכן שלא כל החלקים האלה הגיעו עם המכשיר שלכם ,אם תרצו ,תוכלו לרכוש את כולם. שם חלק פריט מק"ט אביזר לרצפות קשיחות 203-0149 1 מברשת 3אינץ' לניקוי כתמים קשים 203-6651 2 מברשת ריפוד 4אינץ' 203-8114 3 מברשת מדרגות 6אינץ' 203-6654 4 מברשת ידנית ™Powered TurboBrush 203-6652 5 אביזר לניקוי חריצים מרסס 2-ב 1-עם מברשת 203-0116 6 אביזר לניקוי חריצים מרסס 203-6655 7 אביזר למקומות לא נגישים Deep Reach™ Tool 203-8113 8 תיק רשת לאחסון אביזרים 210-3040 9 2 1 5 3 6 4 7 8 9 חומר ניקוי :עיינו בתחתית עמוד 4של מדריך זה בפירוט המלא של קו חומרי הניקוי הנמכרים. www.bissell.com 14 שירות לקוחות של BISSELL אם נחוץ לך שירות למוצר של BISSELLשברשותך: התקשר אל שירות הלקוחות של BISSELLלמספרים שמופיעים למטה ואנו נמסור לך את פרטי מרכז שירות הלקוחות המורשה של BISSELLבאזורך .לשאלות בנושא אחריות ולחלקי חילוף ,התקשרו אל המספרים שלמטה. פניות בישראל: ראשון -חמישי 17:00 - 08:00 אלקטרה מוצרי צריכה 1951בע"מ רח' ספיר 1 אזור תעשייה חדש ראשון לציון 75704 ישראל טלפון039633030 : פניות מהמזרח התיכון ואפריקה: ראשון -חמישי 18:00 - 09:00 BISSELL Middle East FZE PO Box 61286 Office 017, Technopark Building Jebel Ali Free Zone Dubai United Arab Emirates טלפון971-4-881-8597 : או בקרו באתר של - BISSELL www.bissell.com בעת פנייה אל ,BISSELLהכינו מראש את מספר הדגם של שואב האבק. נא רשמו את מספר הדגם שלכם___________________ : נא רשמו את תאריך הרכישה שלכם___________________ : הערה :שמרו את קבלת הרכישה המקורית שלכם .במקרה של תביעת אחריות היא מהווה הוכחה לתאריך הקנייה .לפרטים עיינו בפרק 'אחריות' בעמוד .15 בתום חייו ,אין להשליך את המכשיר ביחד עם פסולת ביתית רגילה .תחת זאת, מסרו אותו בנקודת איסוף רשמית למחזור .כך תסייעו לשמור על הסביבה. ©2012 BISSELL Homecare, Inc Grand Rapids, Michigan כל הזכויות שמורות .הודפס בסין מק"ט 120-4538 גרסה 5/12 בקרו באתר שלנו בכתובתwww.bissell.com : Scotchgardהוא סימן מסחרי של 3M www.bissell.com תוקף תעודה זו מותנה בצירוף חשבונית קנייה מקורית היצרןBISSELL : היבואן:אלקטרה מוצרי צריכה ( )1951בע"מ מרח' שמעון ישראלי ,3 א.ת חדש ראשל"צ ,טל.03-9633030 : סוג המכשיר :שואב אבק BISSELL דגם2T22 : אנו אחראים בזאת לפעולתו התקינה של המכשיר לתקופה של שנה מתאריך האספקה. אחריות זו לא תחול במקרים הבאים: .1קלקול הנובע מהפעלה שלא לפי הוראות השימוש. .2קלקול עקב אספקת חשמל לא סדירה. .3שבר מכל סיבה שהיא. .4תקלה שנגרמה כתוצאה מגורמים חיצוניים :שריפה ,גשם ,ברק וכד'. .5נעשה שימוש במכשיר למטרות מסחריות. .6החלפת שקיות אבק ,מסננים ורפידות אינה כלולה באחריות. האחריות האמורה תקפה בתנאי ששואב האבק יובא לתיקון בצירוף תעודה זו ,כשהיא חתומה ע"י הסוחר ובצרוף חשבונית הקניה ,למעבדות המפורטות על הכריכה האחורית של חוברת זו. כל טיפול או תיקון שלא באמצעות המעבדות האמורות יגרום לביטולה של אחריות זו. פרטים למילוי על ידי הסוחר שם הקונה_______________________: תאריך המכירה____________________: חתימת הסוחר____________________: שם וכתובת הסוחר_________________: תחנות שירות ברחבי הארץ טל0 8-6378368 : סלון ששון ,א.ת חדש .1אילת טל08-8525104 : חשמל קמי ,מרכז מסחרי ב' חנות 24 .2אשדוד טל08-6271410: מאור הנגב ,96רח' יאיר 27 .3באר שבע 08-6274563 טל04-6326088 : אחים איטח ,הנשיא 53 .4חדרה טל04-8671507: שירות רם ,רח' ביאליק 9 .5חיפה 04-8620162 04-8227227 סניף נווה שאנן ,רח' טרומפלדור 29 04-8720642 סניף קריות ,שד' ההסתדרות 279 טל04-9832011 : שרות רם האלונים 97 .6טבעון טל04-6720991 : המקלט ,רח' הגלבוע 5 .7טבריה טל02-6241741 : שירות כל ,רח' הגידם 1 .8ירושלים טל08-9465678 : חשמל אדיר ,רח' עמק האלה ,80 .9מודיעין טל09-7603355 : שי קור המעבדה ,דוד אלעזר 6 .10כפר סבא טל09-8337733 : בר מנחם נחום ,רח' רמז 15 .11נתניה טל04-6522357 : חשמל דושניצקי ,שד' ארלוזרוב 6 .12עפולה .13קרית ביאליק ס.א.פ ,רח' החרושת ,28א.ת קרית ביאליק טל04-8764559 : טל04-6903674 : .14קריית שמונה שירות רם סחר ,רח' רסקו 44 טל03-9666105 : .15ראשון לציון השחזות ראשון ,רח' עין הקורא 11 טל03-7511145 : אלקטרו ברק ,רח' התקווה 25 .16רמת גן טל03-5477745 : .17רמת השרון מעבדות השרון ,ויצמן 1פינת סוקולוב טל09-7603387 : טל אור ,רח' עקיבא 1 .18רעננה טל03-5371015 : אלקטרו מור ,רח' לה גרדיה 22 .19תל אביב טל03-6830191 : אליאס ,רח' העליה 20 .20תל אביב .21תל אביבי .רובין מכשירי גילוח בע"מ ,רח' טל3-6872161 : יסוד המעלה 8 USER'S GUIDE 44L6 SERIES 220-240V 2 Thank You 3 Safety Instructions 4 Product View 5 Assembly 6-11 Operations 12 Maintenance and Care 13 Troubleshooting 14 Replacement Parts 14 Accessories 15 Warranty 16 Consumer Care Thanks for buying a BISSELL CleanView PowerBrush We’re glad you purchased a BISSELL CleanView PowerBrush. Everything we know about floor care went into the design and construction of this complete, high-tech home cleaning system. Your BISSELL CleanView PowerBrush is well made, and we back it with a limited two-year warranty. We also stand behind it with a knowledgeable, dedicated Consumer Care department, so, should you ever have a problem, you’ll receive fast, considerate assistance. My great-grandfather invented the floor sweeper in 1876. Today, BISSELL is a global leader in the design, manufacture, and service of high quality homecare products like your BISSELL CleanView PowerBrush. Mark J. Bissell Chairman & CEO www.bissell.com 2 IMPORTANT SAFETY INSTRUCTIONS When using an electrical appliance, basic precautions should be observed, including the following: ■ Remove plug from electrical outlet before Read all instructions before using your deep cleaner. children) with reduced physical, sensory or mental capabilities, or lack of experience and knowledge, unless they have been given supervision or instruction concerning use of the appliance by a person responsible for their safety Children should be supervised to ensure that they do not play with the appliance Do not pick up toxic material (chlorine bleach, ammonia, drain cleaner, petrol, etc.) Do not modify the Earthed plug Do not use for any purpose other than described in this User’s Guide Use only manufacturer’s recommended attachments Use only cleaning products formulated by BISSELL for use in this appliance to prevent internal component damage Keep openings free of dust, lint, hair, etc. Keep appliance on a level surface Turn off all controls before unplugging Be extra careful when cleaning stairs Pay close attention when working around children Always connect to a properly Earthed outlet. Unplug from outlet when not in use and before conducting maintenance or troubleshooting. ■ To reduce the risk of fire, electric shock, or injury: ■ ■ WARNING: ■ ■ Use indoors only ■ Do not immerse; use only on surfaces ■ moistened by cleaning process ■ Do not leave machine when it is plugged in ■ Do not service machine when it is plugged in ■ If the supply cord is damaged, it must ■ ■ ■ ■ ■ ■ ■ ■ ■ ■ ■ 3 cleaning or maintaining the appliance ■ Not intended for use by persons (including be replaced by the manufacturer or its service agent in order to avoid a hazard Do not use machine if it has been dropped, damaged, left outdoors or dropped into water Do not pull or carry by cord, use cord as a handle, close door on cord, pull cord around sharp corners or edges, run appliance over cord, or expose cord to heated surfaces Do not carry the appliance while in use Do not unplug by pulling on cord; unplug by grasping plug not the cord Do not handle plug or appliance with wet hands Do not put any object into appliance openings, use with blocked opening or restrict air flow Do not expose hair, loose clothing, fingers or body parts to openings or moving parts Do not pick up hot or burning objects Do not pick up flammable or combustible materials (lighter fluid, petrol, kerosene, etc.) or use in the presence of explosive liquids or vapours Do not use appliance in an enclosed space filled with vapours given off by oil base paint, paint thinner, some moth proofing substances, flammable dust, or other explosive or toxic vapours Do not operate the appliance unless the belt door is securely assembled in the location provided www.bissell.com ■ ■ ■ ■ ■ ■ SAVE THESE INSTRUCTIONS FOR FUTURE USE This model is for household use only. This appliance WARNING: must be Earthed. IMPORTANT FOR OPERATION ON A 220-240 VOLT A.C. 50/60 Hz POWER SUPPLY ONLY. If your appliance is fitted with a nonrewireable BS 1363 plug it must not be used unless a 13 amp (ASTA approved to BS 1362) fuse is fitted in the carrier contained in the plug. (Spares may be obtained from your BISSELL supplier). If for any reason the plug is cut off, it must be disposed of, as it is an electric shock hazard should it be inserted into a 13 amp socket. Product view Ergonomically Designed Handle™ WARNING: To reduce the risk of fire and Handle Assembly electric shock due to internal component damage,use only BISSELL cleaning formulas intended for use with the deep cleaner. Non-BISSELL cleaning formulas may harm the machine and void the warranty. Upper Body Assembly Easy Carry Handle Lower Body Assembly Ready Tools™ Dial Belt Access Door Removable Nozzle DirtLifter™ PowerBrush Edge Sweep™ Brushes Cleaning formula: Keep plenty of genuine BISSELL 2X cleaning formula on hand so you can clean and protect whenever it fits your schedule. Always use genuine BISSELL deep cleaning formulas. Non-BISSELL cleaning formulas may harm the machine and will void the warranty. 1.5 L 2X Wash & Protect Professional Formula w/ Scotchgard™ Protector #81L5-E 1.5 L 2X Wash & Protect Pet Stain & Odour Formula w/ Scotchgard™ Protector #66W9-E 1.5 L 2X Wash & Protect Fresh Fragrance Formula w/ ™ Scotchgard Protector #92F4-E 1.5 L 2X Wash & Protect Spring Breeze Fragrance Formula w/ Scotchgard™ Protector #12W4-E 1.5 L 2X Wash & Protect Lavender Fragrance Formula w/ ™ Scotchgard Protector #33D2-E 473 mL 2X Hard Floor Solutions #56L9-E 651 mL Tough Stain Precleaner #0400-E Note: Additional BISSELL formula options may be available at your local retailer. www.bissell.com 4 Assembly Your CleanView PowerBrush comes in five easy to assemble components: • Handle assembly • Upper body assembly • Upper hose rack • Lower body assembly • Lower hose rack Three Phillips head screws are included and can be found taped to the handle assembly. The only tool you will need to assemble your cleaner is a Phillips head screwdriver. 1. Slide upper body assembly onto lower body and secure with two screws. 2. With the “tabs” on upper hose rack pointing toward top of handle, attach upper hose rack to handle assembly by sliding it to top of handle until it can go no further. Turn hose rack until it snaps into place. 3. Slide handle assembly down into upper body until it will go no further and secure with screw. Warning: Do not plug in your cleaner until you have completely assembled it per the following instructions and are familiar with all instructions and operating procedures. 1. 2. Tab Upper Hose Rack 3. 4. Attach lower hose rack to back of upper body by pushing into open slots and sliding down until it snaps into place. 5. Wrap flex hose around hose rack and secure it into notched out holder as shown. 4. 6. Keep flex hose locked in place with hose secure latch. 6. 5. Hose Secure Latch Notch 5 www.bissell.com Operations Special features Your BISSELL CleanView PowerBrush is a home cleaning system that uses a combination of hand hot tap water, BISSELL advanced cleaning formula, brush agitation and suction to safely clean carpets. DirtLifter™ Powerbrush The DirtLifter PowerBrush is designed to enhance cleaning performance. The bristle pattern safely lifts out the deep down dirt while gently grooming carpet fibers. The floating suspension self-adjusts to all carpet heights. When the power is ON and the machine is in the upright position, your carpet is protected because the brushes are lifted up off the carpet. Warning: To reduce the risk of fire, use only BISSELL deep cleaning formula for full size machines in your deep cleaner. Use of cleaning formulas that contain lemon or pine oil may damage this appliance and void the warranty. Chemical spot cleaners or solvent-based soil removers should not be used. These products may react with the plastic materials used in your deep cleaner causing cracking or pitting. ReadyTools™ Dial The Ready Tools feature allows you to choose between FLOOR CLEANING or cleaning with TOOLS simply by turning the dial. The TOOLS setting allows for above floor cleaning of upholstery, stairs, creases along baseboards, and other hard to reach areas. Simply choose the tool that is appropriate for the job, attach to flex hose and you are ready to go. ReadyTools Dial Measuring cup Your deep cleaner is equipped with a measuring cup for adding the proper amount of formula to the 2-in-1 tank. For convenience the measuring cup is built into the lid of the 2-in-1 tank. Measuring Cup 2-in-1 water tank Our 2-in-1 water tank system is designed with a heavy duty bladder inside for clean water. As you clean, the clean water in the bladder will empty and mix with the cleaning formula. Dirty water pulled out of your carpet will collect around the outside of the bladder so clean and dirty water are always kept separate. This allows the user to maximize tank space, yet only carry one tank to and from the sink for emptying and filling. Carry Handle ATTENTION: Some Berber carpets have a tendency to fuzz with wear. Repeated strokes in the same area with an ordinary vacuum or deep cleaner may aggravate this condition. www.bissell.com 6 Operations Special features continued Scotchgard™ Protector Carpet protection applied at the mill typically wears down over time from heavy foot traffic and everyday cleaning, including deep cleaning. To help restore this important protection, only BISSELL offers cleaning formulas with Scotchgard protector. This offers extra protection against dirt and tough stains to keep your carpets looking good longer. Before you clean 1. Plan activities to give your carpet time to dry. 2. Move furniture to another area if cleaning an entire room (optional). 3. Vacuum area with a dry vacuum cleaner before deep cleaning. 4. Plan your cleaning route to leave an exit path. It is best to begin cleaning in the corner farthest from your exit. 5. Pretreating (optional) Pretreating is recommended to improve cleaning effectiveness for heavily soiled carpet in high traffic areas such as entry ways and hallways. EXIT 12 To pretreat: A. Using the BISSELL Tough Stain Precleaner, generously spray evenly over soiled area, do not overwet. B. Wait 3-5 minutes before deep cleaning. C. Clean as normal using your BISSELL deep cleaner, following the instructions below. 7 www.bissell.com 5 9 10 11 6 7 2 4 3 1 T STARRE HE 4' 3' Operations Fill the 2-in-1 water tank 1. Remove the tank from the base of the machine by lifting the tank carry handle. 2. Carry like a bucket to the sink. Rotate the handle forward to unlatch the lid. Remove lid, turn over and locate built in measuring cup. 1. 2. 3. Fill with BISSELL 2X formula to the indicated fill line on the built in measuring cup and pour into mouth of the bladder. 3. 4 4. Fill the bladder with clean hand hot tap water. *Do not boil or microwave water as it can destroy the bladder. 5. Replace the top of the tank by matching the lid and tank edges. Handle must be in the forward position in order to replace lid. Rotate the handle to the carrying position to latch the lid. Note: Remember to secure the lid and test to make sure it is secure before picking up the tank. 6. Place tank into machine base, seating firmly in place. Rotate tank handle back into latched position. 6. 5. Tip: Thorough vacuuming before deep cleaning will prevent early clogging of the lint trap. WARNING: To reduce the risk of fire and electric shock due to internal component damage, use only BISSELL cleaning formulas intended for use with the deep cleaner. Non-BISSELL cleaning formulas may harm the machine and void the warranty. www.bissell.com 8 Operations Carpet cleaning 1. Plug the deep cleaner into a proper outlet. Turn the power ON by pressing the red power switch on the back of the unit with your foot. 2. With your foot, press the gray handle release lever located on the back of unit below water tank. Handle Release Power Switch 3. While pressing the spray trigger, make one slow forward wet pass and another back. Let the formula and DirtLifter PowerBrush do the work for you. Caution: Do not overwet. 4. Release the spray trigger and make one slow forward and backward pass over the same area to remove any residual dirty water and aid in drying. 5. Repeat cleaning passes until solution being pulled up appears clean. Continue passes without pressing the spray trigger until you can’t see any more water being suctioned up. Empty the 2-in-1 water tank/clean removable nozzle 1. Turn power switch OFF. Remove the 2-in-1 water tank from the base using the tank carry handle. Carry the tank like a bucket to a utility sink or outside where you will dispose of the collection water. Remove the top of the tank by rotating the handle forward to unlatch lid and lifting lid off tank. 2. Empty collection water from bottom of tank. 1. 3. 3. After each use, remove and rinse the lint screen located on the tank lid. 4. If nozzle needs to be cleaned, remove by grasping handle at the top and pulling forward. Clean removable nozzle by rinsing under running water. 5. When finished, replace nozzle by slightly raising front of machine to line up slots on the base with the hooks on nozzle. Attach at base first and then click nozzle into place. NOTE: If nozzle is not attached properly loss of suction will occur. 9 www.bissell.com 5. 2. Lint Screen 4. Operations Empty the 2-in-1 water tank/clean removable nozzle continued 6. To continue carpet cleaning, refer back to pages 8 through 9, beginning with “Fill the 2-in-1 water tank” on page 8. If cleaning is complete, refer to the “Maintenance and care” section on page 12. Ready Tools™ bvh g kvh gh j j h d b lg fd hn l kl sd jkn f h Ad bj jh b j cv hh gcg Your CleanView PowerBrush comes equipped with a hose and at least one attachment for cleaning stairs, upholstery, and more. Important! If using the machine to clean upholstery, check upholstery tags. 1. Check manufacturer’s tag before cleaning. “W” or “WS” on the tag means you can use your deep cleaner. If the tag is coded with “X” or “S” (with a diagonal strike through), or says “Dry Clean Only,” do not proceed. Do not use on velvet or silk. If manufacturer’s tag is missing or not coded, check with your furniture dealer. 2. Check for colourfastness in an inconspicuous place. 3. If possible, check upholstery stuffing. Coloured stuffing may bleed through fabric when wet. 4. Plan activities to give upholstery time to dry. 5. Vacuum thoroughly to pick up loose debris and pet hair. Use a vacuum with a brush attachment and a crevice tool to clean in fabric folds and tufts. 6. To begin cleaning with attachments, follow the instructions on pages 7-8 for filling the 2-in-1 water tank. 7. Set the ReadyTools dial to the TOOLS setting. This will allow spray and suction from the hose. 8. Attach the cleaning tool to the end of the hose. www.bissell.com Manufacturer’s tag Tip: To clean with sliding crevice tool, slide brushes forward to clean stain, slide back to suction 7. 10 Operations Ready Tools™ continued 9. Clean by pressing the spray trigger to spray solution onto the area to be cleaned. Slowly move the tool back and forth over the soiled surface. Release the spray trigger to suction dirty water. Continue to clean in the area, working in small sections, until dirt is removed. Caution: Do Not Overwet. 11. 10.When finished cleaning, remove and rinse tool(s) in clean, running water. 11.It is recommended that you suction clean water from a bowl to rinse out the hose. 12.Before wrapping hose onto tool rack, lift end of hose and stretch out to ensure all water is cleared from hose. 13.Wrap flex hose around tool rack. 14.Empty 2-in-1 water tank and rinse out, following instructions on pages 9 through 10. 15.If the ReadyTools dial becomes difficult to turn, the diverter assembly that holds the dial may need to be cleaned. To clean, first remove nozzle and locate screw that holds the diverter assembly in place. With a Phillips screwdriver, remove the screw and set aside. 16.Remove diverter assembly; hold under running water making sure water flows through and around the dial. Turn the dial about 10 times clockwise and 10 more times counter clockwise. This should free up any debris. 17.Wipe diverter assembly with a soft cloth and replace back on machine. Replace nozzle. 18.Return ReadyTools dial to FLOOR CLEANING setting. 11 www.bissell.com 12. Run water through here 15. 16. Screw Maintenance and care Machine care For best results, a few simple steps can assure your machine is well maintained after your cleaning is complete. 1. Turn power switch OFF. Unplug the machine and wrap the power cord. 2. After emptying the 2-in-1 water tank, rinse it with running hot tap water, taking care to clean underneath and around the heavy duty bladder. Clean out red lint screen. Removable nozzle may be rinsed if necessary. Refer to page 9. 3. Replace the 2-in-1 water tank on the machine. 4. Any loose hair or debris can be pulled from the brush roll and thrown away. 5. To clean attachments, remove from hose and rinse in clean, running water. Dry before storing. Clean the hose by suctioning clean water from a bowl. Before wrapping back on machine, lift end of hose and stretch out to ensure all water is cleared from hose. Refer to page 11, illustrations 11 and 12. 6. Wipe the machine’s exterior with a soft cloth. 7. After carpet is dry, vacuum again to remove hair and fuzz. Machine storage Put the unit away in a closet or basement for the next use. Store cleaner in a protected, dry area. Since this product uses water, it must not be stored where there is a danger of freezing. Freezing will damage internal components and void the warranty. www.bissell.com 12 Troubleshooting WARNING: To reduce the risk of fire, electric shock or injury, unplug from the outlet before servicing. Reduced Spray OR No Spray Possible causes Remedies 1. Bladder may be empty. 1. Turn power switch OFF; Refill bladder with clean hot tap water. 2. 2-in-1 tank may not be seated properly. 2. Turn power switch OFF; remove tank and reseat tanks. 3.Pump may have lost prime. 3. Turn power switch OFF; after 1 minute turn ON and depress spray trigger. 4. The pump belt may be broken. 4. Turn power switch OFF and unplug from the outlet. To check if a pump belt has broken, you will need a flat B. head screwdriver. A. Slots Pump Belt DirtLifter PowerBrush Does Not Turn Possible causes A. Insert the blade end into the slot of the belt access door to release. Examine the belt for breakage. You should be able to see the pump belt looped around the motor shaft. If it is broken or missing, please refer to Replacement Parts on page 14. A replacement belt may be ordered by calling BISSELL Consumer Care. Complete installation instructions will accompany the replacement belt. B. When replacing belt access door be sure to line up slots of belt access door with slots in machine, slide door into place and snap shut. Remedies 1. The brush belt or pump belt is off or broken. 1. Refer to Remedy 4 above to check if brush belt or pump belt is broken. Cleaner Not Picking Up Solution Possible cause Remedies 1. ReadyTools dial may be on the wrong setting. 1. Set ReadyTools dial to either FLOOR CLEANING or TOOLS for the cleaning job. 2. Poor tool position. (Hand held attachments only). 2. Adjust angle; apply more downward pressure. 3. Removable nozzle may not be properly attached. 3. 4. 2-in-1 tank lid is not properly installed. Make sure nozzle is on correctly by slightly raising front of machine to line up slots on the base of the machine with the hooks on nozzle. Attach at base first and then click nozzle into place. Refer to image 5 on page 9. 4. Re-install lid; refer to the image on page 8. 5. 2-in-1 tank is not properly seated. 5. 2-in-1 tank must be firmly seated to function; remove and reseat 2-in-1 tank. 6. 2-in-1 tank has picked up maximum dirty water. 6. Empty 2-in-1 tank and refill, refer to the Operation section. 7. The lint screen may be clogged. 7. Clean out lint screen. Refer to page 9. Other maintenance or service not included in the manual should be performed by an authorized service representative. Thank you for selecting a BISSELL product. Please do not return this product to the store. 13 www.bissell.com Replacement parts Item 1 2 3 4 5 6 1 Part No. 203-0104 203-0102 203-8114 215-0628 015-0621 203-0105 Part Name Tank Assembly Complete Tank Base Removable Nozzle Replacement Pump Belt (with instructions) Replacement Brush Belt (with instructions) Lint Screen 2 3 5 4 6 Accessories and formula While not all of these parts may not have come with your machine, all are available to you for purchase, if desired. Item 1 2 3 4 5 6 7 8 9 Part No. 203-0149 203-6651 203-8114 203-6654 203-6652 203-0116 203-6655 203-8113 210-3040 1 2 5 6 Part Name Hard Floor Tool 3" Tough Stain Tool 4" Upholstery Tool 6" Stair Tool Powered TurboBrush™ Hand Tool Spraying 2-in-1 Crevice Tool w/Brush Spraying Crevice Tool Deep Reach™ Tool Mesh Tool Storage Bag 3 7 4 8 9 Cleaning Formula: Refer to the bottom of page 4 of this guide for a full selection of cleaning formula available for purchase. www.bissell.com 14 BISSELL consumer care If your BISSELL product should require service: Call BISSELL Consumer Care at the numbers below and we will give you the location of a BISSELL Authorized Service Center in your area. If you have questions about your warranty or need replacement parts please contact the numbers below. For Israel inquiries: Sunday - Thursday 9 am - 5 pm For Middle East & Africa inquiries: Sunday - Thursday 9 am - 6 pm Electra Consumer Prod. 1951 Ltd. 1, Sapir St. New Industrial Zone Rishon Le Zion 75704 Israel Telephone: 039633030 BISSELL Middle East FZE PO Box 61286 Office 017, Technopark Building Jebel Ali Free Zone Dubai United Arab Emirates Telephone: 971-4-881-8597 Or visit the BISSELL website - www.bissell.com When contacting BISSELL, have model number of cleaner available. Please record your Model Number: ___________________ Please record your Purchase Date: ___________________ NOTE: Please keep your original sales receipt. It provides proof of purchase date in the event of a warranty claim. See Warranty on page 15 for details. Do not throw the appliance away with the normal household waste at the end of its life, but hand it in at an official collection point for recycling. By doing this you will help to preserve the environment. ©2012 BISSELL Homecare, Inc Grand Rapids, Michigan All rights reserved. Printed in China Part Number 120-4538 Rev 5/12 Visit our website at: www.bissell.com Scotchgard is a trademark of 3M 15 www.bissell.com